This post on healthy summer snacks on the go was graciously sponsored by FAGE– all thoughts and opinions are my own.
Summer is finally just around the corner, and I am so excited to get out and about with my kids! This summer is sure to be busy with 3 little ones, and being in my third trimester of this pregnancy will mean snacks on the go for all of us. I try really hard when we are going to be running errands to keep snacks on hand for anyone who might need them during the outing. I LOVE keeping snacks on the healthier side, because if we will be gone all day, it inevitably means an unhealthy lunch out. So, let’s talk healthy summer snacks that help you to live your life to the fullest!!
Healthy Summer Snacks on the Go
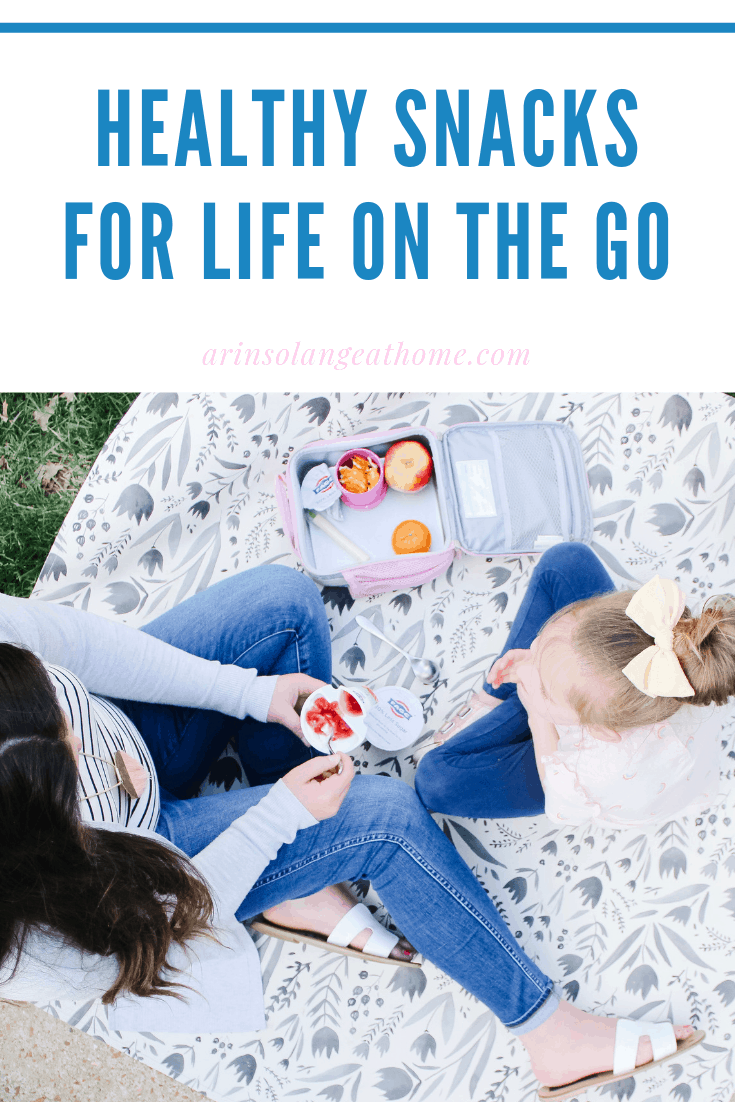
One thing I have learned is snacks are not one size fits all. Pack something everyone will love. When we head out for the day I typically have fruit for Jack, because I know he will love it, and it’s a great time to avoid extra junk with him. For Avé and Walker the snacks vary a bit. Maybe cheese sticks, or pretzels, or carrots. Walker is also the KING of stealing my food, so I basically know if I am eating a healthy snack he will too.
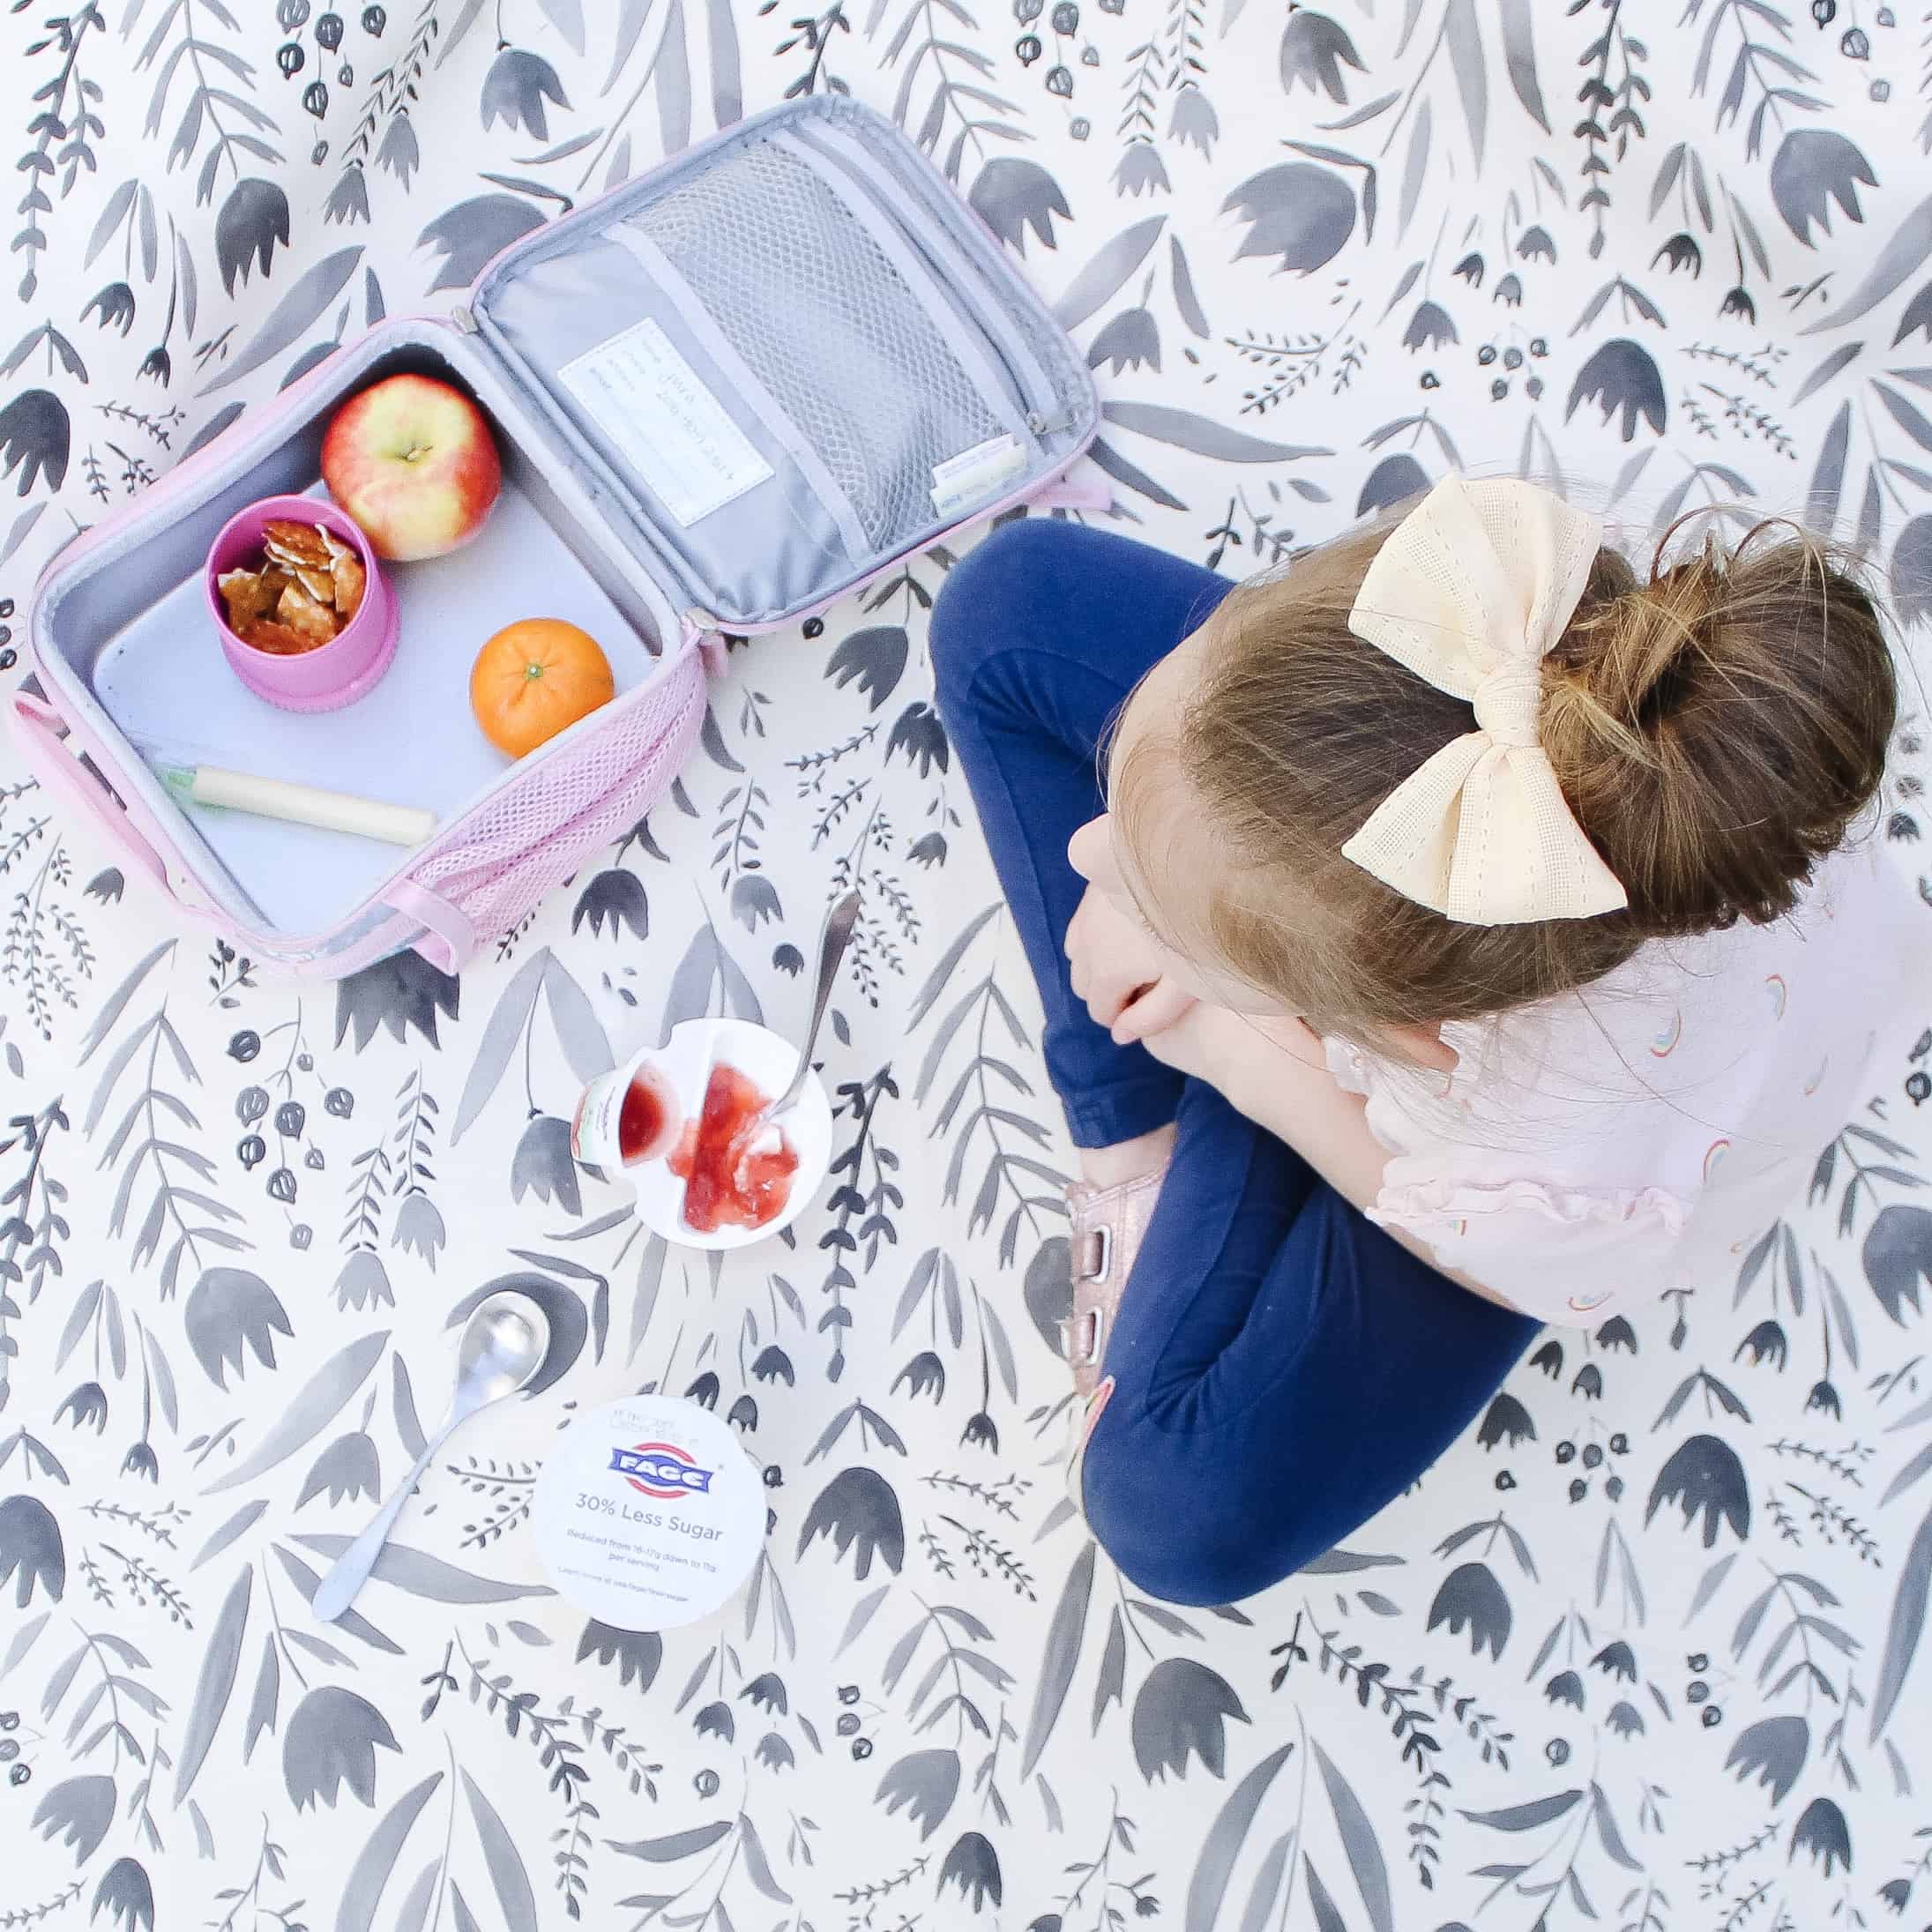
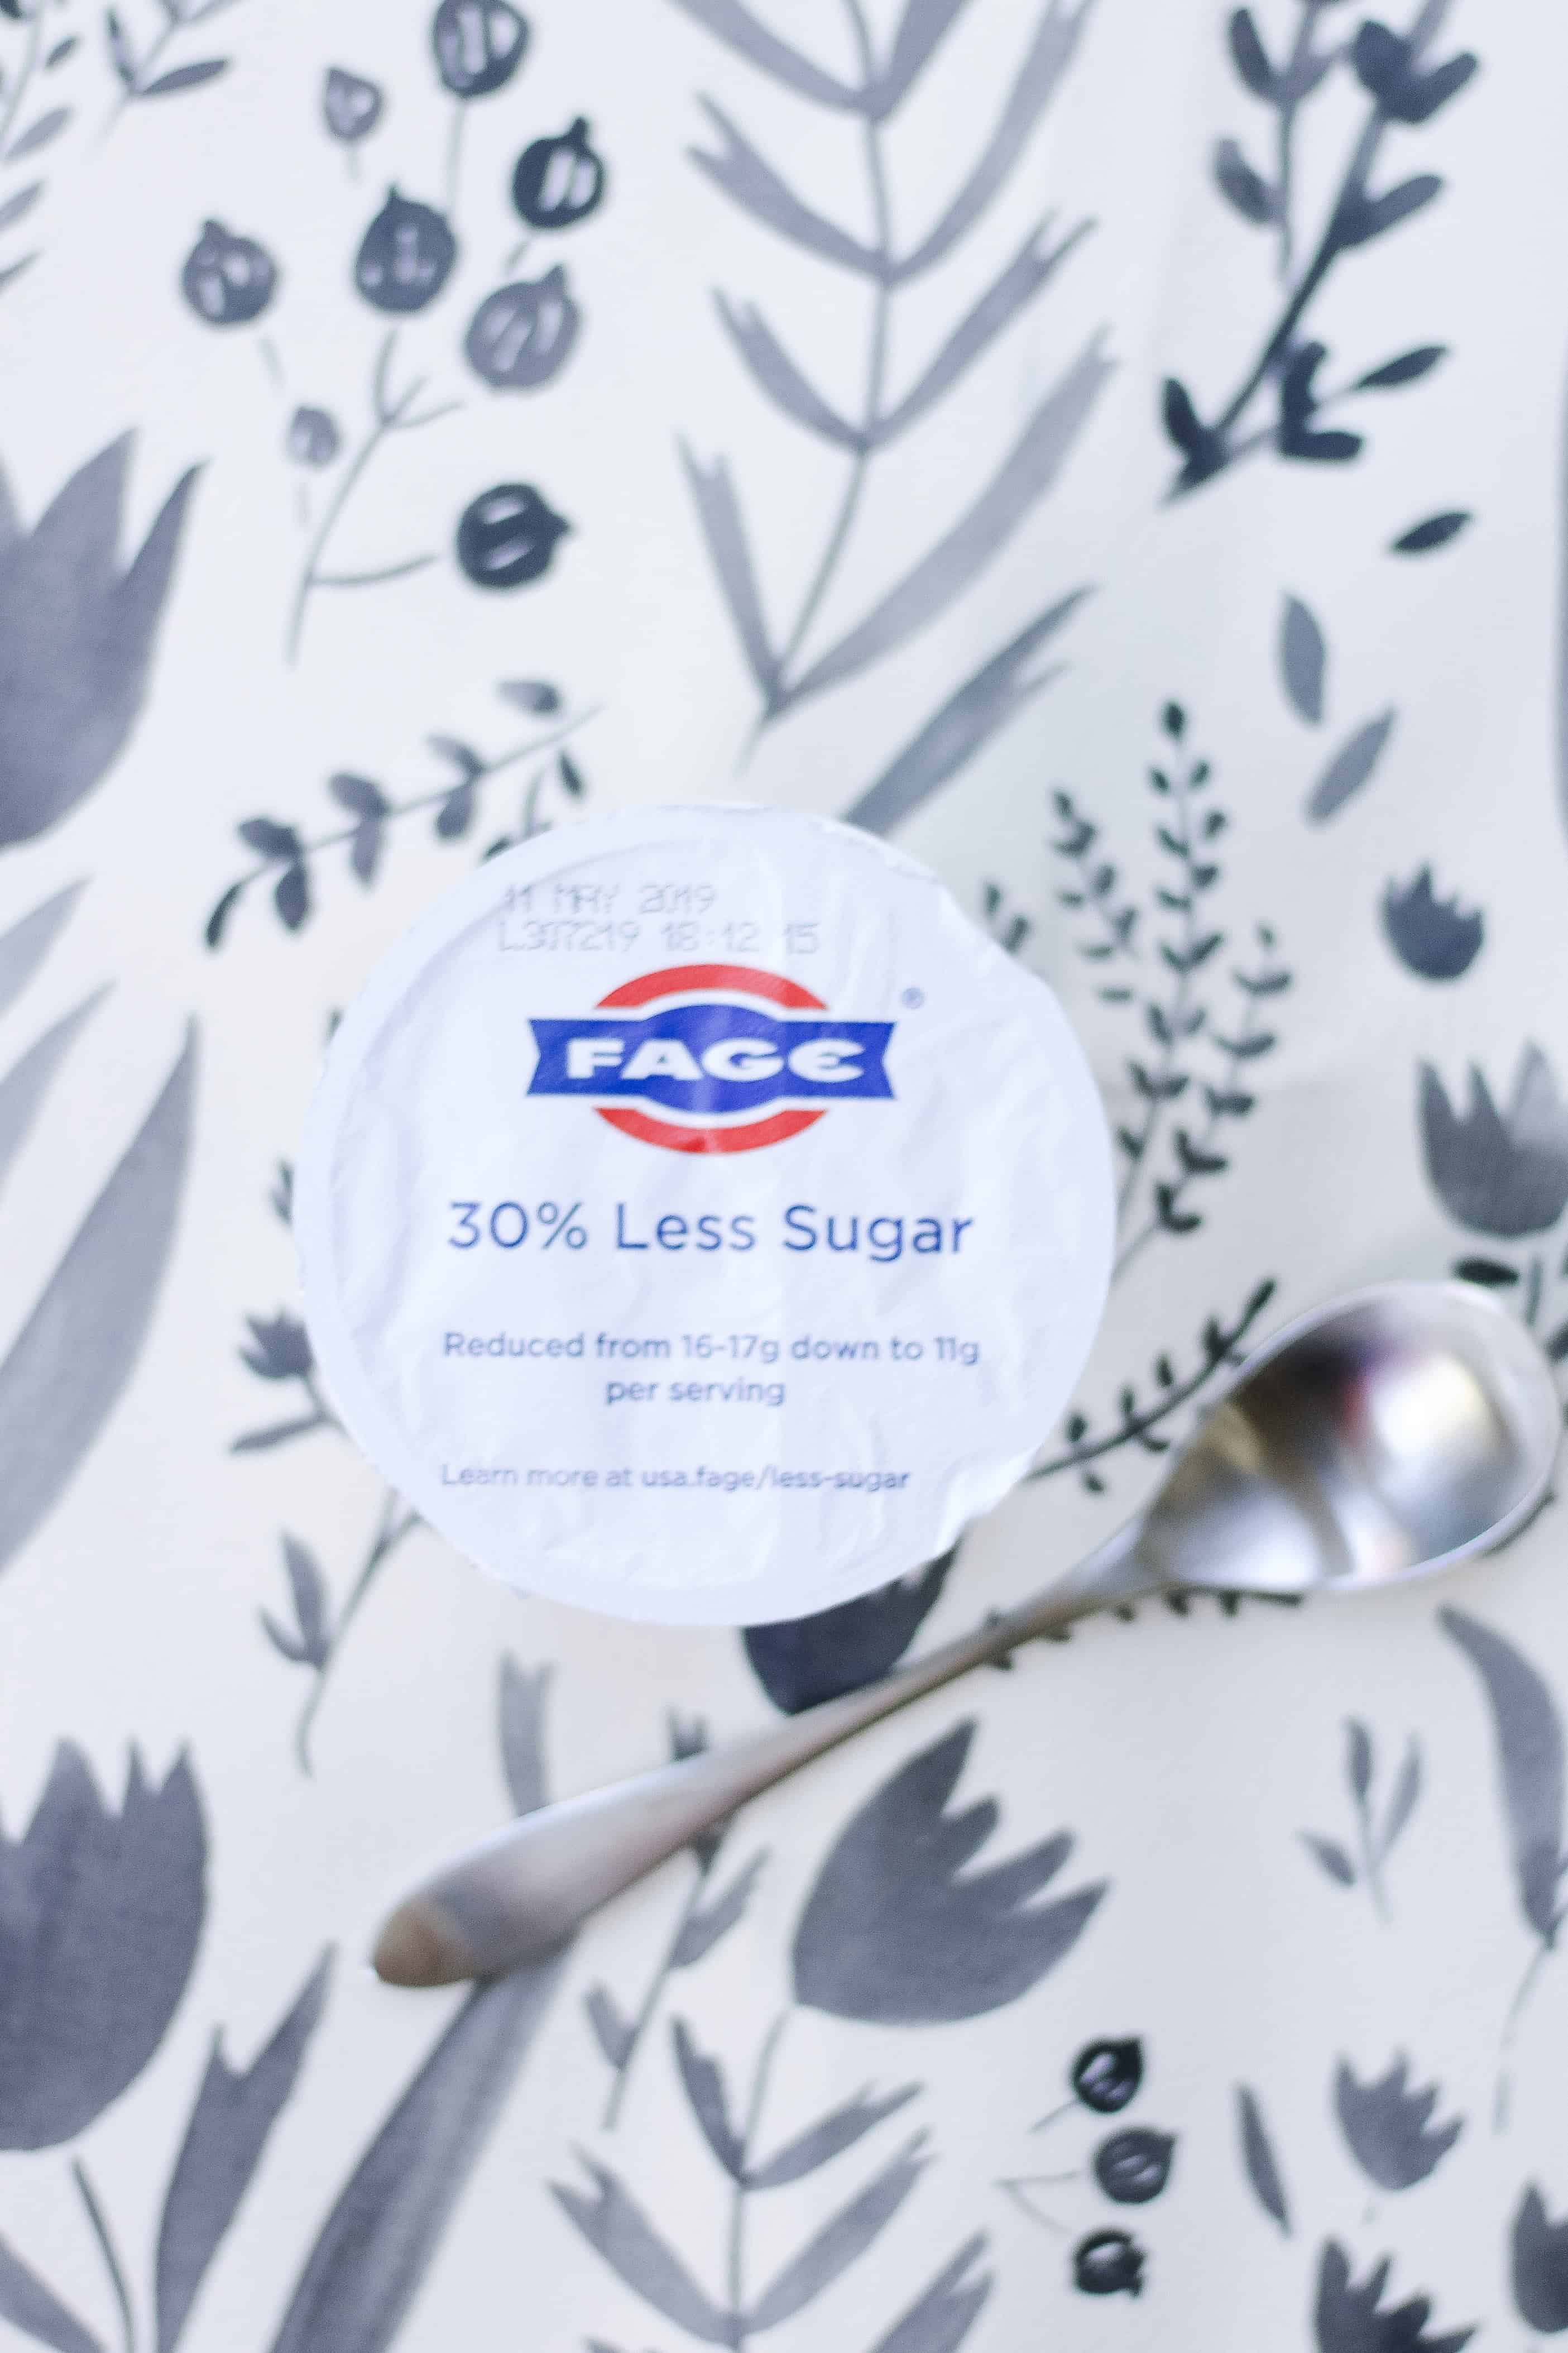
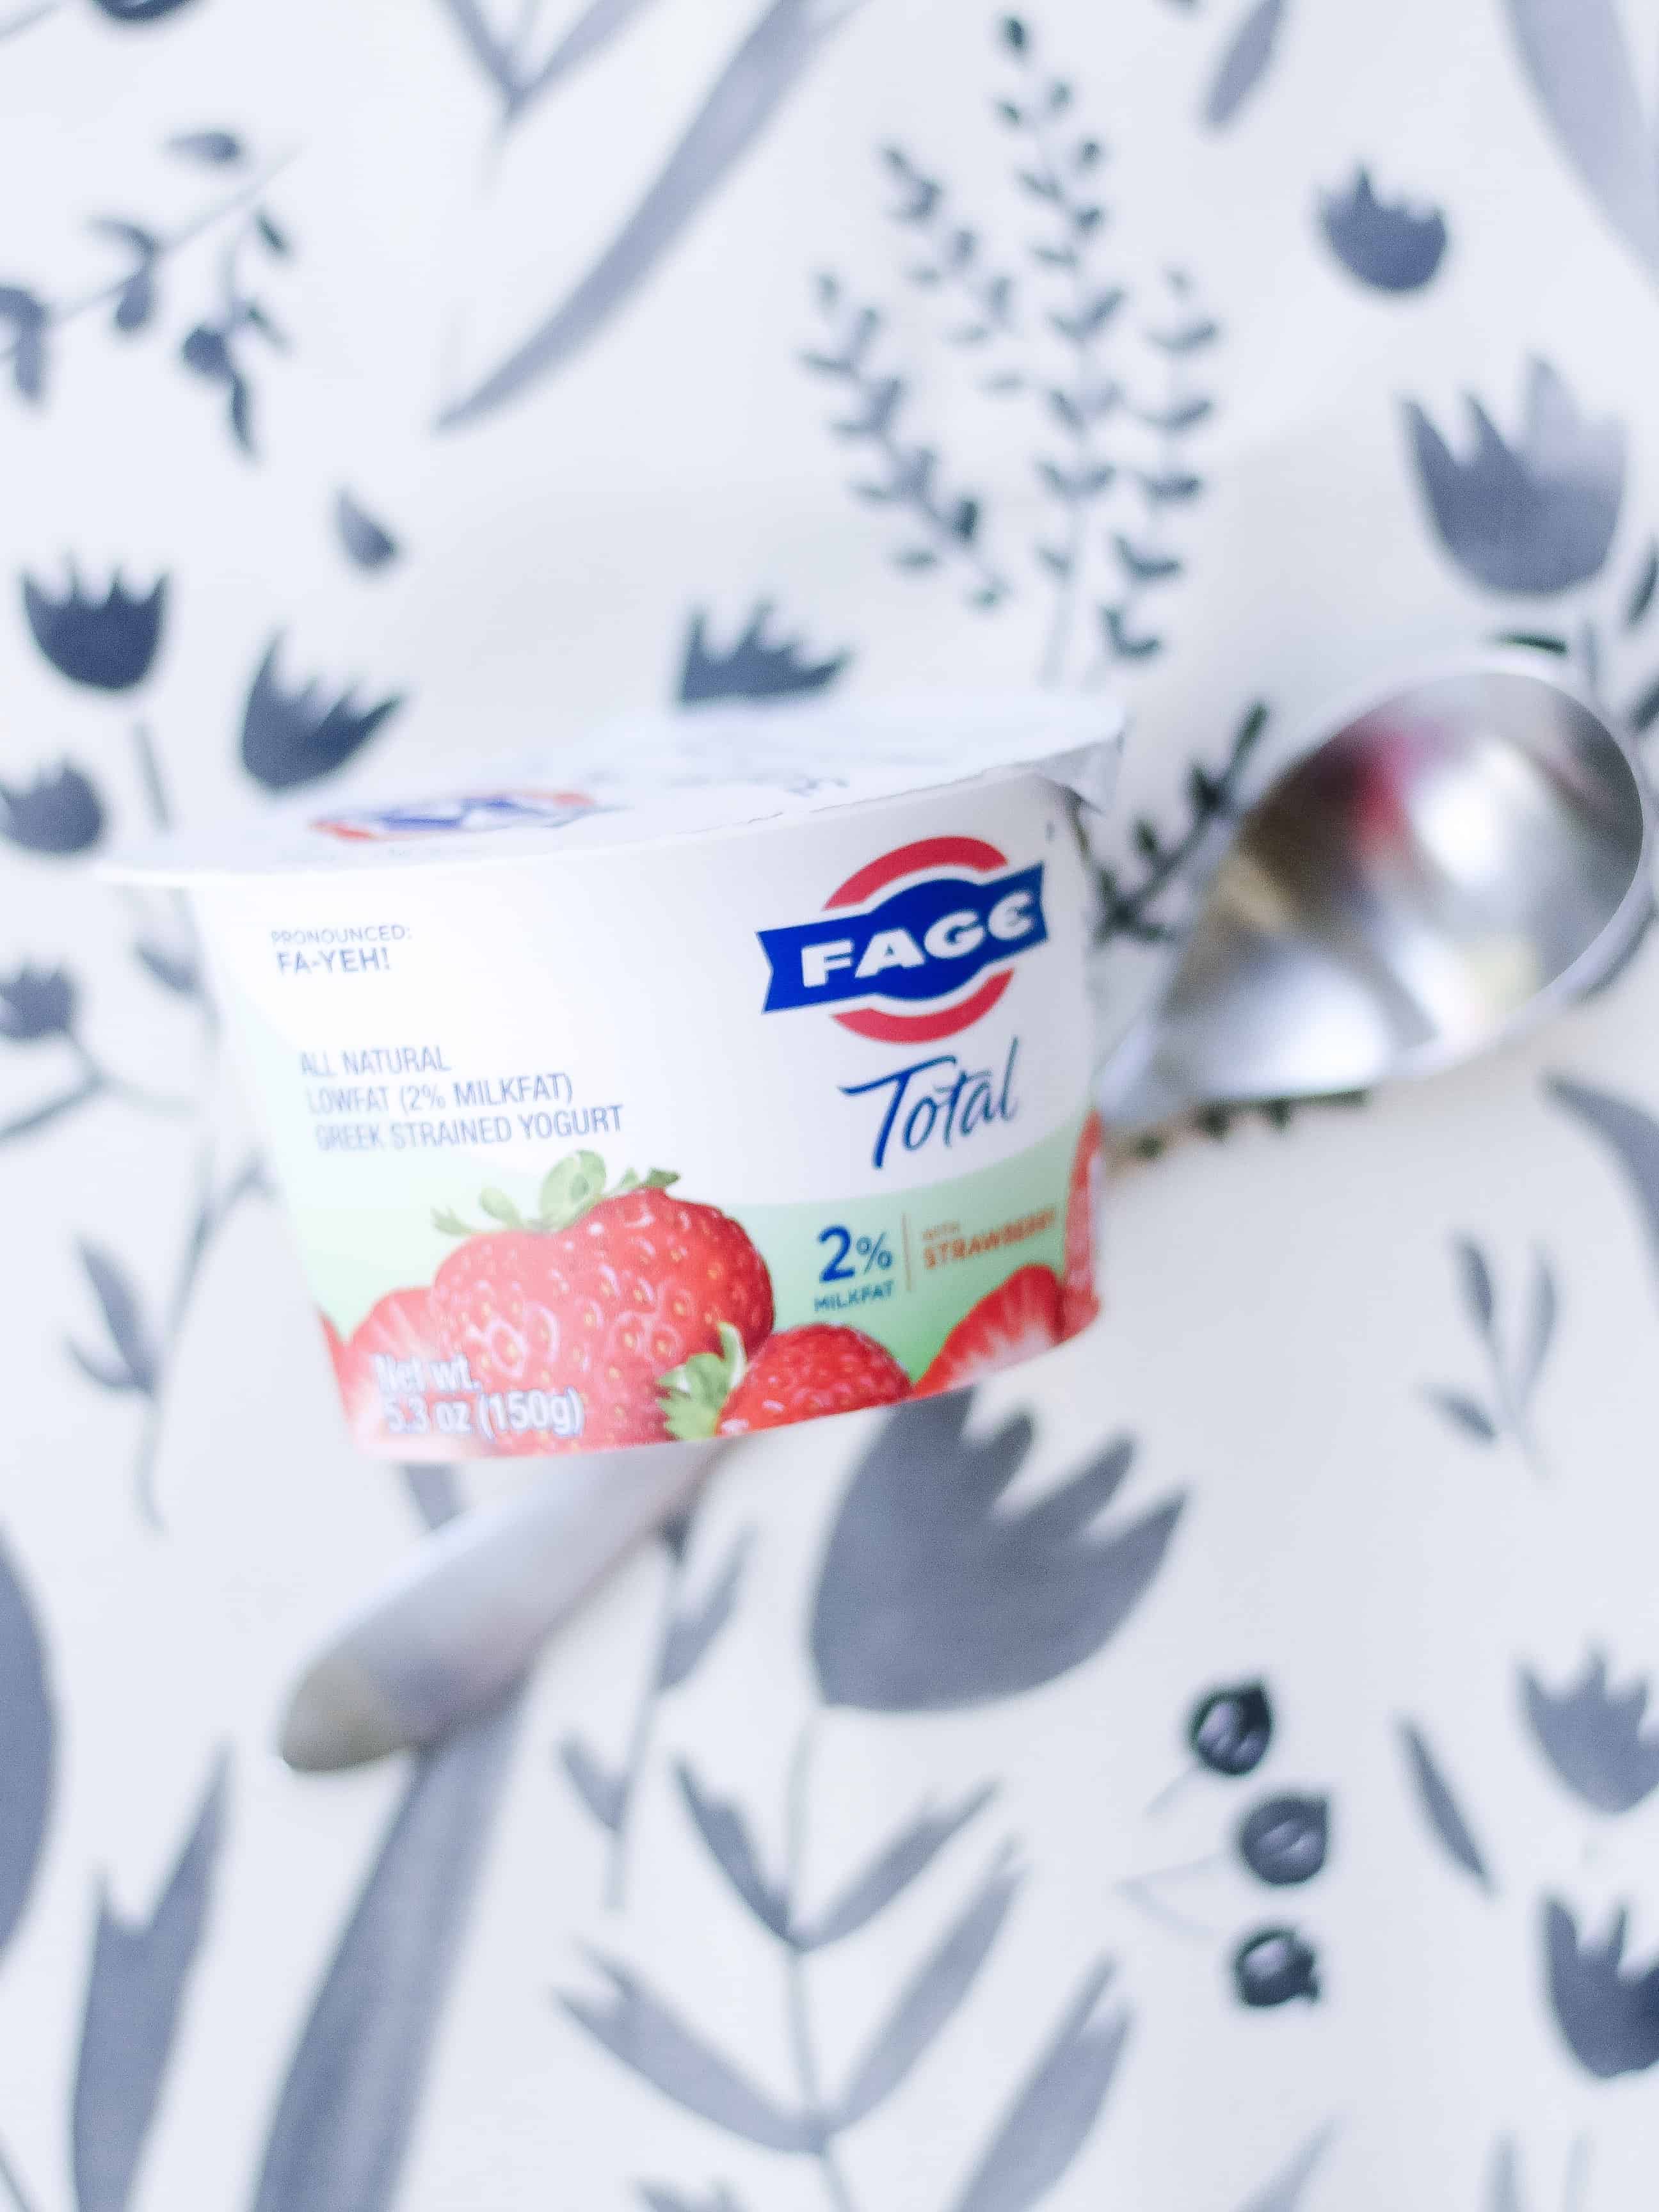
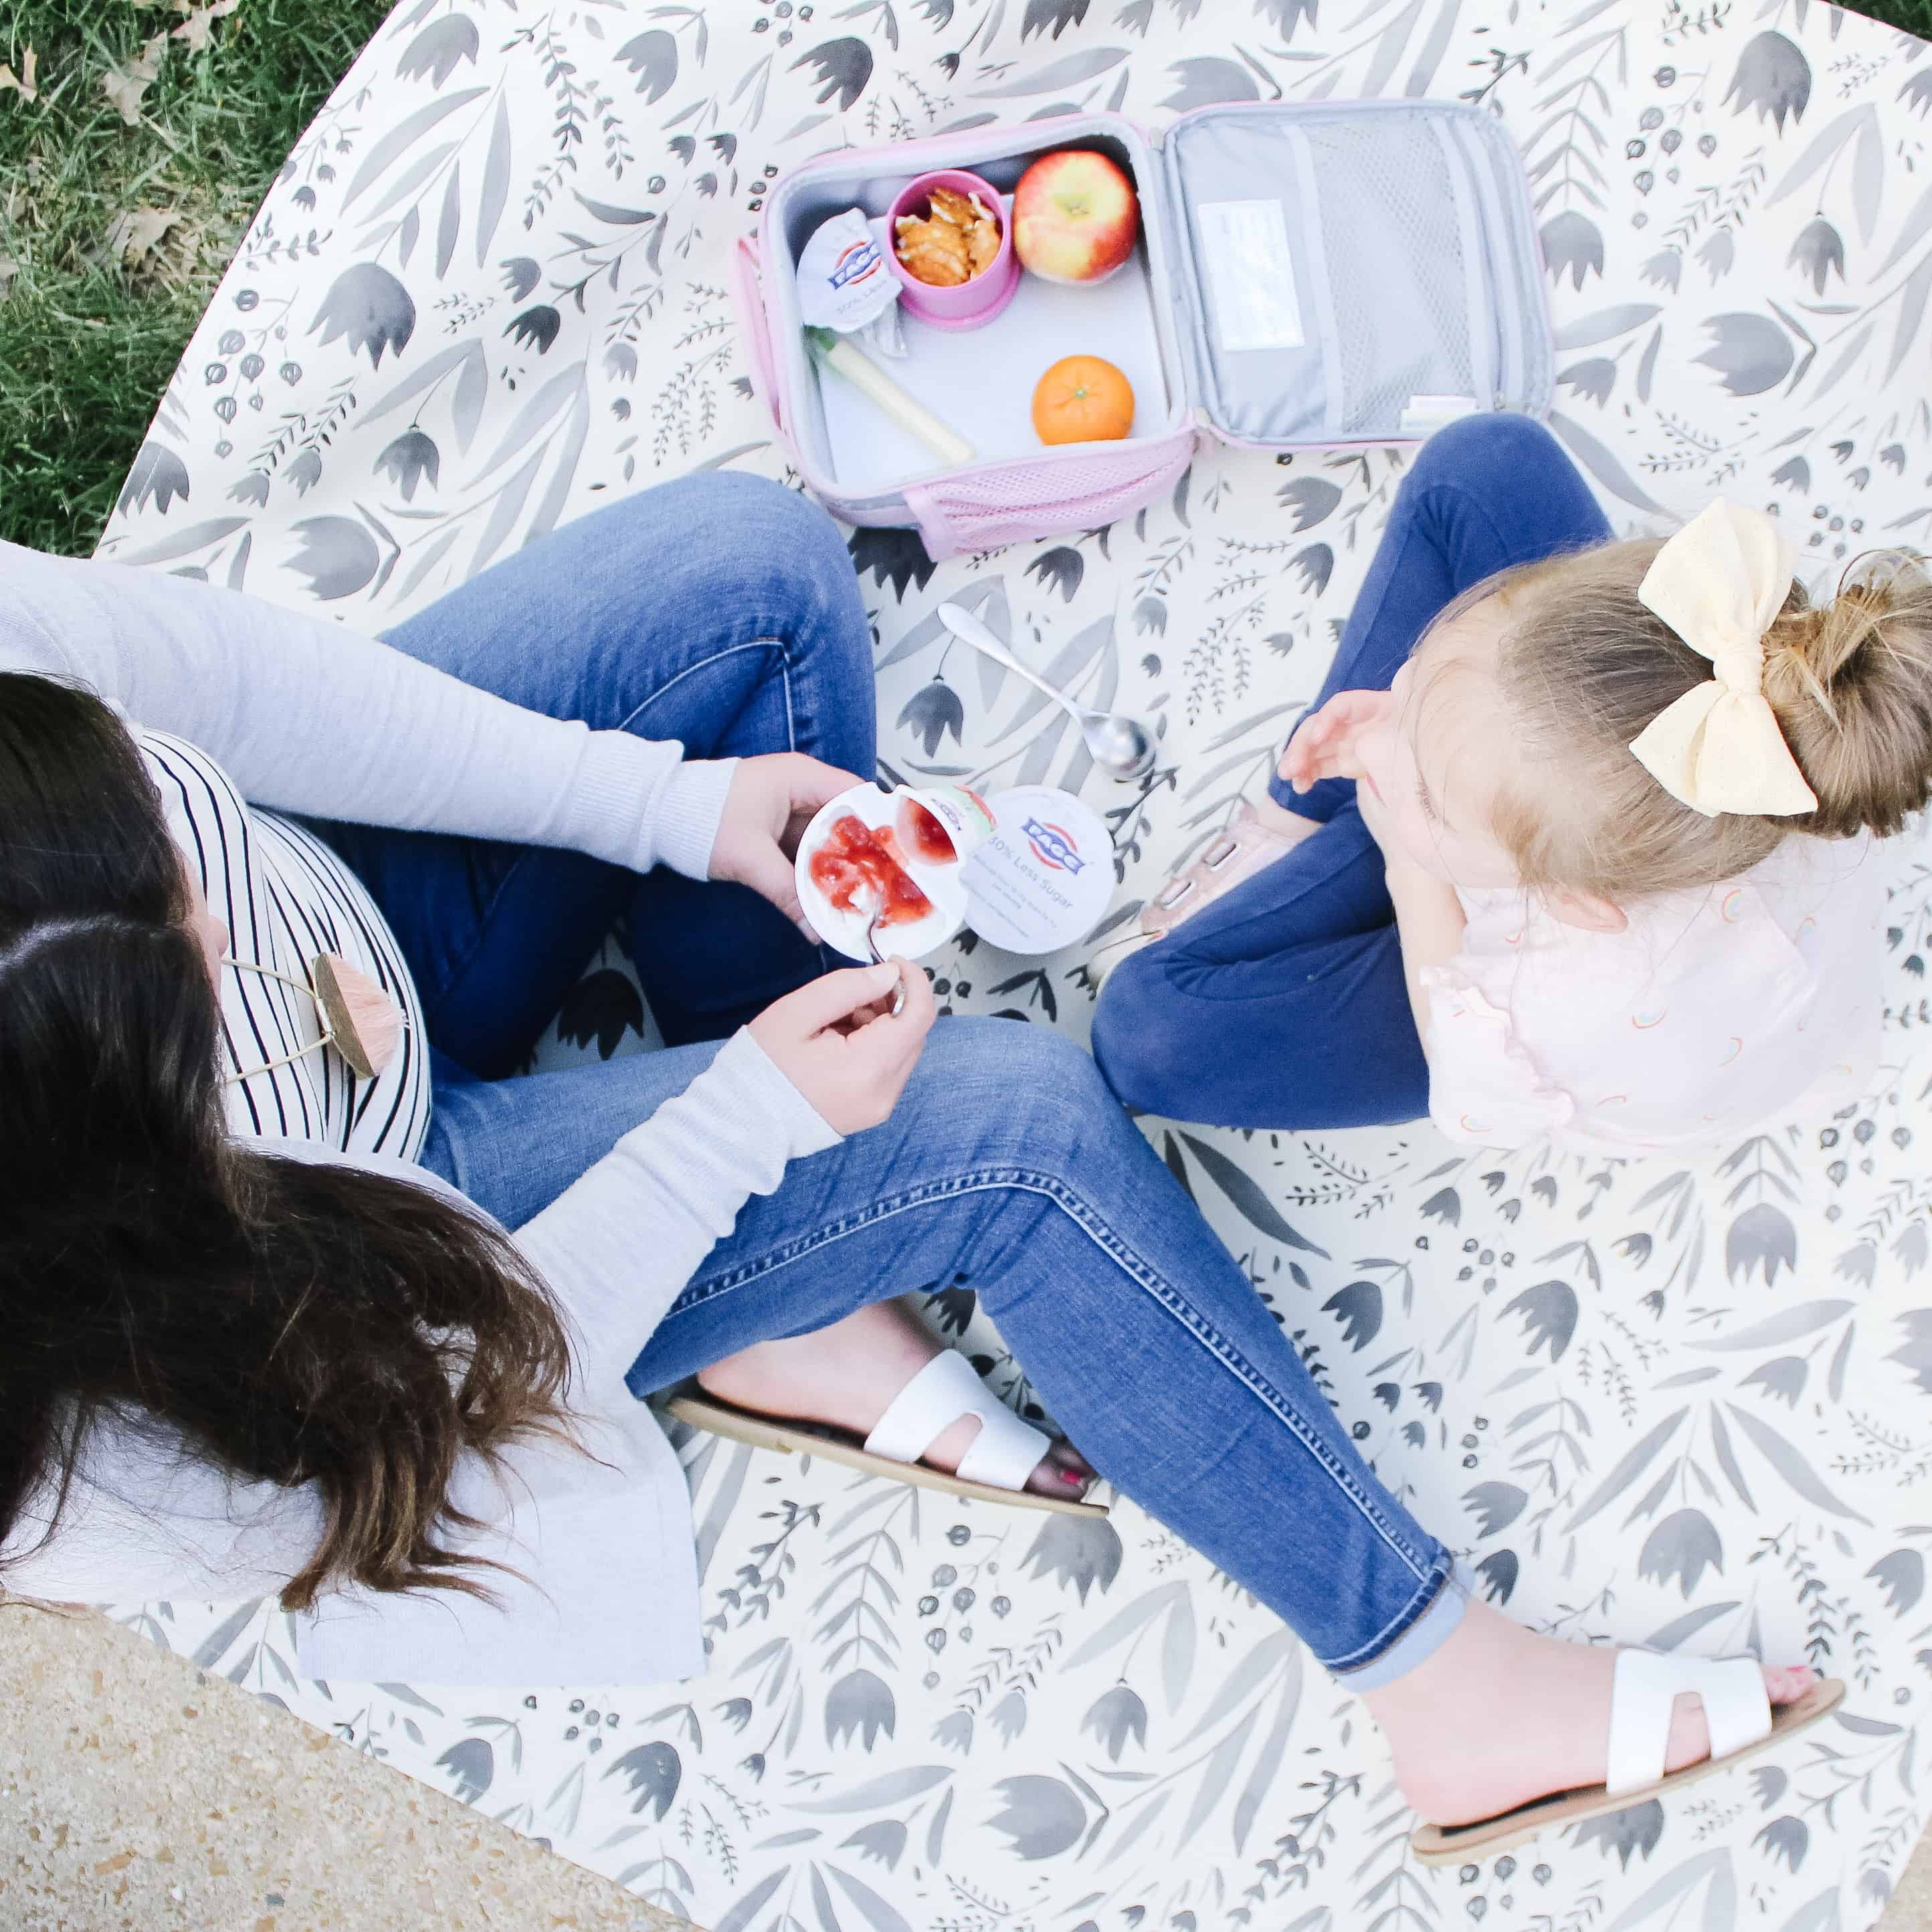
I have been pretty picky during my pregnancy, so I have been sticking to the same foods a lot of the time. My current favorite is FAGE Total Split Cup Greek Yogurt. The new lower sugar varieties allow me to get something good for me on the go without a ton of sugar. Sweets are a weakness when I am pregnant, so it’s SO important to me to have a snack that helps me keep the sugar content low on the go.
One thing I also focus on for myself and the kids is foods that will make us feel good so we can keep going. Nothing is worse than a sugar crash, or being overly full when you’re trying to play at the park or walk around the zoo, so I try keeping things light for all of us. I personally get so hot too when I am pregnant, so a cool snack is great for me! FAGE Total Split Cup easily stays cool in a lunch box with the trick I will share below.
Packing on the Go Snacks
I used to just throw snacks in my diaper bag for the day, but with 3 kids, and a snack for myself I find it so much easier to keep the snacks separate. That, and the fact that so many healthier options really do need to stay cool, it works best for me to pack a lunch box for our days out. What I do is use these snack stackers for anything that will crumble (i.e. crackers), and throw everything else we might need in our lunch box. So, fruit, FAGE Total Split Cups, spoons, and so on, then throw in a frozen bottle of water or two. By the time were ready to eat the water has mostly thawed but is still super cold for a great cool off for everyone. This keeps my yogurt cold, and allows for snacks like cheese for the kids too.
Enjoying the Summer
Above all else, my biggest priority is to enjoy summer time with my kids. I know last summer there was a viral article about how we only have 18 summers, so to make the best of them. Whether or not you like that mentality, it is true, so do what you can to have things on hand, have a game plan, and be able to really enjoy your days out in the sun with your babies. Because come fall you will be missing that quality time – I mean in December we would all kill for a zoo day here in the Midwest!
Check your local store for FAGE Total Split Cup next time you’re there. There are several flavors and varieties everywhere from 0% fat to 5% fat. I personally LOVE the 5% right now for a higher fat, more filling snack so I know I am getting those healthy fat calories for the baby – oh, basically all berry varieties are my favorite (in case you wanted a suggestion!).
This DIY Nursery Decor Round Up post contains affiliate links
If you can’t tell from the blog posts I have been posting recently, I am definitely in nursery mode over here. The boys shared room is well on its way to being finished, and then I’ll be ready to dive in on baby girls room! One thing I have always done is some sort of DIY or DIYS for my kids rooms, and since I know that’s a fun way to save money, or personalize a space, I thought I would do a round up of some of my favorite Nursery DIY’s as well as a few great ones from friends.
DIY Nursery Decor Round Up
Below are my favorite Past DIY’s from my kids nurseries, as well as some wonderful ideas from friends. Click the link to learn more about each project!
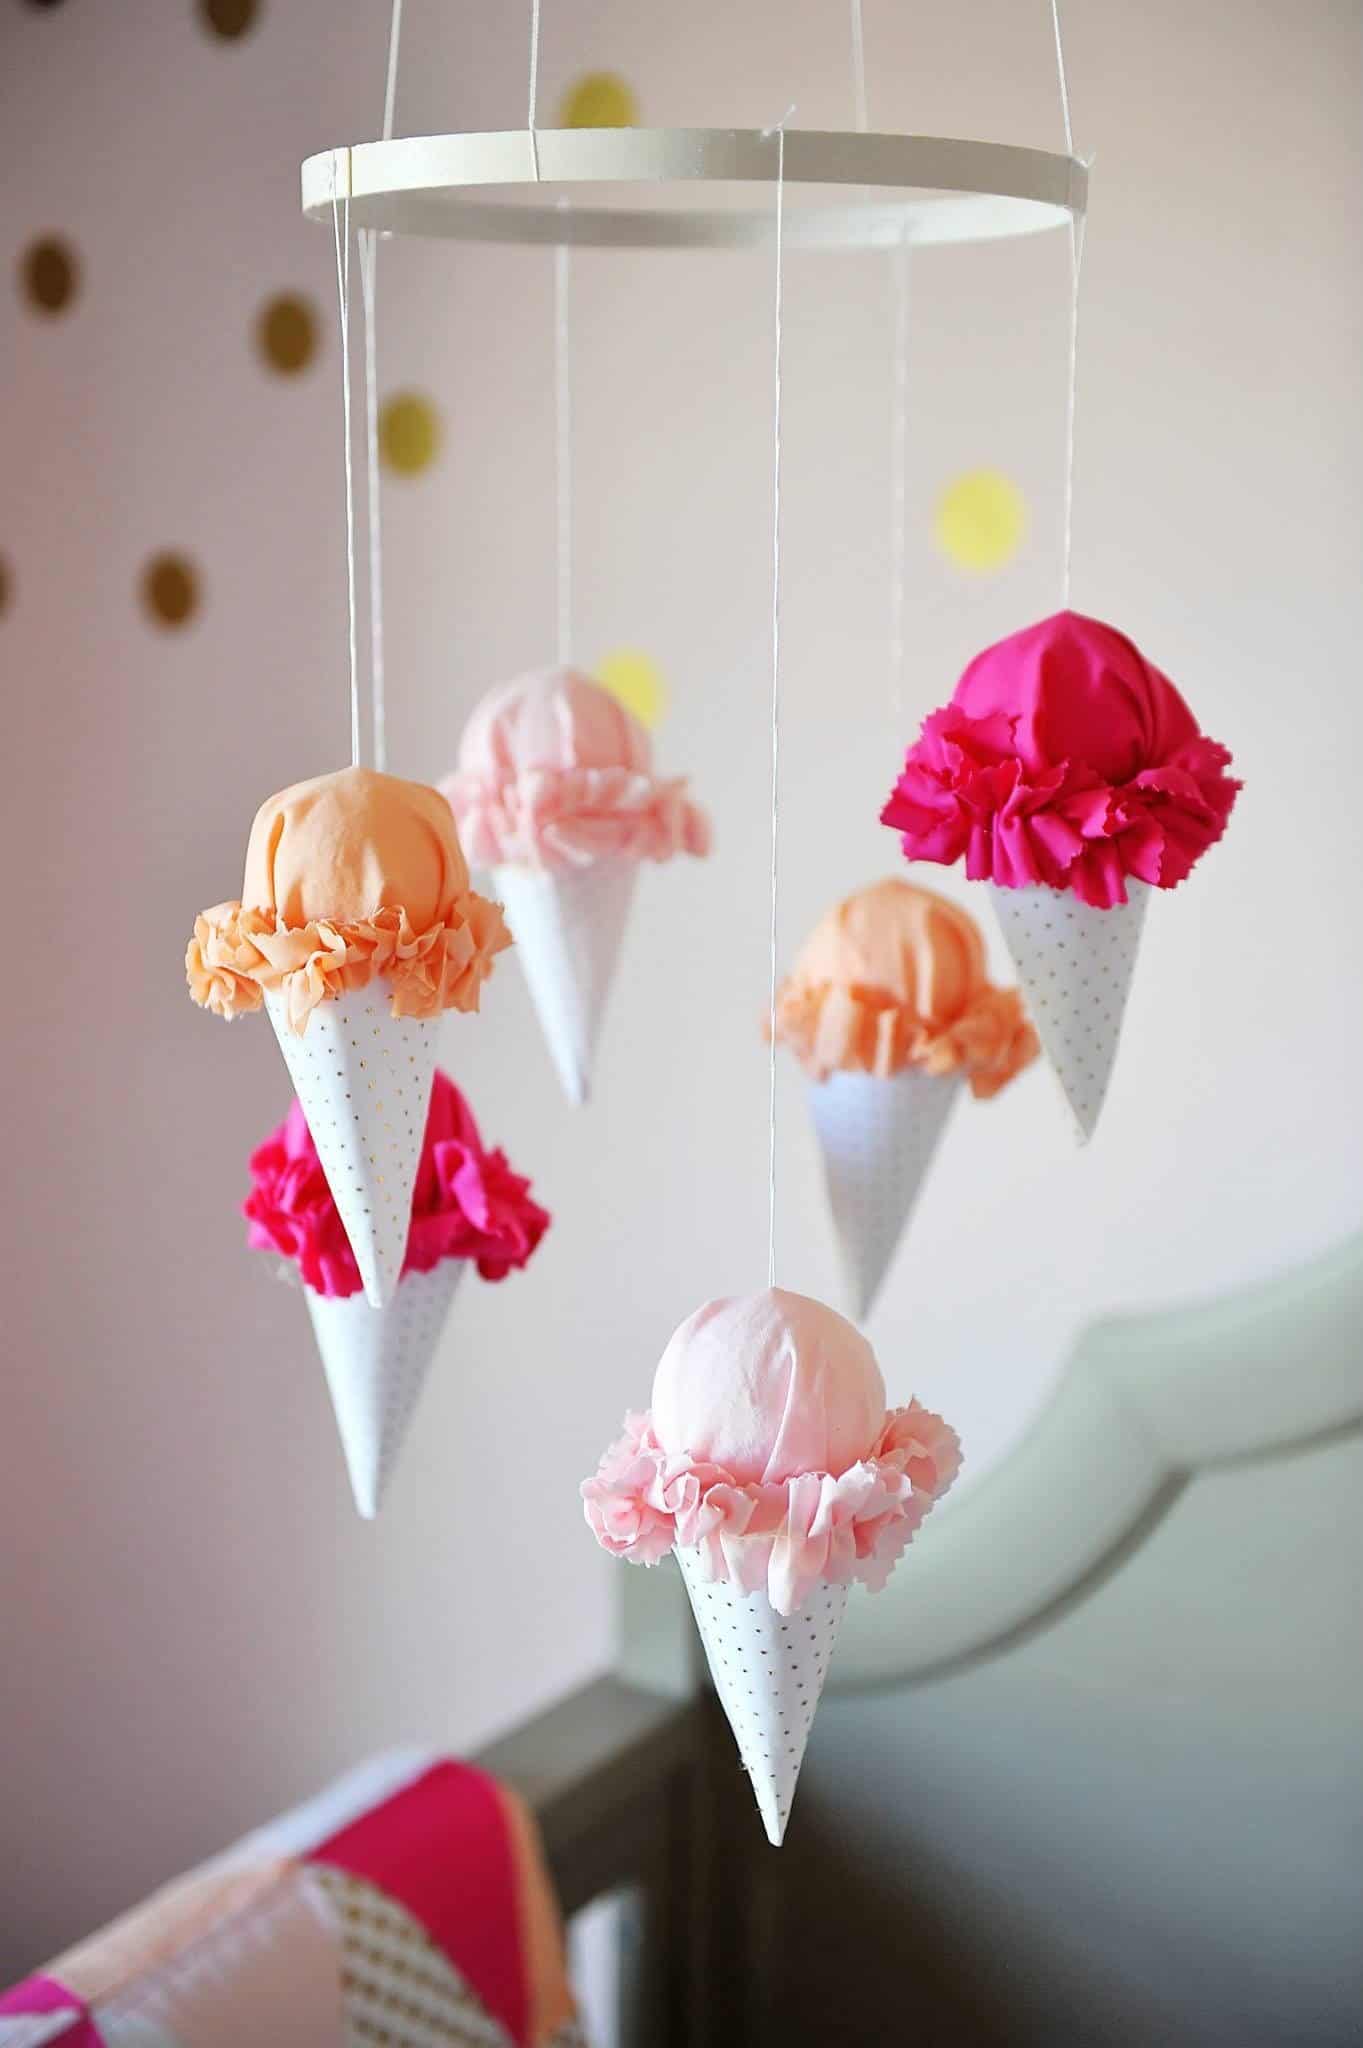
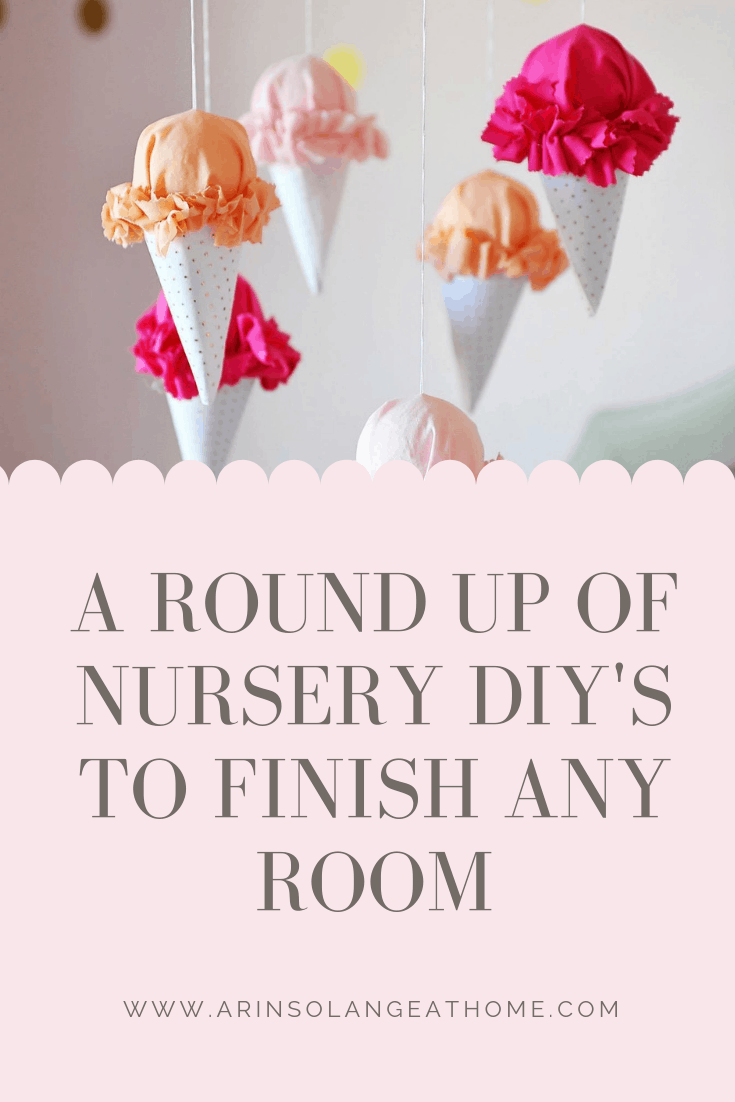
DIY Ice Cream Cone Mobile
This DIY Ice Cream Cone mobile was in my daughters nursery 4.5 years ago. It remains one of my favorite DIY’s to date, and just fit her room so well!! – See more of her Nursery and learn more here!
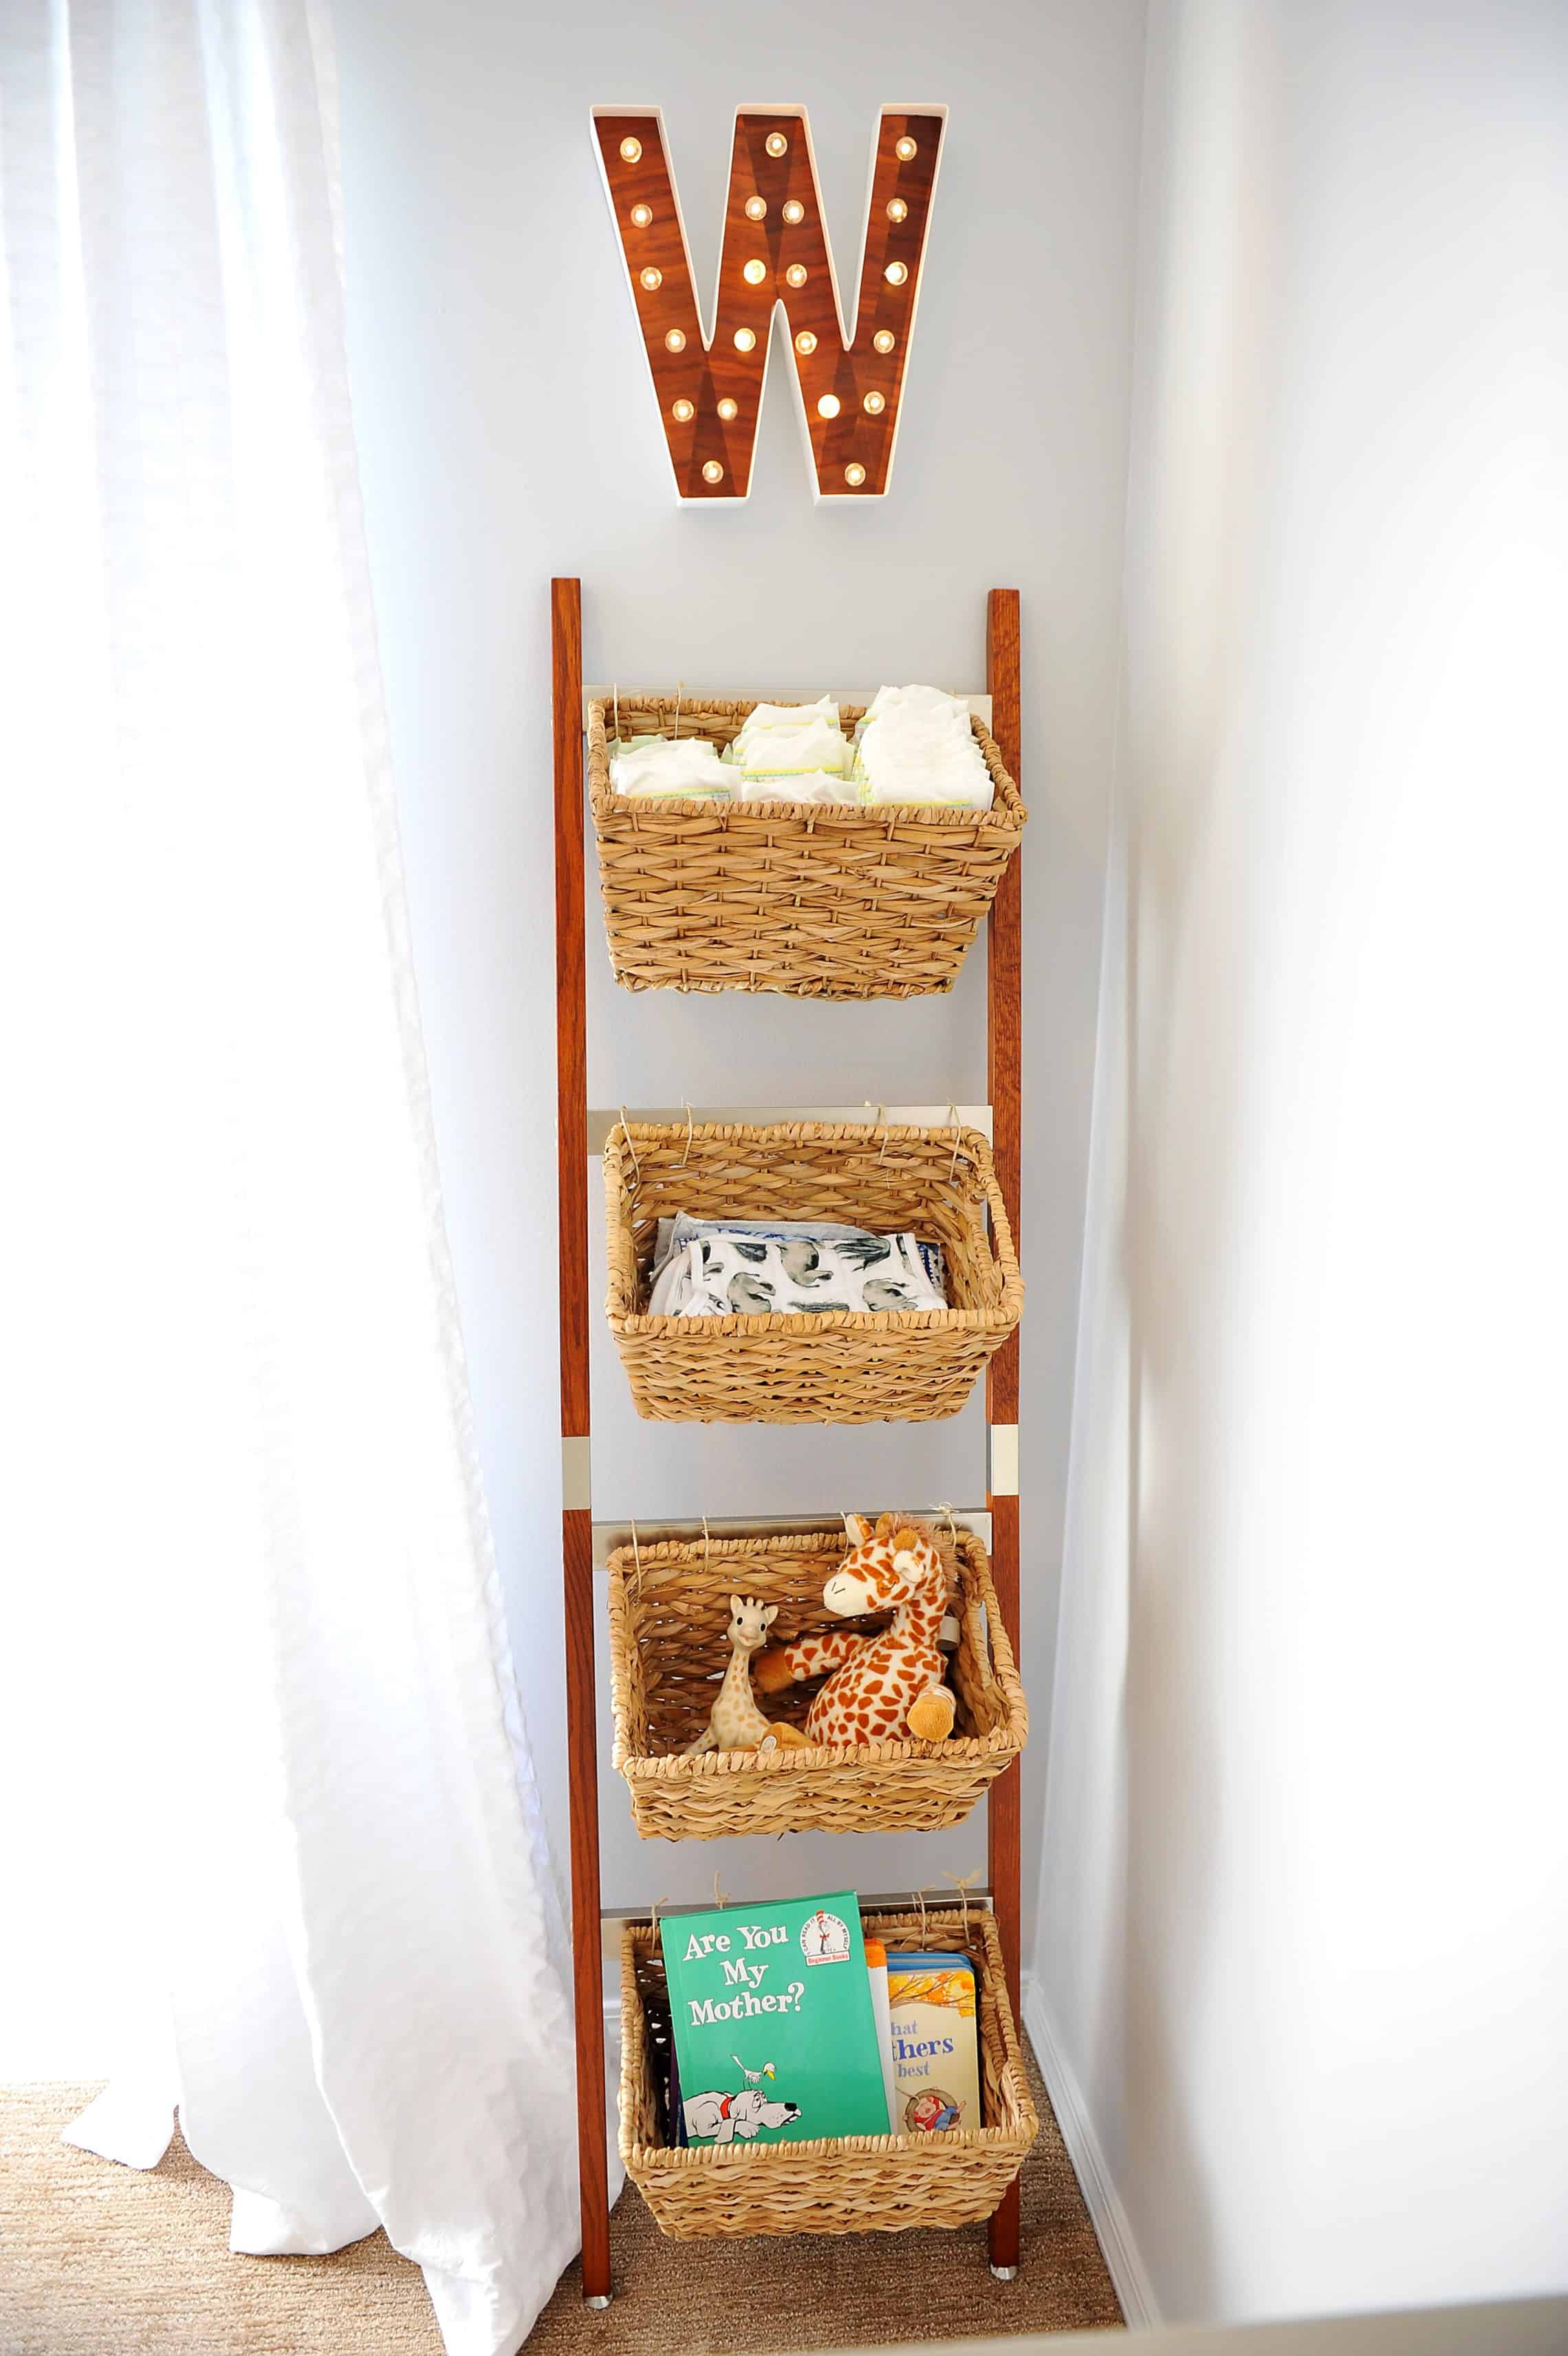
DIY Nursery Storage Ladder
When putting together my son’s nursery 2 years ago I wanted to add unique storage. This DIY Storage ladder now will serve as book storage in my boy’s shared room, so its been a great on-going DIY. – See more here.
DIY Flower Mobile
Nikki from Mommy My Way created this gorgeous flower mobile. Flowers are so timeless in a baby girls room, and I definitely won’t lie saying I considered this look for baby girls room!
DIY Greenery Mobile
For my son’s nursery I knew I wanted a really simple mobile, and ended up creating this DIY Greenery Mobile and it was such a fun way to add greenery to his room… especially after I killed his plant! Check out the post here.
DIY Embroidery Hoop Wall
Lindsay from Lindsay’s Sweet World created this super cute wall that anyone could do from just a few simple supplies for her daughters nursery wall. Check out the post for a fun way to make a statement wall.
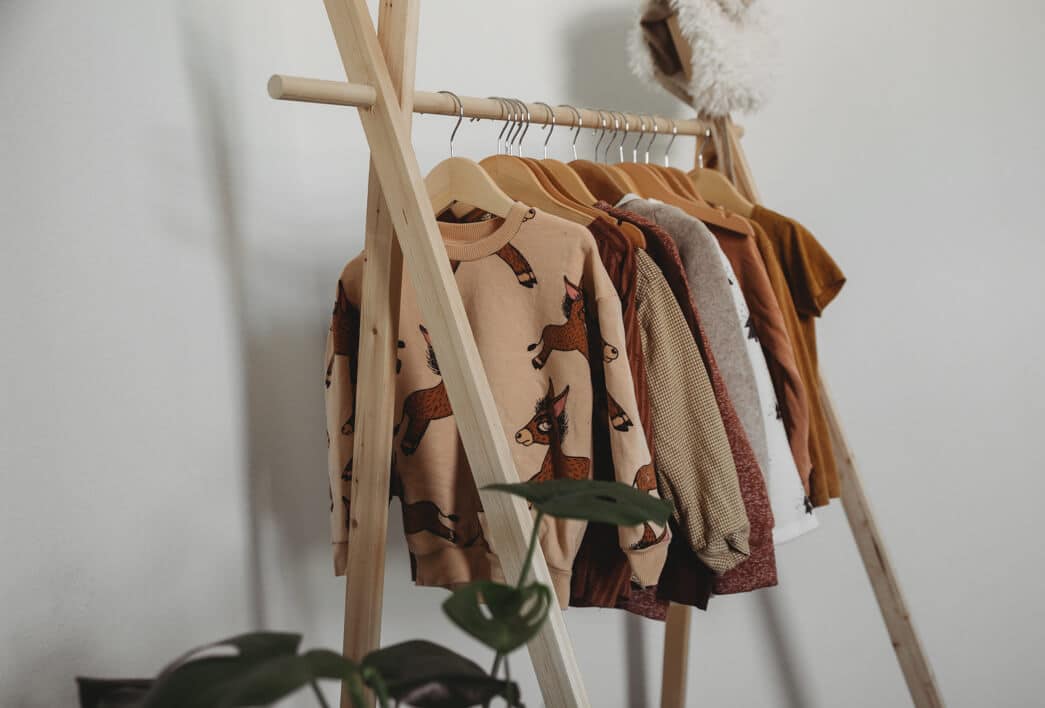
DIY Wooden Clothing Rack
Eileen from The Autism Cafe designed this gorgeous wooden clothing rack for her toddler, but it would be GORGEOUS in a nursery for both function and to display their sweet tiny clothing. I can’t get over how sweet this looks finished, and her gorgeous photography doesn’t hurt either!
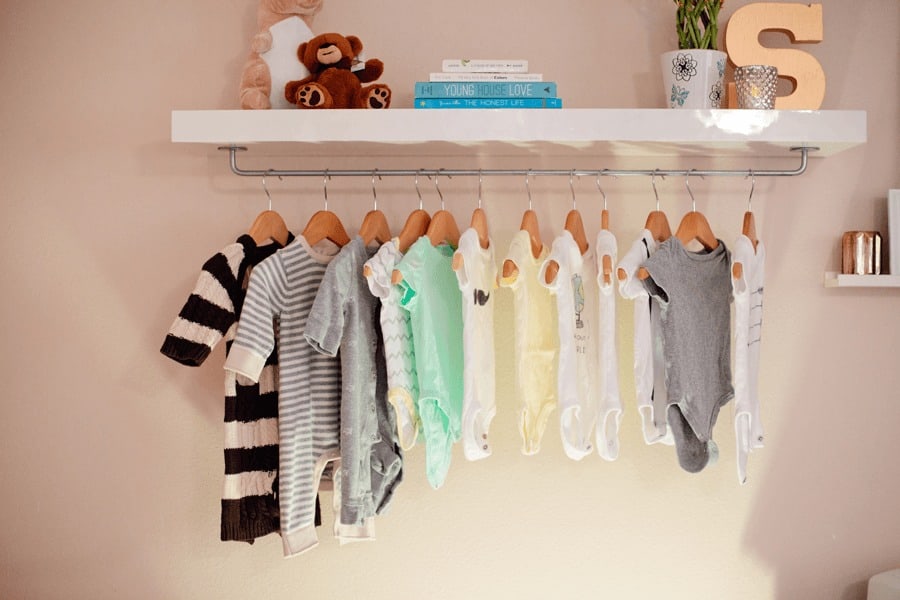
DIY Nursery Wardrobe Shelf
On a similar note, Tabitha from Fresh Mommy Blog created a DIY Wardrobe shelf for her nursery that hangs near the changing table. It is so sweet and would be so useful! Check out her post on the full DIY
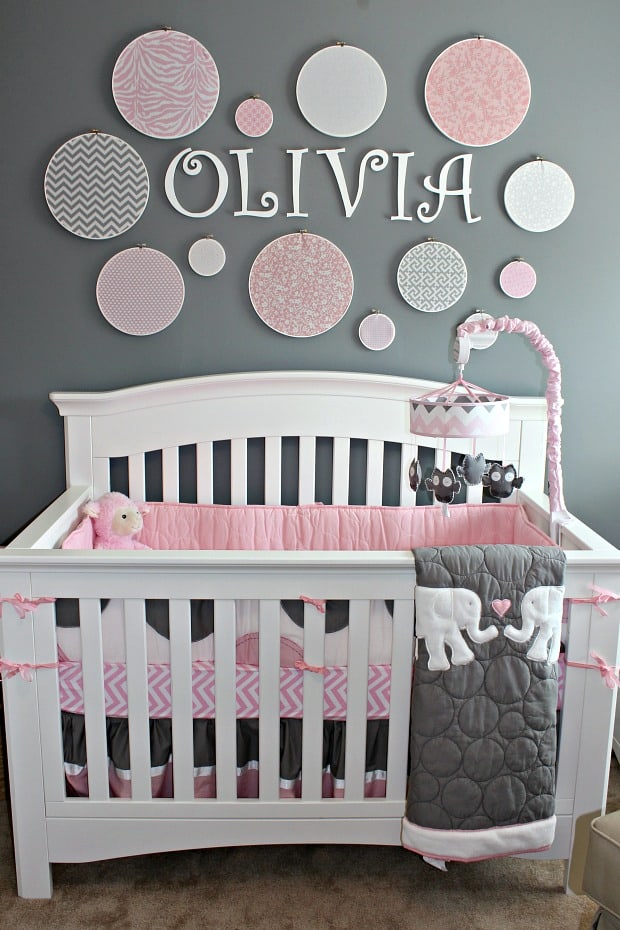
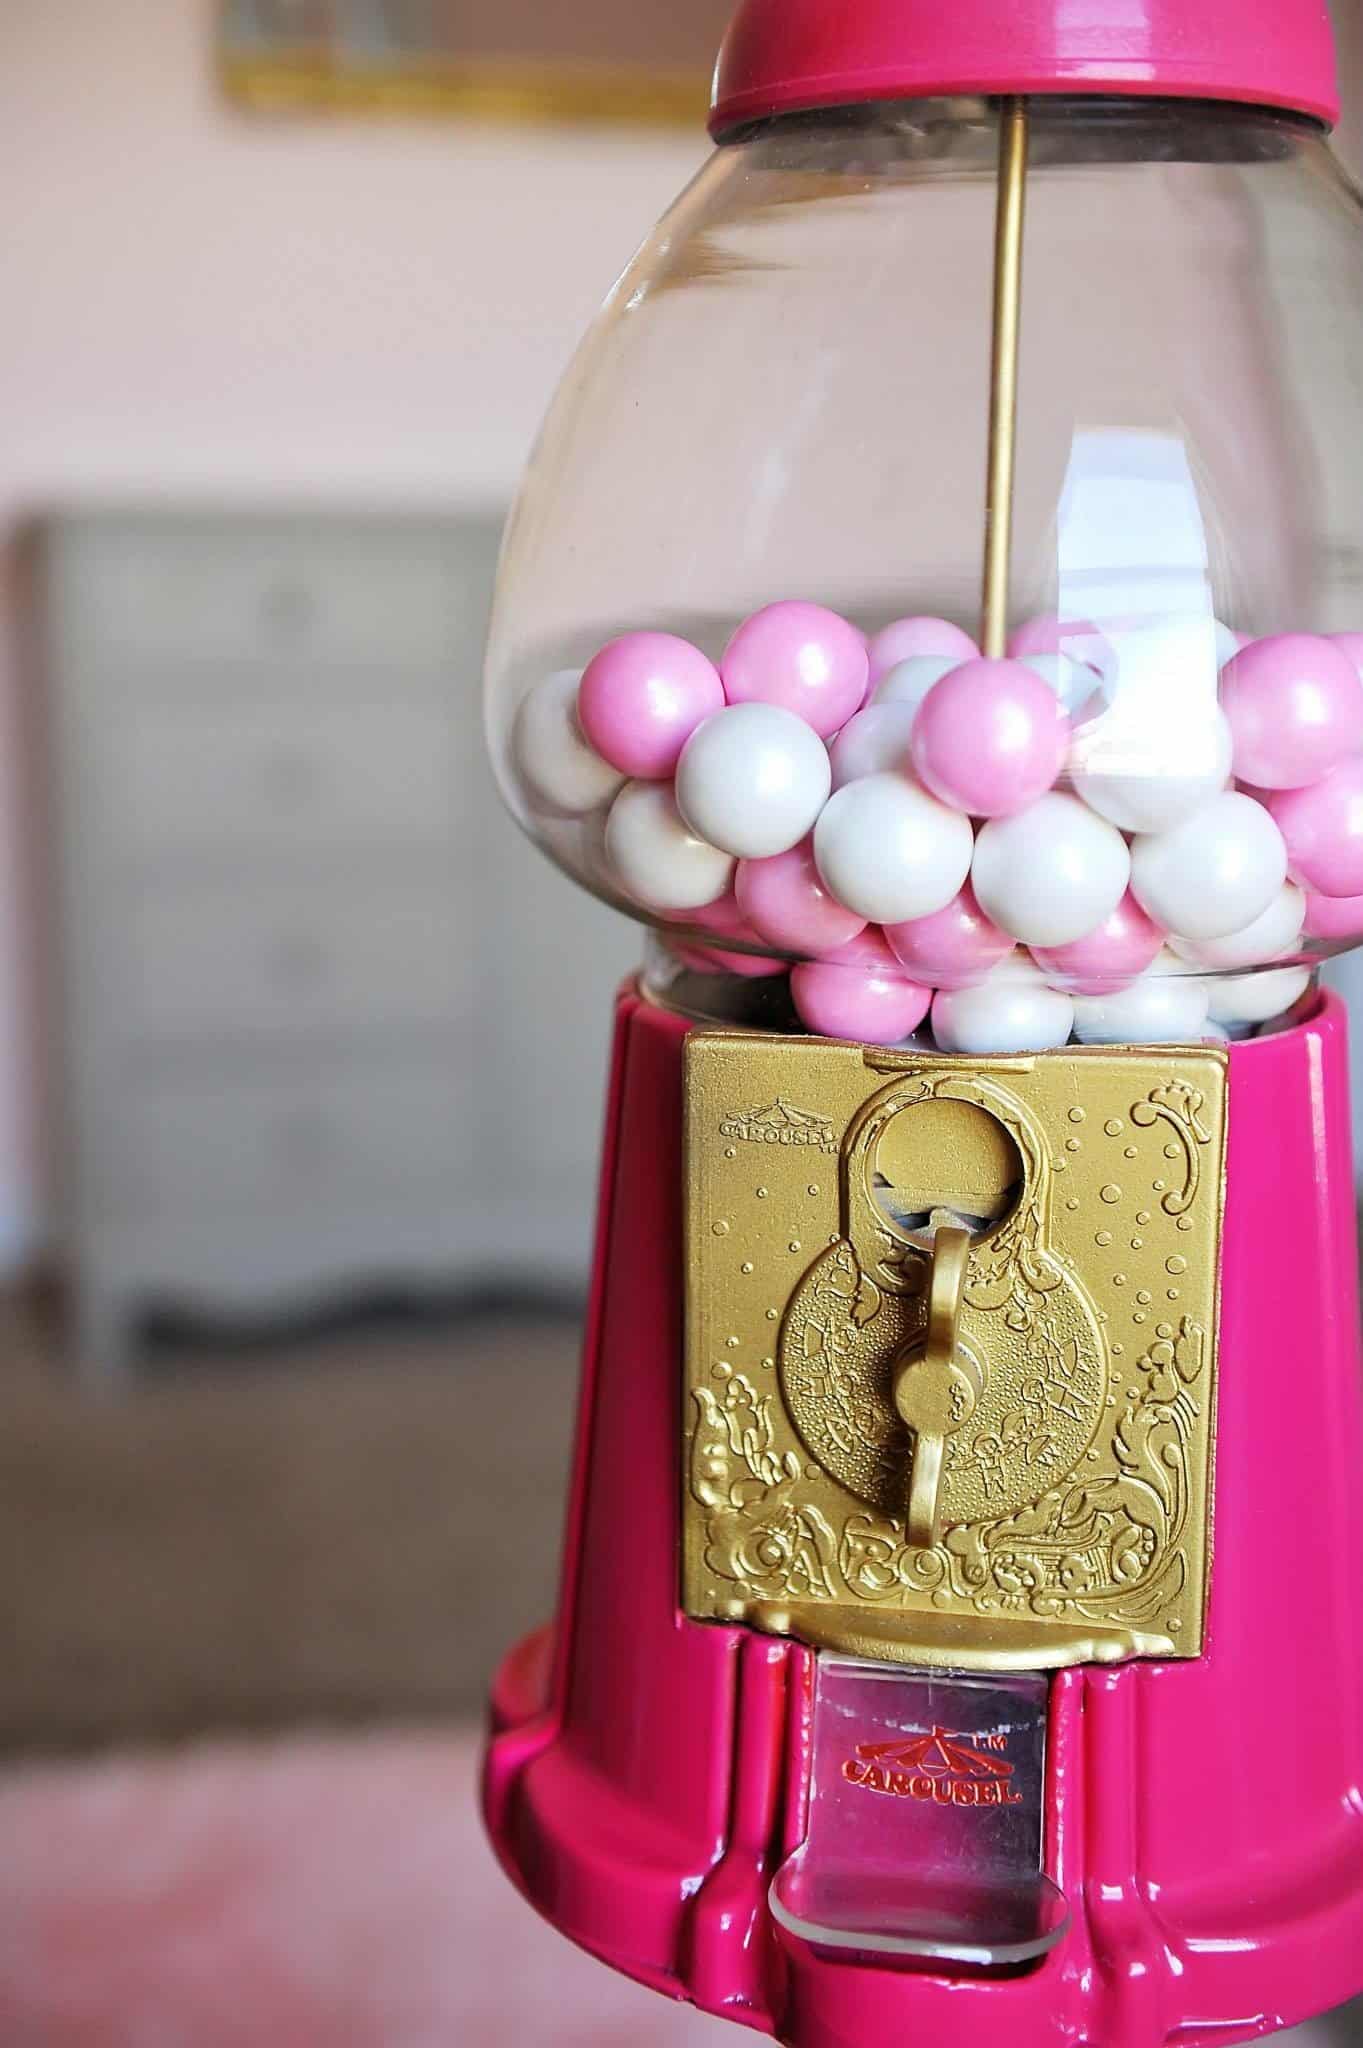
DIY Gumball Machine
So this isn’t all DIY, but more of sprucing up. But to go along with my daughter’s Ice Cream cone mobile I updated an old gumball machine from a thrift store for her nursery. It is still in her room to this day and remains a favorite aspect BY FAR!
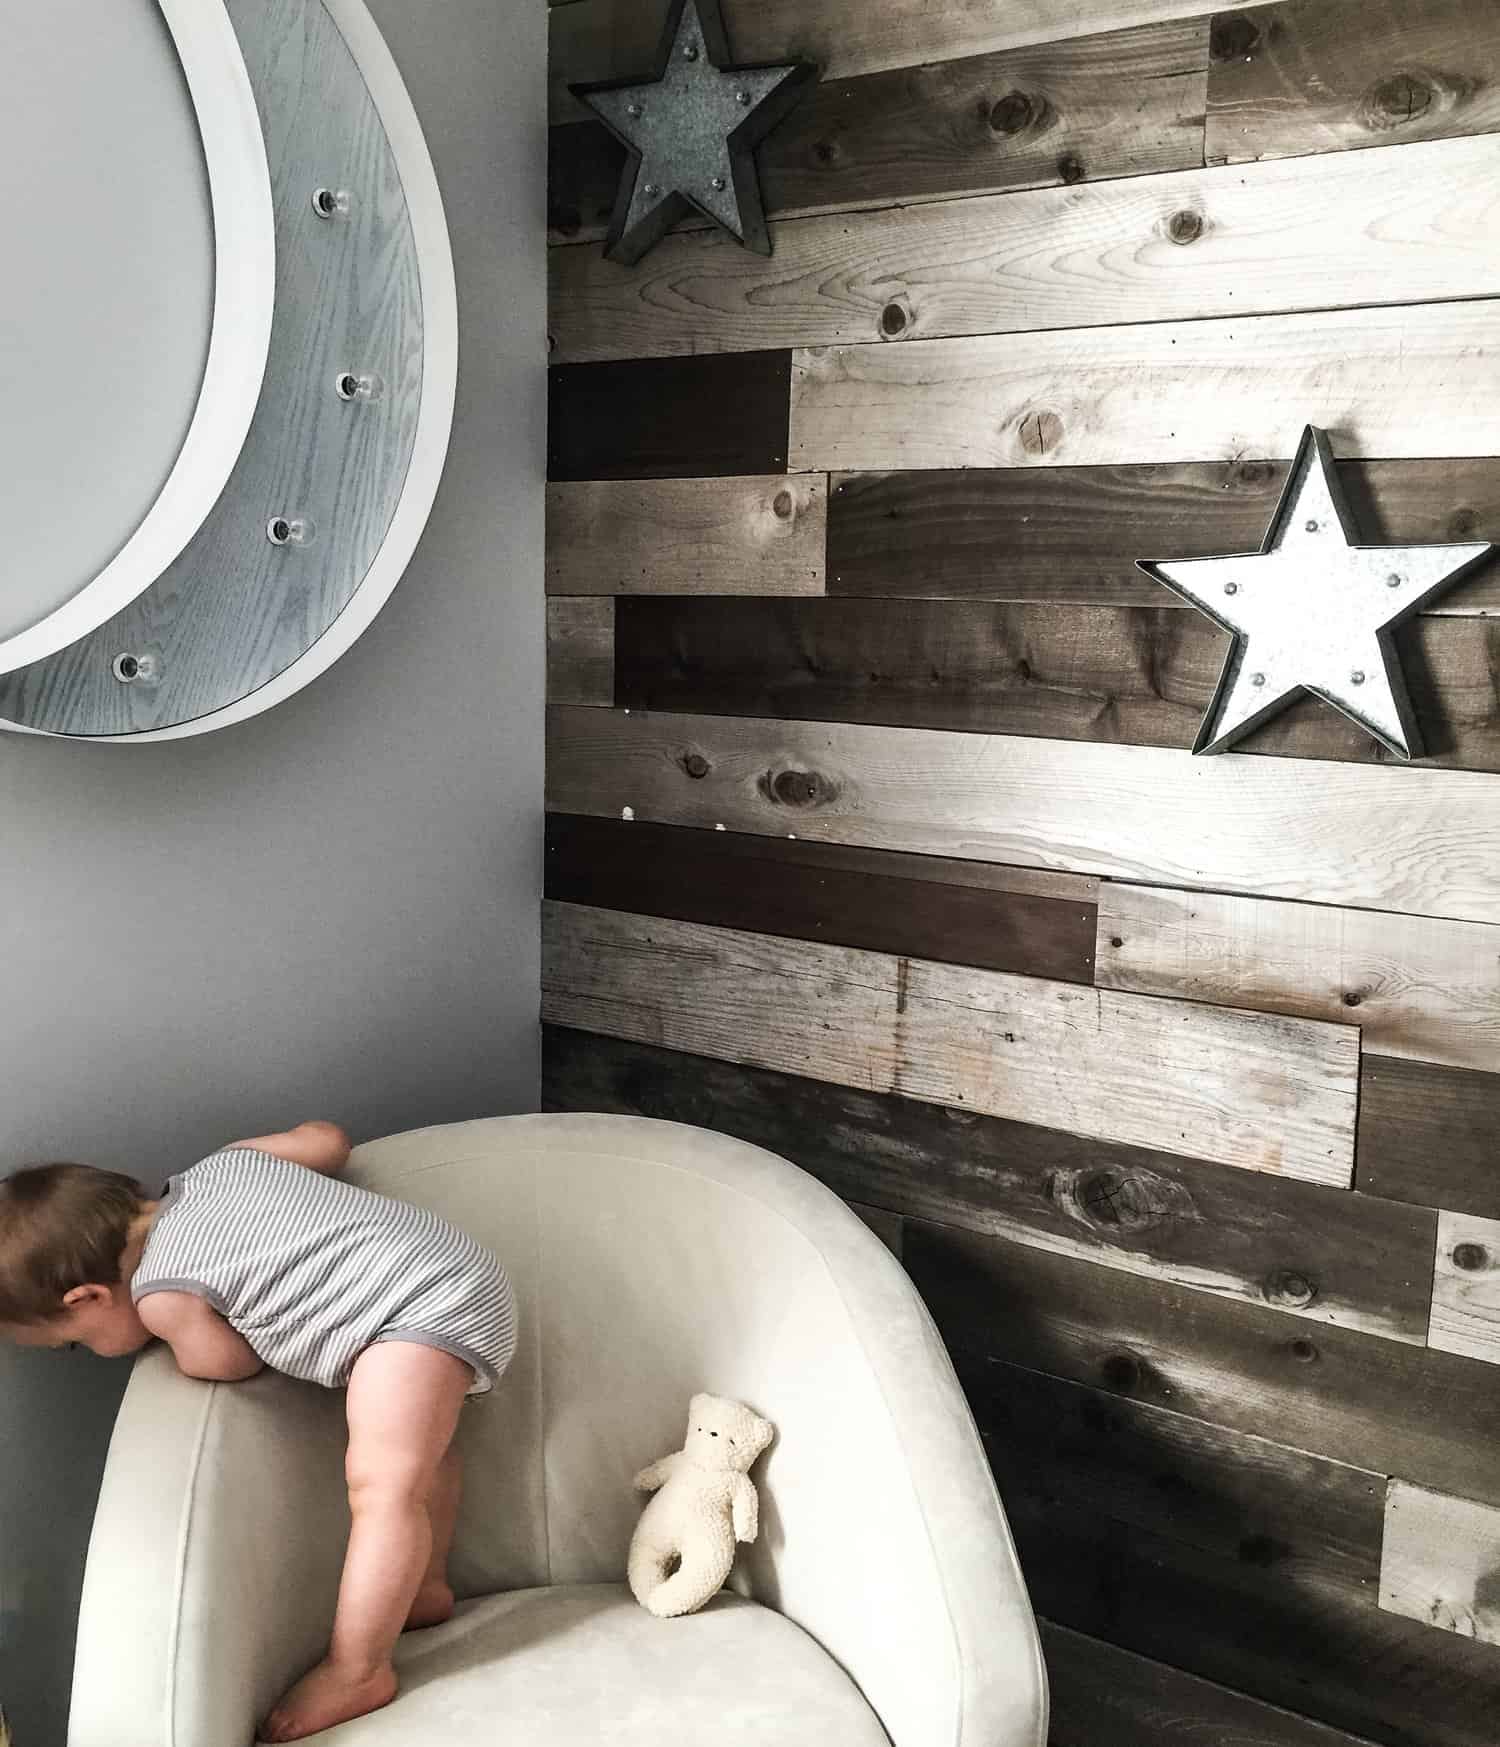
DIY Wood Wall in Nursery
If you’re looking for a great focal point wall be sure to check out Stephanie from First Thyme Mom’s blog post on a great neutral Nursery she did for her first born!
For more Nursery inspiration be sure to sign up for my emails, as I will be adding lots more Nursery posts in the coming weeks and months!! I would love to see your finished product in the comments if you try out this project!
It honestly feels so weird writing this blog post. The fact that I will be 30 this week just feels…odd. I have been married for nearly 8 years, and have 3.5 kids, but for some reason I still feel about 22. Regardless I have been reflecting a lot the last couple of weeks on life, and where I am at turning 30. I don’t know that life looks exactly how I pictured it, but sometimes I forget that I am basically living my own fairytale. Not perfect, but truly just living my own dream. I get nosy when I follow other bloggers, SO I thought it would be fun for me to tell you my thirty favorites at thirty. Not to mention the fact that this will be fun for me to look back at and see how much I cringe when I turn 40. (because trust me if I did this post at 20 HELLO KITTY would have made the cut…)
Being a wife and a mom was SO important to me in life. I think I alway knew that those were my only two real ‘dreams’. I know some people won’t like that, but thats why we all get our own dreams haha. I will also say that since college I have wanted to start a blog, and the fact that over the last couple of years I have turned this into both a dream hobby and career is kind of mind blowing to me. So although my 20’s were pretty amazing, and I am a bit sad to leave them behind, I am cautiously excited to see what the next decade of my life brings (even if that means that it will include 1 kid driving a moving vehicle).
This post contains affiliate links
Finding Your People
One of the best parts of my 20’s has been the relationships and friendships I have made, and one of the best ones has been with my girl NAVY. Coincidently she and I have the same birthday, so while we get to do all the blogging fun (and bitching) together, we get to add in another fun element and team up for our birthdays each year. ( It’s noteworthy that she is still in her 20’s for a few more years, the lucky girl). We thought it might be fun to each write a post about all our favorite things at this age…and of course to make it a bit more fun for all of you, incorporate week long giveaways.
I will explain more about the giveaways at the end of this post, but in the mean time… check out my 30 favorite things at 30!
30 Favorites at 30
My family. ENOUGH SAID.
My Yeti Coffee Mug – As a mama It is so hard for me to finish a cup of coffee in a timely fashion, so I love this mug. And I love that it has a lid so I can finish my coffee on my way to take the kids to school.
Dyson Hair dryer – probably one of the bigger splurges on myself, but this thing has been a game changer for me. I have a lot of hair, so anything that makes that easier to do is a win for me!
Friday night Date nights – I talked about this here, but Sam and I do date night almost every Friday night and its the best thing ever for our marraige. I live for that time and it completely recharges me for the weekend full of family time.
Fresh flowers on my kitchen table. I am super low maintenance when it comes to things like flowers, but I do LOVE having fresh flowers on my table.
This mascara – I love drug store makeup in general but I have been using this one since high school.
Starbucks. I go most days. I have zero apologies about it. Okay I kind of do to my bank account but otherwise I don’t haha.
Large Yeti tumbler – I’ve used this daily for 3 years or so. It makes me drink so much more water. I Love my water ICE COLD, so this is huge for me.
My Saranoni Blanket – I LOVE LOVE LOVE blankets. I asked for a Saranoni for myself a couple of years ago and I am obsessed. So obsessed that I make sure all the kids have them, including the sweet baby in my belly!
Batiste Dry Shampoo – I change up the smells and sometimes I use the one for dark hair and sometimes I don’t.
Long baths – this is by far the biggest self care thing for me. A bath is the best way for me to recharge. If you know me you know that I sometimes take a bath mid day. Always at night, and basically I just LOVE bath time.
Cantina Laredo – I have an unhealthy love for Mexican food, and Cantina is my fav! Sam doesn’t have to ask where I want to go to dinner. Its always Cantina!
Spring time – the best time of the year! Winter is hard in the midwest, and Spring time for me is such a reminder of the calm after the storm.
A pretty big fan of wine, but my current (or most recent seeing wine isn’t currently on my menu) favorite is Kim Crawford Sauvignon Blanc!
Throw Pillows – I’m sure you know I love decor, and I am obsessed with throw pillows. I change them out way too often.
All things Rattan – current trend that I can’t get enough of.
Freshly Picked Diaper bag – with 3 (almost 4) kids I love a good diaper bag. I love my Fawn Design bags too, but the Freshly picked has really worked well for me for the past 2 years.
Fake Plants – I kill all live ones, so I just fill my house with the fake version haha.
Neverfull bag – this was my ‘push present’ when we had Walker and I LOVE it.
A clean house. I actually don’t mind cleaning, and as long as I have time am happy to do it, but a great clean house is huge for me.
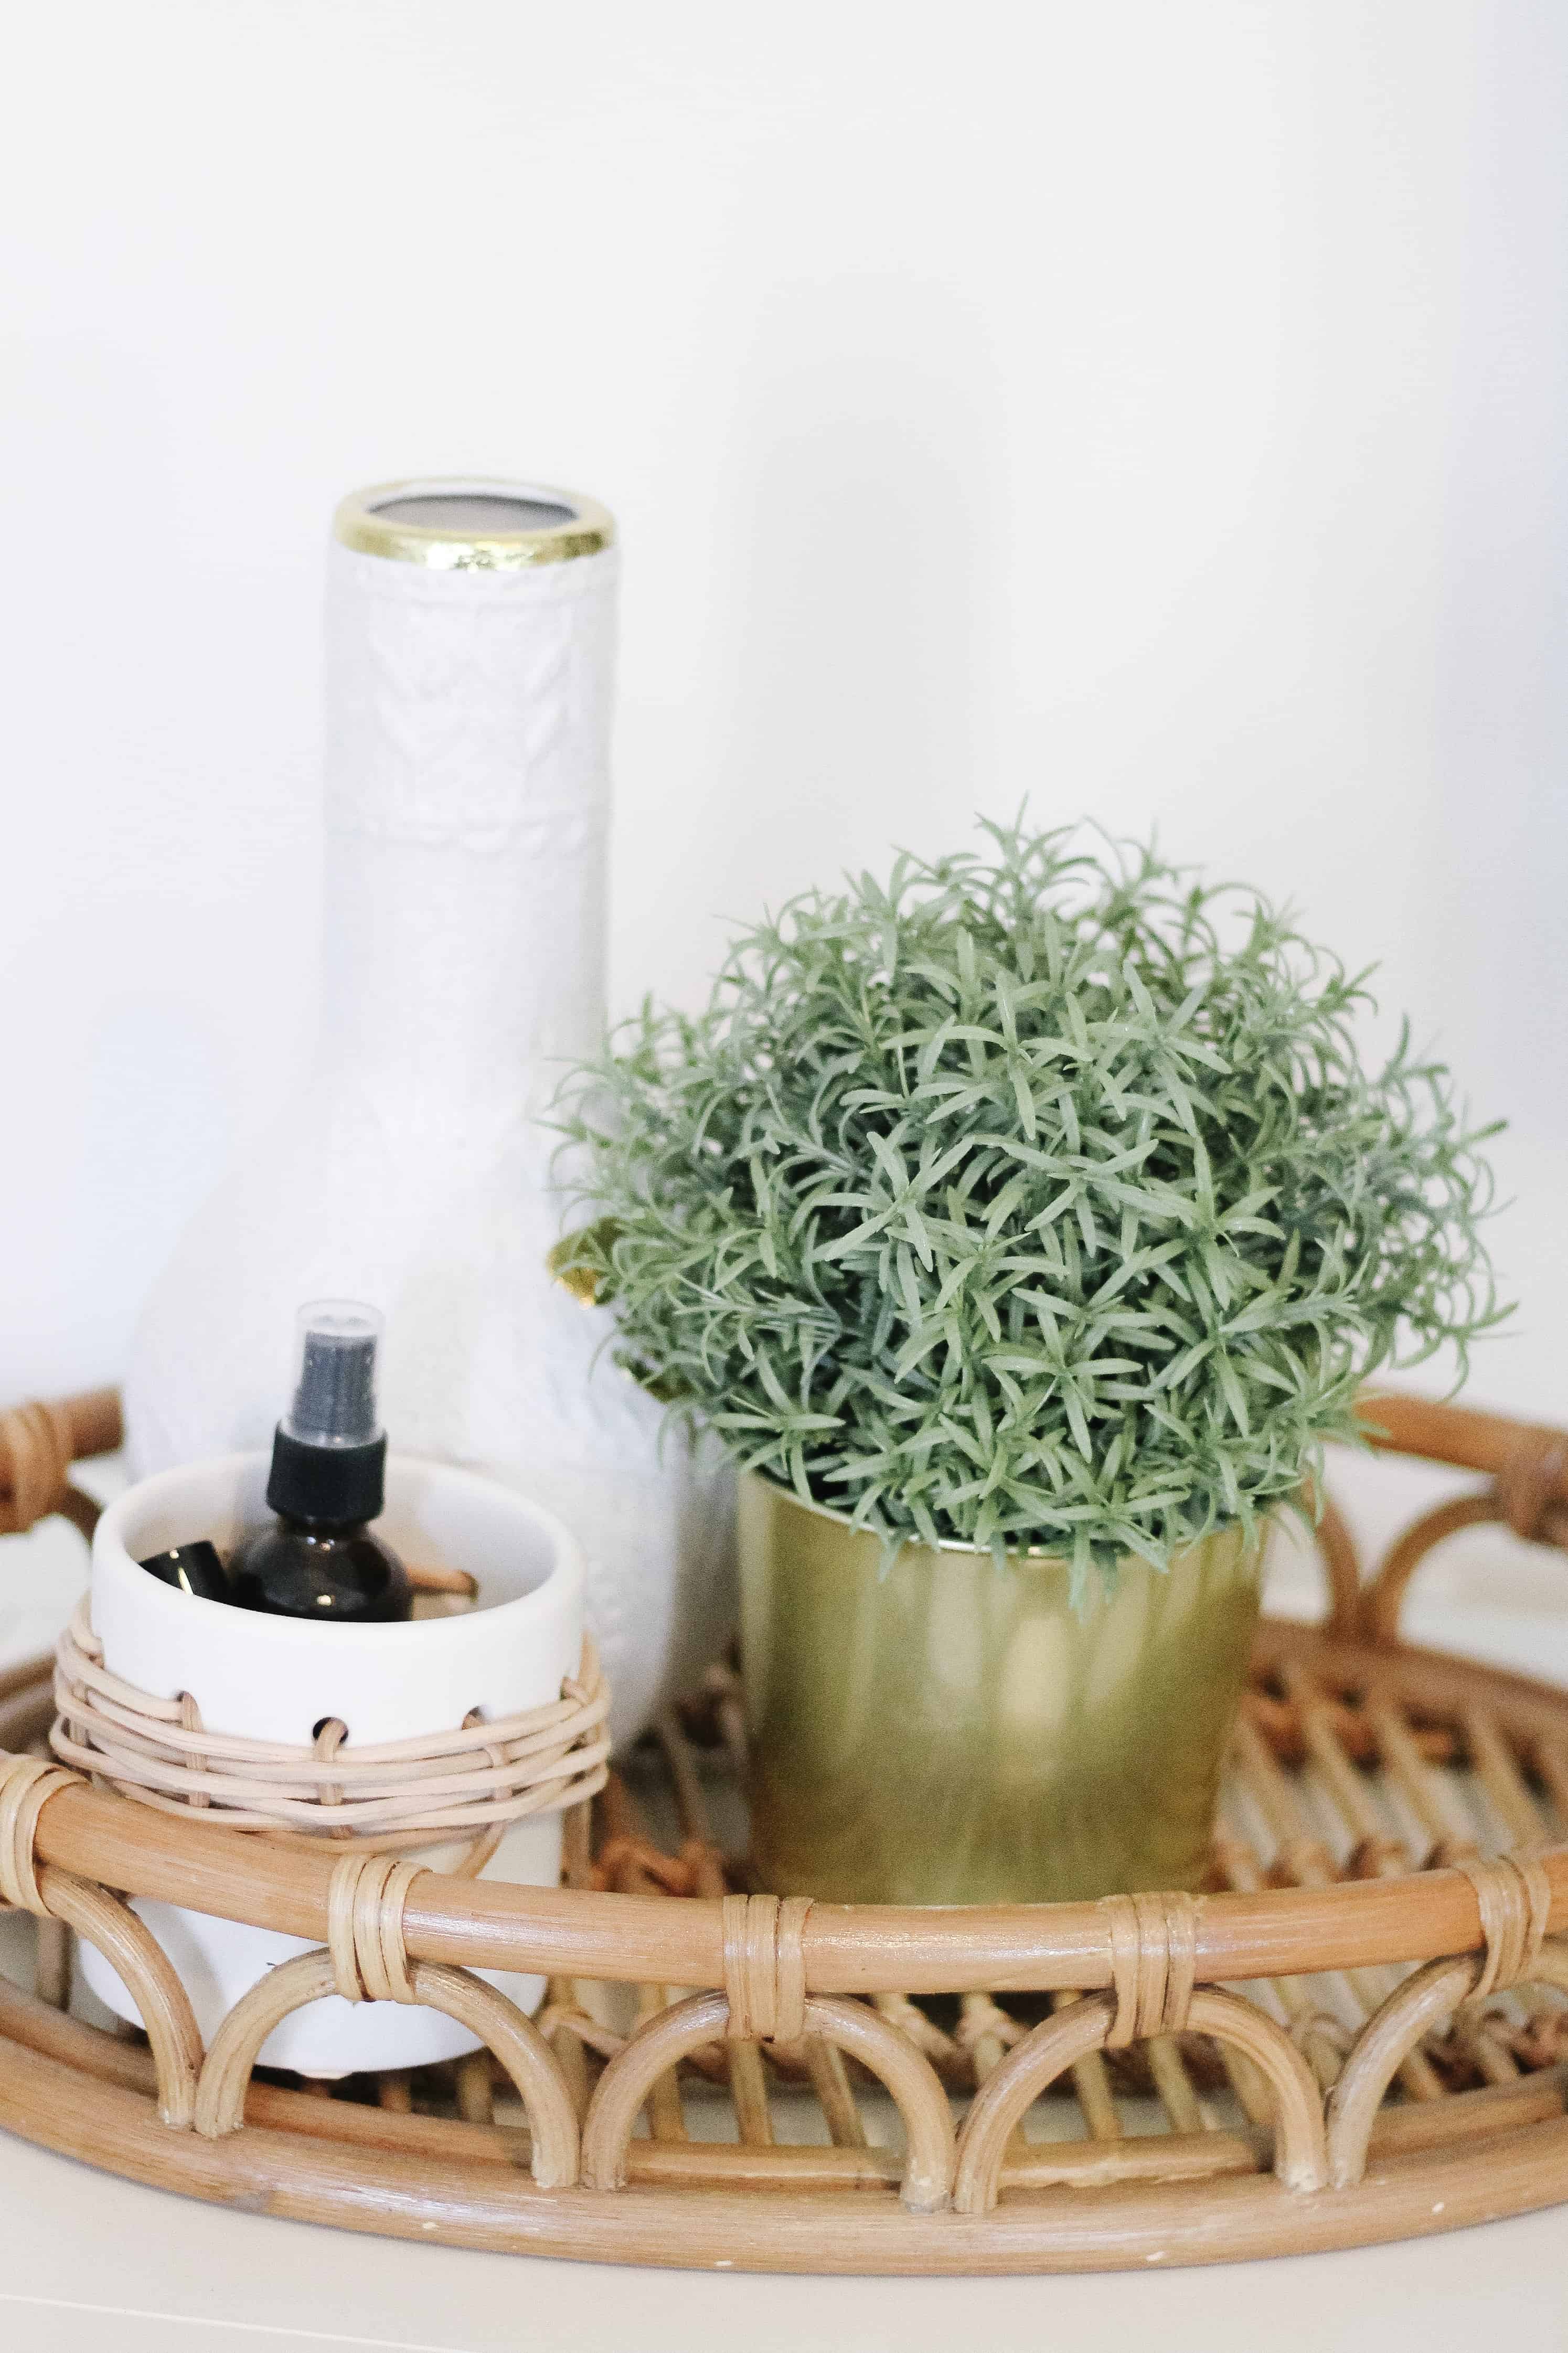
Baskets – I have a true obsession with baskets.
A clean car INSIDE – this is a huge part of keeping me calm. When I start feeling anxious I take my car to get it cleaned out, and it typically helps a LOT.
My MacBook – thanks to blogging I basically live on it.
PINK. anything pink. This includes any and all shades.
Madewell Jeans – Please God don’t let low rise jeans ever come back into style. Great mom jeans are basically life changing.
Grubhub, DoorDash and basically anything else that delivers. Sam and I love a good date night on the couch. LOVE.
Giveaway Fun
Now for the fun!!! Navy and I have teamed up – she did her own 26 favorites post, and each day in our stories on Instagram we will each be sharing a few of those favorites, and giving ONE prize to someone who comments on our post. The daily prizes will be stand alone, but the real fun comes on Friday, April 12th. One person will win a gift basket with all 10 prizes from us combined.
In order to win the big gift basket you will have to have commented on both of our blog posts at least once. But you will get extra entries for answering the question each day. So each person could get up to 10 entries!! We are so excited to share some of our favorite items with some of you, and help you all celebrate our birthdays with us!
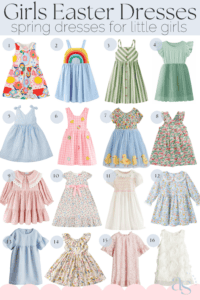
Easter is just around the corner and what’s better than shopping for a new Easter dress for yourself and your daughter?! I remember LOVING getting a new dress every Easter, so this has been a great part of the holiday for my Avé and Goldie. Today I rounded up Easter dresses for girls that you will love no matter your little ones age.
This post was written in 2019 and updated in 2025 – the post may contain affiliate links.
Easter Dresses for Girls
With two little girls – I love shopping for them, and dresses are especially fun. When I was writing this post I wanted to find ideas that were great for Easter day, but also all spring long, because I know I like my girls to get more use out of their dresses.
It’s also nice that my older daughter can hand down a lot of her clothes and dresses to my youngest daughter, Goldie. It brings back so many great memories when I see her wearing pieces that her big sister wore.
Most of the options in this post are affordable, and come in a pretty good range of sizes! And as an added bonus there are lots of options from Amazon that can be here last minute.
Remember, if the weather is still chilly, you can always pair any dress with a complimentary cardigan or light denim jacket. You could even layer a long sleeve shirt underneath and it would still look super cute! And don’t forget tights or knee high socks are always an option too.
Shopping for the Perfect Easter Dress for Little Girls
Below you will find links to all the dresses in this post! I also have several dresses linked on my Amazon store front, and will continue to share some great ideas on Instagram, so be sure to keep an eye out there!
Linen Dress – This dress would be so comfy and the flutter sleeves are so darling.
Fun modern floral print– I absolutely love this modern floral print. It could easily last well past Easter, into other seasons. Pair it with a denim jacket and boots for a fun Autumn look.
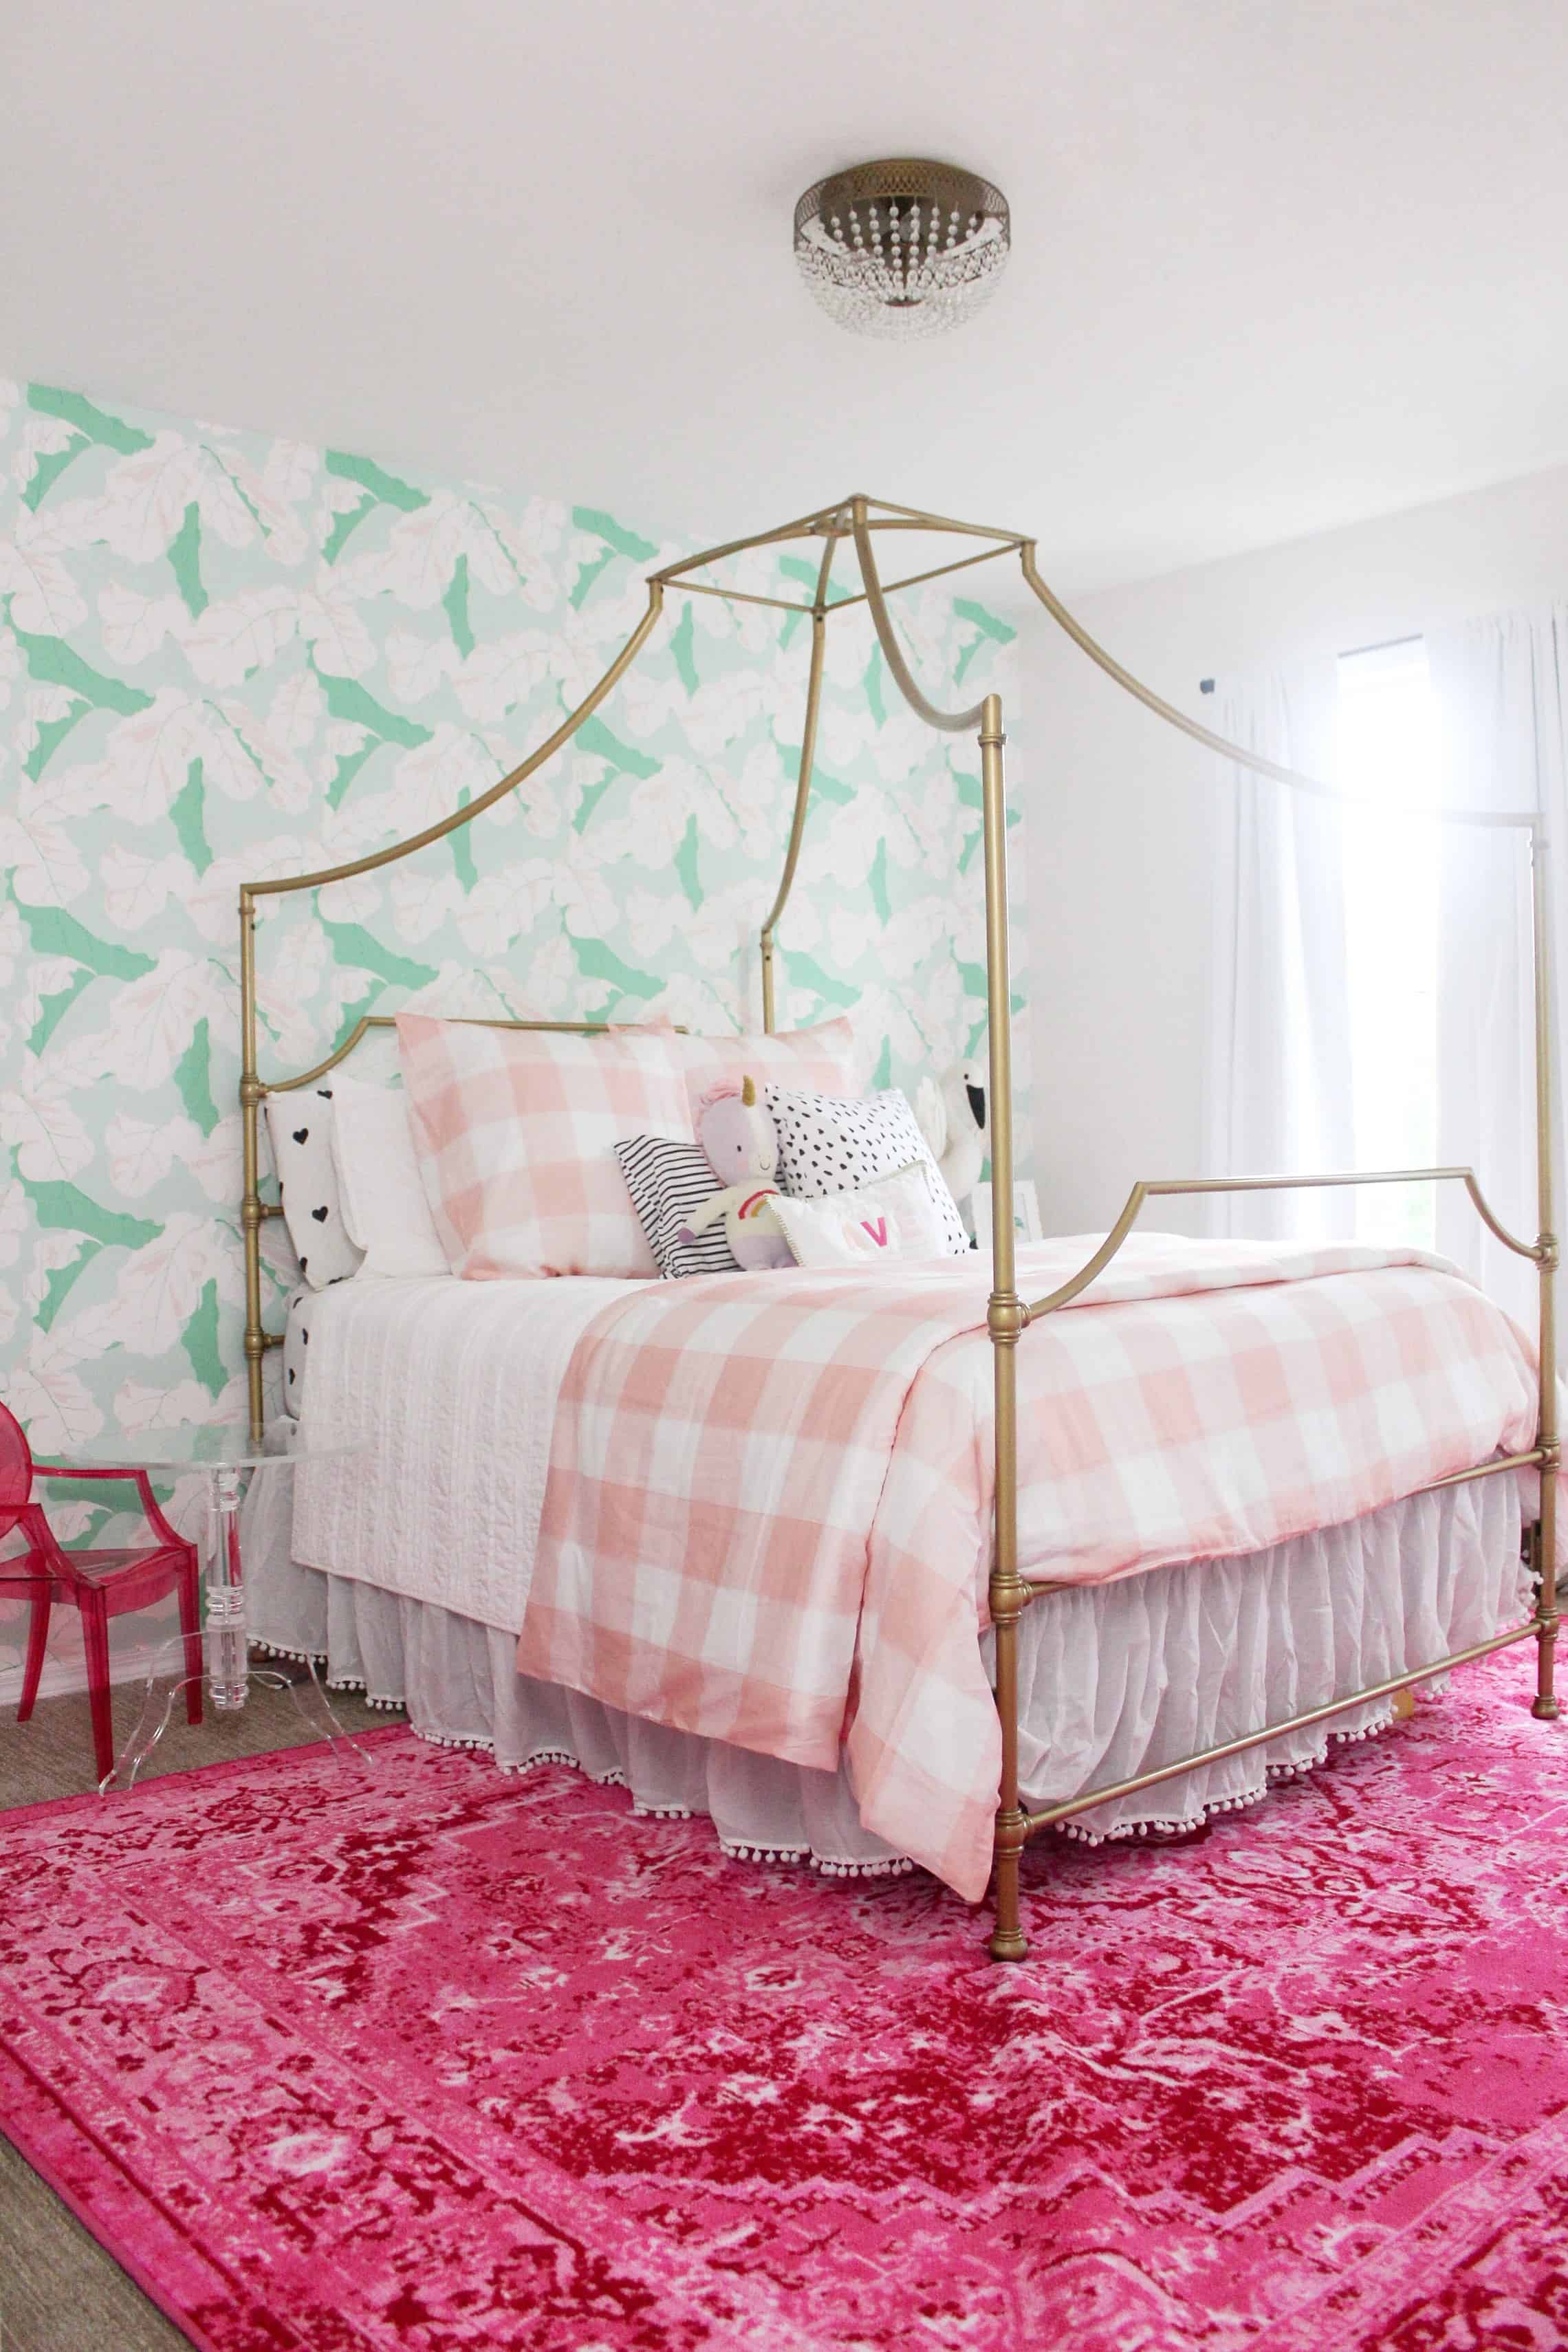
How many of you remember when I posted Avé’s room last fall, and I promised you tricks for hanging water activated Spoonflower wallpaper? It remains my favorite space in the house, and I only hope I can somehow make baby girls room half has fun and beautiful. When we were working on Avé’s room it was our first experience hanging wallpaper, and to be completely honest it was completely overwhelming at first. Wallpaper is a huge investment and the last thing you want to do is mess up the first roll. I am going to give you a step by step on this post on how we hung out wallpaper. Spoonflower does have an AMAZING tutorial I will link to, so check that out also, but I hope this serves as a place for you to ask questions if needed!
This post is purely based on my own opinion. Post contains affiliate links.
Tricks for Hanging Water Activated Spoonflower Wallpaper
Alright so lets start with the biggest thing. THIS IS A TWO PERSON JOB. You aren’t going to be able to do this well alone, and its best done in one sitting. (at least for one wall). The wallpaper starts to dry which can barely shift it, which is the reason for the single sitting being so important. I wouldn’t say this was a huge time commitment for us, block out a couple of hours and you will be fine!
When you set out to hang the wallpaper have all your tools and gear ready, and move all furniture away from the wall with enough distance for you to work and bend in front of the wall. Having things set up, and giving each person a job to be organized will make this go so much smoother.
Tools Needed For Hanging Water Activated Spoonflower Wallaper
a long tarp, towels, or a table surface as long as your wall is tall.
First things first make sure your wall is CLEAN and DRY. I took a wet cloth and just gently wiped down the whole wall to remove dust.
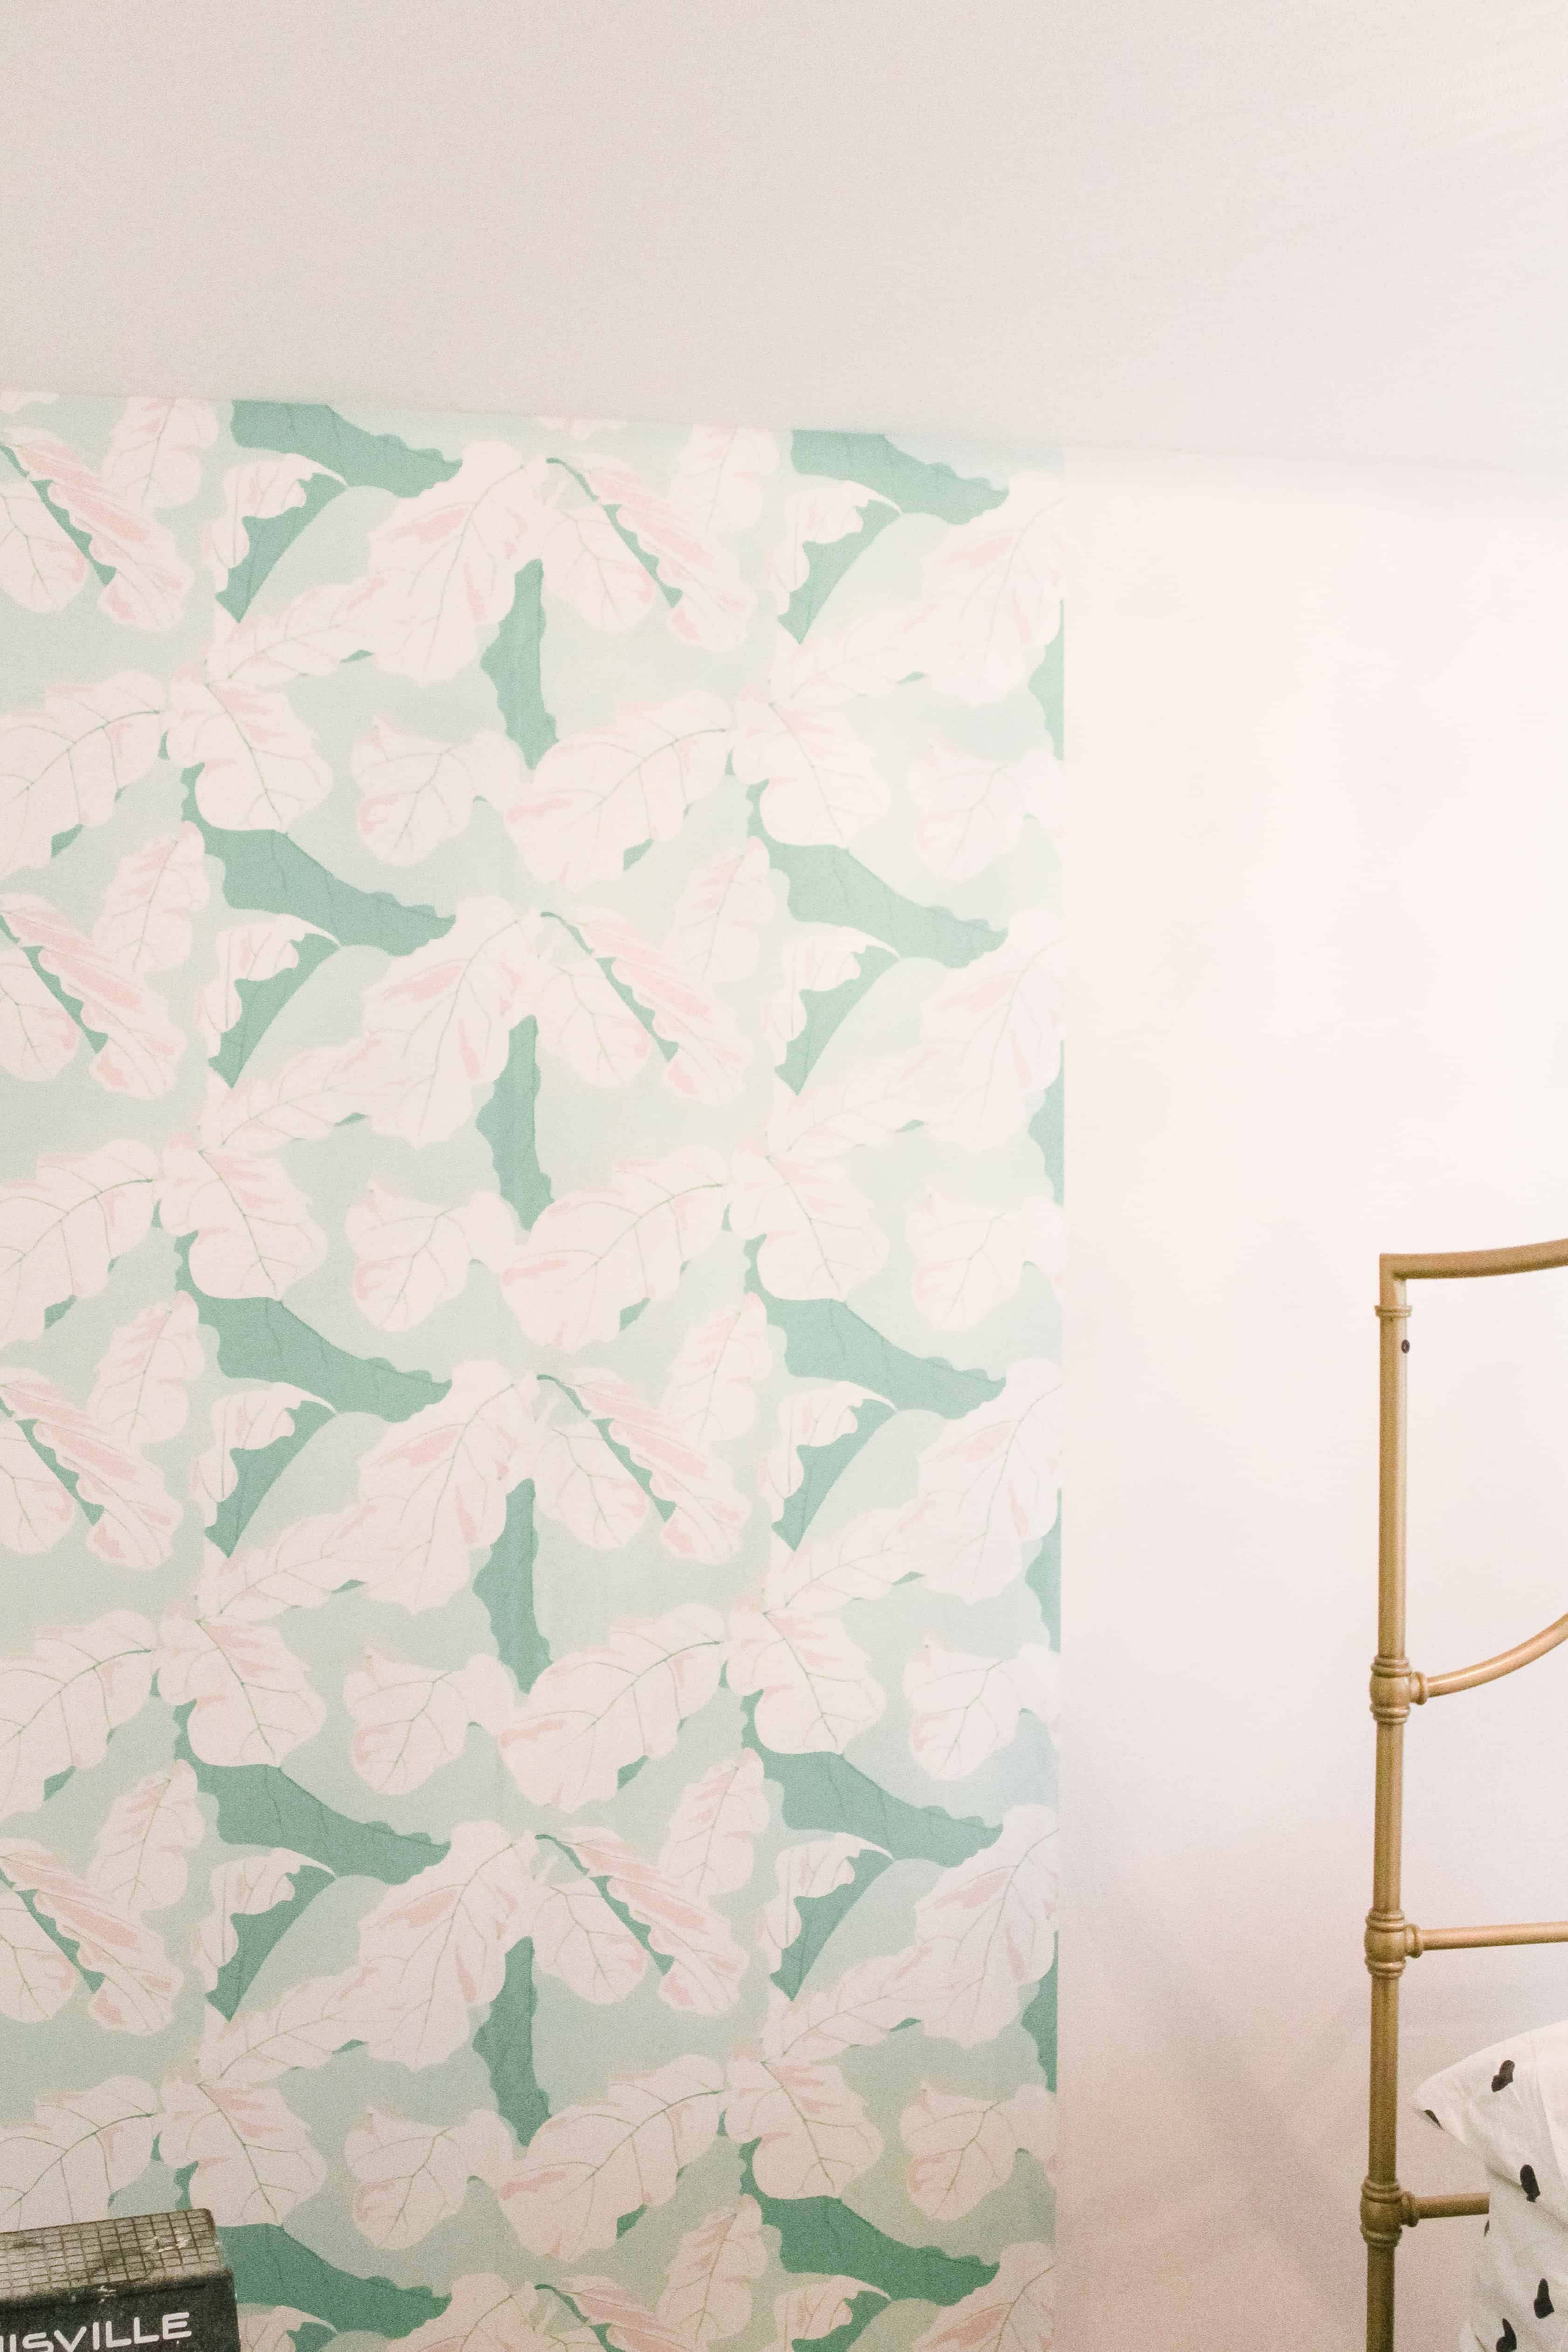
Next, Follow Spoonflowers protocol (or if you’re reading this and hanging another brand follow their brand to know where to start as far as with strips and top and bottom. For me the pattern I was doing was fully repeating so I was able to start my wallpaper with any piece, and start in one corner of the room.
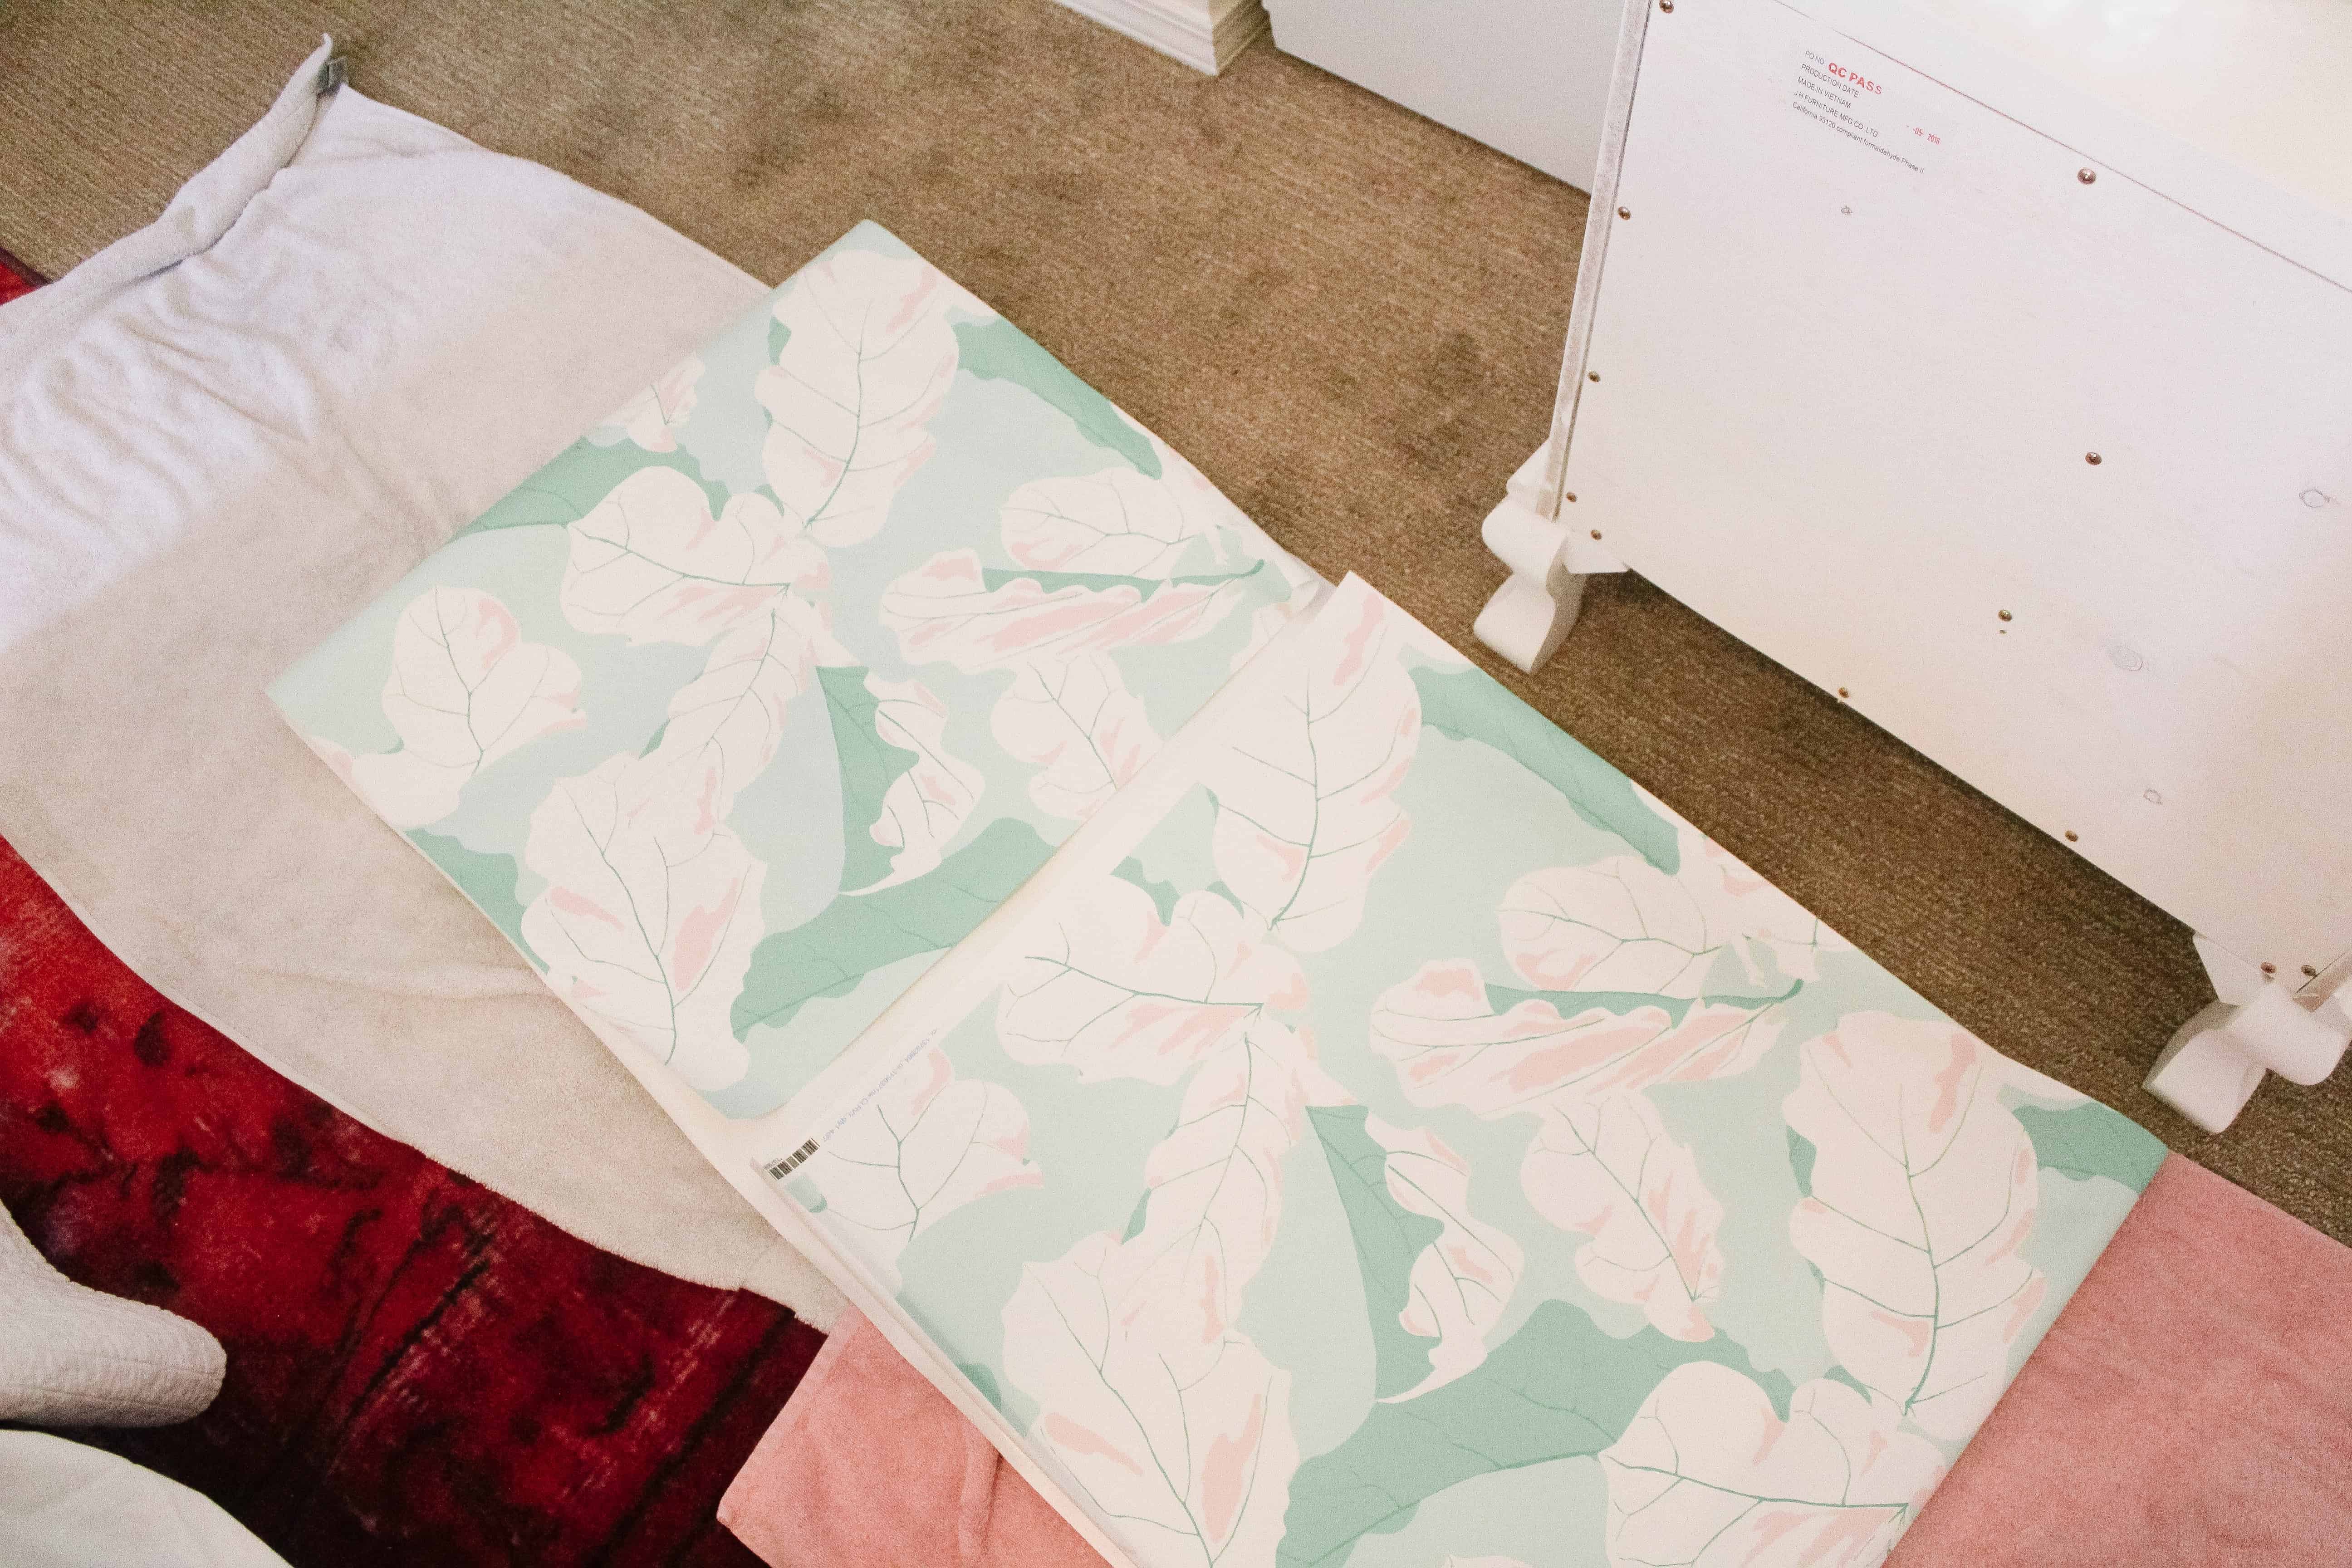
You will first lay your first piece of wallpaper out on whatever surface you have chosen. This surface needs to be something you can wash or throw away because it will get glue on it. For us we lined the hallway upstairs with beach towels. I laid out the first strip out on the towel, then while my husband was holding the piece on one end I used a paint roller to roll it WELL with water. One thing we learned after the first piece was that it is important that the edges are sufficiently wet, so we ended up doing that with a sponge.
You will then fold (but not crease) and gently lay the wallpaper kind of folded in on itself. (see image here). Let that sit for roughly 5 minutes.
Now you’re ready to hang. Pick up the wallpaper still folded as it was, and gently unfold one half of the paper lining up to ceiling on the top. I was lucky and able line up to the corner as well, but that is not as important. Keep things perfectly vertical and if you need to trim the corner later you can. Once you have the top positioned this is when I started to differ from the Spoonflower site on how I felt it was easiest to hang the paper.
In order to really cut down on the bubbles I used a BARELY damp sponge and as I was slowly pushing it down and positioning the wallpaper moving down the wall I used the sponge over the top. I don’t know why this seemed to help, but for me it did. I am not a professional so do this tactic at your own risk.
The first strip will take you the longest and be the most tedious. once you have that one mastered, overlap the rows just like it says on the Spoonflower site. Line them up as best you can, and repeat. I didn’t ever find a need for painters tape, but I do know some people find that helpful for holding the top as you go. Repeat until the end.
Once I was done with all my rows I allowed the wallpaper to fully dry before I trimmed the corner and trim at the bottom. I found if I used a flat edge like a metal putty knife or metal ruler, and ran the utility knife under it along the corner or trim it made it much easier not to go rogue with the knife!
Take Aways
I wish I had realized that the wallpaper is more forgiving than I thought it would be when it dried. It didn’t end up having any areas that I didn’t love. I was so stressed about bubbles and lining it up and I just couldn’t get it perfect in a few spots, and as far as I can tell the bubbles all dried out, and the lining up didn’t end up mattering.
Overall we LOVE the way Avé’s room looks, and we are definitely looking at doing wallpaper again for baby girl. I am definitely glad I already know these tricks for hanging water activated Spoonflower wallpaper if we head down that road again, so I can do it with a bit less fear next Time haha!
As I stated in the first paragraph, half of my point to this blog post was to give you a place to ask questions if you’re setting out to do this the first time. So if you have questions please feel free to leave a comment and I will respond as quickly as possible.
Who is ready for all the tricks for surviving Disney World with toddlers that I promised you last week on Instagram? Like I said last week, we do not do long trips at Disney yet, but we do try to go a couple times a year for one day, and I feel like that has been the easiest way for me to learn new things to make it easier.
I will touch on a few non product things to keep in mind, as well as give you my round up of things I always take with us when we head to Disney World. I have this post that I created after our first trip there, and I still stand behind so much of it, but wanted to update you all with more items now that we have been several times!
This post contains affiliate links – all opinions on items and tricks for surviving Disney World are my own
First Lets Talk Tricks for Surviving Disney World
Alright, before I get to the money spending (because trust me you will start spending Money way before you get to the park when it comes to Disney!! – that mouse makes all the money haha).
Download this Disney App – this will be your life saver. You can see when your fast passes are, but also trade them on this app. For us many times we don’t even start the day with fast passes but we grab a couple as the day goes on! It also shows the wait times for any rides. PRIORITIZE the rides/attractions you need to do. Pending the number of days there, and the ages of your kids you may not do it all. For us seeing ____ princess is always top of the list for Avé. When we see the line is short -ish for that princess we run over. The boys always go see Buzz Lightyear, or something else while we do this.
If you have a princess lover, Check out the Enchanted Tales with Belle. It’s a bit more fun than the typical princess meet and greets!
Head to lunch early if you don’t have a reservation. We typically go to a cafeteria style place, and since my kids are fine with eating at 11, we head in at 10:50 so that by the time we eat its 11:15 or after and it always gets so much busier as we are there.
Have a stroller or seat option for kids much older than you would at home. My older two would never need to sit in a stroller at home, but having the double stroller where Avé can ride with the rider board for Jack is a must for a long day.
Get there right on time. Being on the first Ferry ride over is the best. The park is the most empty first thing in the morning so you can get on a ride or two with much less long ride.
This one is personal preference: we like to pay extra for the more expensive parking. If you are totally worn out by the end of the day it is SO nice getting to your car faster. By then everyone is wiped out. They also hand out free waters which is great.
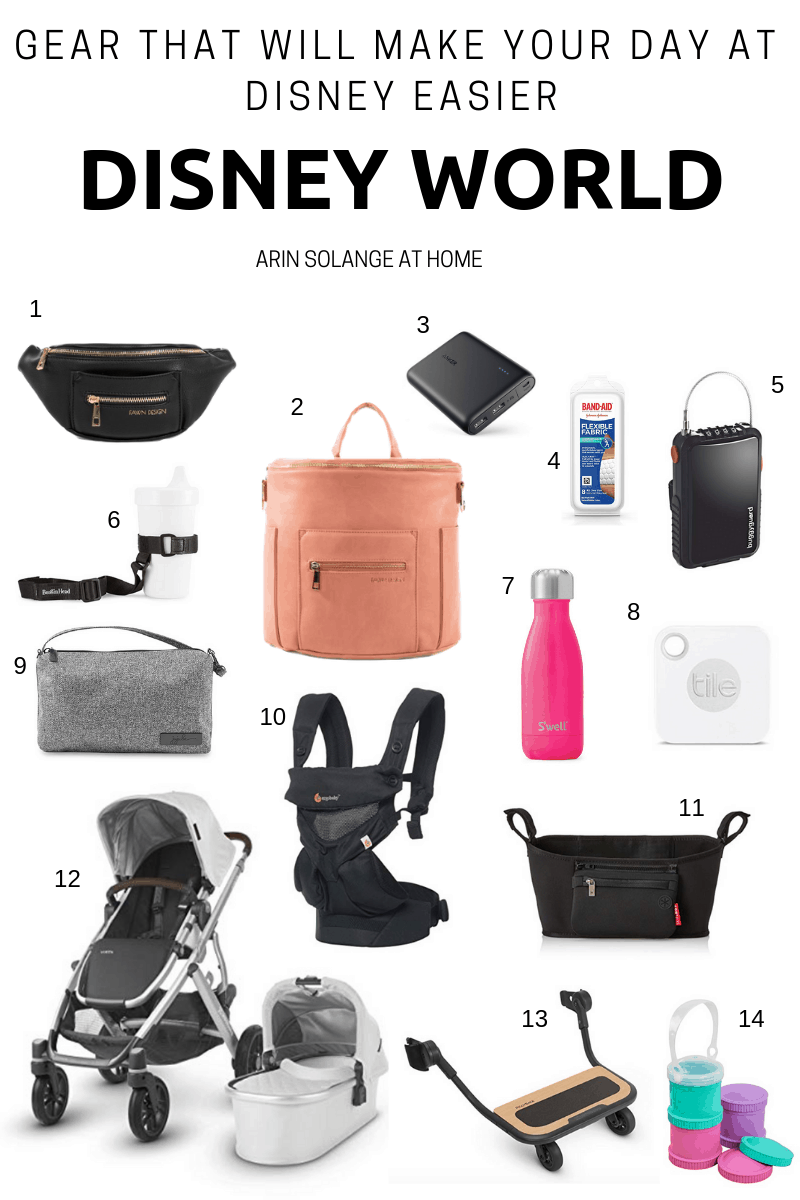
A fanny pack – Lucky for us these are back in and I feel like we all might as well jump on the convenient little bandwagon until its nerdy to use them again! These from Fawn Design are SO cute!
The fawn Design mini – I used mine on our last trip and it was great. I put lots of our loose items (IE snacks, waters, and the diaper clutch from number 9), in the bottom of the stroller. (If they were stollen I wouldn’t care.) I then was able to carry onto rides this smaller backpack diaper bag with just what I cared about.
External Charger – the last thing you want is for your phone to die at Disney World. I love this one, and I also purchased a pack of these short charging cables to go with it. I keep two in the little pouch with the battery so Sam and I can both charge our phone if needed.
Stroller lock – I love taking this with me so that I don’t have to worry about our stroller getting stolen. I have heard that they will cut these if they need to move your stroller but so far I have had no issues.
Drink Strap – this is a lifesaver for kids who throw things out of strollers a lot.
Water bottle – I love these small Swell bottles for both myself and the kids!
Tile Finder – THIS was a game changer for us this time. I used a zip tie and added this to a hidden spot on our stroller. I felt so much better leaving it for long lines at rides because I knew if someone stole, or accidentally walked off with our stroller I would be able to track it!
Diaper clutch – I think this is a game changer all the time but for Disney its needed.
Baby Carrier – If you have a child that can’t stand it line for a long time, this is NEEDED when you’re there all day.
Stroller – we have this stroller with the second seat and its amazing. The basket is huge, and my oldest LOVES the rider board from number 13. I Love that for a trip like this we can leave the second seat at home or in the hotel for non Disney days.
Piggyback Board – I am obsessed with this. If there was ever a stroller accessory to buy, make it this one!!
Snack stackers. – I talk about these a lot, but they are great for bringing snacks for long days. They eliminate trash or having them get crushed in the bottom of the stroller.
For other Disney clothing round ups check out the posts below. Be sure to leave any questions or additional tips or tricks for surviving Disney World that you have in the comments below!
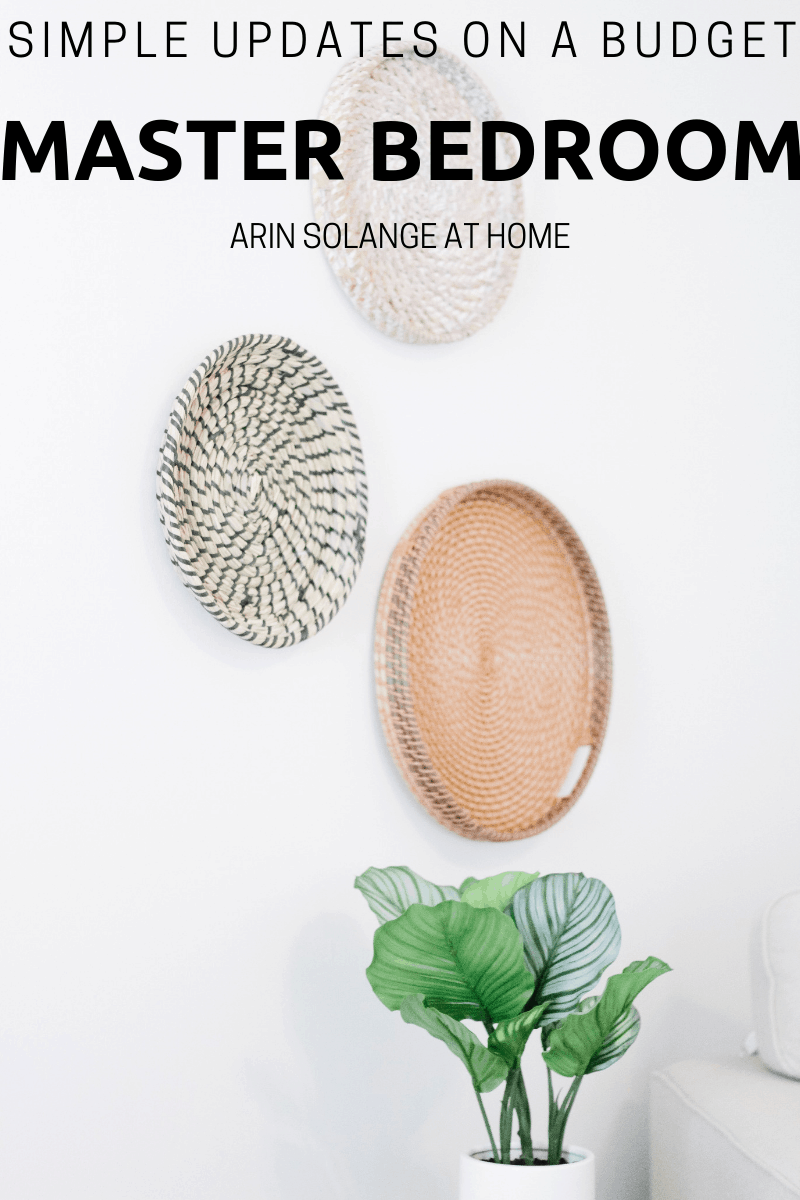
This weekend I was on a mission to make some simple changes to my master bedroom before we really start diving in on the kids rooms to prepare for baby girl. Our master bedroom is always the last room in the house to get love, but I really wanted it decorated before the baby comes. Because of all the other updates that we are doing to the house, I was determined to make the room happen on a budget and with minimal effort, and I LOVE how it turned out. Check out the tips below for ways to make simple master bedroom updates in one weekend!!
This post contains affiliate links and all Joss and Main products were graciously gifted in exchange for this post. All thoughts and opinions are my own. Read more here.
Simple Master Bedroom Updates Tip 1: Update your Bedding
This is probably the most obvious choice, but doesn’t have to be super expensive. For this update, I decided to get a comforter set, throw pillow, and blanket (all three items are sponsored!) for the end of the bed. I love keeping my bedding neutral so I can add new pops when it comes to accents from time to time, but it was time for a new comforter set this time around, and the throw blanket at the end is perfectly neutral, yet warms up the entire space.
My biggest tips for bedding are: go natural on the expensive items, and mix textures. Both of these simple master bedroom updates will keep things able to be updated from time to time without huge expense. I love shopping at Joss and Main for my bedding and throw pillows (amongst so many other things – check out all these kitchen favorites from Joss and main, and this cute hutch in my dining room from there). They offer such high quality items, that are unique but on a great budget.
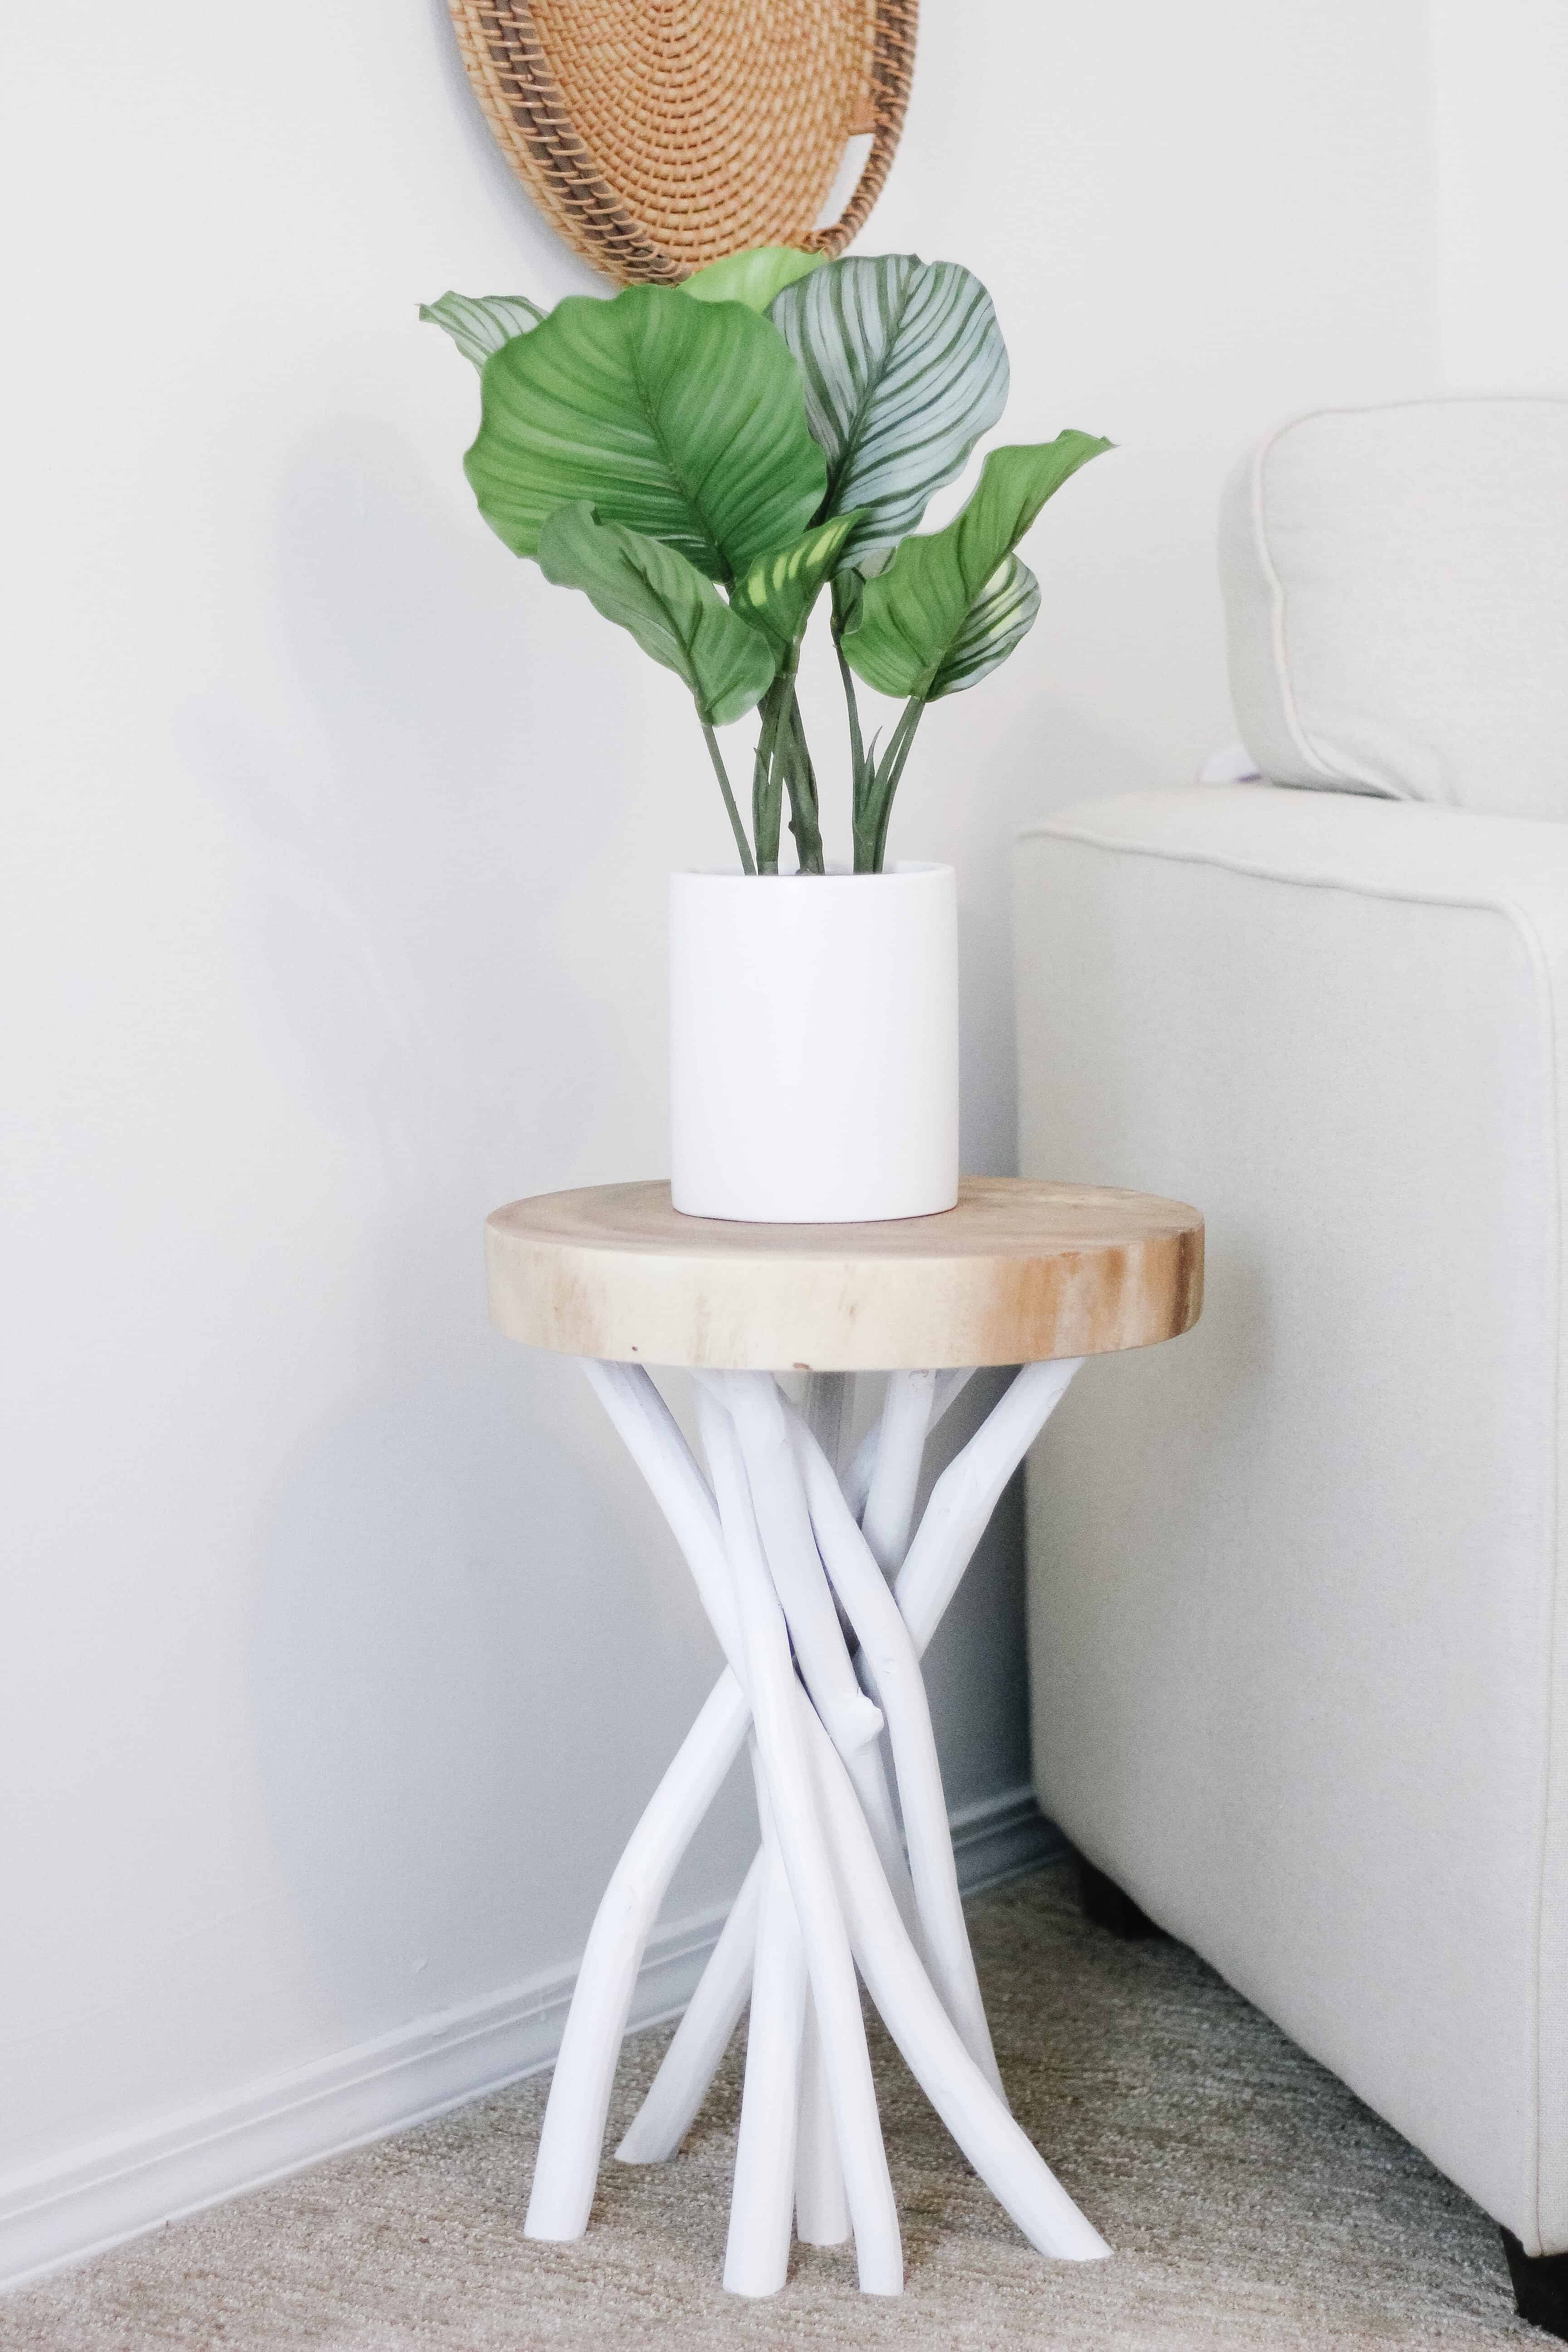
Tip 2: Add Greens
Greenery is the easiest way to decorate and know it will always “go” with the space. I love adding real or fake greenery all over my house. This time around I went with some great fake greens, because I know with a new baby coming and three other kids, I will never remember to water a real plant. There is a great selection at so many stores right now, so its an easy to find update as well! (my personal favorite for super inexpensive greenery is IKEA)
Tip 3: Small Touches Make a big Impact
One thing I think people think is that it takes big changes to make a big impact, but the truth is that sometimes the smallest changes make the biggest impacts. For us those changes included changing out the drawer knobs on all of our dressers and nightstands. Our furniture is very coastal for my current style, but for the time being I don’t want to invest in new, so simply changing out the original wood knobs that were on the dresser in the same finish as the dresser its self, for a modern metal version made a huge impact!
Another change we made that was at minimal cost was hanging out tv. Instead of having the TV sit on the dresser, Sam mounted it and it made that side of the room look so much more put together. I know decorating over a dresser with a TV isn’t necessarily the best look, but hanging it makes it look more put together than sitting on the dresser.
Tip 4: Shop Your House
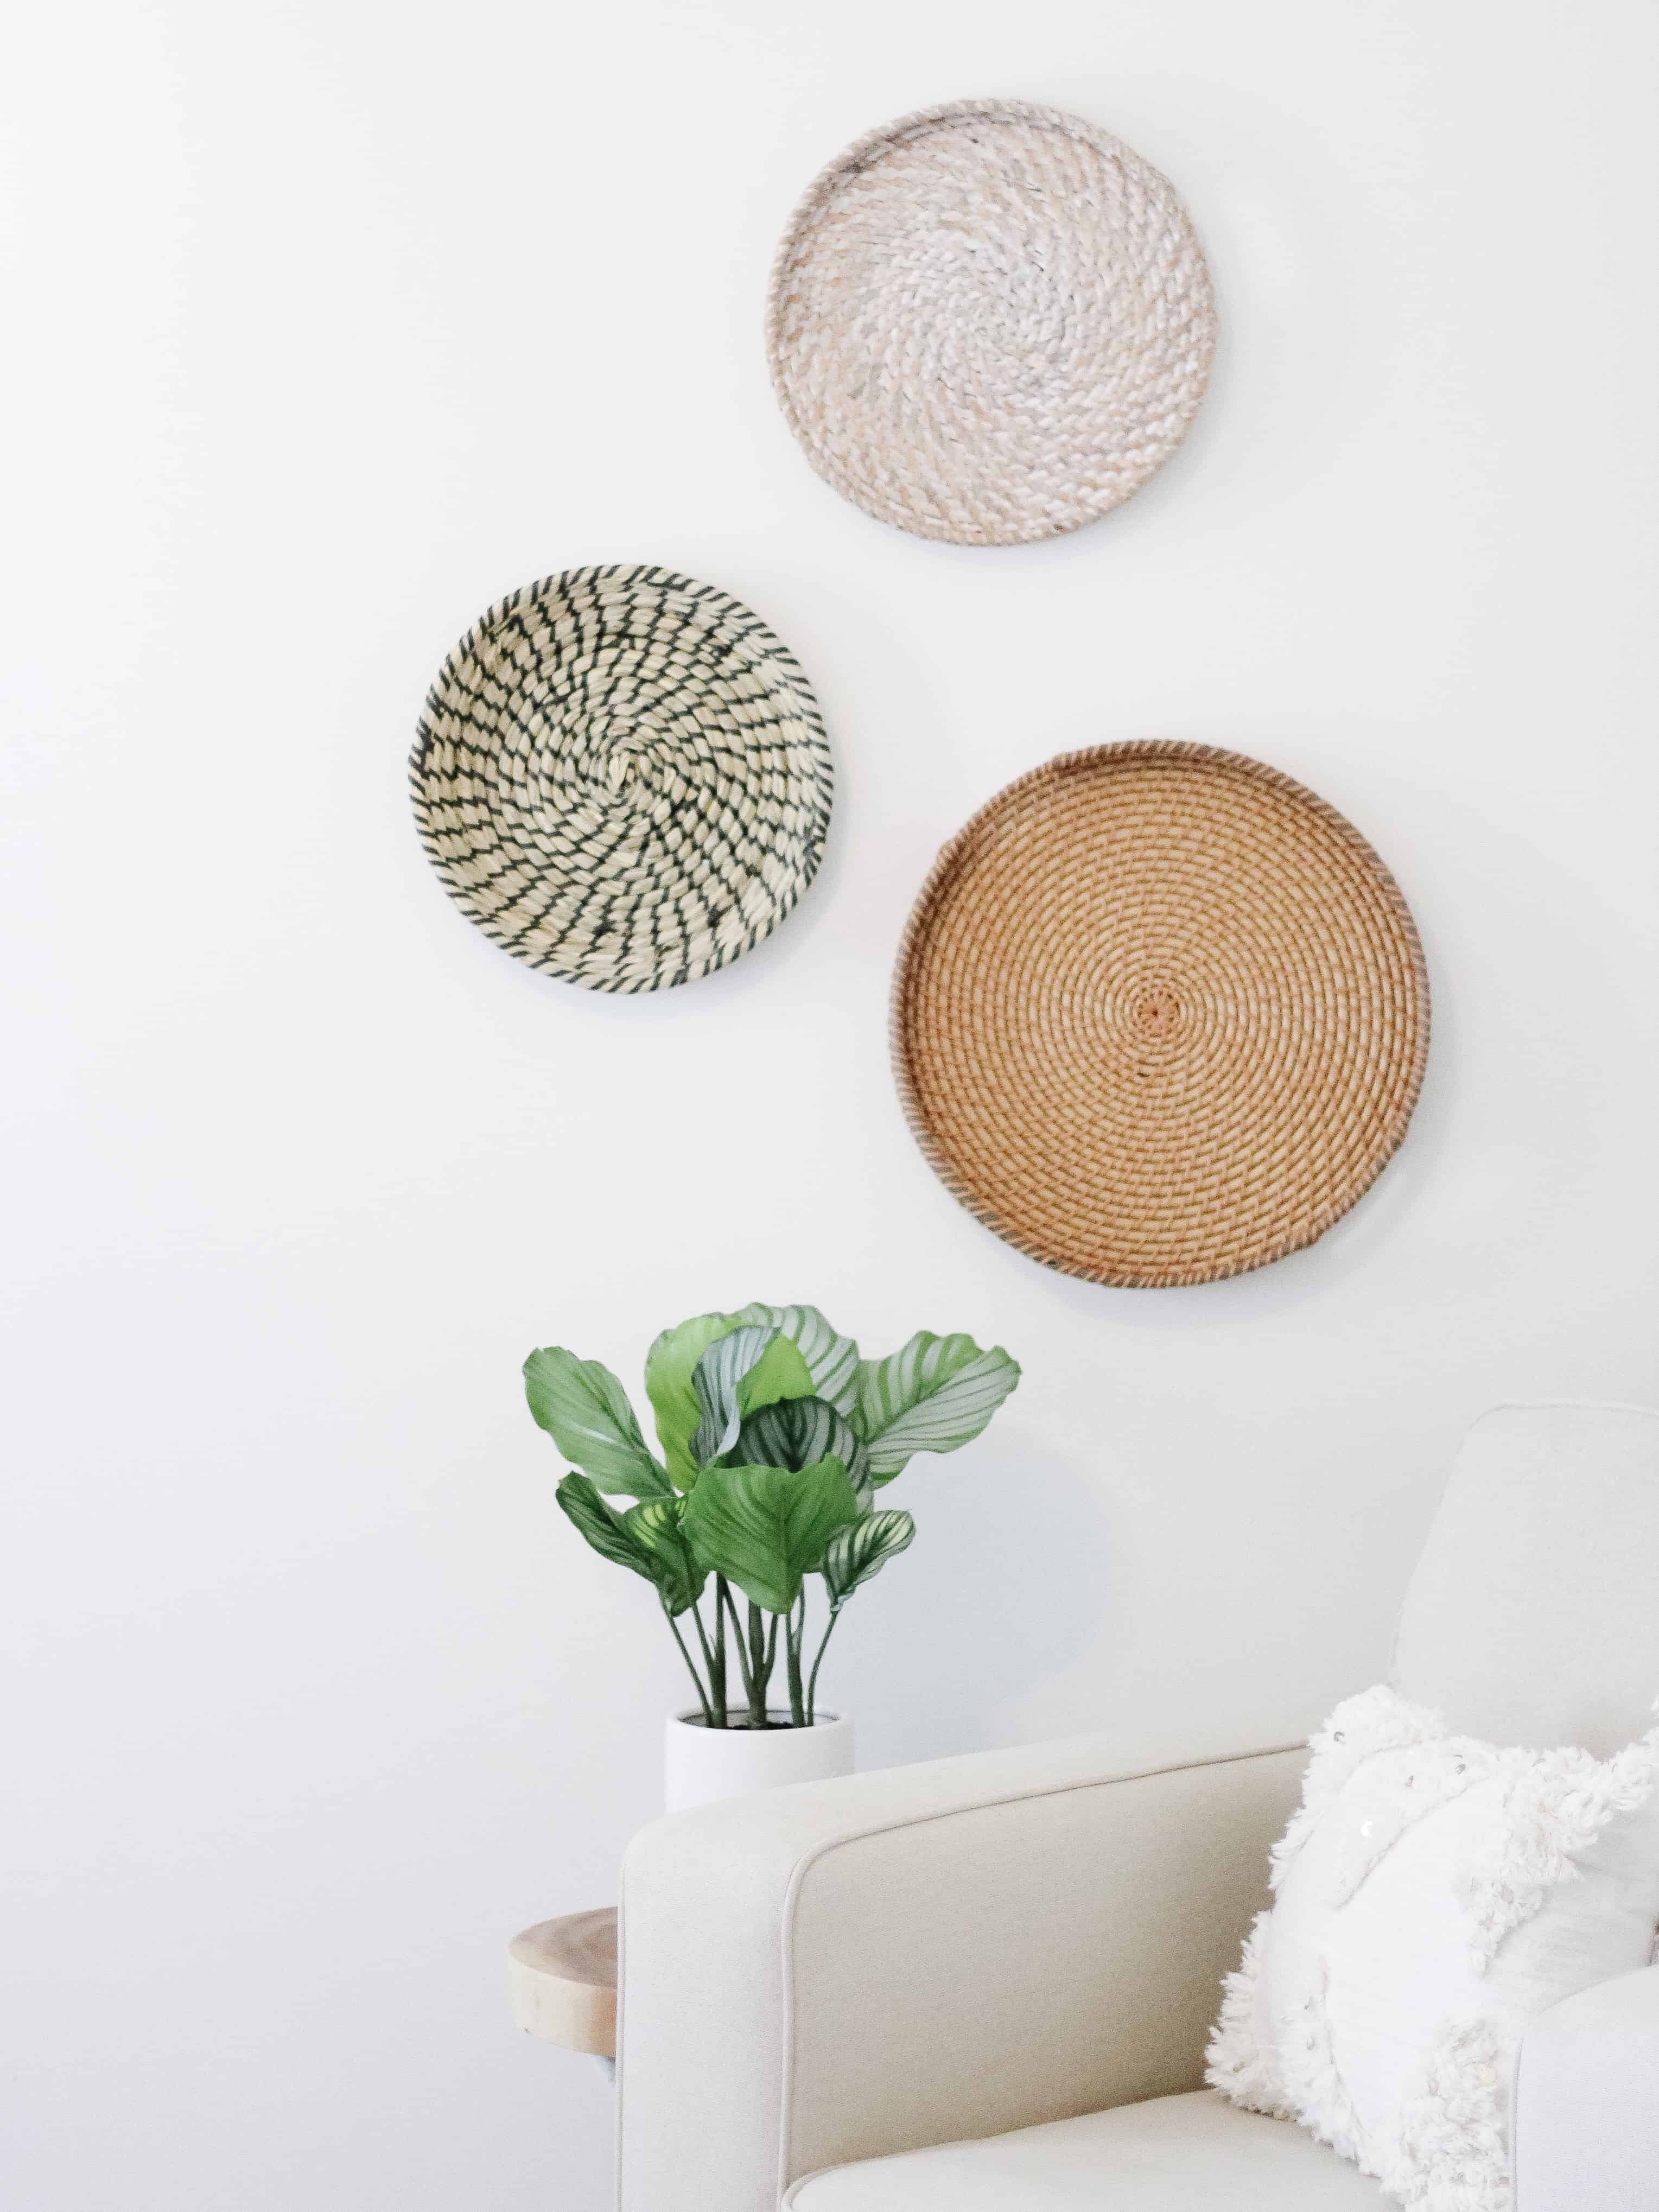
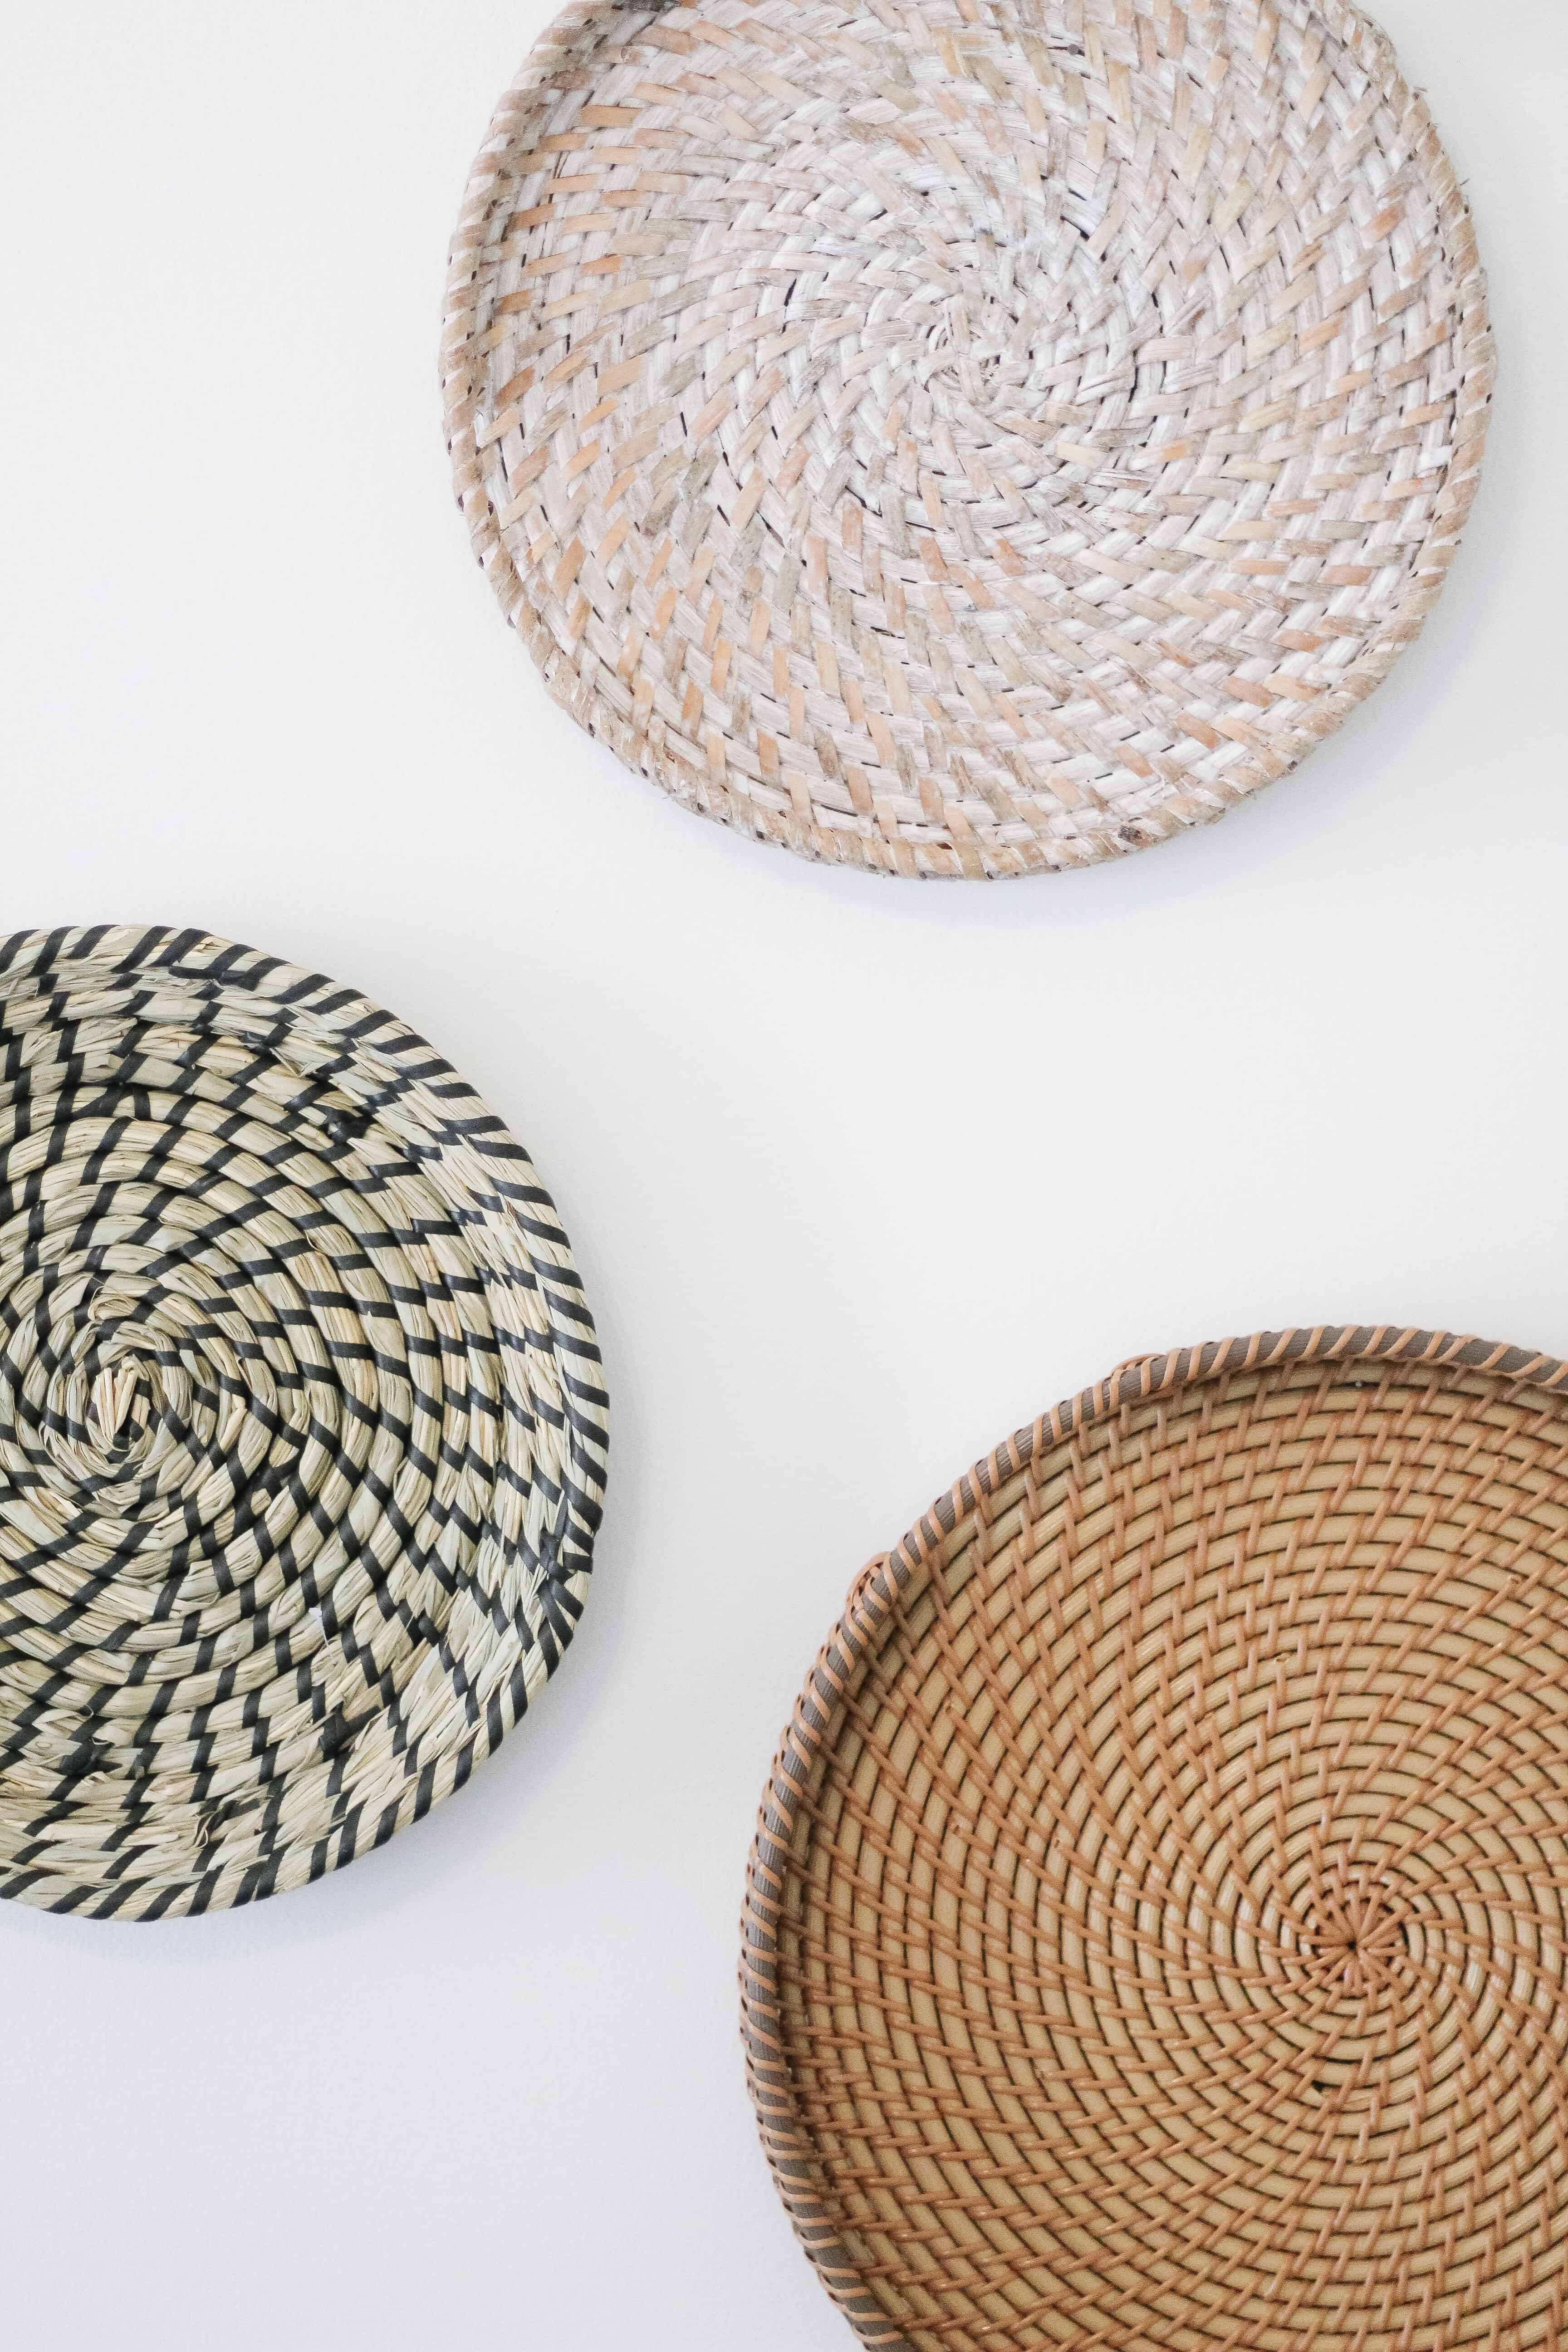
I had to buy a few small accents, but I also was able to shop my house for so many of the fun accents in the room. It’s so easy to move things around your house to make your house feel like home. I had one of the wicker trays that are hanging by the chair, so I decided to buy two more to match and hang on the wall. It turned out great, and it made such a fun change for such a good price.
We also decided to take the lamp from Jacks bedroom. He will be moving in with Walker soon, so I know it won’t work in that room, so it was a fun way to change up our nightstands and not spend any money. I wasn’t able to find the same one for my nightstand, so instead I went with a totally different style for my nightstand and I LOVE it.
Overall, I love how these simple master bedroom updates made our room look more complete, and I feel like I can check that off the list before our sweet girl arrives. I didn’t spend a fortune, but I made it a fun oasis for Sam and I to dip away to when we need to be away from the kids, and I made it a fun place to be during those long nights!
Is the sneak peek gender test accurate? Incase you missed it on Instagram, I announced that we are expecting another SWEET BABY GIRL!!! I posted all about the symptoms and old wives tales on this post, so if you’re curious on that be sure to check out that post too.
One thing I will fully admit about myself is that I am NOT patient. Like not at all. So this time around when I found out I was pregnant I decided I would try out the Sneak Peek Gender Predictor Test.
I had a strong feeling on the gender and wanted it confirmed earlier. So are you wondering, is the Sneak Peek Gender test accurate? Read on to read my opinion.
This test was not sponsored by Sneak Peek. I purchased it on my own, and did the test for my own research and fun, to see if the Sneak Peek Test was accurate. This post contains affiliate links.
Sneak Peek Test Review
A Video Sharing my Experience with Comments from Others who have also Taken the Test
I have updated this blog post to contain a video with some of the comments from both readers and friends and their experiences.
I want to make it clear, I am not anti this test, I am just sharing my experience and the experiences of people (both positive and negative) that have reached out to me who have also taken this test!
My Experience with the Sneak Peek Test
Before I share my results from the Sneak Peek test I want to share why I felt so comfortable and confident doing this test, when I had never done something like this in previous pregnancies.
When I found out I was pregnant it took me only a couple of weeks to be 99% sure we were having a girl. I was confident.
This was my 4th pregnancy and so far I had 2 boys and one girl, going Boy, Girl, Boy. I had experienced how my body handled both boy and girl pregnancies, and in my opinion felt as though my body felt different with the two genders.
I pretty much knew the gender 100% with Walker and this time around, due to CRAZY similar pregnancies, and a gut feeling. Reading the reviews for Sneak Peek test it seemed as tho ‘false results’ were only if it said ‘boy’.
I was fairly confident in my abilities to take the test, and was so sure it was a girl, so I figured I was good to go, and my hunch would be validated earlier. I know not every mom with multiple kids has this same experience with similar symptoms and such, but for me it had held true with my other three.
I should also add – people always ask if I guess well for other pregnant women, and hilariously I DO NOT. I actually am the worst at guessing other peoples gender of their baby.
My Symptoms
With Jack and Walker I was slightly sick. Not horrible, but really nauseous and tired for the first trimester. By about 7 weeks it had set in and I felt pretty darn crappy for a while.
I remember when I hit 8 weeks with Avé and I didn’t feel sick, I started getting some pretty strong feelings I might be carrying a different gender. (Avé is my second.)
With Avé and with this baby I got REALLY SICK. Like I am talking food poisoning sick, and in the midst of it realized I missed my period and took a test to find out I was pregnant. That might be a coincidence, but either way happened both times.
I wouldn’t say any other symptoms were the same super early on, but as the pregnancies progressed those similarities did continue.
About the Test
Incase you aren’t familiar with the test, let me first walk you through how the test works.
You order a test online. You can get it through their website or even grab it on Amazon, so it is really easy to get. You get the kit in the mail, and you prick one of your fingers to fill a small vile with blood.
The blood sample is then sent off to be tested to see if they detect any Y chromosomes. Basically because as females we only naturally have XX chromosomes present in our system, the presence of Y chromosomes would show that we are carrying a boy.
If the Y is detected then it is deemed you are having a boy. If no Y is detected it says you are having a girl. Overall – the premise of the test is wild. It is so crazy that a body shows the Y chromosome so soon.
Contamination Risks
Due to this process, it is VERY important to do the test alone and without your husbands help. You don’t want any male DNA to get into the test from someone else.
I know some people have a friend who is female help them, because it is tricky to do with one person, but do not let your husband or partner help!
You also need to thoroughly clean yourself and the area you’re taking the test as to not get any male dander in the test tube. This is as important for taking the Sneak Peek Test as the absence of men during the process!
I am a mom of 2 little boys and am married to a man, so I knew the process of getting rid of Male DNA would be trickier than others, but went into the test with great confidence in my abilities to get the area ready.
When can you Take the Sneak Peek Test?
I have been asked a few times when you can first take the sneak peek test. The answer is at 8 weeks or later in your pregnancy. I believe I was about 9 weeks pregnant when I took the test. You need to wait until that 8 week mark to assure the male DNA has time to be in your system.
Where do you Take The Sneak Peek Test?
The Sneak Peek Test can be done both at home or you can go to to many locations and get the blood drawn for you. From what I have heard the blood draw from locations has a higher rate of success due to no contamination, although I still don’t think based on reader comments that is 100%.
For the sake of this blog post I am talking about taking the test in my home, as that was what I chose to do.
How Accurate is the Sneak Peek Test?
Their website states that the test is 99.1% accurate – I can not confirm or deny that.
How long does it Take to get the Sneak peek Test Results?
There are 2 options based on what you buy. There is a 72 hour option and a 5-7 day result option. Either way they will come to your email.
My Experience Taking the Sneak Peek Test
I took the test on a day when all my kids were napping and my husband, Sam was at work. I cleaned the kitchen, and sprayed it down with lysol like it was my job. I keep a very clean house as it is, but I was very determined to find out what I was having early, so was thorough.
When it came to actually collecting the blood – IT IS NOT EASY. You will use a item they send to pick your finger and fill a vile to the line.
This sounds easy as can be, but let me tell you…getting enough blood out of your finger IS NOT EASY. I have talked to others who have since done the test who have said the same.
I was squeezing like no ones business and even had to use more than one finger. By the time I was done I truly had a bruised finger, but I am sure that isn’t everyones result. I kind of wonder if getting the blood would have been easier if I had gotten my hands really warm prior.
The instructions tell you to make sure you don’t get blood under your nails, which I also found to be impossible due to how you have to get the blood and the slow flow.
I had scrubbed under my nails really hard, but I feel like its worth noting that blood DID go under them. ( again from talking to others…they had that same issue ha).
The Results Are In – My Sneak Peek Test Results
Fast forward one week. The result were timely and I truly appreciated that. I mean after all…I had paid money just to appease my own impatience. The results were sent to Sam (because I knew I would just check my email 400 times a day), and he came upstairs on a Friday while the kids were napping, to tell me he had the results.
I was so excited to hear him tell us we were having another sweet girl, and he said IT’S A BOY. I literally burst into tears.
When we found out we were pregnant I was pretty impartial on what we would have. I would say I was 60/40 leaning towards wanting a girl.
But you guys, I LOVE my boys, so in no way did I think this would be my reaction. For the first time in 4 kids, my intuition was so rocked. With Walker and this baby I was so sure on gender, so it just felt wrong.
We had a doctors appointment 2 weeks later where I was already planning the doctor ordered blood panel. I decided to assume that the Sneak Peek might have been wrong, but to also assume 90% it was a boy.
We discussed boy names and such, but I in my heart was still so shocked. I just sort of blocked it out because I just didn’t think it was right.
Roughly 1 month after the original results came in from the Sneak Peak test, we received our panel from the doctor and were told we are having a GIRL. I again cried so hard. We had a name, and it just felt right. It was so great to know my intuition was right.
I had spent the month prior both sad, but mostly confused, and when I think back to it I am half happy I did it, because hearing “its a girl” was that much sweeter, but also regret it because I spent a month just so emotionally torn.
I think because my personality is needing to know things 100% it was probably not the best thing for me to take a test without those kind of results anyway.
With my oldest two I had several ultrasounds confirming gender, but really needed that confirmation when they were born to believe it, so I defintily lean towards needing 100% results.
So, Is the Sneak Peek Test Accurate?
So does this fully explain the question of ‘is the Sneak Peek Gender test accurate?’ NO. This is my experience. I am a mom of 2 boys, and a little girl. – so yes there is more mane DNA in my house than some.
I’m very Clean and follow the rules very well. So although this might have been user error, I feel confident saying that it wouldn’t be hard for another person to have flawed results also when it comes to contamination.
I know few people who follow rules better, and keep a cleaner home, so although that was likely what skewed the results, I feel that is the same for so many others then.
I have many friends who have done the sneak peek test and gotten accurate results stating both boy and girl. I have also had many friends who have taken the sneak peek test and gotten a false male result. (I have not personally had anyone report a false female result).
So, it definitely is possible for an accurate early gender detection, but for me if this had been my first baby I wouldn’t have done the test again.
I think ultimately most things like this are more for fun, and not results to be fully tested without a doctor involved!
I would love to hear in the comments if you have done the Sneak Peek test, and if so if your sneak peek test results were accurate or not, and for what gender!
A little edit – there are lots of comments on here, and I have had so many messages on Instagram, so always feel free to message me there!
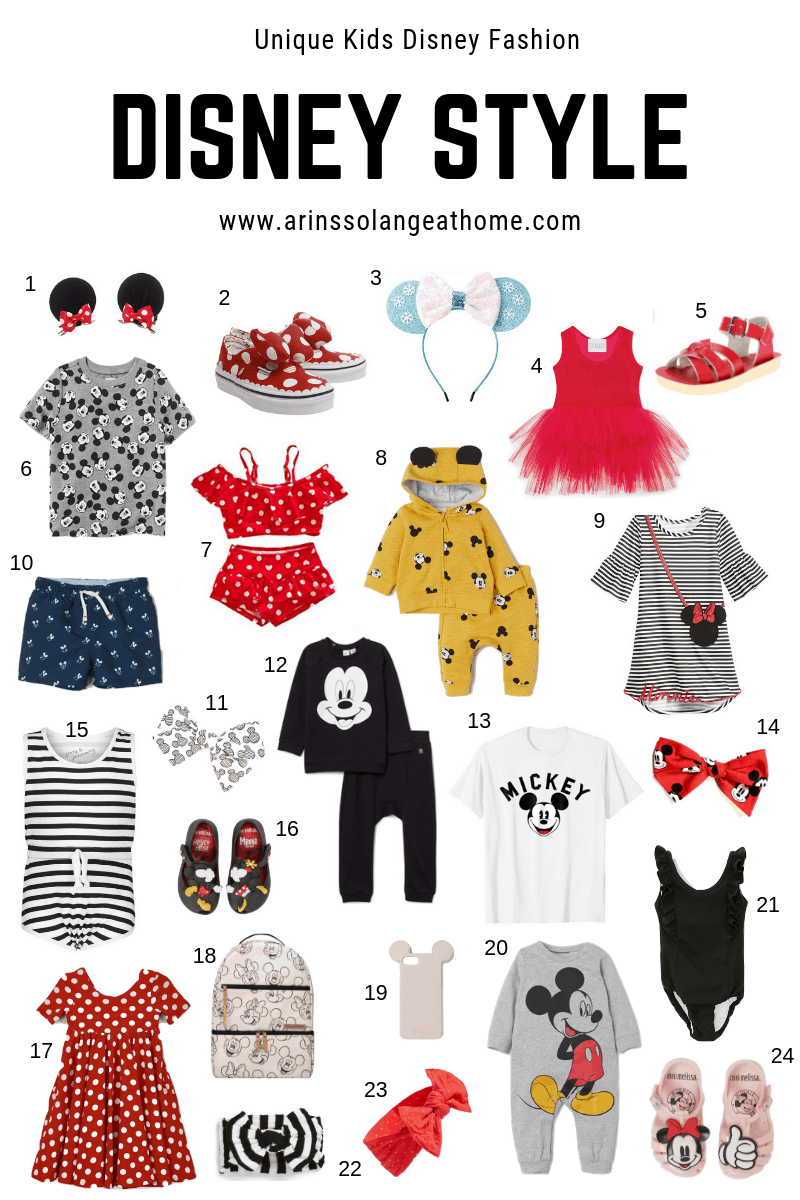
These are always some of my favorite blog posts to do! It’s another spring break, which means its time for another round up of Disney Fashion. I love dressing my kids in unique Disney outfits when we go, so always try to round up fun ideas for clothes that have pops of actual Disney, but the rest of it is just great simple pieces that can be worn anywhere.
Be sure to check out my past Disney round ups when you’re done here! I will link them at the end of this post.
Alright FINALLY I am announcing if baby number 4 is a boy or girl tomorrow. (if you missed the pregnancy announcement head to this post to read more!). I thought it would be fun to do a little blog post with some of my symptoms, and talking about this pregnancy, so far through 16 and a half weeks, and see what everyones guesses are. So once you leave your Boy or Girl Gender Guesses in the comments I will pick one of you to win a Starbucks card if you’re right! (I figure maybe thats good karma…get you guys alert with coffee and maybe ill feel alert too haha).
Symptoms
Morning Sickness: Not much at all. Felt like crap some of the first trimester, but it was never nausea or traditional morning sickness in anyway.
Food Aversions: Really REALLY picky to basically everything.
Cravings: I don’t know if I would say actually cravings, but definitely wanting sweets and fruit more than normal. (I am always a sweets girl, but never really like fruit).
Tired?: Off and on. Part of me feels like I have to say not THAT tired because I know it hasn’t been as severe as it was with Walker, but then some days I was just wiped out.
Skin: Horrible – which I don’t think has ever happened to me before when pregnant. NOT HAPPY ABOUT IT.
About the Pregnancy
Heart rate: Alright, forgive me because its the 4th kid, so I don’t remember the number but it was considered “lower”.
Carrying: I feel like I’m carrying higher? Its hard to tell because I’m only 16 weeks, but I’m already really starting to show which I wasn’t prepared for.
Old Wives Tales:
Chinese Gender Calendar: Boy
Husband Weight Gain: No – but he never has with pregnancies so I’m not sure this one works for us ha
Comparing to Other Pregnancies
This pregnancy has been super similar to my pregnancy with Avé, just maybe not quite as easy as hers was. I don’t remember feeling sick or tired AT ALL with her, and did some with this baby. With Jack and Walker I had identical pregnancies. I thought that would definitely mean girl at first but asked my dr who kind of popped my bubble lol.
I took the Sneak peak test at 9.5 weeks pregnant to find out the gender of the baby. I won’t tell you the results of that, or if it was right or wrong, but you will have to check back on my blog post tomorrow to read more about that! UNTIL THEN, if you leave a comment on this blog post with your gender guess AND your Instagram handle, one person who guesses the right gender will win a Starbucks card on me tomorrow!
Real Moms talk about When Does Morning Sickness Start
When Does Morning Sickness Start?
Alright so you’re pregnant, or you think you might be, and obviously we all google EVERYTHING. I mean truly everything. I am now expecting my 4th baby, and I remember even within a few days of taking a test this time, I was still googling “when does morning sickness start?”. I mean I have obviously been down this road before, but I also just always get in my head and want to know. So I figured I wasn’t alone in this and really wanted to ask some other moms the question of “when does morning sickness start?” and share it with you all!
How Soon Can Morning Sickness Kick in?
Alright, for those of you here for the quick answer – Most moms all agreed that morning sickness sets in between 6 and 8 weeks. That was the common answer between everyone I asked.
How Does Morning Sickness Feel?
Before I go a bit further and share some answers from some of those amazing moms, I wanted to address how morning sickness feels! If this is your first pregnancy you may not even be sure if what your experiencing is morning sickness. Honestly, it’s not a terrific part of pregnancy. Morning sickness can anything from feeling a bit queasy, to mild to severe nausea, to vomiting. And contrary to its name, morning sickness can occur at anytime of the day; some women do experience in the morning, others at night, some all day, and others are lucky enough to not have any!
When Does Morning Sickness peak?
Alright, so let’s get into what these awesome ladies have to share about their experiences and how to relieve morning sickness!
My friend Casey stated that she has had 2 pregnancies. With her first morning sickness set it around 7 weeks. She was super nauseous until 14 weeks but only threw up a couple of times. With her second it started around week 6 and lasted until she was 16 weeks. That time around she threw up 2-3 times per day! (it is worth stating, because I know if you’re like me, you will wonder – Casey has two GIRLS. You can check her out on Instagram here!)
My friend Emily said that her morning sickness started around week 6 with both of her daughters. With her first pregnancy it subsided mostly by week 15 (with only occasional sickness bouts monthly after that). With her second pregnancy she was VERY sick the entire pregnancy, so if you’re reading this and finding yourself in that same boat, she would be a great person to reach out to via Instagram! She has 2 beautiful healthy girls.
Hilary one of my best friends via Instagram has 2 kids and this time she did have a bit different experiences and different genders (if you like to read into that kind of thing). With her first, a girl, she was sick from 7-15 weeks. It was mostly in the evening and a walk or working out really helped it subside. With her second, a boy, she had textbook morning sickness from 6-13 weeks. She didn’t throw up but had nausea the first half of every day!
First time she was mostly fine as long as she had food in her stomach (she even kept snacks next to her bed!) With her second it was from about 7 to 12 weeks mostly in the evenings, and with her current and 3rd pregnancy it was from about 6 to 14 weeks!
Myself – Mom of 2 boys, 1 girl, and one unannounced
And before I get to the advice these mama’s have for you – in case you were wondering. With my first and third pregnancies my morning sickness set in at 6 weeks, and lifted right at 12 ish weeks. I never threw up but I was so nauseous and just pretty miserable. With my second and 4th I didn’t have any morning sickness, and once I made it to the 7th week of my pregnancy kind of breathed a sigh of relief knowing I was in the clear!
Morning Sickness Remedies: Advice from these Great Moms
Alright, so I am going to compile some great advice from all these moms on ways you can cope with the morning sickness if you’re experiencing it, and just remember, if this is your first time around, it is SO worth it!
Preggie Pops ( Megan mom of 1 boy and 1 girl – she said she didn’t have horrible morning sickness but these really helped with what she had!)
Morning sickness medication- both Casey and Emily from above stated that sometimes that is just needed! Emily, also said there is a program where you pay a dollar a pill which makes it much more affordable if you have the sickness the whole time through.
If you have other kids, don’t feel bad if they have extra TV time and you just need to lay on the couch. Growing a human is hard, and those early weeks you have to take care of you!! ( This advice is from Casey and I couldn’t agree more!!)
Wink Naturals morning sickness lozenges, lemon candy, peppermint, ginger tea, B vitamin supplement, and ginger ale (Casey)
Calm (a magnesium supplement) helped with constipation. Ginger Chews also helped (Jen)
Peppermint and Lemon Essential Oils – which I love too (Hilary).
Hopefully this gives you some clarity on the whole, “when does morning sickness start?” and also some hope that not all mamas get it, and if you do maybe it won’t be to the same degree each time around!! I will be documenting much more of this pregnancy here on my blog, so make sure you subscribe for emails, and follow along on Instagram.
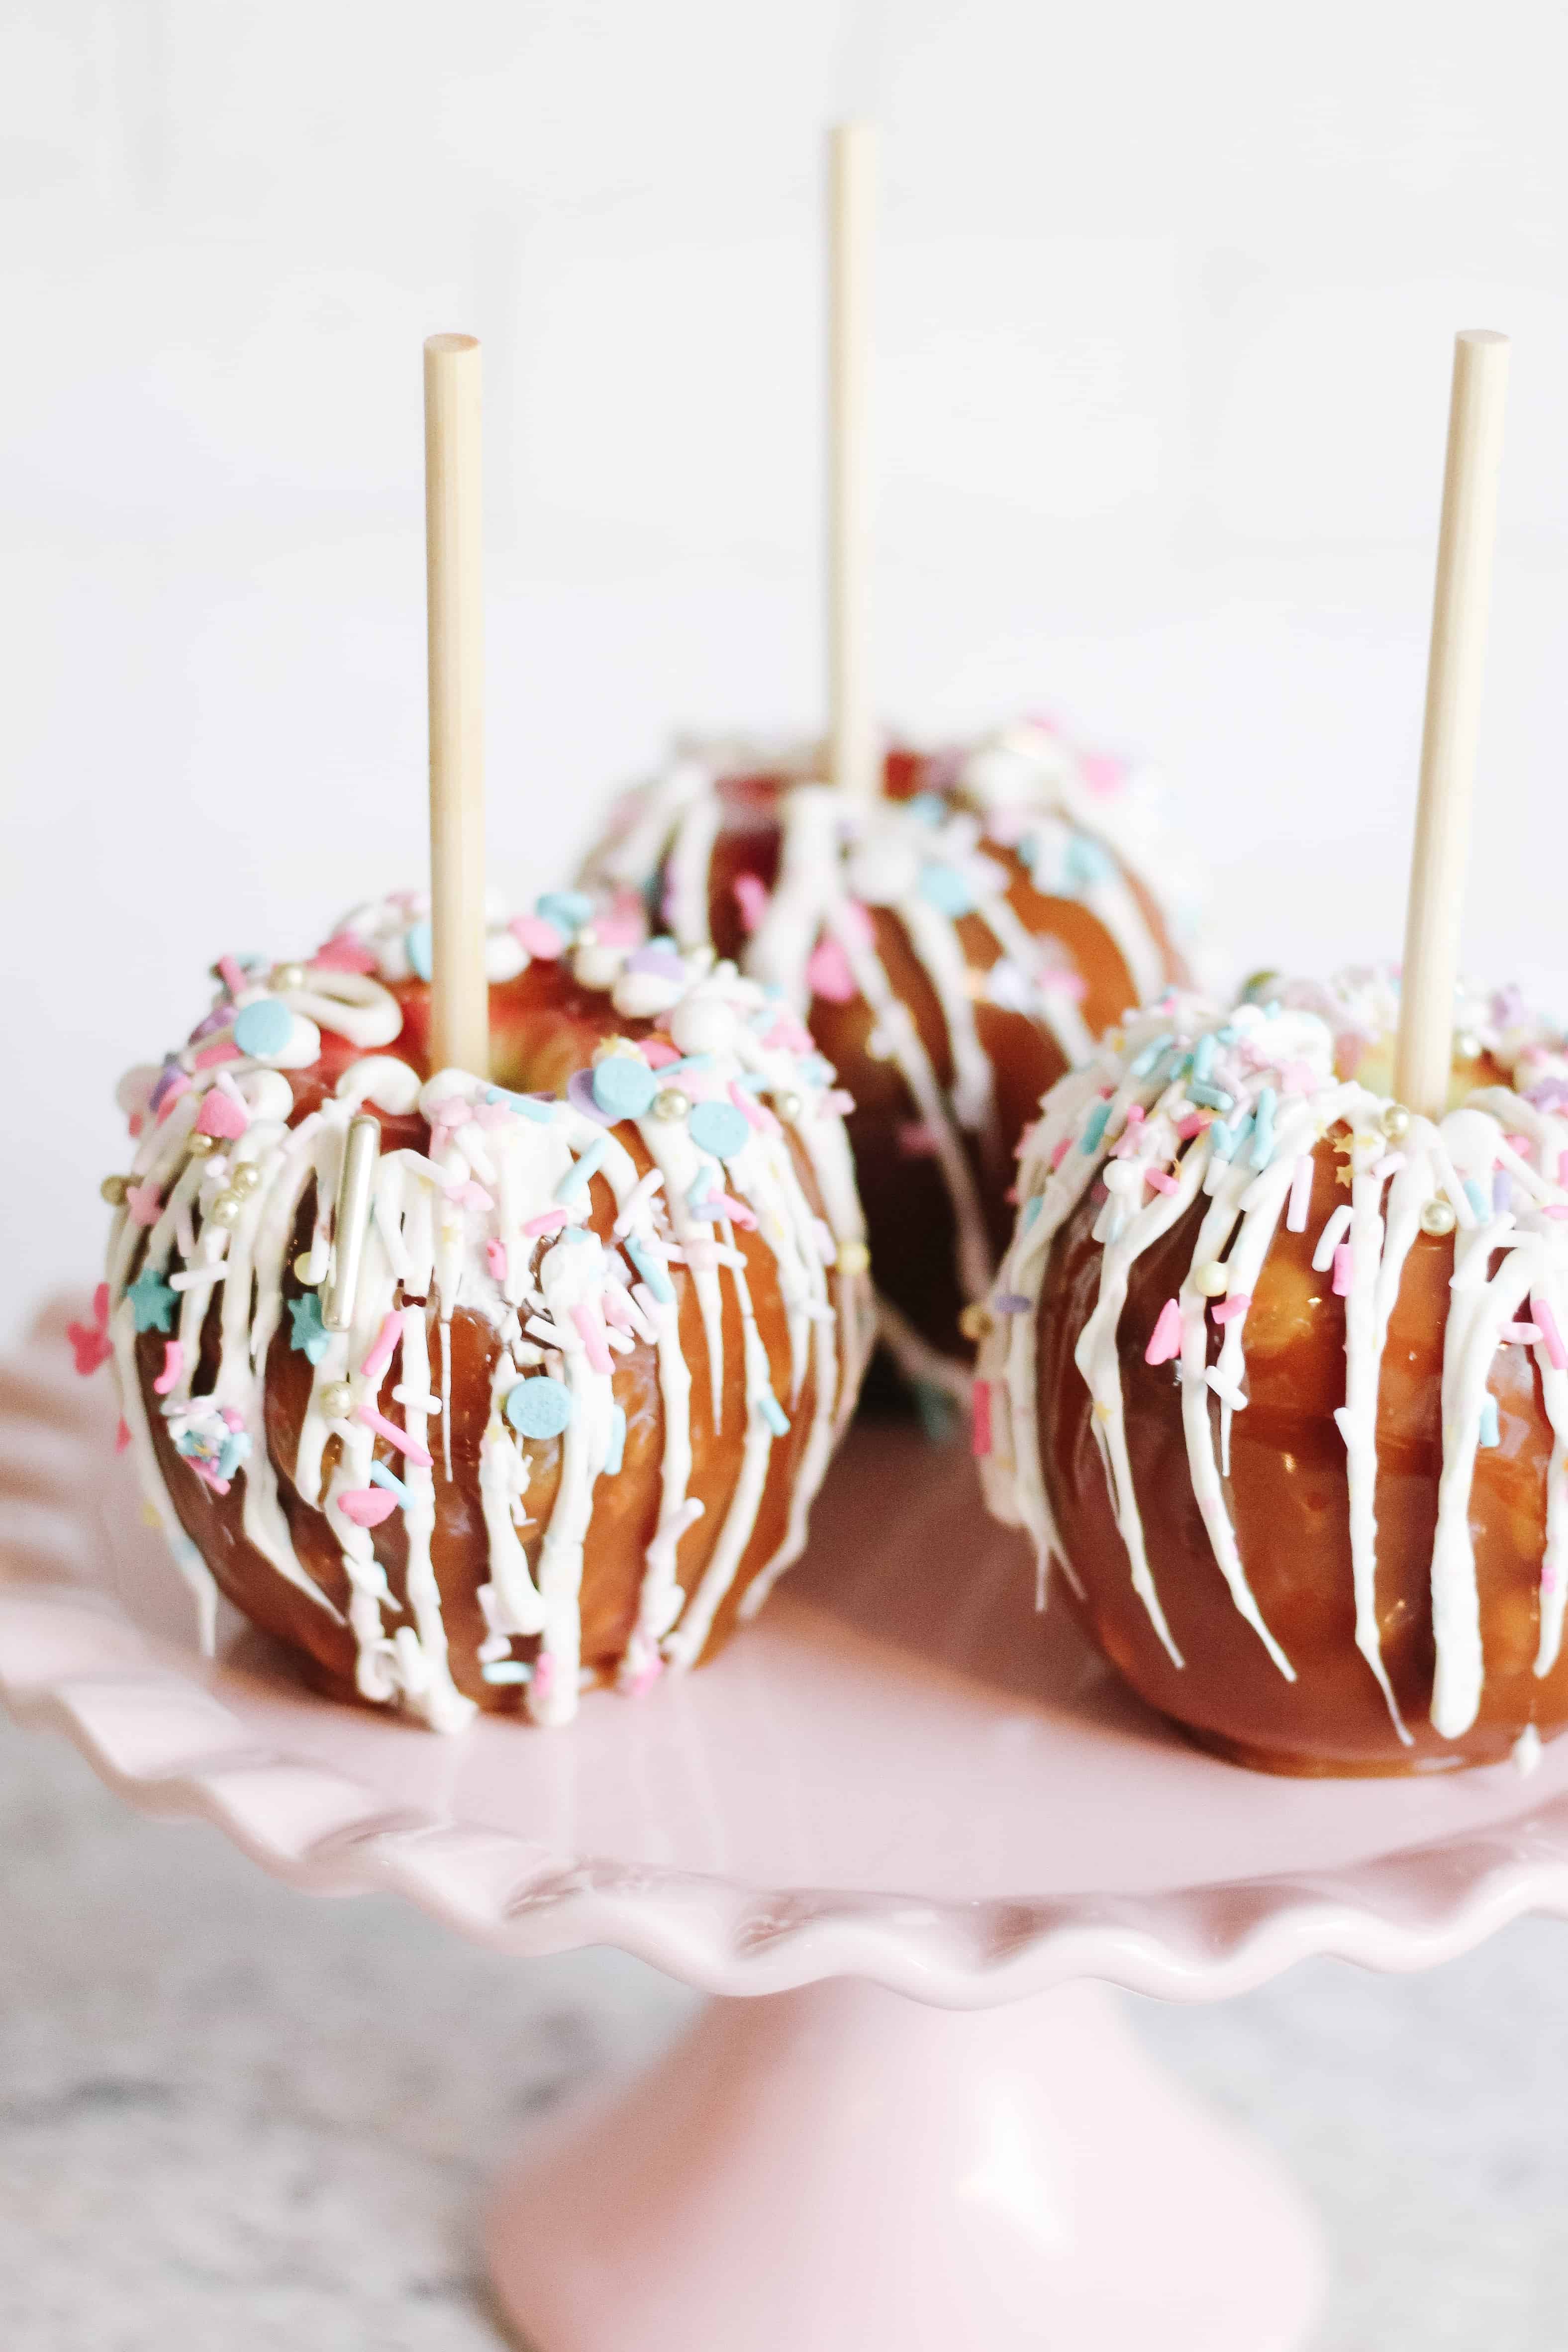
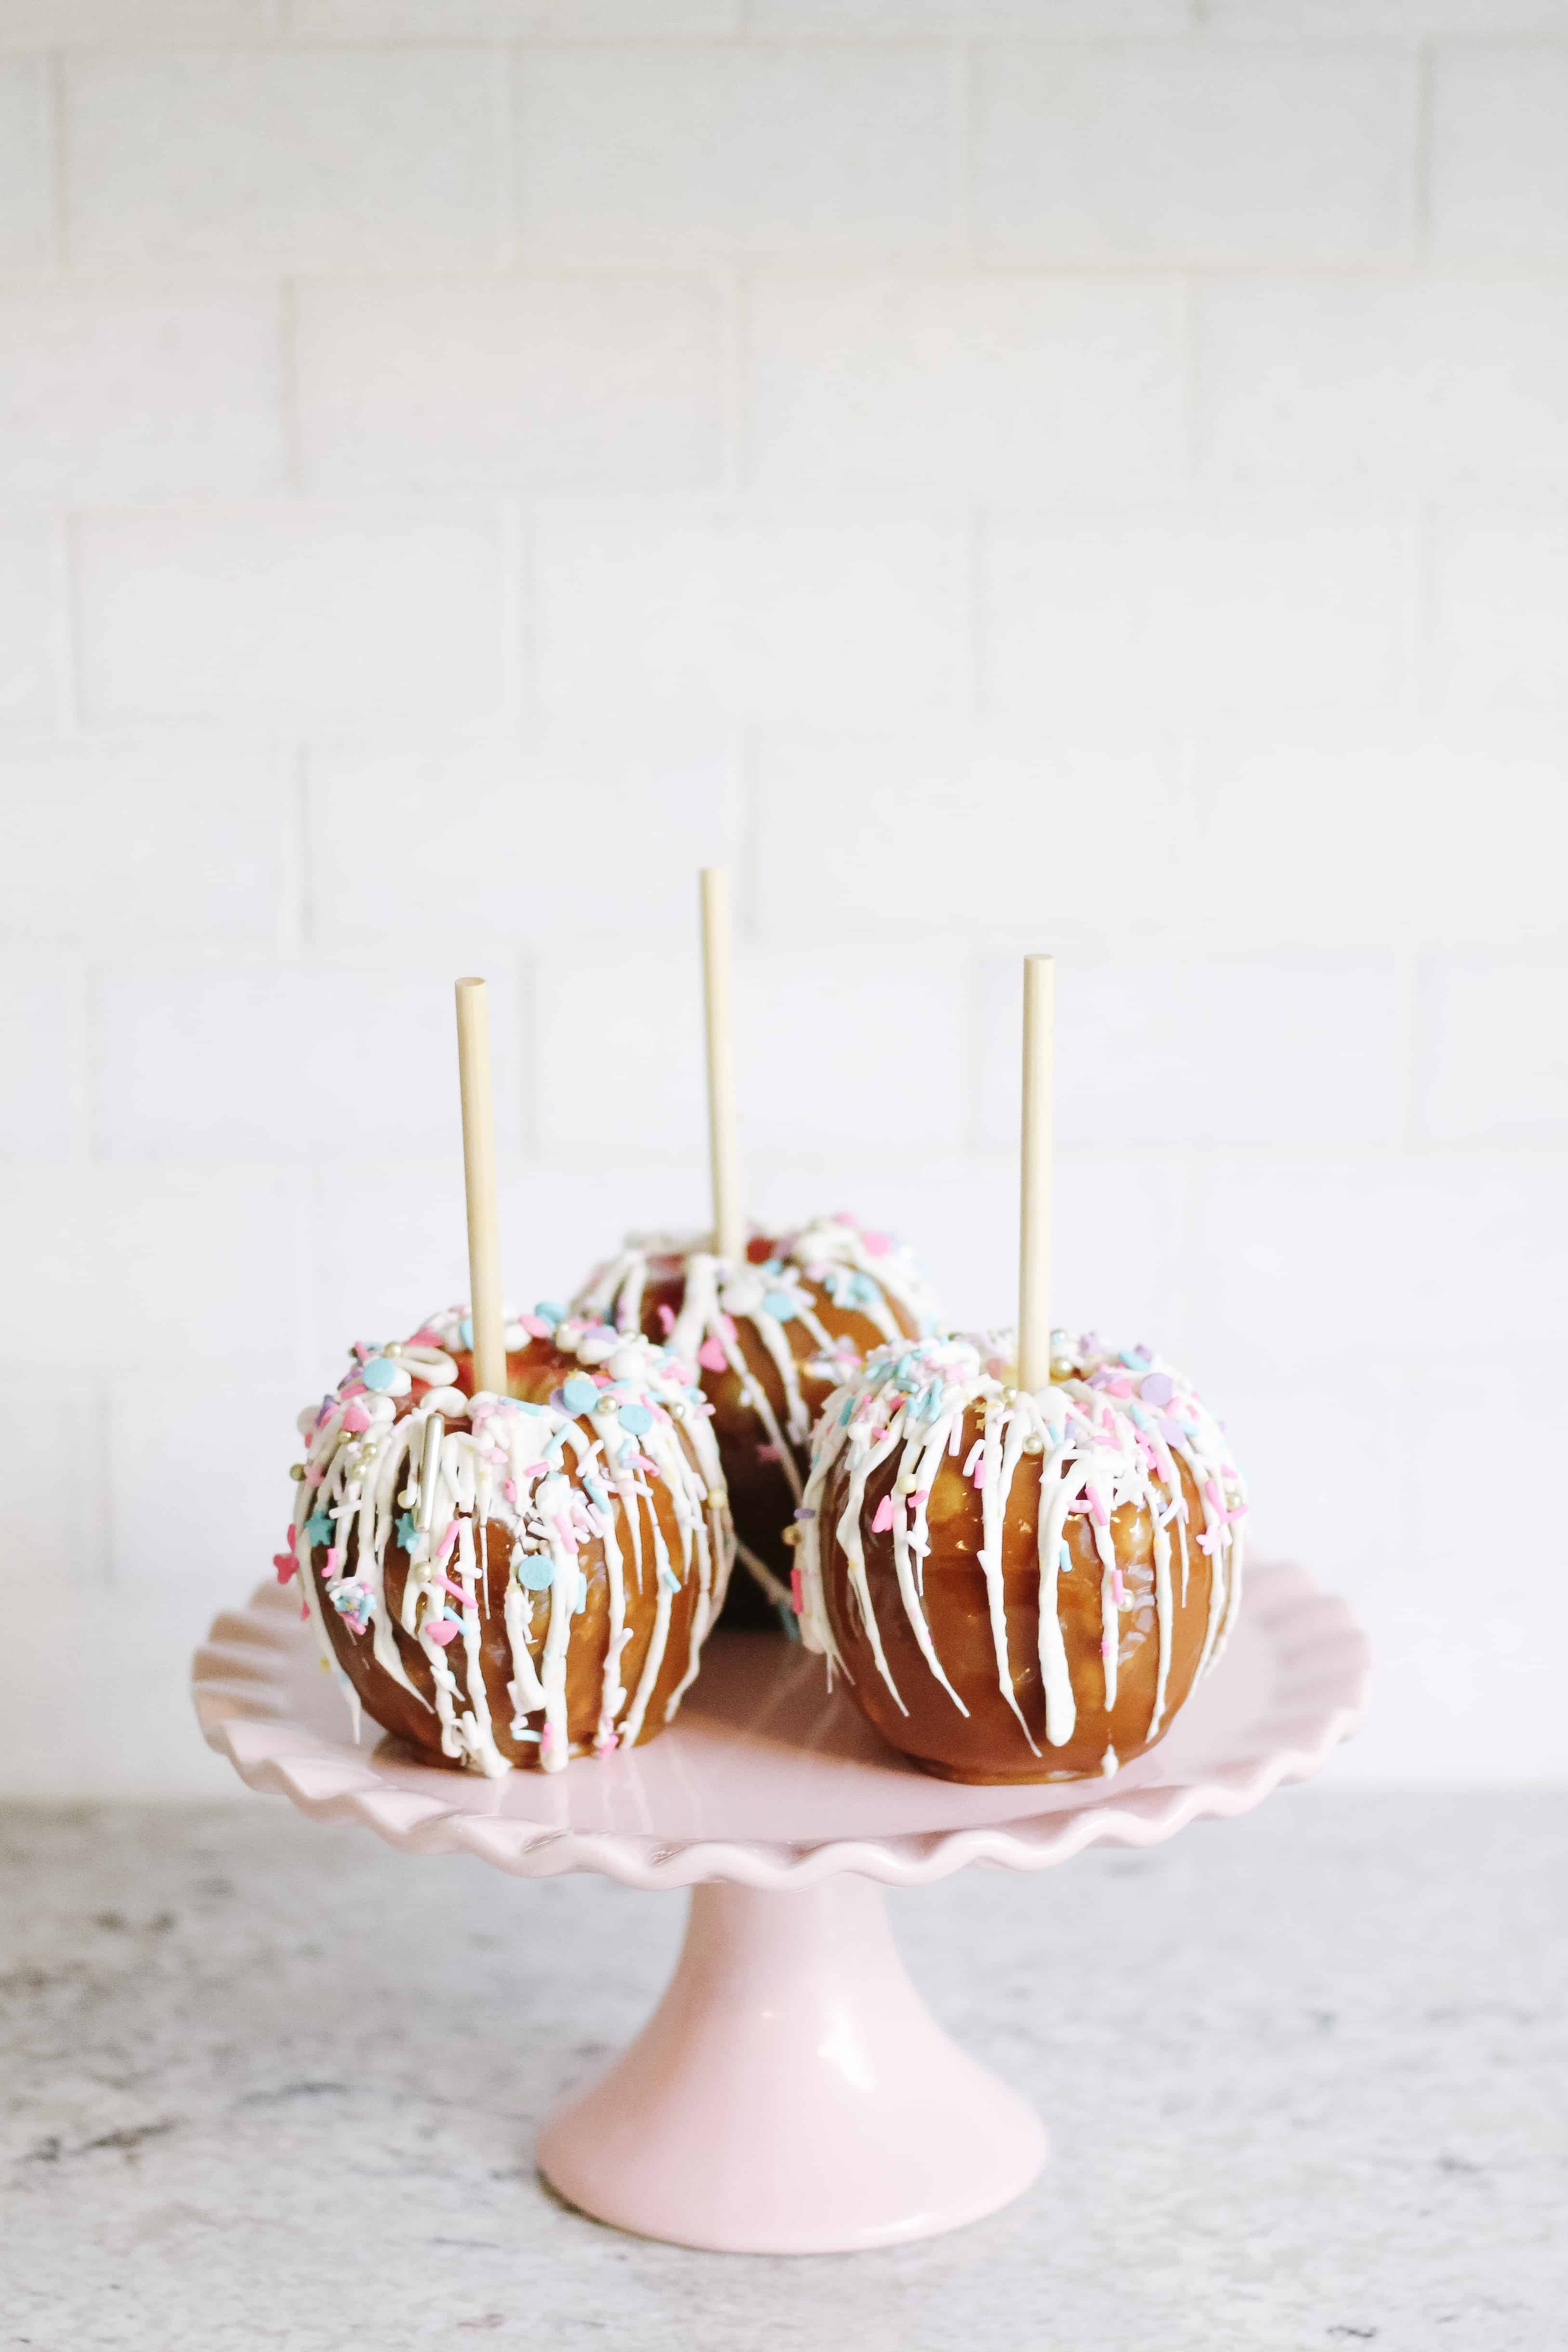
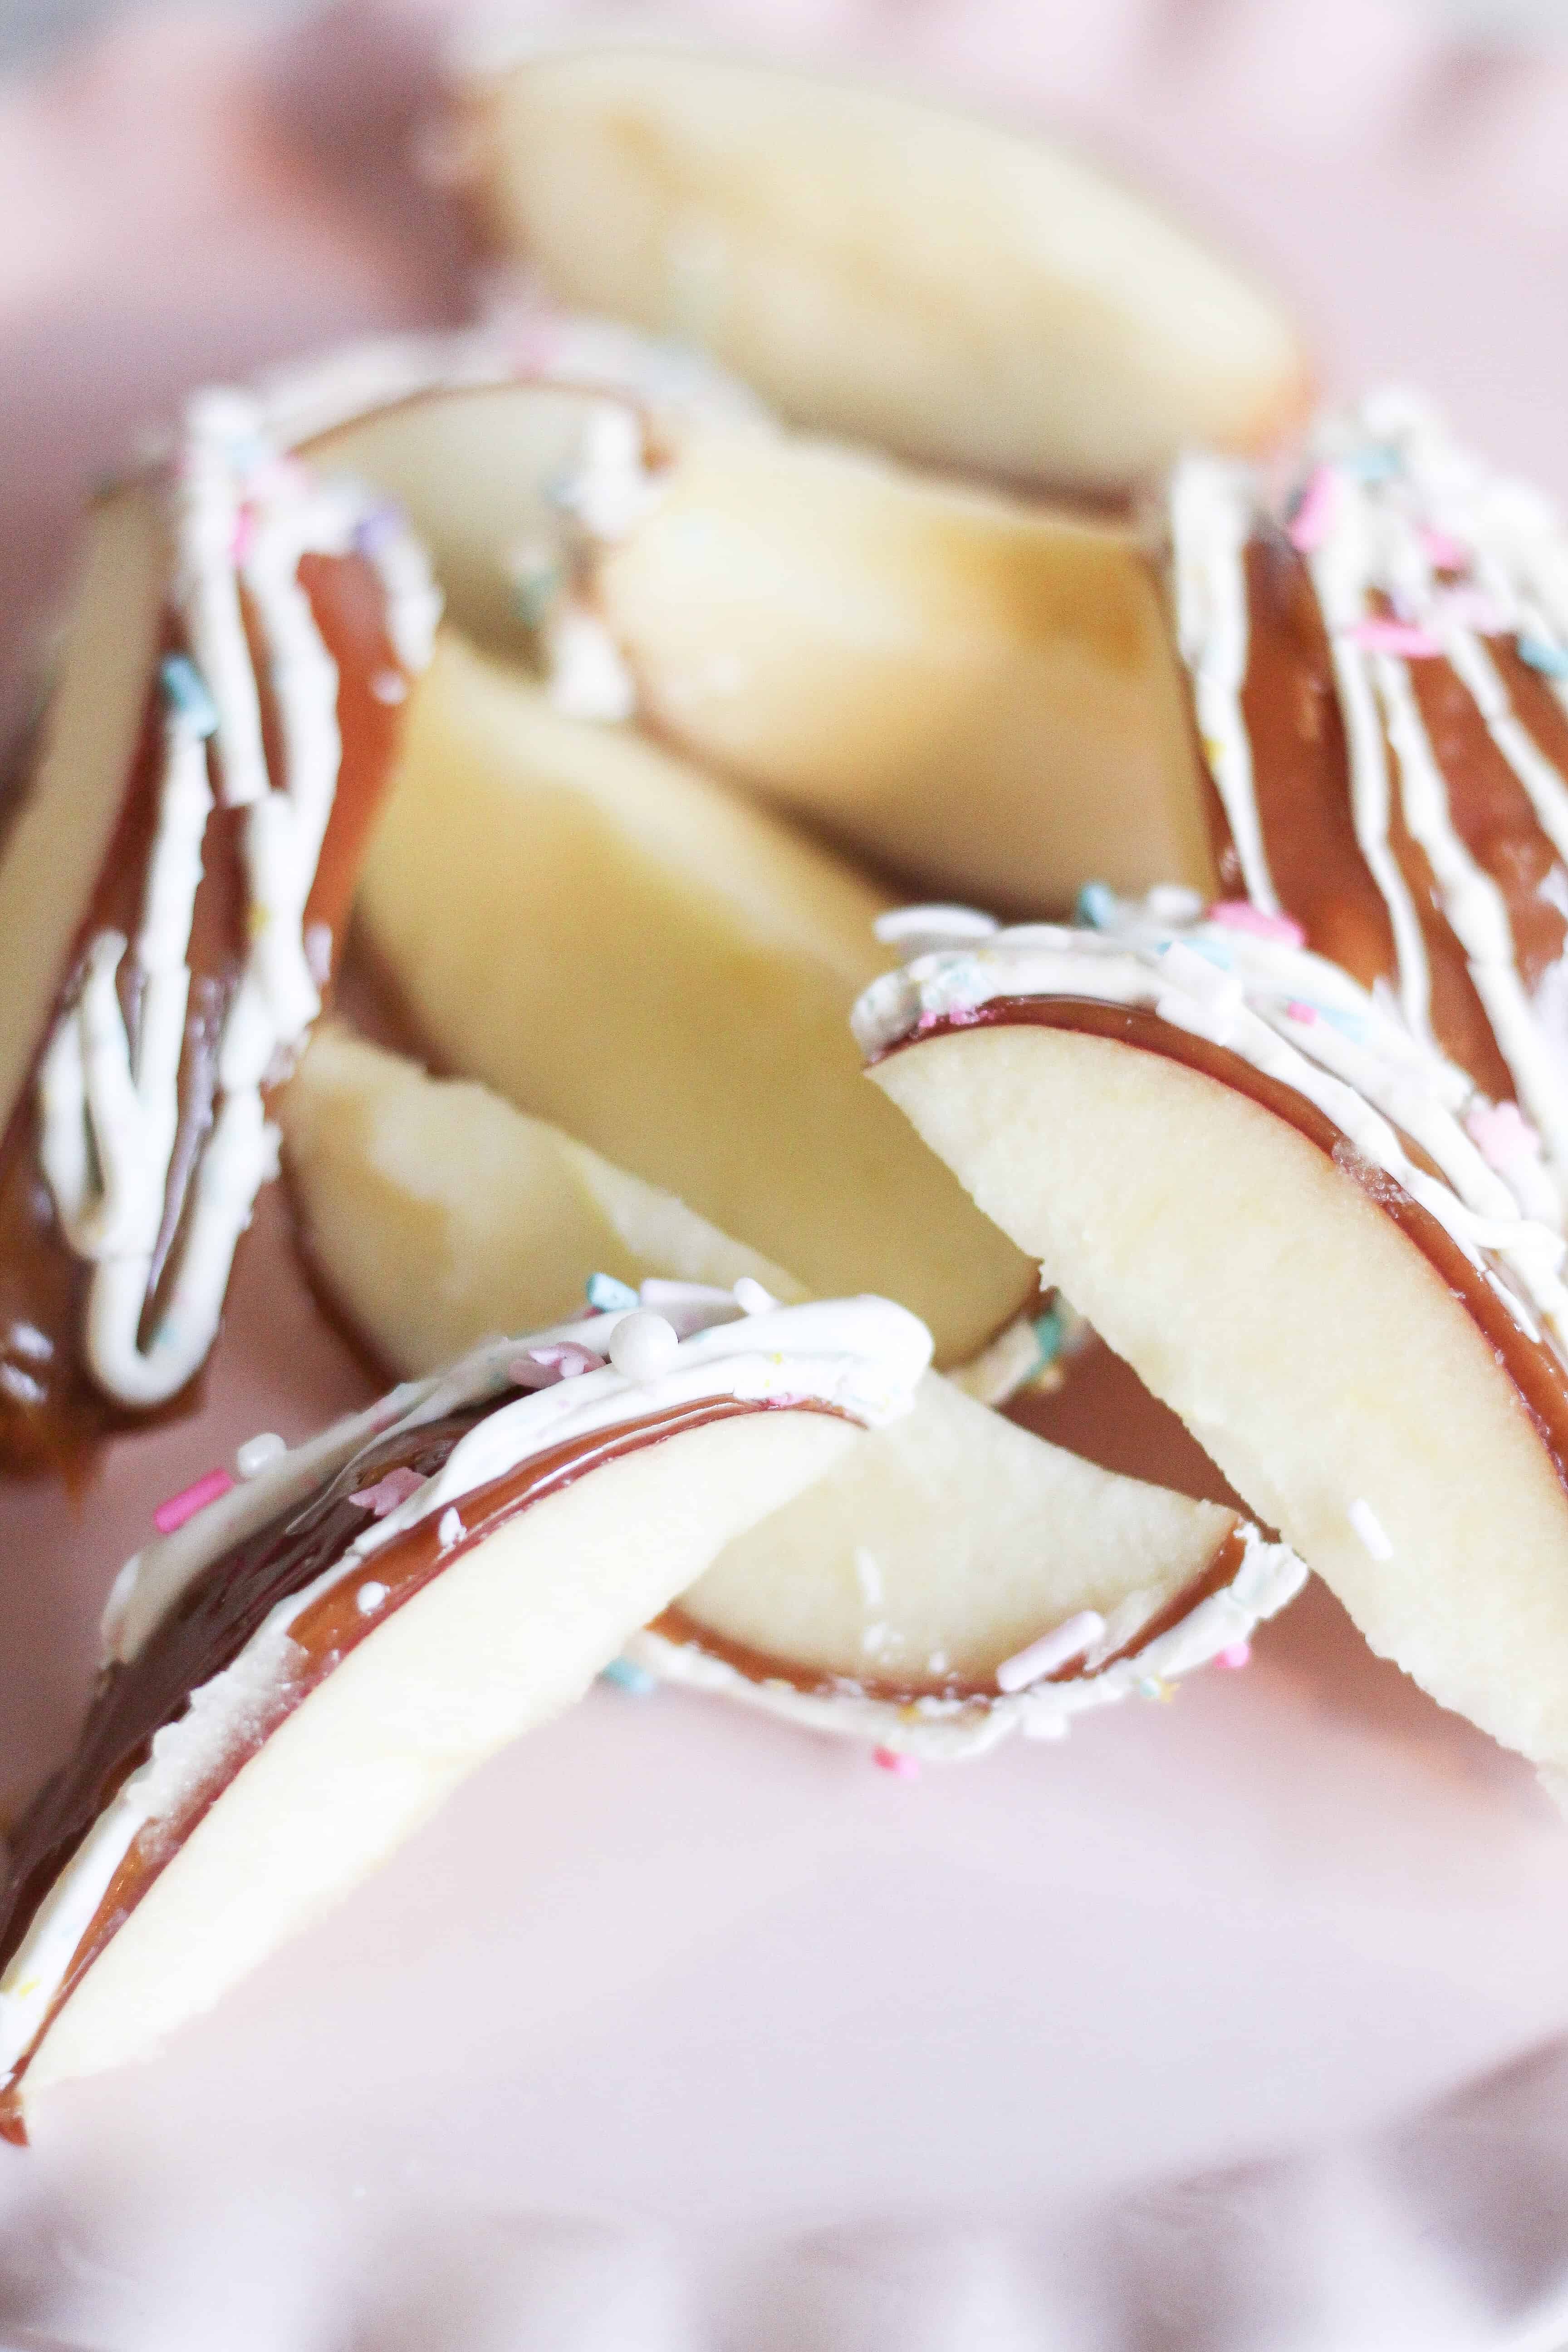
If you follow along with my blog, then you know that I am not a food blogger. But I do LOVE posting fun little easy recipes that will make the most special snack for your kids. Today, I am so excited to be teaming up with Ambrosia Apples from BC Tree Fruits to share with you all some Unicorn Caramel Apples. I can’t be the only mom out there with a little girl who is still on the unicorn train, so I know so many of you will love this EASY recipe you can make your kids.
This post has been generously sponsored by Ambrosia Apples from BC Tree Fruits, home of the original. The opinions and language are my own and in no way do they reflect BC Tree Fruits.
Picking the Right Ingredients
As with anything, starting a recipe with the right ingredients is huge, however it’s even more important for simple recipes. There are only a handful of ingredients for these Unicorn Caramel Apples and starting with great apples is key. Ambrosia apples are both sweet and crisp, so they were the perfect choice for this recipe. They come from the birth place of this variety of apples, British Columbia, Canada, making them home to the original! They work great in recipes, but they have such a great flavor, that they’re great to eat on their own. Another reason to choose Ambrosia apples for this recipe is that they naturally take longer to oxidize (turn brown) than many apple varieties, so when you cut them apart to serve, they stay pretty. You can learn more about these apples and how to enjoy them here.
Melting Caramels – Follow the instructions on the bag for melting.
Melting Chocolate – I love that this one was whimsical, but you could use plain white
Fun sprinkles!!
Directions
Start melting caramels in pan on stove.
Remove the stem to your apples and pierce with your stick.
Once the caramel is ready, dip your apples in and swirl until they are fully covered. Then let the excess drip off. Set them on a sheet of wax paper to dry fully.
While the caramel is drying, melt your melting chocolates in a bowl in the microwave.
Transfer the chocolate to a squeeze bottle.
Now squeeze the chocolate onto the apples in an up and down motion. While they are still wet, sprinkle with sprinkles and set back on wax paper to fully dry (you can speed the process along in the fridge).
You can serve them cut or full, but I think they are much easier to eat cut off the core!
This is such a fun recipe for a birthday party or just for a fun snack for your kids that they will love. If you try the Unicorn Caramel Apples, be sure to let me know so I can see the different varieties everyone comes up with and leave me a comment with any questions! If you’re looking for another fun little recipe for a party, be sure to check out this ice cream cone cake pop recipe!