Mudrooms are the ultimate mom hack when it comes to storing and organizing all of your kids’ belongings. The first thing my kids do when we come through the door is throw all of their stuff all over the house. It’s important to find a space in your home as an organized drop zone for all of those backpacks, jackets and shoes. Whether you have a designated mudroom or a spot by your front door, investing in some extra storage in a convenient place will make a difference. Recently, we installed our own mudroom lockers by our back door for all of our belongings. I love how all of my kids know exactly where to look now for all of their school and sports equipment. If you are in need of creating some extra storage space, this is the post for you. I’ll go over our DIY mudroom lockers and how we use them to stay organized.
This post may contain affiliate links.
DIY Mudroom Lockers: How To Build Storage In 4 Steps
As the queen of organization, I was going a bit crazy with my kids throwing their school backpacks and extracurricular bags all over our house. With four kids in our home stuff adds up and seems to multiply. I knew I needed to find a solution that would work well for our whole family. I also had to be extremely intentional in using what little available space we have left in our home.
Our Blank Canvas
Our backdoor area has been a blank canvas for some time. I knew it would be a great place to install some entryway lockers. Of course I also wanted these DIY lockers to have that built-in look, but without the price tag that comes with custom mudroom lockers.
Fortunately, our back entryway was in need of a major facelift. The floor tiles that were installed when we initially renovated our home was not something I picked. If you are new to my blog, we renovated our historic home with a major home network show. Unfortunately, not all of the design choices were mine to make. So, I’m in the process of making our home really our home that is both stylish and functional for our family.
Since we planned on replacing all of the floor tiles, it ended up being the perfect opportunity to install our own built-in lockers for our designated mudroom. I’m so pleased with how everything turned out and love that every kid has their own lockers to store all of their belongings. One of my favorite things is that it has also helped foster more independence in my kids. They pack for their school and extracurricular activities each day and know exactly where to look for everything they need.
Step 1 Plan Mudroom Locker Designs
There are several different ways you can go about creating your own mudroom locker cabinets. You may be limited on what you can build based on the space you have available and your room dimensions. For us, we were fortunate and had a fairly small room that was a blank canvas.
Consider Your Priorities For Your Mudroom
I had several priorities when it came to looking at that back room and how I wanted to use it. I knew I needed to house our second refrigerator for easy access directly off our kitchen. At the same, I also wanted a space where my kids could create art and have messy play- not on my kitchen counter. Lastly, I needed a place to organize all of their items. I also wanted that space to include closed storage so I wouldn’t be plagued by keeping the space organized looking.
After brainstorming several mudroom design ideas, I knew I had the perfect solution for our space. We have used Klearvue cabinetry in several projects throughout our home. Klearvue cabinetry is exclusively available at Menards and allows you to customize your space via their online design tool. Once you are happy with the design and layout, you can order directly online via Menards. We have used Klearvue cabinetry in both our butler’s pantry and my small home office. It has been a great system to work with and allows you to create a custom look for a fraction of the price.
Another great option would be to use my IKEA Billy Bookcase hack to install your own built in mudroom shelving unit. This hack is a good idea if you are looking for DIY mudroom bench as well.
Step 2 Determine Your Dimensions
Once you have an idea of where and what you want your mudroom locker cabinets to look like, you’ll need to take a few measurements. It was important for our family to have locker dividers for each family member so that we could all have our own space without sharing. At the same time, we had to somehow fit a large piece of cabinetry into a smaller space.
The back wall of our soon to be mudroom was the perfect location to house the lockers. It was a blank wall that could comfortably fit enough lockers to give each of us plenty of room. I also needed to make sure that the width and depth of the lockers would work within the room.
If you aren’t able to open a locker door without cramming it into the bathroom door, then it really won’t function well. So make sure that when you are planning your design you have enough open space for your doors to open and close.
Take the time to sketch out your design with measurements. This is a simple step that shouldn’t be skipped. If you plan on using stock cabinets like Klearvue cabinetry, be mindful of the fact that they come in standard sizes. You won’t be custom ordering your cabinets to your room, but you can get creative to make those standard sizes fit in a design built for small spaces.

Step 3 Order & Assemble Your DIY Mudroom Lockers
Once you’ve taken the time to sketch out and plan your design, you can order your cabinets directly from Menards. They make it super simple to order and pick up is a breeze. There are directions and you’ll only need a few basic power tools to put the cabinets together. Since we aren’t creating these cabinets from scratch, I won’t be sharing a cut list or measurements as it will be fully dependent on your space.
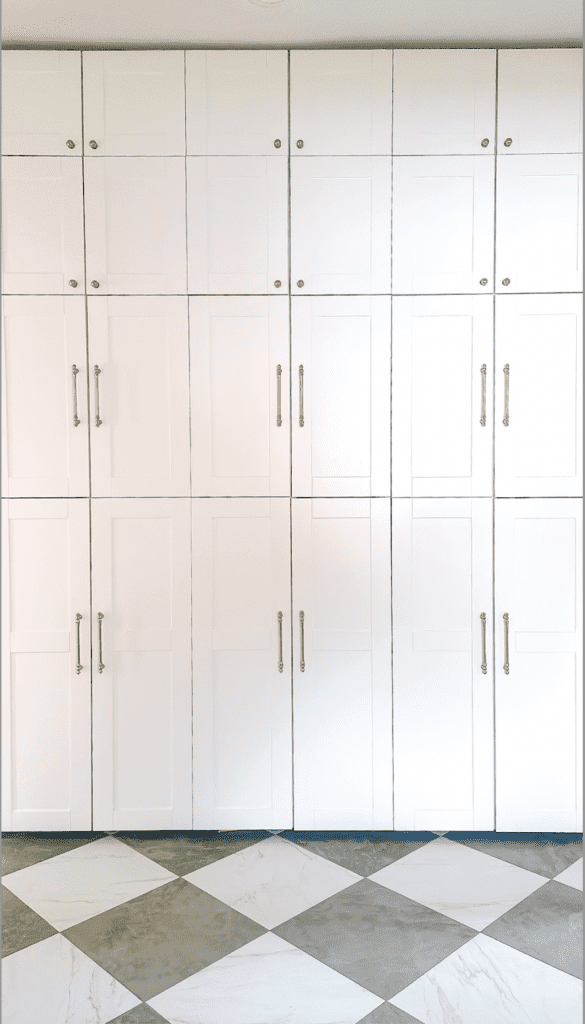
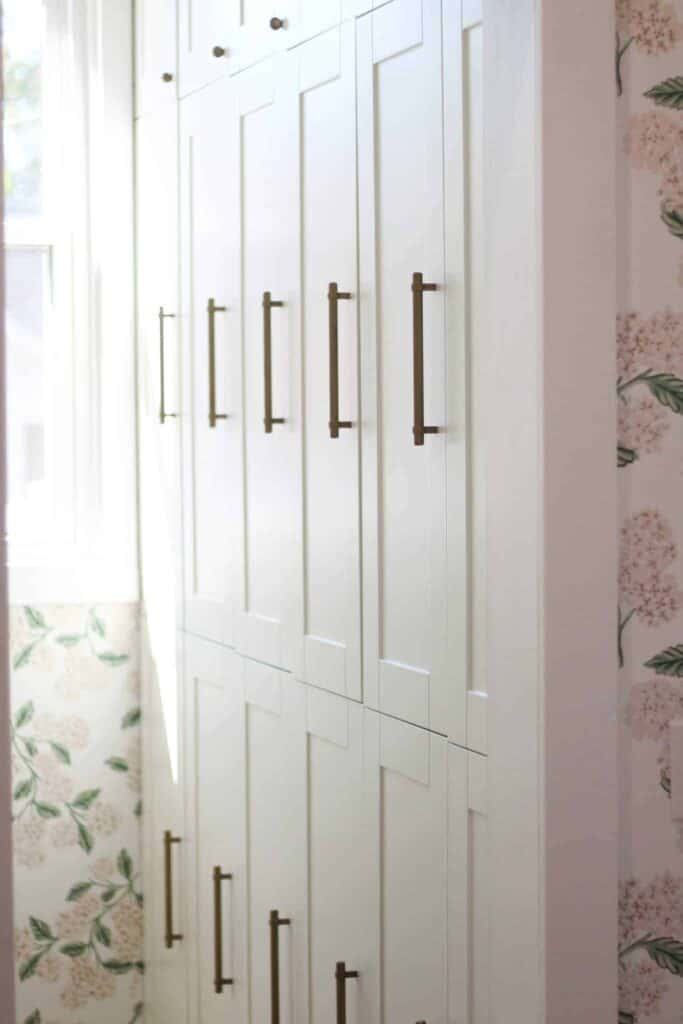
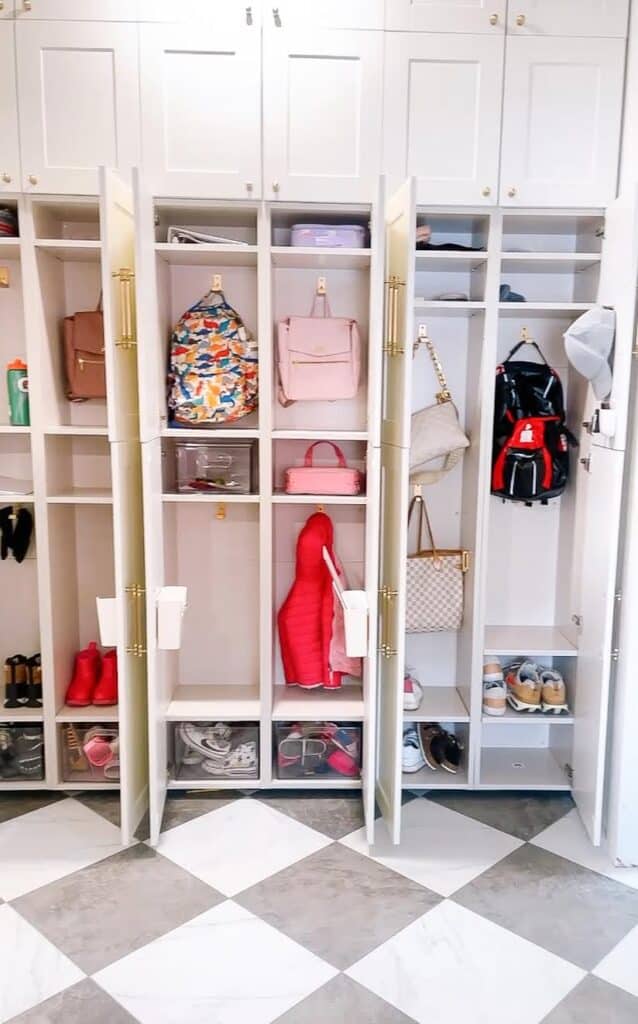
Our lockers extend all the way from floor to ceiling. We have 6 main lockers for each member of the family to store their belongings. The larger lockers have enough space for book bags and longer coats.
In addition to our 6 main larger lockers across, we also have small cabinets on top of the lockers. In total, we have 18 total spaces. Our larger lockers are spaced near the bottom and they get smaller the higher up they go. Because the cabinets get smaller the higher to the ceiling, we store out of season items up higher since they won’t be used as much. Items we use everyday are stored within reach.
Here is what I love about this DIY. You don’t need to be comfortable around power tools to install these cabinets. There is no need for a table saw or circular saw and you won’t be putting in pocket holes or dealing with messy wood glue. While I love creating DIYs, sometimes you just need a project that comes already semi-completed.
Simply follow the directions to install and you are ready to go! This is a great project if it is your first time building to get comfortable around power tools. The whole thing was completed over the course of a weekend and cost approximately $7,000 for our wall to ceiling lockers.
Step 4 Add Your Finishing Touches
Once you have your lockers assembled you can begin my favorite part- adding the finishing touches. You can find all of the supplies I used at the end of the post below!
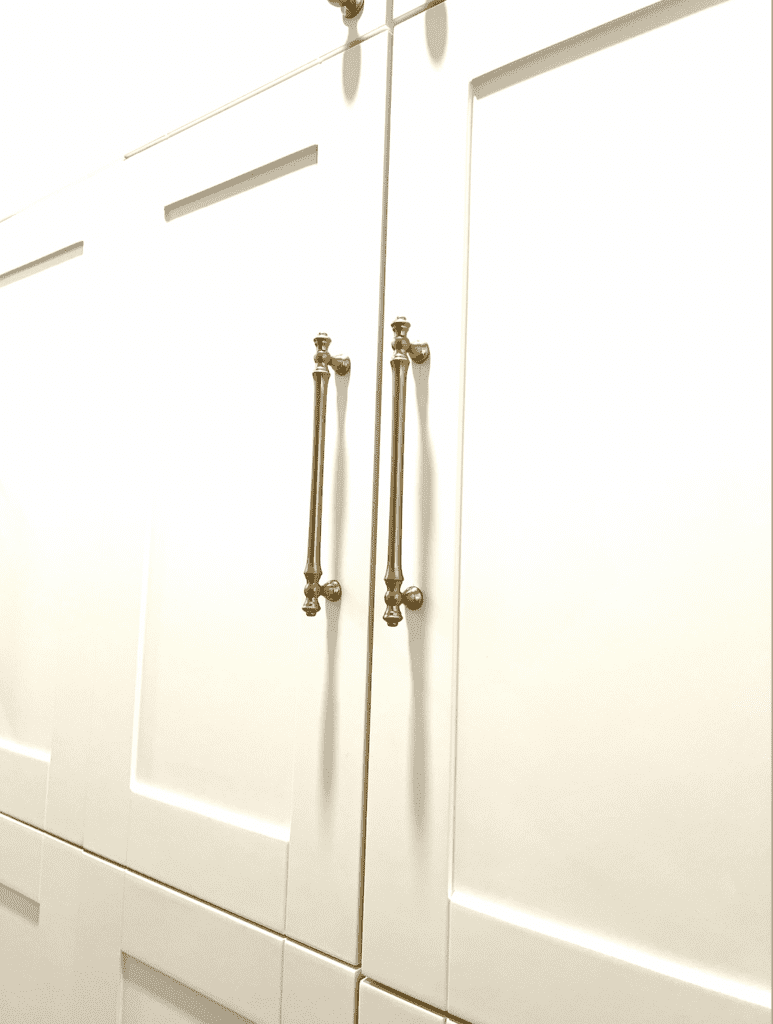
Cabinet Hardware
I went ahead and grabbed some champagne bronze cabinet hardware. It matches the rest of our cabinets in our house and adds a nice finished look.
Locker Organization Finds
Naturally, I also had to include some incredible Amazon finds to keep the lockers tidy.
Inside the lockers I have several items to help my kids stay organized. Each locker is outfitted with an adhesive file holder to house important papers for school. I also have smaller adhesive containers to house pens and art supplies. For Sam and I we use the smaller containers to place sunglasses, change, and anything we may need to grab when we are running out of the house in a hurry. The adhesives stick to the inside of the locker door and don’t take up any valuable space.
If you are constantly looking for your car keys, you’ll love the adhesive key catcher that mounts inside the locker and uses magnets to hold your keys. This little device has given me a lot more free time back since I’m no longer looking all over the house for my keys! It’s the little things in life that can really add back valuable time to your day.
Each locker has coat hooks that can hold heavy winter coats for our Midwestern winters. For my boys, they have several adhesive wall mounts for their hats too. In my locker, I love my dry erase board for meal planning and errands. It is a great way to keep myself organized and accountable.
Lastly, each locker has a set of stackable containers to house shoes. I’m not a huge fan of letting shoes just air out in the lockers- especially for my boys. These containers help keep the stinky feet smell away at least for a little bit.
Add In Any Additional Touches
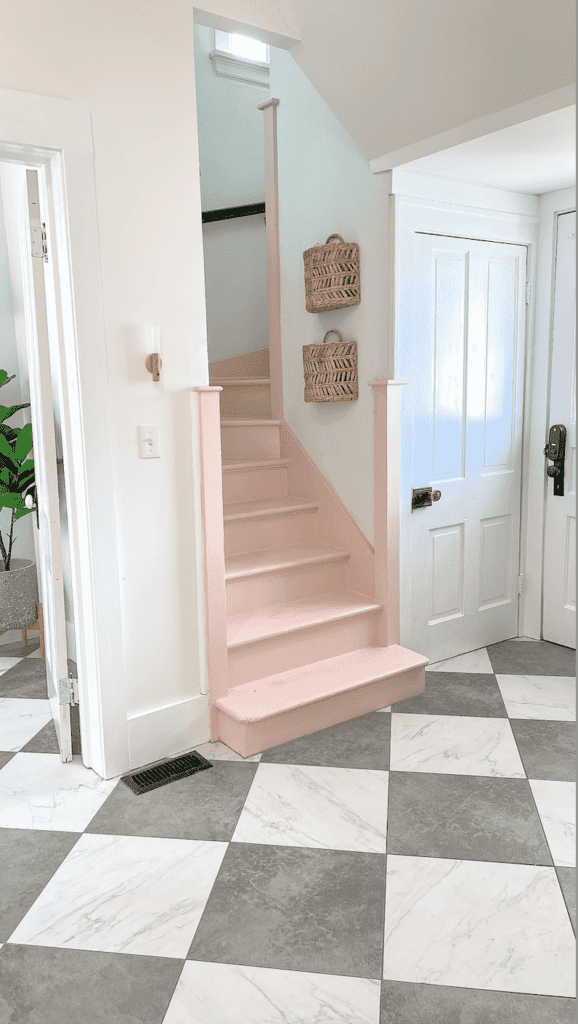
What I love about this project is that everything is completely customizable for your family and your needs. For us, I wasn’t worried about having a bench seat available for my kids. Our back staircase is right by the door and the stairs always end up being the place that everyone gathers to put their shoes on.
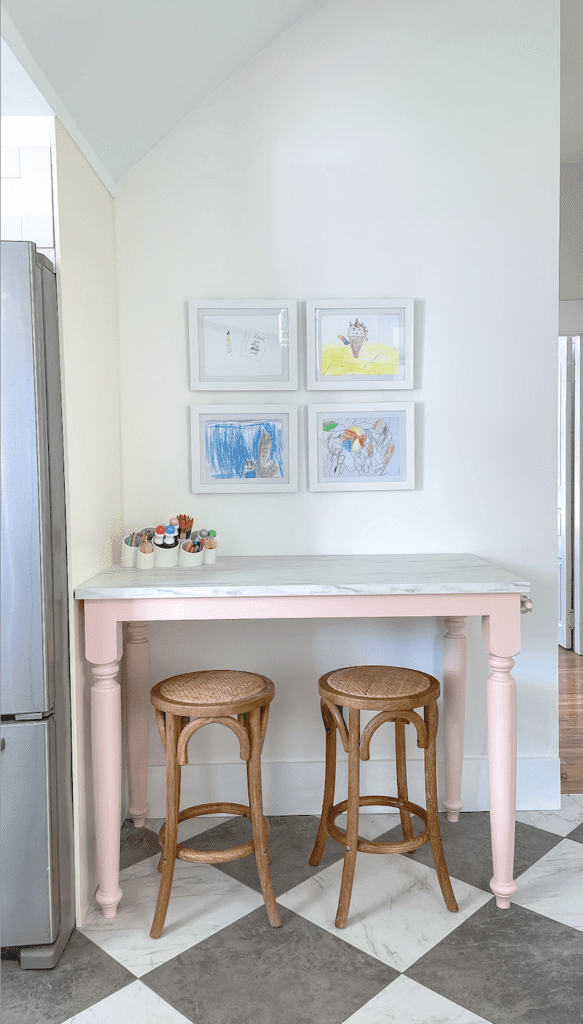
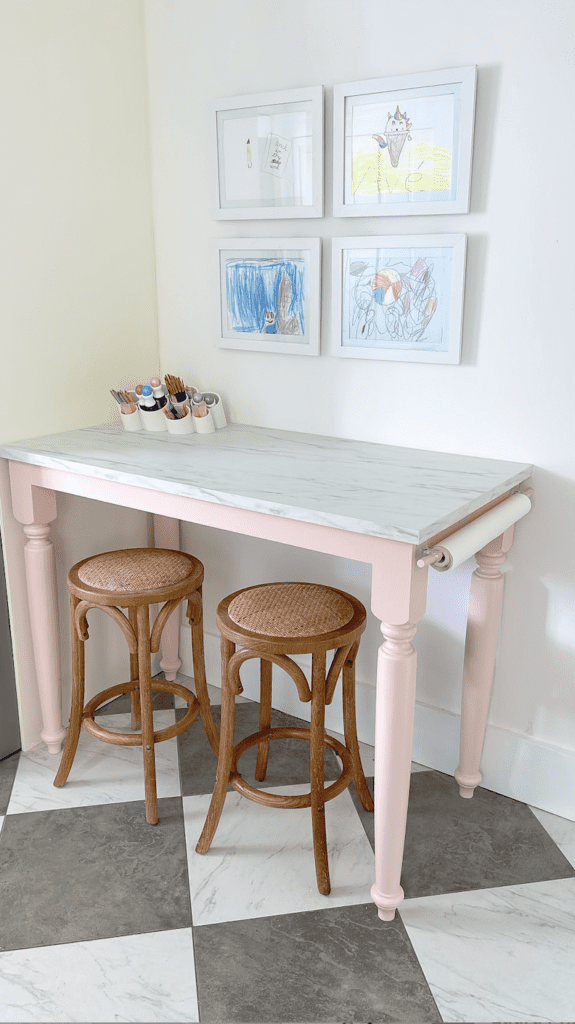
DIY Craft Table
Instead, I wanted to take the space I had available for a bench top and place a craft table in its place. This craft table was a fun DIY that I’ll highlight in a later post.
The table has 2 stools so if one of my kids needs a place to sit to put on their shoes, they have a spot readily available. Otherwise, it is a great spot to do crafts or Legos. It was important that they have a space that they can create and be messy without it being on my kitchen counters. I really don’t love leaving Lego builds up overnight. In this space Jack and Walker can build to their heart’s content without taking over my dining room.
I added some frames right above the space to showcase the kids’ art work. Goldie loves creating something new to put on display each day! With four frames, each kid has their own frame to display.
Lastly, with the table top, I went ahead and used a butcher paper roll holder for easy access. In our last house, we had a DIY wall mounted easel. I wanted to recreate that here without mounting it on the wall. So I went ahead and found a way to utilize our table top to make it function in the same way.
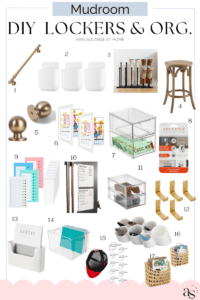
DIY Mudroom Lockers: Shop My Look
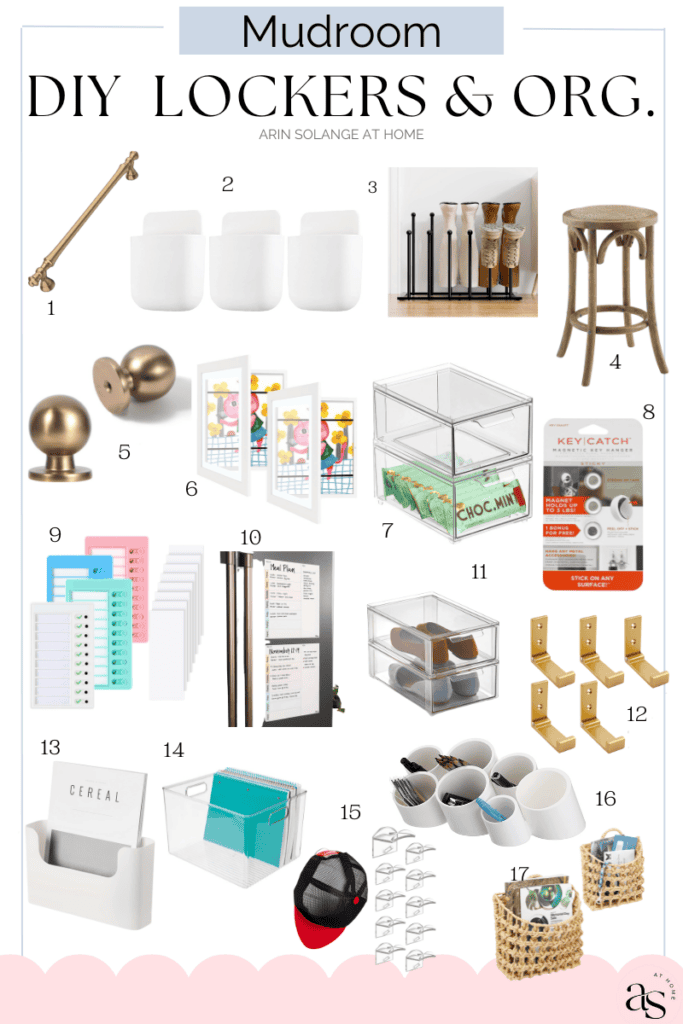
1 | 2 | 3 | 4 | 5 | 6 | 7 | 8 | 9 | 10 | 11 | 12 | 13 | 14 | 15 | 16 | 17
- Champagne Bronze Cabinet Pulls
- Wall Mounted Adhesive Remote Control Holders – These are perfect for holding small items that you need handy on the go.
- Free Standing Metal Boot Rack
- Natural Rattan Stool – These are the stools we have at our DIY craft table.
- Champagne Bronze Cabinet Knobs
- Kids Art Frames – These are great to display all those masterpieces your kids make for you.
- Stackable Storage Containers
- Key Catch Adhesive Mount
- Chore Chart
- Dry Erase Weekly Meal Planning & Errand List
- Stackable Storage Container With Front Pull– This is another great option to store shoes.
- Folding Wall Hooks
- Adhesive Wall Mount File Holder – This is great at holding all those important papers for school.
- Plastic Bin Container– This is another great option to store and organize library books or notebooks for school.
- Adhesive Wall Mounted Hat Hooks
- Cylinder Table Organizer– This is another great option for storing pens, pencils, art supplies.
- Wicker Hanging Basket– We love having these on our stairs for easy access.
Champagne Bronze Cabinet Pulls
Wall Mounted Adhesive Holders
Free Standing Metal Boot Rack
Natural Rattan Stool
Champagne Bronze Cabinet Knobs
Kids Art Frames
Stackable Storage Containers
Key Catch Adhesive Mount
Chore Chart
Dry Erase Weekly Planning Kit
Front Pull Storage Container
Folding Wall Hooks
Adhesive Wall Mount File Holder
Plastic Bin Container
Adhesive Hat Mount Hooks
Cylinder Table Organizer
Hanging Wicker Baskets
Other Posts You’ll Love
Mudroom Tile Ideas | Functional Butler’s Pantry | Klearvue Cabinetry Review | Small Home Office
Pin This Photo Below For Later
Hopefully, this post gave you some great insight on how to create your own DIY mudroom lockers. Whether you intend to use Klearvue cabinetry, build your own cabinets from scratch, or purchase a cabinet tree, you can make a functional area that will work for any space. Any solution will work as long as you can store and organize all of your day to day items in a convenient place for easy access.