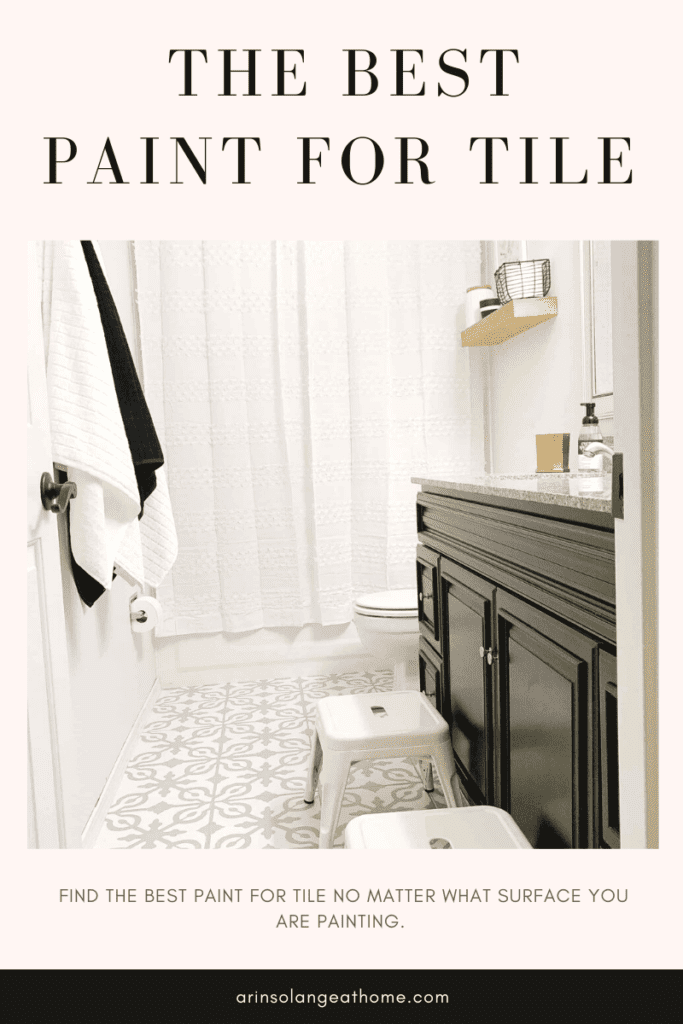
Every new year, I get the itch to do some major declutter and DIY. We will definitely have more on a declutter challenge soon, but in the meantime, let’s talk DIY. I am all about immediate gratification (for better and for worse) and a couple years ago that set me on a path to paint our tile floors in a bathroom. I am asked all the time about the best paint for tile, so I wanted to share what I found.
This post may contain affiliate links
The Best Paint for Tile
What do you think about when I say the word floor tiles? For some, you may love tile and others may have an entirely different relationship all together. I definitely love tile floors in high-traffic areas (like mudrooms) and water-prone areas like bathrooms.
Otherwise, I think tile floors can date themselves significantly when in comparison to a timeless wood floor. Bring in paint. Yes, that’s right, paint! Did you know that you can paint your outdated old tiles to bring new life and a new look to a room?
Painting tile is an affordable way to drastically change the entire look of a room without undergoing any major renovations. If you’ve ever wondered about painted tile, I’ll go over the best tile paint for your project to yield the best results.
My Experience with Tile Paint
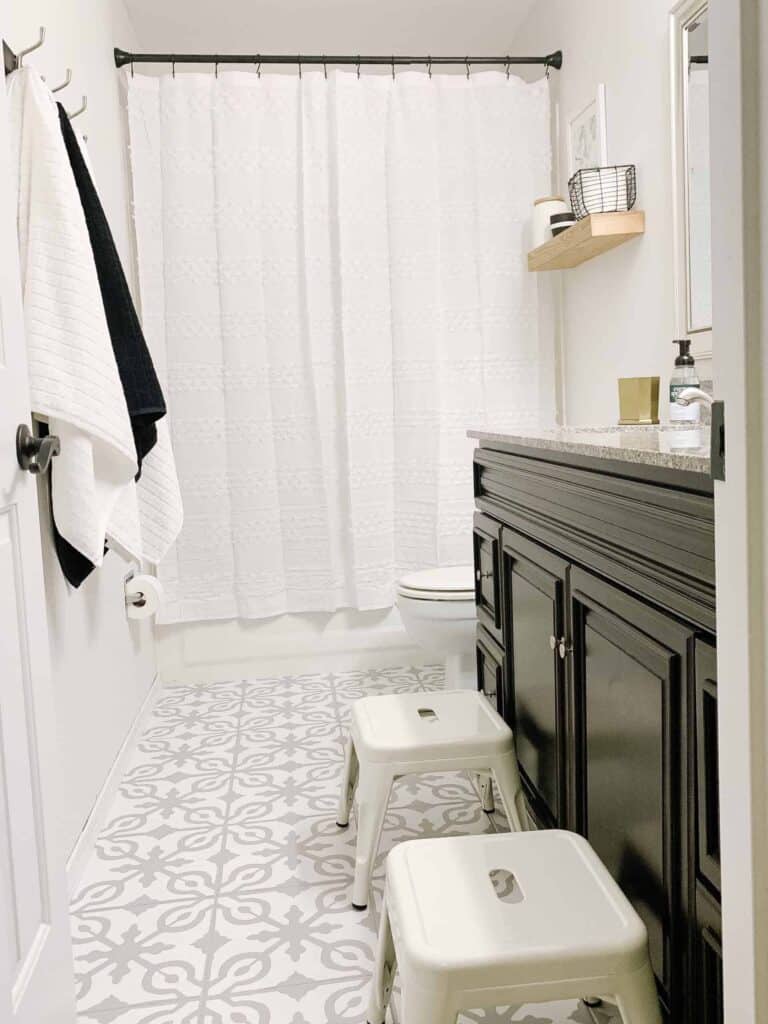
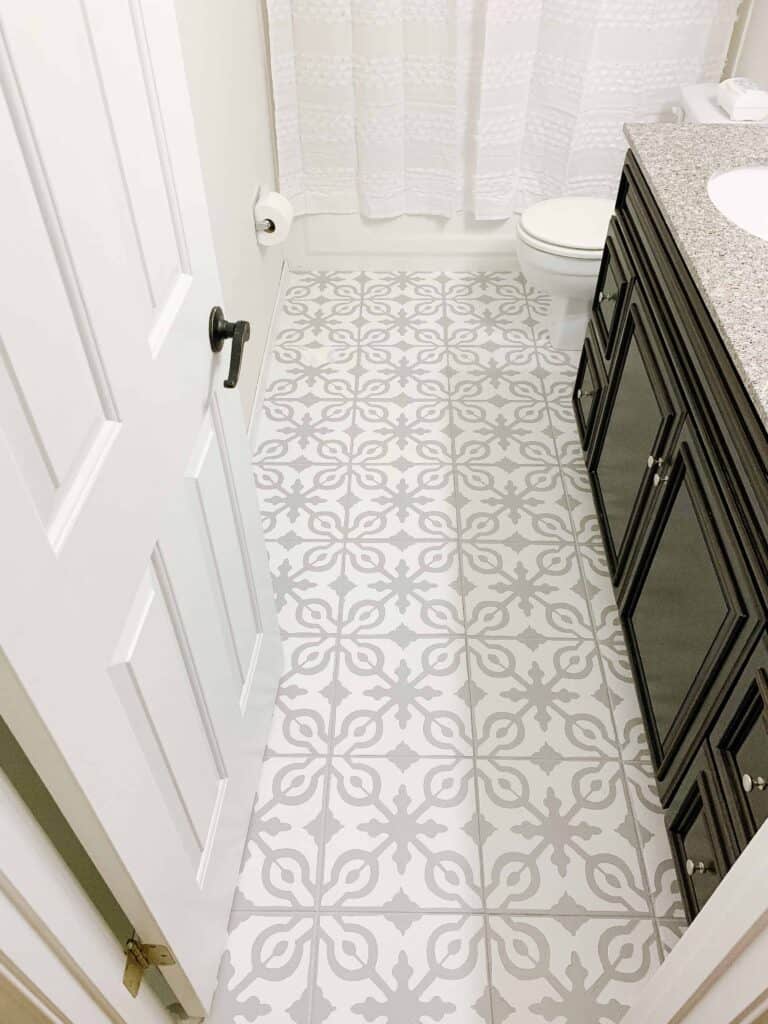
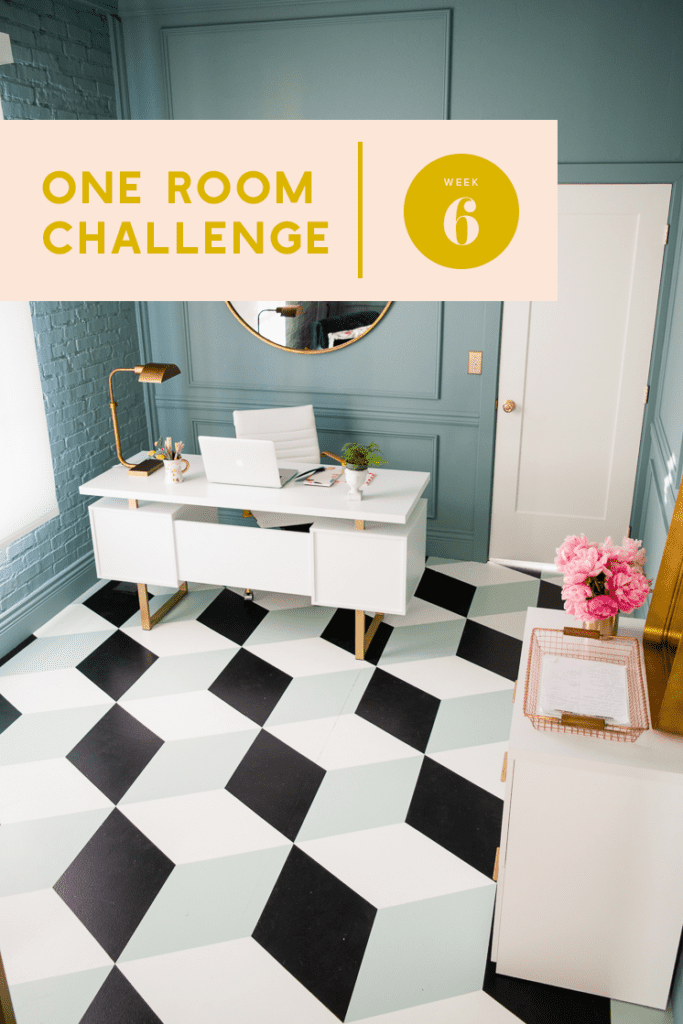
In our last house, as I made my way from room to room and DIY project to DIY project, I came to a screeching halt at my kids’ bathroom. The early 2000s ceramic tile floor was a huge eyesore and no matter how much updating I did around it, the bathroom tiles gave away it’s age. I knew I needed to figure out a way for it to match the rest of our home, but I didn’t want to spend the insane amount of money on new tile. I mean, it is my kids’ bathroom after all!
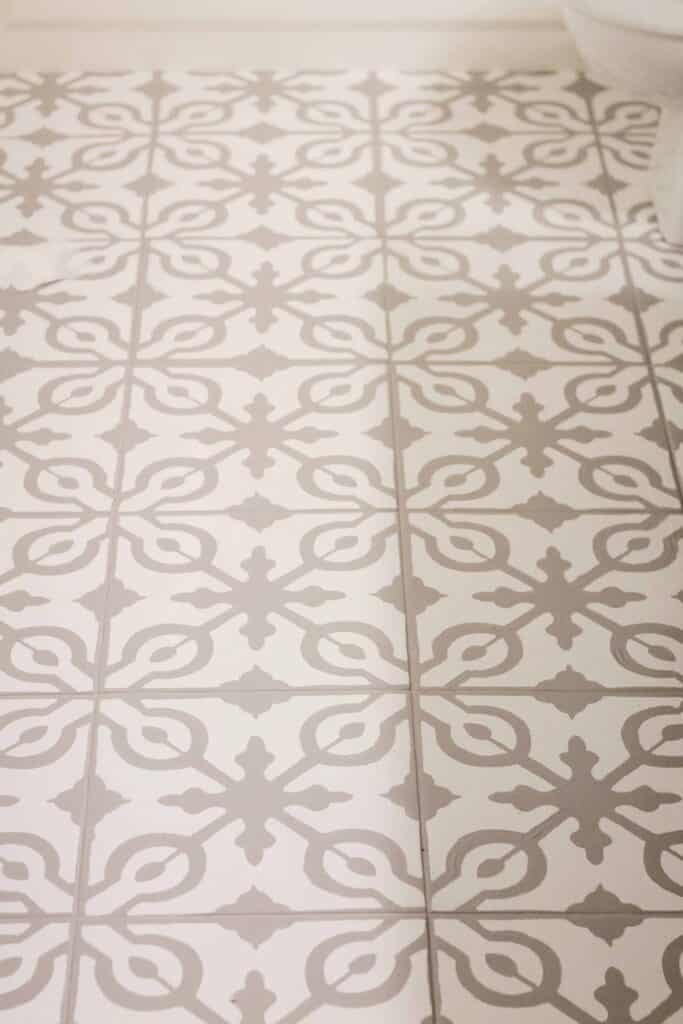
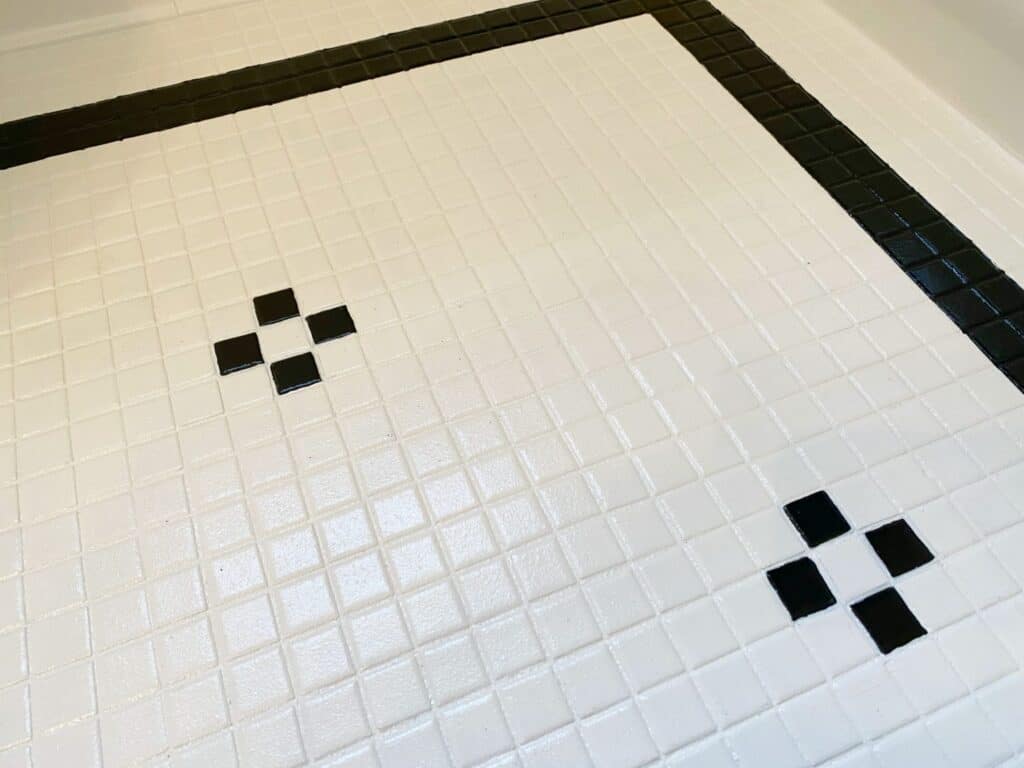
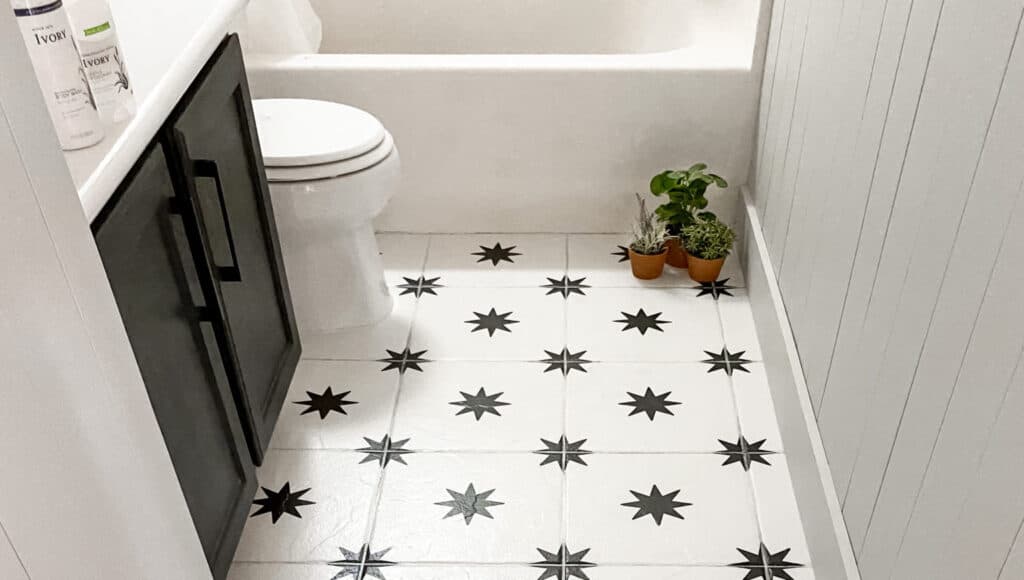
Enter tile paint. I decided to give it a try and create a stencil pattern over freshly painted tile. The bathroom floor tile had to look better than what was already there, so I took my chance and jumped into this project. To view the whole project, check out my post here. The end result was stunning and ended up costing very little, but made a huge impact.
What is the Best Paint for Tile?
So what type of paint can you use to paint tile and where do I start? It all starts with your supplies, of course. Keep in mind that while my project was tile flooring, you can use these same rules and apply it to other tiles like tile backsplashes.
You may have an outdated kitchen backsplash that could use updating or an old tiled laundry room. The good news is you can apply these principles and you’ll have a dramatic change to your space in no time. The first step is to pick the right paint for your project.
No matter what type of paint you use, you may still need to have touch ups done over time. Paint can chip and is not as durable as ceramic or porcelain tile. If the tile is in a heavy wear area, you’ll definitely want to ensure you keep extra paint for touch ups. Now I don’t say any of this to scare you away from doing this project.
Rather, I want you to have a realistic expectation that paint can chip and with foot traffic, you may need to touch up the floors periodically. But what area of your home doesn’t require a bit of maintenance from time to time?
Best Paint: Paint Types
There are several types of paint you can choose to paint your tile from latex paint, acrylic paint, to epoxy paint. All are options when it comes to your project. While we used chalk latex paint to paint our floor, if I could go back, I’d choose a different option. It did work well in our project, but paint designed specifically for tile would be the best bet.
There is no right tile paint, but there are paints specifically designated as tile paint. Epoxy paint is a tile paint that is resistant to abrasions and the use of detergents allowing the tile to be easily cleaned and durable. This may be your best option for high-moisture areas like your shower area or bathroom wall.
Keep in mind that tiles near water will require a waterproof barrier as well. Epoxy paint can come in two forms. One-part epoxy paint is easy to work with as it dries naturally and generally only requires a base coat. Two-part epoxy paint is a chemical process that requires two substances to be mixed together to then be used.
Another tile painting option is two-process paint. This is just as it sounds: a two step process with a bonding agent that is applied as a first coat and then a finishing top coat is applied last. This yields better results with durability and is a good idea for areas that see higher traffic. Another paint product for tile paint includes alkyd paints that are generally seen in cabinet painting. Similarly to enamel paints, alkyd paint gives a durable long lasting finish and can also be used to paint metals.
Acrylic paint (specific to tile) is another ceramic tile paint option that is designed to be water resistant and more durable than your
standard acrylic latex paint. All of these are options when it comes to the right paint for your project.
Regardless of the type of paint you use, you’ll need to ensure you take the time to properly prepare the surface area before you begin to paint your ceramic tile surface.
Steps For A Fresh Coat of Paint
So you’ve decided to take the leap and find a paint color for your tile! Congratulations! Before you go to Home Depot and pick out your color, the first step is to spend some time making sure you understand the process and what supplies you’ll need.
Step 1: Clean Your Surface
In any type of paint job, you’ll want to clean your surface to make sure that it is free from dirt, grease, and debris. If you are painting tile bathroom floors or another tile floor, make sure you vacuum the space and sweep very thoroughly. You’ll want to get any dust off the surface. For wall tiles, you still may want to run a handheld vacuum over the surface or use a dry duster to get particles off and out of the way.
The next step you’ll need to do is roll up your sleeves and be prepared for some elbow grease. You are going to use a degreaser to clean the surface area that you are painting. We’ve used a product called Krud Kutter (available here) but you can also use another great product called TSP (available here).
Both products are great to have on hand if you plan on doing any other DIY projects, especially when it comes to painting. Make sure you wear proper protective equipment like gloves, eyeglasses, and respirators when dealing with chemicals and any project with harsh fumes. You’ll need to ensure you rinse the surface area with lots of water and get as much grime up as you can. Once the surface area has been cleaned, allow enough dry time before starting your next step.
Step 2: Repair Any Defects
Whether you are painting walls, cabinets, or tile, you’ll need to repair any visible defects in the surface area before applying your paint. Don’t push it off any longer, this is the time to do it! For tile, look for any cracks or chips in the tiles themselves and along the grout lines and grout joints. You can use caulk to repair small tile cracks and grout can be repaired with, well grout.
Step 3: Cover Your Assets
This may be a play on words and if you are offended, then it is most definitely not a play on words. Basically, you need to tape off the areas that you don’t want your paint to go- so cabinets, toilets, appliances, etc. If you don’t want tile paint to be splattered on it, then I highly suggest taking the time to use painter’s tape and plastic sheeting to protect your assets. This is the best tool to prevent an unwanted mess.
Step 4: Sand Time
I’ve seen this done both ways- sanding versus not sanding. You’ll want to lightly sand your surface area just enough to scuff them up but not enough to do any real damage. The key to sanding is that this helps the primer and paint bind to the materials.
You’ll need to clean the area again (yes, again) to rid the tiles of any sanding dust. Also be sure to check the products you use as some will say that sanding before application is not required.
Step 5: Prime Time
This is another step that you’ll want to check the products you are using to paint your tile. You may not need a bonding primer. I do think as a general rule of thumb, having a good primer makes a huge difference in your outcome. If the product you are using doesn’t require a primer, I don’t think it would hurt at all to add a coat of primer before you begin painting.
If you do add a layer of primer, you’ll want to make sure that it is a high-adhesion primer that is formulated to bond to tiles. Once you’ve added your primer, make sure you allow plenty of time for the primer to dry before starting your base coat. This may take up a lot of time, but the end result will be worth it.

Step 6: Base Coat
Now you can finally begin to paint! The best way to begin is to start in small sections. You’ll want to use a paint brush to help the paint get into the grout lines, but then use a foam roller to roll over the entire area. If you use a brush to paint the whole area, you’ll get brush lines and won’t be happy with the result.
The foam rollers will allow you to have an even consistent result. Again, this base coat needs to dry completely before you do anything else. I’d let it dry for a full day! We did a second coat of paint before we began our stencil design. I’d highly recommend a second coat of paint with the foam roller for the best results. If you are using white paint and your tile is a darker color, multiple coats of paint may be necessary.
Keep in mind that while you are painting, you’ll need to keep the area as clean as possible to avoid painting and later sealing in any dirt and debris. If you are painting floor tile, my best tip is to wear clean white socks in the area.
Step 7: Stencil Time
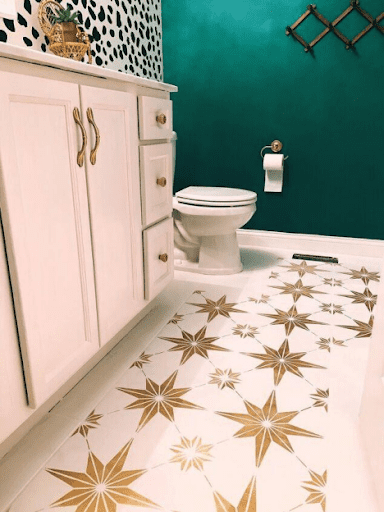
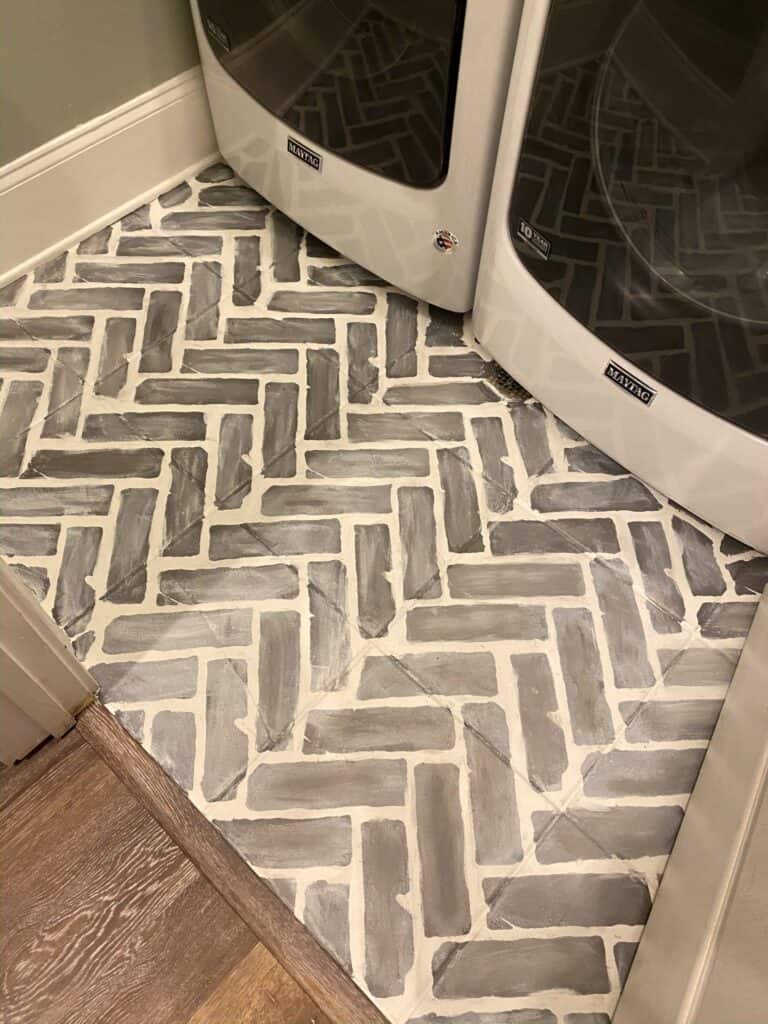
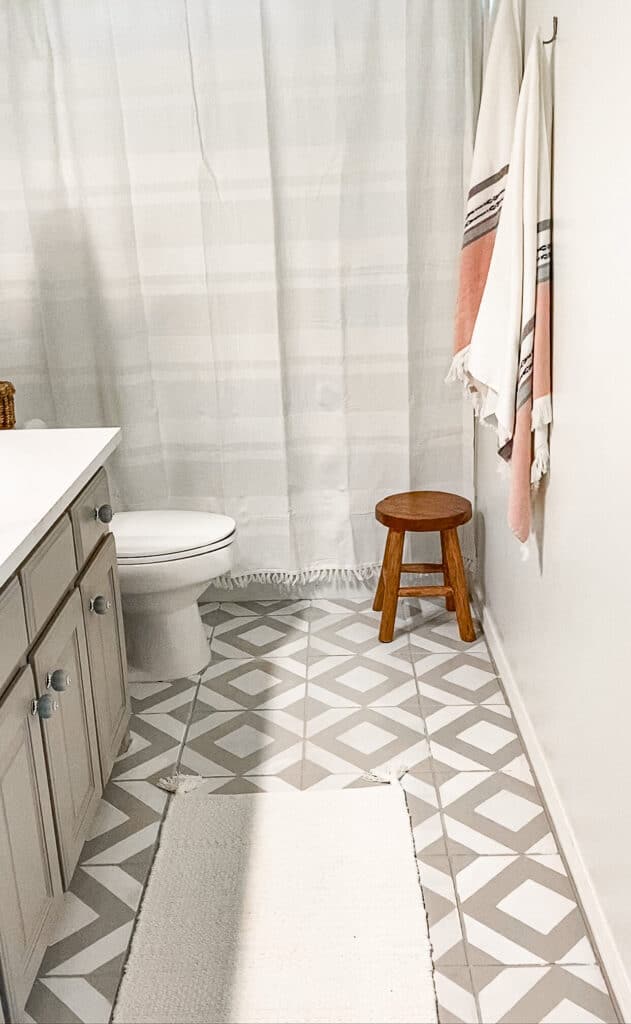
If you are going to add a design to your tile, this is the time to begin. If you want to see my full blog post on how to get the stencil design down, check out my post here. Keep in mind that you’ll need lots of patience for this step. This is not something you want to rush and it may take a long time to achieve the results you want.
Going slow, using thin coats of paint, and ensuring plenty of dry time between coats is key. If you are stenciling and using a different color, you’ll also likely need to touch up the paint and design once you have completed painting. After removing the stencil, look for places that need to be touched up. If you don’t find any, then you aren’t looking hard enough!
Step 8: Seal It
You are so close to the finish line. Before you let anyone near your new beautiful tile, you’ll want to seal it to ensure all your hard work lasts as long as possible. You MUST make sure your floors are totally, completely, without a doubt, DRY.
I repeat, the floors must be dry! You’ll use a foam roller to apply the sealer. Some products recommend only 1 coat, but I would definitely do more if your tile is in a high traffic area. Between sealing, you can lightly (very lightly) sand the area for a smoother finish. If you do this, make sure you remove the dust particles so you don’t seal those in your tile.
One thing that I stress heavily in my tutorial for my floor is that you need to use a water based sealer – oil based will leave a yellow color!
Step 9: Enjoy Your Hard Work
Before you enjoy all that hard work, you’ll want to leave your surface area alone for a few days. Tile can take up to 20 days to fully cure once you’ve painted it, so I would recommend leaving it alone for as long as you can! Now you get to enjoy your beautiful new tile!
Best Paint for Tile
If you are ready to take on this project and grab some paint, here are some of my favorite paints for tile.
1. Benjamin Moore’s Aura Bath & Spa
This is a great acrylic tile paint that is perfect for high-moisture areas like bathrooms and laundry rooms. This also contains a paint and primer in one product. The best part in my opinion, is that this paint is also mildew resistant. The acrylic paint is durable and won’t fade overtime.
2. XIM Tile Doc Kit & Aerosol Spray
This is another great option if you are looking to paint showers, tubs, or bathroom porcelain tile surfaces that hold up to water (both cold and hot soapy water). As an added bonus, this also comes in an aerosol spray form as well. The doc kit can be tinted to match other paint colors, but the aerosol spray is only available in a white gloss finish.
3. Rust-Oleum Tub & Tile Refinishing Kit
This is another great product for showers and bathrooms. This is a two part epoxy system that allows you to paint ceramic and porcelain tiles. The one downside is that you are limited on colors as this comes as white tile paint.
It does, however, give you great results and easy to use instructions to help you achieve those results. You will have to mix the parts together and use within a 6 hour time frame, so be sure to set aside plenty of time to not get interrupted. We actually used this on our wet bar backsplash in our last house and it worked amazing!
Other Posts You’ll Love
My Tutorial for Bathroom Floor | Best Paint for Cabinets | How to Paint Kitchen Cabinets
Pin the Photo Below for Later
I hope this post gave you some good ideas when it comes to painting your tile, and you feel confident in the best paint for tile. It may look like a daunting task, but you can definitely achieve an incredible look for less by utilizing tile paint! If you have any questions, feel free to leave them in the comments, and follow me on Instagram @arinsolange for more home, decor, and DIY. Happy painting friends!
Hello! I’ve painted my bathroom floors, and now they seem really slick. Any suggestions? Thanks!
try adding a matte poly layer