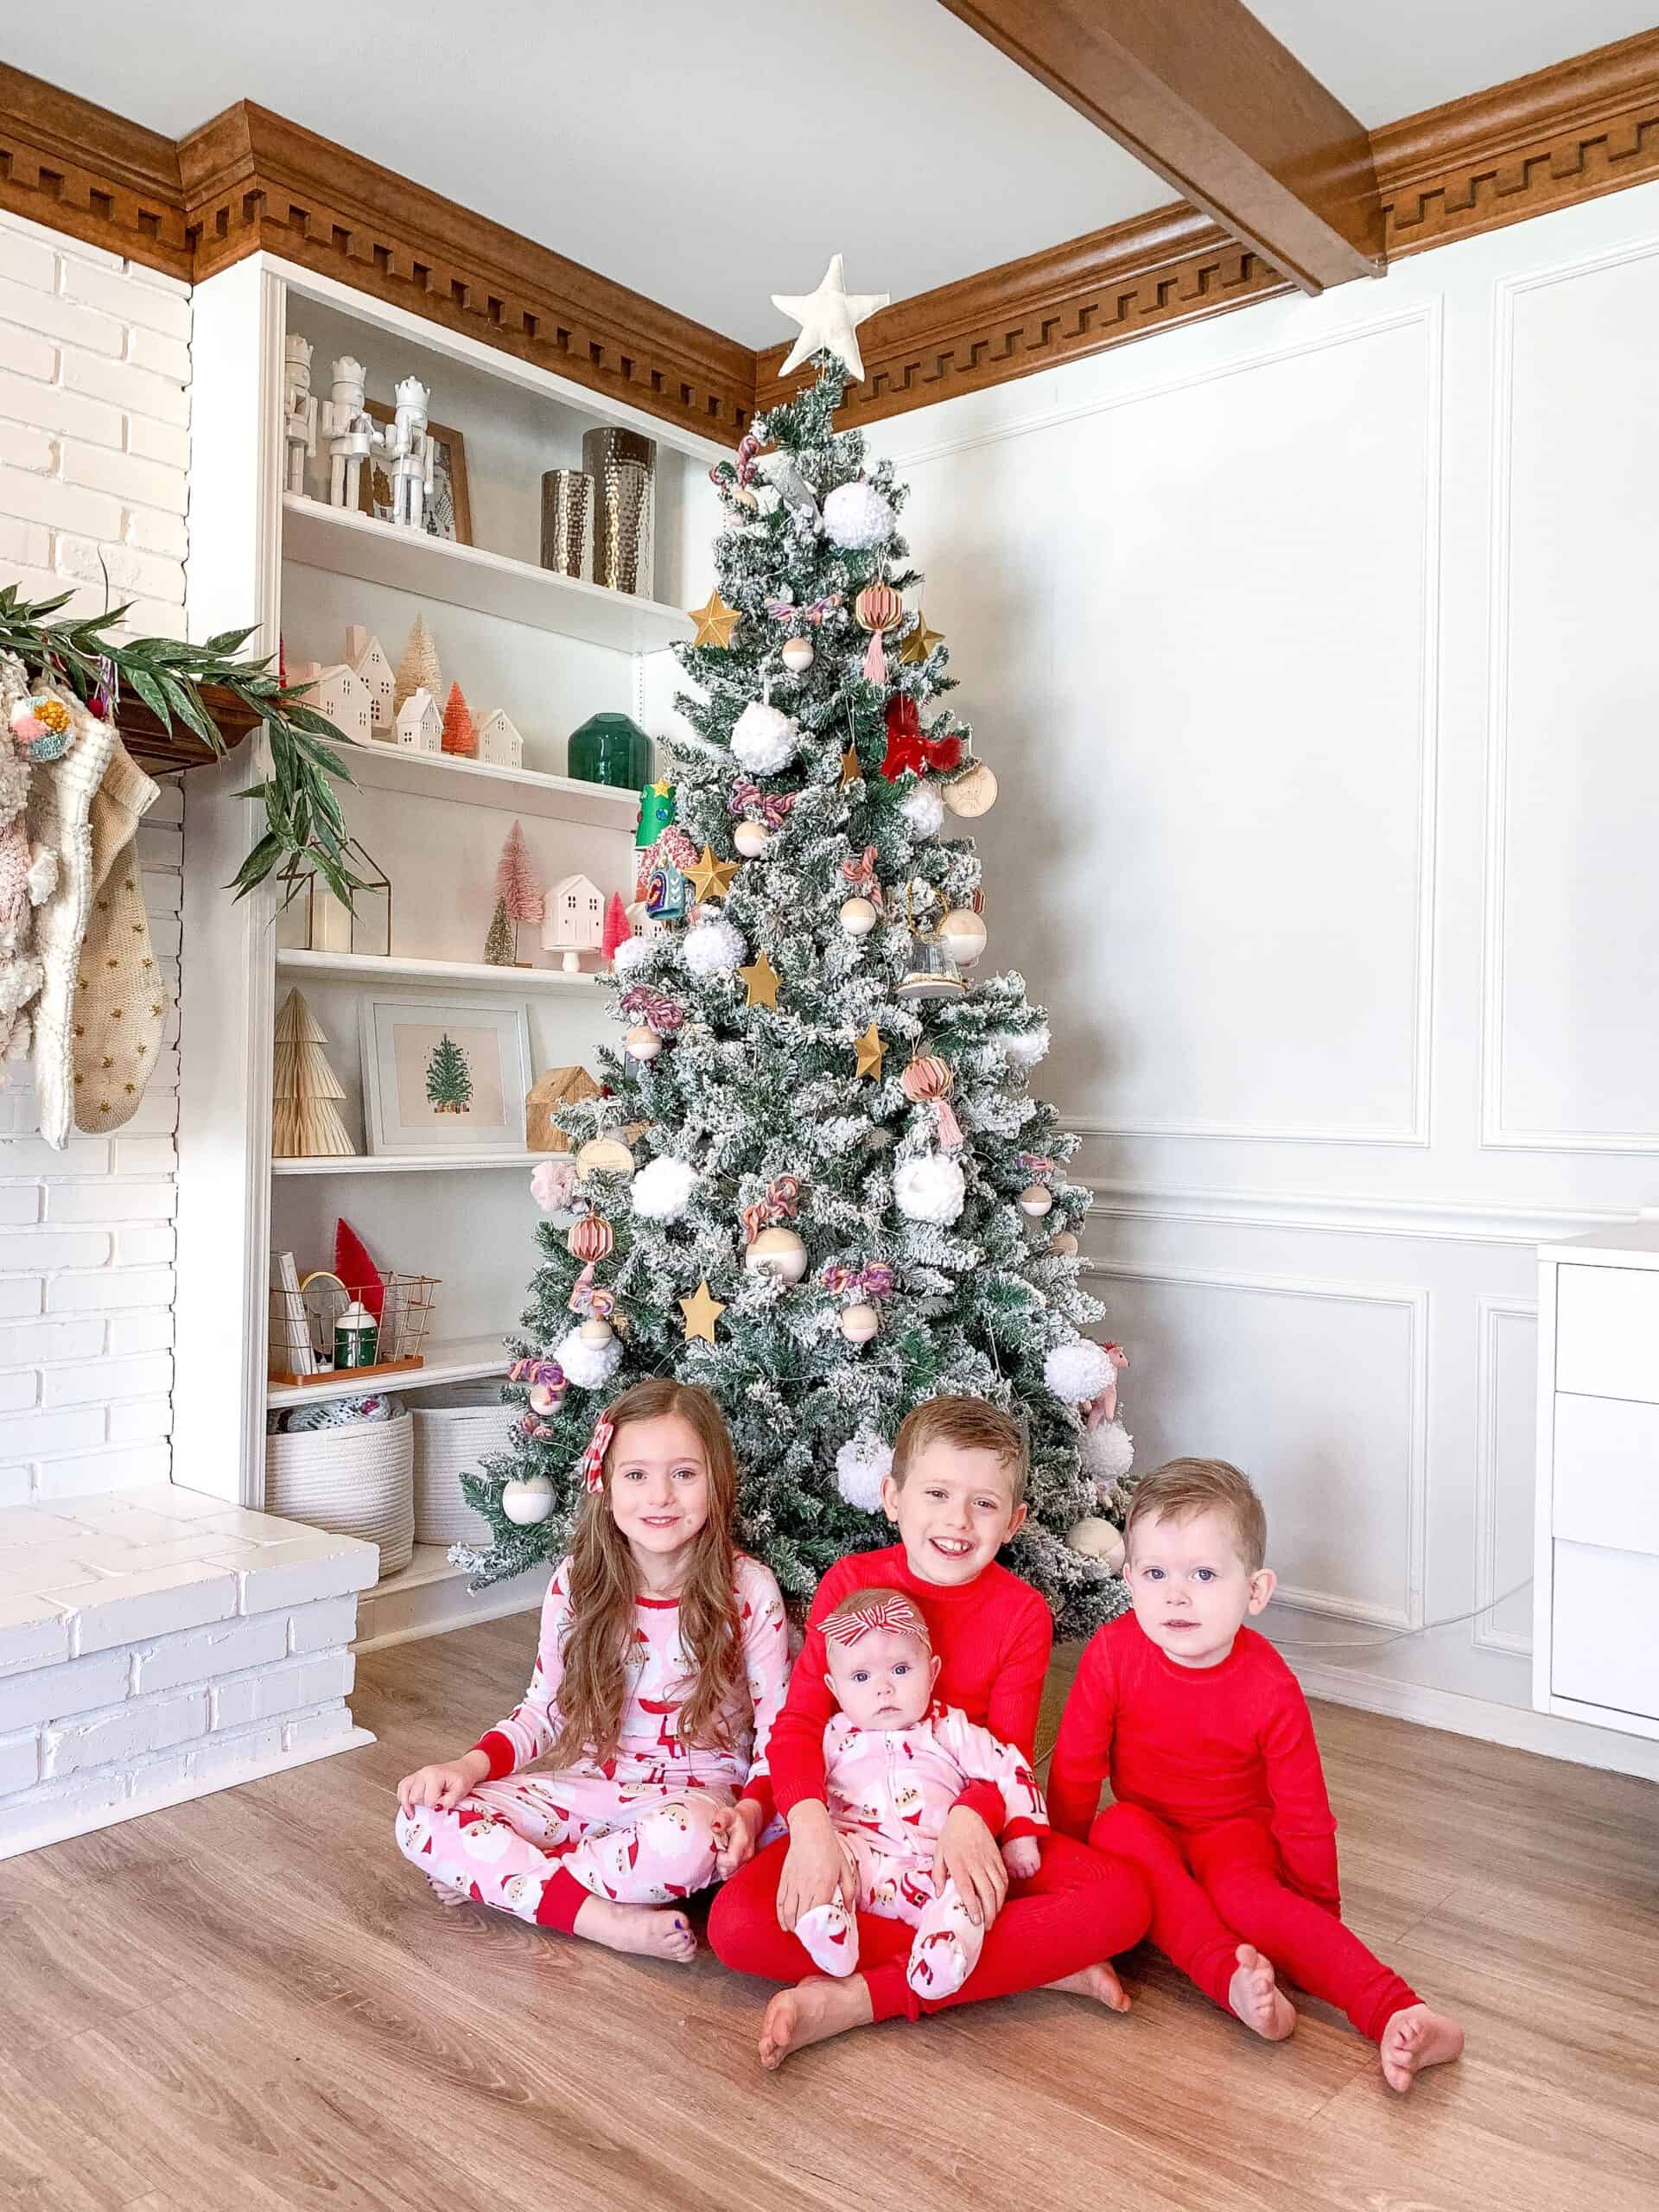
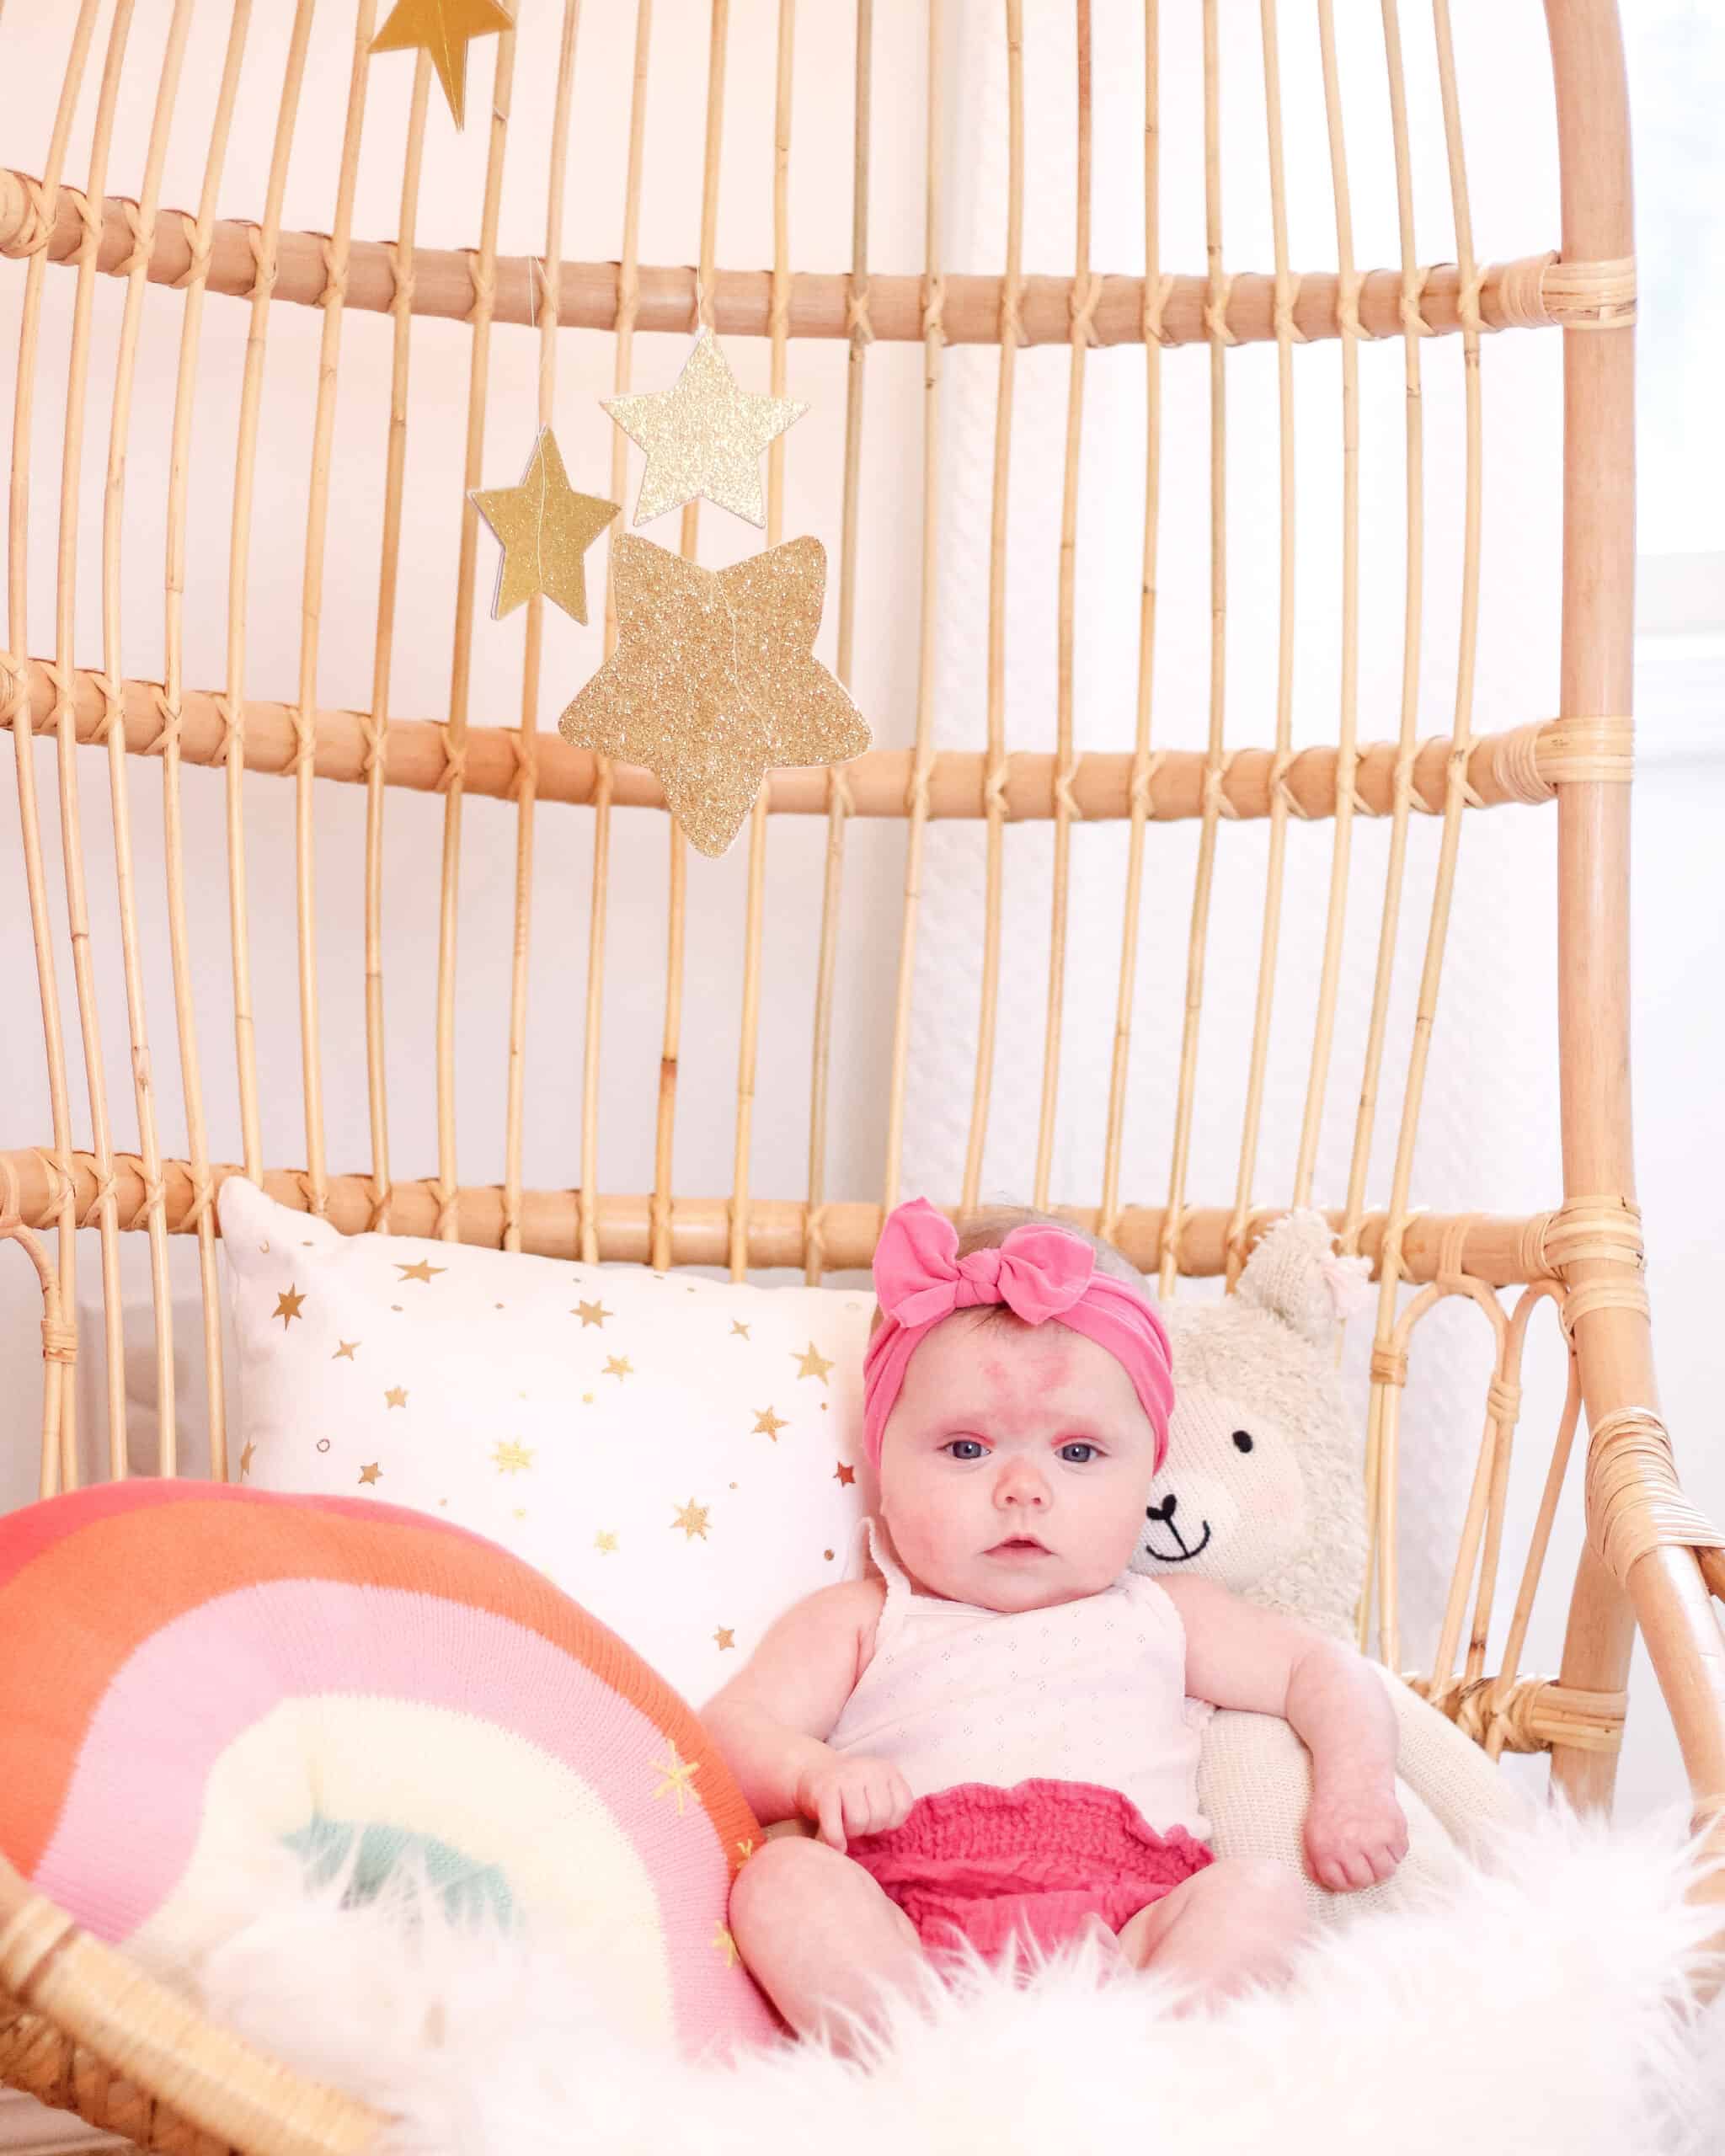
Our sweet Goldie Mae is 5 months old. Which is literally heart breaking for me to type. I have her 5 month update and favorites for 5 month old products to share!
This post contains affiliate links
If you have been following along, then you likely know that I have been tracking Goldie’s first year with monthly updates as well as her favorite items each month.
My hope is that if you click through these posts you will find some products that we used consistently throughout the months and will know where to splurge and where to save.
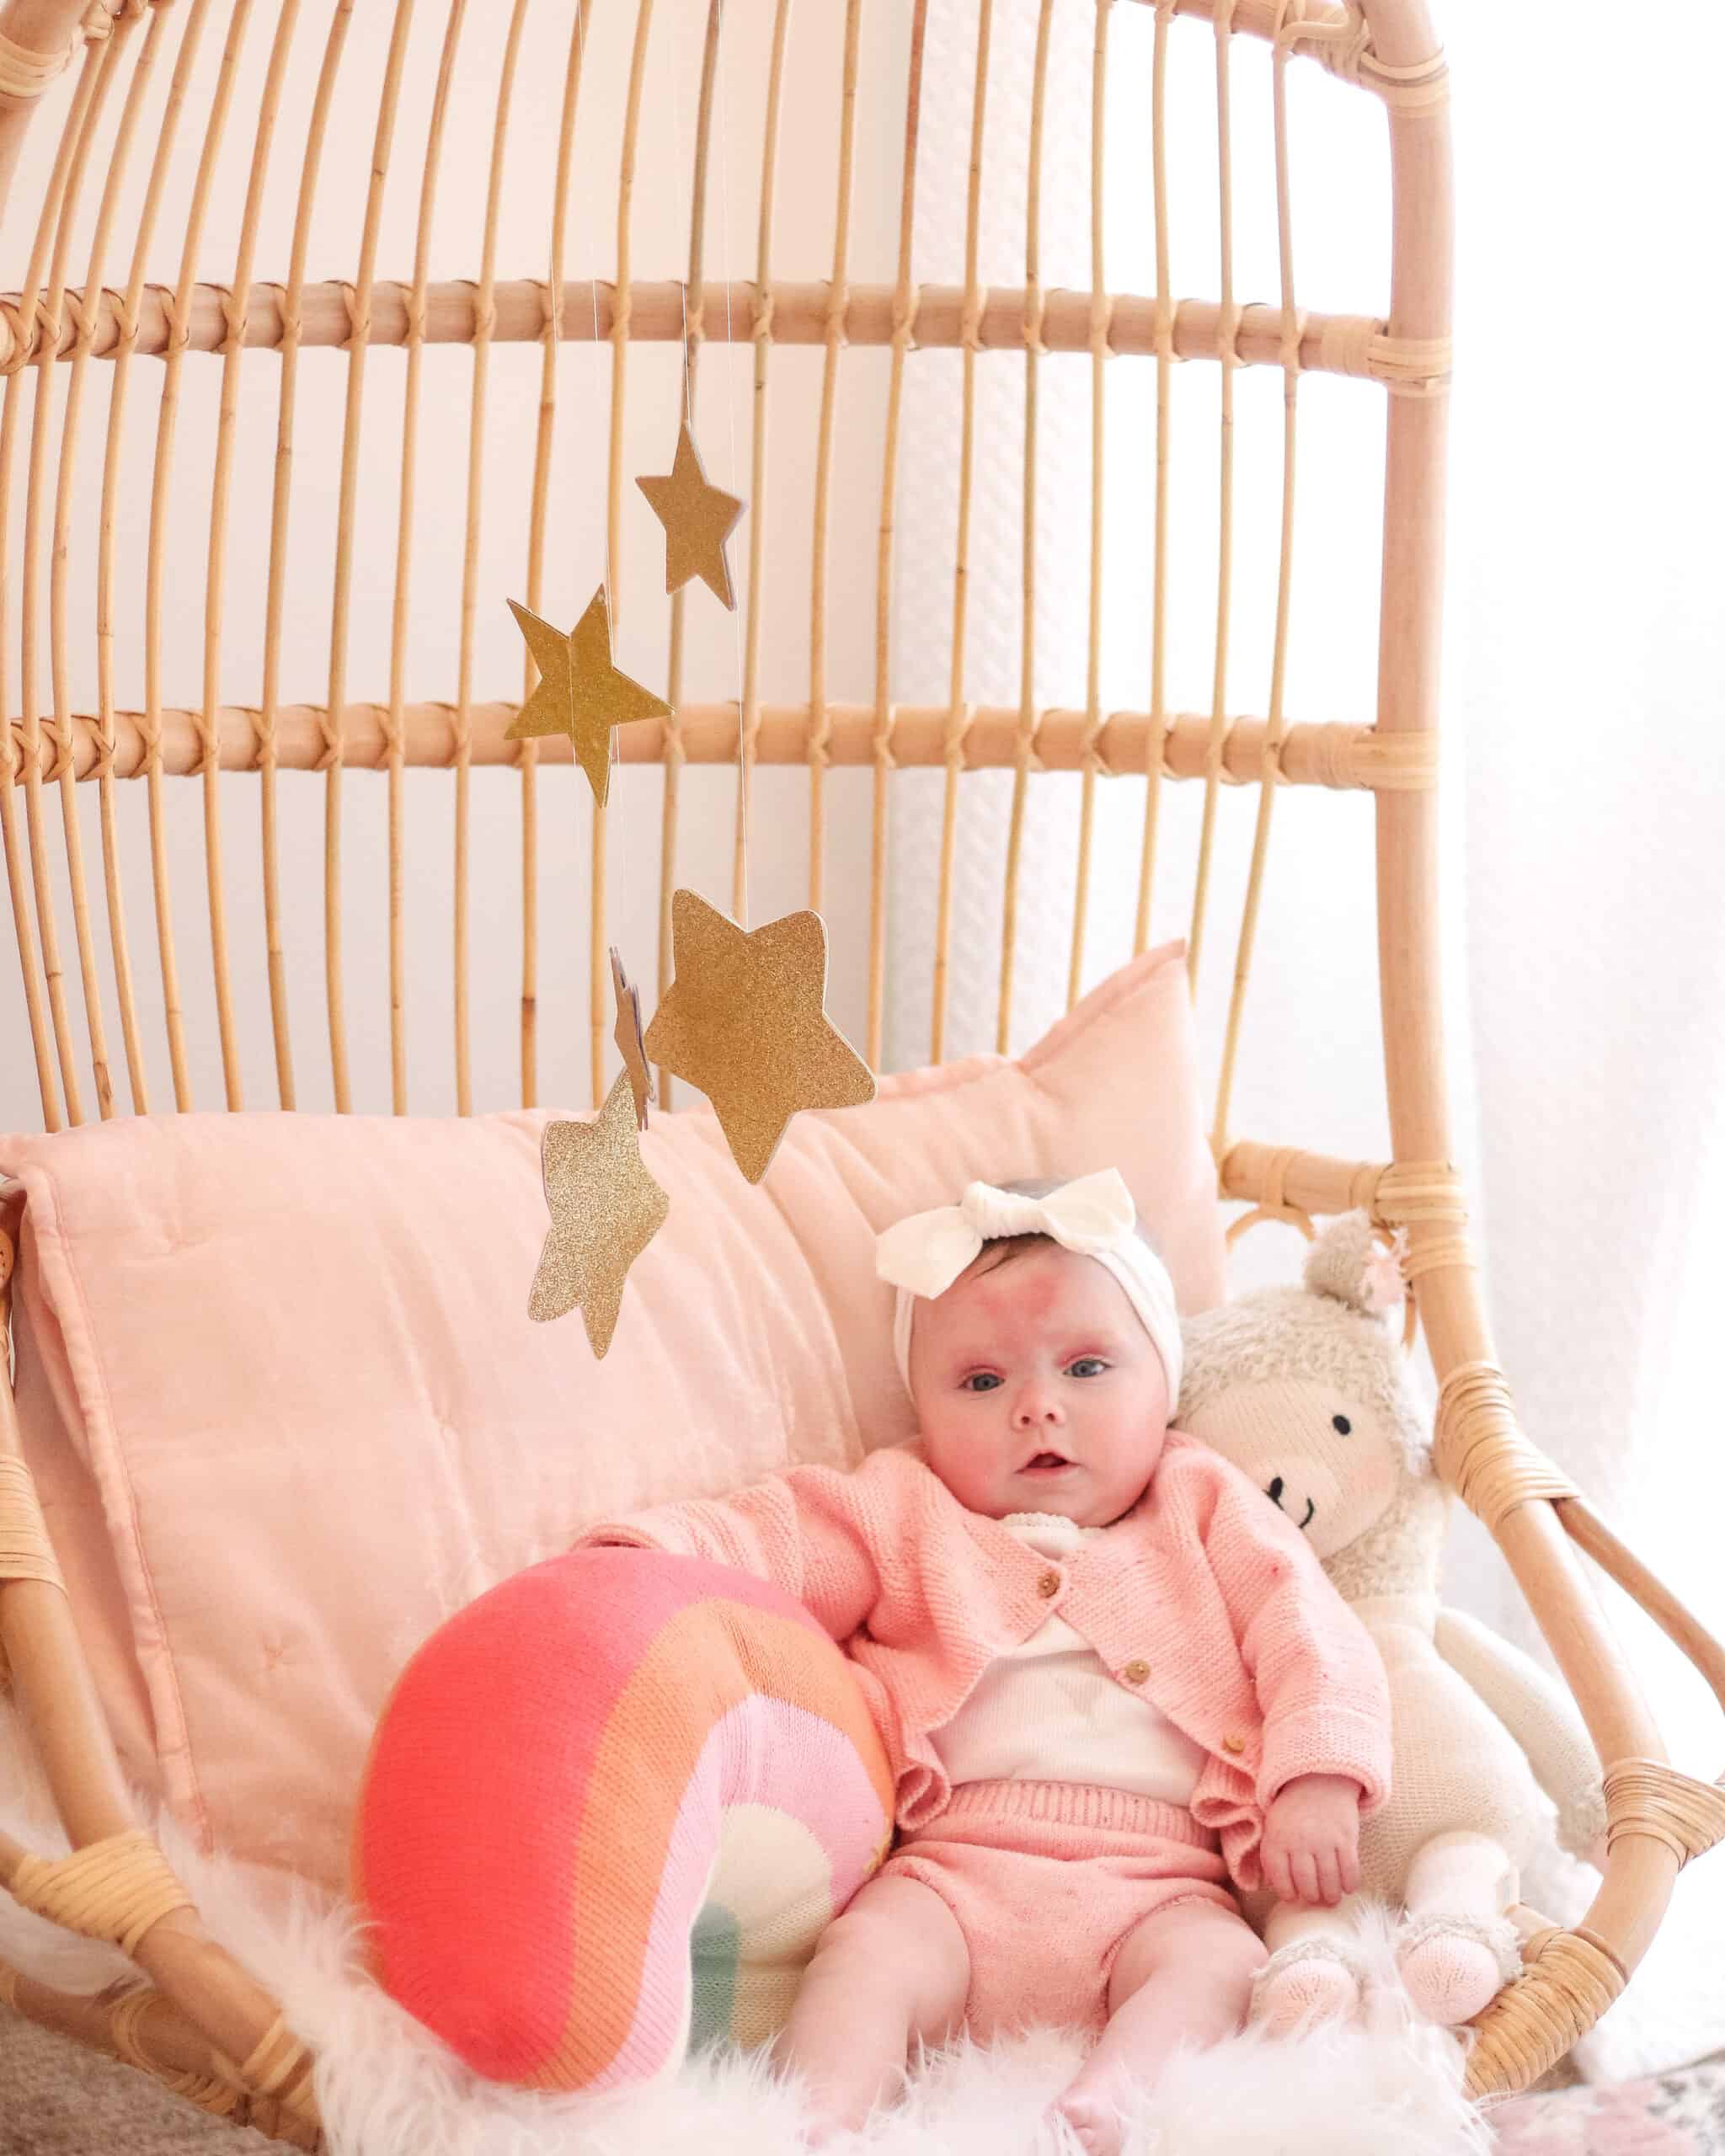
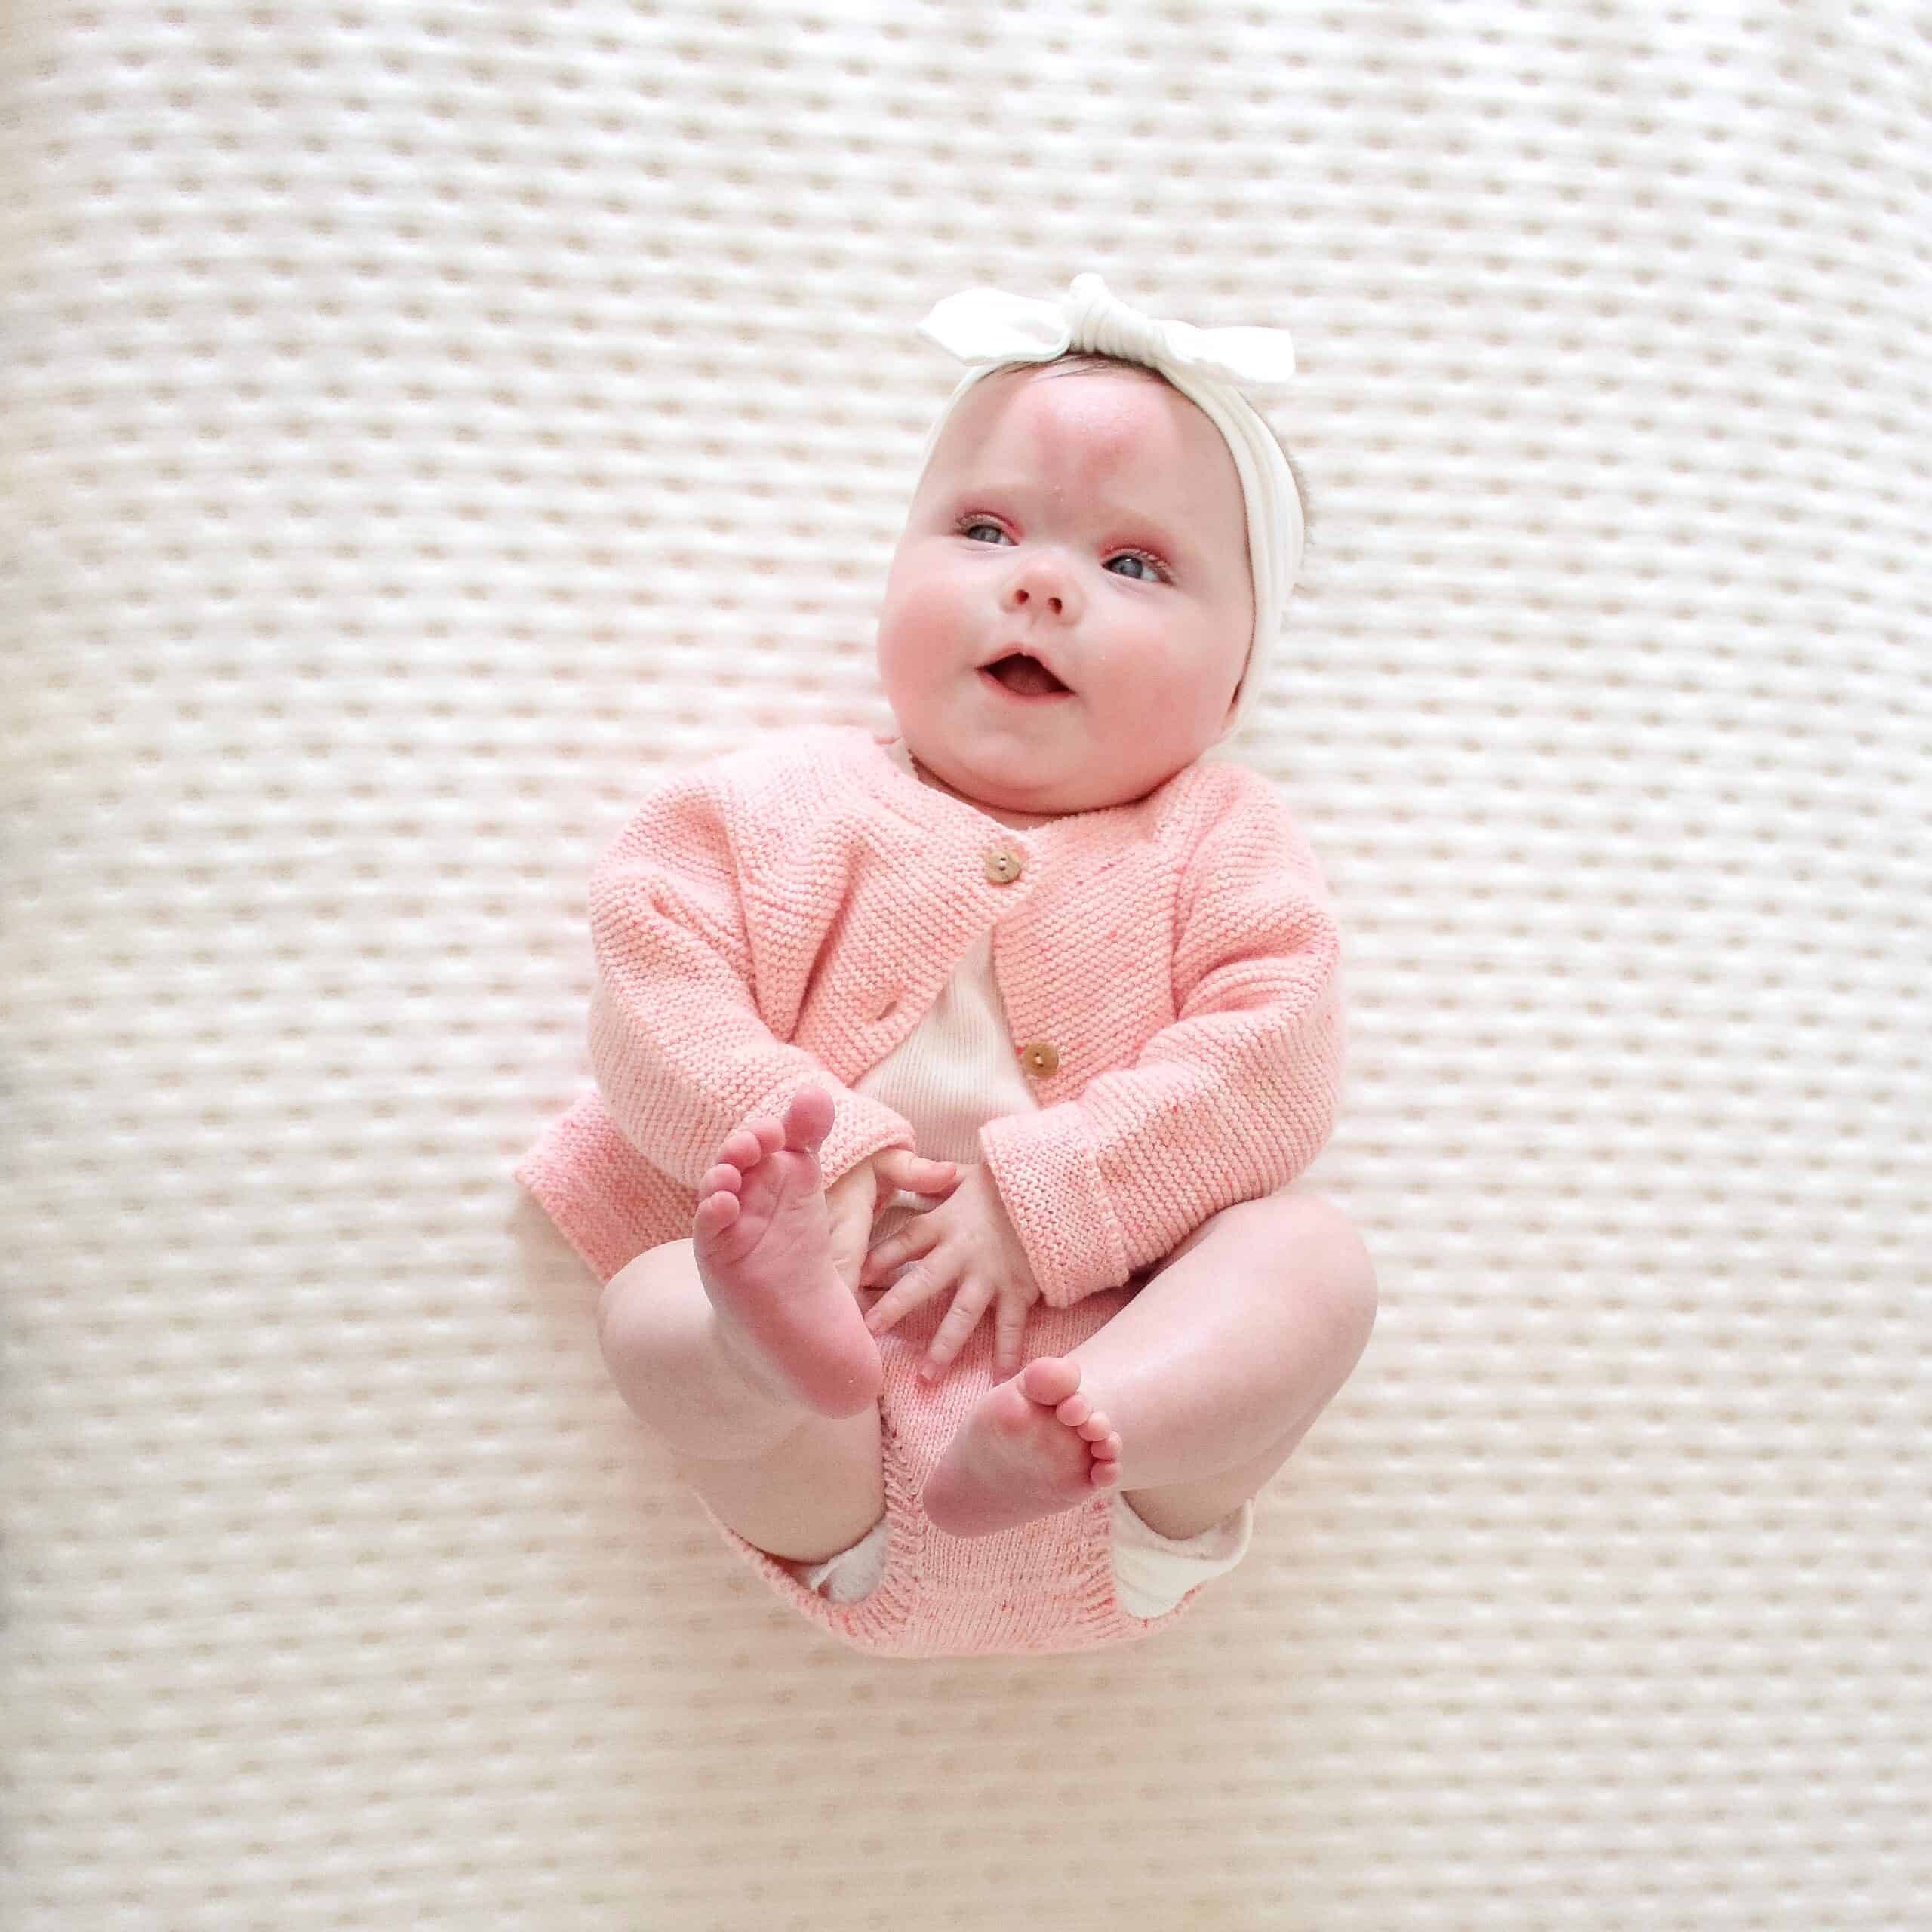
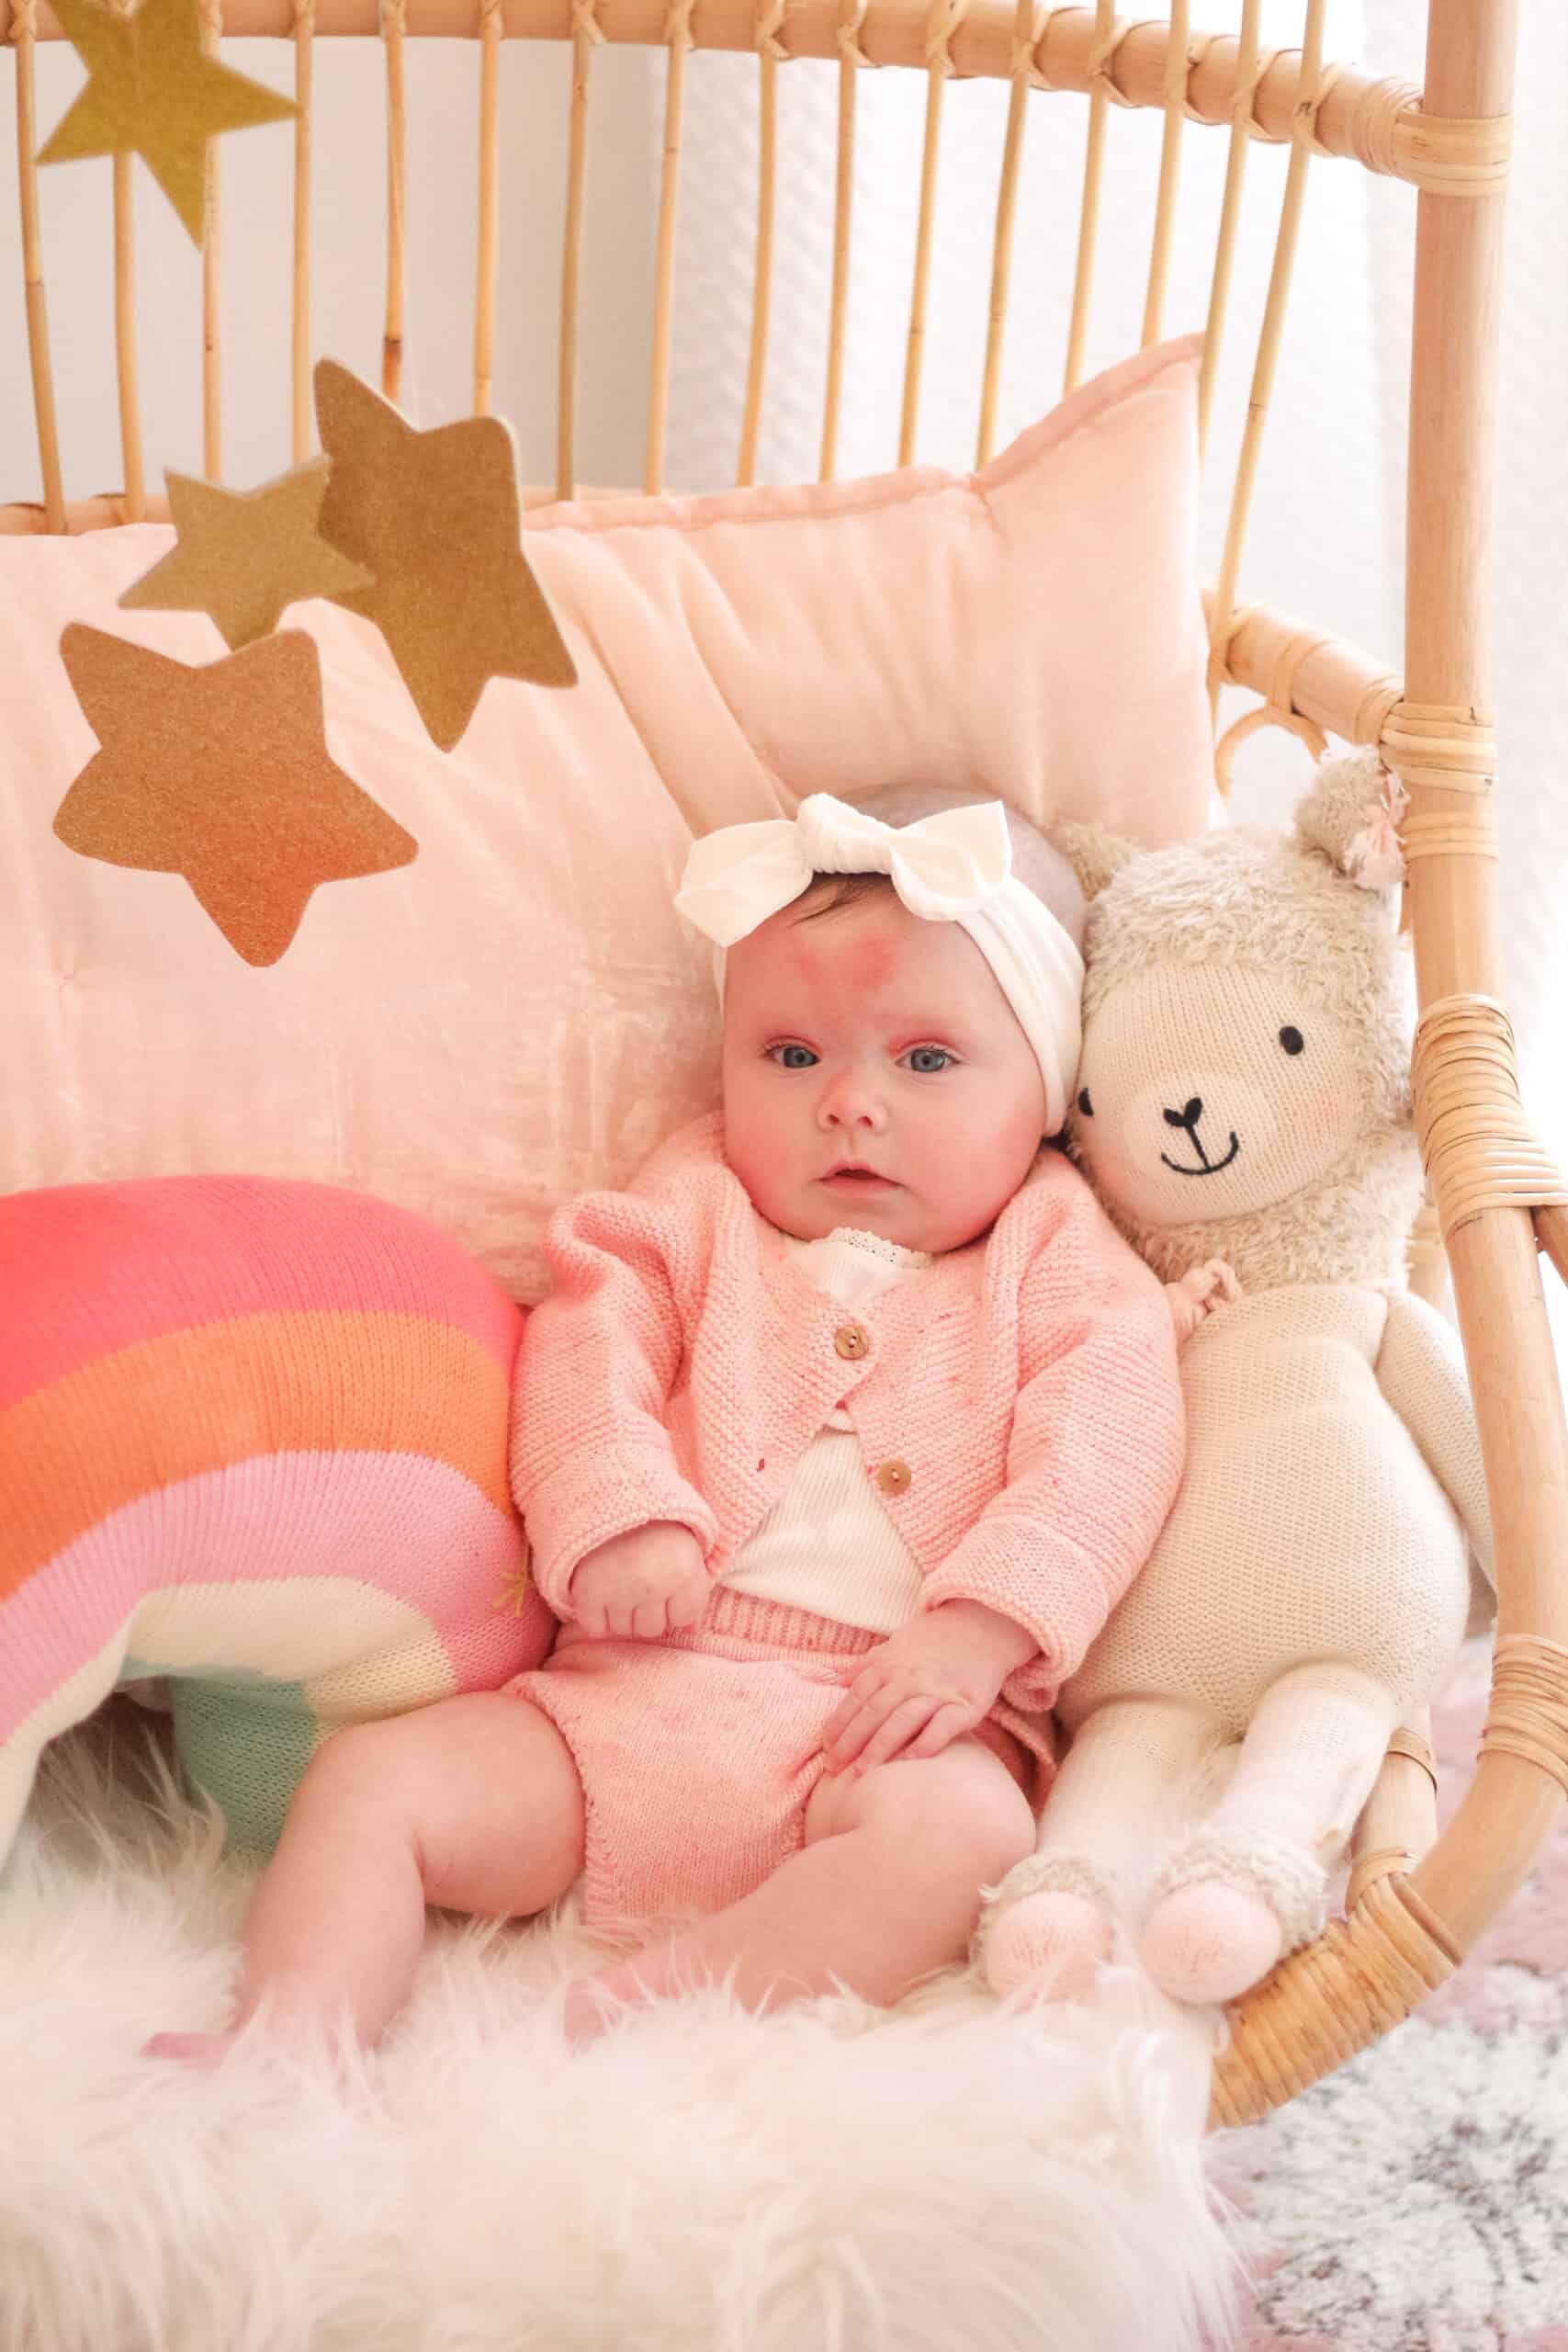
Goldie Mae – 5 Months Old
For starters lets talk about our sweet girl. I feel like this update won’t be super exciting because I was a little late in writing her 4 month update. She is still such a smiley happy girl, however has been a little under the weather.
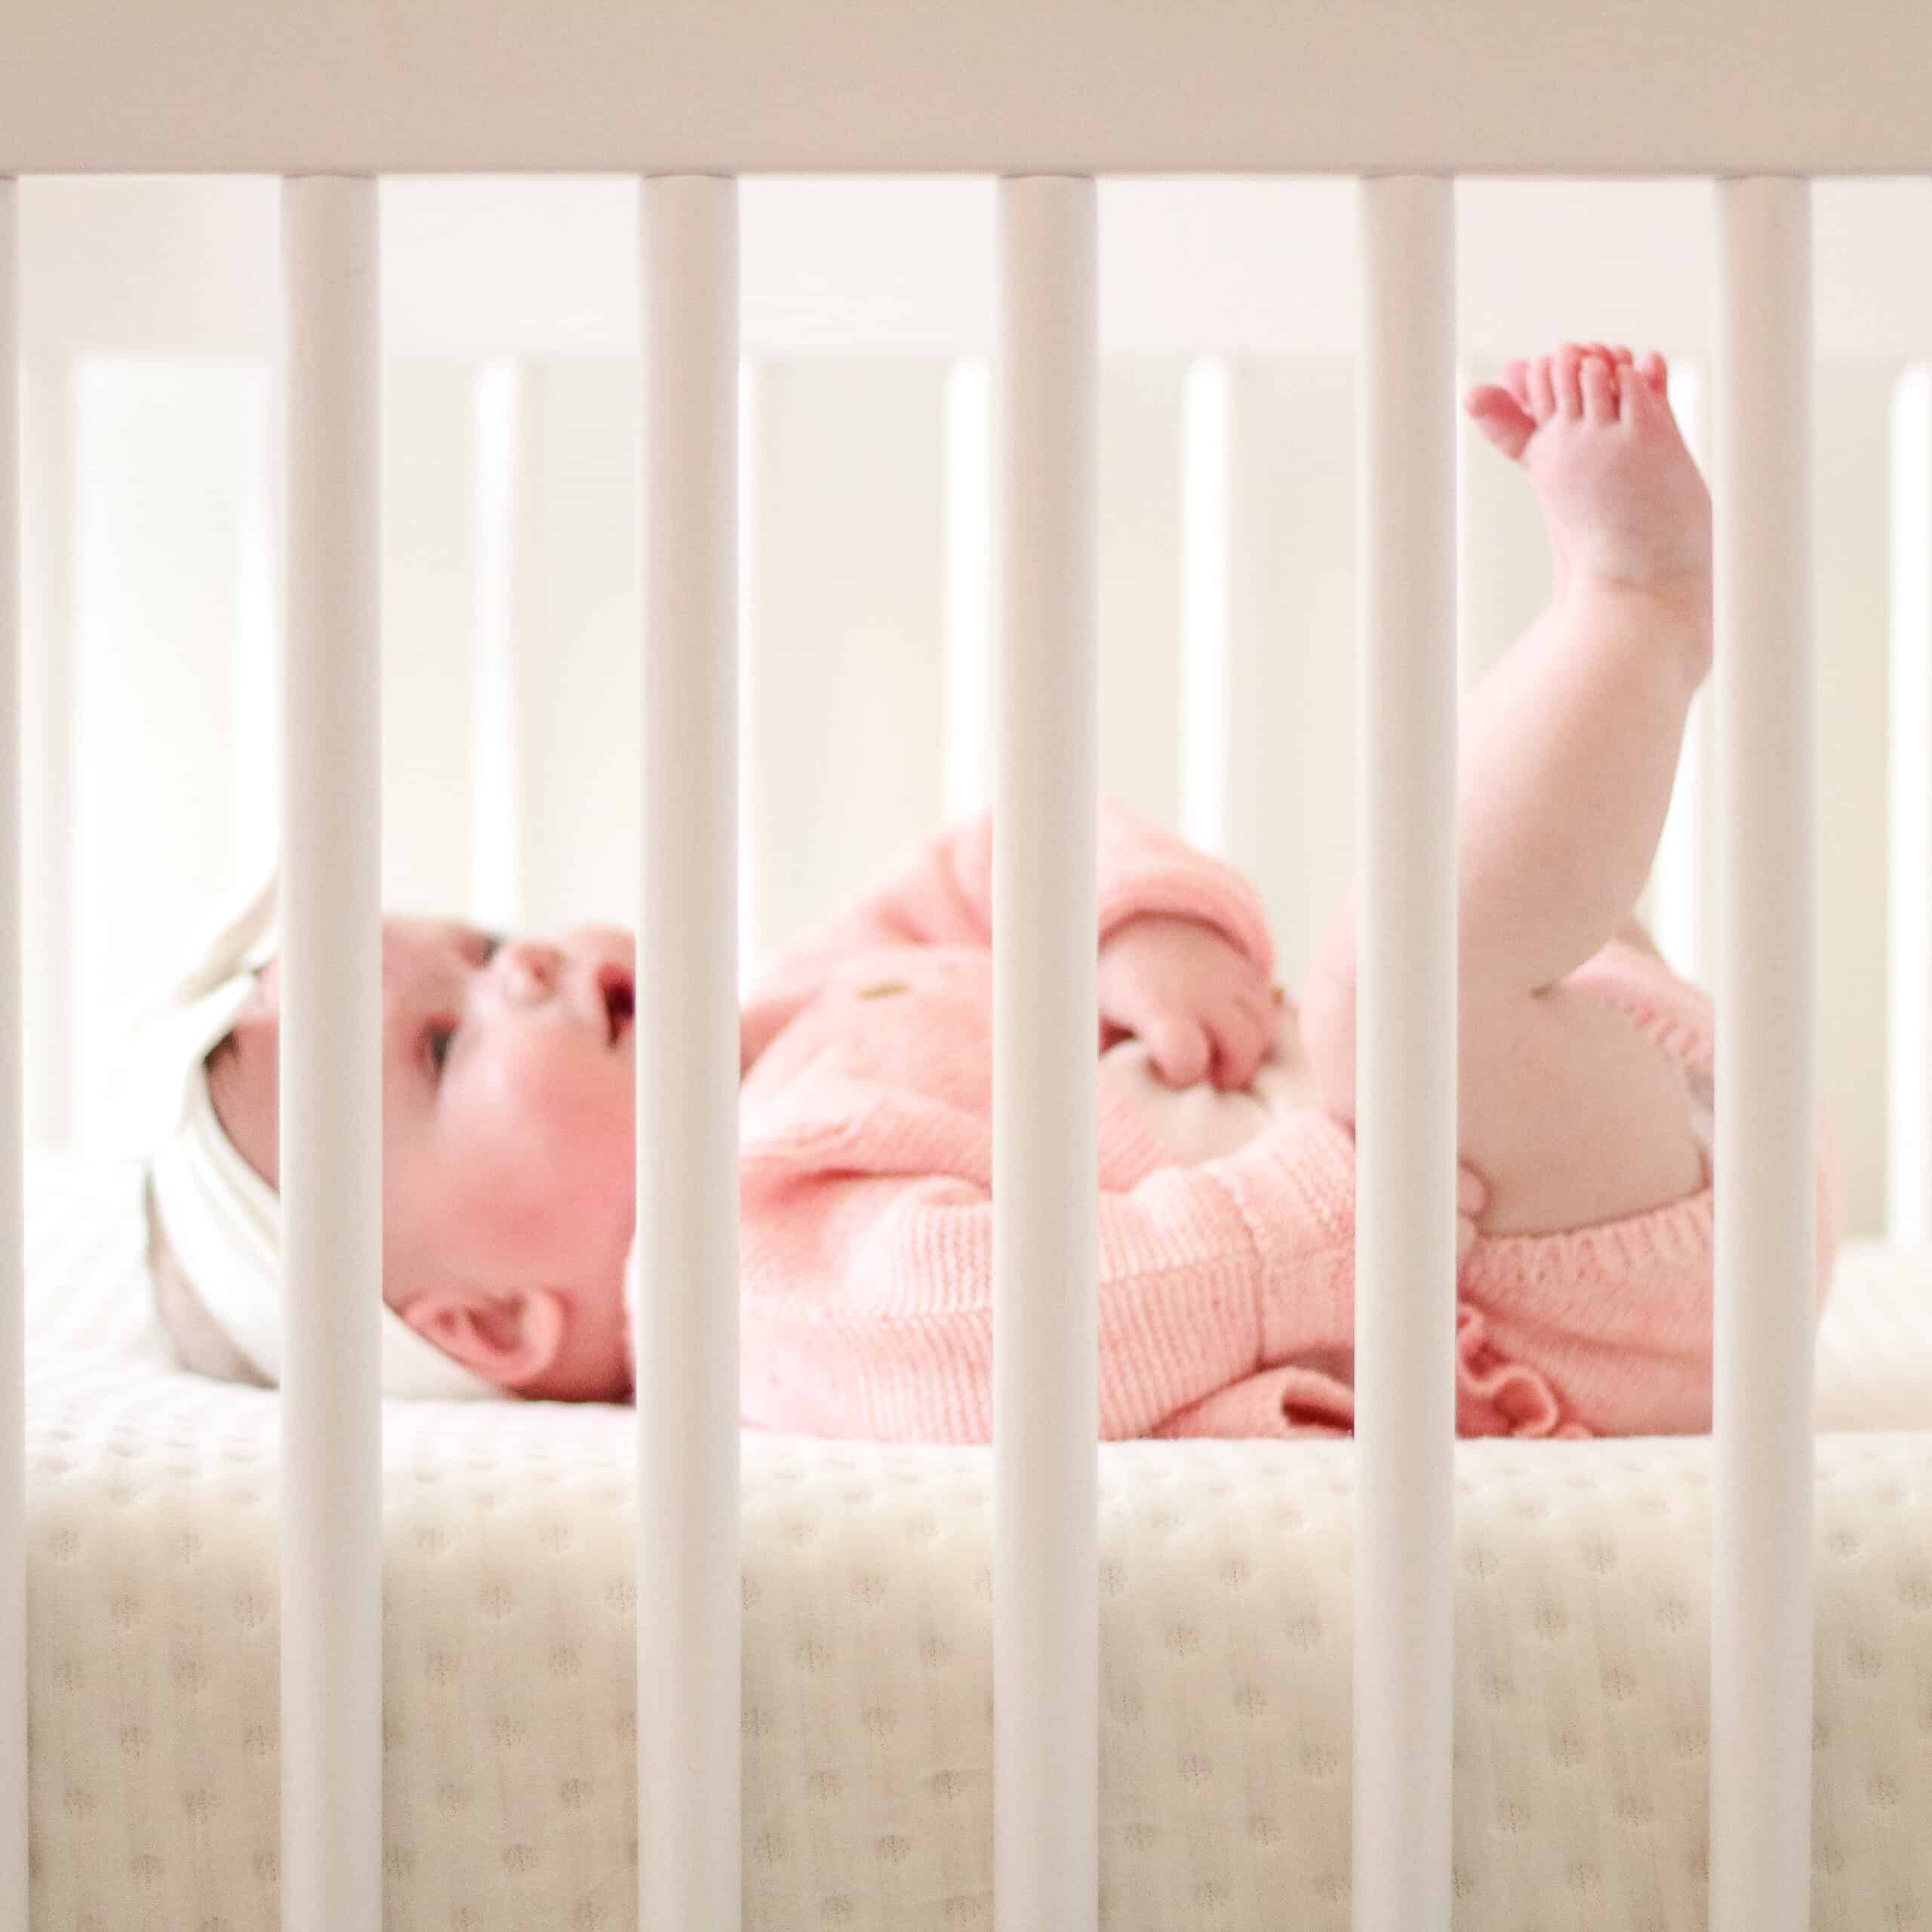
We broke her of the swaddle here recently and she did really well. She definitely had a little bit of a regression, but mostly did really well, and is now sleeping in just a sleep sack.
She is still not rolling, but is darn close to sitting up. Honestly – I feel like being the 4th baby she never gets time on the floor to even try to roll. We are constantly on the go and she is being held 99% of the time. I am not sure if that’s a good thing or bad thing, but it is the reality ha.
She is wearing mostly 0-3 month clothes, we are struggling with her skin, but it is definitely doing MUCH better since changing to all scent free.
Overall – she is just such a doll baby and makes us all so happy. I wonder daily how on earth we got lucky enough to have her.
5 Month Postpartum Update
Not much change from last month – I have been trying to tackle losing the baby weight as of the first of the year, which has been nothing short of frustrating. But none the less – I am working at it. My hair is falling out horribly which has been a bit hard, but I knew that was coming.
I am still very much struggling with the balance in life. With not wanting to miss a thing, but also accepting the reality that I am a working mom now. If I am being honest – it’s constantly hard for me to know if I am making the right choice on that. But alas…. we are taking it one day at a time, and I am doing my best to just balance things the best I can!
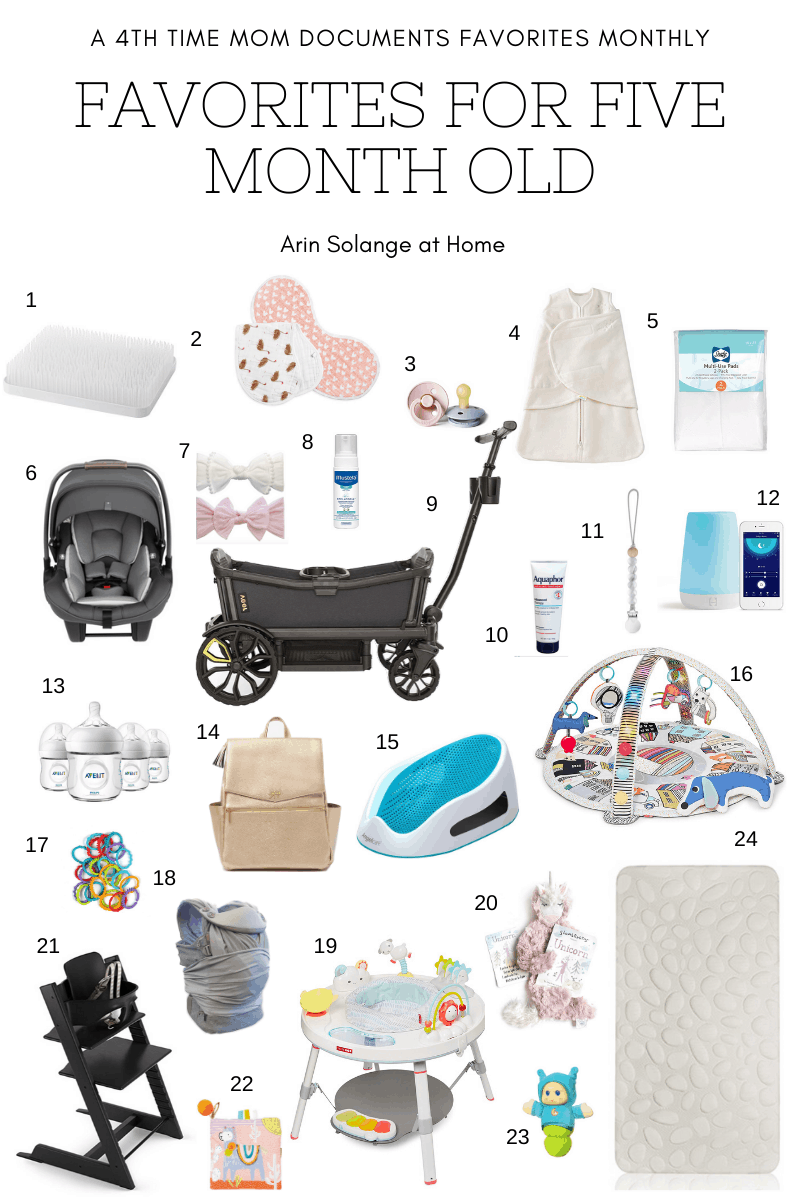
5 Month Old Favorite Baby Items
To shop this image just click the item you are interested in shopping, or head to the descriptions below. As a reminder, I have done these every month, so if you are wondering how long it has been a favorite, you can click back on those past monthly posts.
Some items that have ‘fallen off’ are still items we love and use, and you are more than welcome to comment or message me on Instagram to get my opinion. The Nuna Leaf vs the Stokke items have been a big debate, and I am going to speak on that in stories!
Pacifiers – tip – get some of them in glow in the dark for their crib at night
Halo Swaddle – we are using this now as just a sleep sack. Its a great transition option because you can do it tighter around the waist until they get used to being in nothing.
These Mats are my favorite for changing baby on the couch or bed!
Infant carseat – have remained really happy with this one.
Headbands – these baby bling bows leave no marks on their head and are so so so cute on.
Hatch sound machine – this remains such a favorite. One of my favorite aspects is that if something is going on during nap time I can turn it up on my phone to try to keep her asleep.
This infant bathseat is amazing. Just put it in the tub for your baby to use.
Baby playgym – this one has remained great for Goldie!
Rings – these are amazing. Goldie loves to fling them and chew on them, but they also allow you to clip toys on things or get toys lower on the playgym.
Boppy Baby Carrier. Seriously a game changer in terms of baby carriers. We have owned them ALL, and my husband and I both agree in terms of more of a structured carrier this is the way to go.
Slumberkins – my kids are all obsessed and Goldie is no exception.
Stokke High Chair – we own this one and the Skokke Steps and honestly LOVE both. I am going to bring up the other and try them both out and do a comparison post here soon.
Glow worm. The ugliest favorite for all my kids. we actually don’t even use it in the glowworm anymore, but just use the music and sound. When we lay her down we push the button. My kids start to know that sound means to go to sleep.
Mattress – I will be talking more about this this week, but we are in love with this mattress!
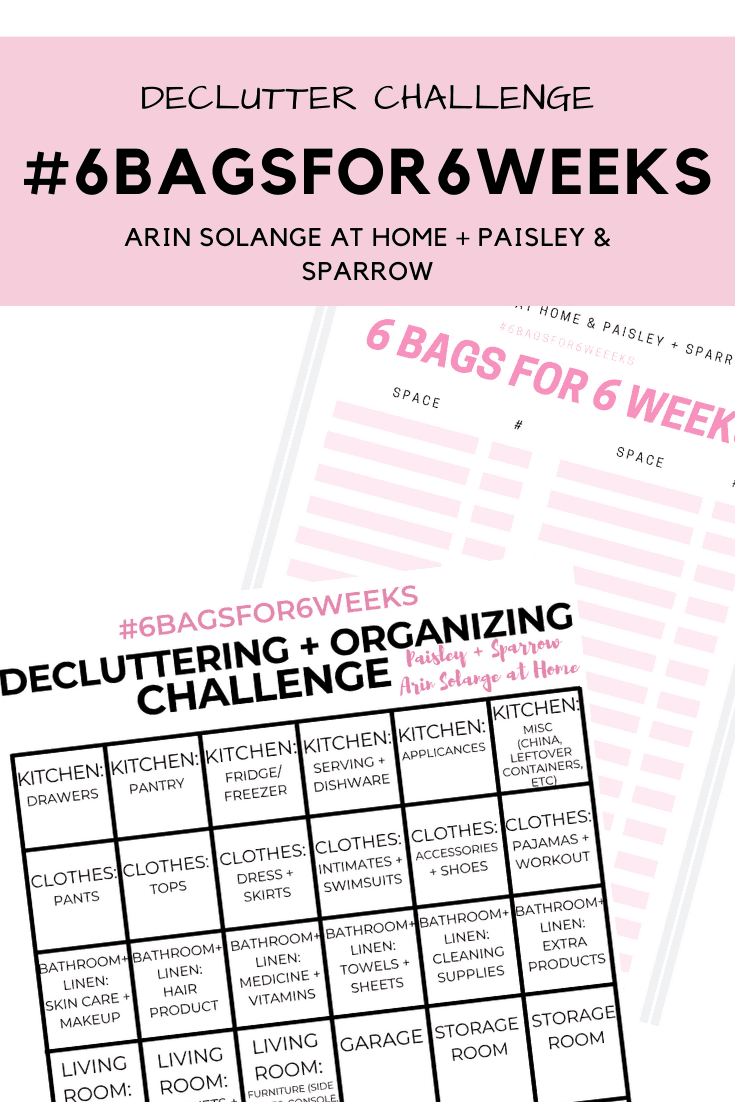
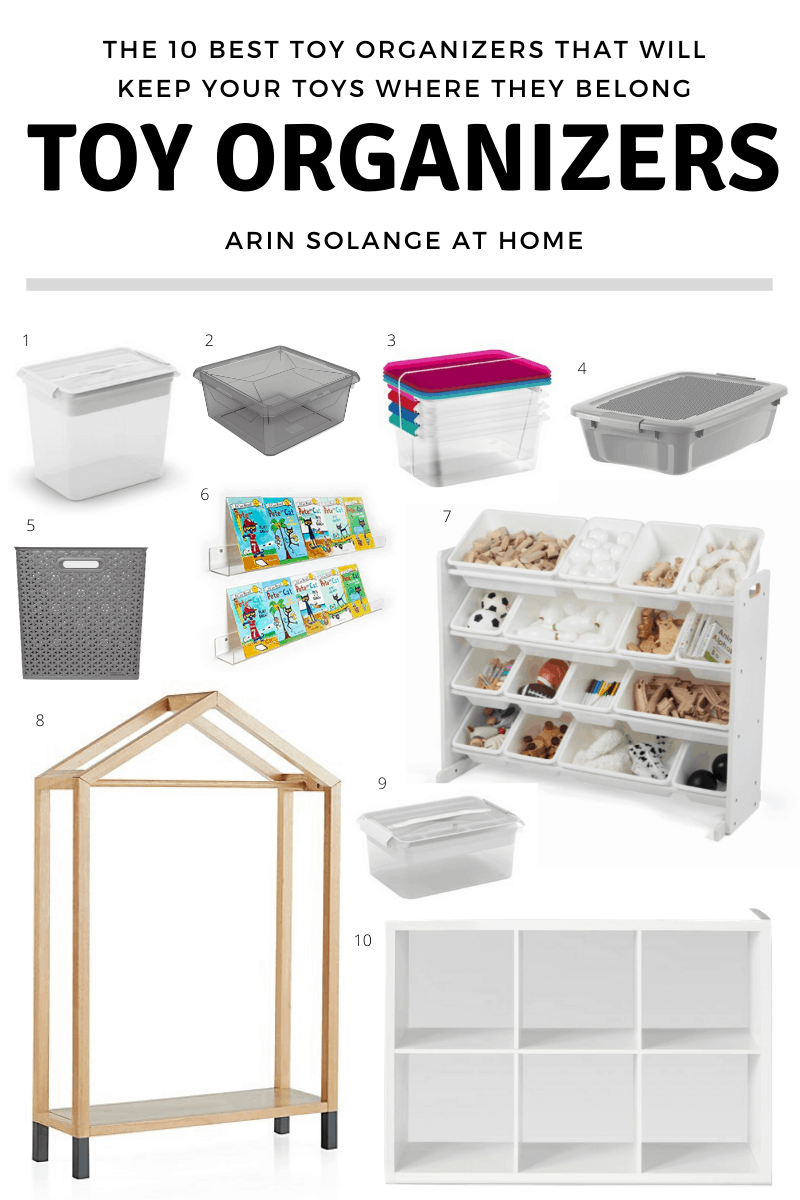
Trucking right along with 6 bags for 6 weeks, and I am sure I am not alone when I say, I am loving the results, and also am a little ready to be done. The end to anything like this can start to be hard to push through, but try your best. These last couple of weeks are HUGE for making it successful. This week I am going to talk easy toy organizer methods and options.
This toy organizer post contains affiliate links
The Best Toy Organizer
I get asked what is the best toy organizer all the time. Which honestly is not an easy question to answer, because my answer IS ALWAYS – that depends on the space you are organizing.
But in this post I am going to talk to you about the best toy organizers I have found, and some great methods for keeping your toys and play spaces tidy. As a reminder, my post for last weeks 6 bags for 6 weeks post was all about keeping toys in your Living area organized, so this post will not talk about that at all!
If you are looking for ways to organize toys in those living spaces head to that post – a little disclaimer – I AM VERY passionate about that topic. I think that its very much a reality to have toys in your living spaces, as well as your play room and both can stay organized with the right methods.
I will definitely dive into other aspects of toy organization in areas like the garage and such as this spring goes on so be on the lookout for that, and make sure you are signed up for my emails!
6 Bags for 6 Weeks
Before I get going on this – I want to recap what 6 bags for 6 weeks is, incase you are scratching your head about this. Basically, my girl Jen and I created a great method for decluttering and organizing your house that helps you to declutter every room in 6 weeks and get rid of 36 bags of stuff.
If you want to read more about that and get the documents head to this post!
Weekly Giveaway and Partner
This week we’re giving away a $50 to Joy Creative Shop – a high end personalized stationery and gift company.
Along with the giveaway, we’re so excited to introduce you Stephanie from Honestly Mommy! Stephanie is not only an amazing blogger but she’s also a personal friend! She’s a mom of 3 with one on the way and shares all sorts of amazing content for mos. Be sure to follow her on Instagram and check out her blog!
As well as that, Jen has a KICK BUTT post on organizing all things kids. Like I am talking she hits on everything, so check out her post here!!
Decluttering Toys
Since this is a decluttering challenge, I want to touch on how I declutter toys! I personally don’t do a toy rotation, however that is a great alternative option to getting rid of as many.
When it comes to toys – 1 thing I talk about below is picking a container for a certain type of toy (say cars), and if you have too many to fit in that container you likely have too many. Most of the time you don’t need 100 of one certain thing.
Pair down to just a few of like toys as a first order of business. There are items you need more of for kids to play, but most of the time you have too many of almost everything.
If your kids don’t play with it – DONATE IT. Sometimes thats painful because it was something you thought they would love. Or its cute, or expensive, or the list goes on. I have gone through that a lot, but the reality of it is, if they don’t like it you shouldn’t keep it.
You can always sell the nicer items to feel like its not such a loss.
I do get asked how do I actually go about decluttering – I do it in a couple of sweeps. I first declutter one time just to get rid of the obvious. I then get the kids involved and we do a second sweep.
I let them help and talk to them about how we need to give to those who need. I know they are kids, and won’t be as apt to give items away so I try to give away some before they get to this, while still incorporating the learning.
The hardest thing for most kids is stuffed animals – when I purge stuffed animals I hide them in a bag in my closet for a few weeks first because I don’t want to take something they actually are attached to. We also TRY to have a 1 in 1 or 2 out rule, but it doesn’t always work.
When it comes to decluttering toys, just remember – you will likely always have more than you want, and it seems as though they reproduce, so it is a job you will want to do a few times a year!
Small Toy Organizer
One thing I have learned recently when it comes to organizing kids toys is that choosing containers with lids tends to be a better way to go. Kids tend to just dump to find. So although it can make clean up slightly longer, having like toys in container that have lids does help contain the mess.
You have all seen me talk about these bins that I am OBSESSED with, that originally started out as craft bins, and have now turned into everything bins.
The reason these specific bins are so great is that they have latches to fully close, and you can fill the bottom with larger items then the top with smaller items. So things like LOL dolls, Barbies, coloring supplies, and etc can all be in one bin but not fully mixed up where the small pieces just fall to the bottom.
I am using the bigger size for Barbies because Avé has so many, and the smaller size for several other things in the playroom currently.
For the items that are all one size, or just a mix I chose the same containers without the top organizer shelf and that has been amazing! Again they close tight so there isn’t just a dump and mix mentality from my kids. The size has been perfect for a lot of our toys, and we basically decided that if there were too many for one bin it meant we had too many.
Large Toy Organization
Larger toys should still be separated and there are some options.
First off – if you have access to a closet I highly recommend using one for toy storage. We are in the process of reconfiguring ours to give it more shelves and more space for storing toy, games, and so on. We don’t let the kids have unlimited access to things with tiny pieces because of their ages which to me is wise haha.
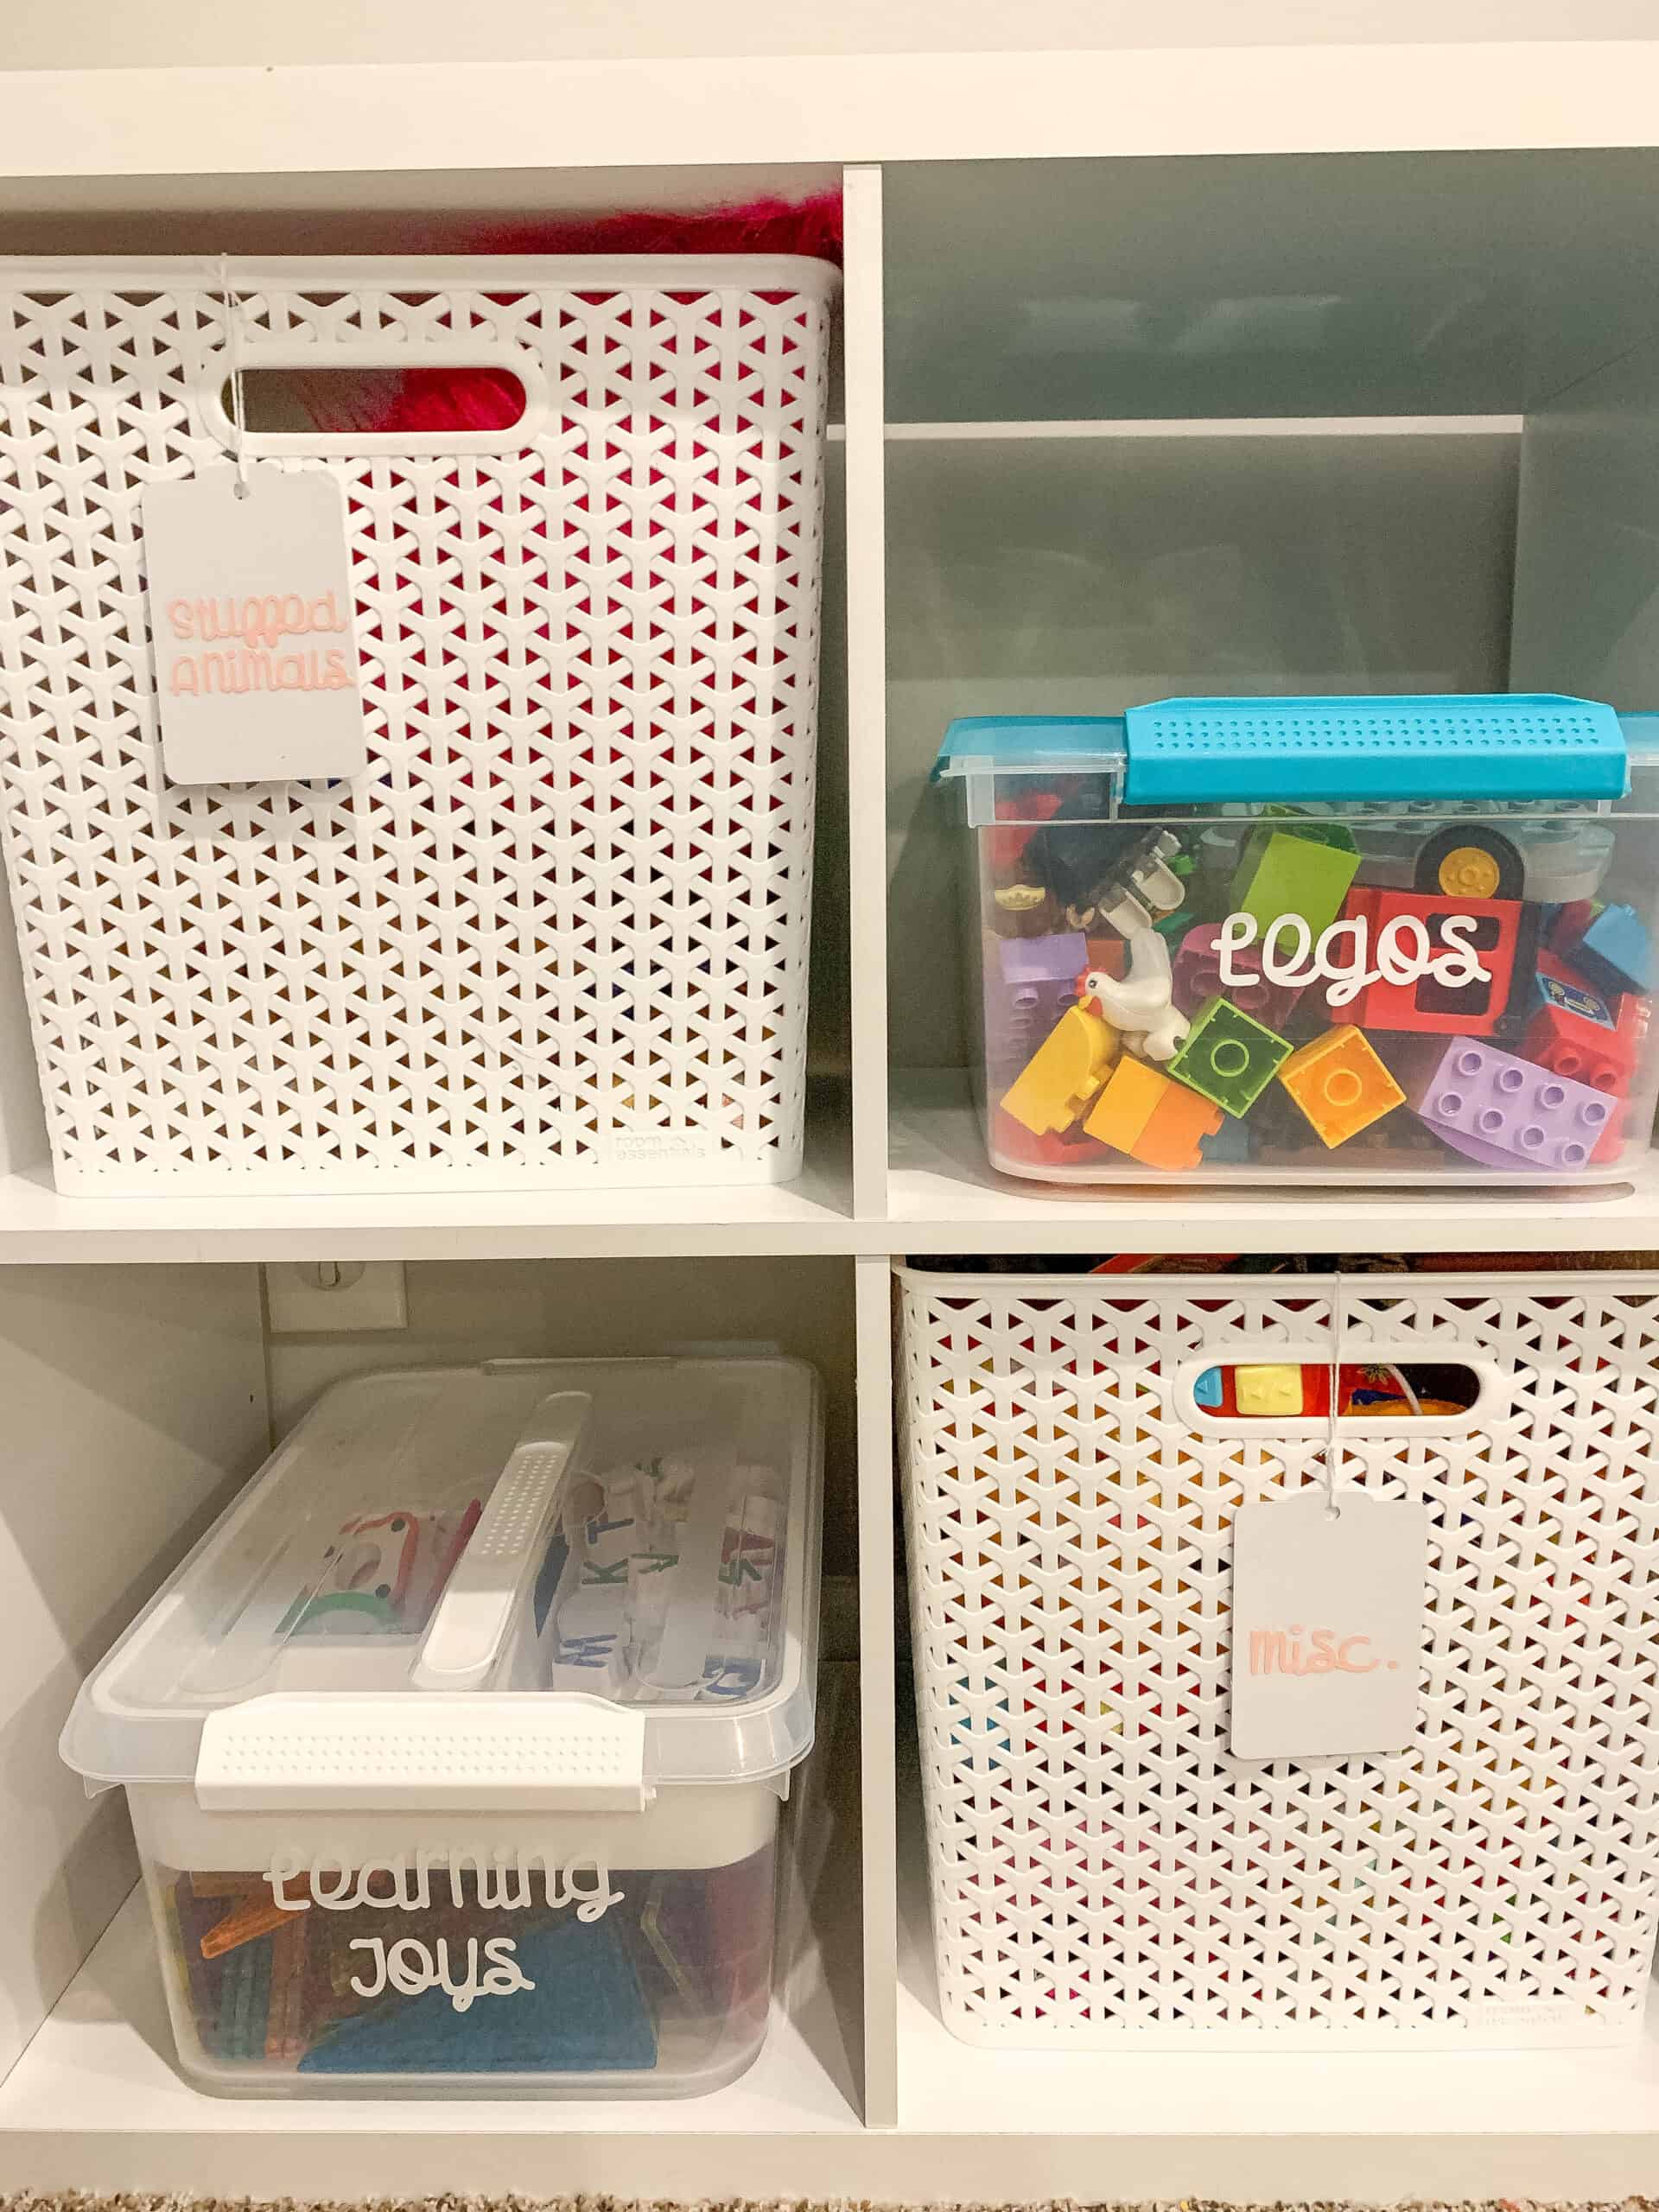
We also have some these cube organizers, which are really popular for good reason – THEY WORK. They are an affordable way to add storage to a playroom, and they have worked great for us.
I can stack two of the containers from above in each cubby, then in some they are left empty for really large items like large cars. I also use THESE containers that I love all over my house in some of the squares for things like stuffed animals and balls. Again my rule is that if they can’t all fit in one bin then we have too many.
The reason I like the plastic container over the fabric is that they hold up a lot better. I also love going with white because playrooms tend to be busy enough as it is.
Labels
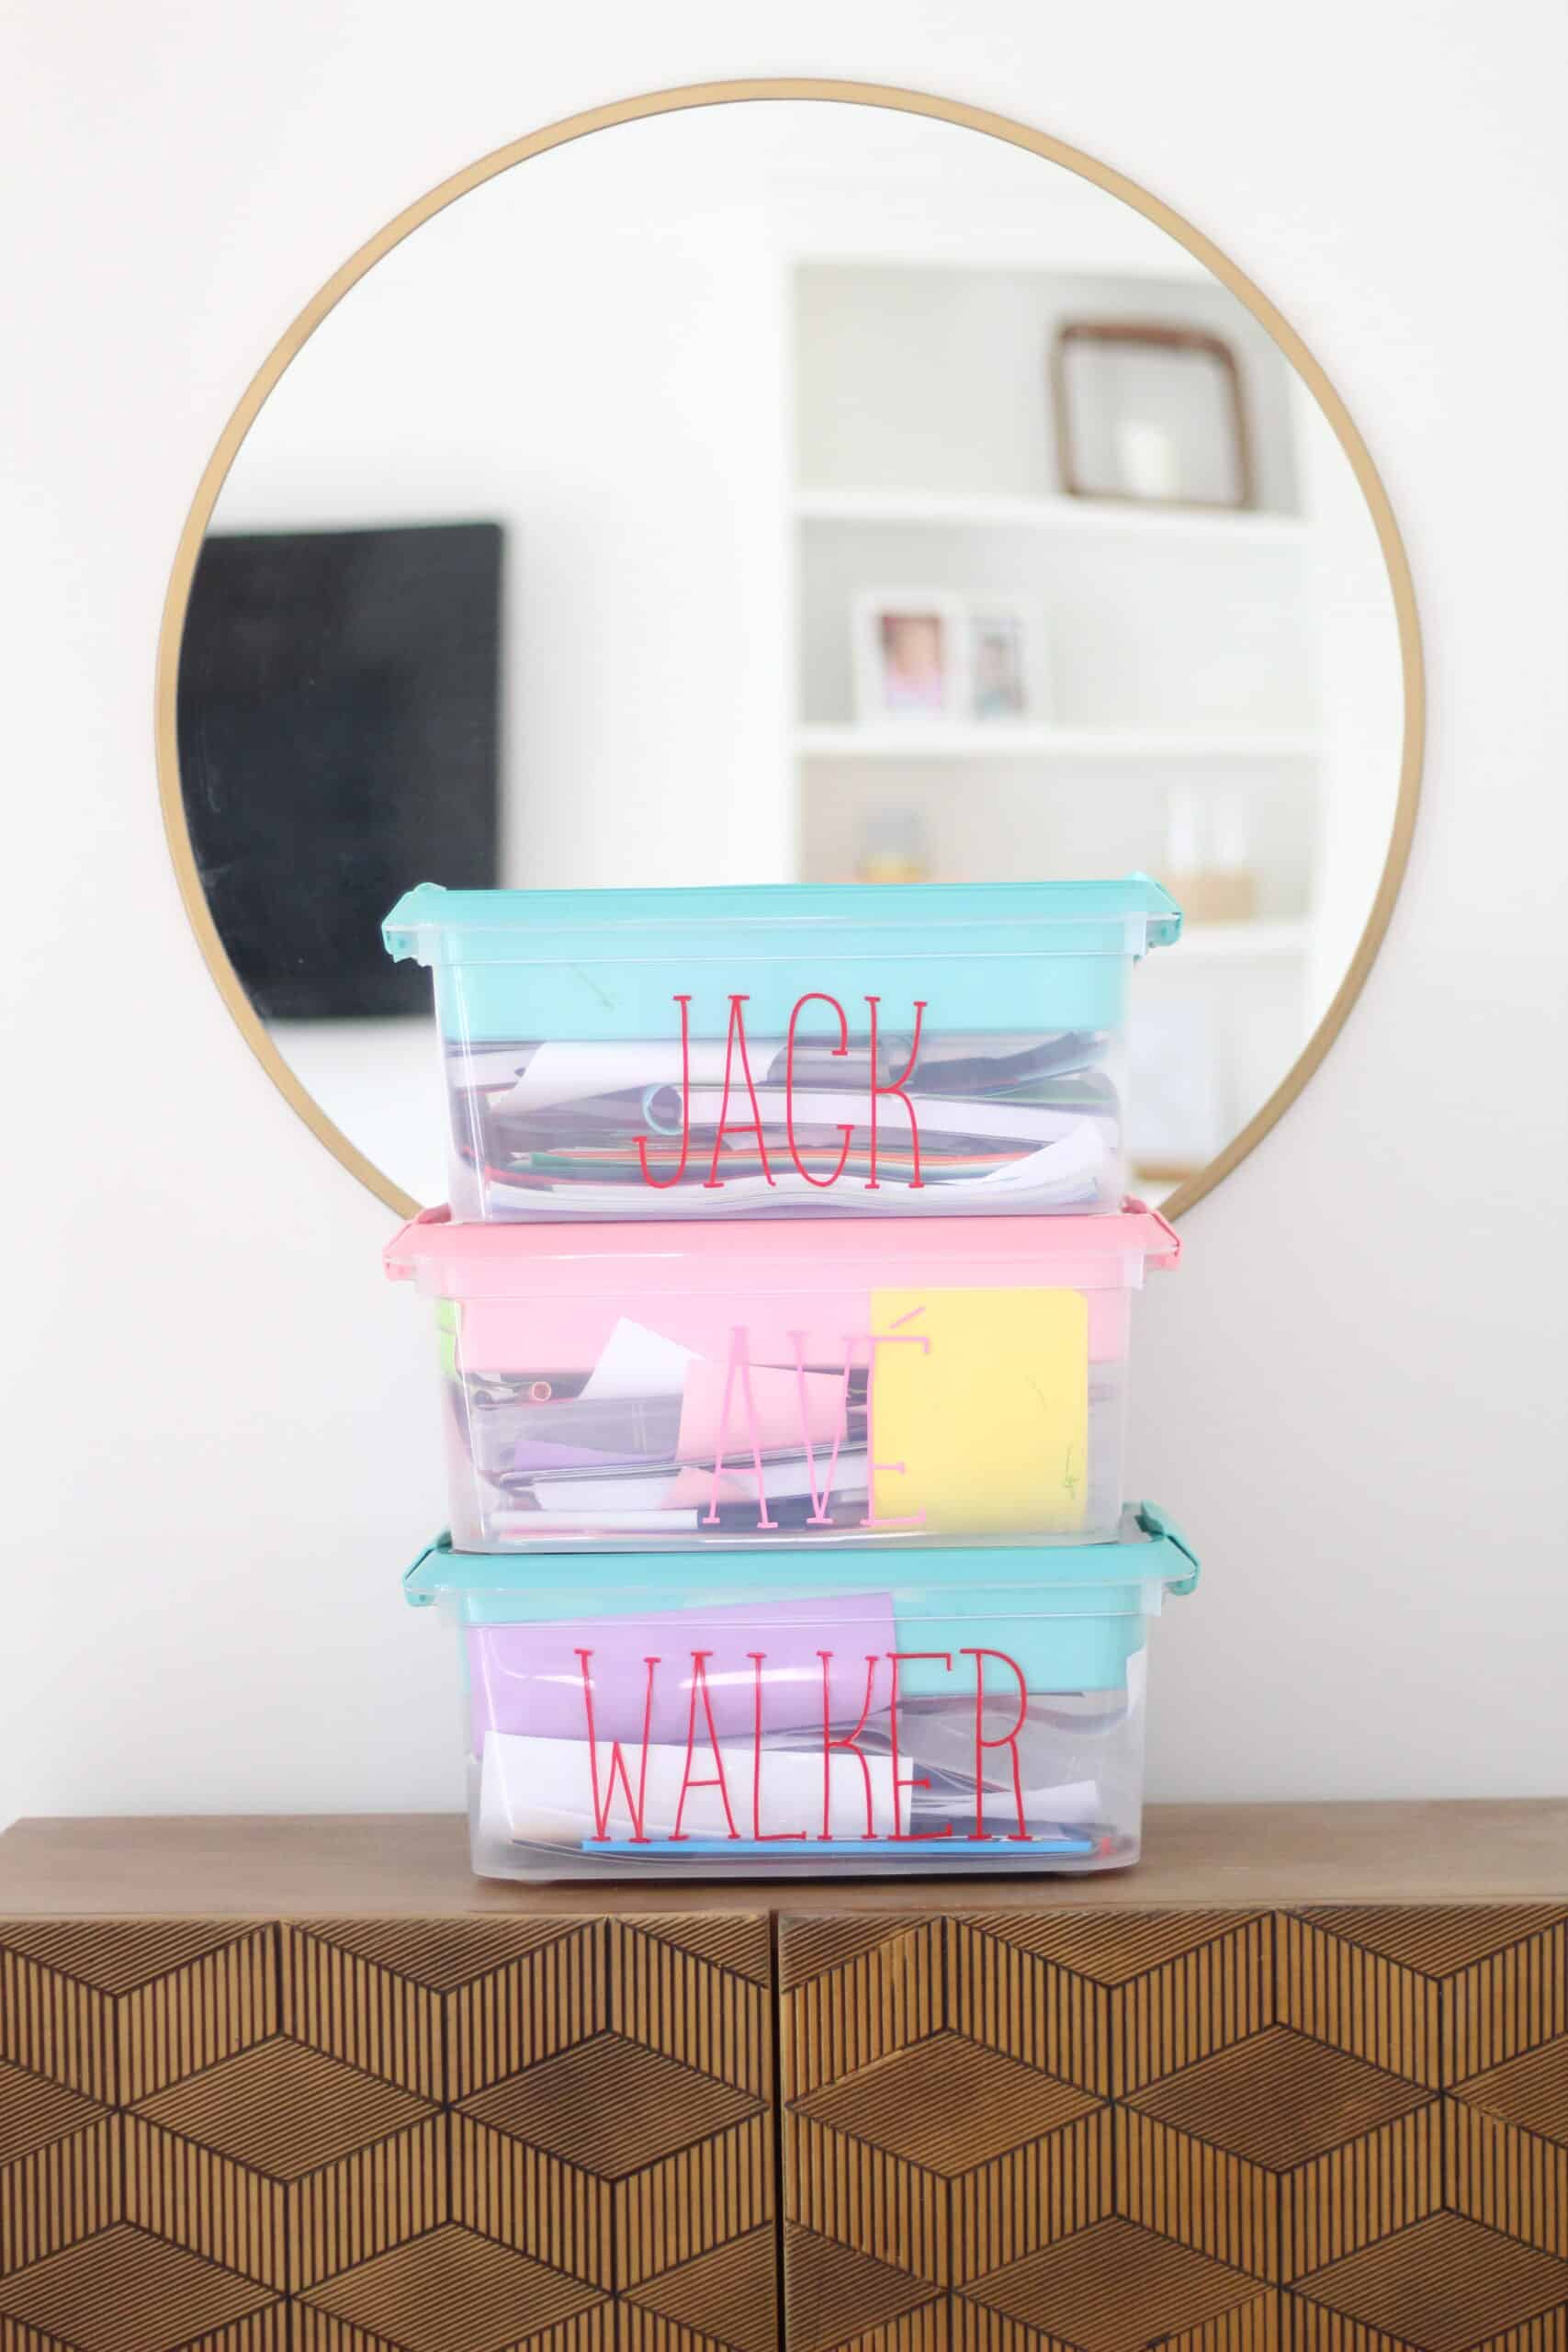
We recently started labeling our kids bins which has been VERY helpful. Jack is able to read, and although the other two aren’t old enough to read, Jack or the babysitter can help direct them to the correct bin, and once one is in there, Walker and Avé can follow in suit.
I personally used labels I made using my silhouette, which if you are a label user might be worth investing in, but they also have amazing options on ETSY!
Placement Matters
One thing that is VERY important to remember is that placement matters.
If you have a table and desk area that kids color at – keep those items in that area. If you have play food keep it near the play kitchen. I think you get the point. It is no different that us. We keep our kitchen towels by the sink right? It just makes sense.
Make things easier for kids to use the items in one area and hopefully you won’t have play donuts and cookies strewn all over your playroom!!
We have a really unique basement with this fun Built in playhouse, so all our play food is on the walls by the playhouse because that houses their play kitchen. It doesn’t help 100 percent, but I can say that it keeps most of the food on that half of the playroom. (if you like that playhouse be on the lookout for a really fun update this spring!)
Great Toy Organizer Options
I figured it might be helpful to be able to shop some of my favorite toy organizer options all in one image, so just click on the item you are interested in in the image below.
On top of that I am linking to previous posts that will help you get your toys and other kiddo related items in tip top shape below!
These bins are great – I mentioned them in small toy storage, but you they are a bigger version of the craft bins that allow for something more like Barbies where you have several.
These bins come in a few heights and are sooo inexpensive (like $3) and fit right in your cube organizer.
I have seen this in person and think it would work really well in a playroom. I have considered something like this in our closet in the playroom when we refinish it. I like the neutrals because toys add enough color and chaos.
Cube organizers – I know this is so simple, but honestly they are popular because they work.
Hopefully between utilizing these ideas and buying the right items you will be able to keep your toys and play spaces much more organized. If you have questions feel free to reach out to me via Instagram (@arinsolange) or by leaving me a comment.
Remember that no play space will ever be perfect. But if you have a system in place and stick with it, AND TWEAK it for their ages you will have so much more success. My own toy storage methods have changed a lot over the years as our needs have changed.
I now have 4 kids skipping gender each one so have a need for a lot of toys, and thus have to have systems in place for quite a few items. I also have changed my methods as my kids have gotten older and more able to help clean up!
Good luck organizing!!
Pin The Photo Below to Find The Best Toy Organizers Later
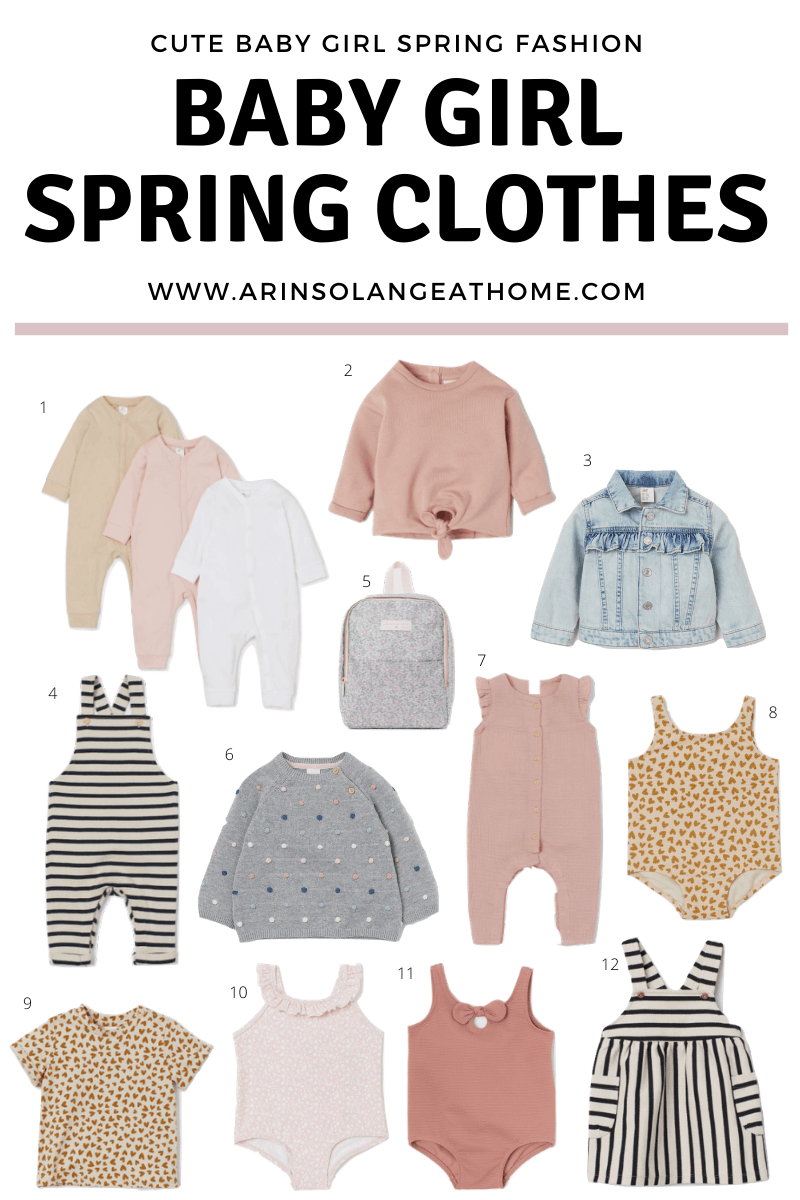
I know it’s still winter, but I have had my eyes on Spring Baby girl clothes getting ready for spring break. I will be adding to this post as spring goes on, but for starters rounded up a few favorites from one store for today.
This post contains affiliate links
Spring Baby Girl Clothes
To shop these collages simply click on the item you are interested in in the image below. I am going to try to do round ups from several stores that will help you to do one big purchase and save on shipping each time.
I love that H&M offers affordable and really stylish options for kids. It is one of my favorite places to get clothes for my own kids, and they are great quality for the price. I rounded up a few of my favorites – including some swim suits I couldn’t resist and had to get Goldie Girl.
If you are looking for some favorite options fro specific stores leave me a comment below so I can round up some finds from there, otherwise, watch for more round ups in my Insta stories in the coming weeks.
H&M FINDS
Again – to shop these items, just click the item you are interested in and it will take you right to the product, or I have them listed below for you!
Most of this is from 4 months – 4 years
I am all about great simple pajamas, especially for travel and these colors are so good.
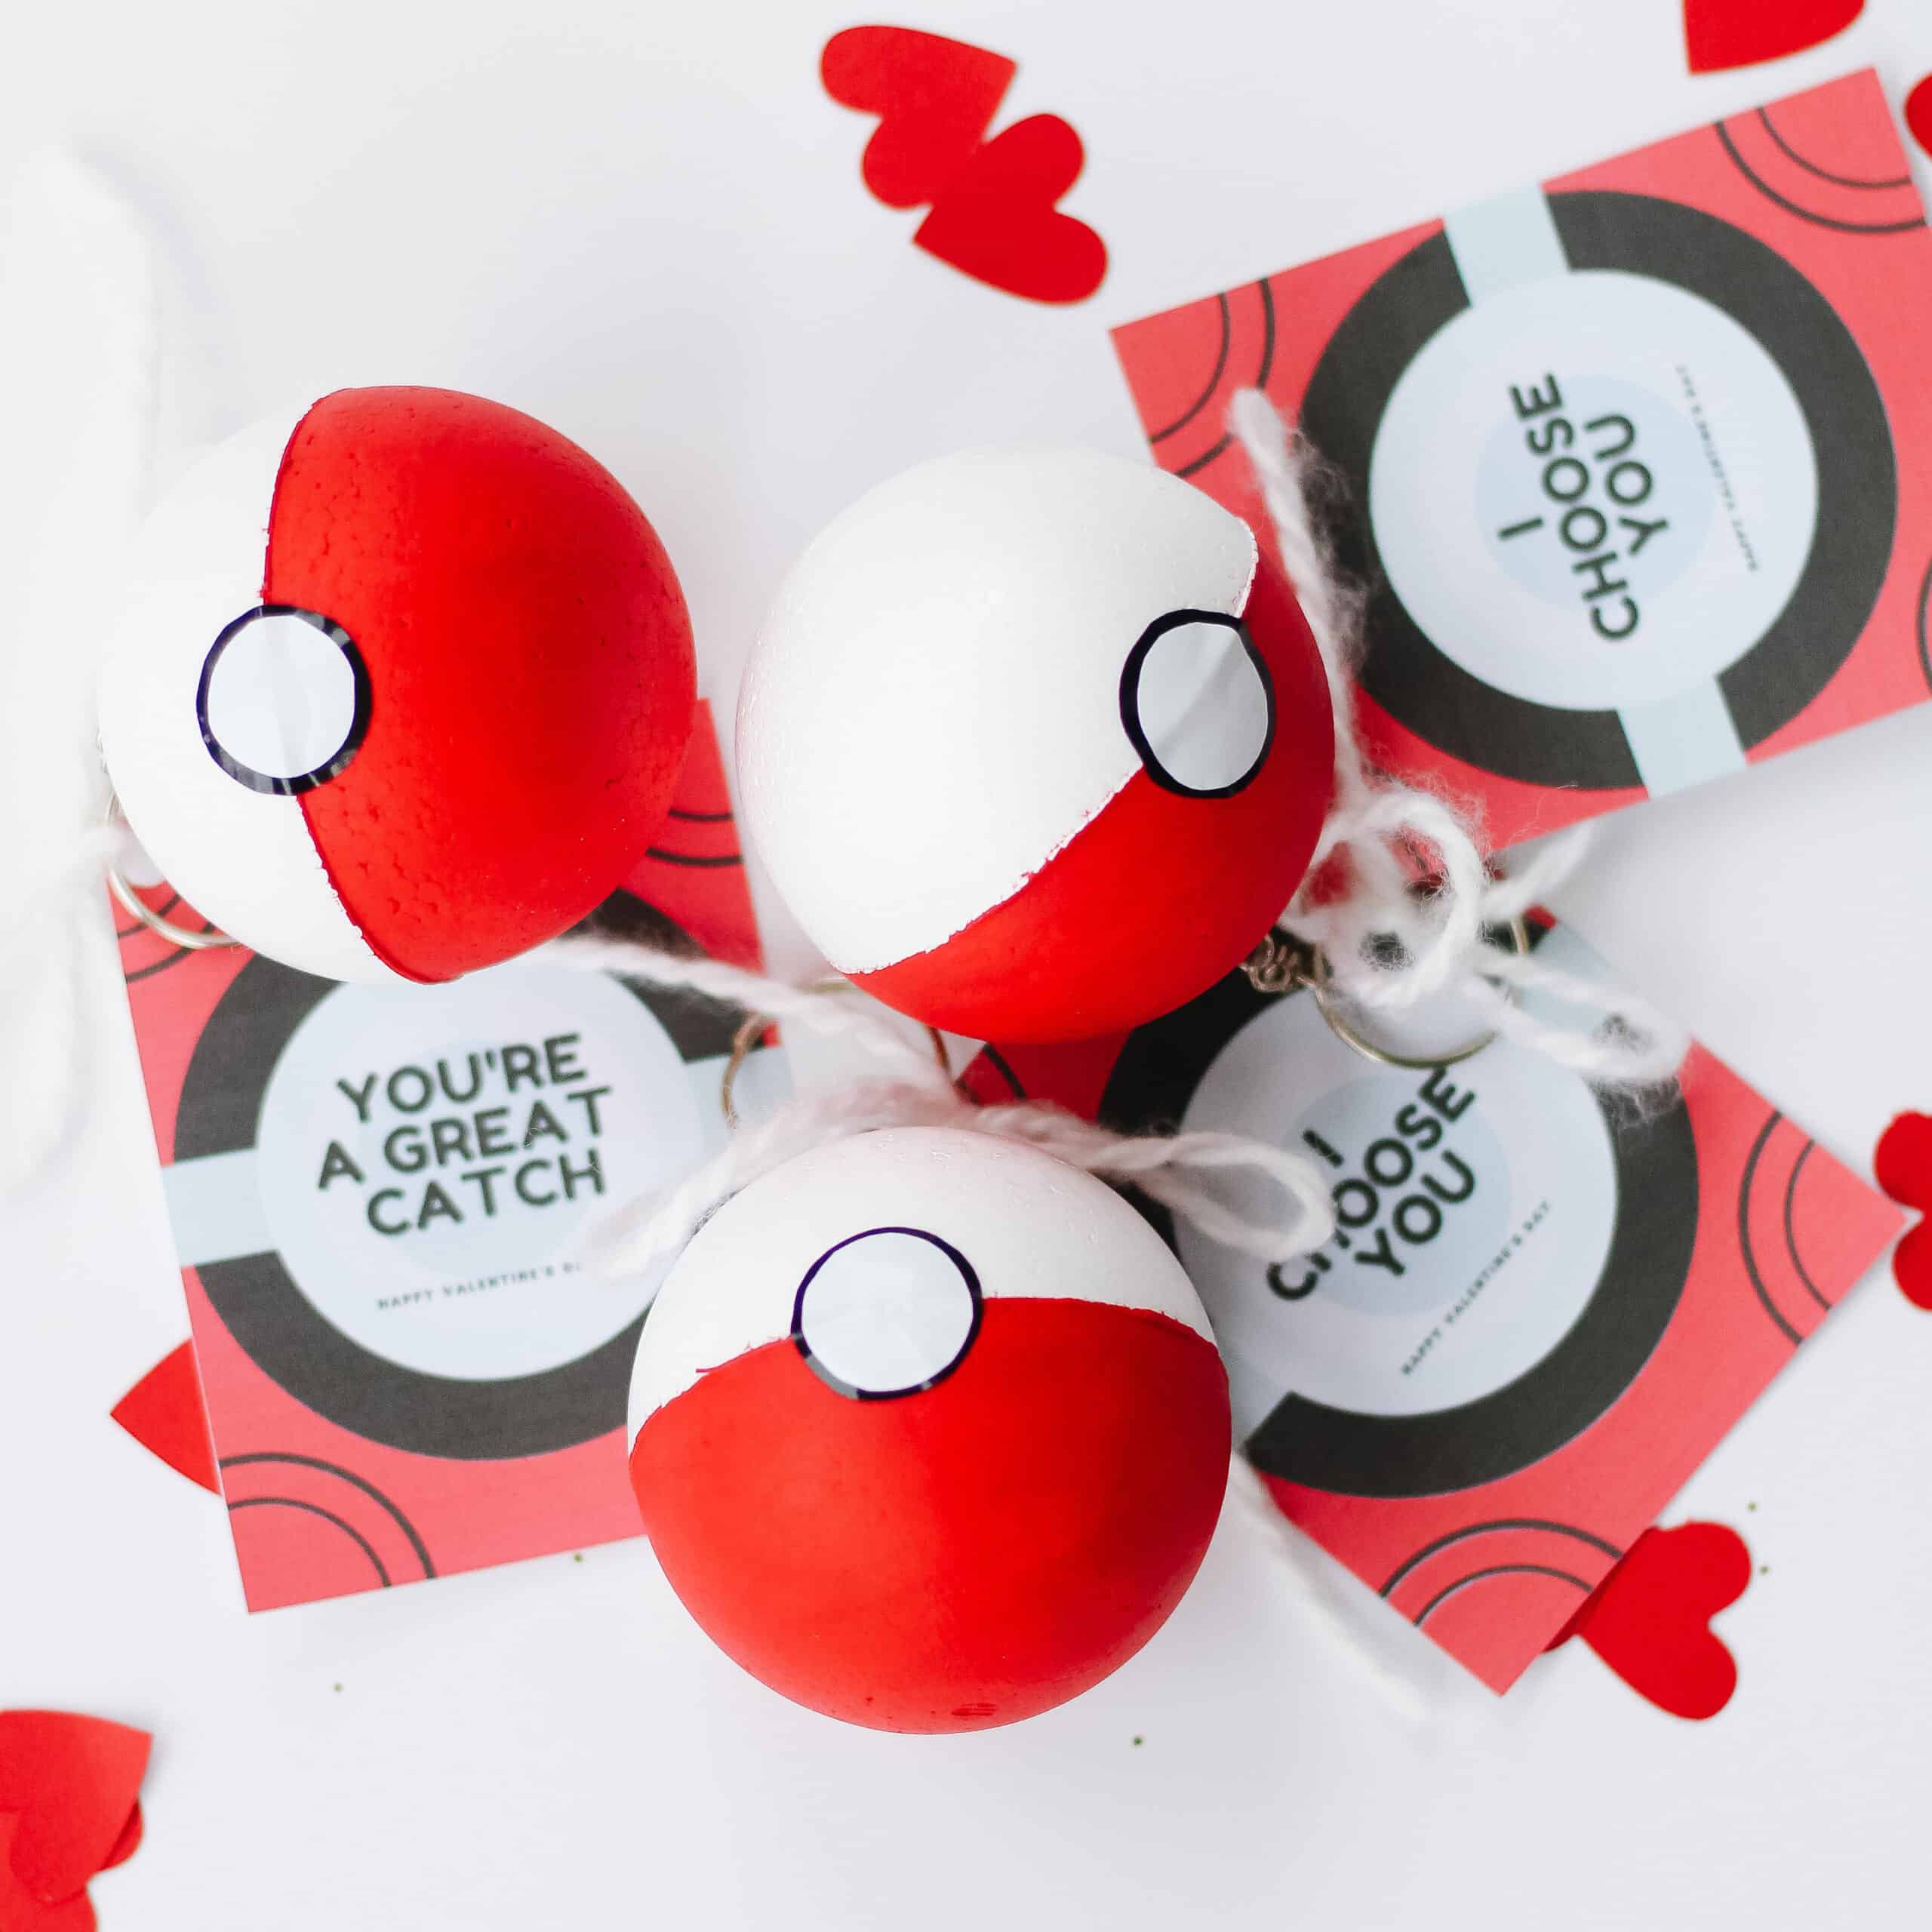
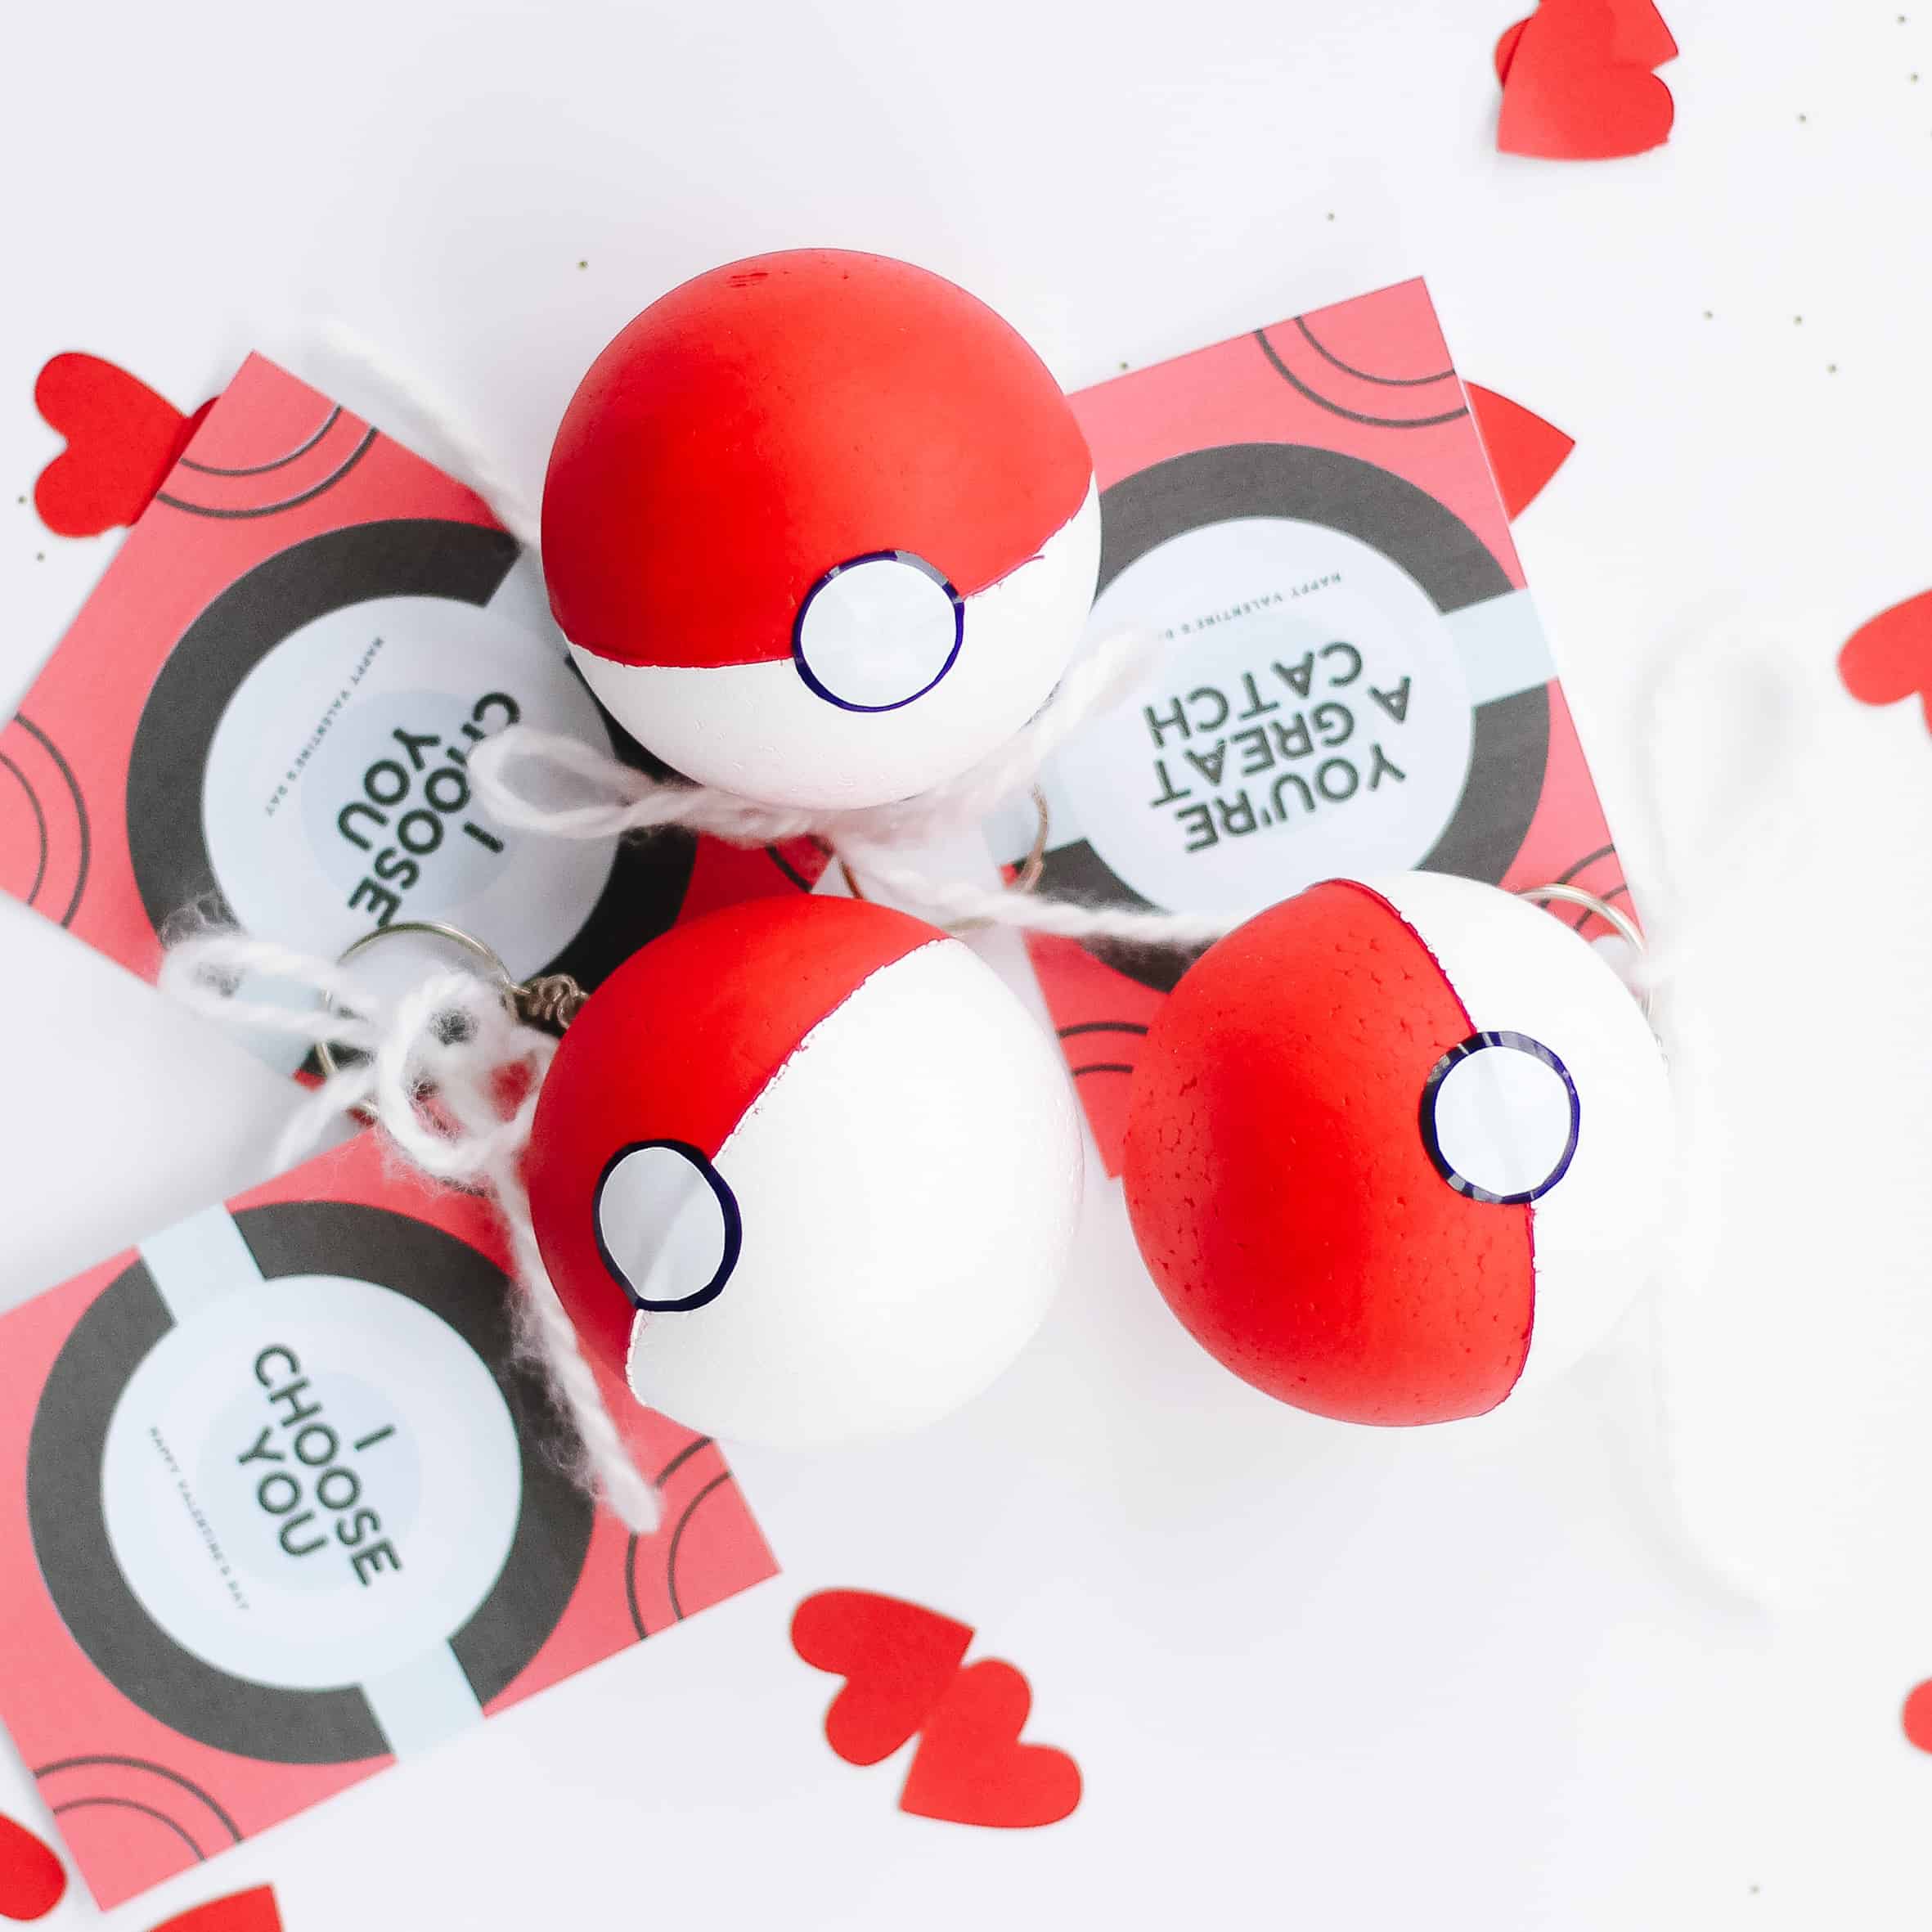
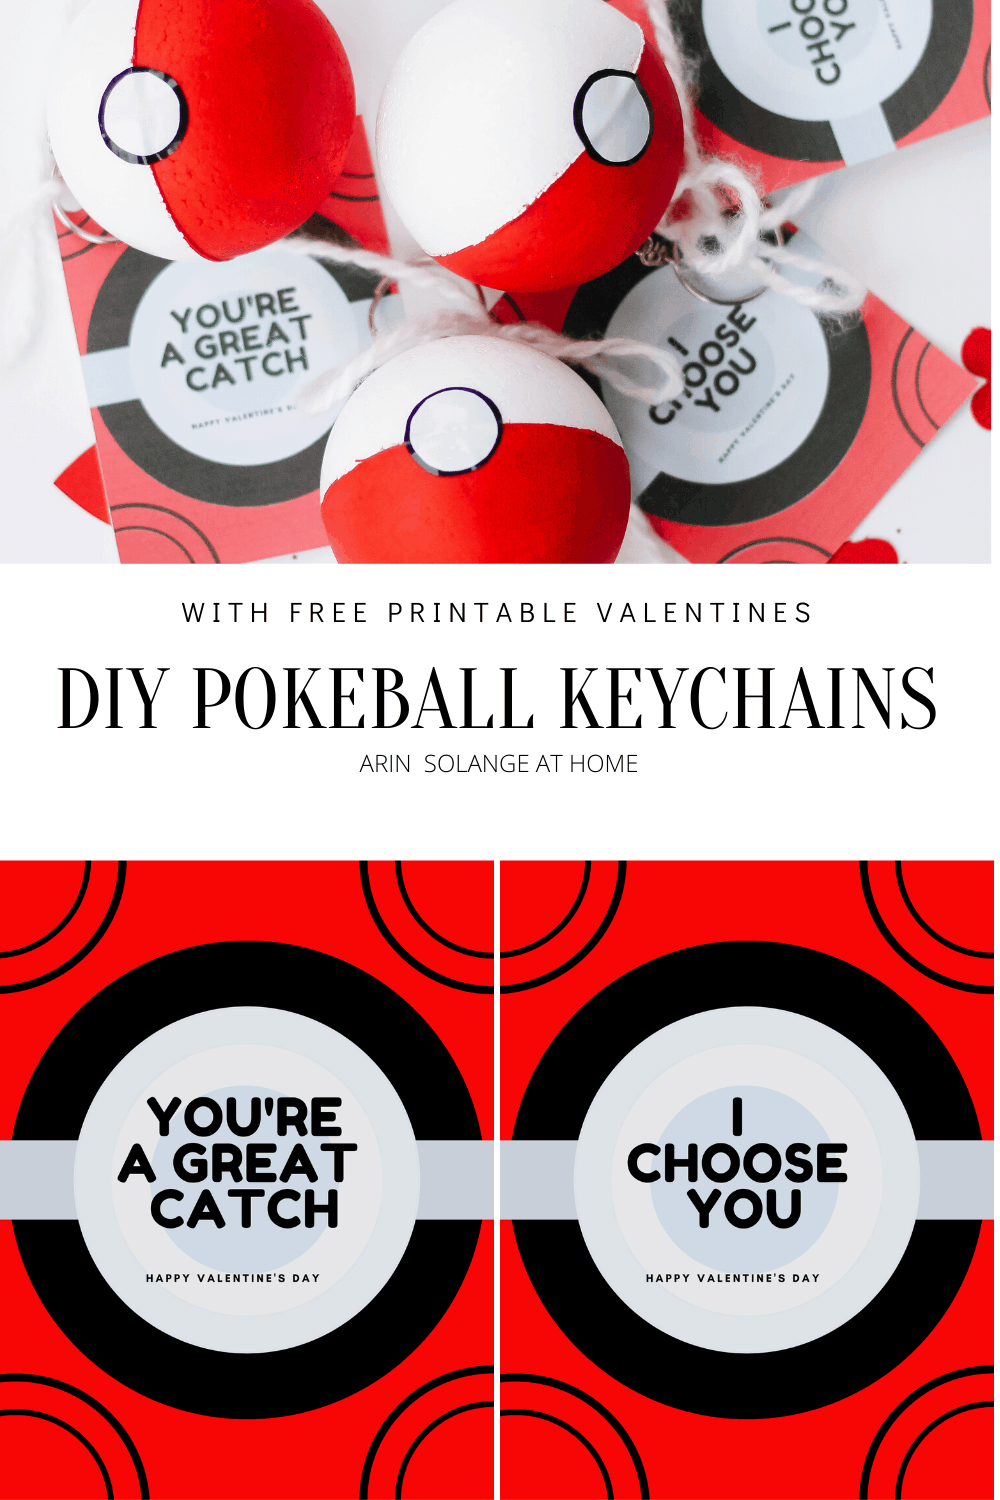
I am 99.9% sure I am not the only one with a 7 year old that is Pokemon obsessed. My oldest son, Jack, and his whole class is obsessed with Pokemon, so with Valentine’s Day around the corner I knew I needed to get crafty. I figured I would show you all how to make a DIY Pokeball, so we can all be cool moms together.
This post contains affiliate links
This little DIY was very simple, and such a hit with my son. I love doing DIY Valentine’s when I have time, so this year I set out to do Pokeball keychains for Jack’s class boys, and Ice-cream Cone keychains for the girls in his class (first grade).
For Avé’s preschool class I made wands and peg doll superheros, and those posts will be up in the next week or so.
They go to a smaller school that makes it a bit easier to do these fun Valentine’s – but I also set the goal to have them all done before Feb 1 so that it wouldn’t be such a stressed this year!
Supplies Needed for DIY Pokeballs
Like I said above, I turned mine into keychains, BUT I actually originally had the idea to add a piece of stretchy string to each with a loop hole for their fingers so they could throw them. Definitely a fun idea to do with these if you would rather that over the keychains.
For that you would simple trade out the keychains for some tiny eye bolts and string.
Basically you can do all of this with paint or with Vinyl. I liked both versions I made just as well!
How to Make a DIY Pokeball
Now for the steps.
Tape with painters tape around your foam balls so that you can paint only one side. Take your time and get a good straight line. The balls have a seam you can follow.
Paint one side of each ball with red paint. For me each ball needed two coats of paint.
Remove your painters tape and get ready to add your dots. You can do this in 1 of 2 ways.
Cut a vinyl black circle and apply it centered over the red and white line split. Then cut a slightly smaller white circle and place it in the center of the black dot. I used a glue stick and a lipstick for my circle sizes!
Or you can use paint. If you use paint, put your foam circle brush in your black paint and do a test dot on a paper plate. Then firmly push the brush on the ball on the red and white seam to get a black dot. You will need to let that fully dry then add a white dot in the same way in the of the black dot.
Once your balls are fully dry you can add your keychains. For this step, first put the two keychain parts together in the bag ( you will know what I mean). Fill the small hole in the foam balls and insert the one end of the keychain into the hot glue and hold it really still while the glue starts to dry. Once its sort of set up you can set the ball down to finish drying.
That is it! These were such a hit with my son! He seriously thinks I am the coolest mom, and I am sure your kids will too.
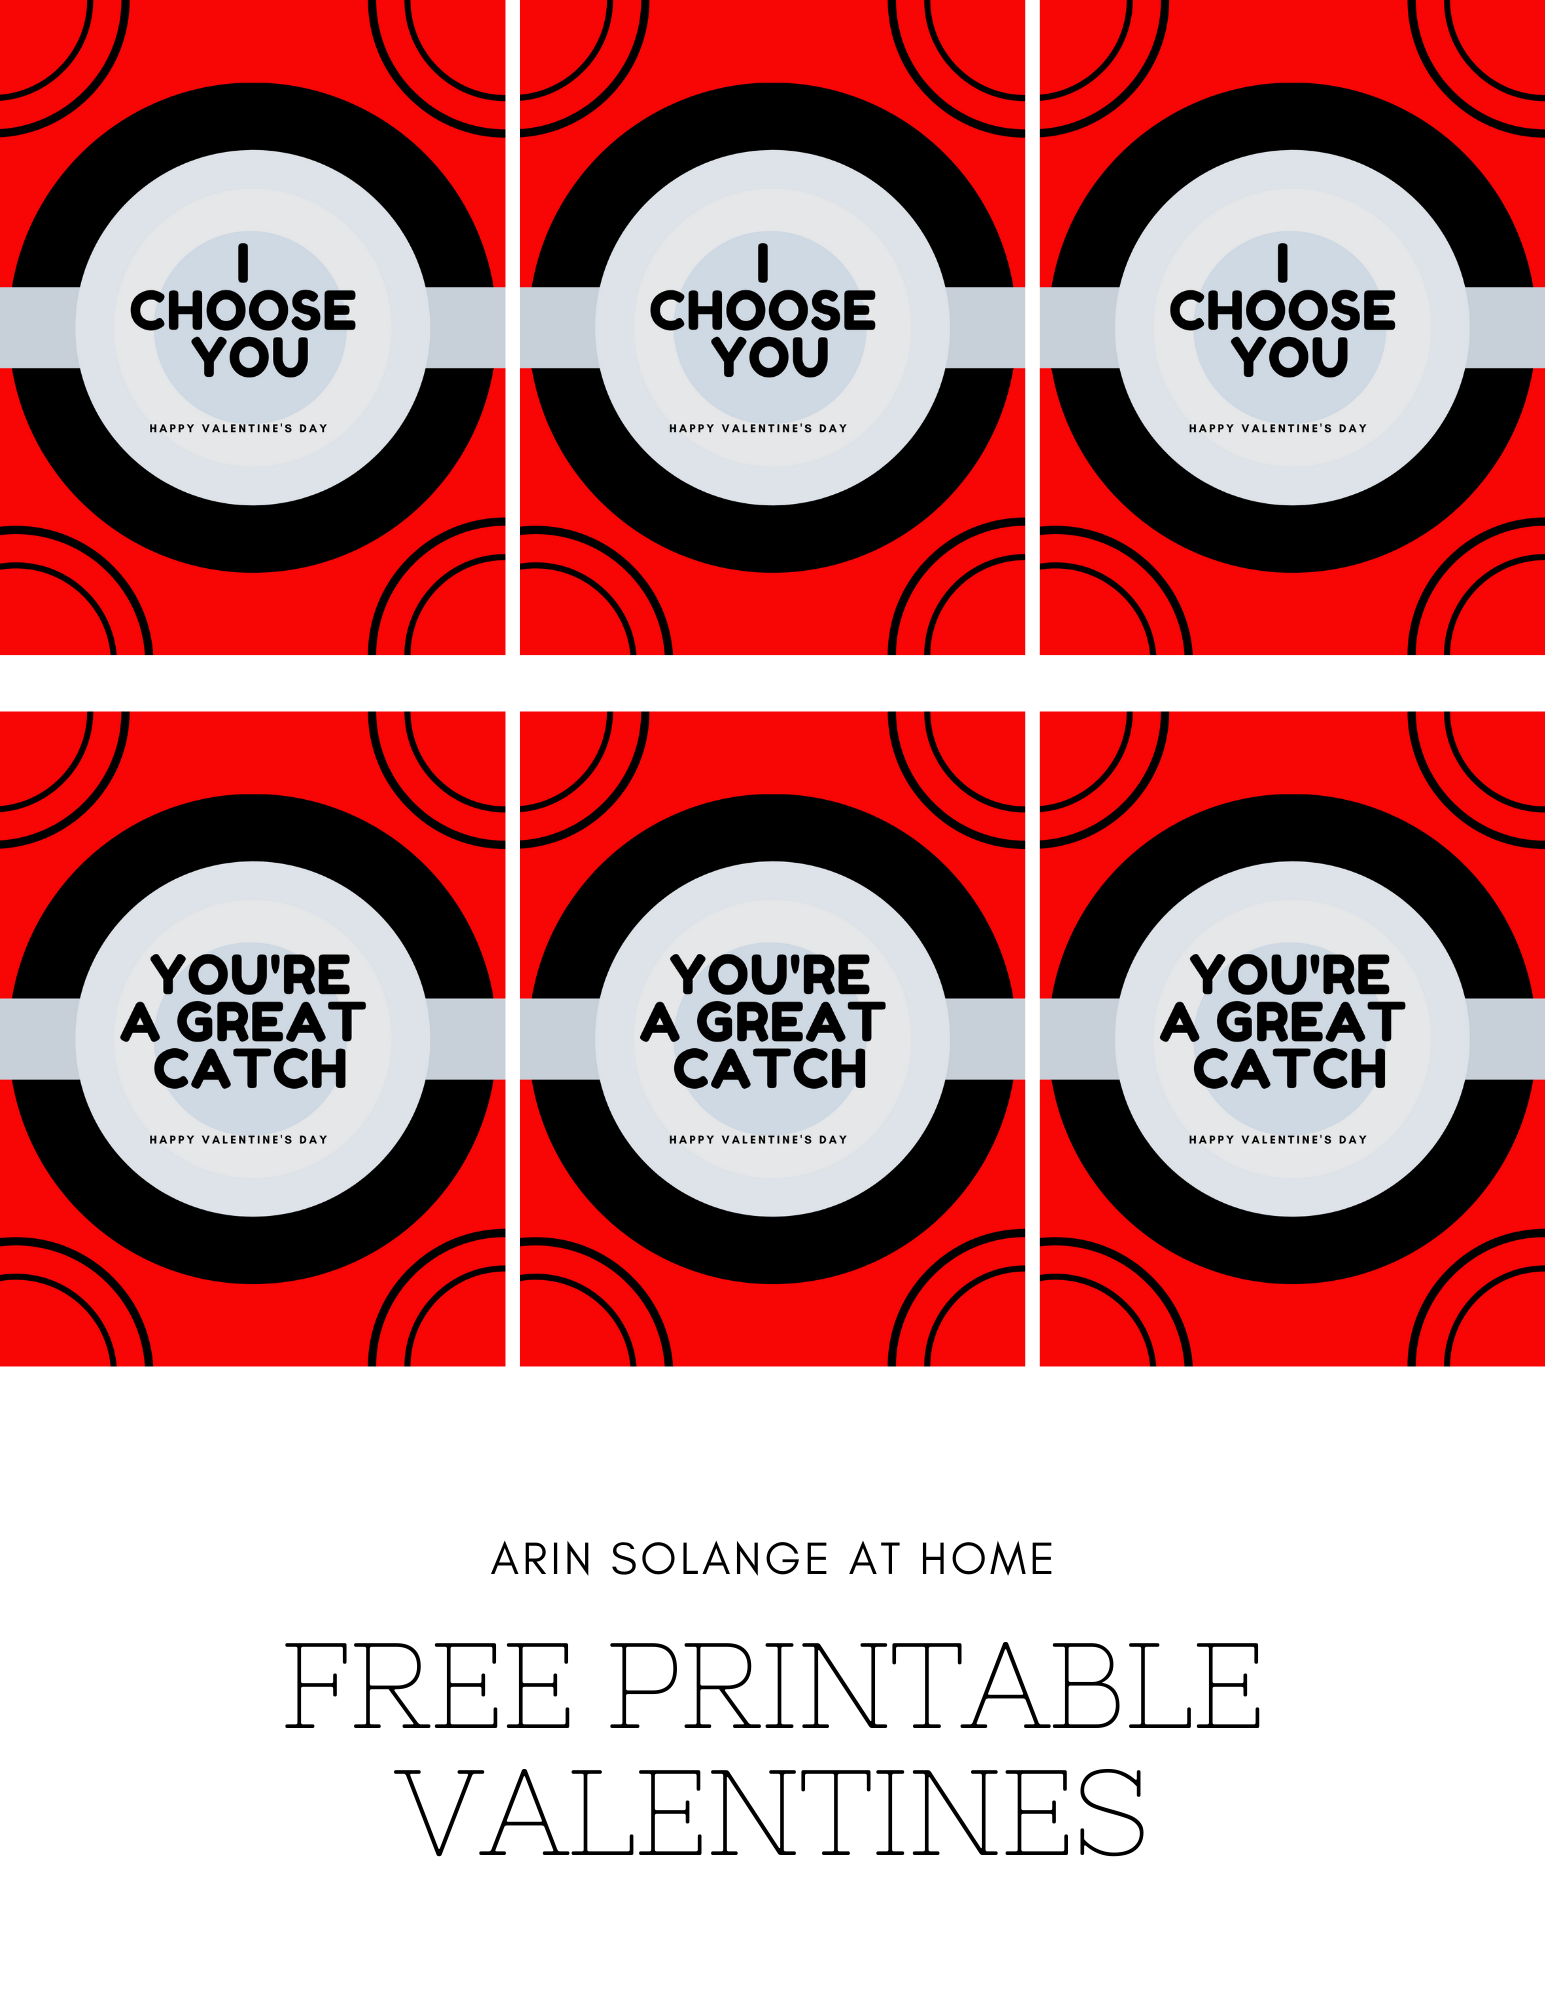
Free Printable Pokemon Valentines
If you have any questions, let me know in the comments below, and as an added bonus, I wanted to make things really simple and created these free printable Valentine’s you can add to your pokeballs.
My hope is that they look like a Pokedex…also why do I know all these terms? What has my life come to? haha. To print them just click below and enjoy! I simply used a hole punch and tied them onto the keyring with yarn.
I hope you enjoyed this fun DIY, and be sure to follow me on Instagram to see more DIY fun, and subscribe for my emails to get notifications of the rest of the DIY Valentine’s this year.
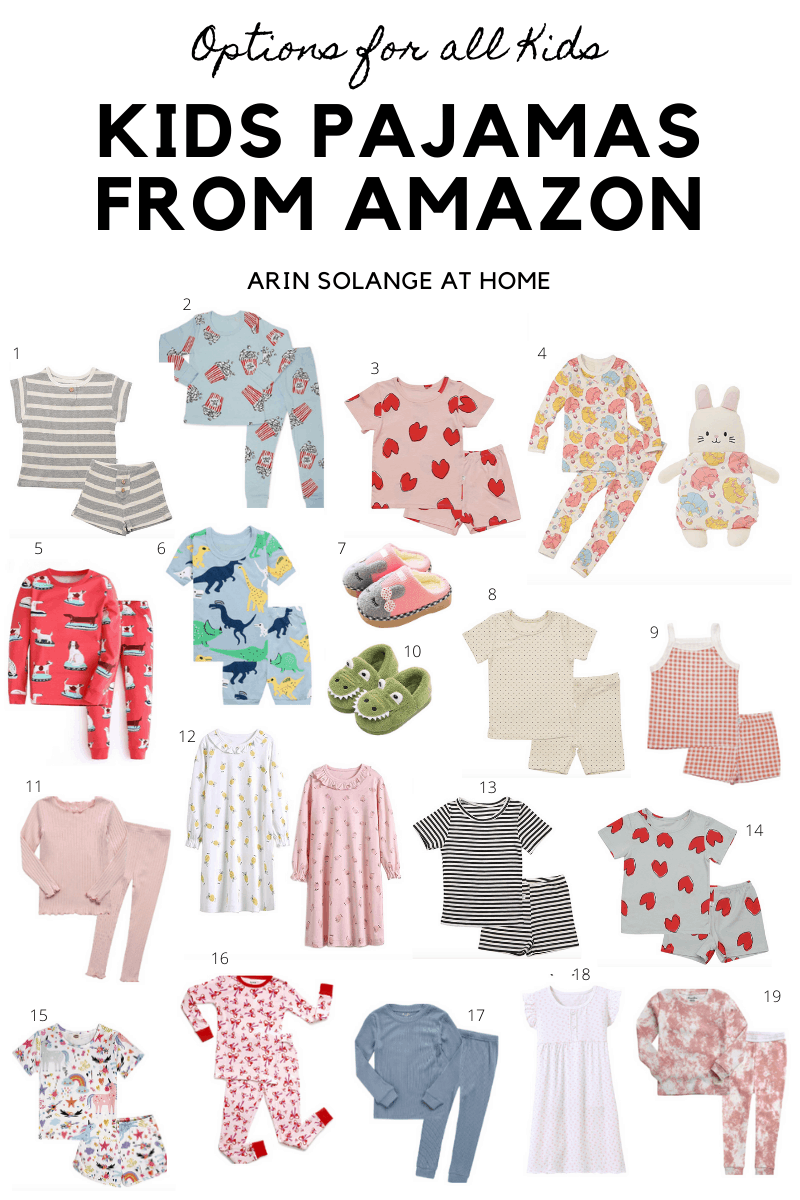
After polling my Instagram followers last week about what they want more of, it was pretty clear that Amazon finds are a favorite. I have purchased so many pairs of kids pajamas from Amazon, and honestly some of them are my favorites that I own.
this blog post contains affiliate links
I have been doing a Wednesday finds series on here, so this weeks finds will be Pajamas! As an added bonus, I did an Amazon finds haul on Instagram today that I will highlight that showed some of these up close!
When it comes to Pajamas I try to get unique, and well made options because I always pass them down to my kids. I will make note on many of these if we own them, and try to elaborate on sizes and such that are offered!
Tie Dye set – this pair comes in several colors as well as some cloud prints.
If you have questions on any of these be sure to leave me a comment or message me on Instagram. I have several other Amazon favorite posts you can find linked below, as well as a page here that has all of my current Amazon finds.
If you like Amazon finds, be sure to let me know what you want to see next, or if there is another store you want finds from one of these coming Wednesdays, and in the mean time enjoy these Kid’s pajamas from Amazon.
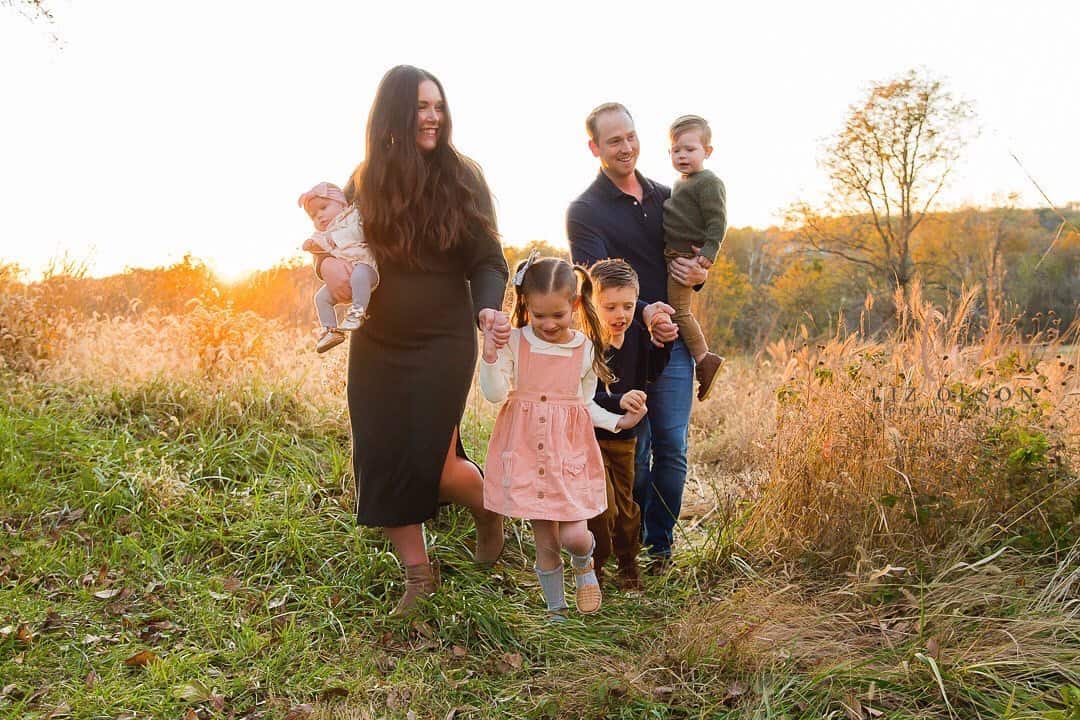
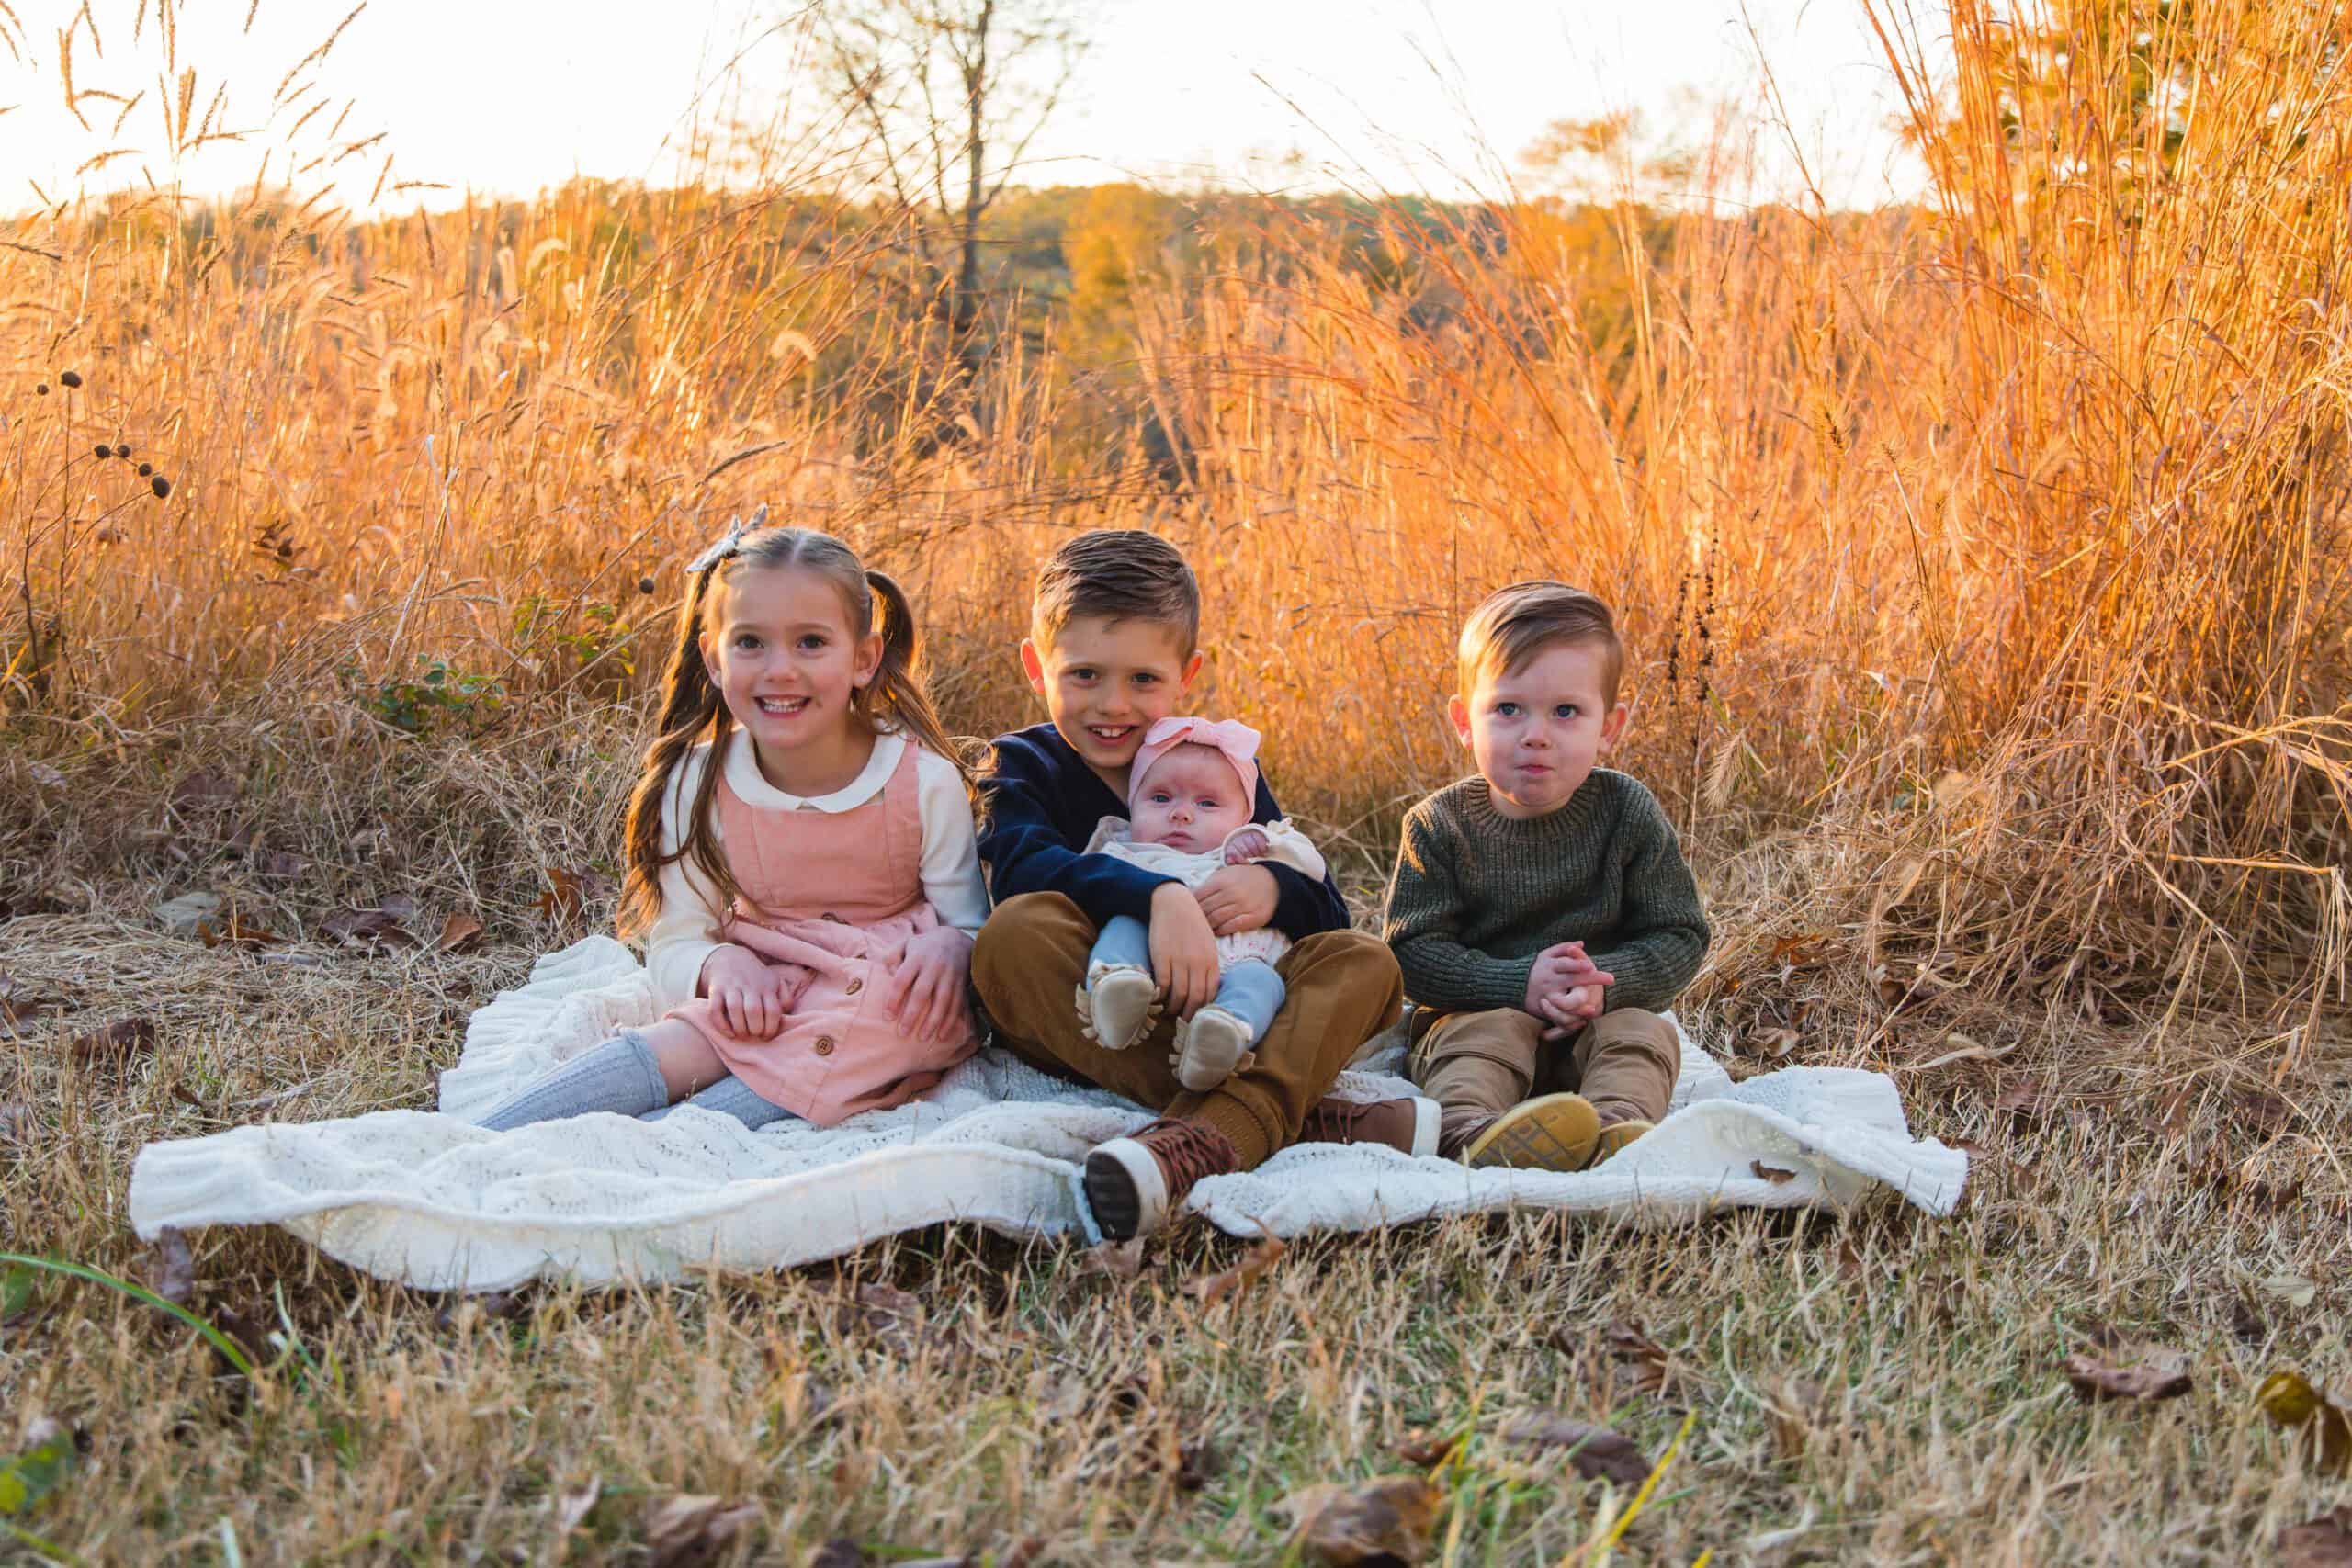
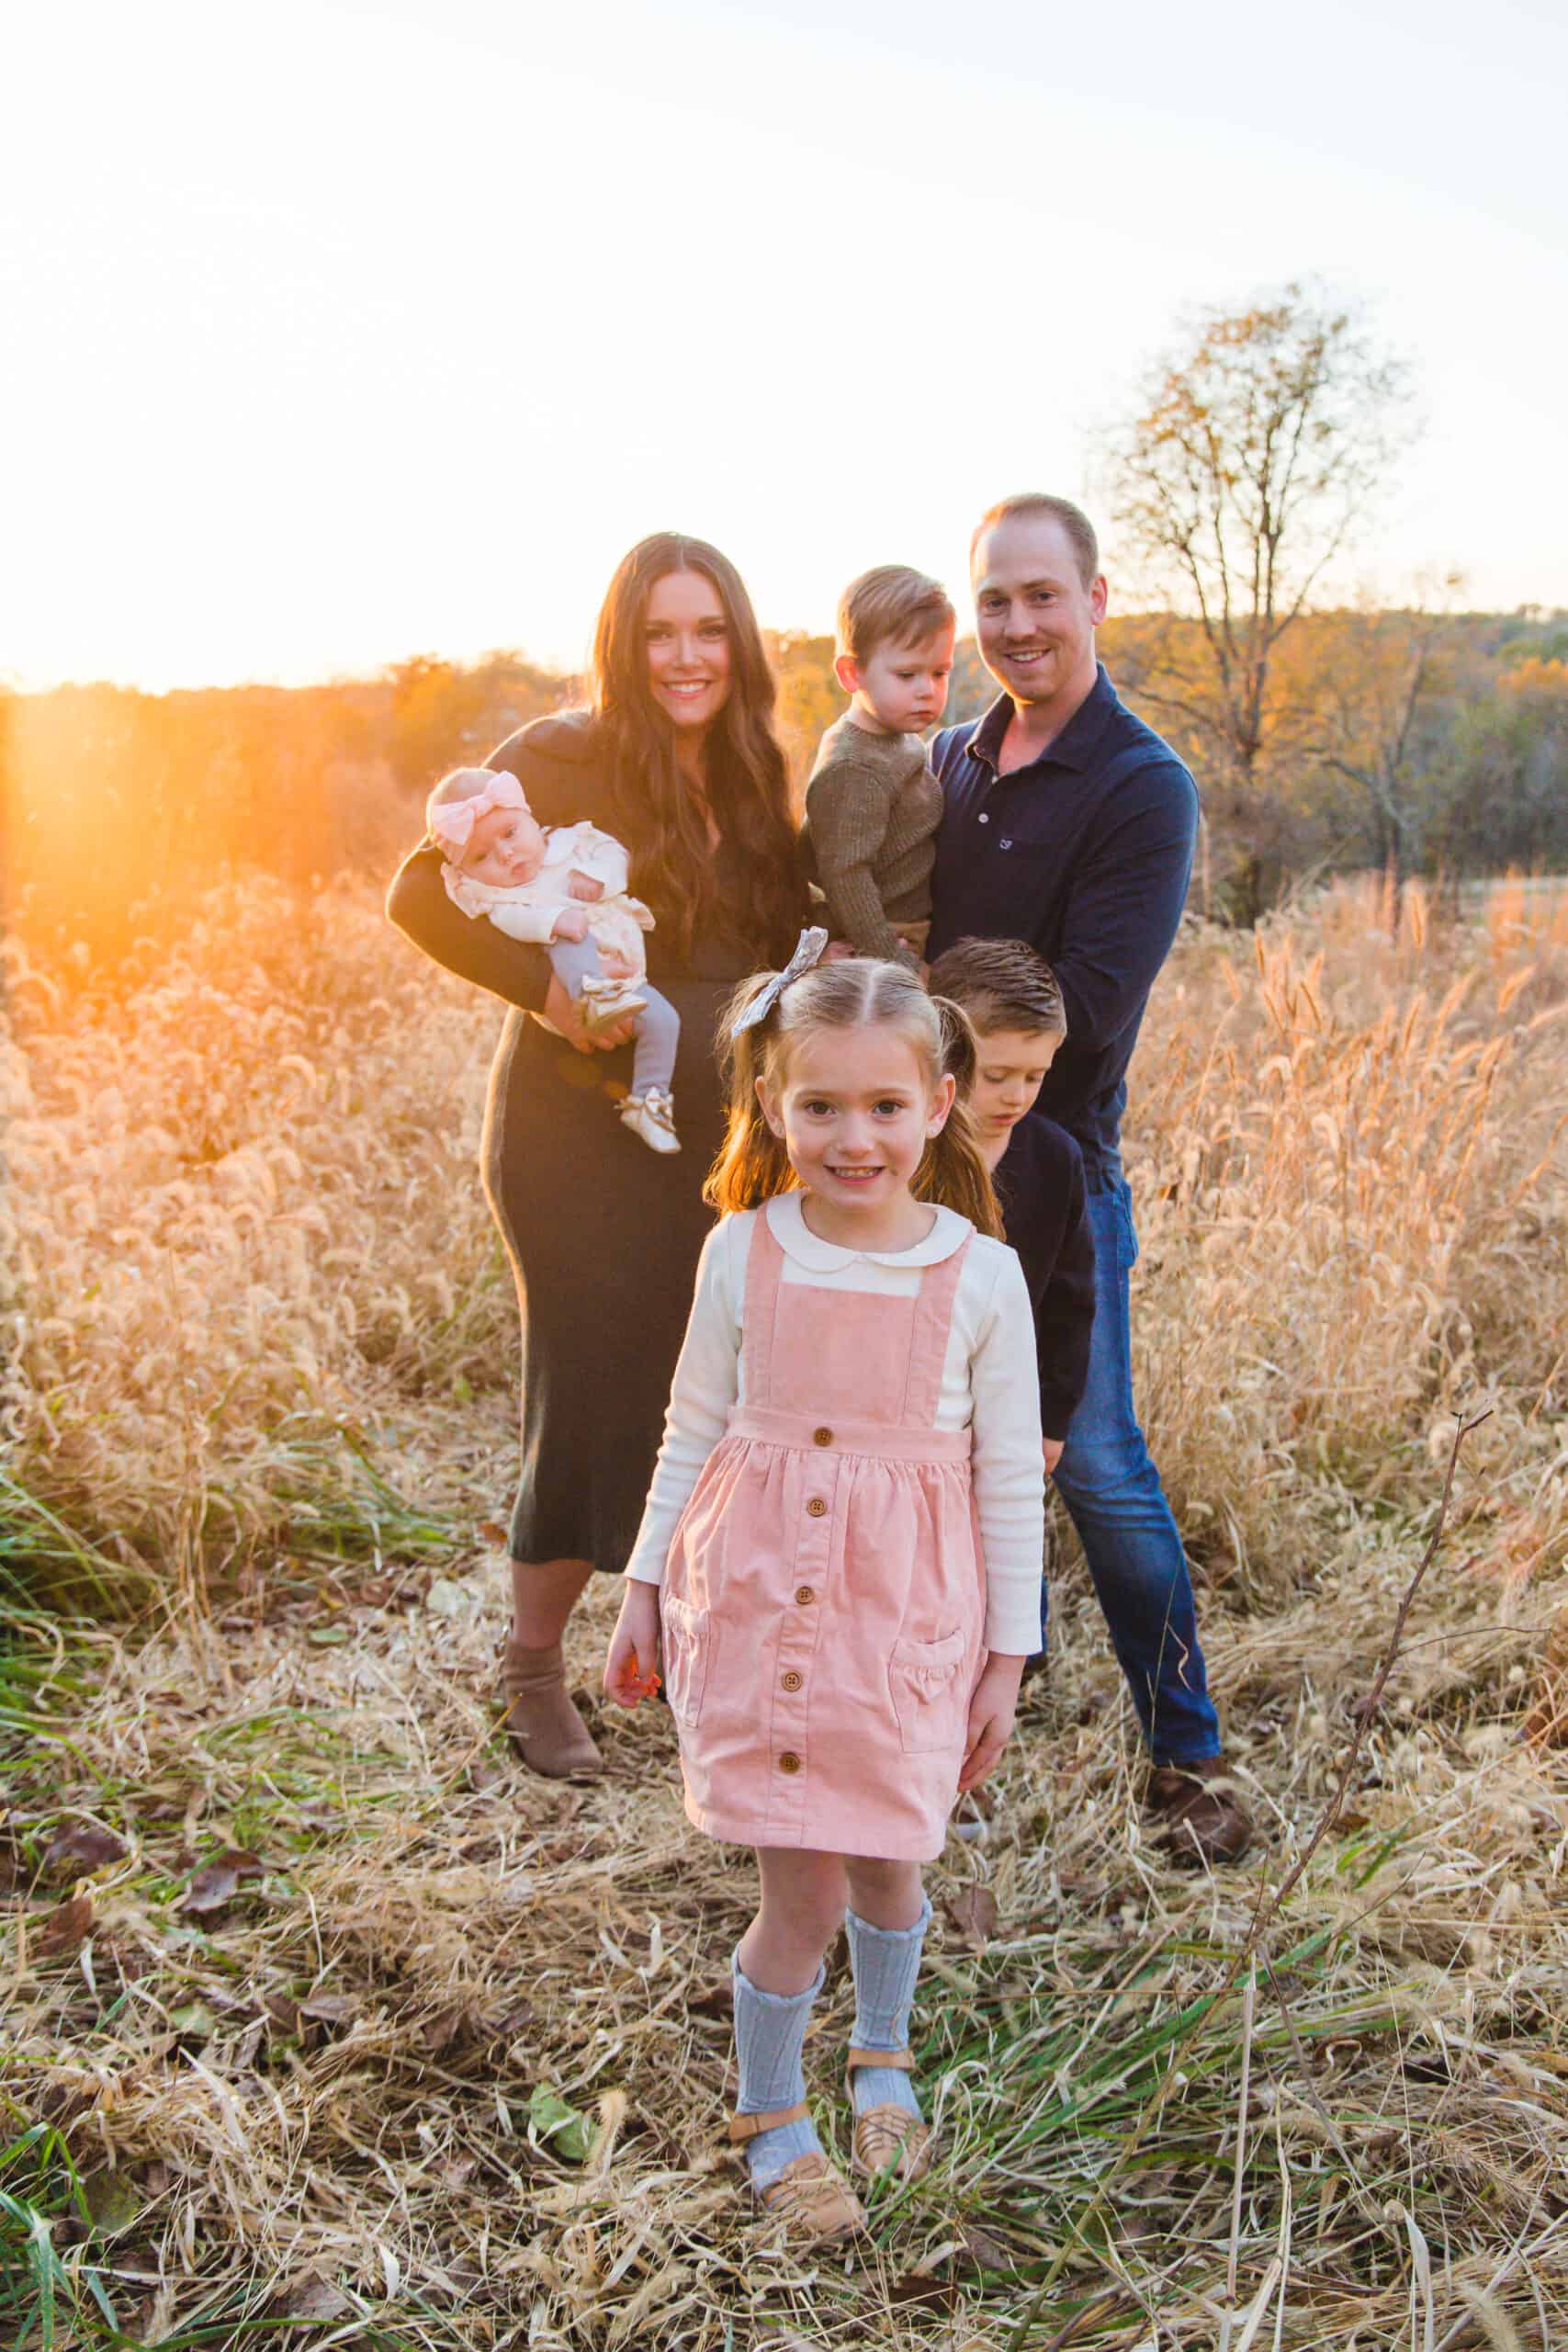
I seriously can’t believe we are already nearing the end of the first month of 2020. Someone tell me where the last few weeks went? Sam and I have been ALL over the place on our home plans for 2020, and I have been super vague about our plans for the past few months on Instagram, so I thought I would talk about our plans for this year and how we got here.
2019 In a Nut Shell
A year ago when we found out we were expecting Goldie we instantly did an “oh crap” because of our house. Our house is set up perfectly for 3 kids, but 4 gets trickier. We have 3 kids rooms and a master upstairs, and none of the rooms are massive.
Ultimately (and obviously) at that time we made the decision to stay put until after Goldie came, because I had no desire to try to move pregnant. I knew that kids shared rooms all the time (heck my husband and his brother did for years), so it wasn’t a big deal.
During all of the room moving and nursery prep we also spent time looking for lots and talking with a local builder about building a new home. It seemed to be the best way to get what we were looking for in terms of a house.
Sam and I built our last house, and loved it! When we moved to this house I was excited for the fixer upper aspects, but we knew that when the time came to move we would likely build again just based on the overall floor plan we want and that being more rare in this area.
At the end of last year we found a lot… we thought it was THE LOT. Close to the kids school, large, and the list goes on. But without going into details it just felt like there kept being small speed bumps in this process.
Both Sam and myself kept saying “what is God trying to tell us?”
We talked a lot about that question over Christmas and the new year. We really tried to think about what this year, what the next few years were going to look like. What our ultimate plans over all were, and what was highest priority.
So Our ultimate Decision…
We finally decided it seemed like the speed bumps were to slow us down. Give us more time to think on this big move. We have had 4 babies in the past 7 years. We have built a home, moved and done tons of home updates in that time. We are finally sort of settled. Our family is complete, and we are praying for no huge changes.
One thing I stress all the time on Instagram and here on my blog is how with effort you can update your home on your own. How inexpensive changes can make your current home perfect for the now.To learn to love where you are, and make the best of the home you have.
So this year, we will be doing just that. We know that moving is still going to be in the cards for us down the road. We eventually want the kids to have more than one bathroom to share (but for now lets be honest – they all just use ours!), and we eventually want everyone to have their own rooms.
What Does that Mean for This Space?
I LOVE DIY and love sharing those projects here – and I have zero desire to move to a new home and start shaking up “perfection”.
So for this year expect to see more DIY. We plan to do 1 small and one larger project in our house each month. I will try to share at the start of the month what we will be tackling that month, and hope this is inspiring for all of you.
Sam and myself will be working together on this, and you will likely see lots more of him on my page/blog/stories. I am the brains, but he is the power tools.
I know no one will have all the same projects on their to do list, and that we all have different homes with different needs. But I also hope that I am able to inspire you all to find those areas of your house that aren’t functioning well and update them. I hope I can be a great resource for you if you’re looking for ways to change up your house.
My reason for sharing this is to hopefully let you all know that although we LOVE LOVE LOVE our home, it isn’t perfect. It isn’t necessarily our dream home, and I am probably in a very similar position to many of you. We don’t have exponential budgets, so I get creative and love to find ways to make our house function and look how I want on a budget.
If you have any questions always feel free to DM me on Instagram or email me. I am sure my Instagram will start shifting to a heavier dose of decor during this, which I love, and I hope you all will too. There will still be plenty of the same page happening too, and I will likely still be the hot mess, flighty human you all have been following! xo
So lets do a little throwback
So since I am talking about updates…I thought it would be fun to show you a bit of where our house started when we moved in. Sometimes I am blown away to see how much we have done. Most all updates have been done DIY, however flooring and a few other small things were contracted out!
Before of the kitchen – changed out the oven, all lighting, flooring and paint. More to come in here this year I hope!
You guys know those IKEA built ins in my home office….yeah this is that room. We added French doors to the entryway, and the whole room got a MAJOR CHANGE.
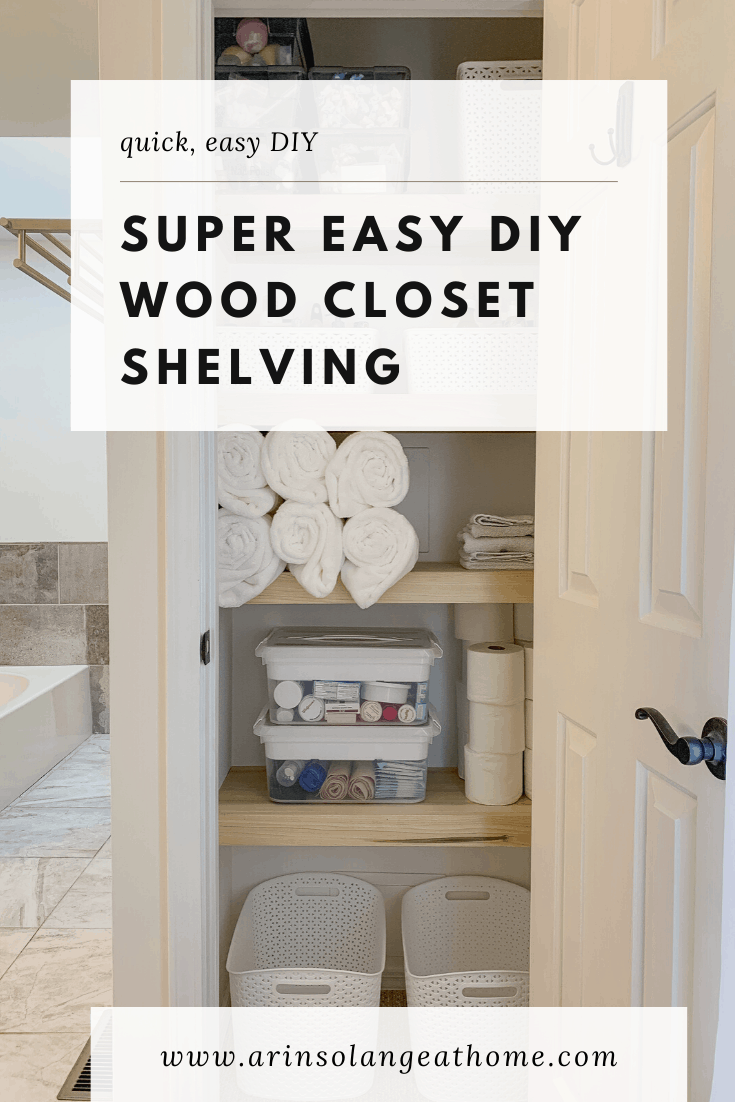
How to Make Simple and Inexpensive DIY Closet Shelves
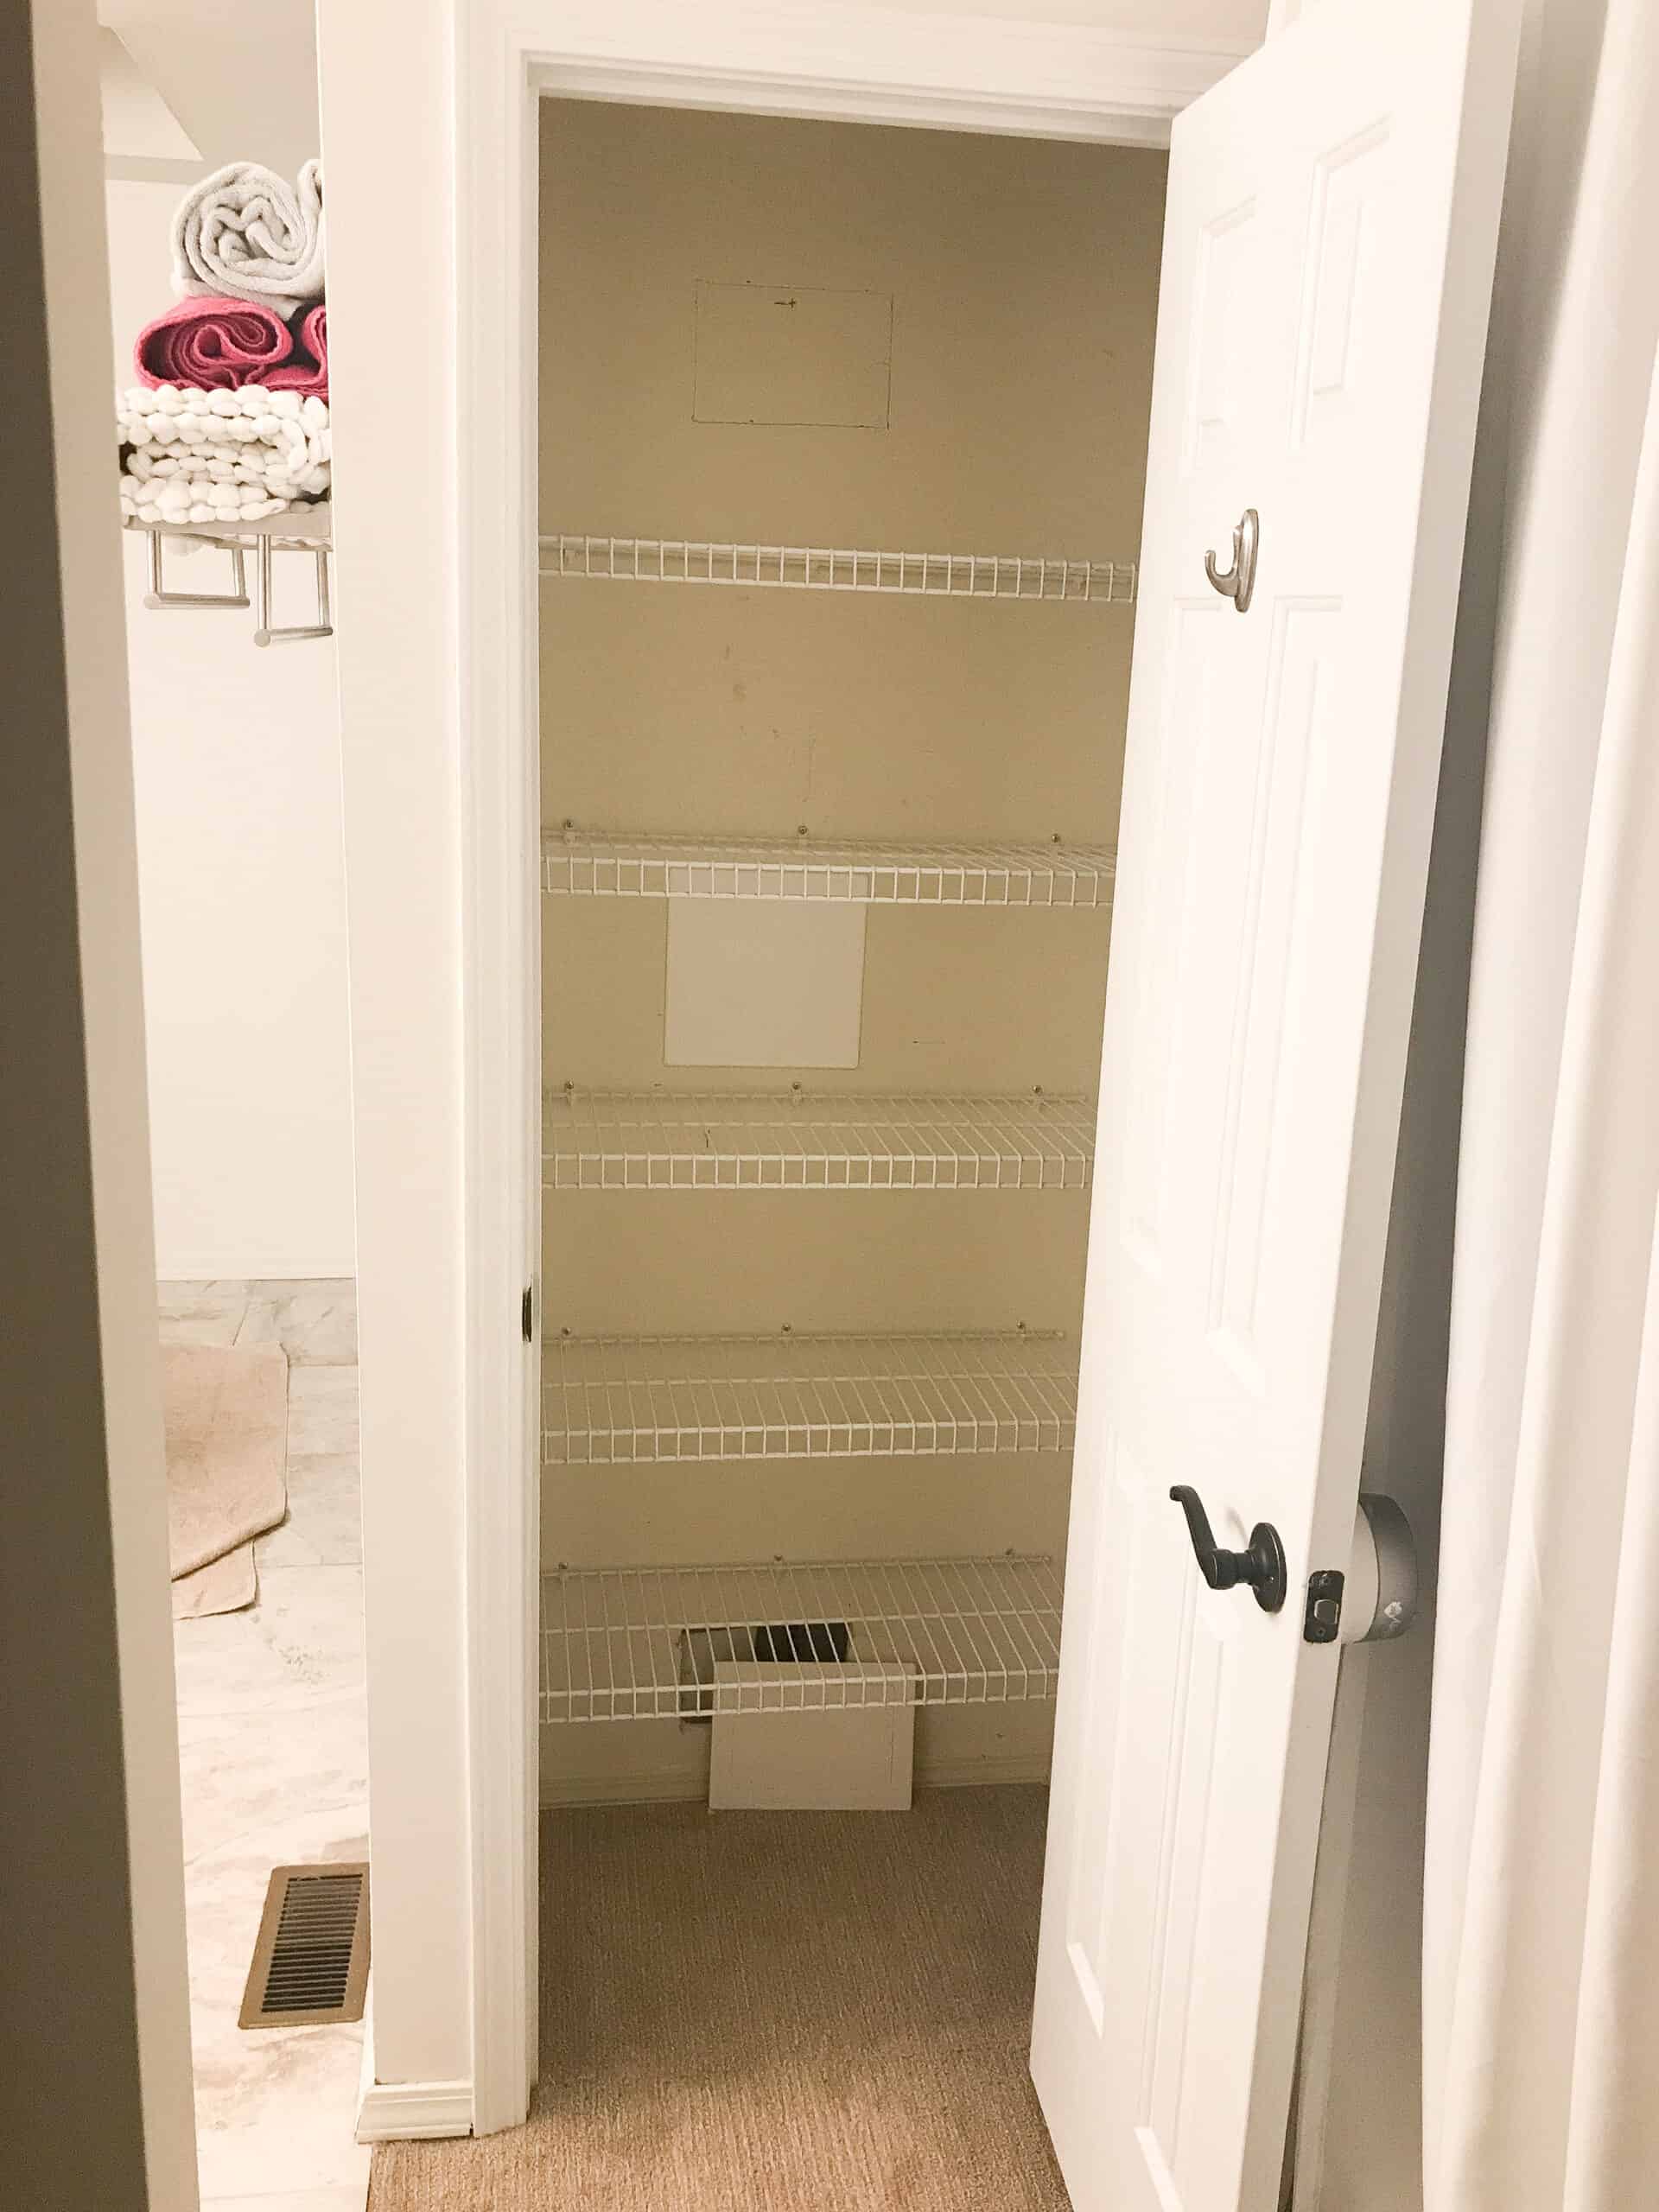
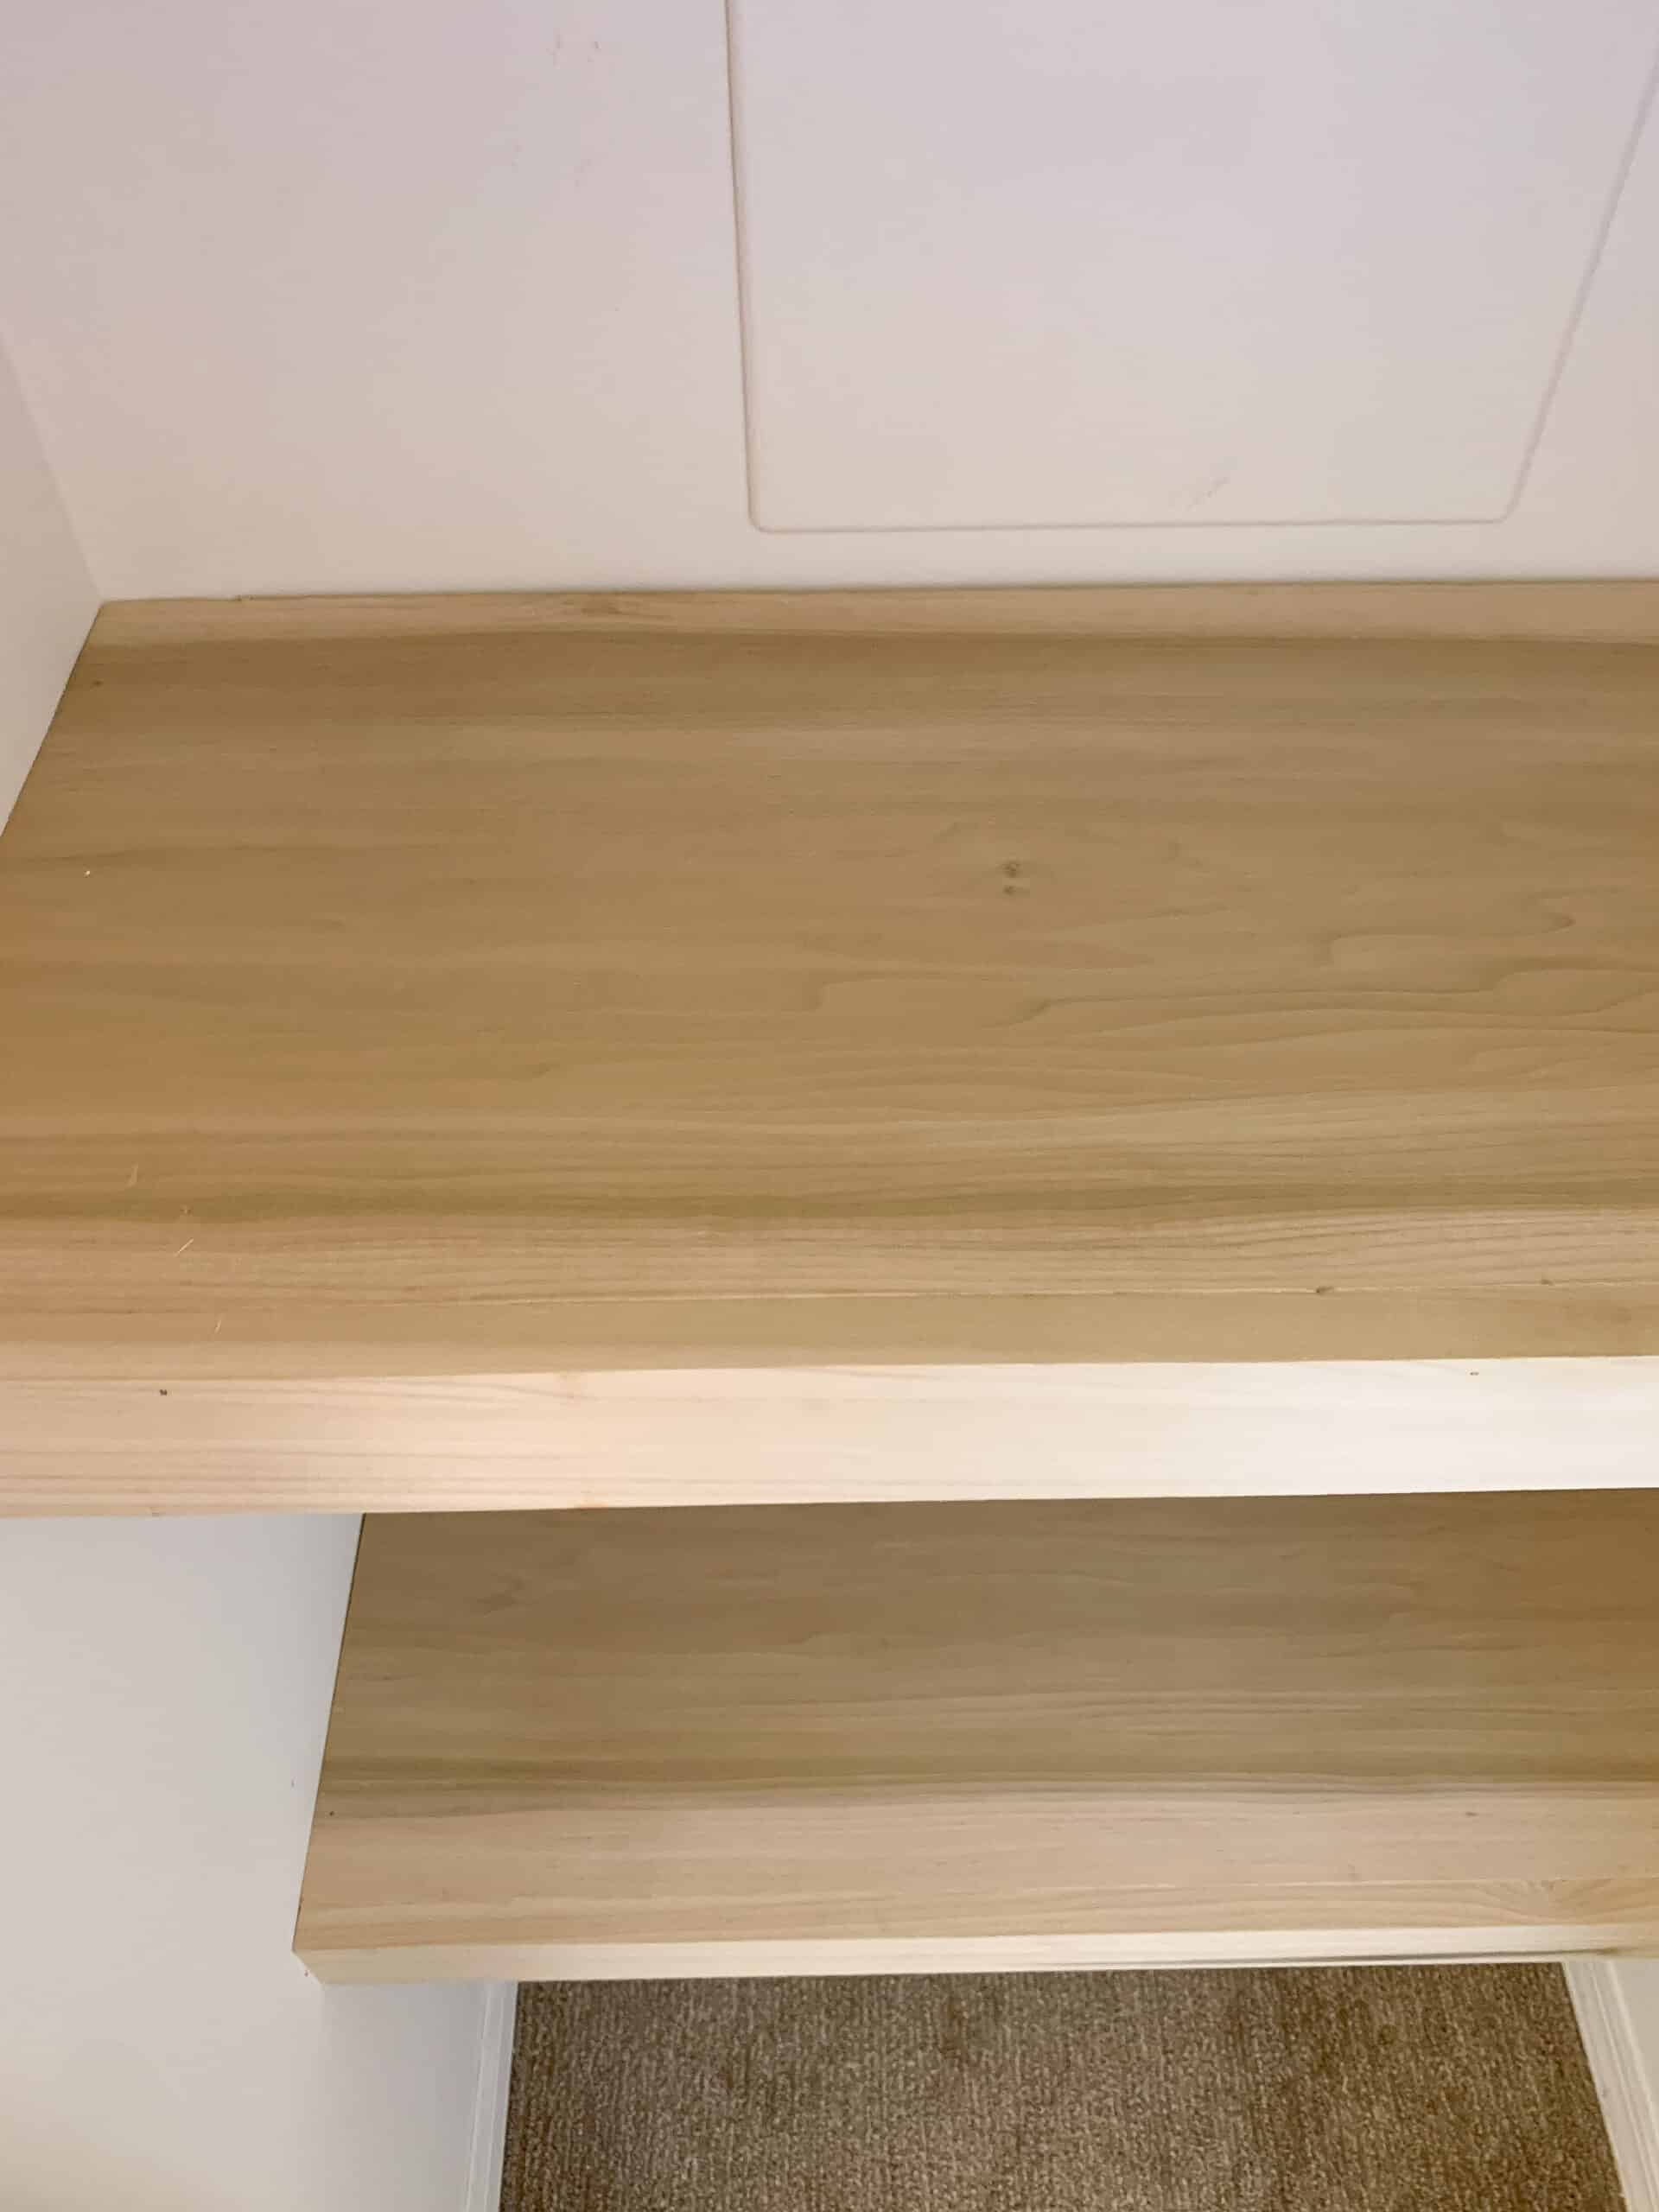
I have been so excited to install wood closet shelves DIY style! We could have opted for closet shelves from Lowes or Home Depot, but closet shelving we decided to do DIY closet shelves to kick off week 3 of my 30 Day Declutter challenge. When it came to tackling our bathrooms and linen closets I was slightly uninspired, because we HATE all the closets in our house. So instead of just organizing and decluttering we decided to do some DIY wood closet shelves.
This DIY wood closet shelves post contains affiliate links
Closet Organization – Wood Closet Shelves
The linen closet we tackled first is right outside our master bathroom in our bedroom and we are in it every day, so I really wanted to see it more functional and give it an update that looked nicer. It ended up being a really easy DIY and we are already at the ‘assembly’ step for the kids linen closet too.
Home Declutter Challenge
Before I get started on this DIY let me recap why I did it and what I’m talking about when I say ‘6 bags for 6 weeks’. My friend Jen and I are on 30 day declutter journey and taking you all along with us.
During the 6 weeks you will declutter every area of your home with a helpful chart to remind you of all you need to purge, as well as a chart to track how much you have actually gotten rid of. The end goal is a minimum of 36 bags of items OUT OF YOUR HOUSE. This can mean donate, sell, trash, whatever works!
This week we are tackling bathrooms and linen closets. I talk at the end of this post a bit about how I organized ours, but Jen did a full blog post on organizing bathrooms, so she will be your resource this week!
DIY Closet Shelves-How to Make Simple Shelves
Okay now onto the closet shelves DIY! Like I said at the start of this post – our shelves in this house in EVERY closet drive me mad. They are all wire, and our house is from the late 80s, so many of them just are not in good shape at this point. When it came to organizing closets, it made sense to get things in better shape.
We are on a mission this year to really tackle some projects around our house in DIY style and can’t wait to have you all along with us, so if easy, LIKE ONLY REALLY EASY, DIY is your thing make sure you subscribe to my blog and follow along on Instagram to see more of these projects.
Total Breakdown:
Cost: Lumber was $100 but we purchased for 5 shelves and decided to do 4. We personally owned everything else! So it was VERY inexpensive. (editing to add – I just did these again 3 years later and again the lumber was roughly $100)
Time: Disassembly – 10 min, Putty and paint – 1 hour (that doesn’t include waiting time), Cutting and Assembly – 1 hour. TOTAL – 2 ish hours!
What You Need:
Lumber amounts will differ based on your shelves, but I will give you a breakdown. ALSO, we used tools you may not have. I will share the tools we are using, in case you want to slowly invest in them and join us in the coming DIYs.
We have found that projects just get so much easier and go so much faster with the right tools.
Lumber: What Kind of Wood Is Used For Closet Shelves?
How thick should wood be for shelves?
1×2 Poplar Board – this will be your frame. You will need enough to go along the two sides and back for each closet shelf. Our shelf top was going to be 30.5 x12. So we needed 30.5 inches + 10 inches for each side (take 2 inches off your side pieces, so for us 12- 2 = 10).
To try to make that more clear. Our table top was 30.5 x12
Our frame pieces were cut for each shelf at 30.5 + 10 + 10
Total amount of 1×2 we used was 142 inches.
1×12 Poplar Board – This is your shelf top! For us we went with these boards that were already 12 inches. BUT if you have much deeper closets or want a deeper shelf you will buy 1x_ poplar boards for your shelf top. We were able to ask the men at Home Depot to cut the boards to length so each ended up being 12×30.5.
1×3 Poplar Board – This will be your face piece to make your shelves look pretty. You need the length of your shelf (for us 30.5 inches) x the number of shelves!
Tools:
We used a nail gun for this whole project. We personally have this one from Amazon and love it, but you could also use a drill and drywall screws as well as a hammer and nails.
A saw of some sort – this is up to you. We personally have the following 3 tools that would all work, but for this project used the miter saw option as it tends to be the easiest.
Stud finder (optional if you are trying to get nails or screws into studs)
How to Build your DIY Wood Closet Shelves
First things first – dismantle your current shelving. Patch any holes with spackle, then when that is dry sand and fully clean the walls.
2. Next you want to paint the closet fully. We used paint we had on hand, and personally did each of these steps a night.
3. Cut your lumber – If you are personally cutting this at home, cut your lumber for ONE CLOSET SHELF to make sure your measurements were right. If they were great then it’s time to cut the lumber for all remaining shelves.
DIY Closet Shelves Assembly
Assembly was CRAZY easy with our nail gun, but will take a bit longer without.
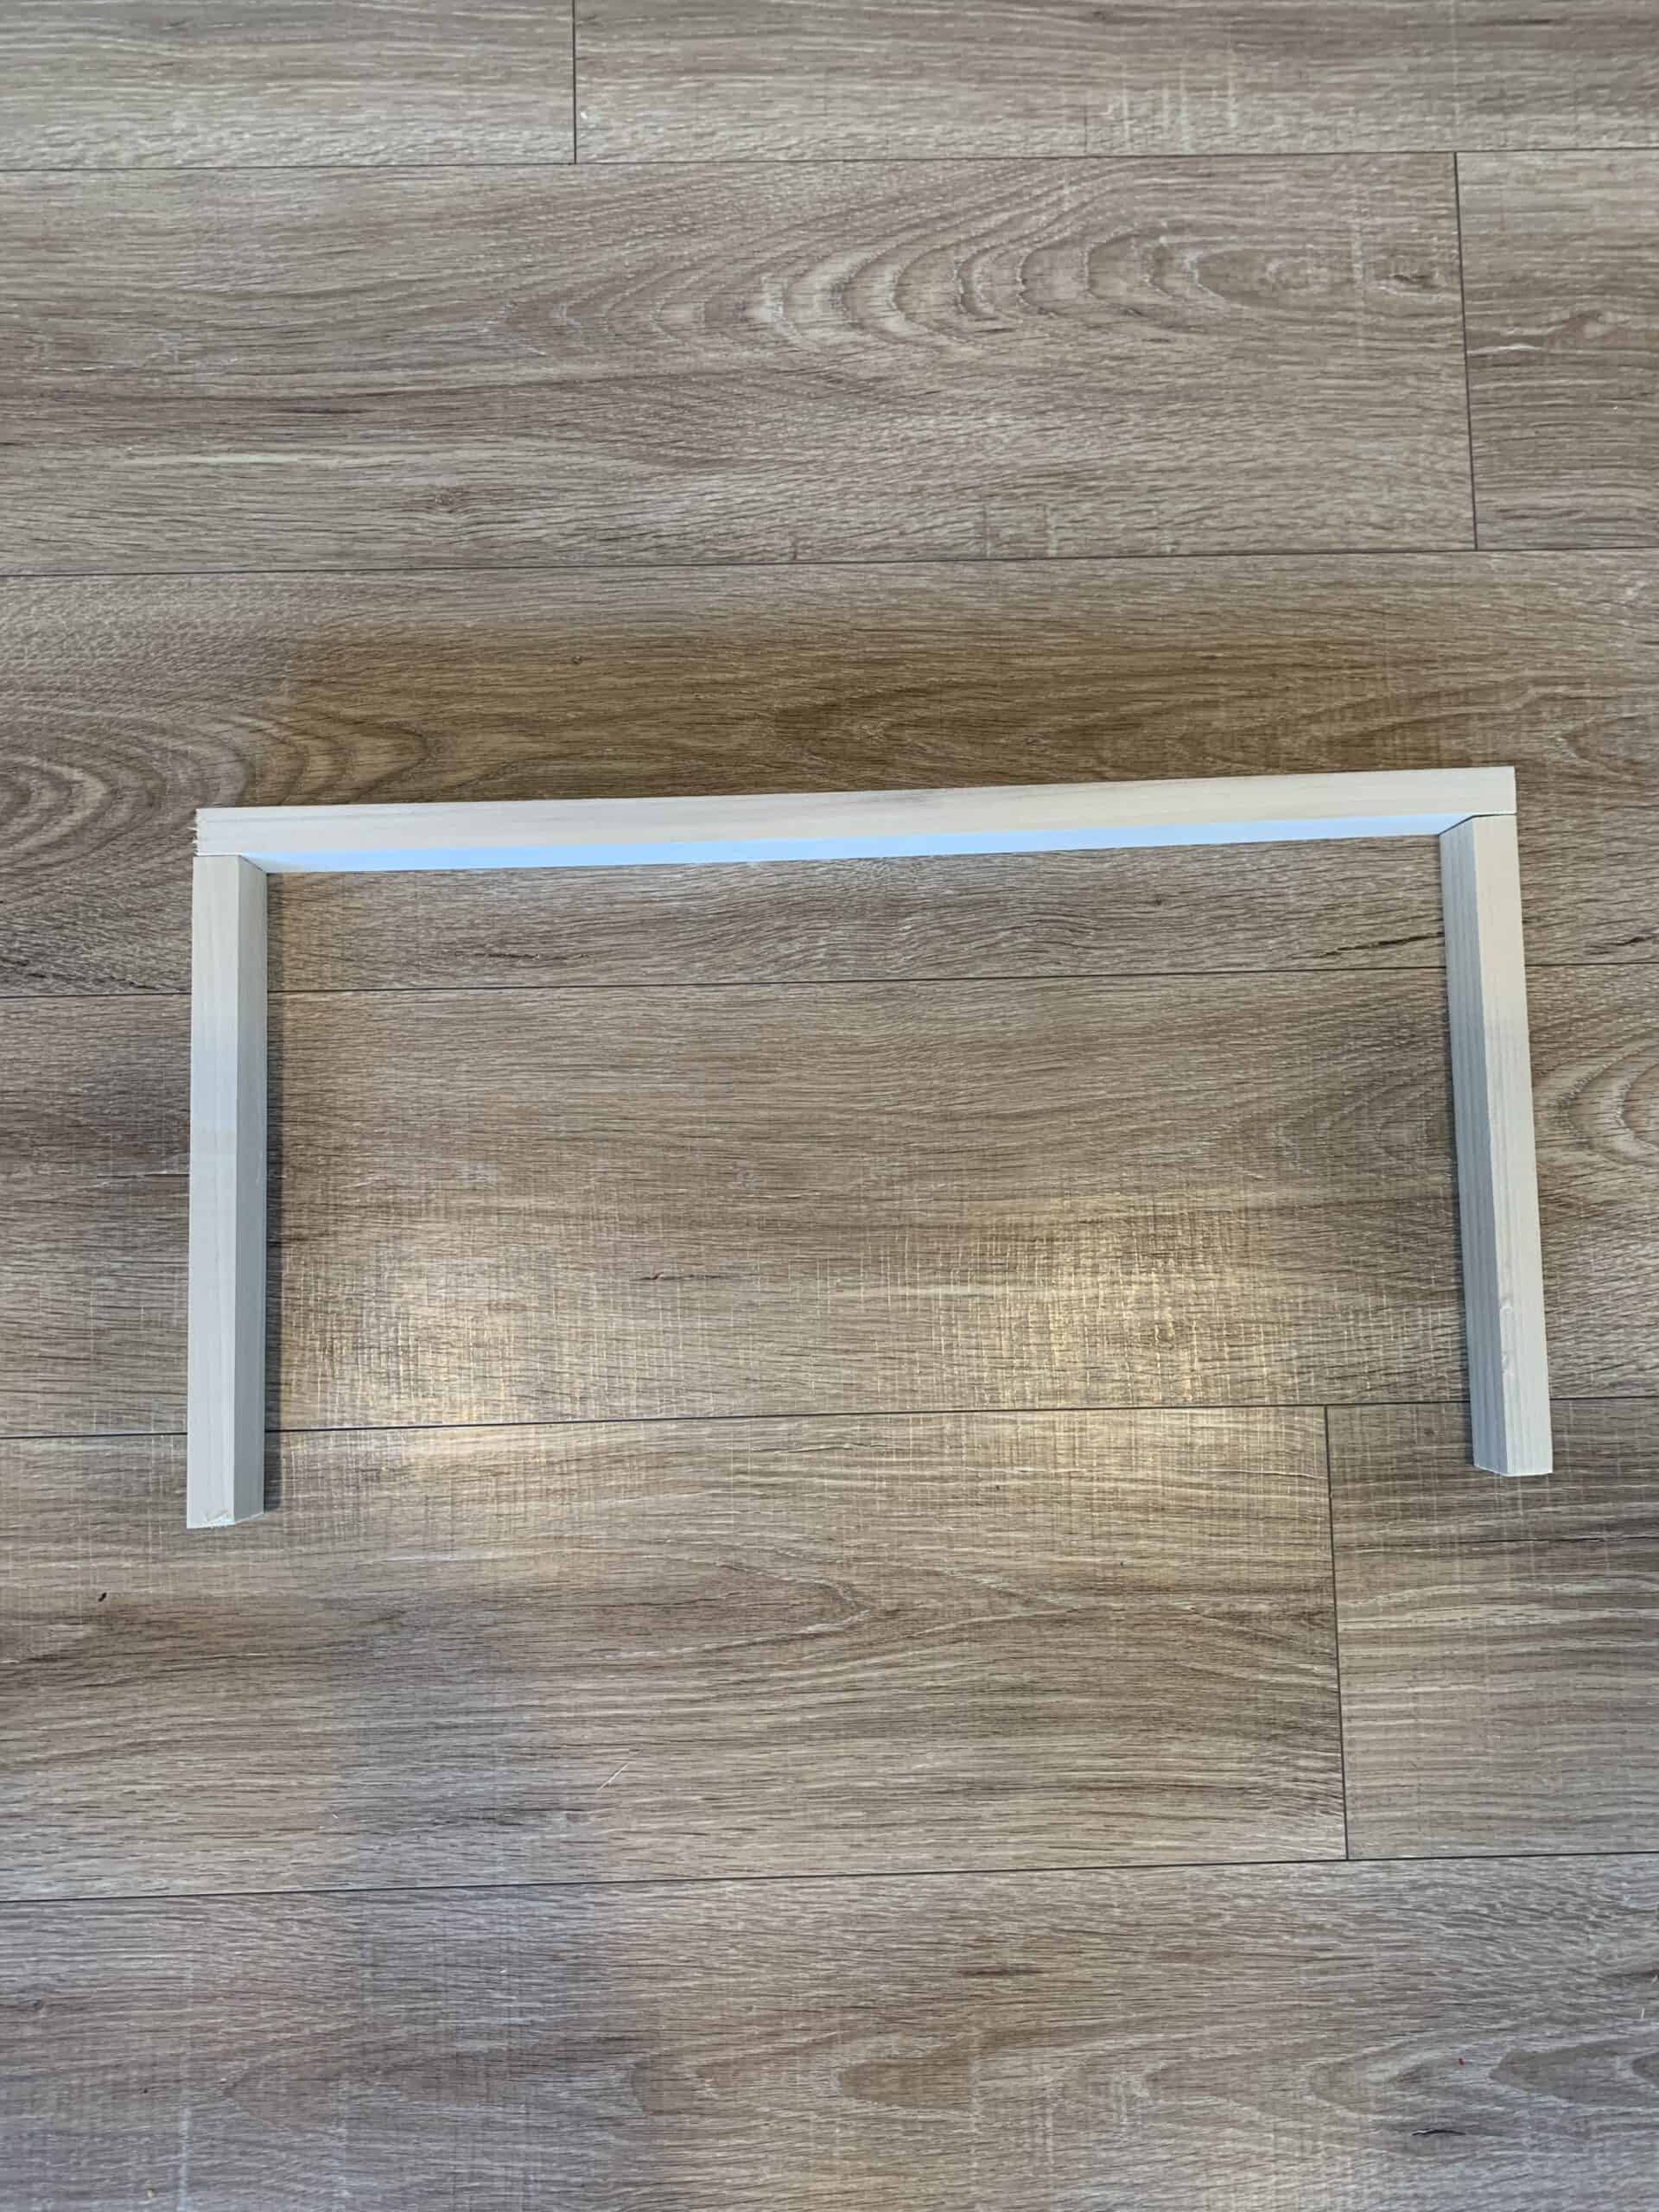
worth nothing – the photo of our frame, we did our cuts slightly differently due to trial and error. I am giving you the directions to do it how we will on closets going forward as far as the longer back piece and shorter side pieces!
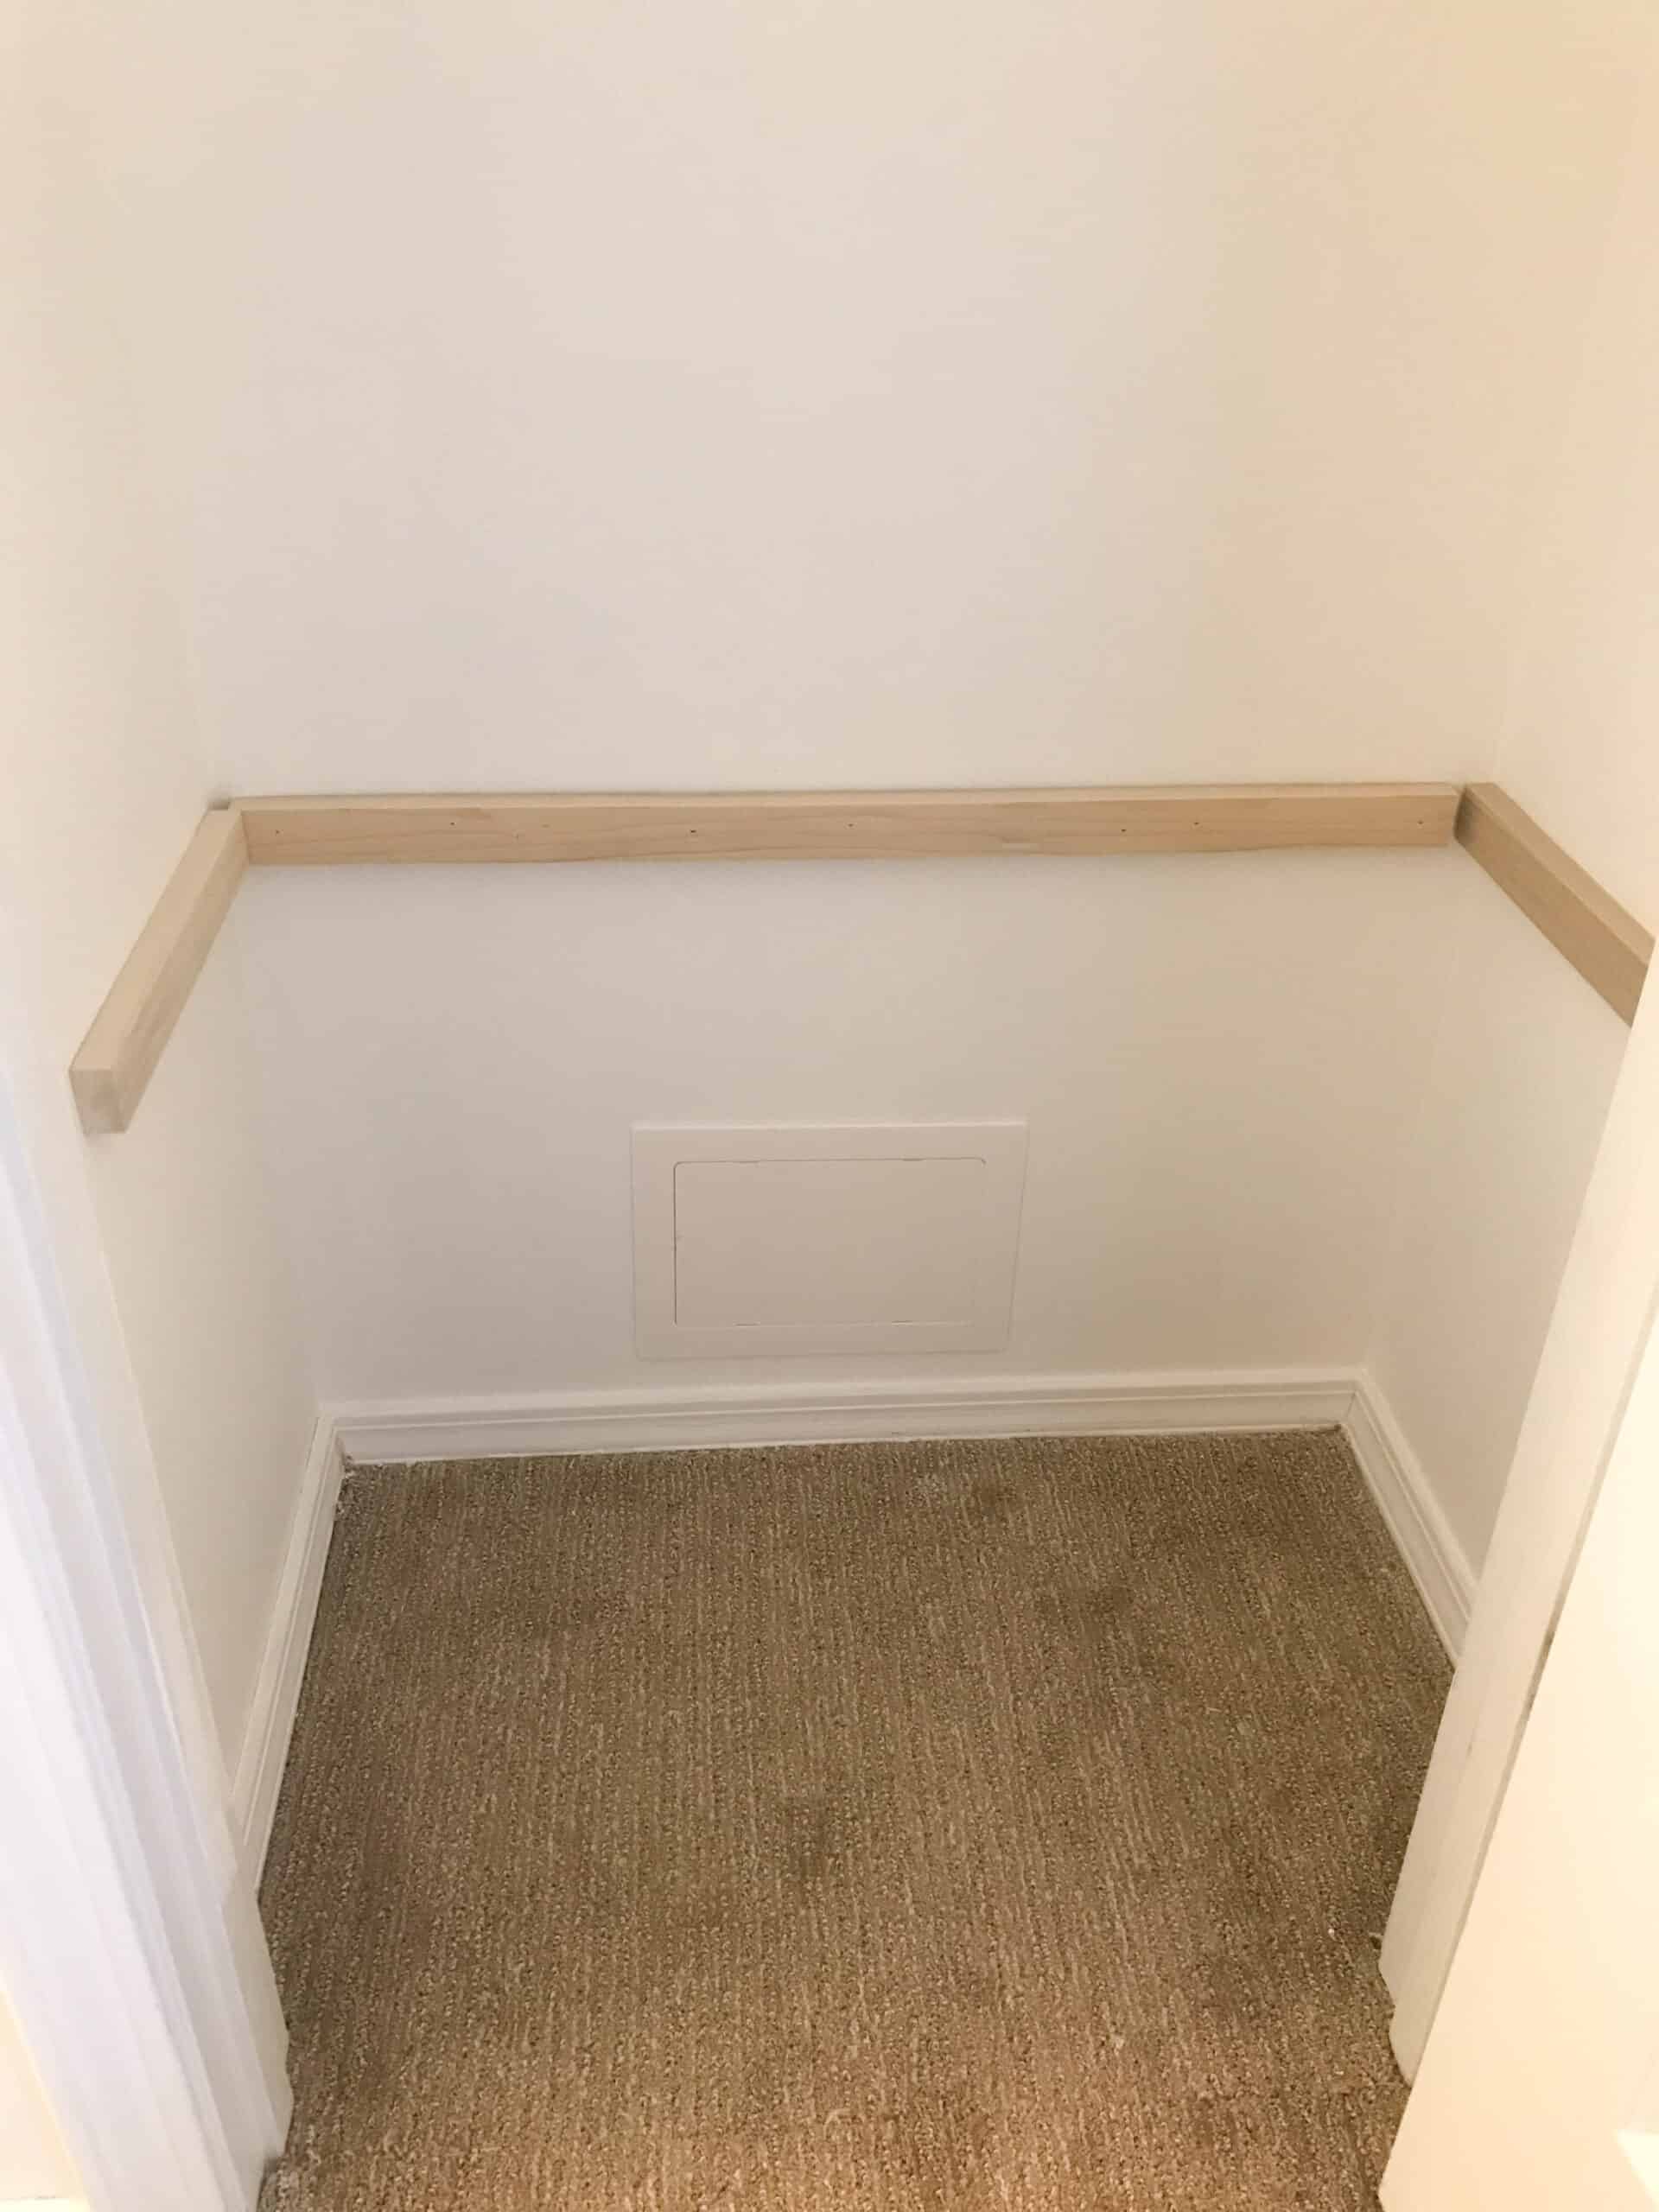
4. First attach your 1×2 against the back wall where you want your shelf. Make sure it is level as this is how you will support your closet shelf, and remember your shelf is 1 inch tall and will sit ON TOP of this, so if that matters in terms of your placement be aware. Use your drill to attach this piece – if possible putting into the studs.
5. Next you will do your side pieces of 1×2. Same height and push them as far back and close to the back piece as you can. It’s fine if there are gaps, but the biggest thing to remember is it can’t hang in front of your top board. Use your drill to attach these to the walls – and if you can get them into the studs.
Here is an example of what you want to aim for on your walls
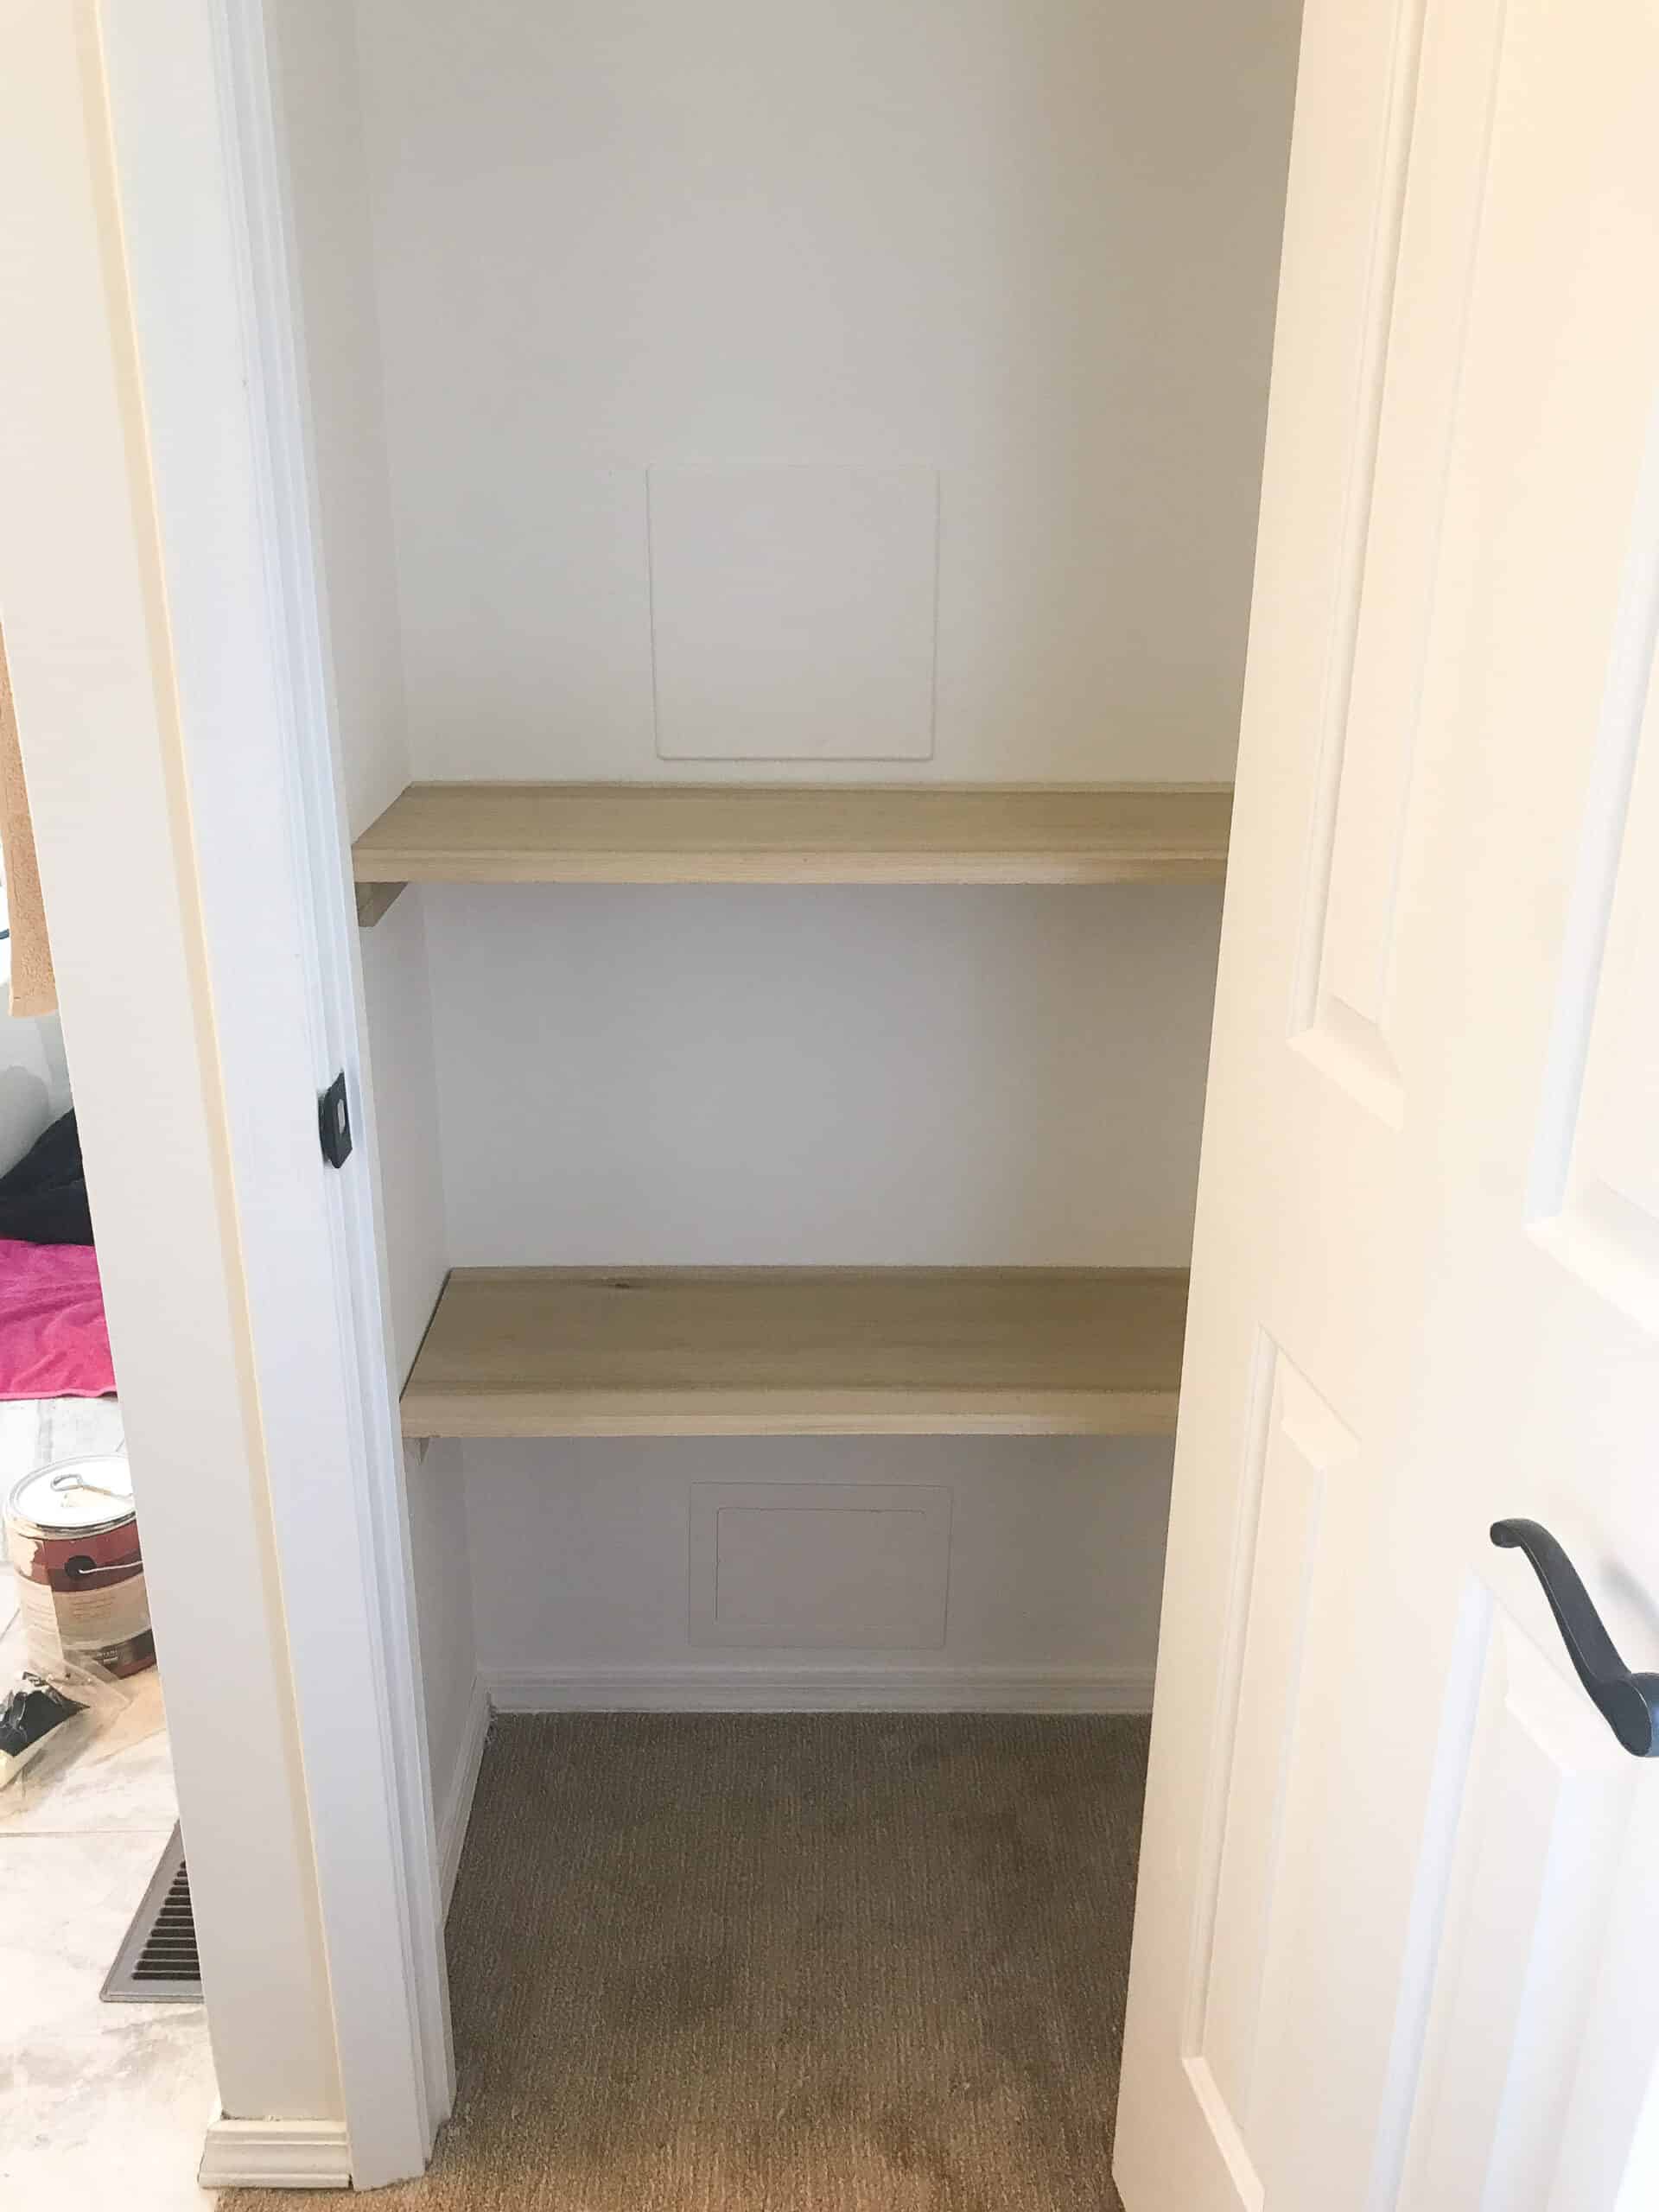
6. Once all your frames are up, it’s time to put on the shelf tops. Take your top board (this is your 1×12) and place it on your frame all the way into the back corners then use your nail gun or a hammer and nails to secure it. Adding wood glue will also keep it more secure.
7. The last step to assembly is to nail the 1×3 to the front. Take your time and line it up well so you don’t have a lip! This piece simply makes it look more finished. Again we used a nail gun, and wood glue, but a hammer and nails will work too. Just be careful not to dent your boards.
Finishing Your DIY Closet Shelves
You will have some tiny nails to cover on your closet shelves if you used a nail gun. Use a TINY spot of wood filler and allow it to dry. Once it is dry sand your boards then wipe them fully.
After you have many options – you could stain the boards and then seal them, but we personally loved the natural look so just sealed the boards by rolling the sealer on with a foam roller.
Allow the shelve to fully dry before loading them up.
Details on my Styling and Organization
Here is a really embarrassing before.
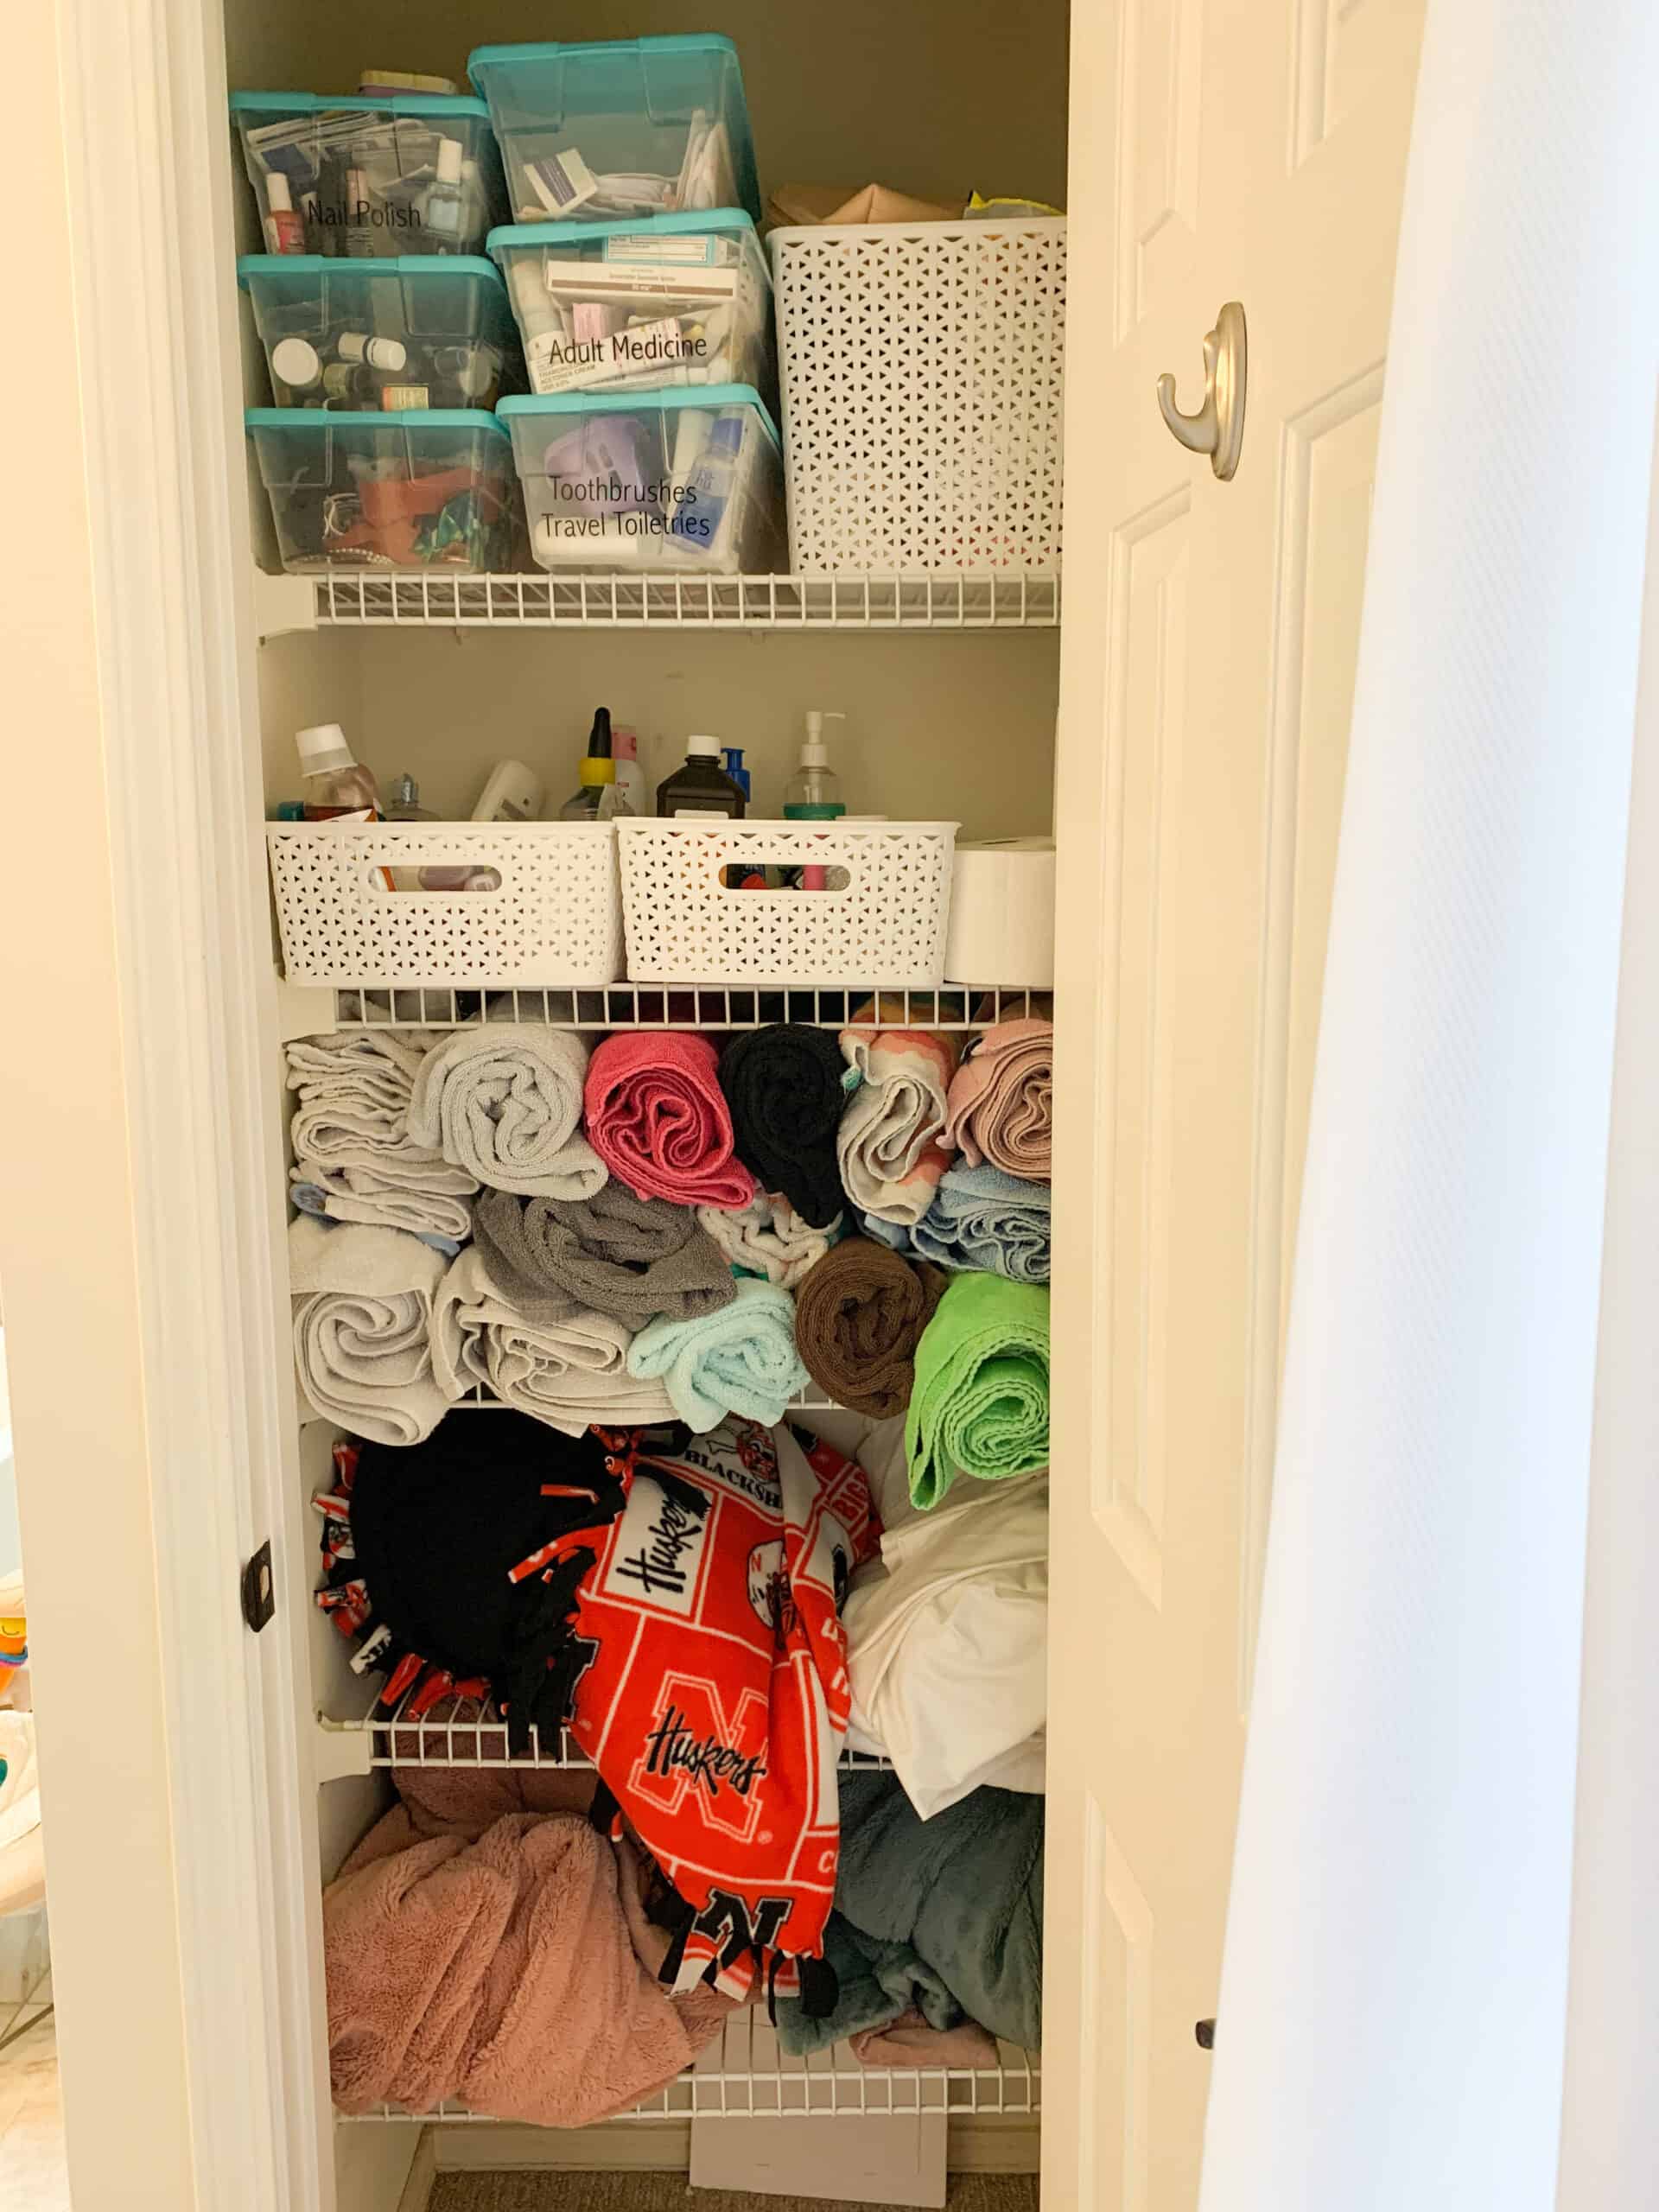
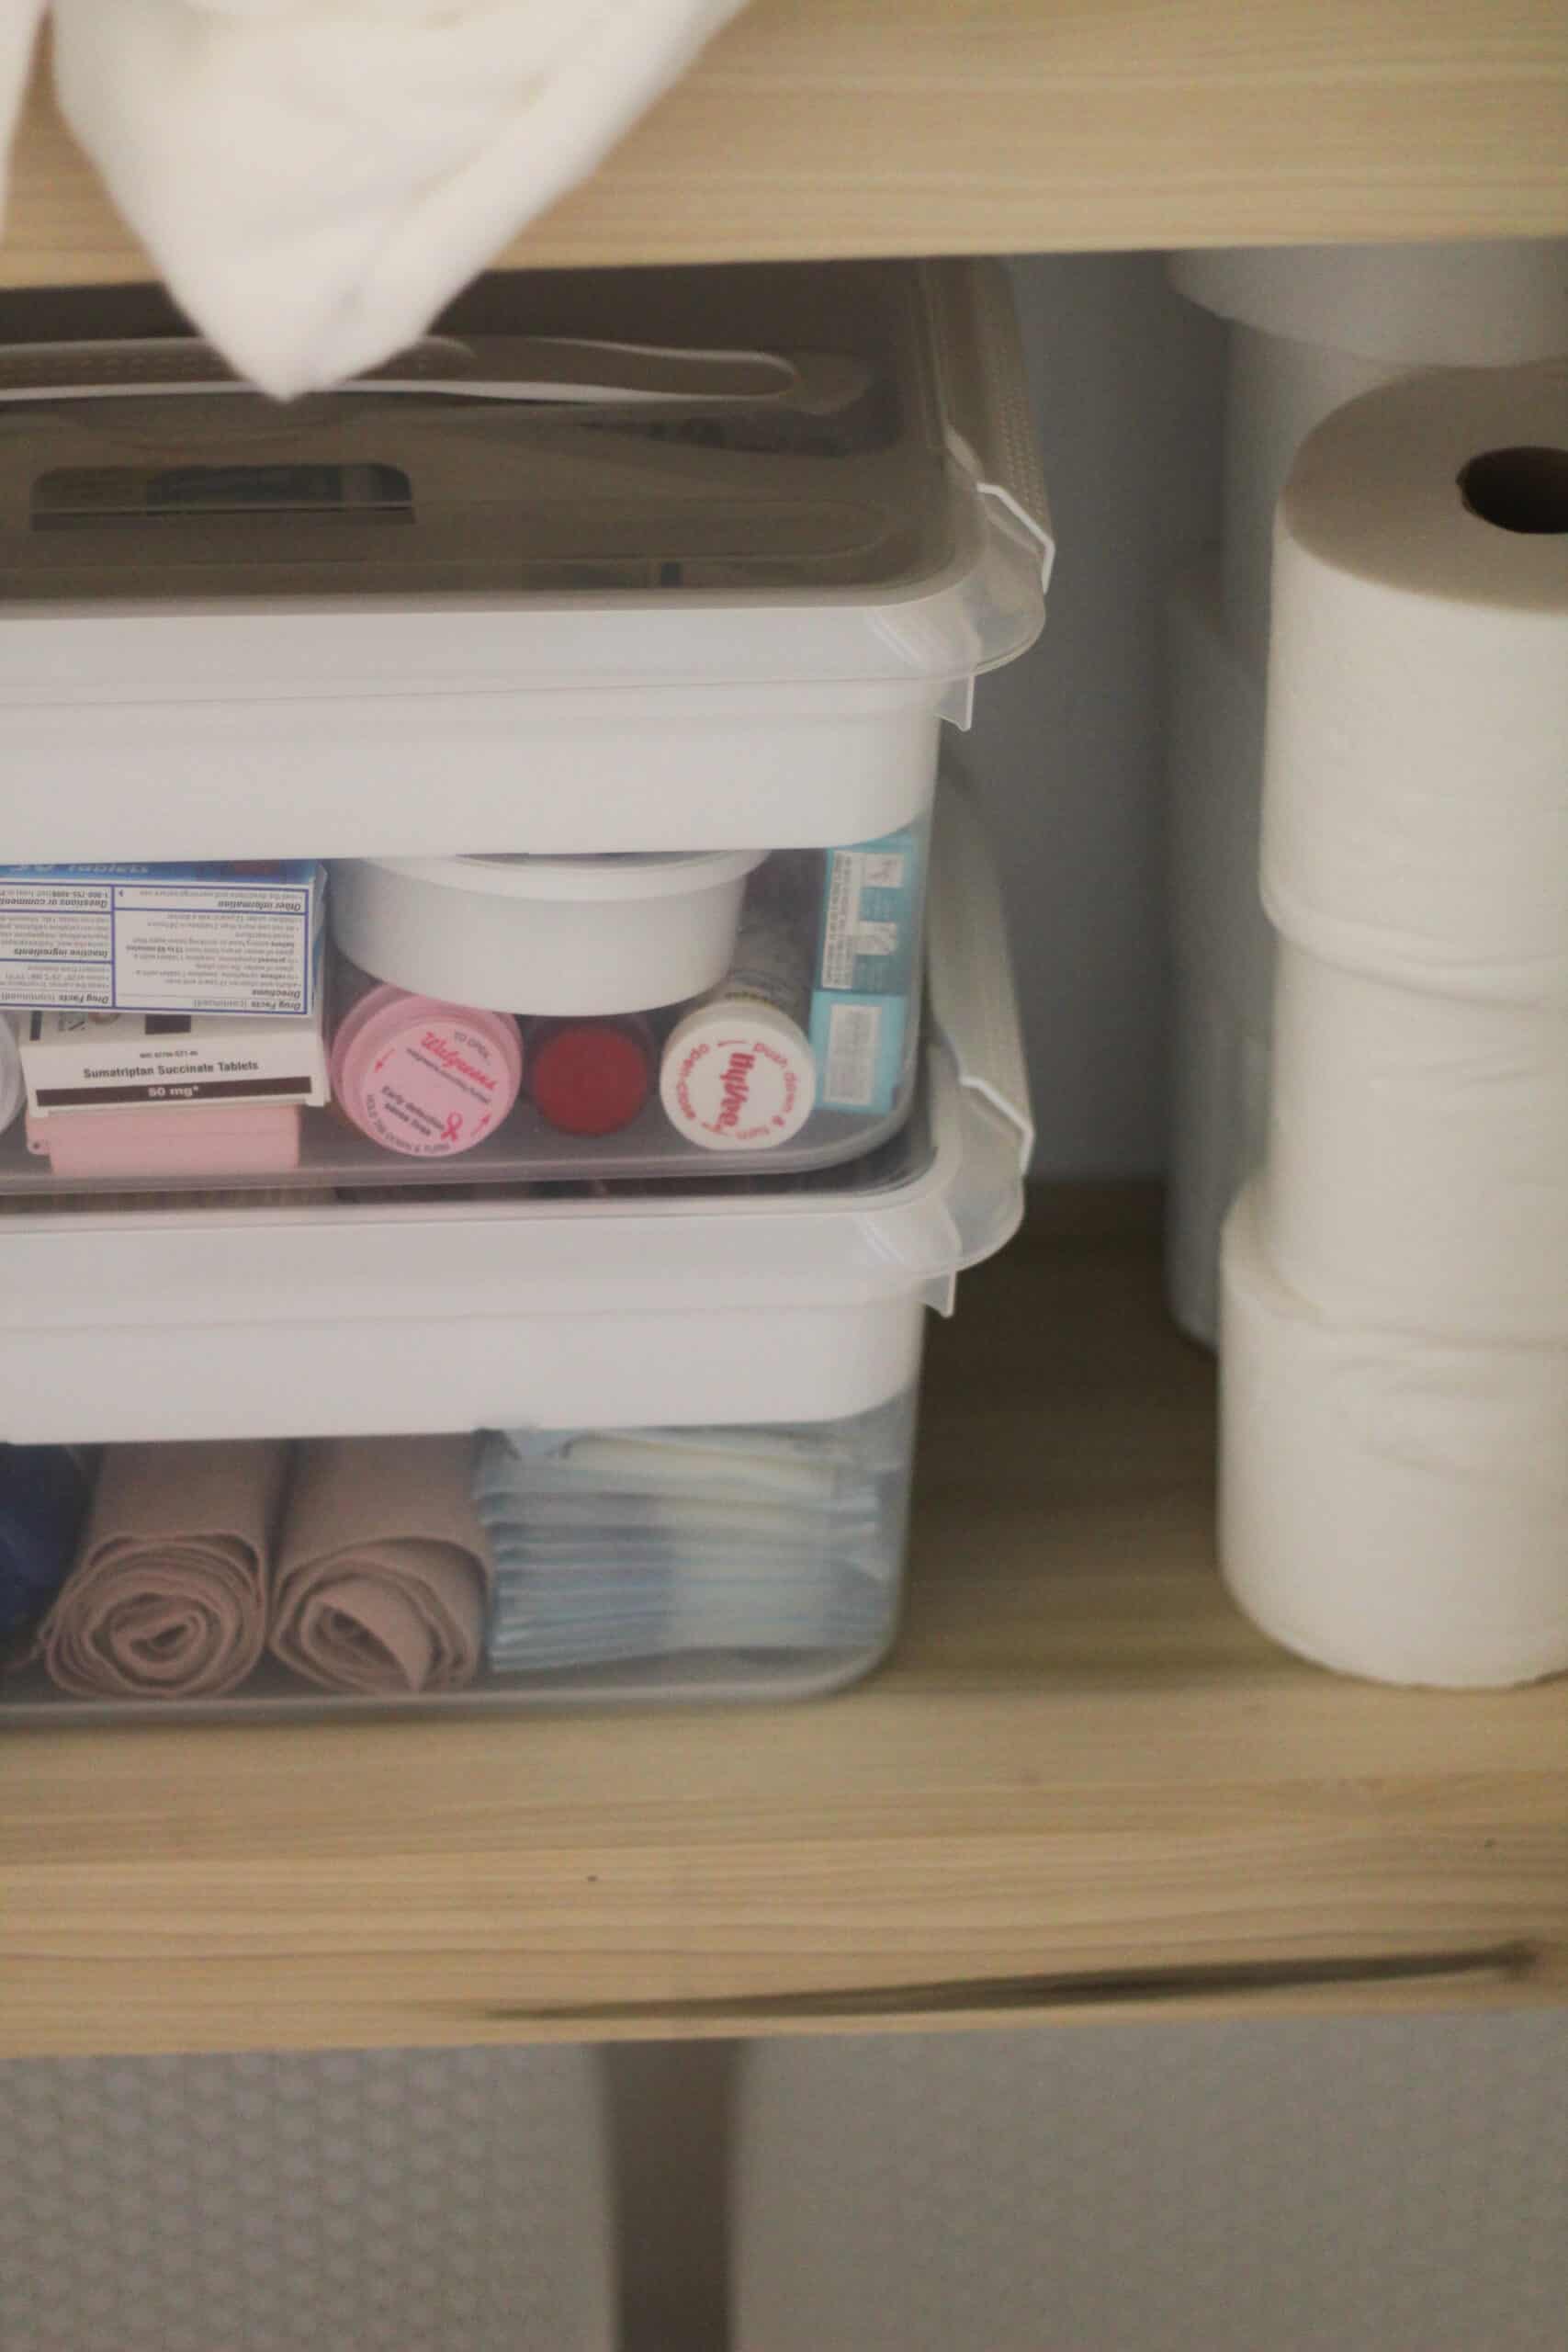
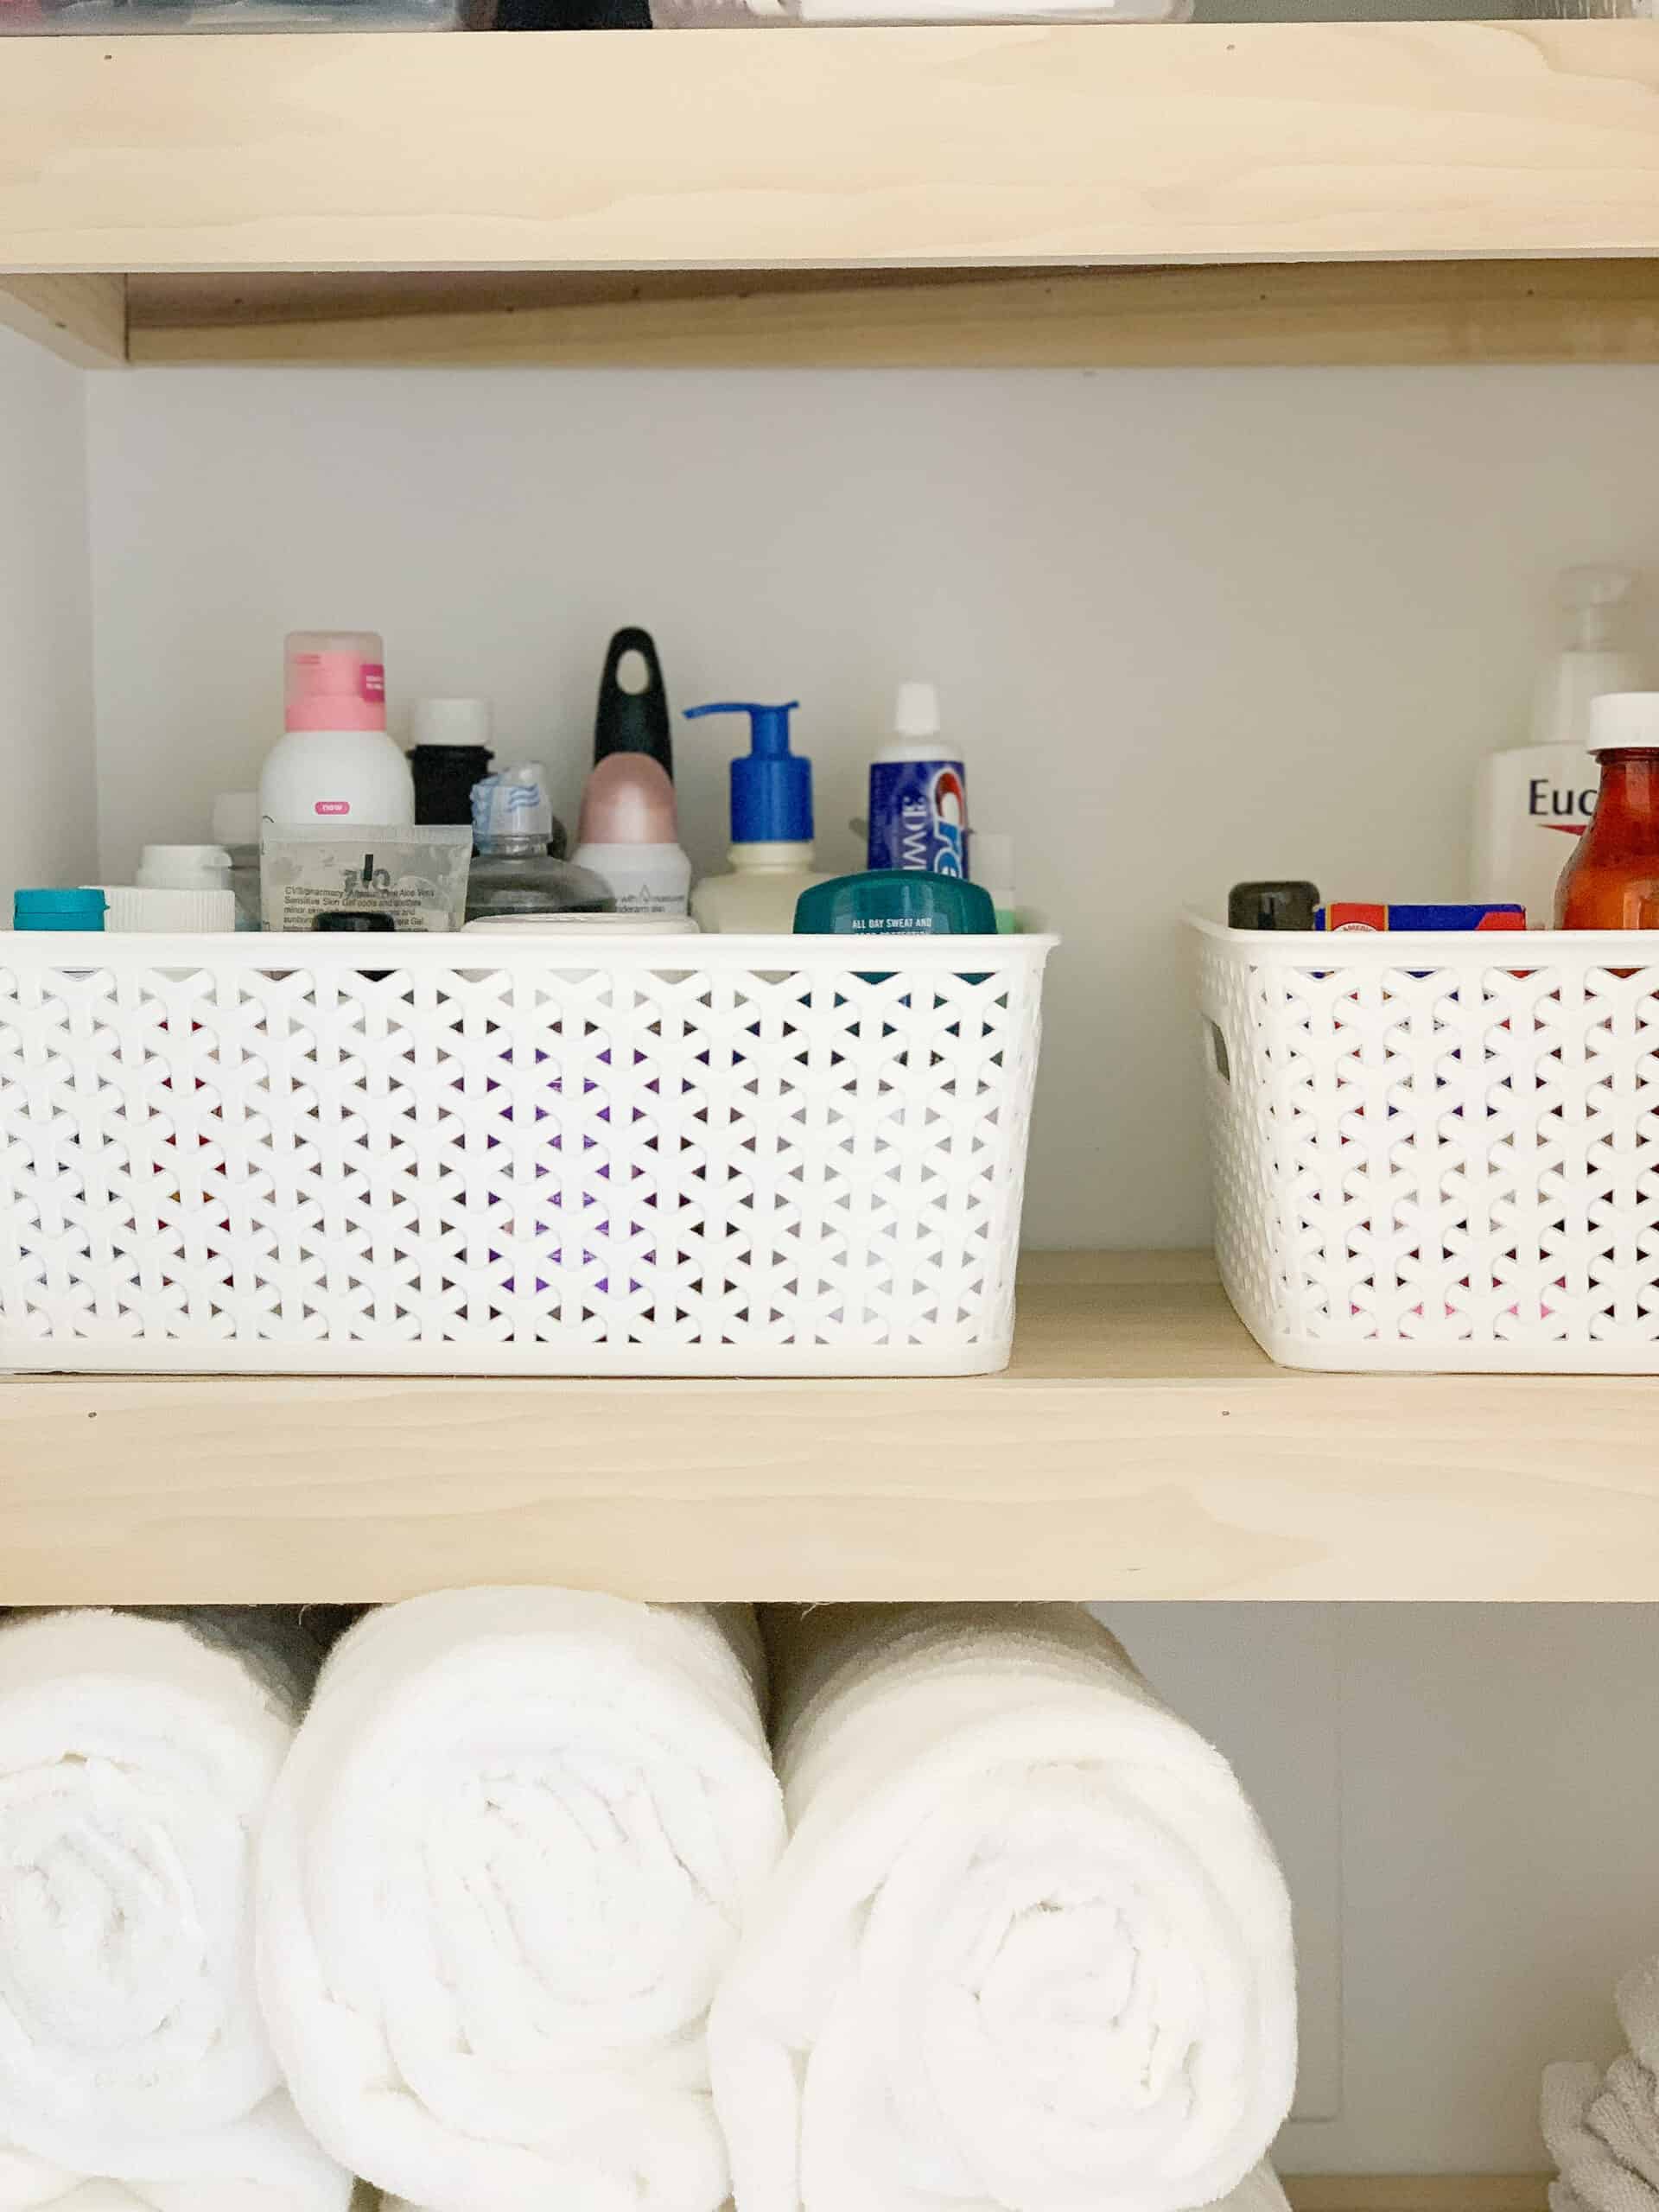
And since this was a part of our organization, I wanted to talk a bit about how I organized my closet shelves once they were in. I have been using the white bins throughout the house recently and love using those for extra products. Some of them are products we use only once in a while, or backups.
The bins on the top closet shelves contain things like nail polish, oils, and stuff. Things I don’t use daily at all but want organized.
For towels we always roll our towels. You can fit way more on a shelf, and its easier to keep them uniform. We donated all our old towels and are updating them, so if they look new and white – it’s because they are ha!
Hopefully this post was helpful and you feel ready to tackle DIY closet shelves. My husband and I are learning as we go on DIY – and I would definitely say this fits into the beginner level of projects, so if wood closet shelving has been on your list to try, definitely give it a go! If you have questions leave a comment below or DM on Instagram.
Pin the Picture Below for the DIY Wood Closet Shelves tutorial later
Hopefully you feel ready to tackle your DIY shelves and if you have any questions be sure to leave them in the comments below. Don’t forget to pin the photo below before you leave and follow me on Tik Tok and Instagram (@arinsolange) for DIYs.
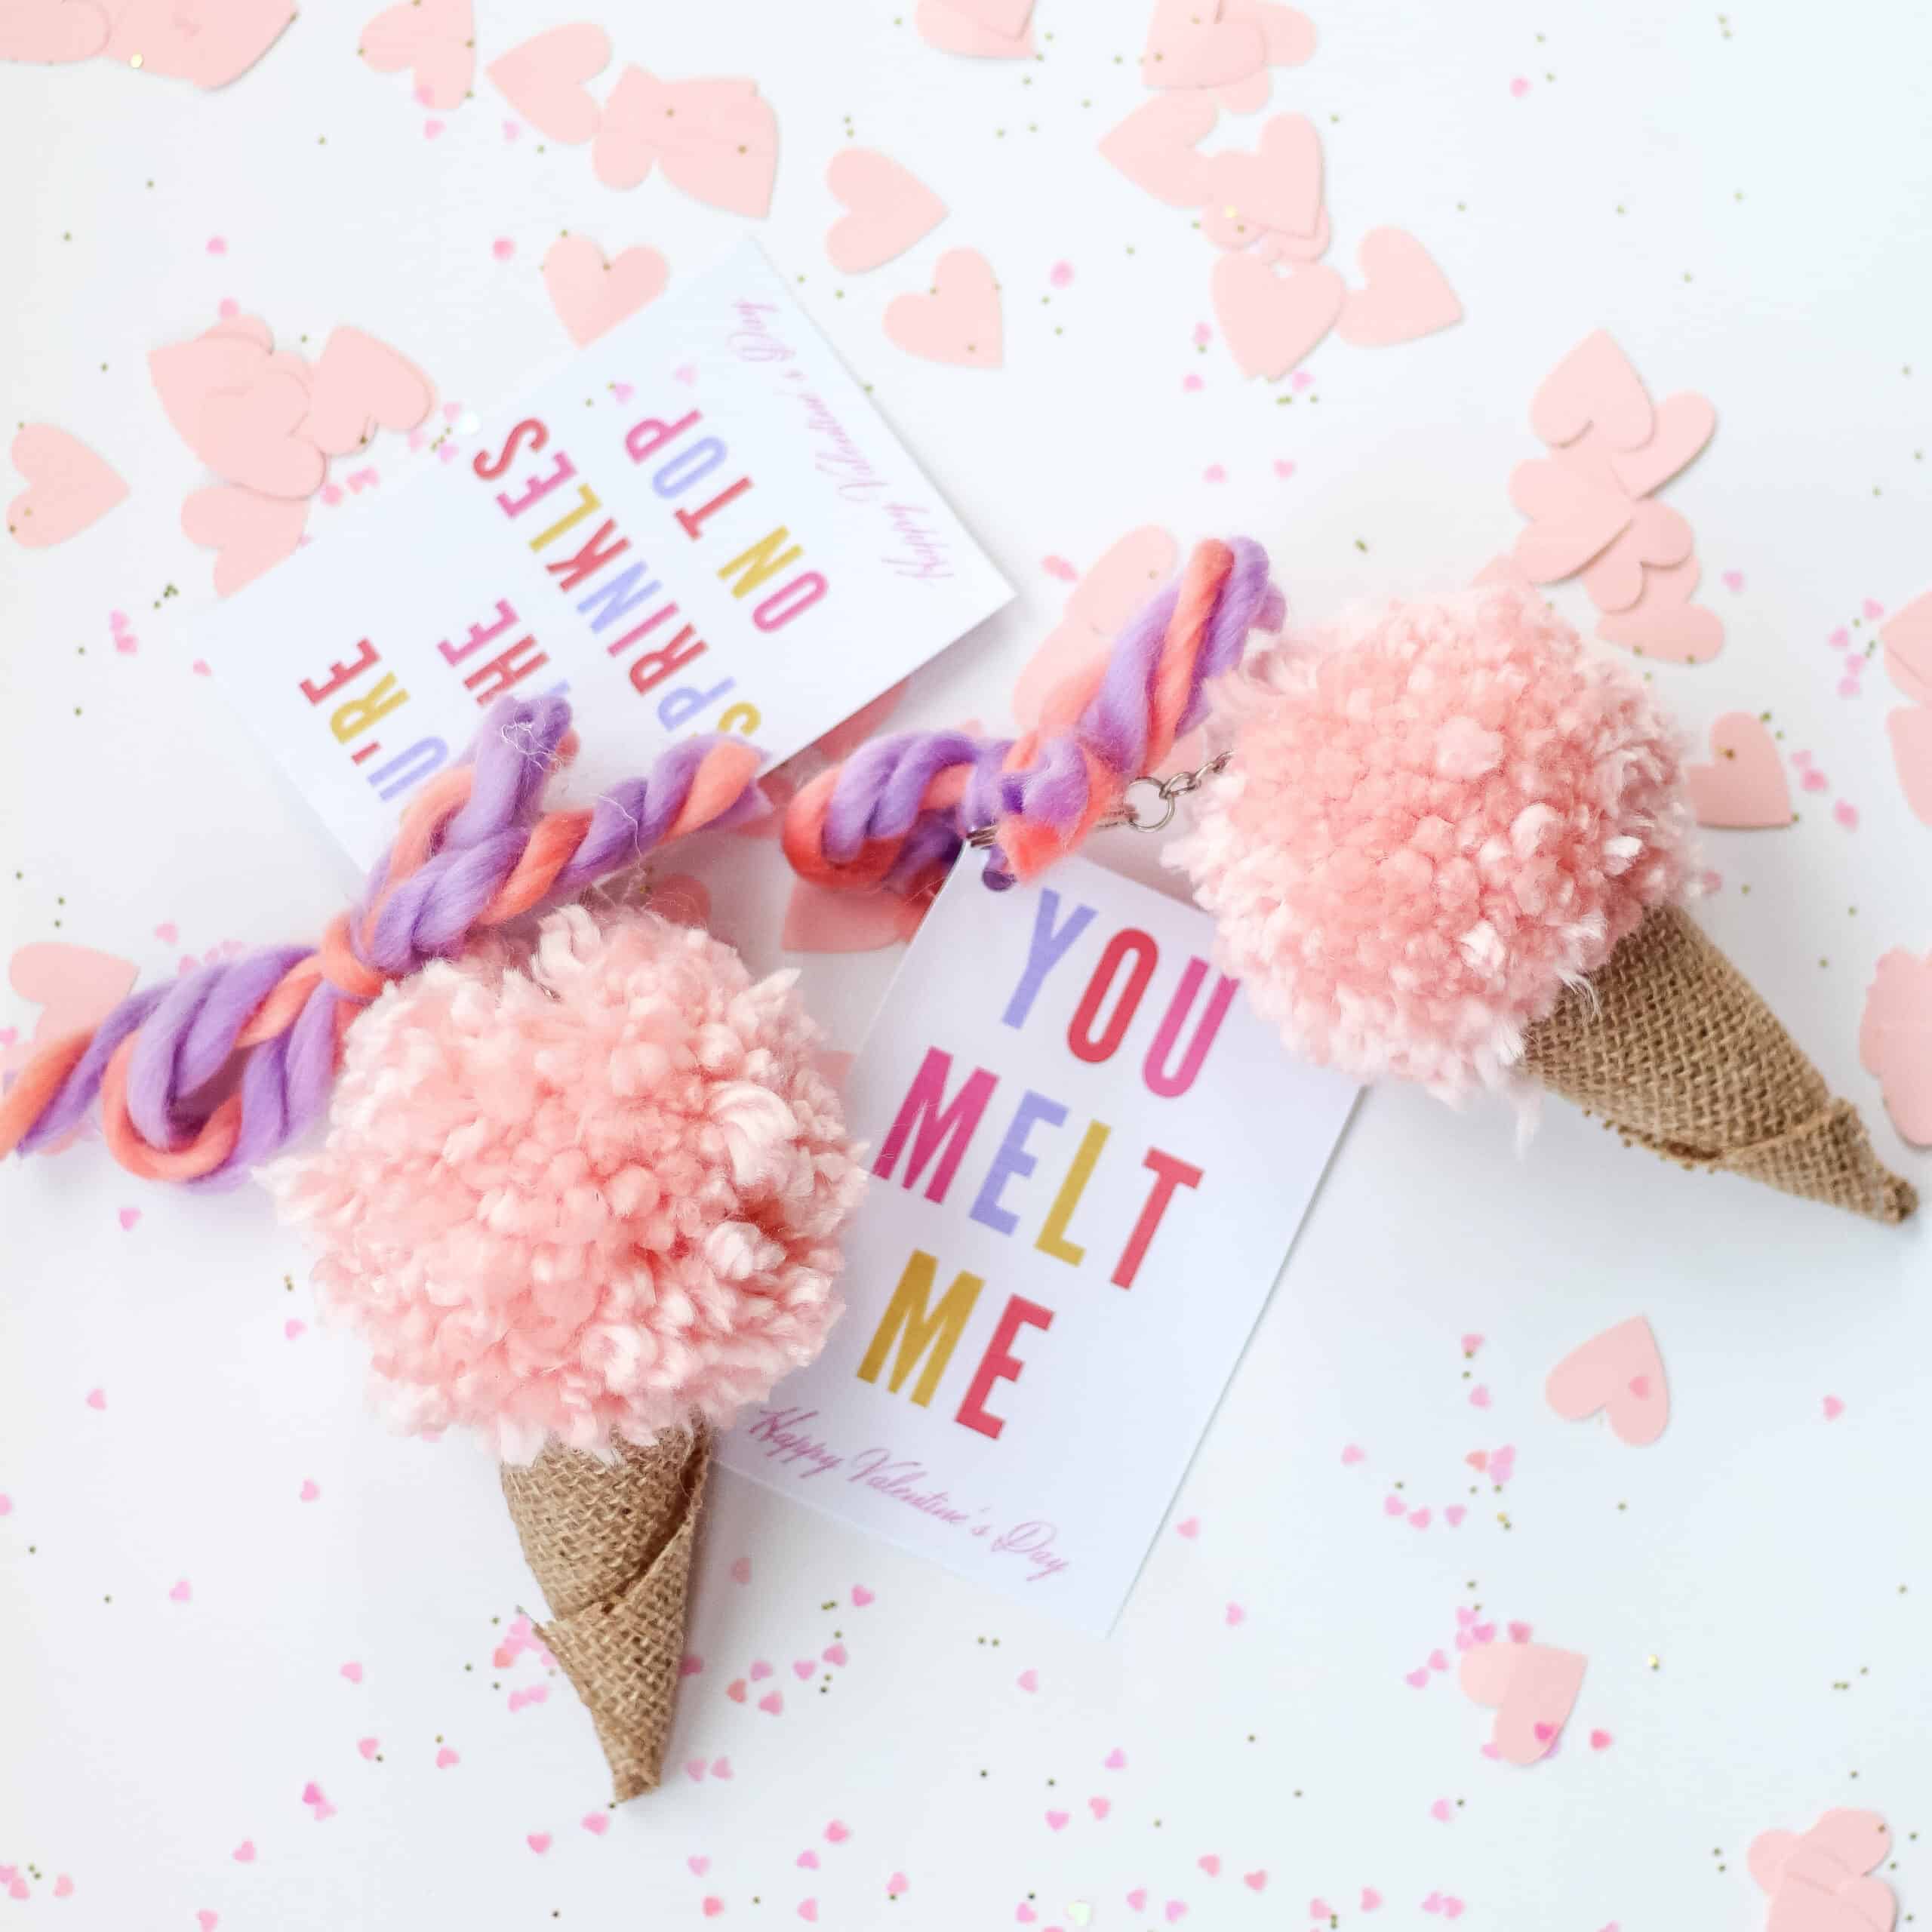
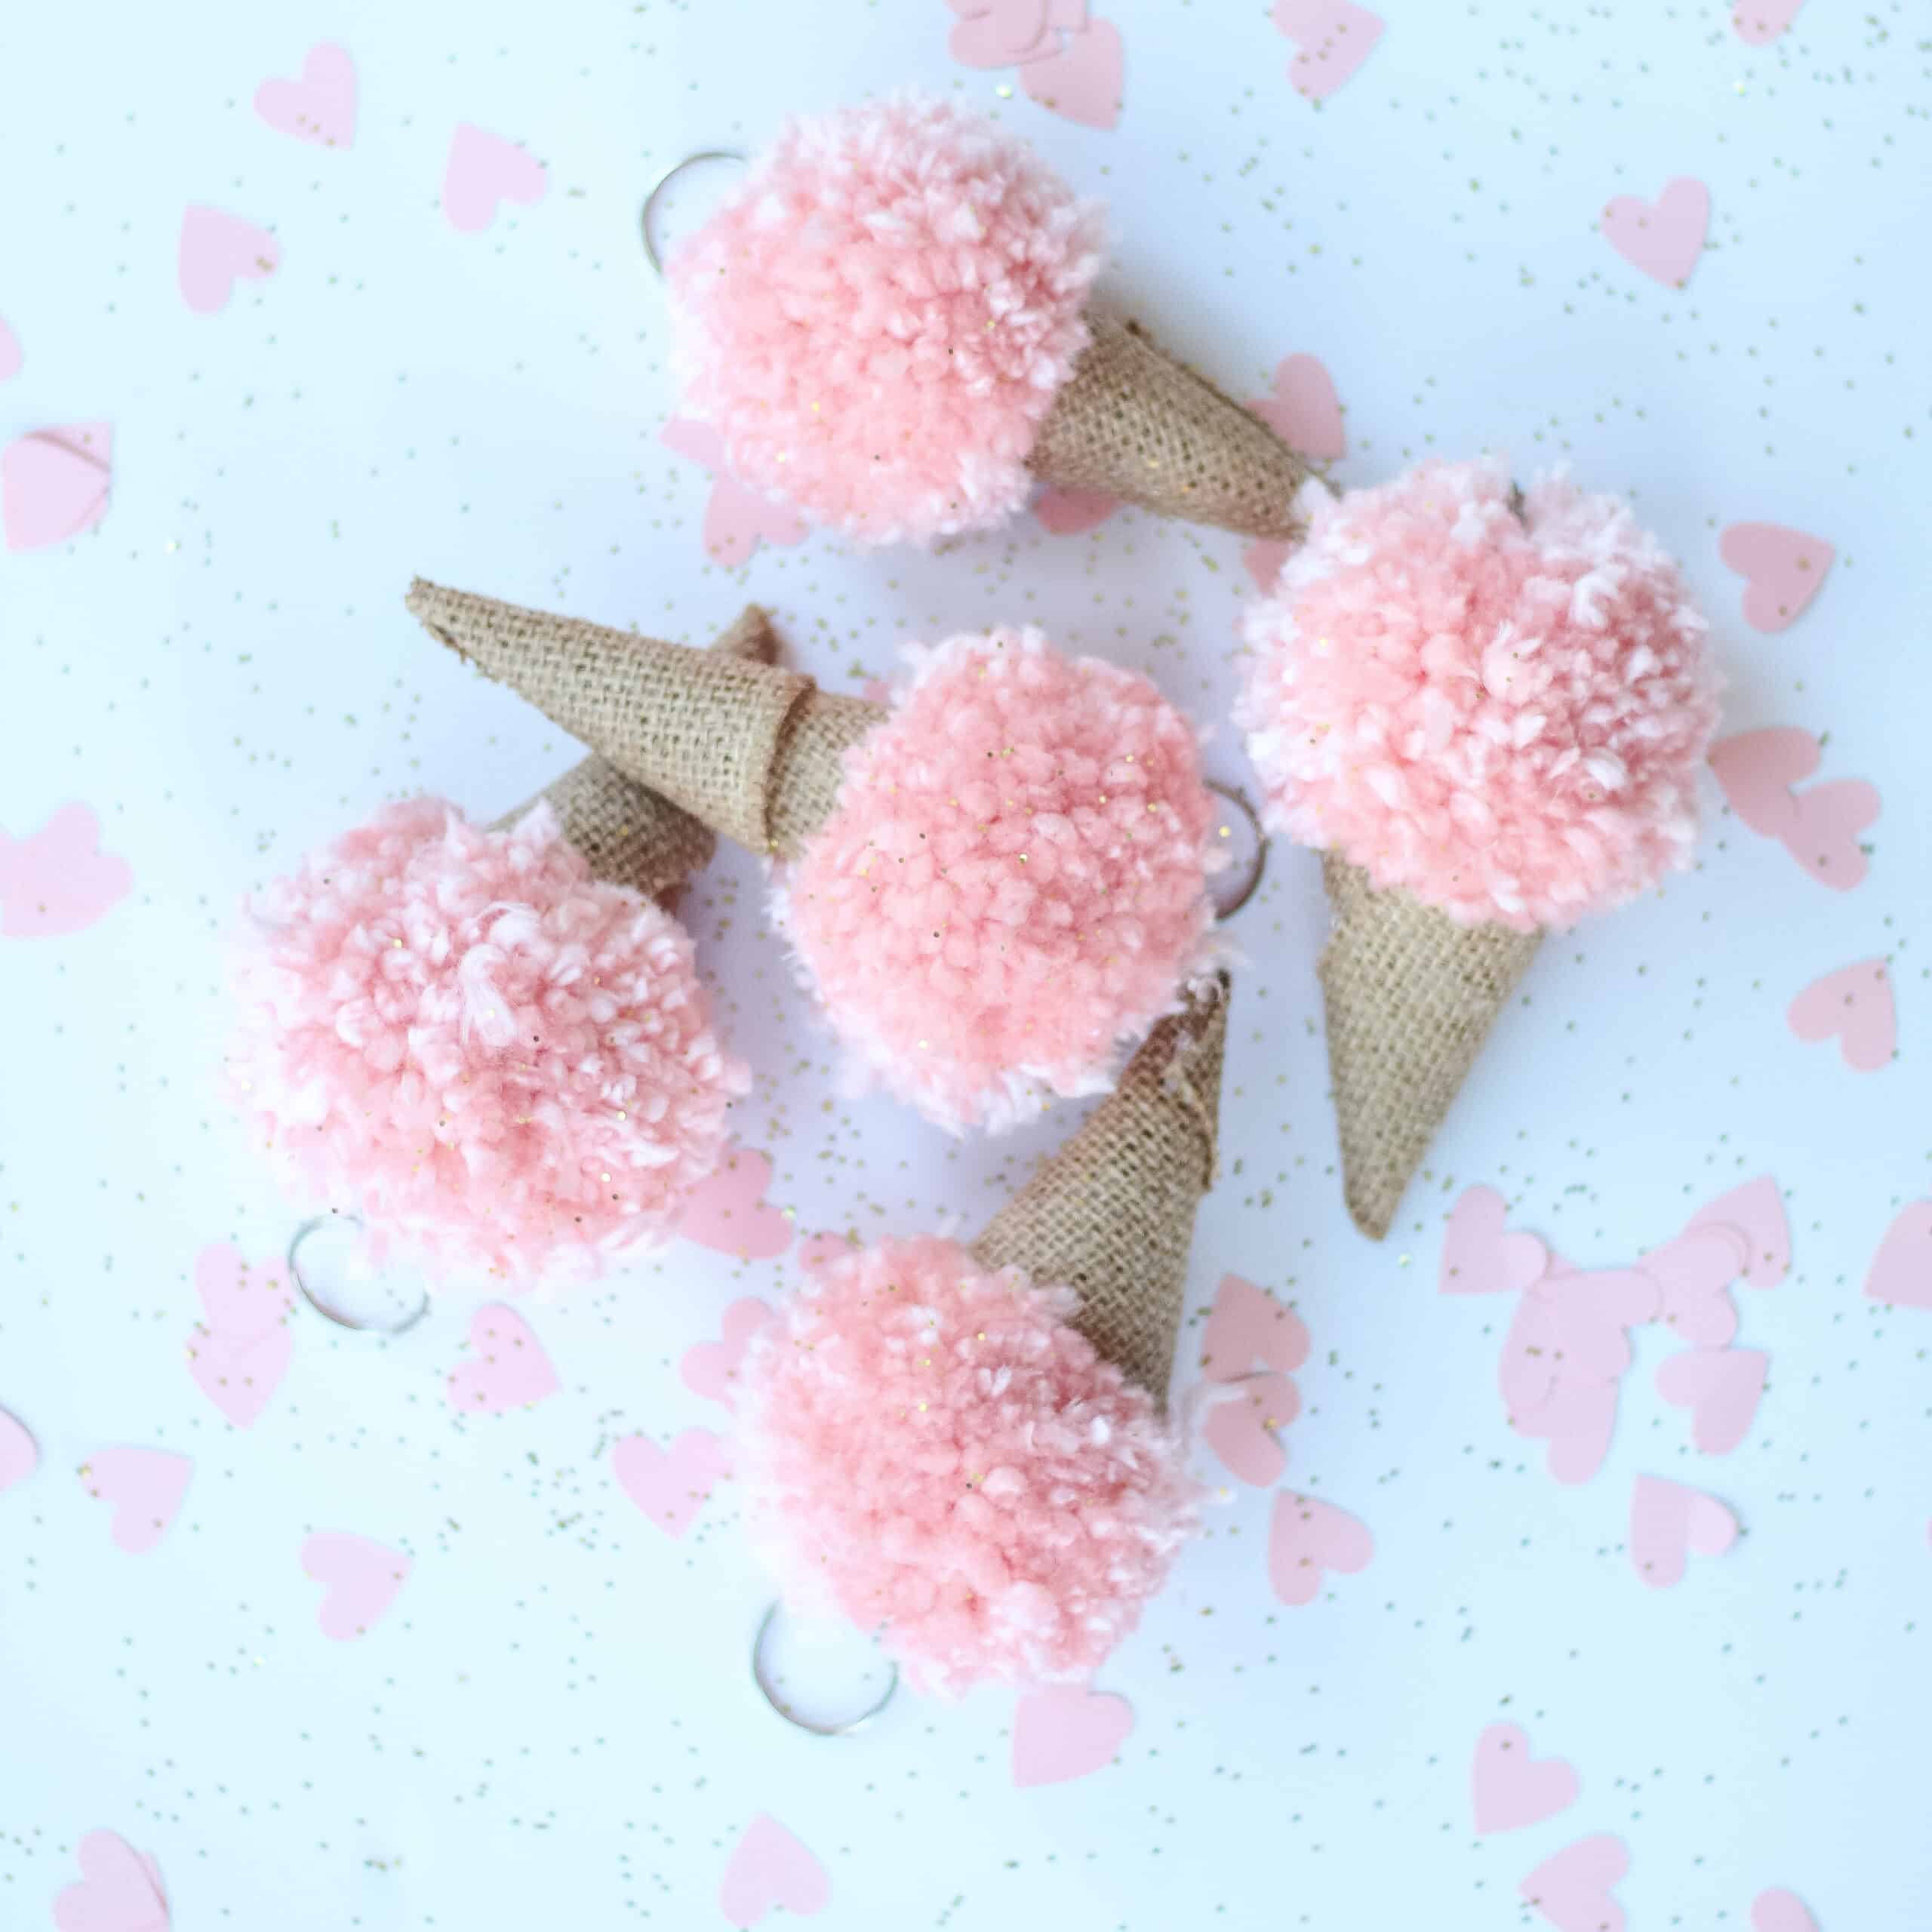
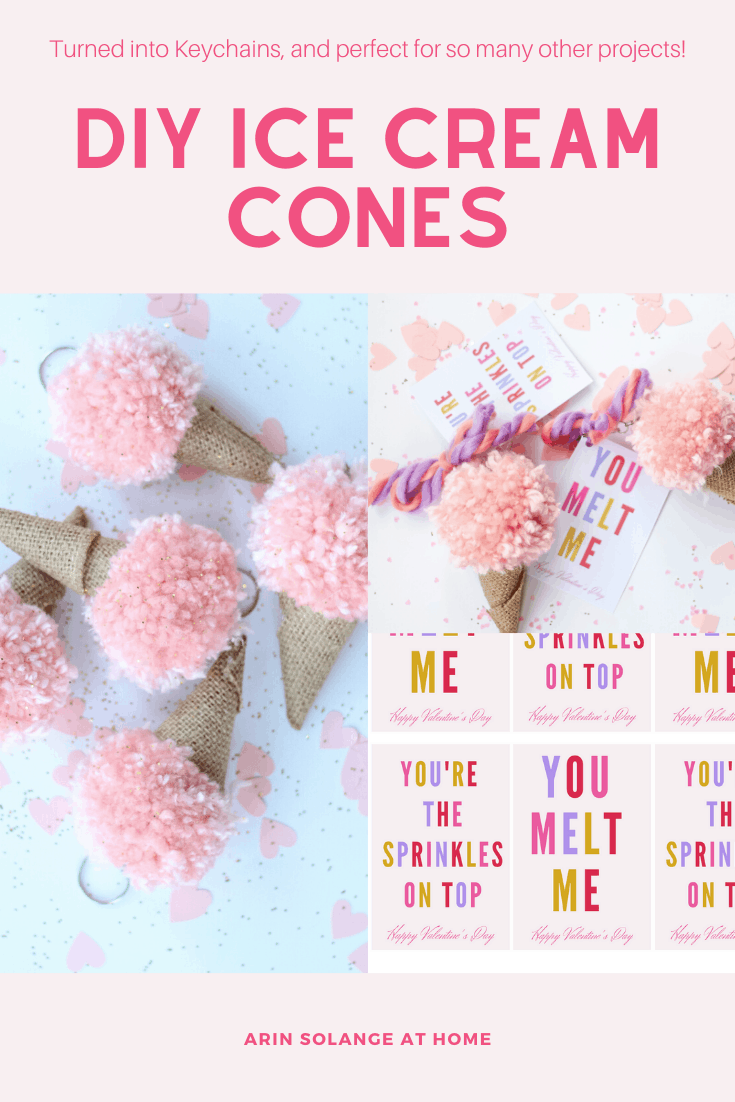
If you are a long time reader or follower, then you may know I have done a DIY Ice Cream Cones before. Sweet Avé’s mobile over her crib was ice-cream cones and SO SO CUTE. So I must have a thing for those sweet treat DIYs.
This year when I was trying to think of Valentine’s for the kids to take their classes, I knew I wanted to go a non candy route. I decided to try to come up with Key Chains for the girls in Jack’s class (because first graders love key chains!).
This post on DIY Ice Cream Cones contains affiliate links
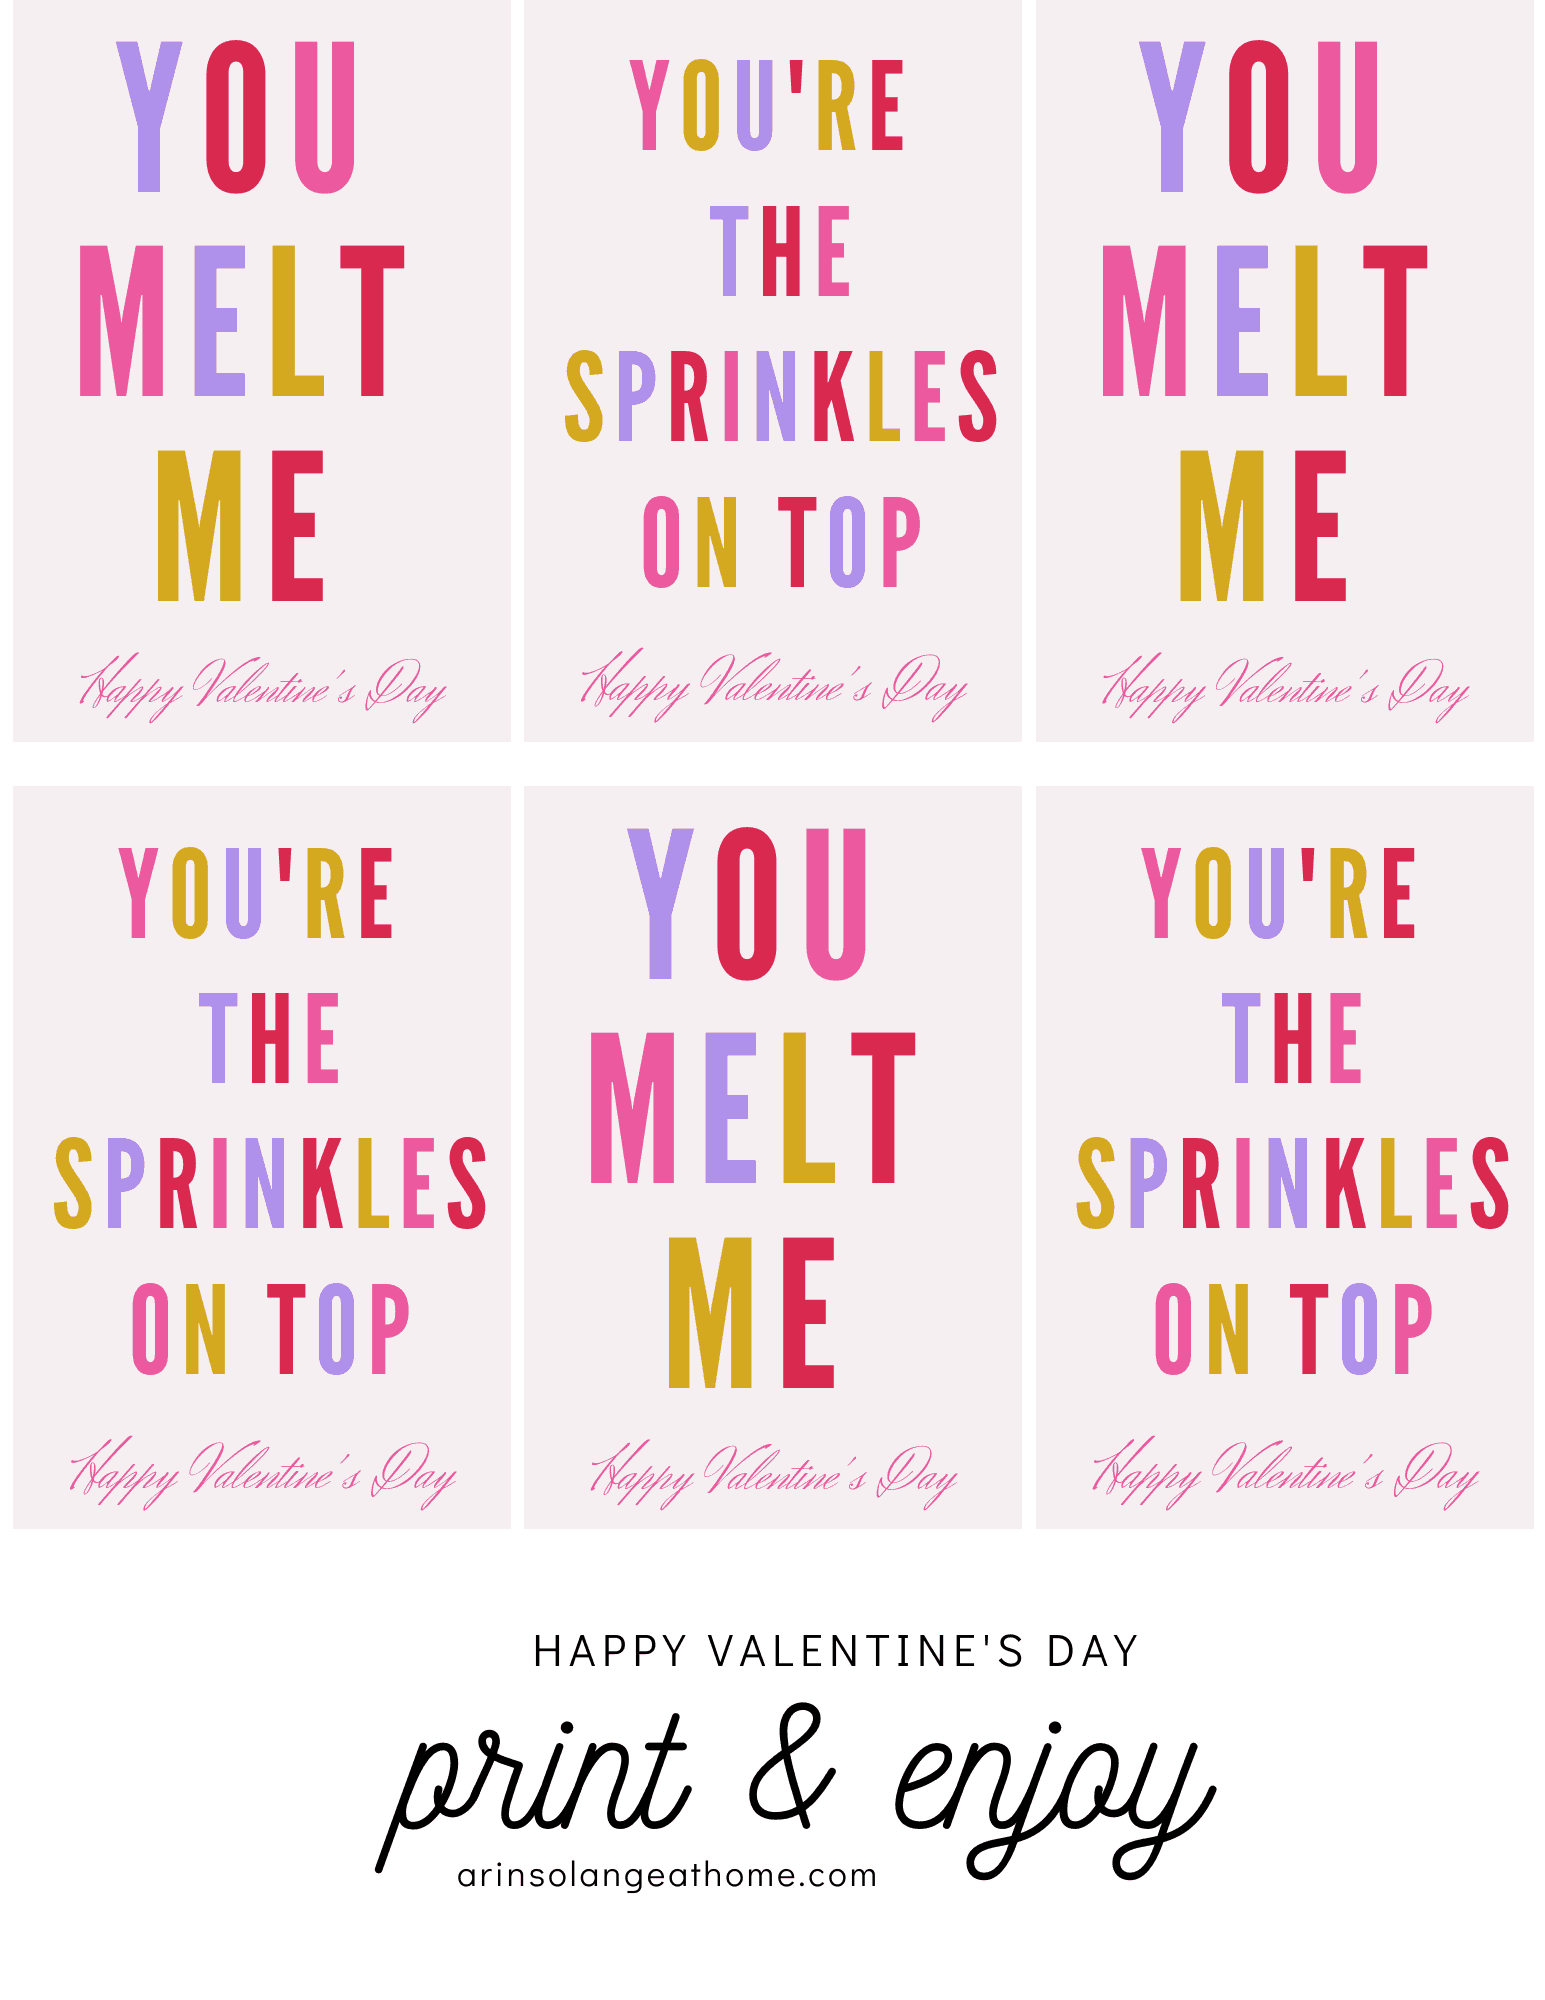
Before I dive in on the actual DIY, I thought I would put together some free printable Valentine’s incase you were planning to hand these out as well. I love to do printable inexpensive Valentine’s for the paper portion for my kids since I know it ends up right in the trash.
The free download is below, and just print as many sheets as you need!
These are pretty simple, but you definitely want to have all your items on hand before you start. I turned mine into key chains so I will list that as a step, but you could make them into a garland, just play food, or about anything!
Supplies
Yarn
Pom – Pom Maker (this set comes with yarn and is an insane deal!)
Step 1: Cut roughly 4 inch pieces of the burlap ribbon and lay them on a piece of foil or similar and paint them with the mod podge. Make sure to fully cover each piece.
Step 2: Next you will roll them into an ice-cream cone shape. I personally used a clip to hold the bottoms of some at the start while they dried, but I ran out so ended up just laying them seam side down to dry.
Step 3: While those are drying you’ll want to make your pom-poms. You will need one per Ice cream cone. I am not going to walk you through the process here, but I have a highlight on Instagram named “pom poms” where I make them on video!
Step 4: Once all your pom-poms are made you want to trim them down really short and nubby. I am not sure if there is a better way to describe that or not ha! Then set them to the side
Step 5: Once the cones are FULLY dry, you will hot glue the seam to give it a higher wrap.
Step 6: Trim the tops of the cone to be more flat across like a traditional ice-cream cone.
Step 7: Cover the top rim of the cone with hot glue HEAVILY especially inside then quickly top with the pom pom. Once you place the pom on, tip the cone upside down so the glue really runs into the yarn for the most contact!
** Important note – if you are making these into keychains or stringing them to make a garland make sure when you glue the cone on you glue it with the string that goes around the pom pom fairly centered at the top, as that is what you will string anything on!
If you are only making the cones – you are now done!
Step 8: Now comes the keychain step. You are going to have a small round open piece in the keychain bags above, as well as the chain and round keychain part. Take the small little piece and put it on your chain. then while its still open put the center piece of yarn through that loop.
Step 9: Once it is all together take a pair of pliers and close the little piece. You want to really squeeze so they don’t fall apart!
Overall these are pretty easy, however making pom pom’s can be time consuming, and the trimming portion was MESSY. Allow time to make a few at a time and give yourself a break.
You also want to give the mod podge step plenty of time. I actually did mine at night and just let it dry while I slept!
Don’t forget to print your free Valentine’s and tie them on with some fun yarn or ribbon for the perfect end result!
If you have any questions on the DIY Ice cream cones please feel free to leave me a comment or DM on Instagram (@arinsolange) me so I can get them answered!
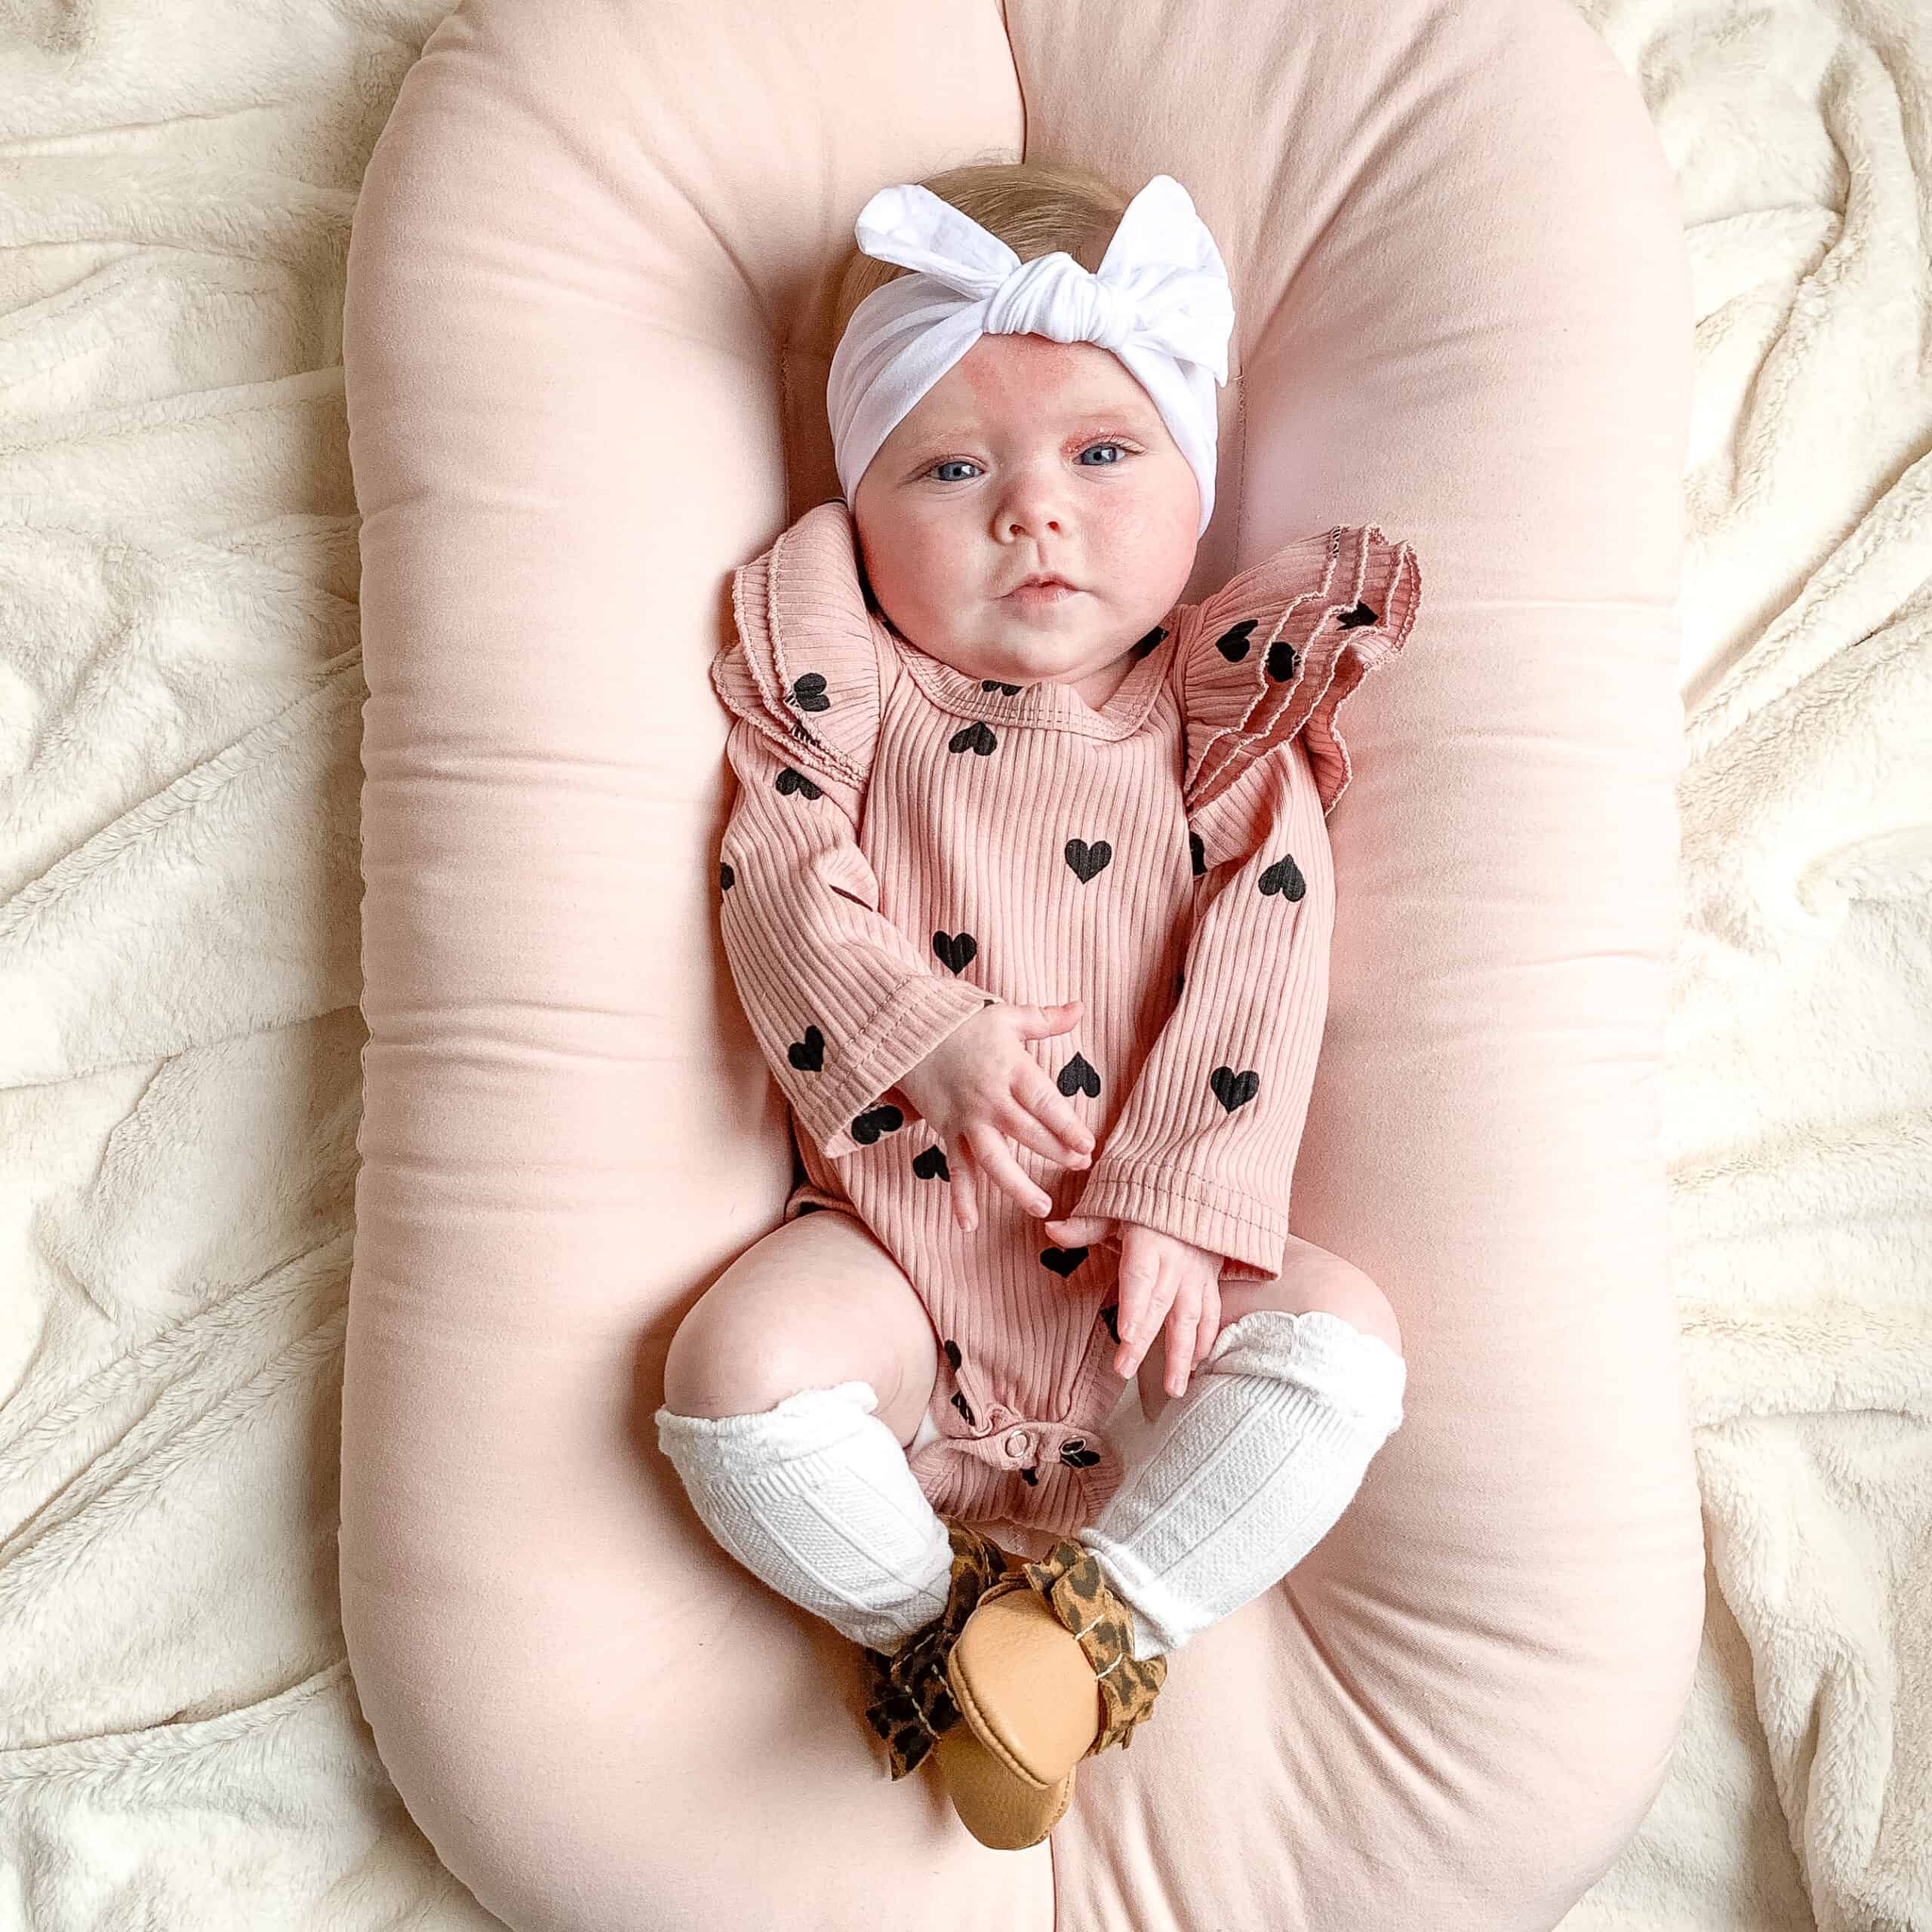
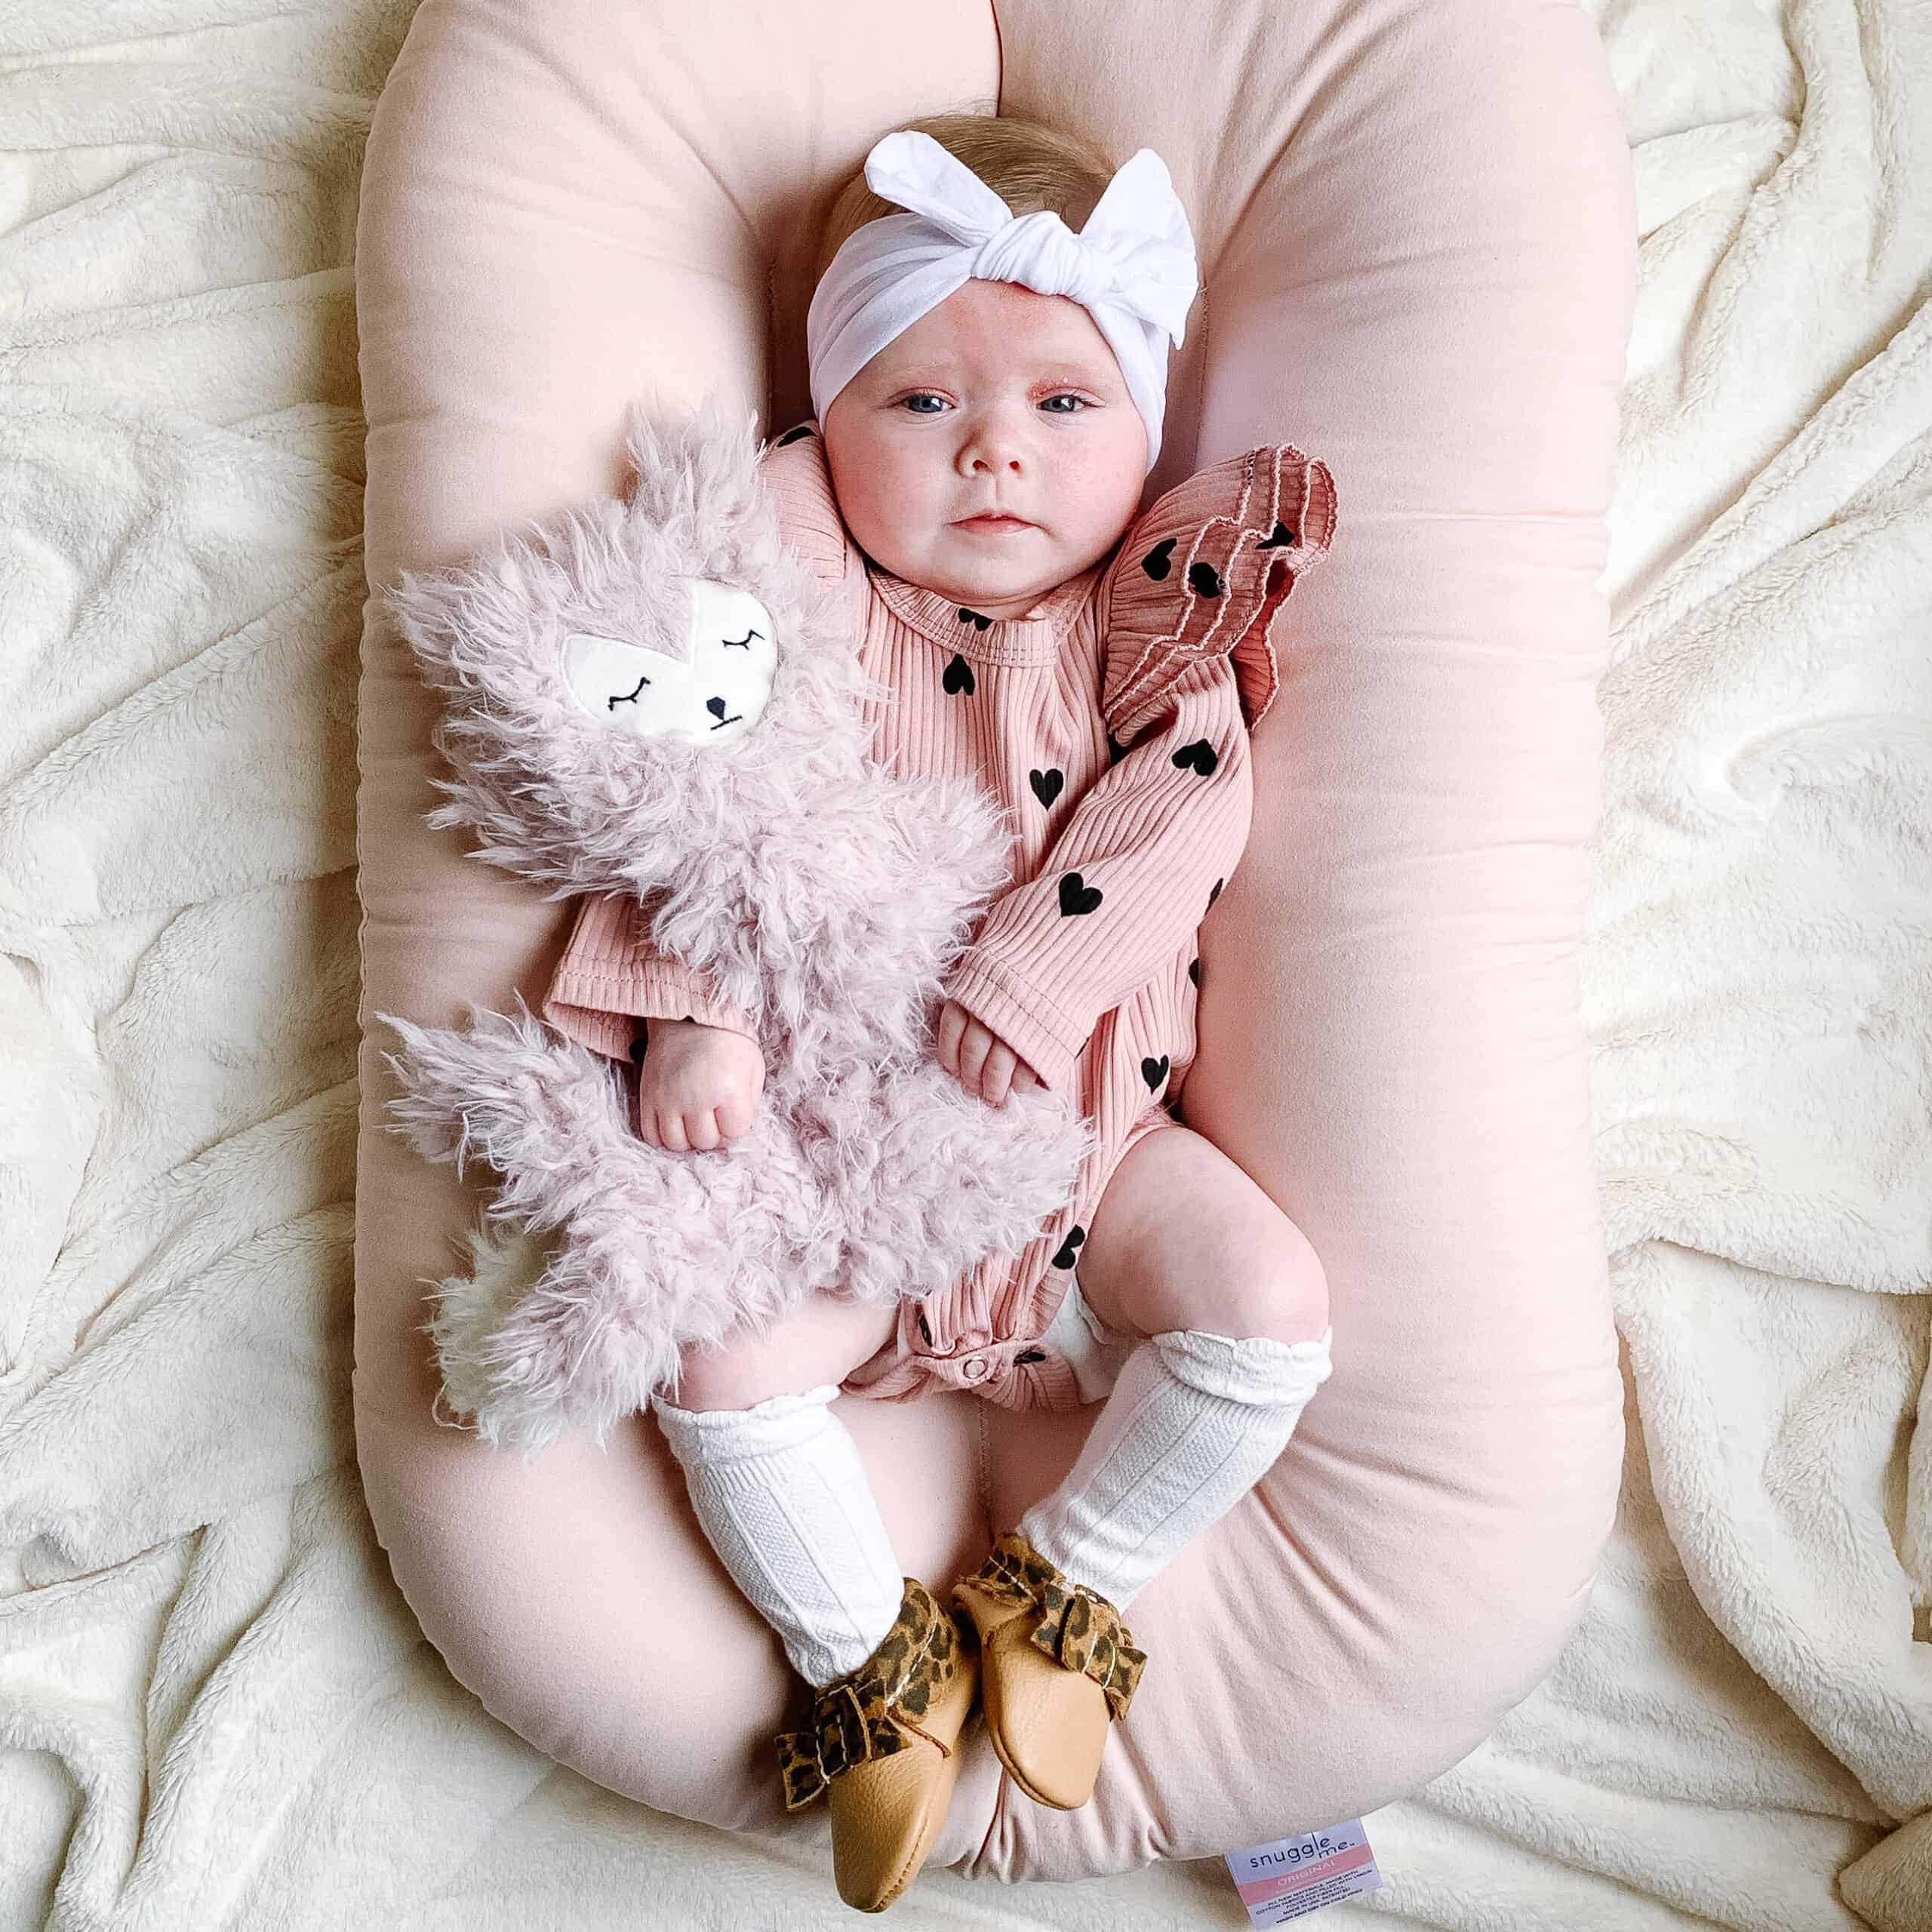
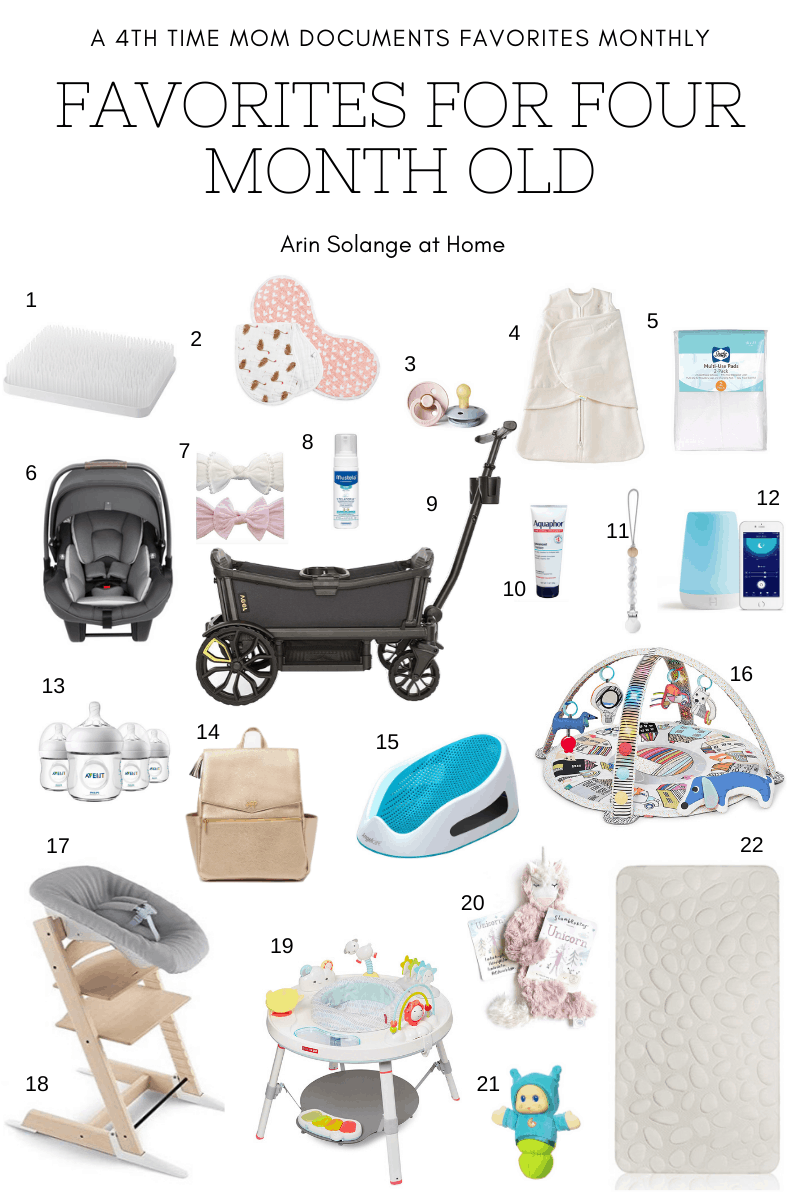
Talk about a post that is more than behind. My Goldie Mae 4 month update, and best items for a 4 month old baby post is FINALLY going up, and she will be 5 months in 13 days.
This post on best items or a 4 month old baby contains affiliate links
Sam and I were just talking last night bout how time goes too fast. I couldn’t believe that before we know it Goldie will be 6 months old, and honestly it breaks my heart a bit. Being our last baby we both wish we could keep her little longer.
Goldie Mae – 4 Month Update
Before I get to the products we are loving, lets give a little update on that little sugar. Goldie is 12 lbs, and wearing 0-3 month clothes. I am praying she holds out in each size just like Avé did so we can soak up the tiny stage longer. She is SO smiley and when she smiles her little eyes fully close.
We have been fighting eczema so badly with the poor thing. All our kids have had it, but hers was pretty extreme. We changed all soaps and detergent and have seen a great improvement in just that alone.
She hates tummy time, and can roll right on out of it, but still hasn’t figured out rolling from her back to her tummy. We JUST cut the swaddle last night at 4.5 months old…she was SO good at getting out, but didn’t really want to sleep without it either. Typical little lady hahah.
She loves to have us sing her songs, is pretty easy going, but does like all the attention. Overall she is spoiled rotten with so many people just obsessed with her!
Postpartum Update – 4 months
The 4 month mark was slightly dreaded by me…I had told myself that at 4 months (the start of the year) I would start trying to shed the baby weight. I didn’t want to rush it with the holidays, and a newborn, but she is sleeping well, and it was time. So that said, that has been a big part of the past couple of weeks. I will talk about this more on Insta stories in a couple of weeks, but for now just know if you invite me to ice-cream ill no longer be your friend HA.
Emotionally I have done much better as time has gone on. I can tell I am struggling with some anxiety (which I always have, but its more severe). I struggle a lot to leave her with our nanny, and constantly think of all the bad scenarios…which I haven’t really ever done before with a baby.
I know it’s just a lingering part of her horrible birth, and I think that for me being aware of it is the biggest thing. I figure the want to hold her more and spoil her more isn’t going to be a bad thing, so I just do that.
The other struggle right now is work. I was working a bit more when we had Walker, but not like I am now. I an definitely feeling the working mom struggle of constantly being torn in a couple of directions. I have had a lot of guilt about it and have to constantly remind myself I am doing nothing wrong and it’s okay for me to push forward in my career and be her mama.
Best Items for a 4 Month Old Baby
To shop this post simply click over the item you are interested in in the image below, or in the descriptions below, either way.
Halo Swaddle – We just cut Goldie from her swaddle at 4.5 months, but I Love that for now we can keep swaddling her tummy tight as she gets used to it.
Baby Playmat – this has been a FAVORITE for us, and I have owned SO many baby playmats
Stokke Infant seat for highchair – Maybe my favorite item for the past couple of months. This little seat attaches to the top of the Stokke Highchair and makes it so you can have a younger baby at the table with you. We use it a lot for Goldie to be near us when we are cooking.
Play Gym Thing – this little guy is so fun for Goldie and I love the size. Our previous jumper was jus really bulky and that made it hard
Slumberkins – all of my kids are OBSESSED with them.
This little glow worm might be the ugliest thing ever, but all of my babies have slept so much better with it. With Goldie we don’t even have it in the stuffed animal part anymore, but just have the light up music box. Every time we lay her down she falls asleep to it.
Nook Mattress – more on this later, but we recently got the mattress as an upgrade since ours was 7 years old and pretty worn out, and it is SO NICE.
Hopefully with the best items for a 4 month old baby you will see a lot of crossover with past months, and be better able to decide what items are long lasting! If you have questions always DM me on Instagram (@arinsolange) or leave me a comment!
Many products that didn’t make the cut are items I still LOVE, but just don’t think were TOP products this month.
To see past months Favorites Check out these posts:
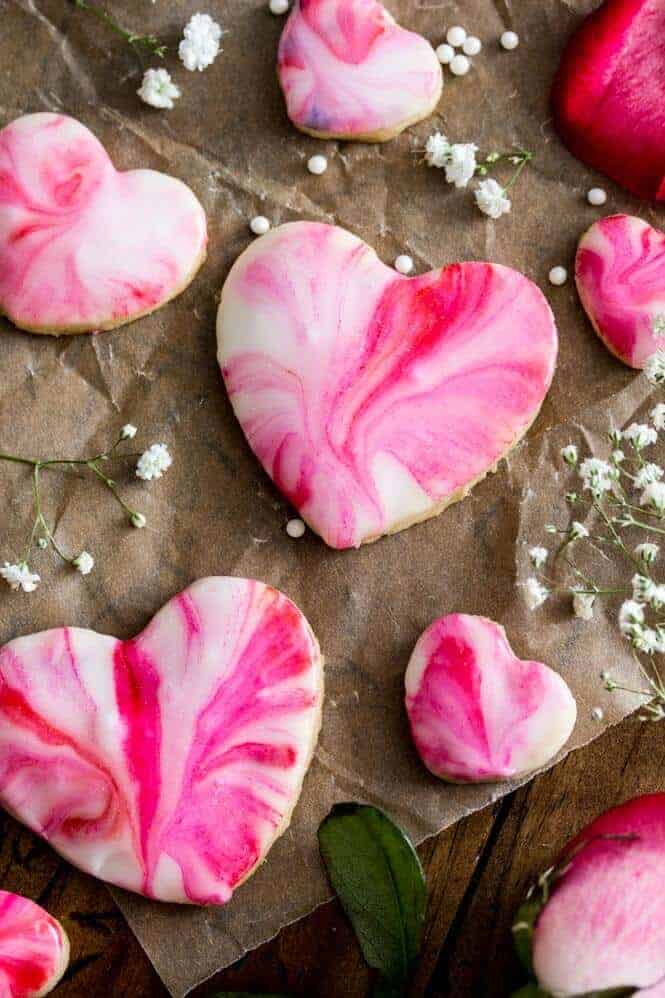
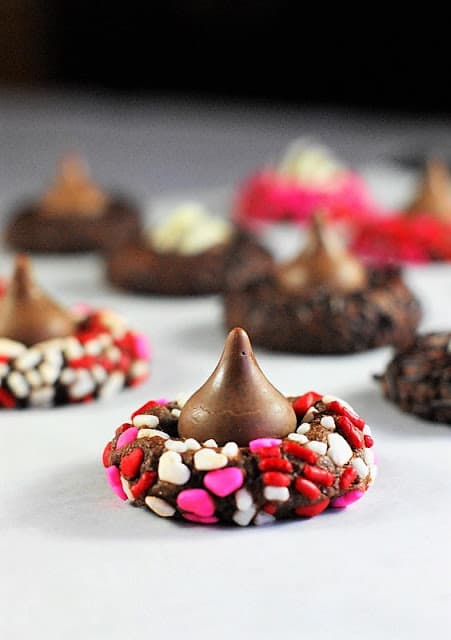
I am not going to lie…I love some Christmas decor, but Valentines Day and all its pink has my heart. I know it’s early, but I have rounded up 10 easy Valentines Day treats for you.
I know so many of you are moms, and I am always looking for fun, unique ideas to take into my kids classrooms on Valentines day, and there are some great options here!
These cute tie-dye cookies are seriously so freaking cute!! Talk about cookies that will wow your kids/neighbors/classroom. These are picture perfect! Find the recipe here from Sugar Spun Run.
These are simple sugar cookies with a glaze and the swirl icing is beyond gorgeous.
Easy Chocolate Truffles
When it comes to easy sweet treats for Valentines Day, truffles are high on my list. This recipe from Spend with Pennies is an easy recipe that anyone can handle. She also says you can make them ahead and freeze them, which I am ALL ABOUT!
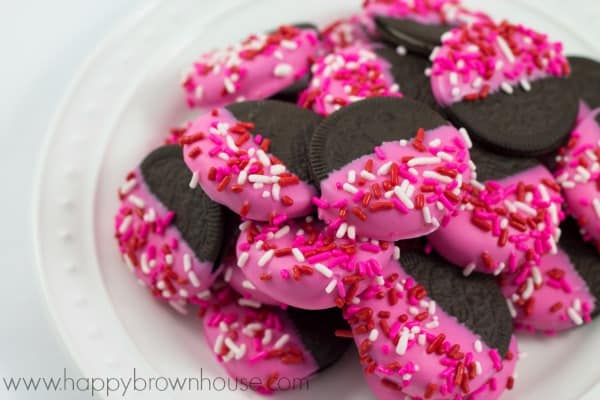
Valentine Oreos
Literally anything Oreo will forever have my heart. Like I am convinced there isn’t a better cookie on the planet (and I am totally a homemade treat person…so that’s saying a lot).
Happy Brown House has these Valentines Day Oreos that are such a simple way to jazz up that favorite treat. This would be so so cute for your kids or their classrooms!
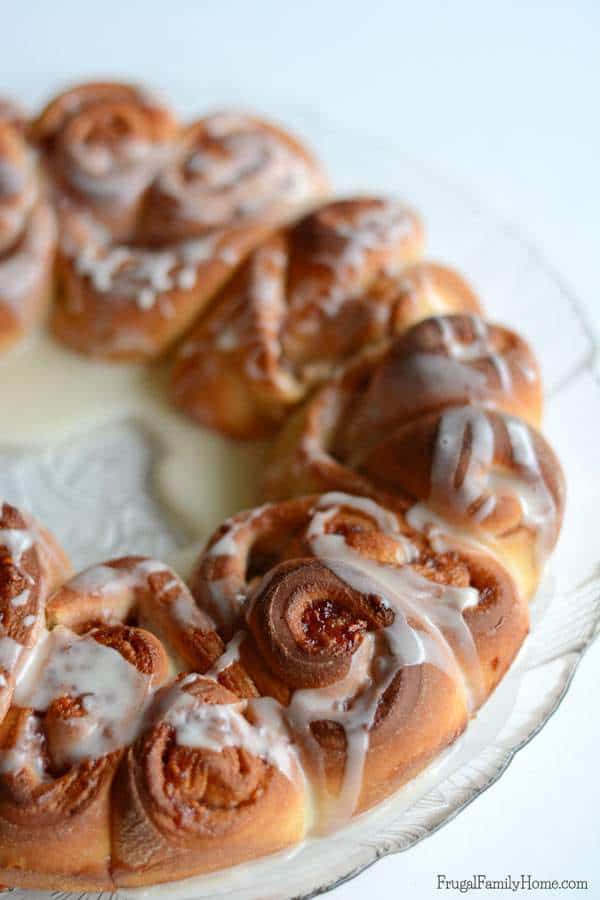
Raspberry Heart Rolls
This sweet treat is absolutely gorgeous. I love the idea of starting Valentines Day off with a fun, festive breakfast for my family, and this is the perfect solution.
This one is such a fun take on a favorite Christmas treat around here! The Kitchen is my Playground shares the recipe for these Chocolate Valentine Kiss cookies and they are definitely going to happen over here this year.
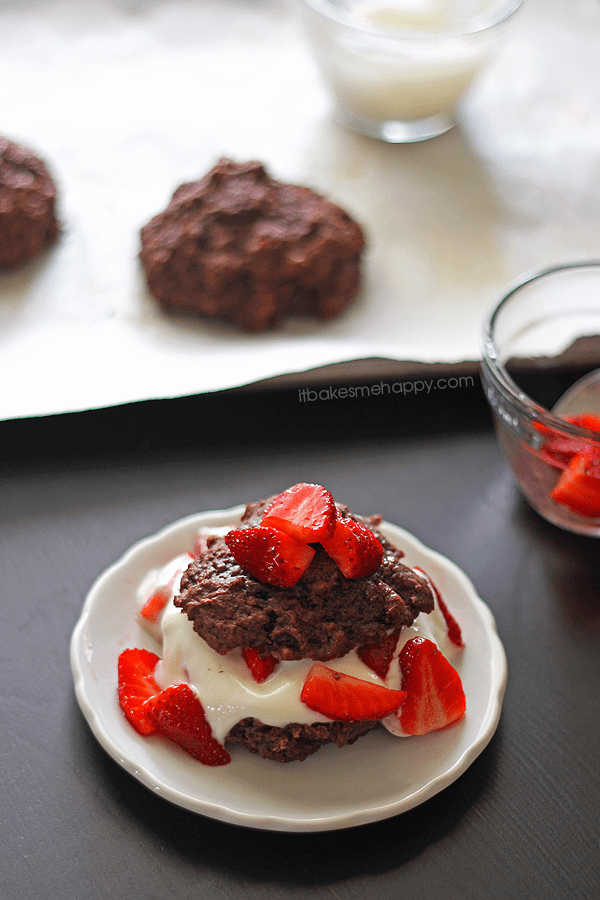
Chocolate Strawberry Shortcake
Strawberry shortcake is hands down one of my favorite desserts, and one I love to make for family. I love that It Bakes me Happy shared this recipe for Chocolate Strawberry Shortcake! If you are looking for a fun twist on a favorite try this one out this year!!
Chocolate Covered Cookie Dough Hearts
Cookie dough is basically a gift from God right? Centsable Momma shared these chocolate covered cookie dough hearts, and they are so cute and simple. I feel like this would be LOVE for my kids.
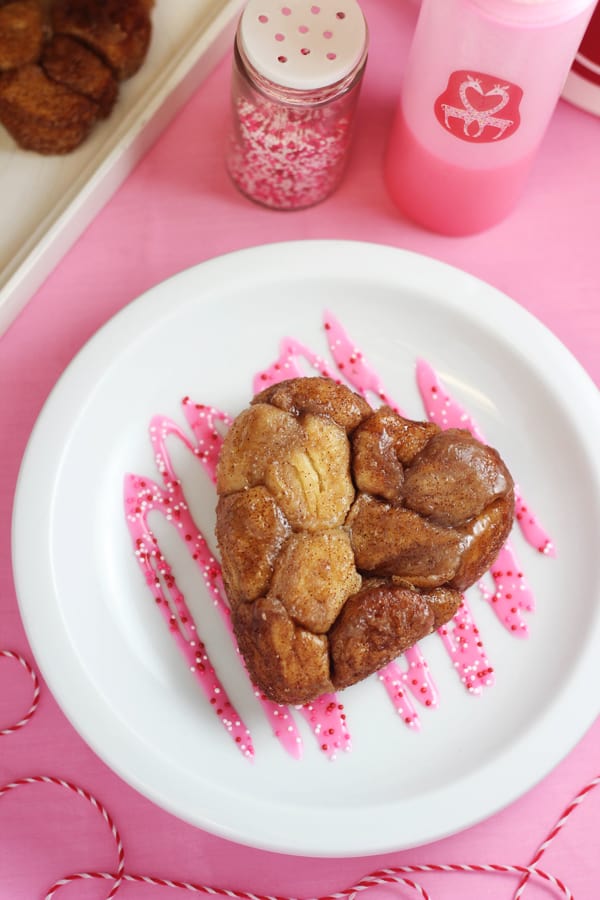
Valentine’s Day Monkey Bread
Another great breakfast option, and maybe what I will go with that day. This recipe from Home Cooking Memories shares exactly what pans to get to make these individual little heart shaped monkey breads. How excited would your family be to get their own??
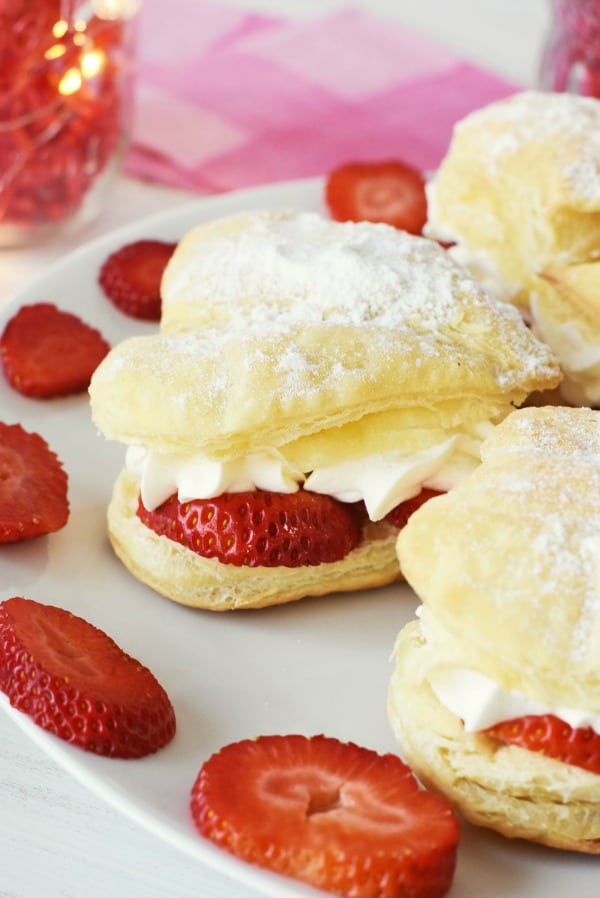
Strawberry Cream Puffs
Cream puffs remind me so much of my childhood, and these Strawberry Cream puffs from Savvy Saving Couple look amazing. Talk about an amazing dessert that is beautiful. If you are looking for a romantic dessert for your partner this would be perfect.
Hopefully these 10 ideas gave you all the easy Valentine’s Day sweet treat inspiration you needed, and if you are entertaining be sure you check out the posts below for some other fun Valentine’s Day fun. I would love to hear wha you make, so be sure to leave me a comment below.
Having kids means ALL SORTS of extra stuff. I mean lets face it – every room is affected. I want to talk about how to Organize your kitchen with kids stuff in this post.
Incase you missed it this is my week 1 post for our 6 bags for 6 weeks challenge! This week Jen and myself are walking you through how to declutter and organize your kitchen. She has so many tips on her blog post, so be sure to check it out!
Before I get to the nitty gritty of organizing that kitchen full of kid products, lets recap this challenge. For the next 6 weeks Jen and I will be walking you through every area of your house to clean and declutter your spaces. The end goal is to trash or donate at least 36 bags of stuff, and to have a cleaner, more organized home for 2020!
This Weeks Guest Blogger
Each week we will have a guest blogger, and this week we have Lex from Restoring Radiance! Lex is one of the best food bloggers we know and since we’re tackling our kitchen this week it’s only fitting that we have a food blogger involved!
Lex is a mama to 1 and pregnant with her 2nd. She’s as sweet as can be and we know you’ll love her! Be sure to check out her Instagram for tons of ideas for meals and her blog for amazing recipes!
This Weeks Giveaway
Each week we will also have a giveaway. The details will be listed on an Instagram post by Jen, myself and the guest blogger each week, but I will also always share the prizes and brands here too.
Branch Basics is an amazing home cleaning supply company. They have one concentrate that cleans everything! Their multi-purpose concentrate saves you money since you’re able to mix your own cleaning solutions, saves you space since all you need is the concentrate (if you’re like me you have extra of everything – soap, cleaner, etc – in case you run out) and it really works! They’ll be sending one lucky winner a Starter Kit (and be sure to complete the entire challenge because they’re also giving our grand prize winner a trial kit!).
Style and Dwell shares all things organizing on their Instagram and blog and create amazing boards to help you stay organized when it comes to your shopping list, meal planning and more! They’ll be donating one of their boards to one person this week!
How do I win?
First off follow both Jen and I. Then, when you’ve completed every area for the week, head to either post and comment “done”. You’ll also need to follow Branch Basics, Style and Dwell and Lex from Restoring Radiance to be entered to win.(Direct tags to each of these accounts will be on our post!)
You can get a BONUS entry each time you share your progress and tag both @arinsolange and @paisleyandsparrow with the hashtag #6bagsfor6weeks on your stories!
Another way to get a BONUS entry is to tag a friend on our posts to encourage them to get involved!
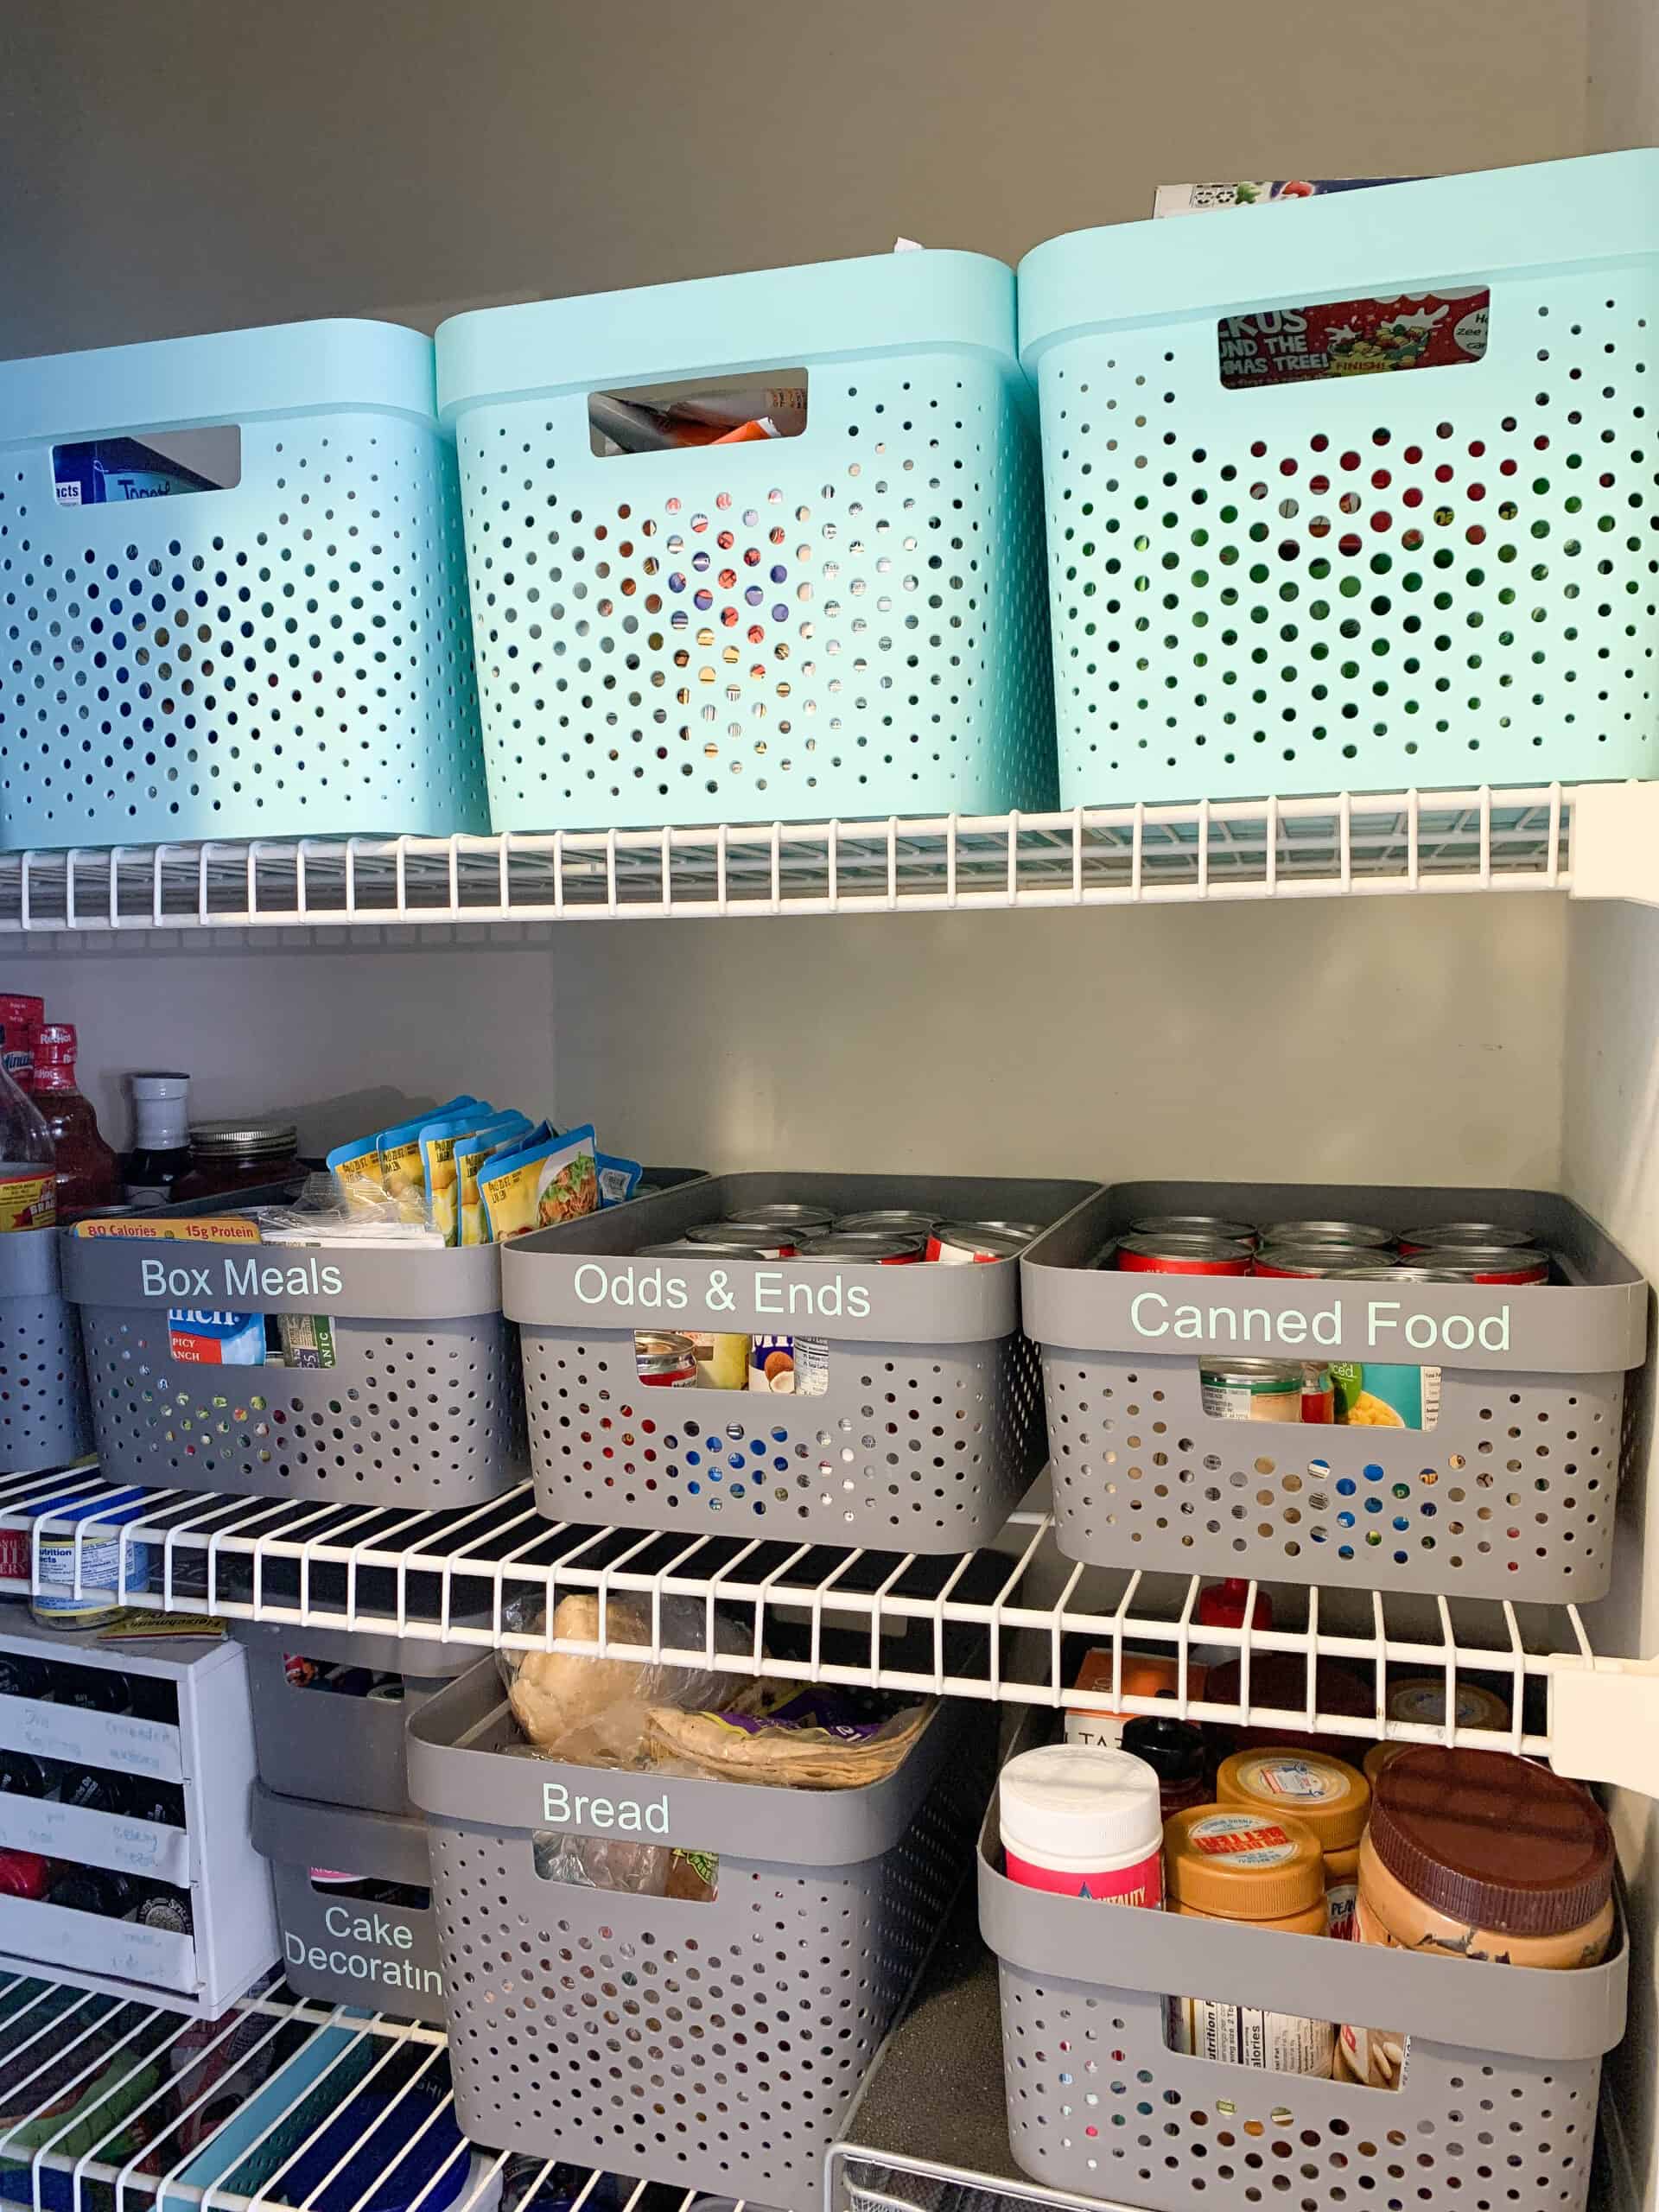
How to Organize your Kitchen with Kids Stuff
Okay now onto this weeks tips. You will hear me say this over and over again – LESS IS MORE. When it comes to living an organized life you need to have less stuff, and more of the right stuff.
I have a blog post about this in some regards here, but for me Replay Recycled is hands down your best choice in products for your kitchen with kids. Everything they have stacks, so you can have 15 plates, but they will all be in one stack. Prior to this I had such a mishmash of plates and bowls and my cupboards didn’t stand a chance.
For water bottles this summer I cut back the number of Camelbaks I had and got each kid a hydroflask. That said – I keep some camelbaks as well because I don’t want them losing the nicer bottles at school. I also do have a few odds and ends for the kids that I will touch on here in a second!
How do I store and organize it all?
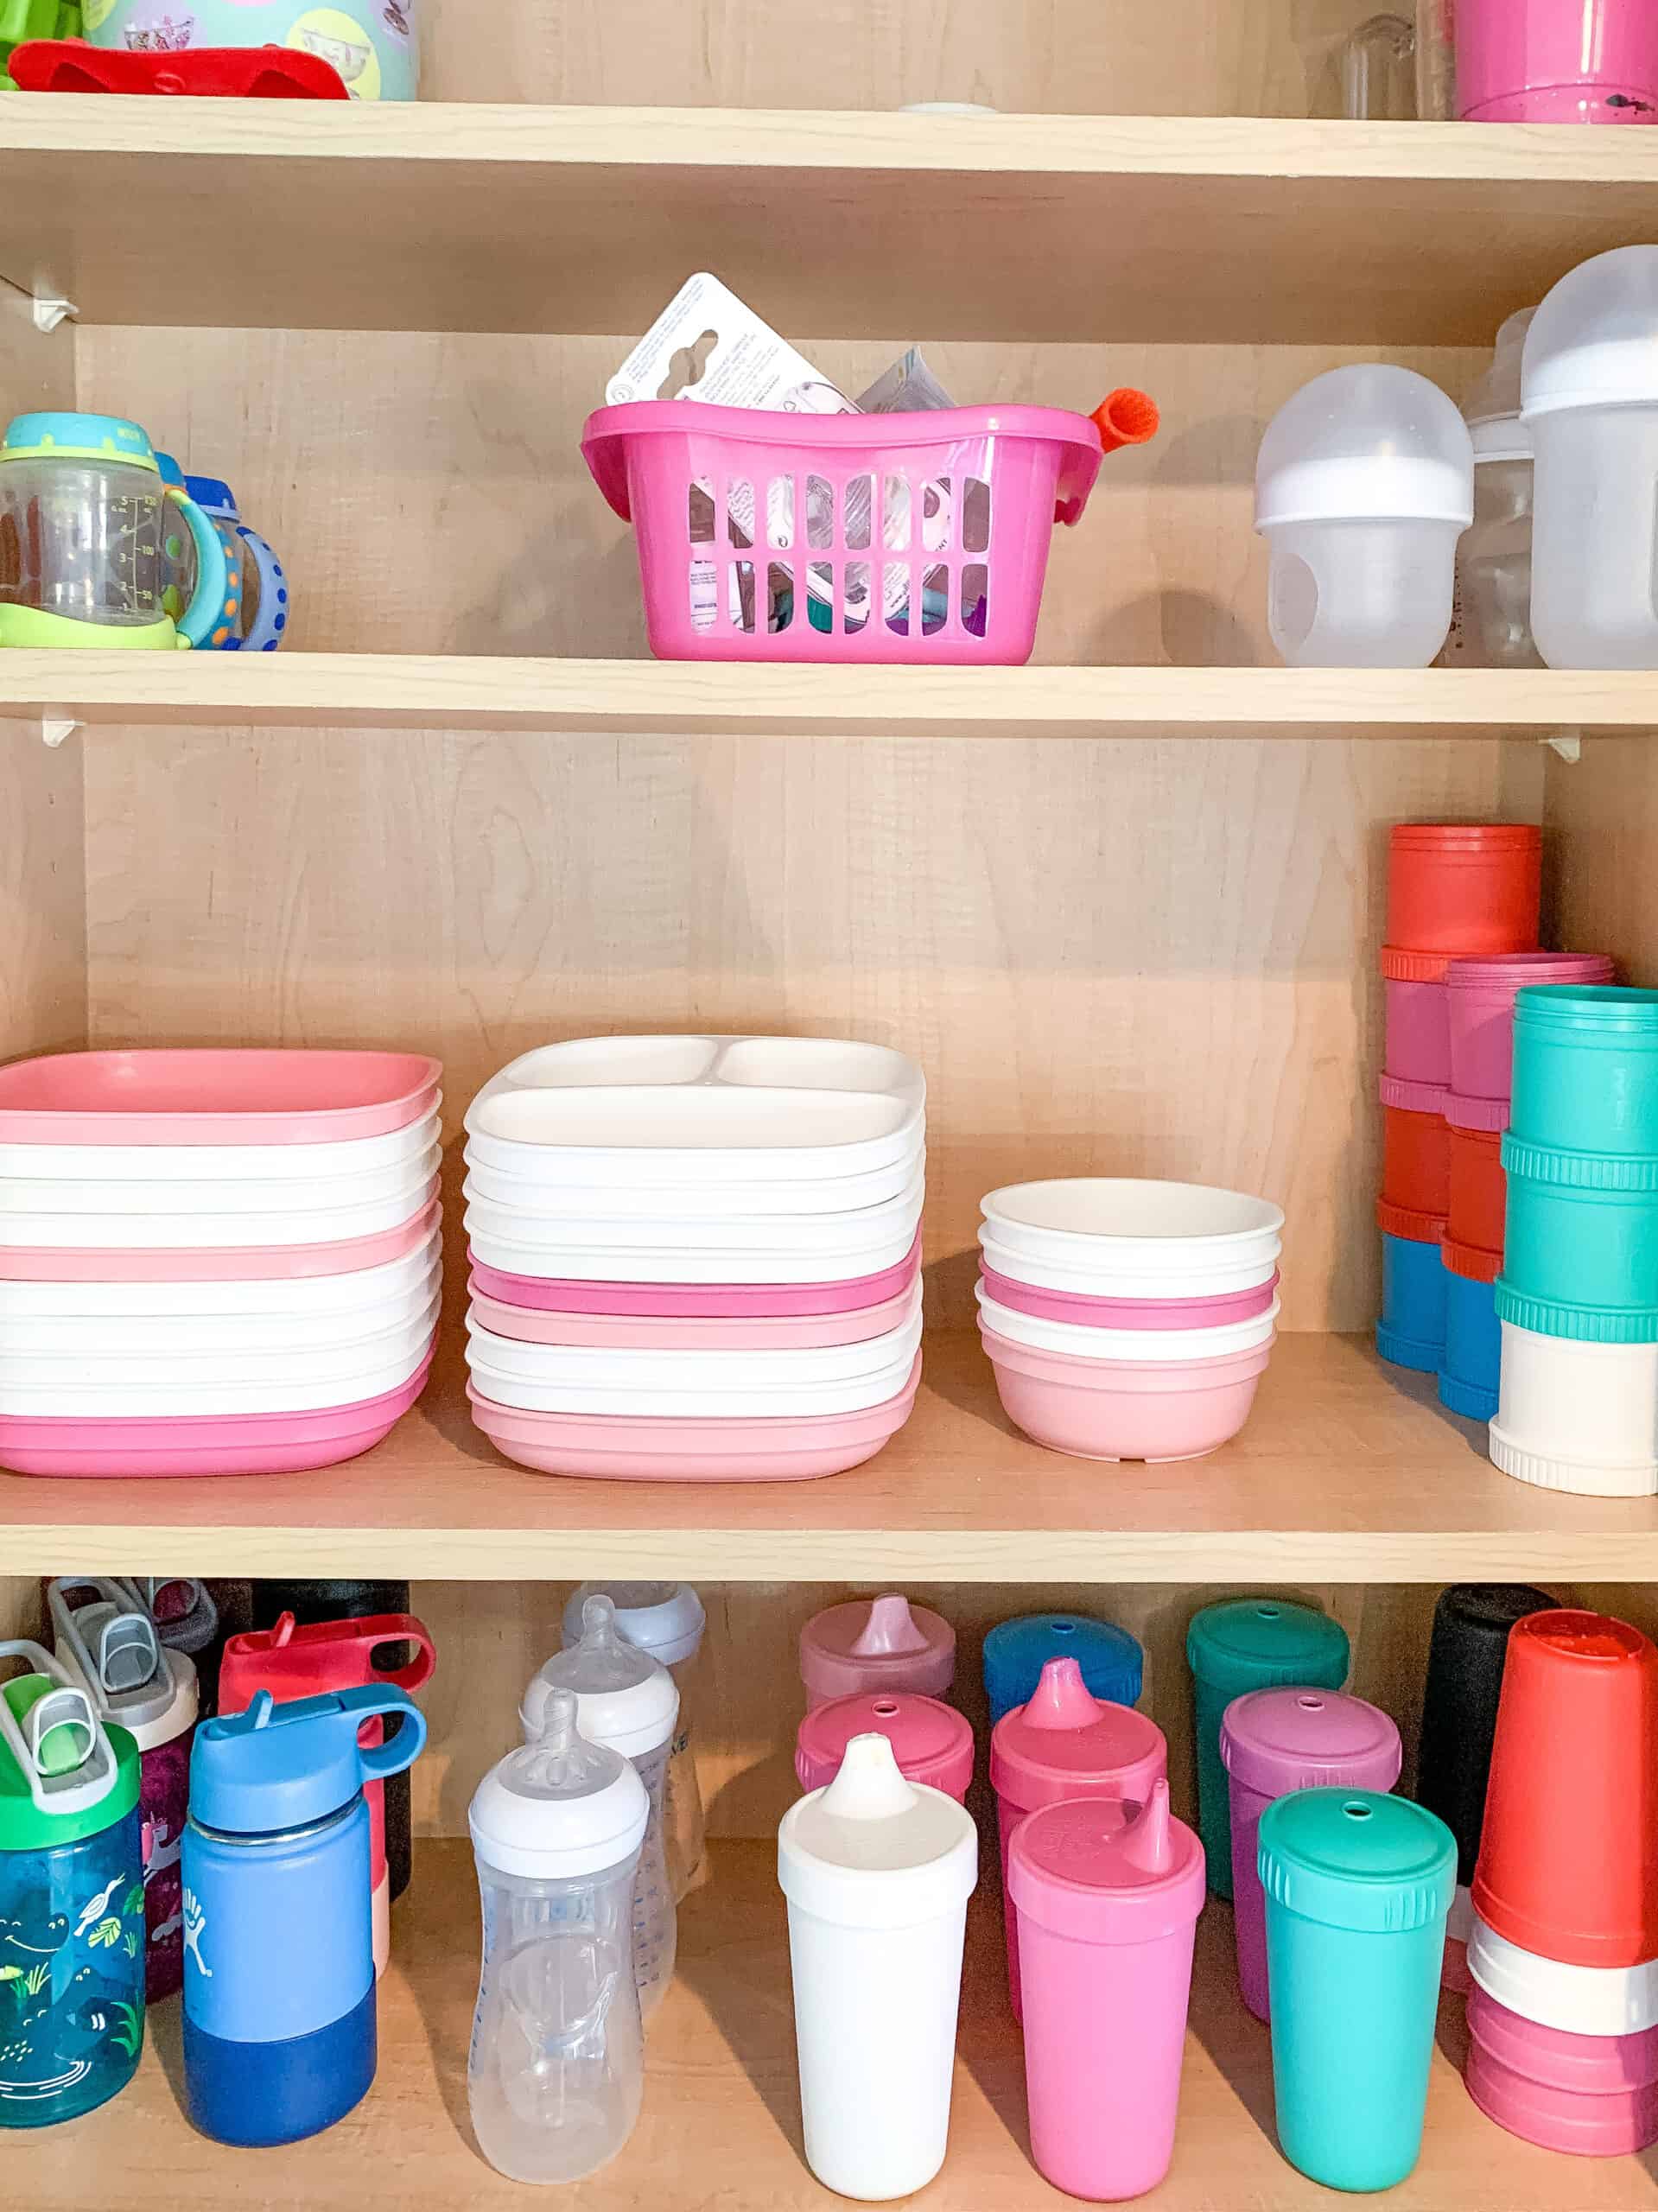
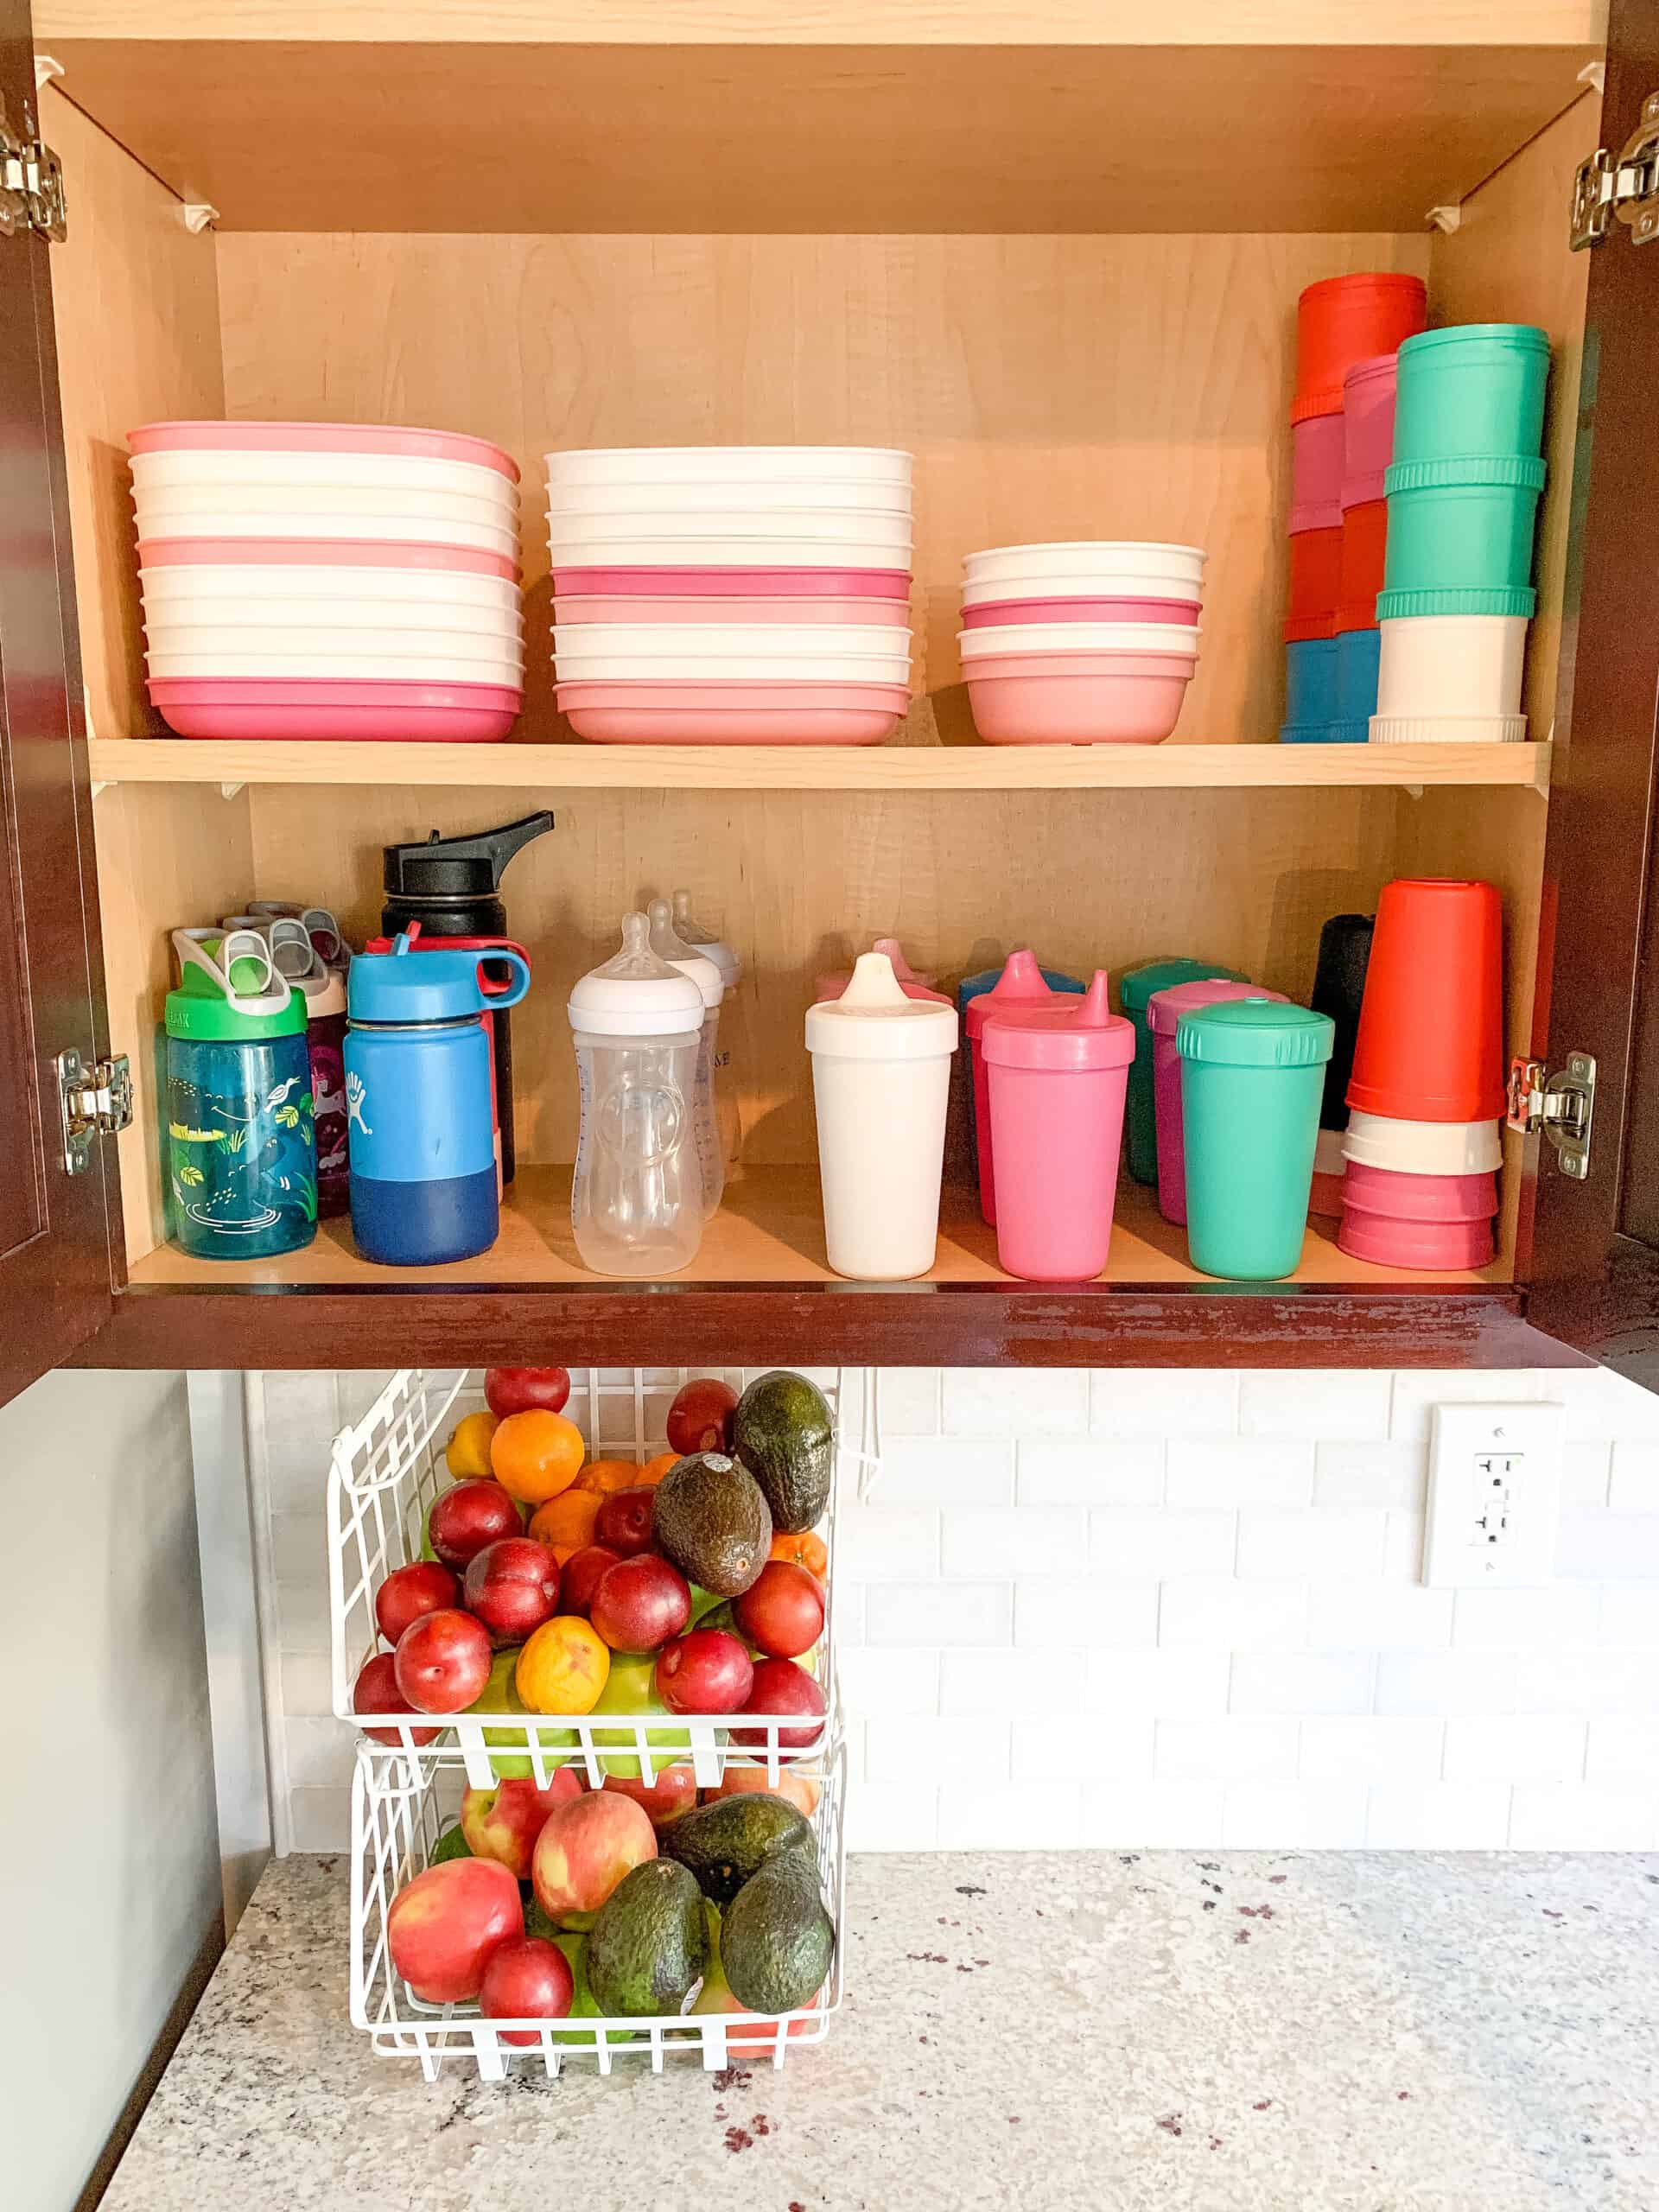
All of my kids stuff is confined to 1 cupboard and 2 drawers.
Cupboard
We have tall cupboards so I keep things that I use the most lower then move up. On the bottom shelf I keep cups, sippys, water bottles, and bottles for the baby.
The second shelf is the stacks of plates, bowls, and snacks stackers.
Third shelf is baby bottles we don’t yet use (some that she didn’t like as a tiny baby but I know we will want to use by 1 year), and a basket with the odds and ends.
This basket holds those extra lids to the snack stackers, a couple of mesh feeder type things for the baby, extra nipples for bottles, and extra camelbak mouth pieces. They are all items I don’t need frequently at all, but are items I need none the less.
The top shelf is just a few sentimental type bowls and such, and some silicone molds to make baby food and free it.
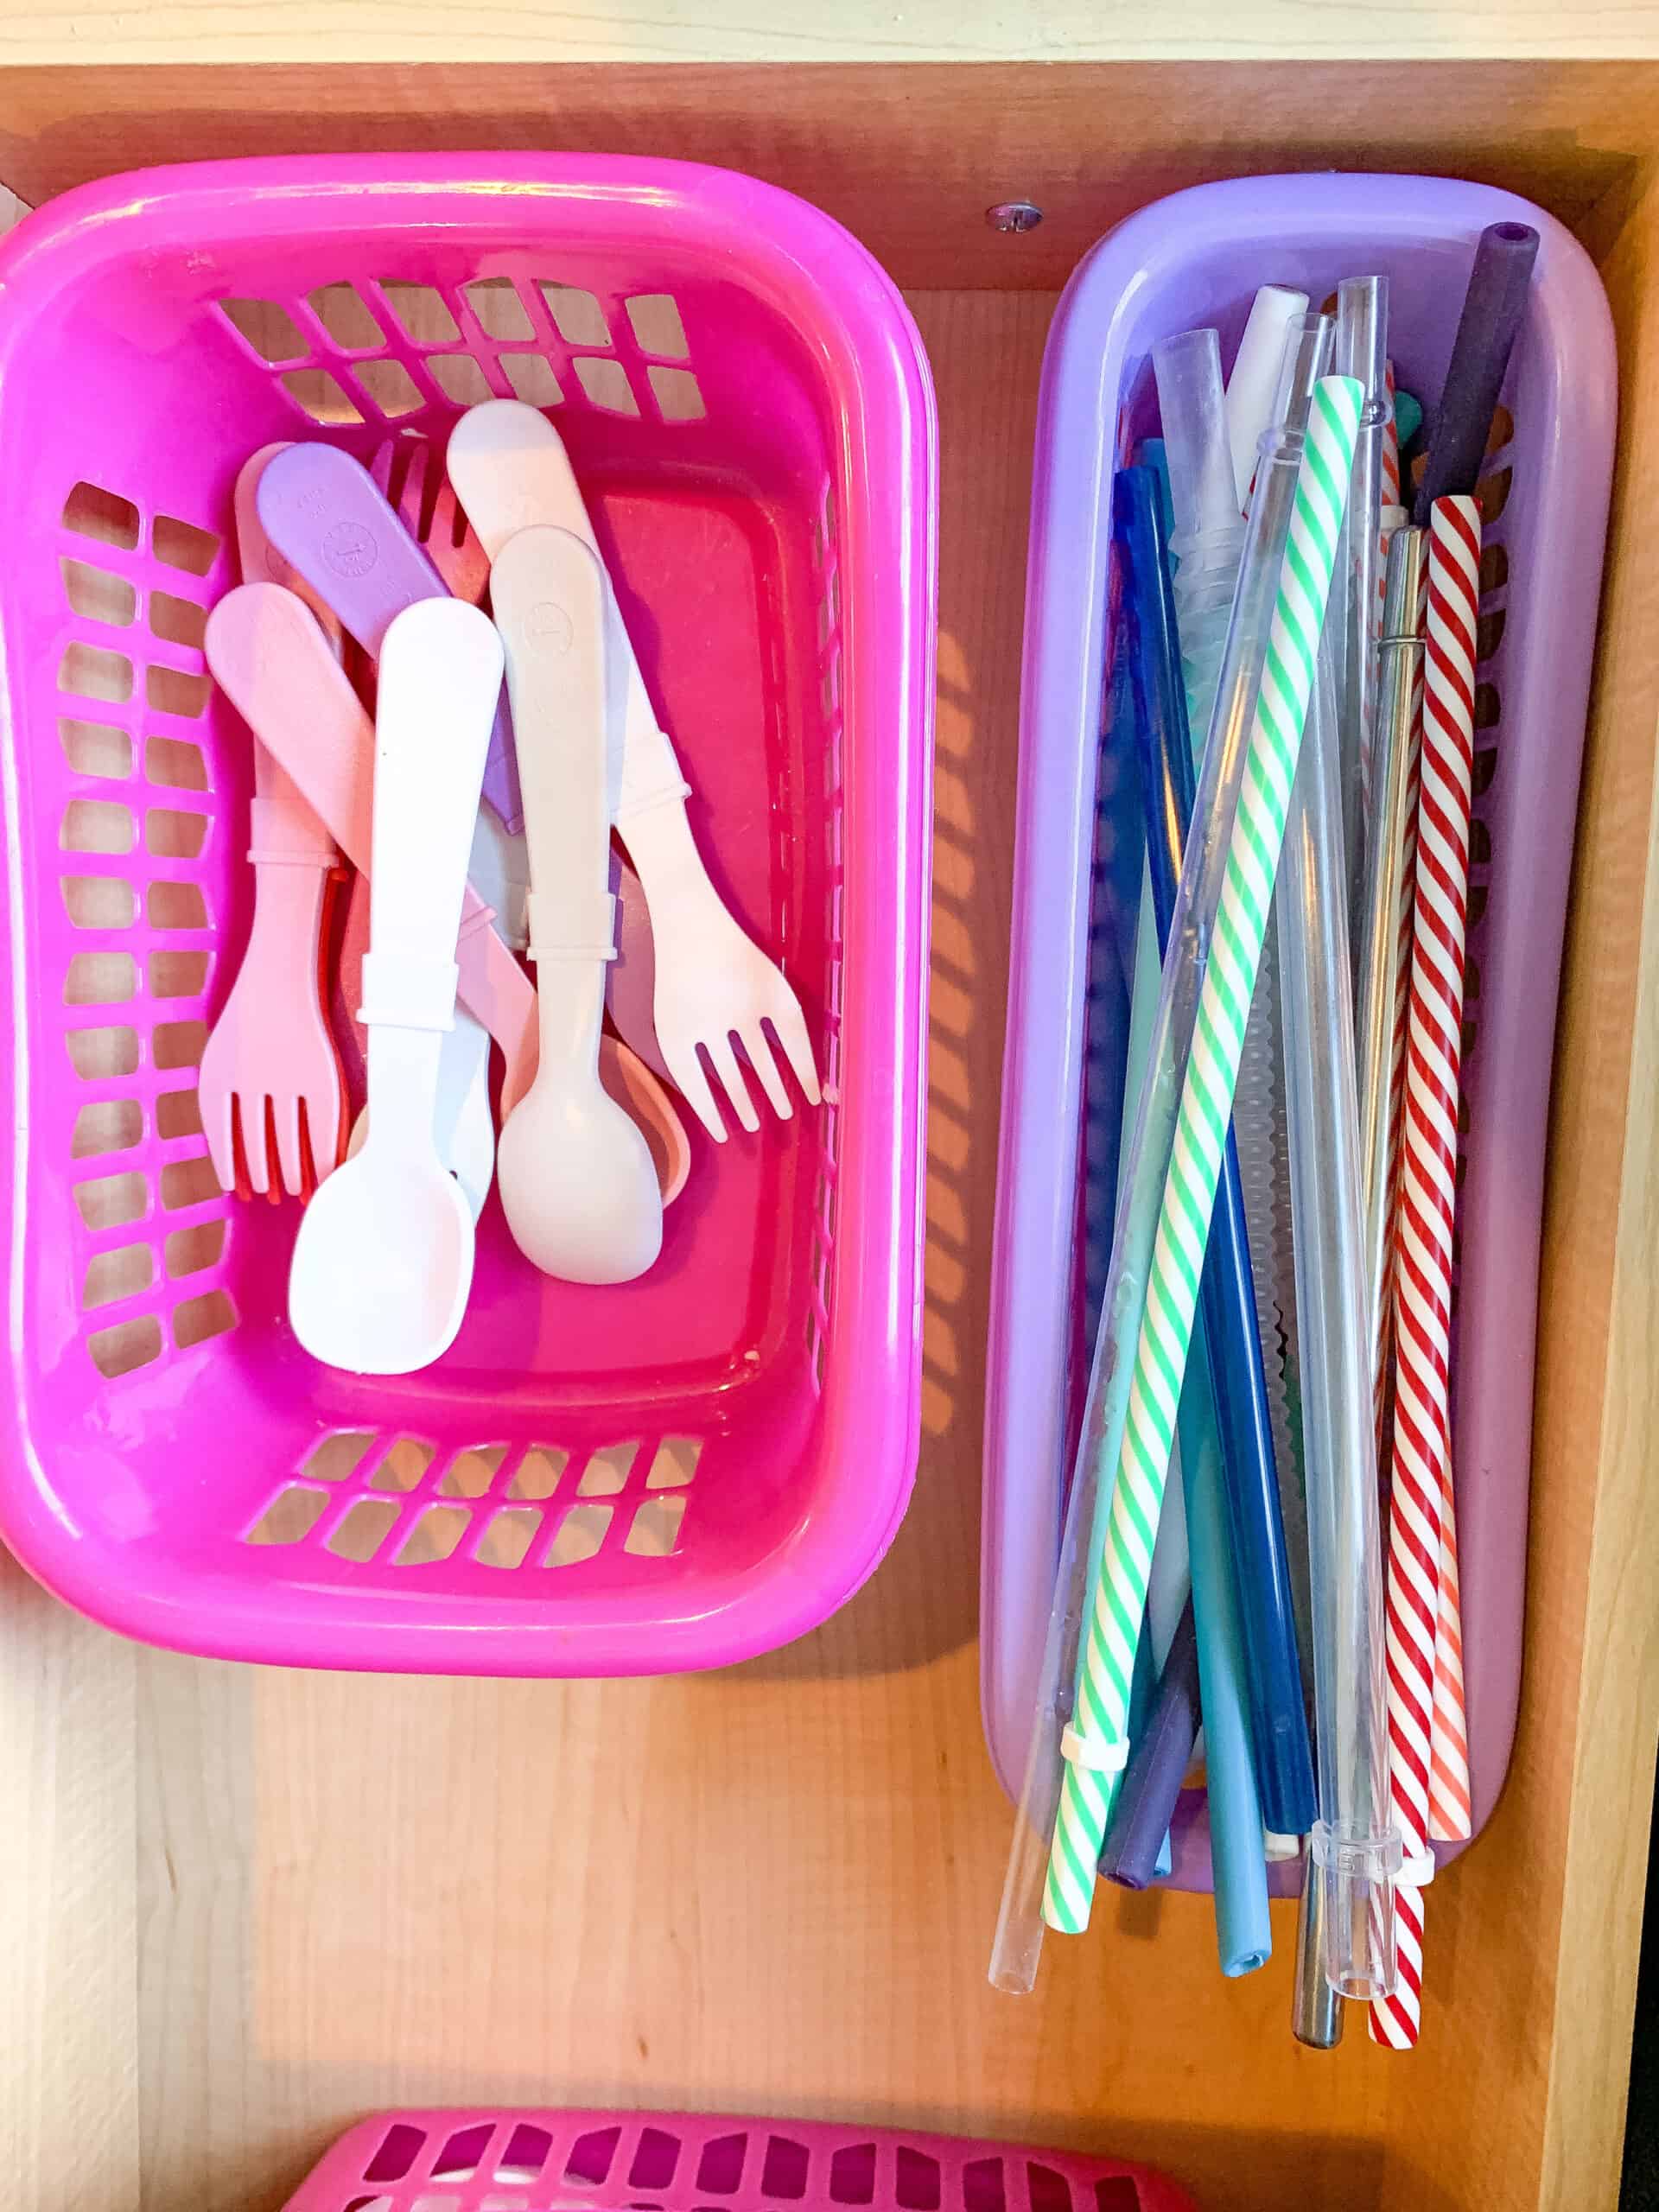
Drawers
I also keep all the kids stuff separate when it comes to drawers. – We use a small drawer with all our straws (so technically thats for all of us), and a small basket is in it for kids cutlery. At the back there is also a small basket for extra lids to their cups that come up from time to time.
That is it. I want them to be able to get in that drawer and not be messing around with other stuff.
We also keep an optional extra drawer with bowls and containers. This drawer is within reach for the kids, so allows them to get their own snacks. I don’t like the kids climbing the cupboards so it was the best solution.
The bottom drawer honestly, before this started was FULL of random cups and bowls. What I decided to do was order 3 new sandwich containers that are uniform for the kids to take sandwiches to school.
I ordered THESE for Goldie to have snacks to go when that time comes, or the occasional time I would need them for Walker. I then also ordered extra Replay Recycled bowls. I figured having less random cups and bowls would make things easier and so far its been amazing.
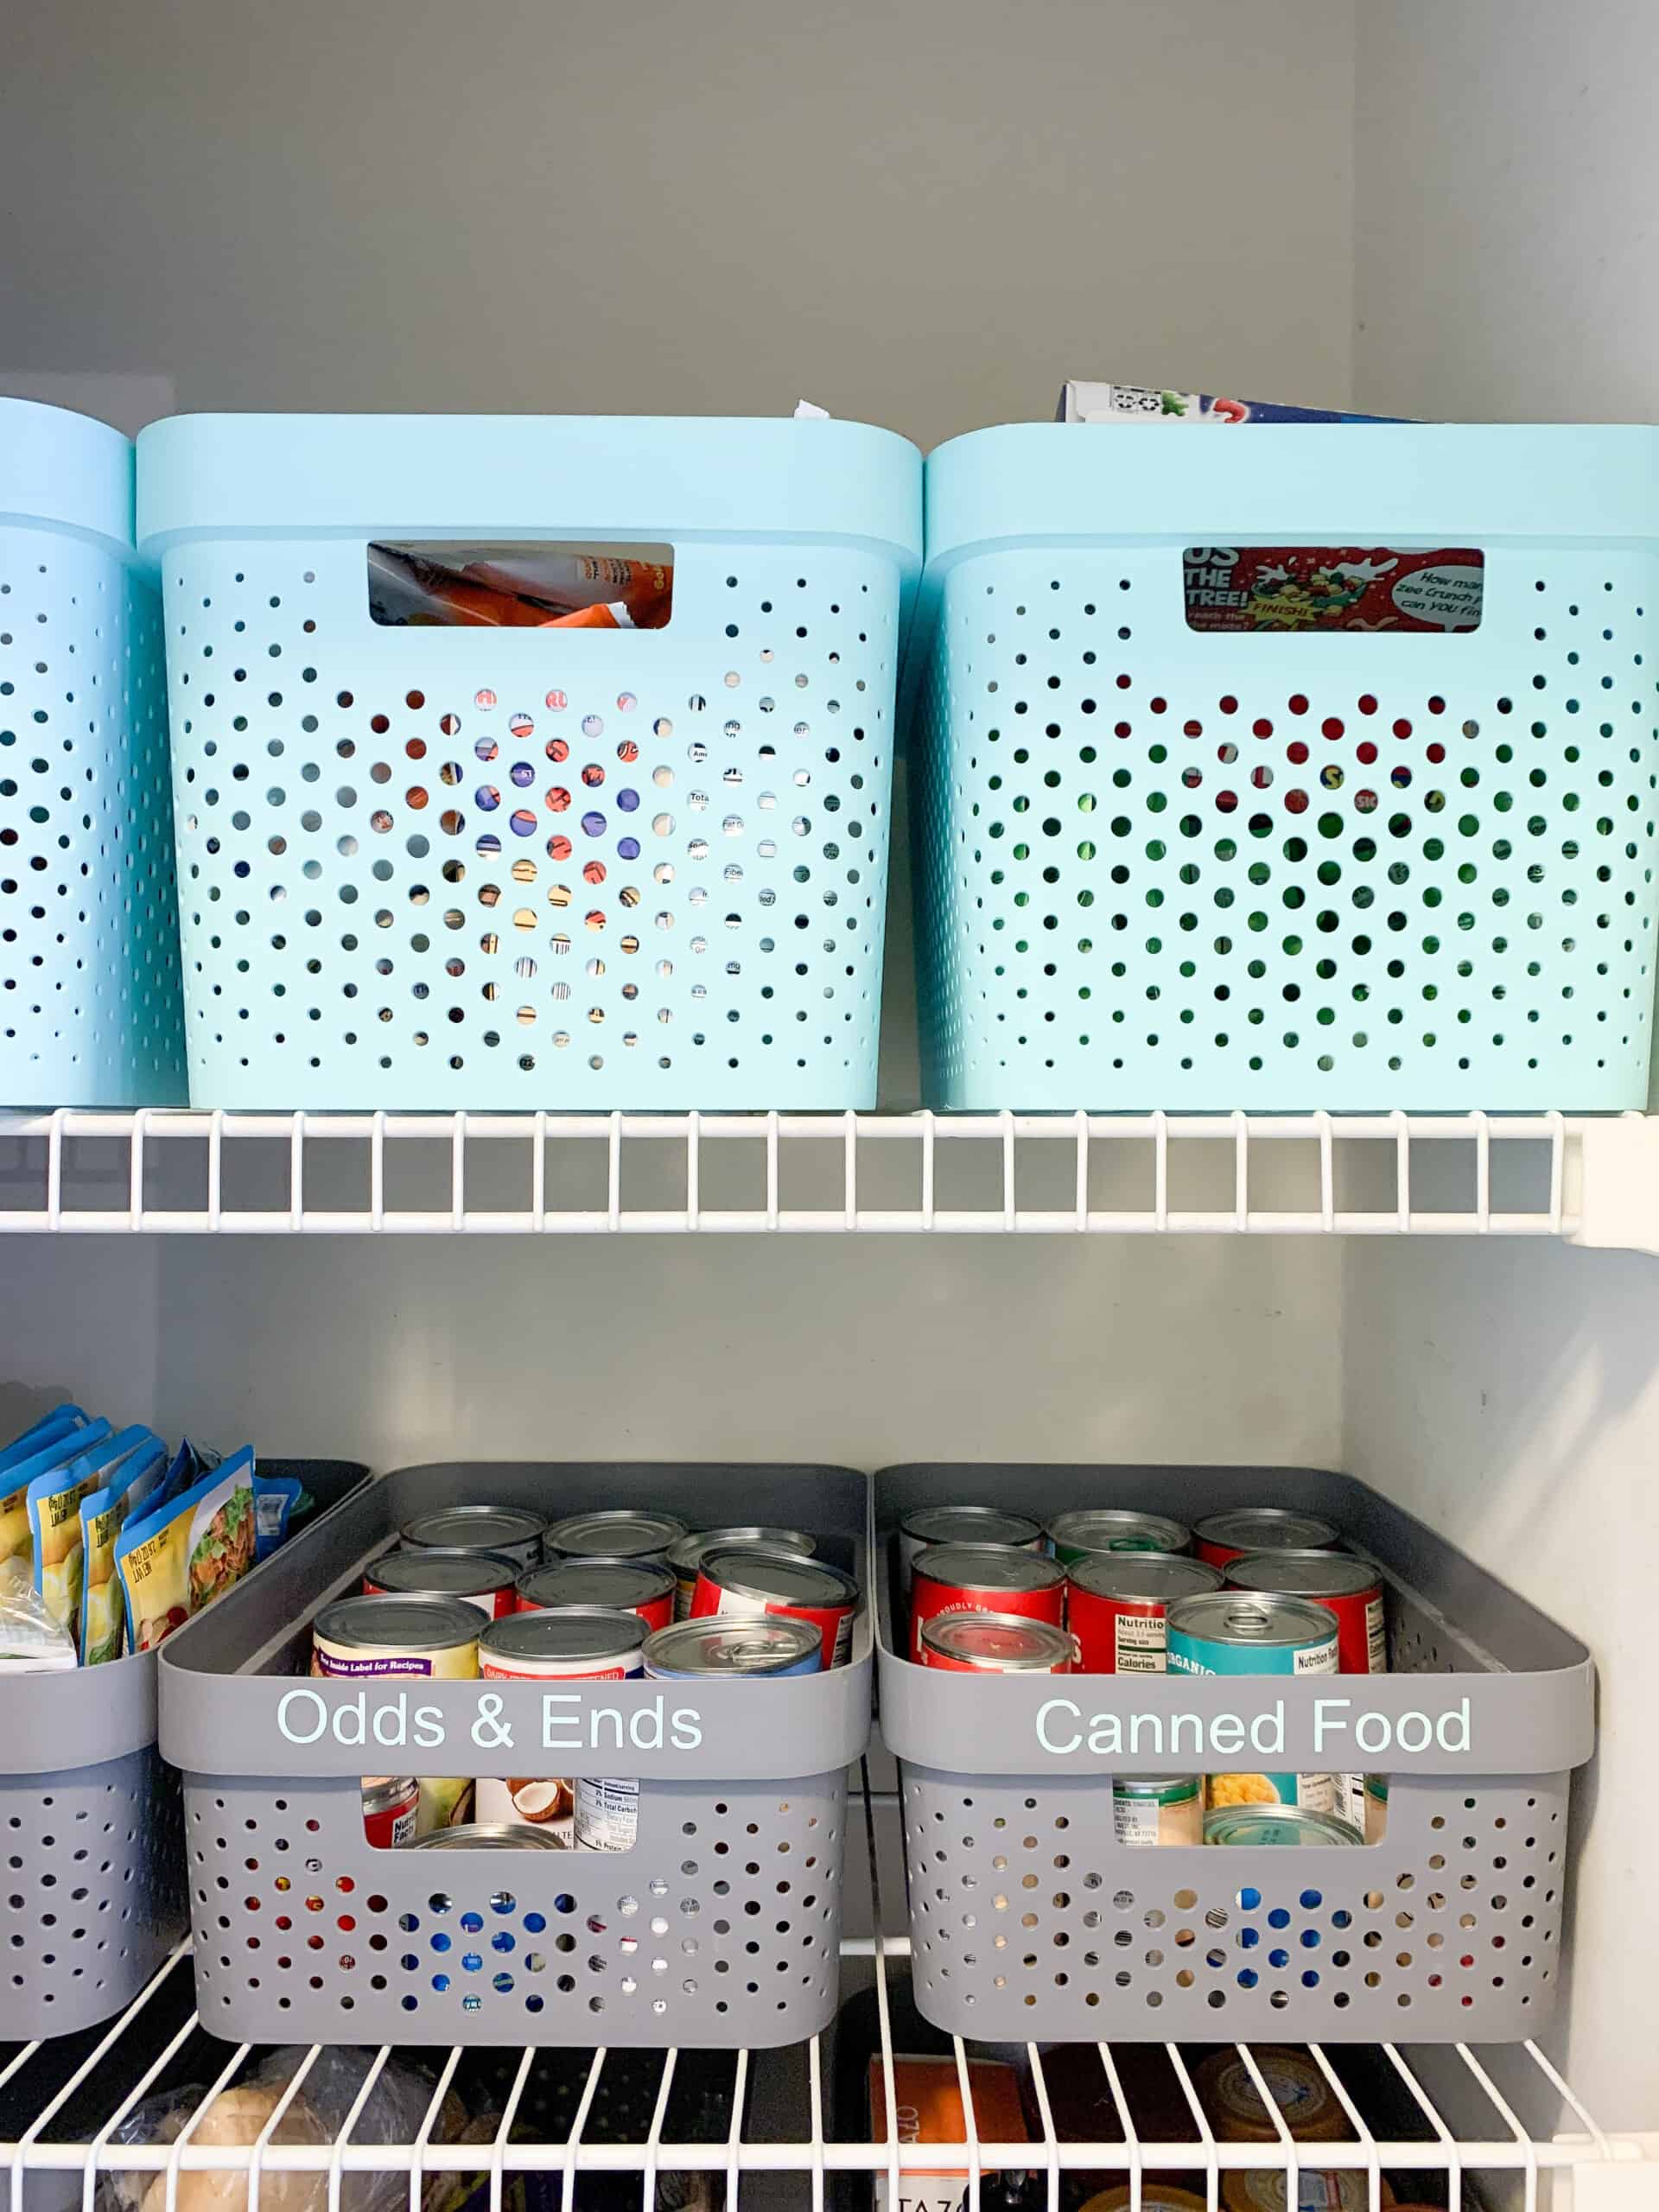
Organizing Their Food/Items in the Pantry
last, but not least on areas that can get complicated with kids is the pantry. We keep things VERY simple, and you can read quite a bit about our pantry here, but to explain best I can –
We keep three large catch all baskets on the top shelf of the pantry. These baskets hold ALL kid snacks. (bars, apple sauce, gold fish etc). We open the boxes when we buy them and pour them in. We keep them up top because we found that out of reach is better for my kids. Thats it.
I have found that not being TOO organized, but at the same time giving everything a place works best. (I used to try to keep fruity type snacks in one bin, healthy in one, and cracker type in another, but it was just a pain!). You kind of have to just figure out what works best for you.
For a long time those bins were on the bottom of our pantry because I preferred the kids could get their own snacks, but for now with Walker’s age I like them out of reach.
Free Pantry Labels
One thing I talked about on my Instagram stories was offering free labels you could hang from baskets each week. Click below to download your labels. I suggest laminating them ( I have this one and love it!), then hole punching them.
Tomorrow in Instagram stories I will show you my progress on 6 bags for 6 weeks as well as walk your through my kitchen and pantry to show you how I organize everything else. I am not fully finished with this week, but will be tomorrow, so can’t wait to show you!
If you have any questions on the challenge be sure to leave me a comment or DM me on Instagram.
Pin the Picture Below for tips on How to Organize your Kitchen with Kids Stuff Later
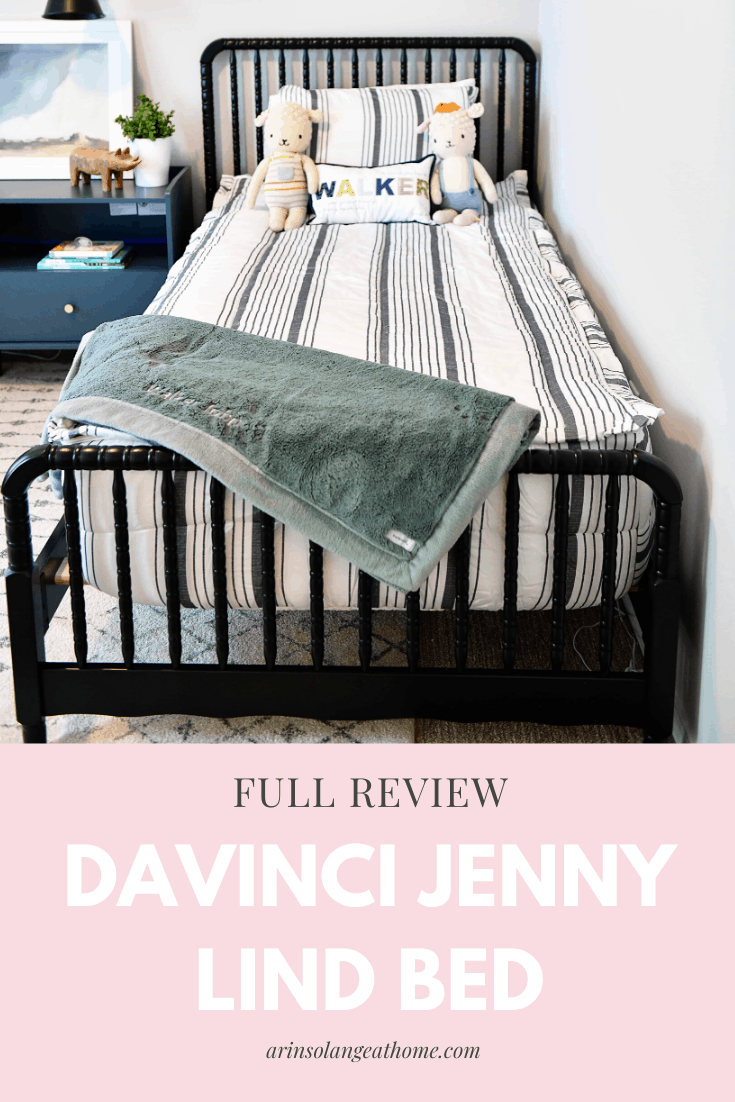
DaVinci Jenny Lind Kids Bed: Best Twin Bed Option?
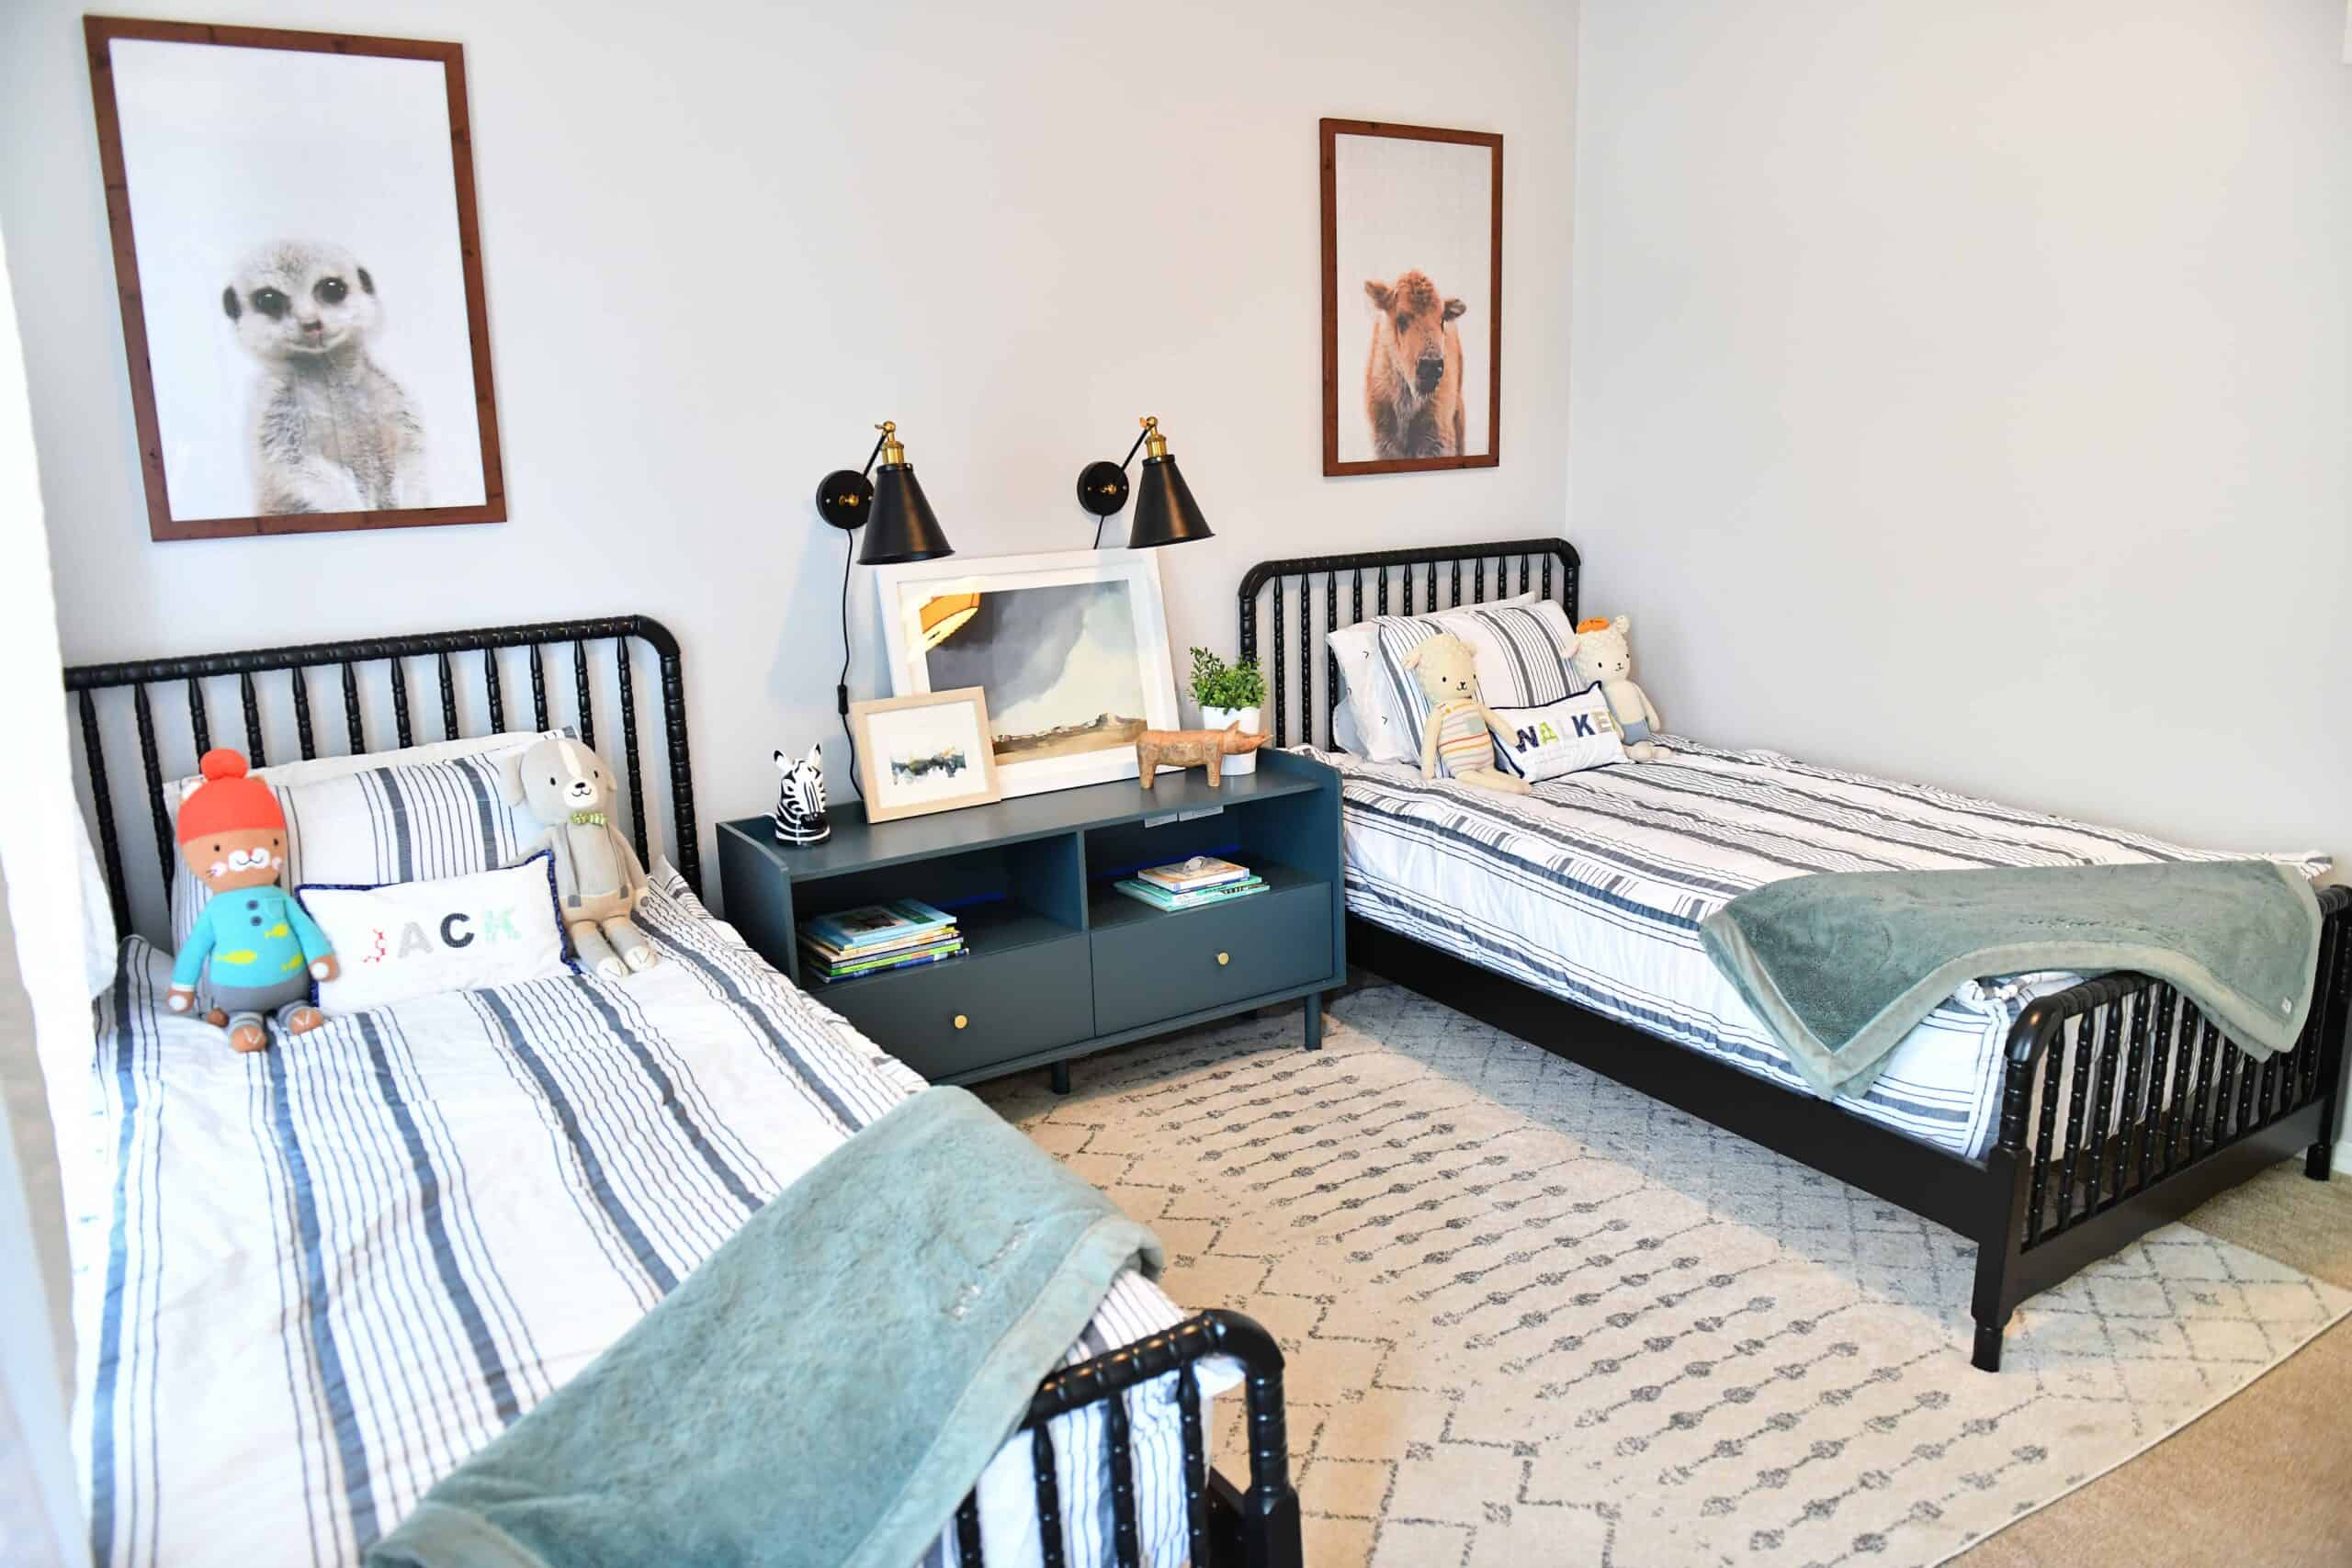
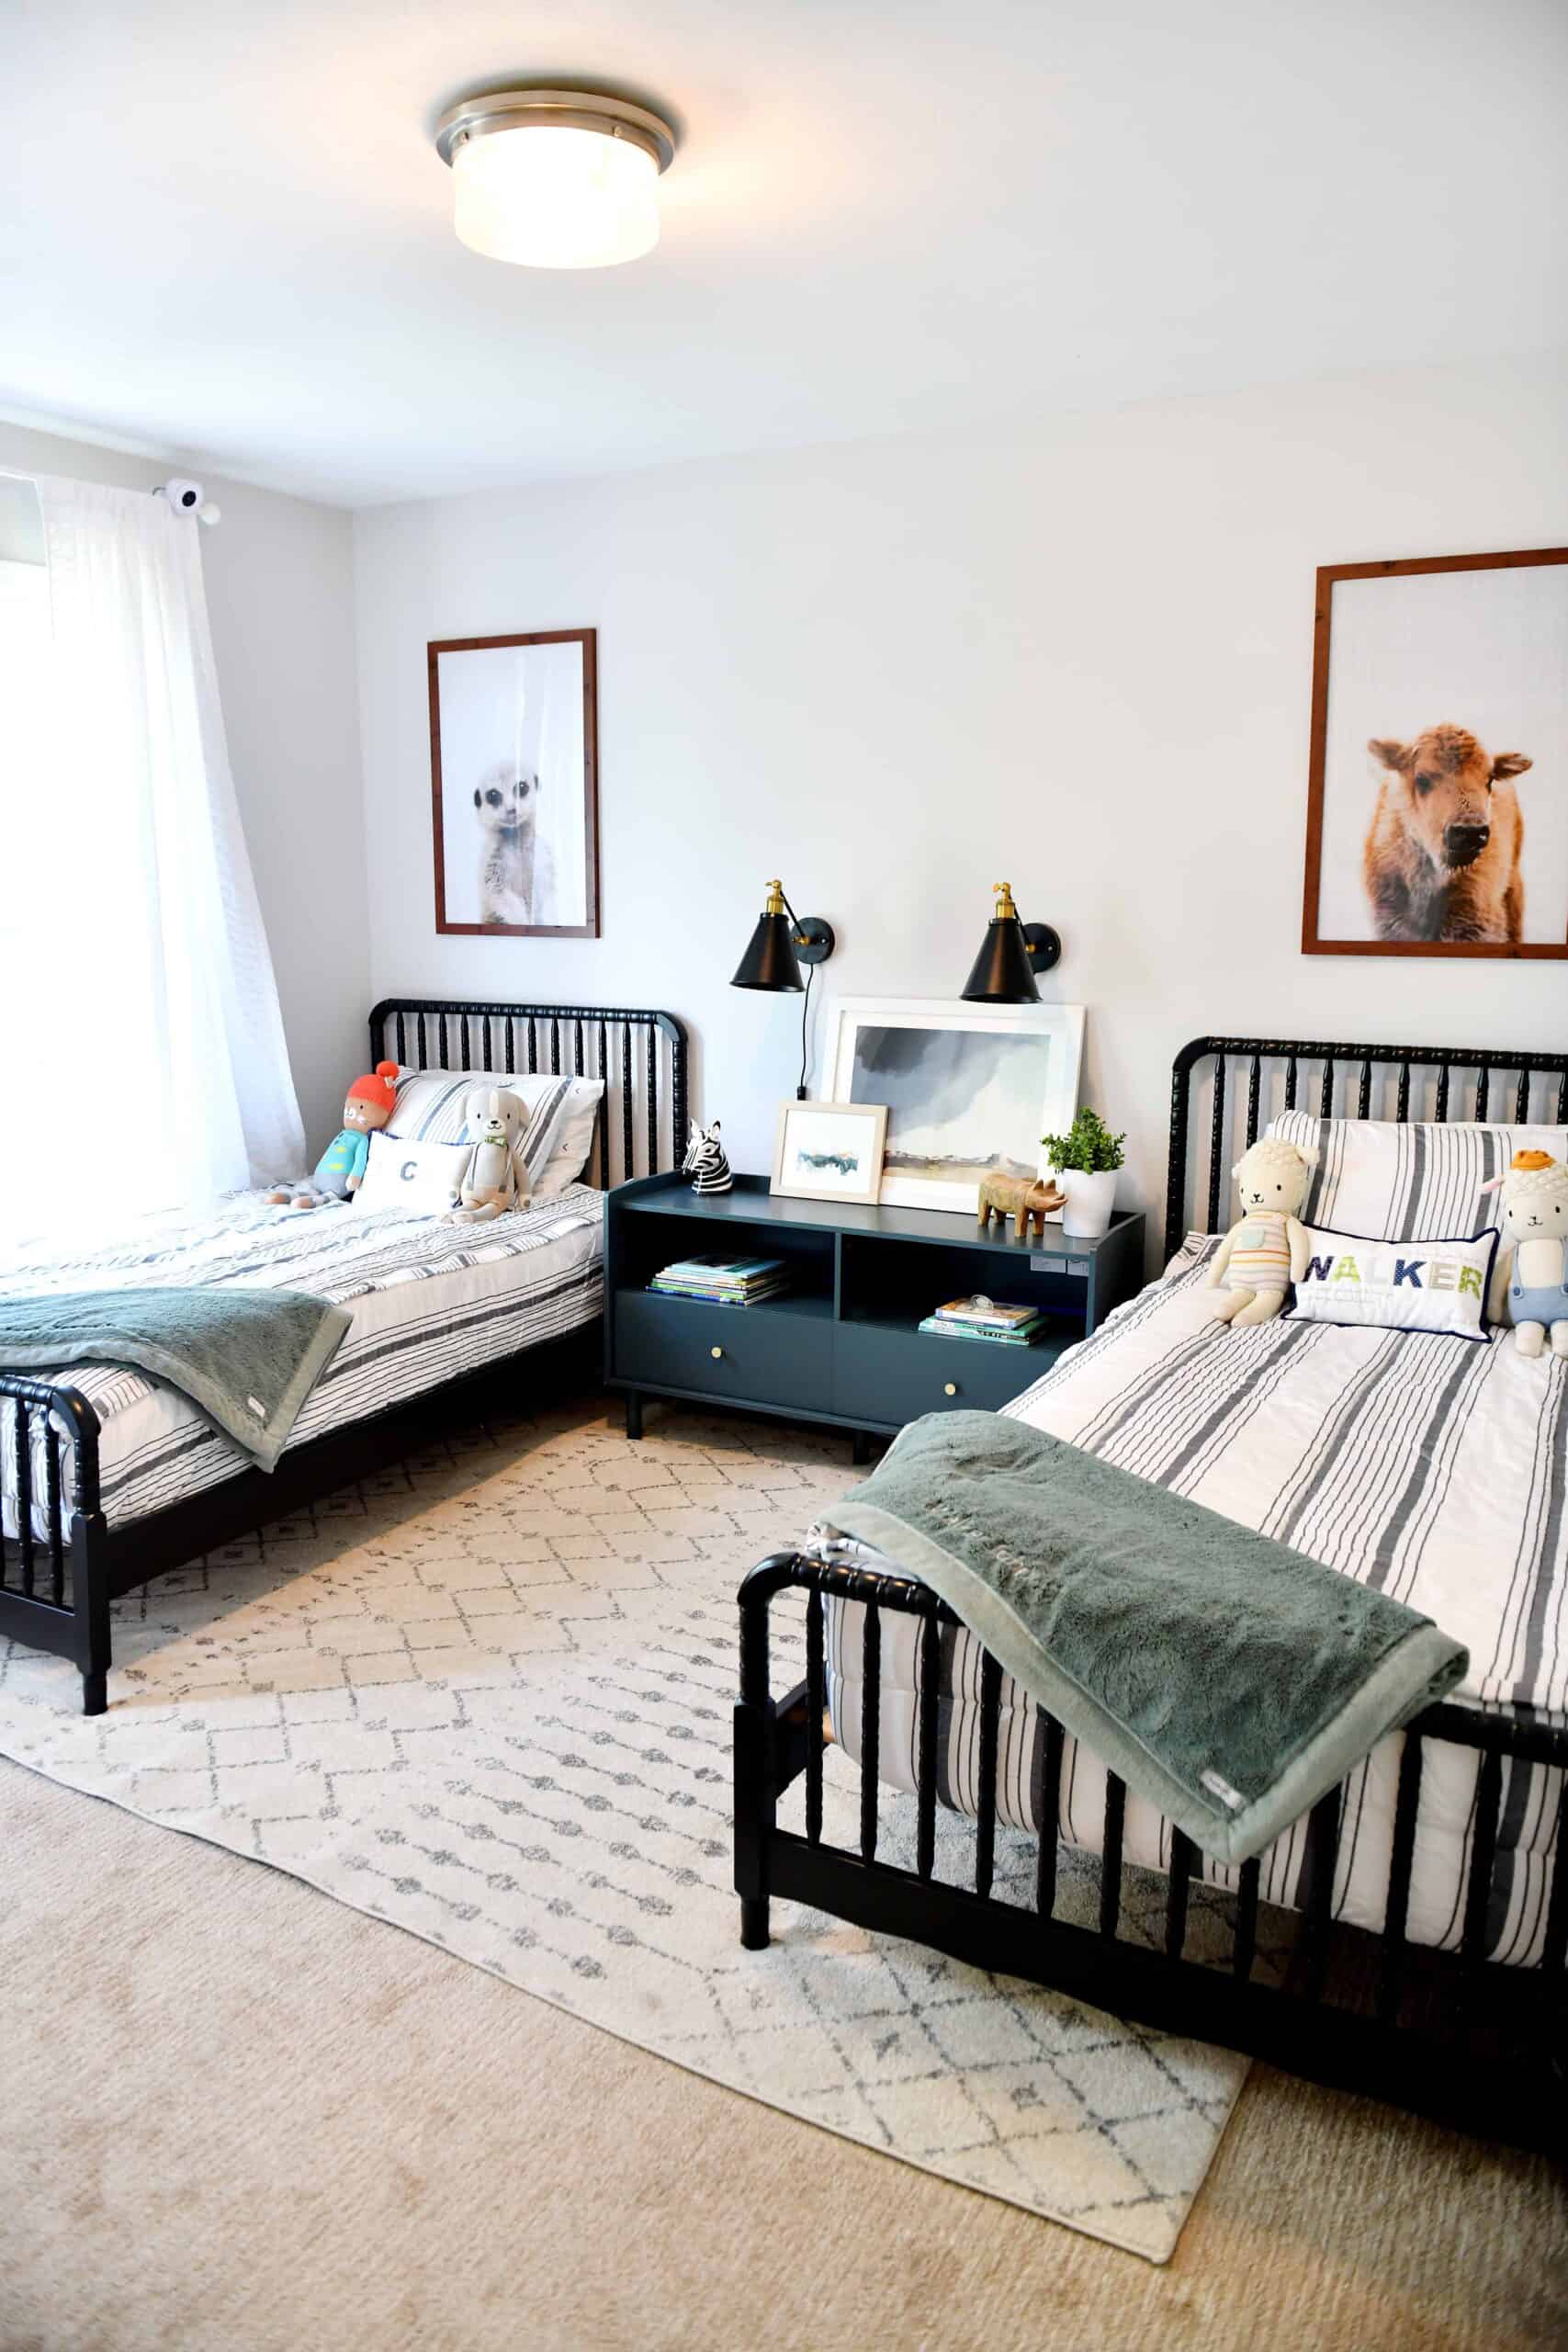
I am asked all the time about the Jenny Lind twin bed we went with in our boys’ room. This past year we found out we were expecting our 4th baby, and needed to move our two boys into a shared bedroom. After a lot of thought, we went with two twin beds for the space.
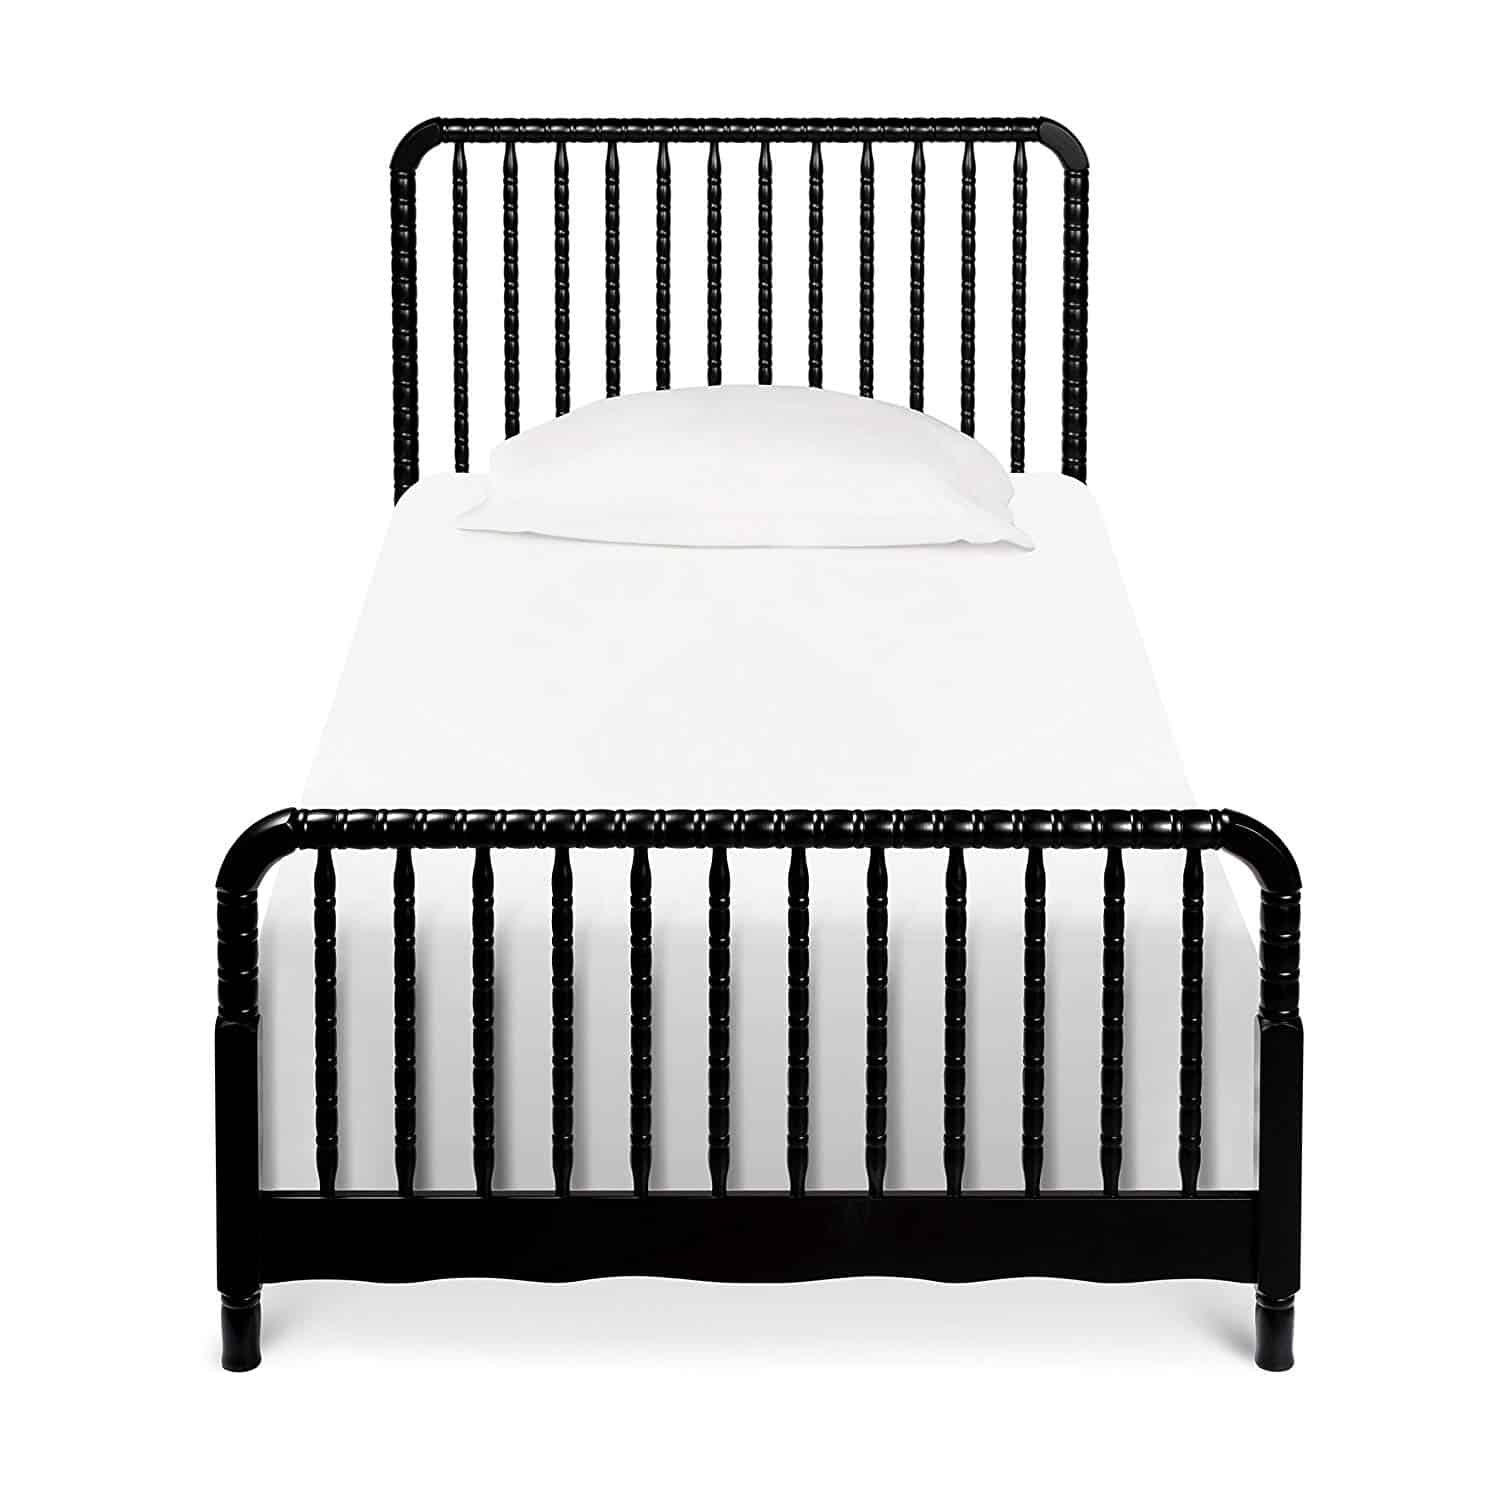
I wanted an inexpensive option for the beds, knowing the room sharing wouldn’t be long term, and ultimately decided on theDaVinci Jenny Lind twin bed in black as being the best twin bed option for us.
I have been asked SO many times about choosing a twin bed, and the Davinci Jenny Lind twin bed, that I decided I would do a DaVinci Jenny Lind bed review to keep my thoughts in one place.
This post contains affiliate links
DaVinci Jenny Lind Bed Review
Because I know I am all about reviews when I am buying products, especially furniture online, below is my unbiased review of the DaVinci Jenny Lind Beds. Sometimes hearing if someone else really likes an item, or regrets buying it helps me make my final decision.
This is not sponsored, and we purchased both of the beds on our own, so please know this is fully honest and unbiased – I would definitely tell you with some disdain if I didn’t like them haha!
Why we picked these beds
(How much are kids beds, DaVinci vs. Crate and Kids, sturdy kids beds, etc.)
First off – I thought I would explain why we picked these twin beds before I go into the actual review of the beds.
When we were pregnant with sweet Goldie, our 4th baby, I did SO much research on whether I wanted the boys to have bunk beds or 2 twin beds. So much so I even wrote this post on it after talking to lots of moms.
Ultimately I clearly went with two twin beds, based on Walker only being not even quite 2 years old, and feeling the access to bunk beds would not be great at that time. Because I wasn’t sure how long this shared room situation would last didn’t want to spend a fortune.
I also loved that these beds not long looked adorable in a shared space, but also would be perfect in a room alone. At the time when we bought them we assumed we would be moving in a year or so, and thus I wanted something I could continue to use in Walker’s room after the move!
We own a metal twin bed from Crate and Barrel that we had for Jack as a young toddler, and although it was adorable, the metal frame was really squeaky, so we knew that wood was the right choice this time.
I also change my decor ALL THE TIME (comes with the job), so picking something neutral was super important to me, and I felt black made it slightly more masculine than the white version, but do know you can get it in white!
The other reason I went with this twin spool bed is the fact that they have a great sturdy look, yet don’t make the room feel heavy. One thing I would recommend if you are dealing with a lot of furniture in a smaller space would be to go with something that isn’t too “heavy” feeling. It keeps the room feeling open and airy, but in this case still didn’t make it too feminine.
One thing I love about the Crate and Kids version is that you can get it bigger, which she did for her oldest son. They have also since barely changed the side of the version I have, so I can’t say enough good things about BOTH this version as well as the Crate and Kids if you are looking for a great black, wood bed.
Most all of the things I love about our version you will also get in the Crate and Kids Jenny Lind bed, so it is worth checking out both, but be sure to grab the Crate and Kids one on sale!
But the metal twin bed we had for Jack was from Crate and Barrel, as I mentioned above, and we didn’t have great luck. Add that to the fact that I really didn’t love them much more than the DaVinci twin bed version for nearly double the price.
How Much Do The DaVinci Jenny Lind Twin Beds Cost?
For the boys beds I paid $279 EACH and was able to get them on Amazon Prime. They arrived in two days, however I know that although they are always on Amazon they are not ALWAYS on Prime, so watch for the delivery time. If you aren’t in a rush, they go back to Prime eligible often!
It is worth nothing that the beds each arrive in 2 very large boxes, and for me they were a bit too big for me to manage on my own.
The beds were VERY easily assembled with one person. My husband was able to do both beds on his own in one evening, with very little headache. I have seen him really curse some of my purchases, and this wasn’t one of them!
DaVinci Jenny Lind Bed Review
My boys have now had these beds for roughly 8 months each. I really wanted to give them a good try and see how they were holding up before writing this review, and knowing if I would truly recommend them.
Incase you want to stop reading – short answer is YES I would buy these again. BUT be sure to notice that I mentioned a small change in the frame to this bed since my first writing this post as well as since I purchased them. That change is to me VERY noteworthy.
The beds have been a great height from the ground up for my boys (ages 2 years old and 7 years old). One reason I picked this bed was the slat base – there is no need to add a box spring for this bed, which I LOVE.
It allows for the bed to be low to the ground, but not TOO low, in my opinion. I don’t worry about my boys falling out and getting hurt, but I still feel like decor wise, they look pleasing to the eye with no box spring (as opposed to some beds I have seen!).
My boys do not follow all the rules by any means (if yours do…please leave me your secrets in the comments haha) thus I have caught them jumping on these beds a lot! One of the things I like the most about these beds is how sturdy they are. I have not once heard them squeak and I don’t feel as though when I move them for cleaning and such that the connecting points loosen.
My daughter has a pottery barn bed (see her room here) , and I honestly feel as tho this one is as sturdy or more than hers is! – however hers is also a canopy bed – IE a 5 year olds monkey bars haha.
One small negative thing I will say about the bed is that when we put together one of the beds there was a slight flaw where the foot board met the side board making them not sit fully flush. I couldn’t tell you which bed it was at this point because it was slight, but that was truly the only issue I saw. I don’t know if it was error on assembly or if it was just a slight imperfection, but that truly was the only flaw we found, and I feel as though it was worth noting!
Some Measurements
When I am looking for a piece of furniture there are always a few measurements I am wondering about for mostly decor or storage reasons that are hard to find online. I measured a few spots to help you plan out your room. Many of the other measurements can be found on their website/ the Amazon listing, so I won’t go through every single one.
Clearance under the bed from the floor to the bottom of the bed (helpful if you are thinking you need a twin bed with storage): 8 inches
Floor to the top of the foot of the bed (helpful if you are looking for benches or storage units for the end of the bed): 22 inches
Floor to the top of the head of the bed (I took this measurement into major consideration on the dresser piece I put between their beds): 42 inches
You don’t need (and I am not sure you could use) a bed skirt wth this bed. Due to the slat base and the corners I am not sure there is any way to actually add this.
I have noticed that the photos online seem as though the side piece has now changed to being 2 separate pieces with an additional leg in the middle of the sides of the bed. This does change the overall look to the bed a bit and doesn’t make it as identical to the Crate and Barrel one, so make sure you note that this has changed!! I would feel awful if you purchased based on this review and got something that looked slightly different!
As with any painted wood bed (similar to a crib) if you have a little one who might be rough on it you could definitely ruin it by scratching it or chewing on it. We haven’t had that issue, but its worth noting that with wood there is always that possibility.
This same bed comes in white as well and would make a great option if you are looking for a white version.
As far as I know the bed only comes in a Twin or a toddler size, so if you are looking for a full, you will want to visit the option of the Crate and Barrel version.
Like I said, we have TRULY loved this bed. It is available in white as well, and honestly is perfect in a child’s room for a good budget. Please feel free to leave me a comment or DM on Instagram if you have questions, and I would love to see pictures of it in your home if you purchase!
Since sharing these beds on Instagram and my blog the first time I can not tell you how many friends and followers have told me they wish they had seen these before spending the money on the Crate and Kids version. They truly are a really close dupe of the more expensive option, however to me in the case of a boys room I find that this version actually leans more masculine.
The spindles aren’t as “bubbled” so it takes away a bit of the girly factor to me.
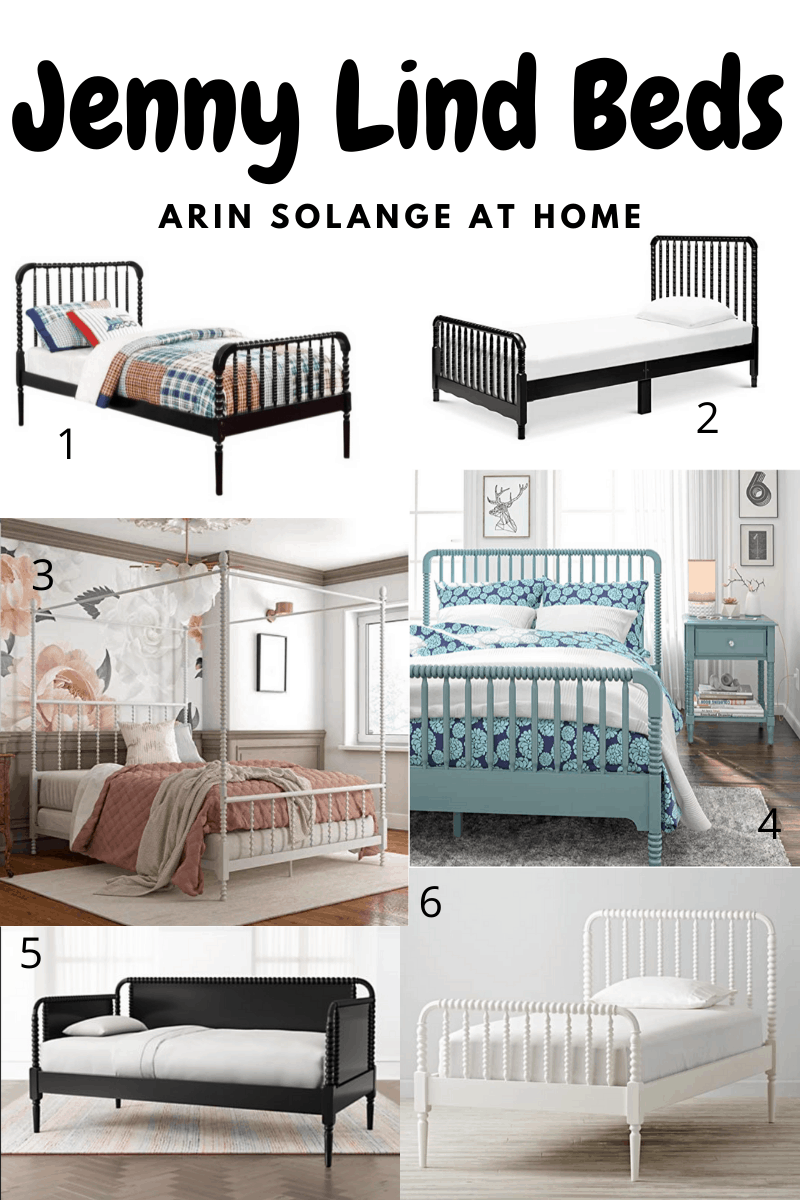
Other Jenny Lind Beds To consider
The current bed I shared is out of stock, so I wanted to give you other great options to consider for the times this one is sold out. Below you can shop these great beds!
5. Day Bed – This comes in black and white and is $700
6. $550 for the Twin – this option comes in several colors and sizes!
Pin the Photo below to find this review of the DaVinci Jenny Lind Bed later
Below is a photo to pin incase you want to read this review later, and don’t forget it you have any questions on this room the full room you can check out their shared bedroom here.
This room remains such a favorite, and the dresser between the boys beds has been a top seller – so if you are looking at these beds in a shared room situation similar to myself that might be worth checking out!
Please always feel free to reach out to me via Instagram (@arinsolange) with any questions or comments. I would love to see pictures or hear if you decide on these beds for your home, and would love to hear if you prefer the look of this one or the Crate and Kids!
If you purchase the Jenny Lind bed after the newly added middle leg on the side pieces, I would also LOVE a review on how you feel that looks in person, as I have gotten a few questions on that.