Shop
Food

Pool Side Meals

This post was kindly sponsored by Replay Recycled, however all thoughts and opinions are my own.  I greatly appreciate you supporting the brands that make my blog possible!

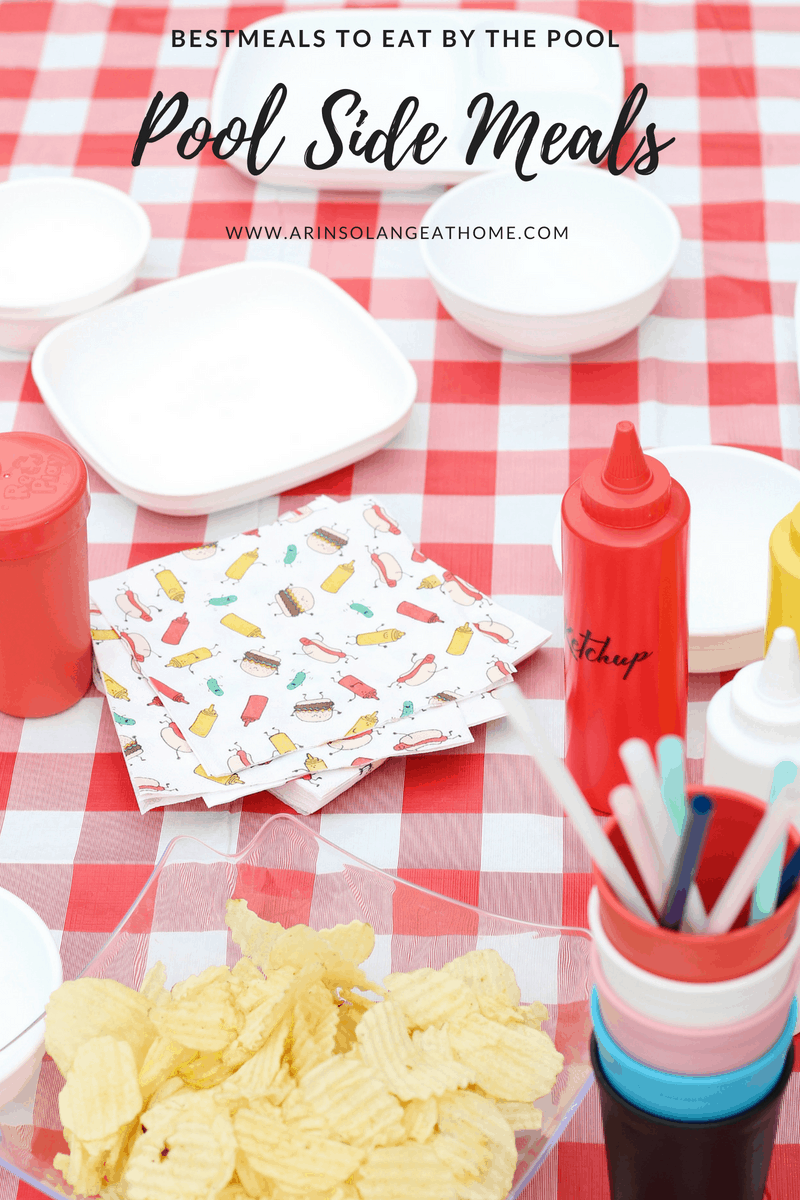
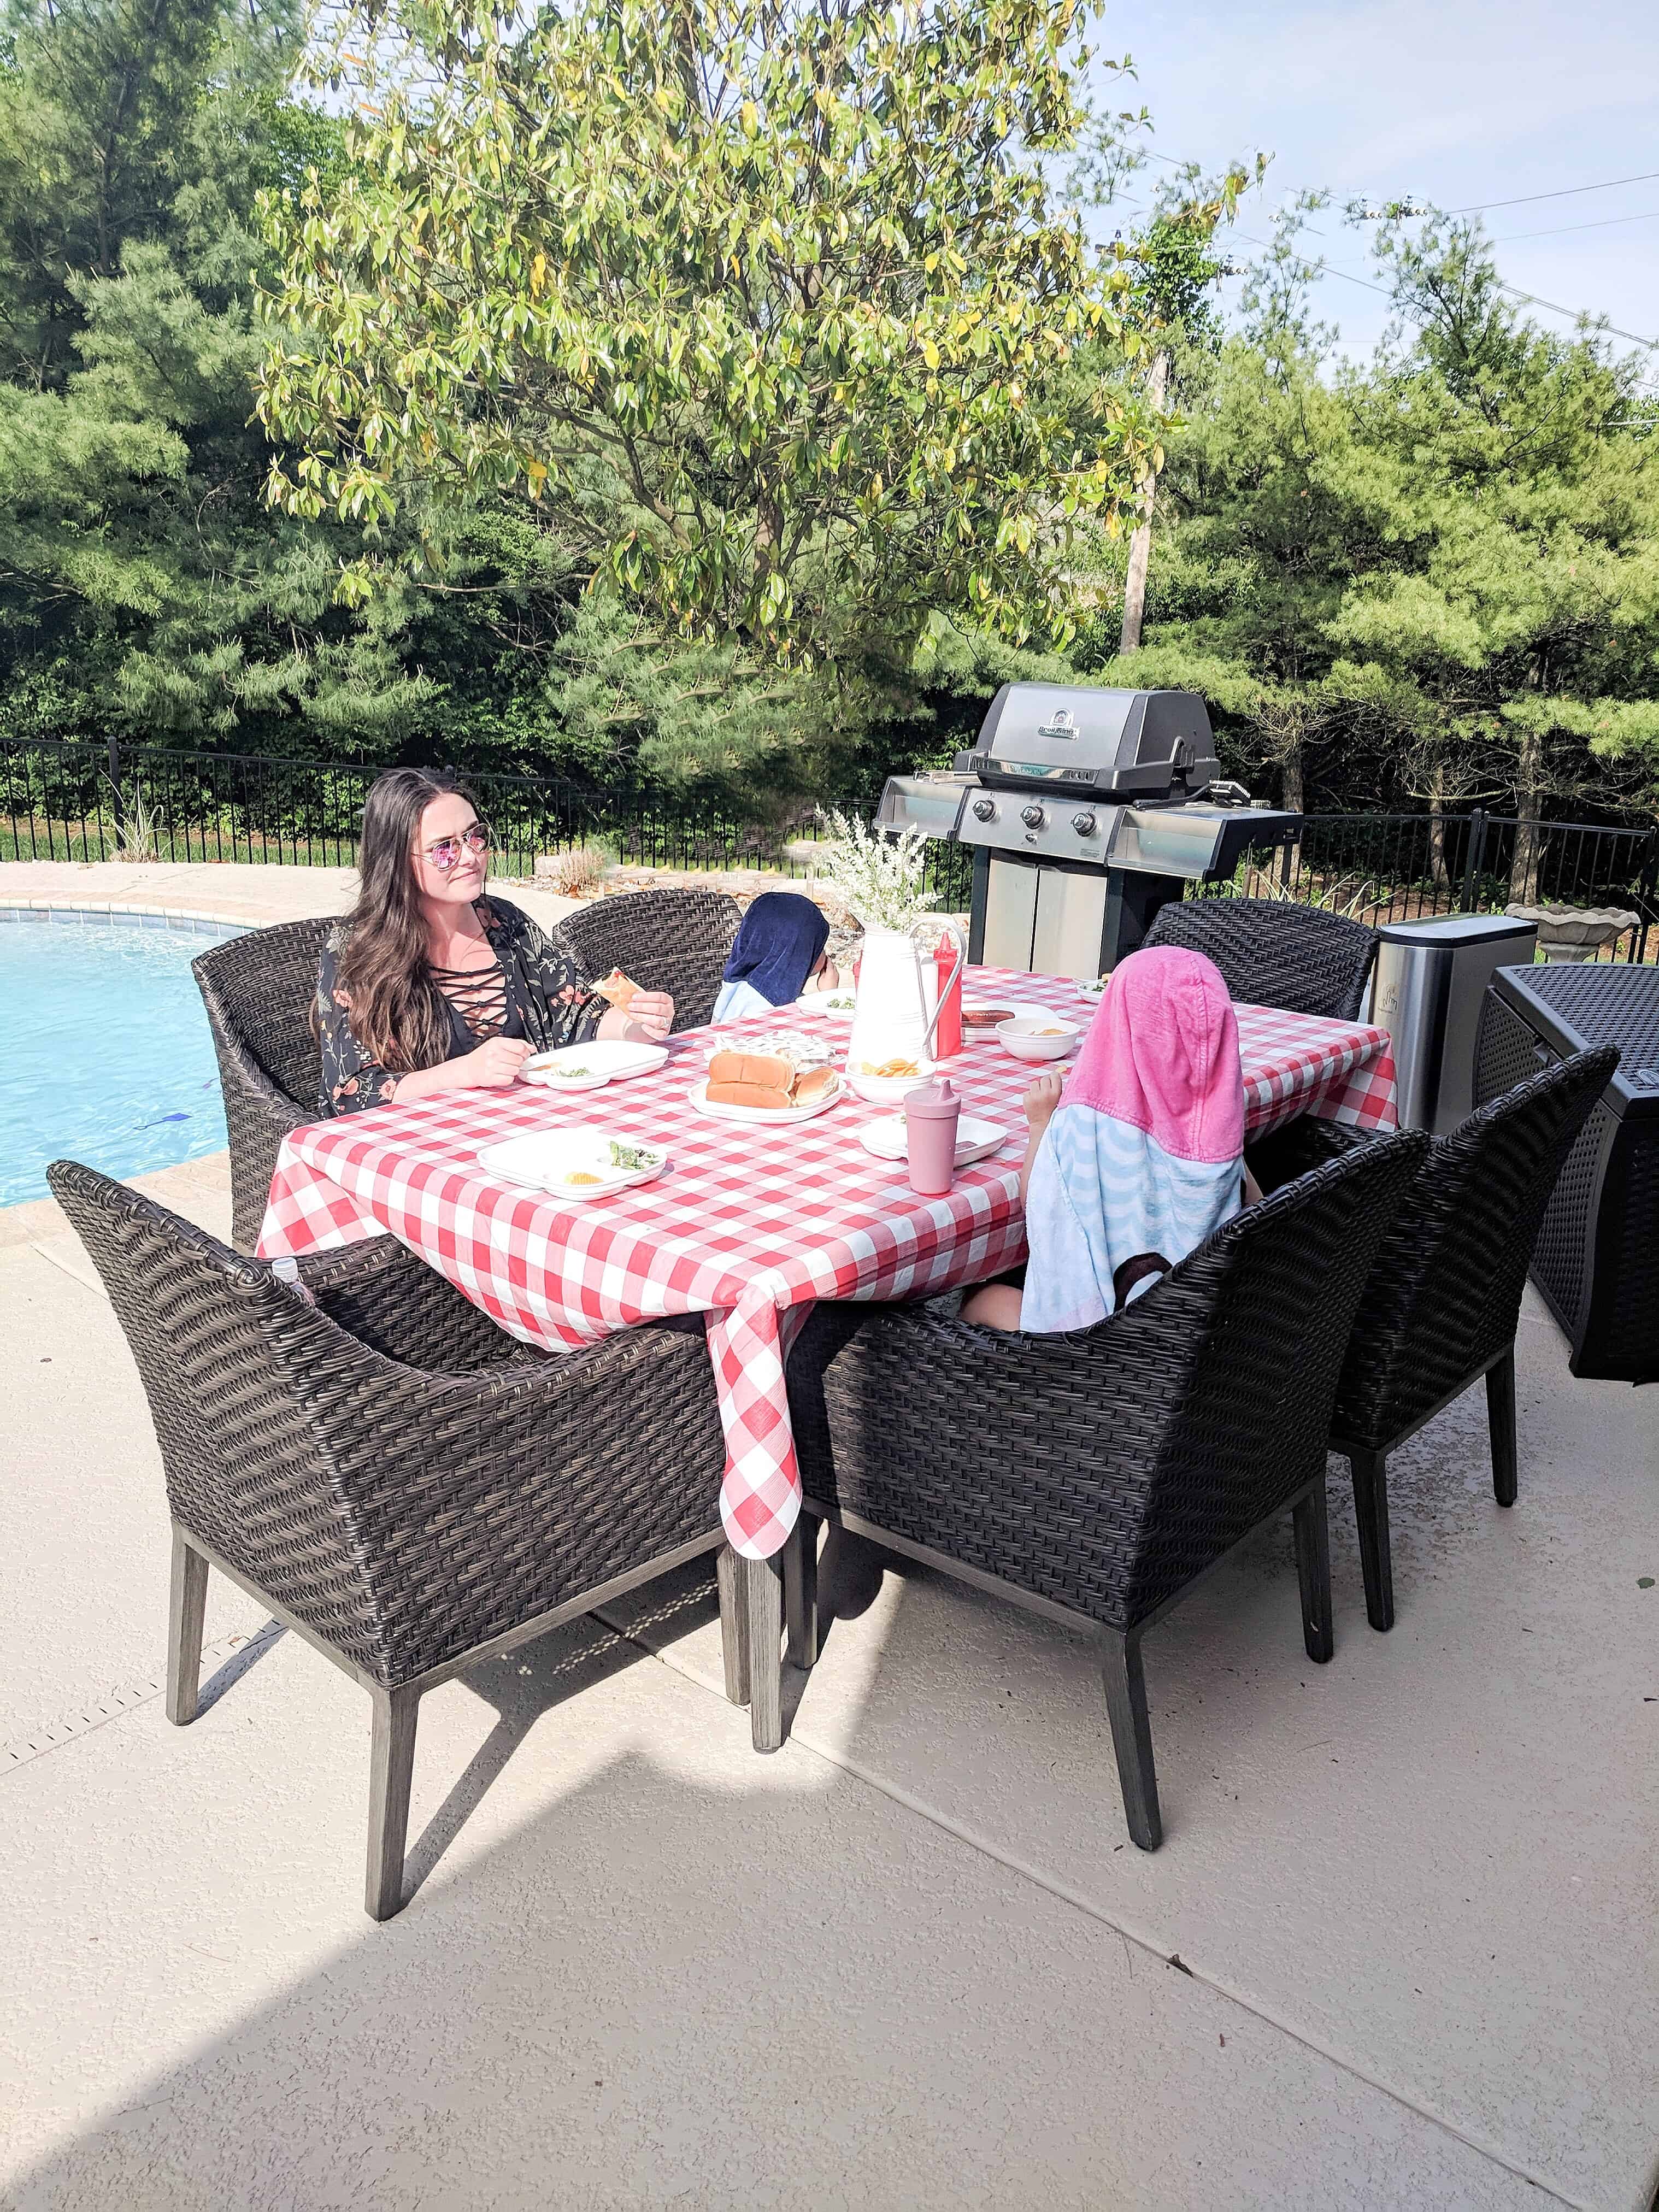
Sam’s parents recently put in a pool, which means we have been living pool side this summer!  Whether its lunch or dinner, we are enjoying so many pool side meals, and I thought I would talk about what my favorite meals we make are, and my tips and tricks for keeping it easy for MOM, so you can enjoy your pool time too!

red and white table cloth with plates and cups

pizza party table

What to Bring

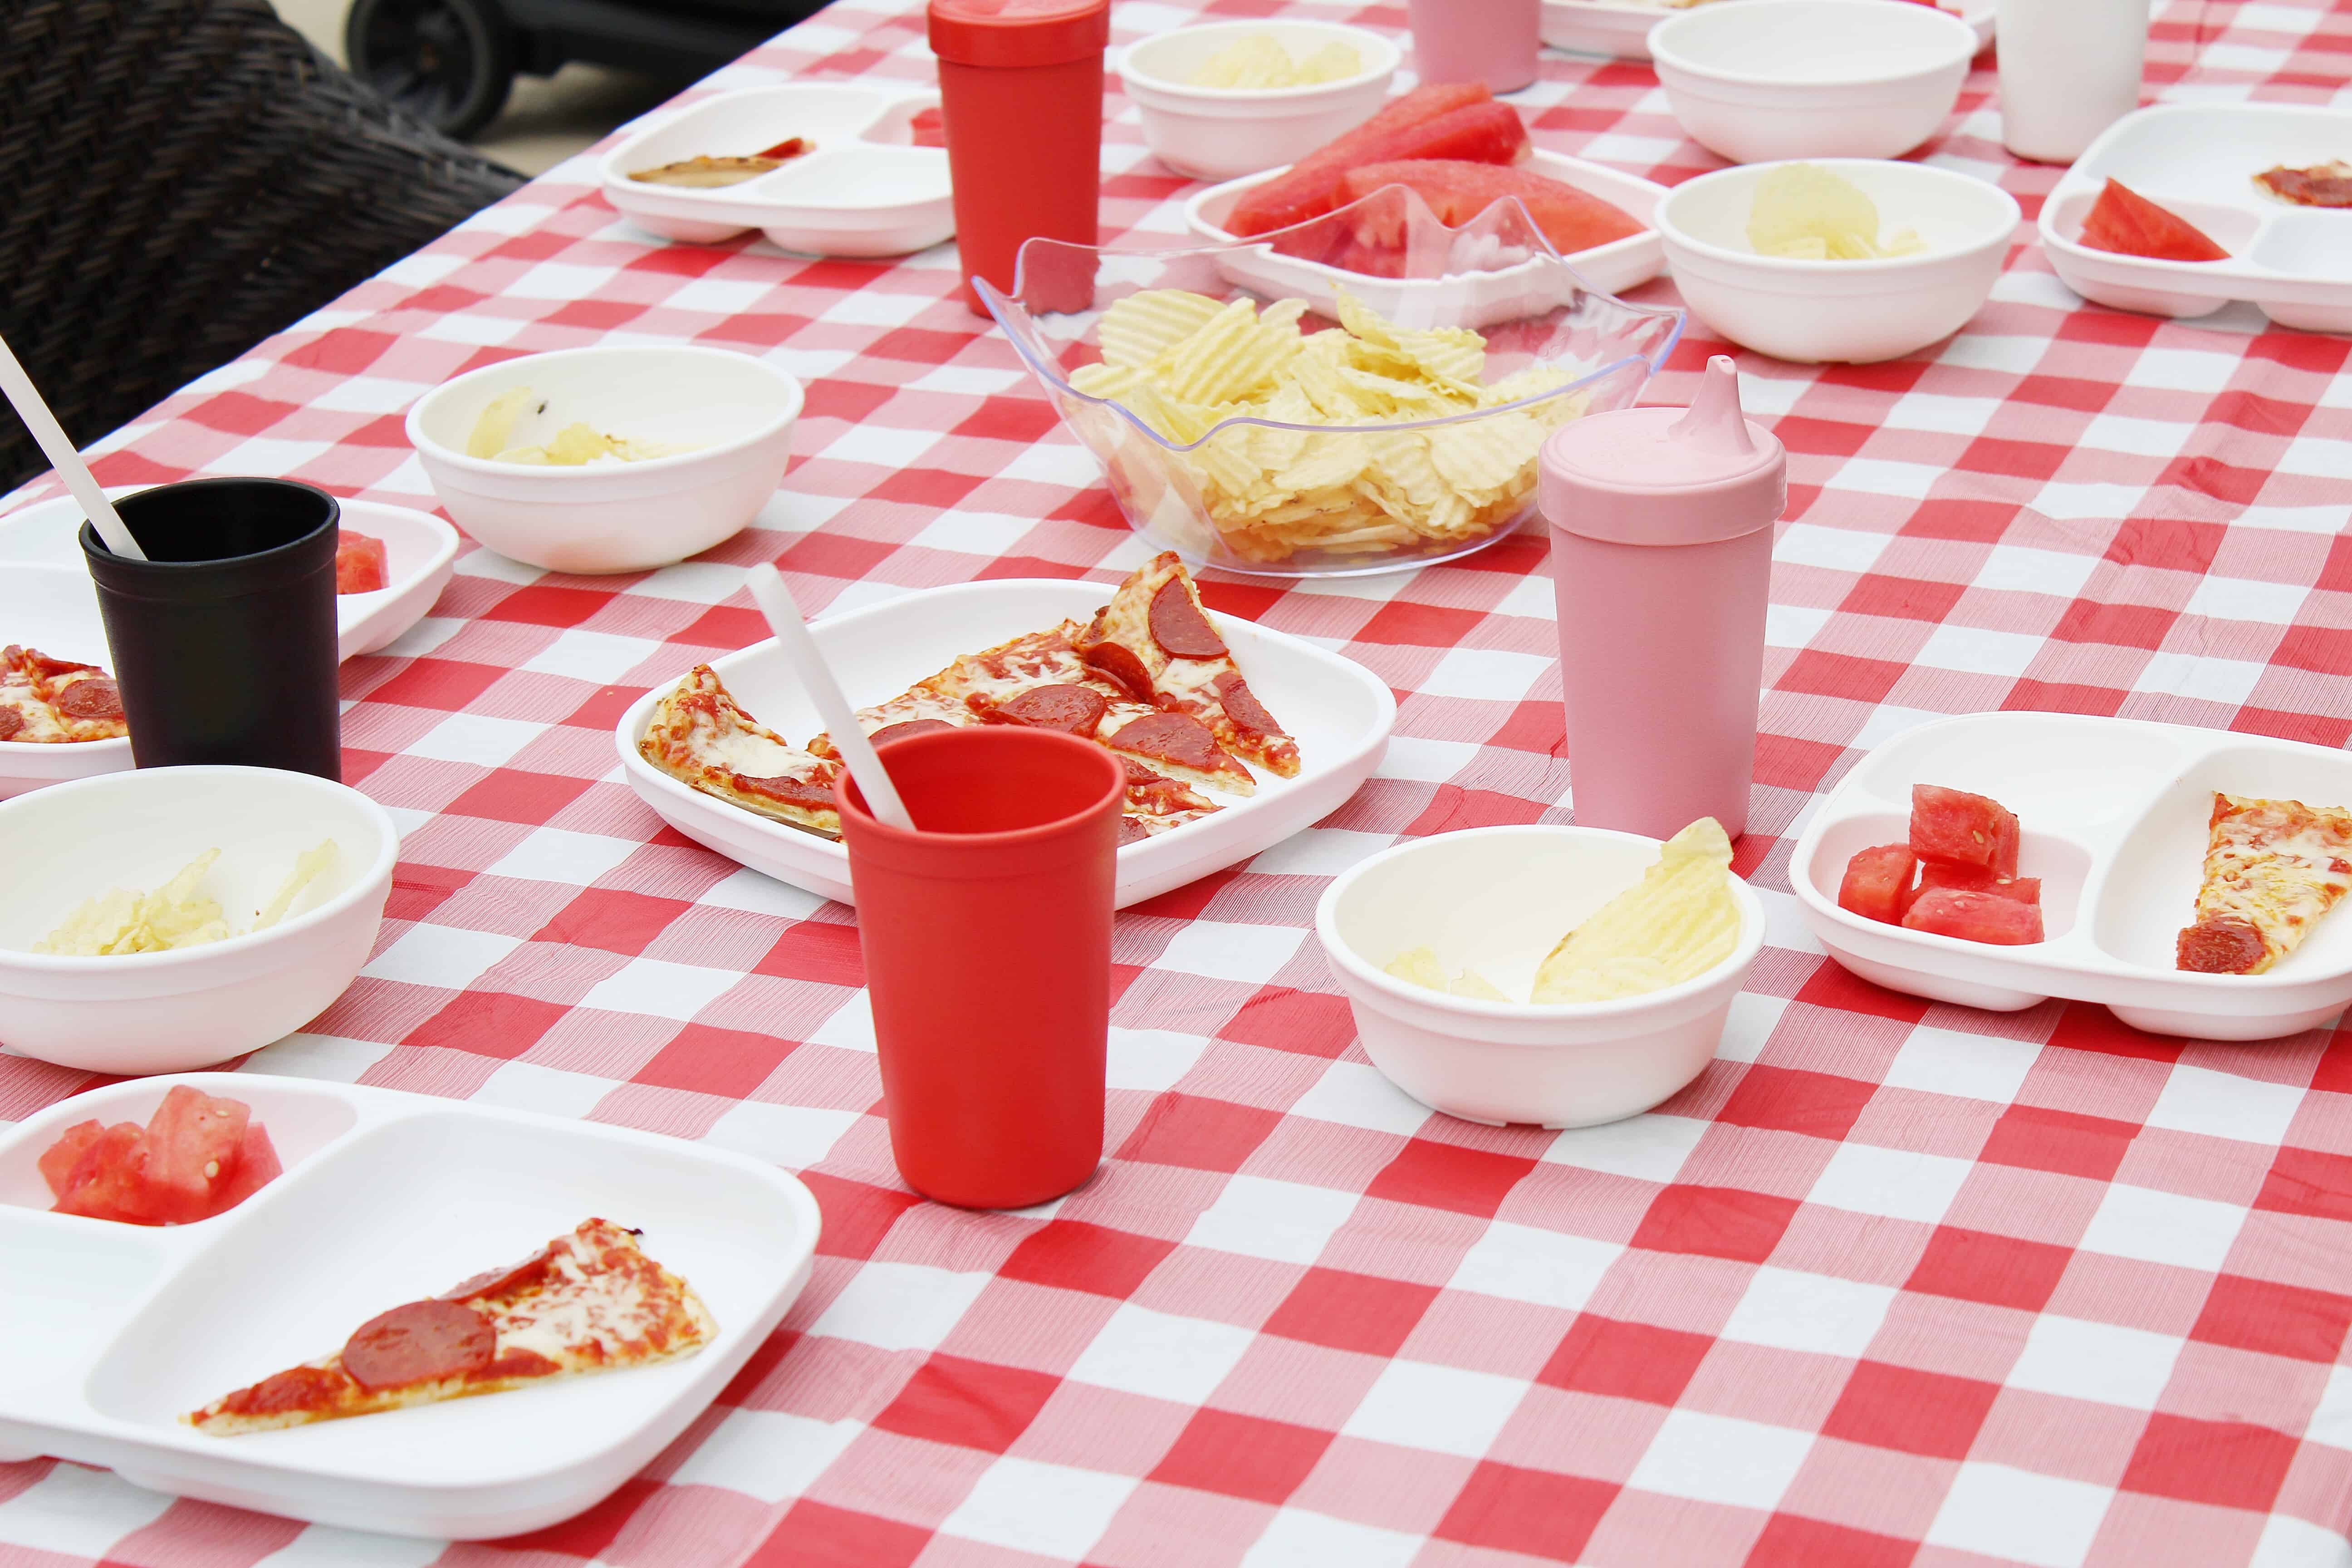
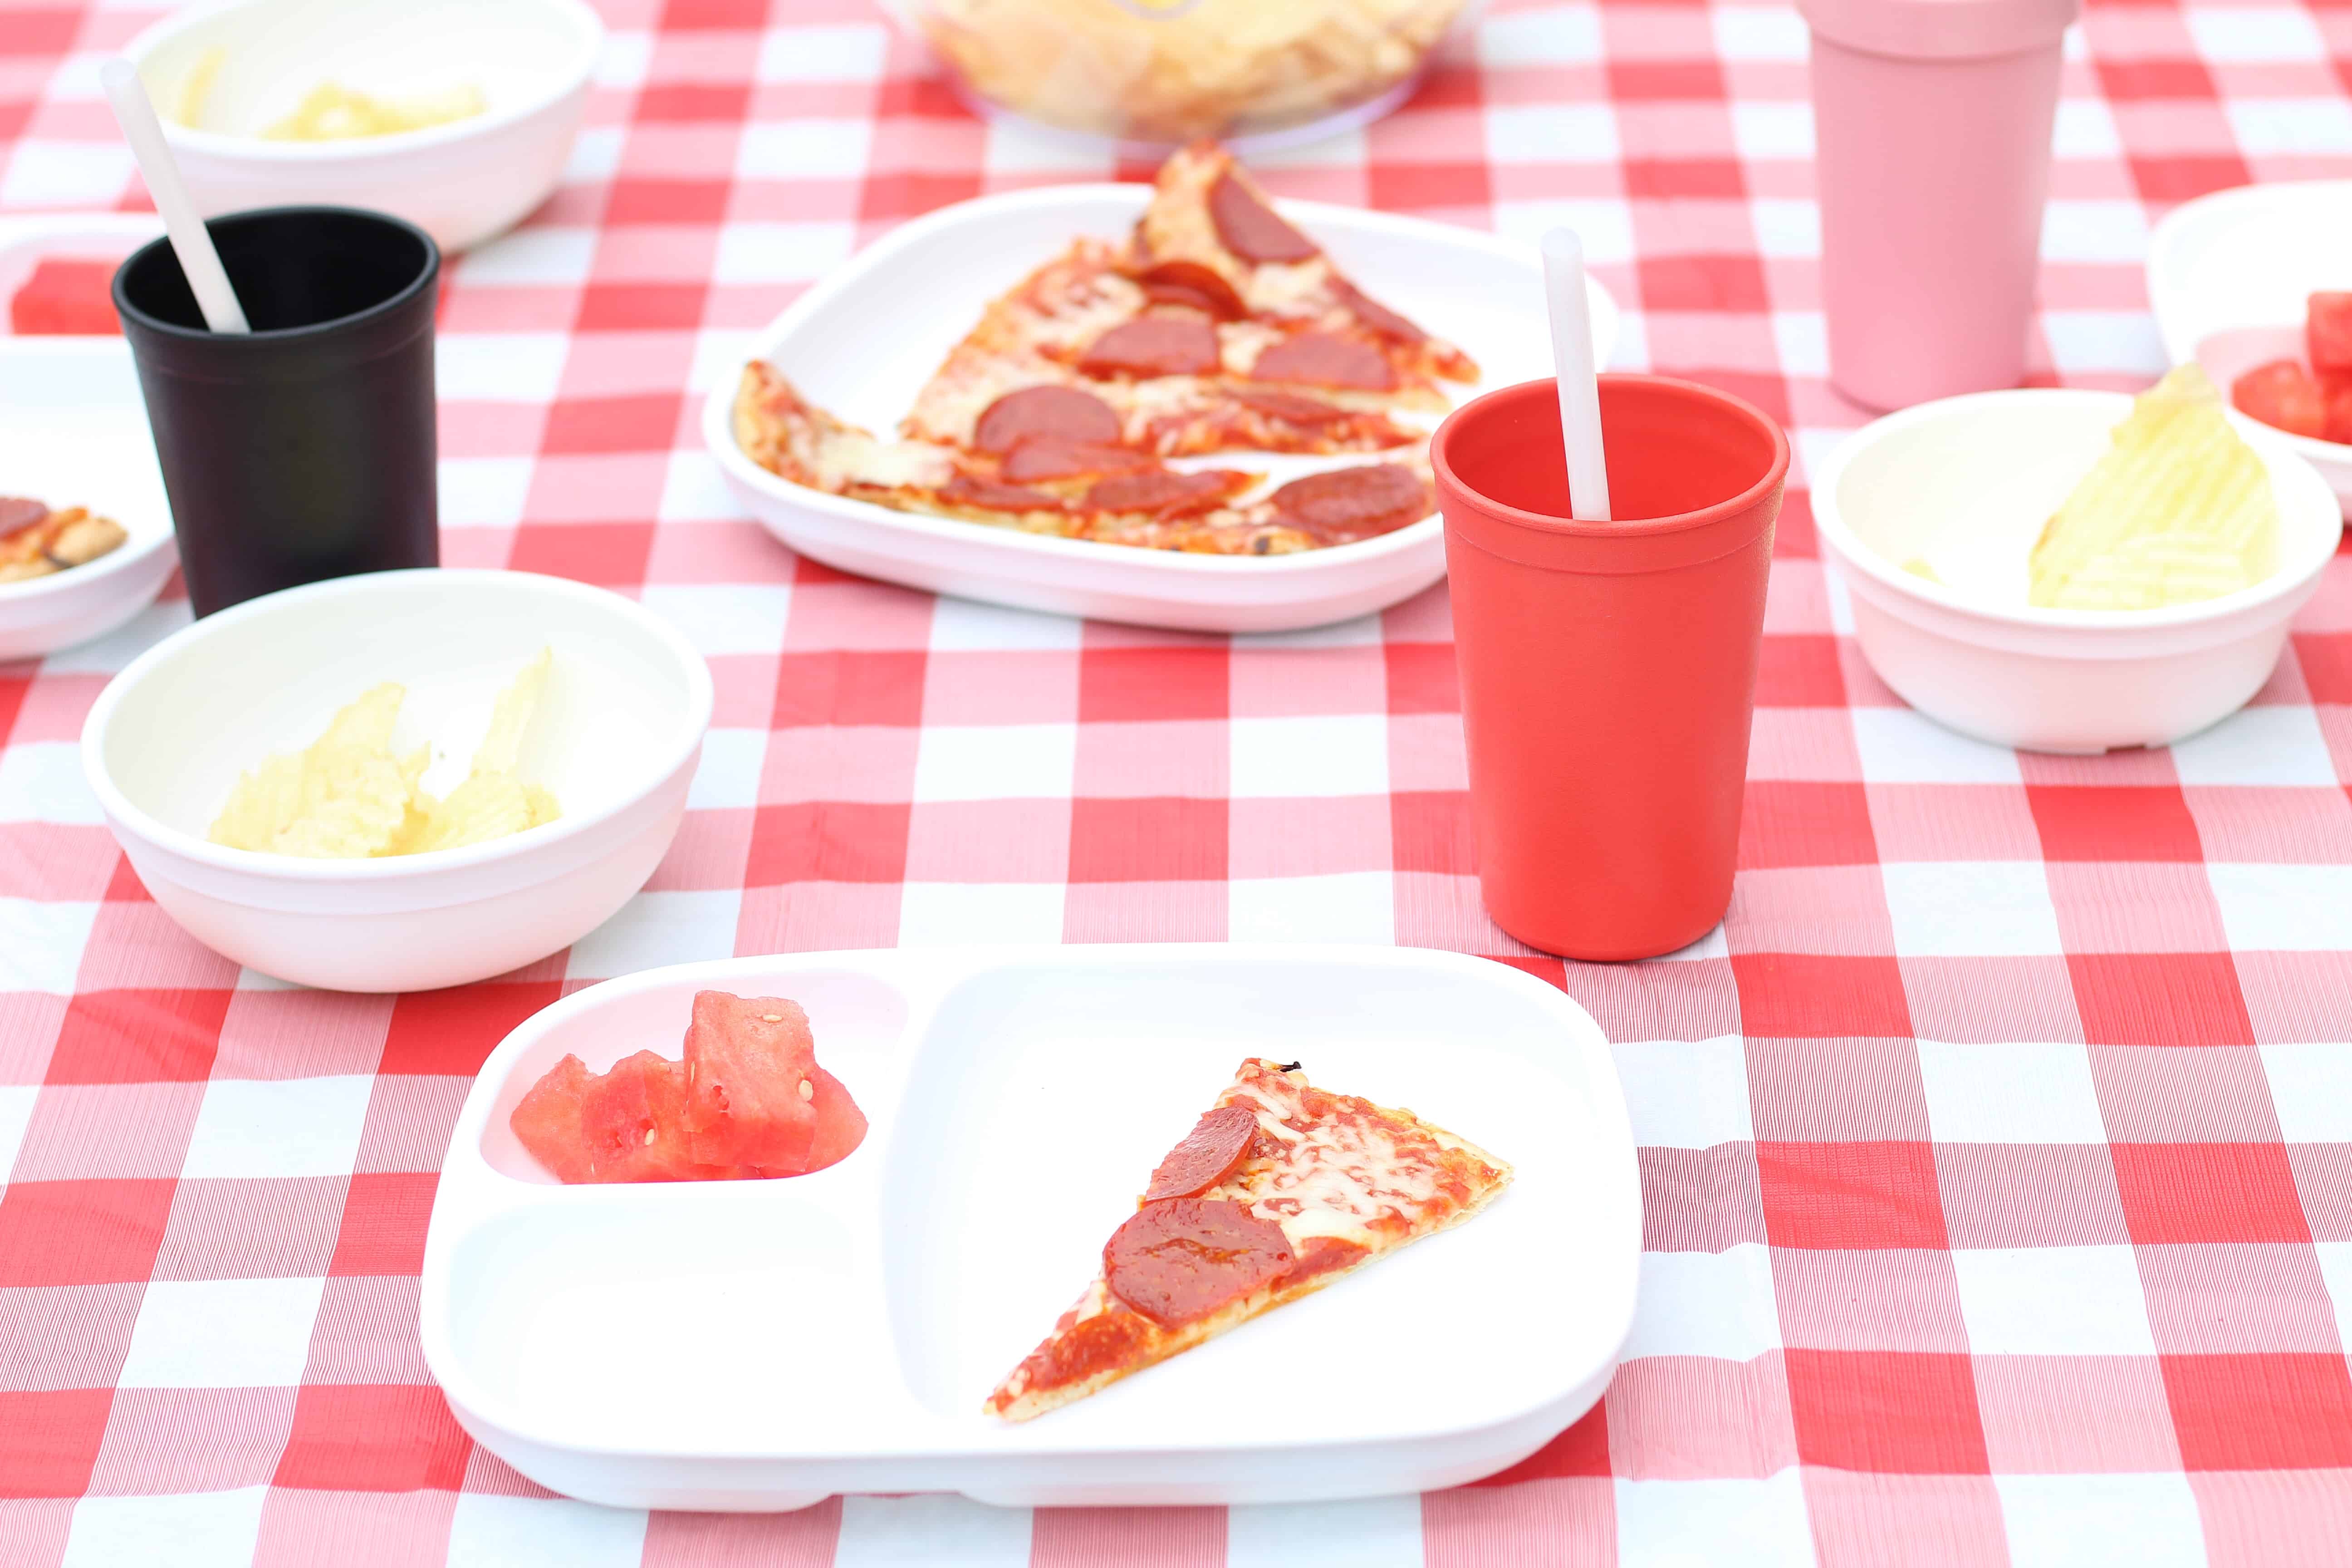
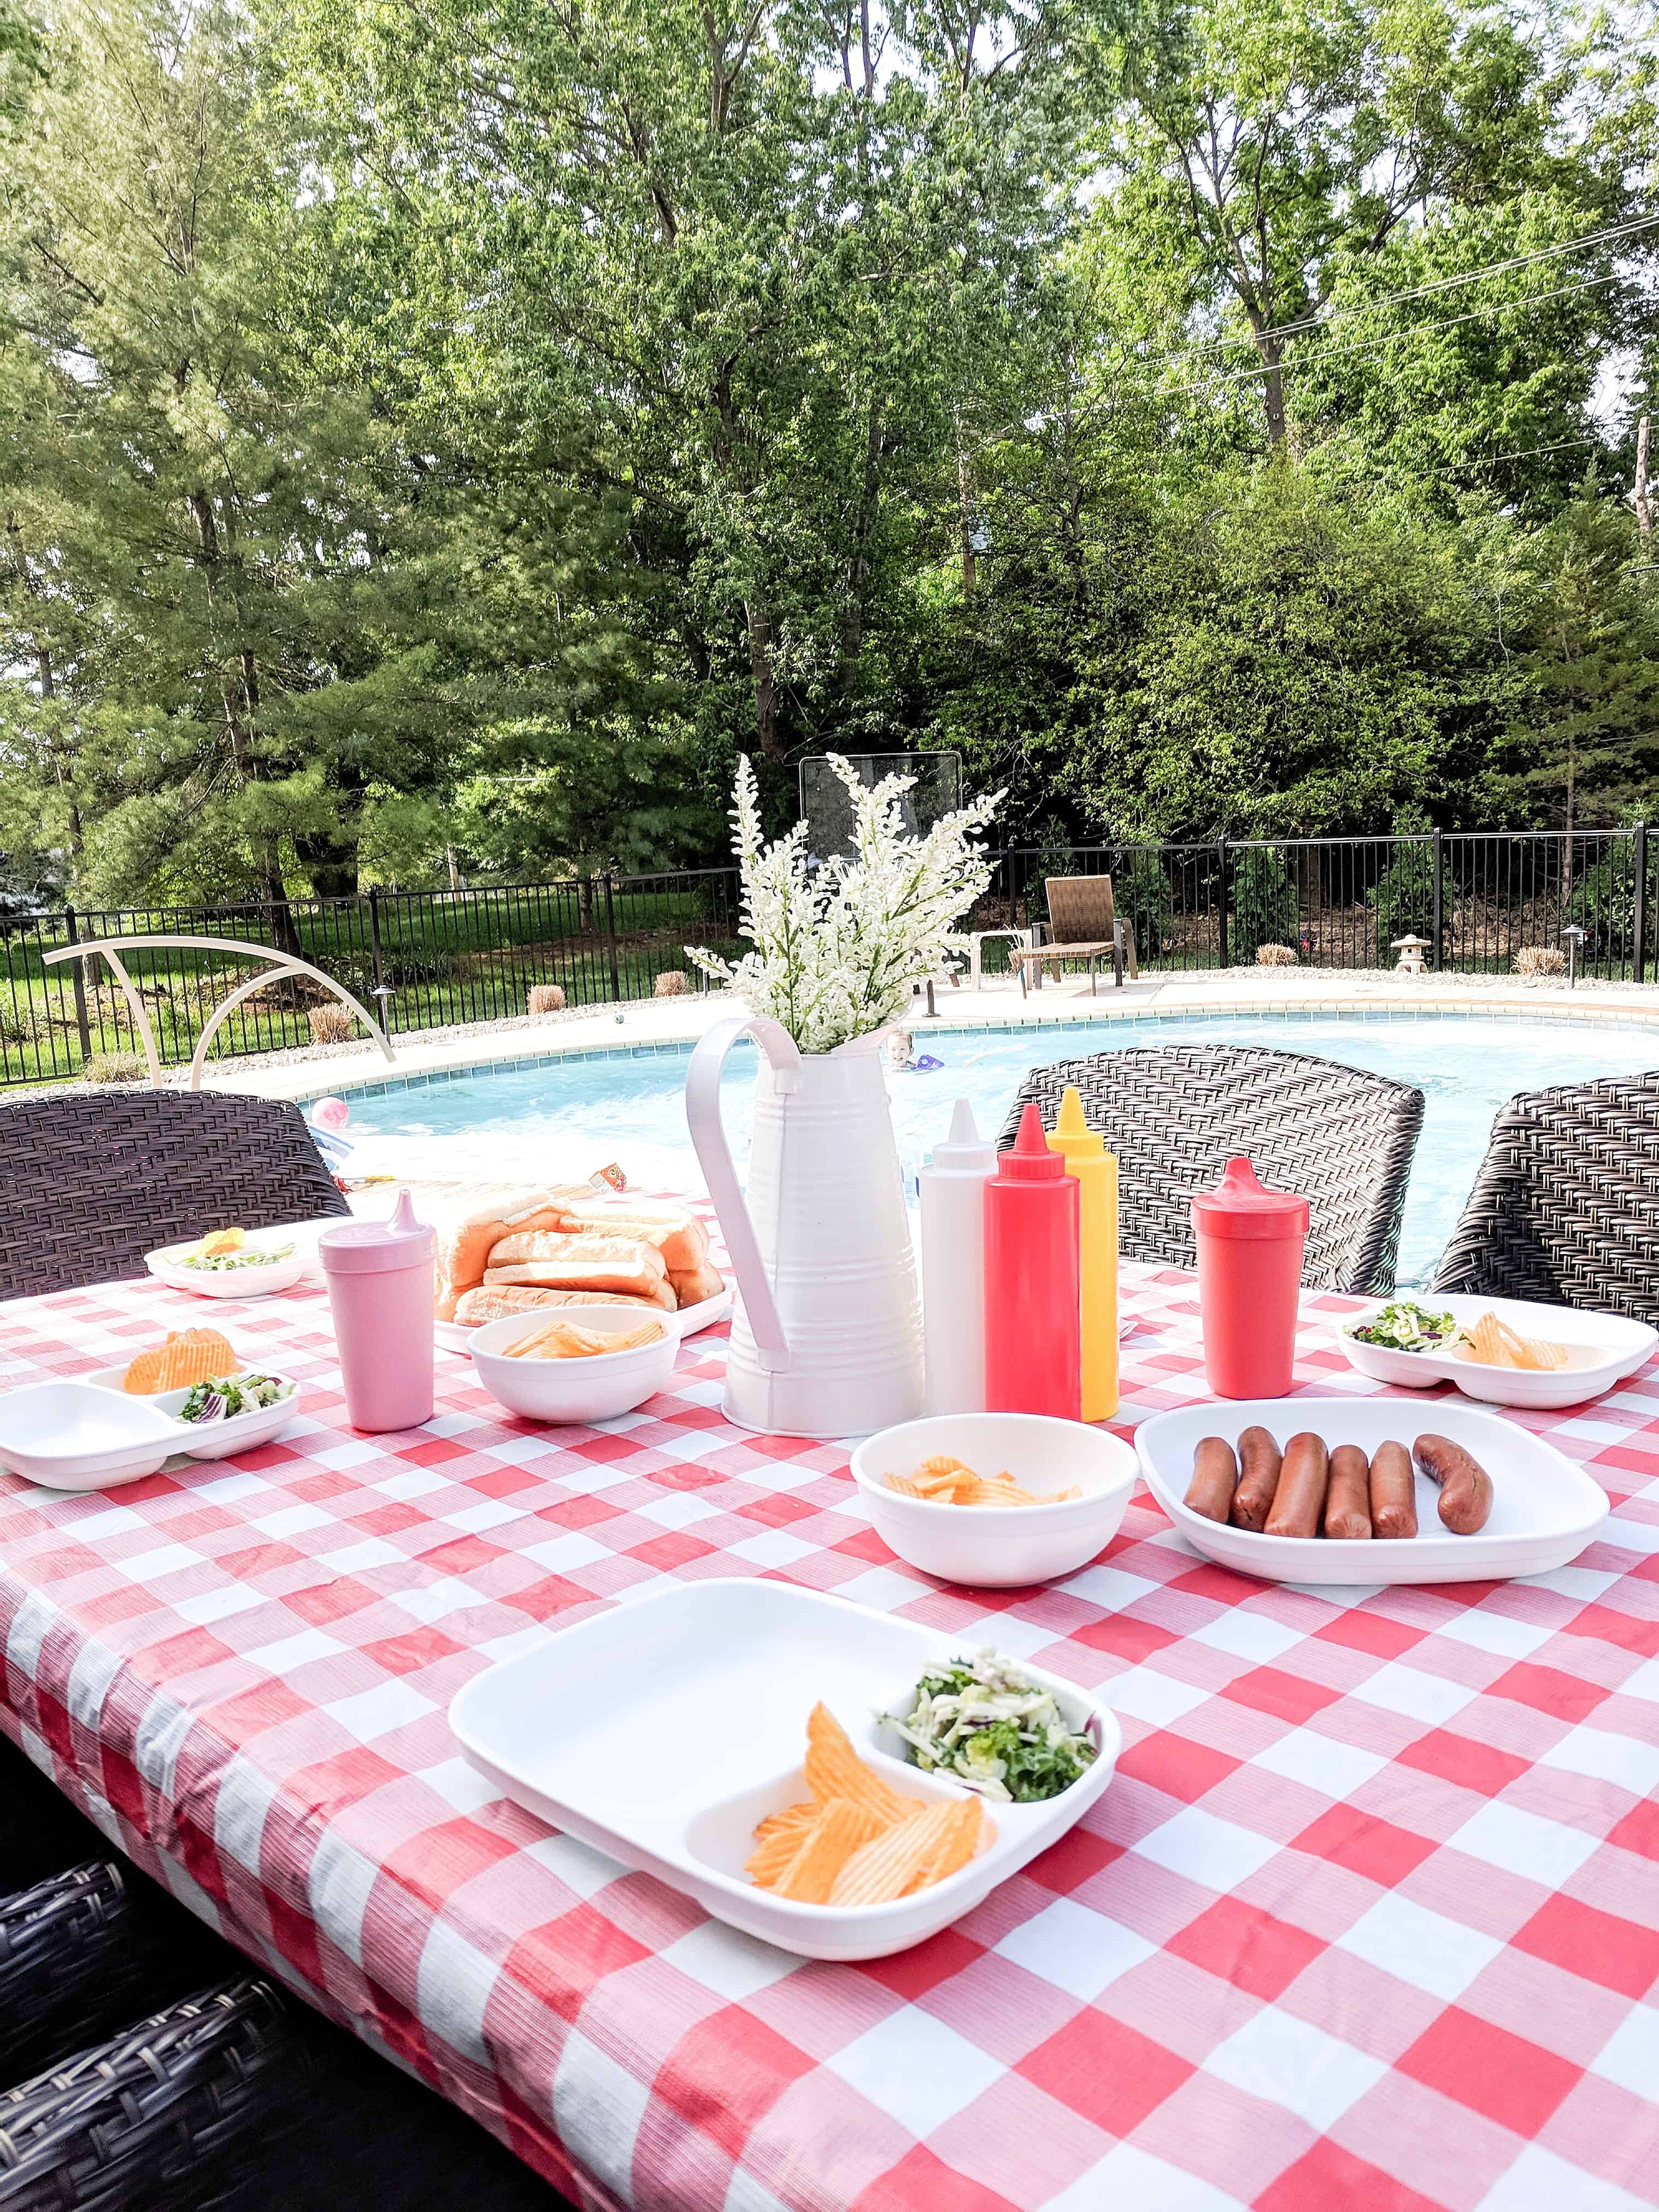
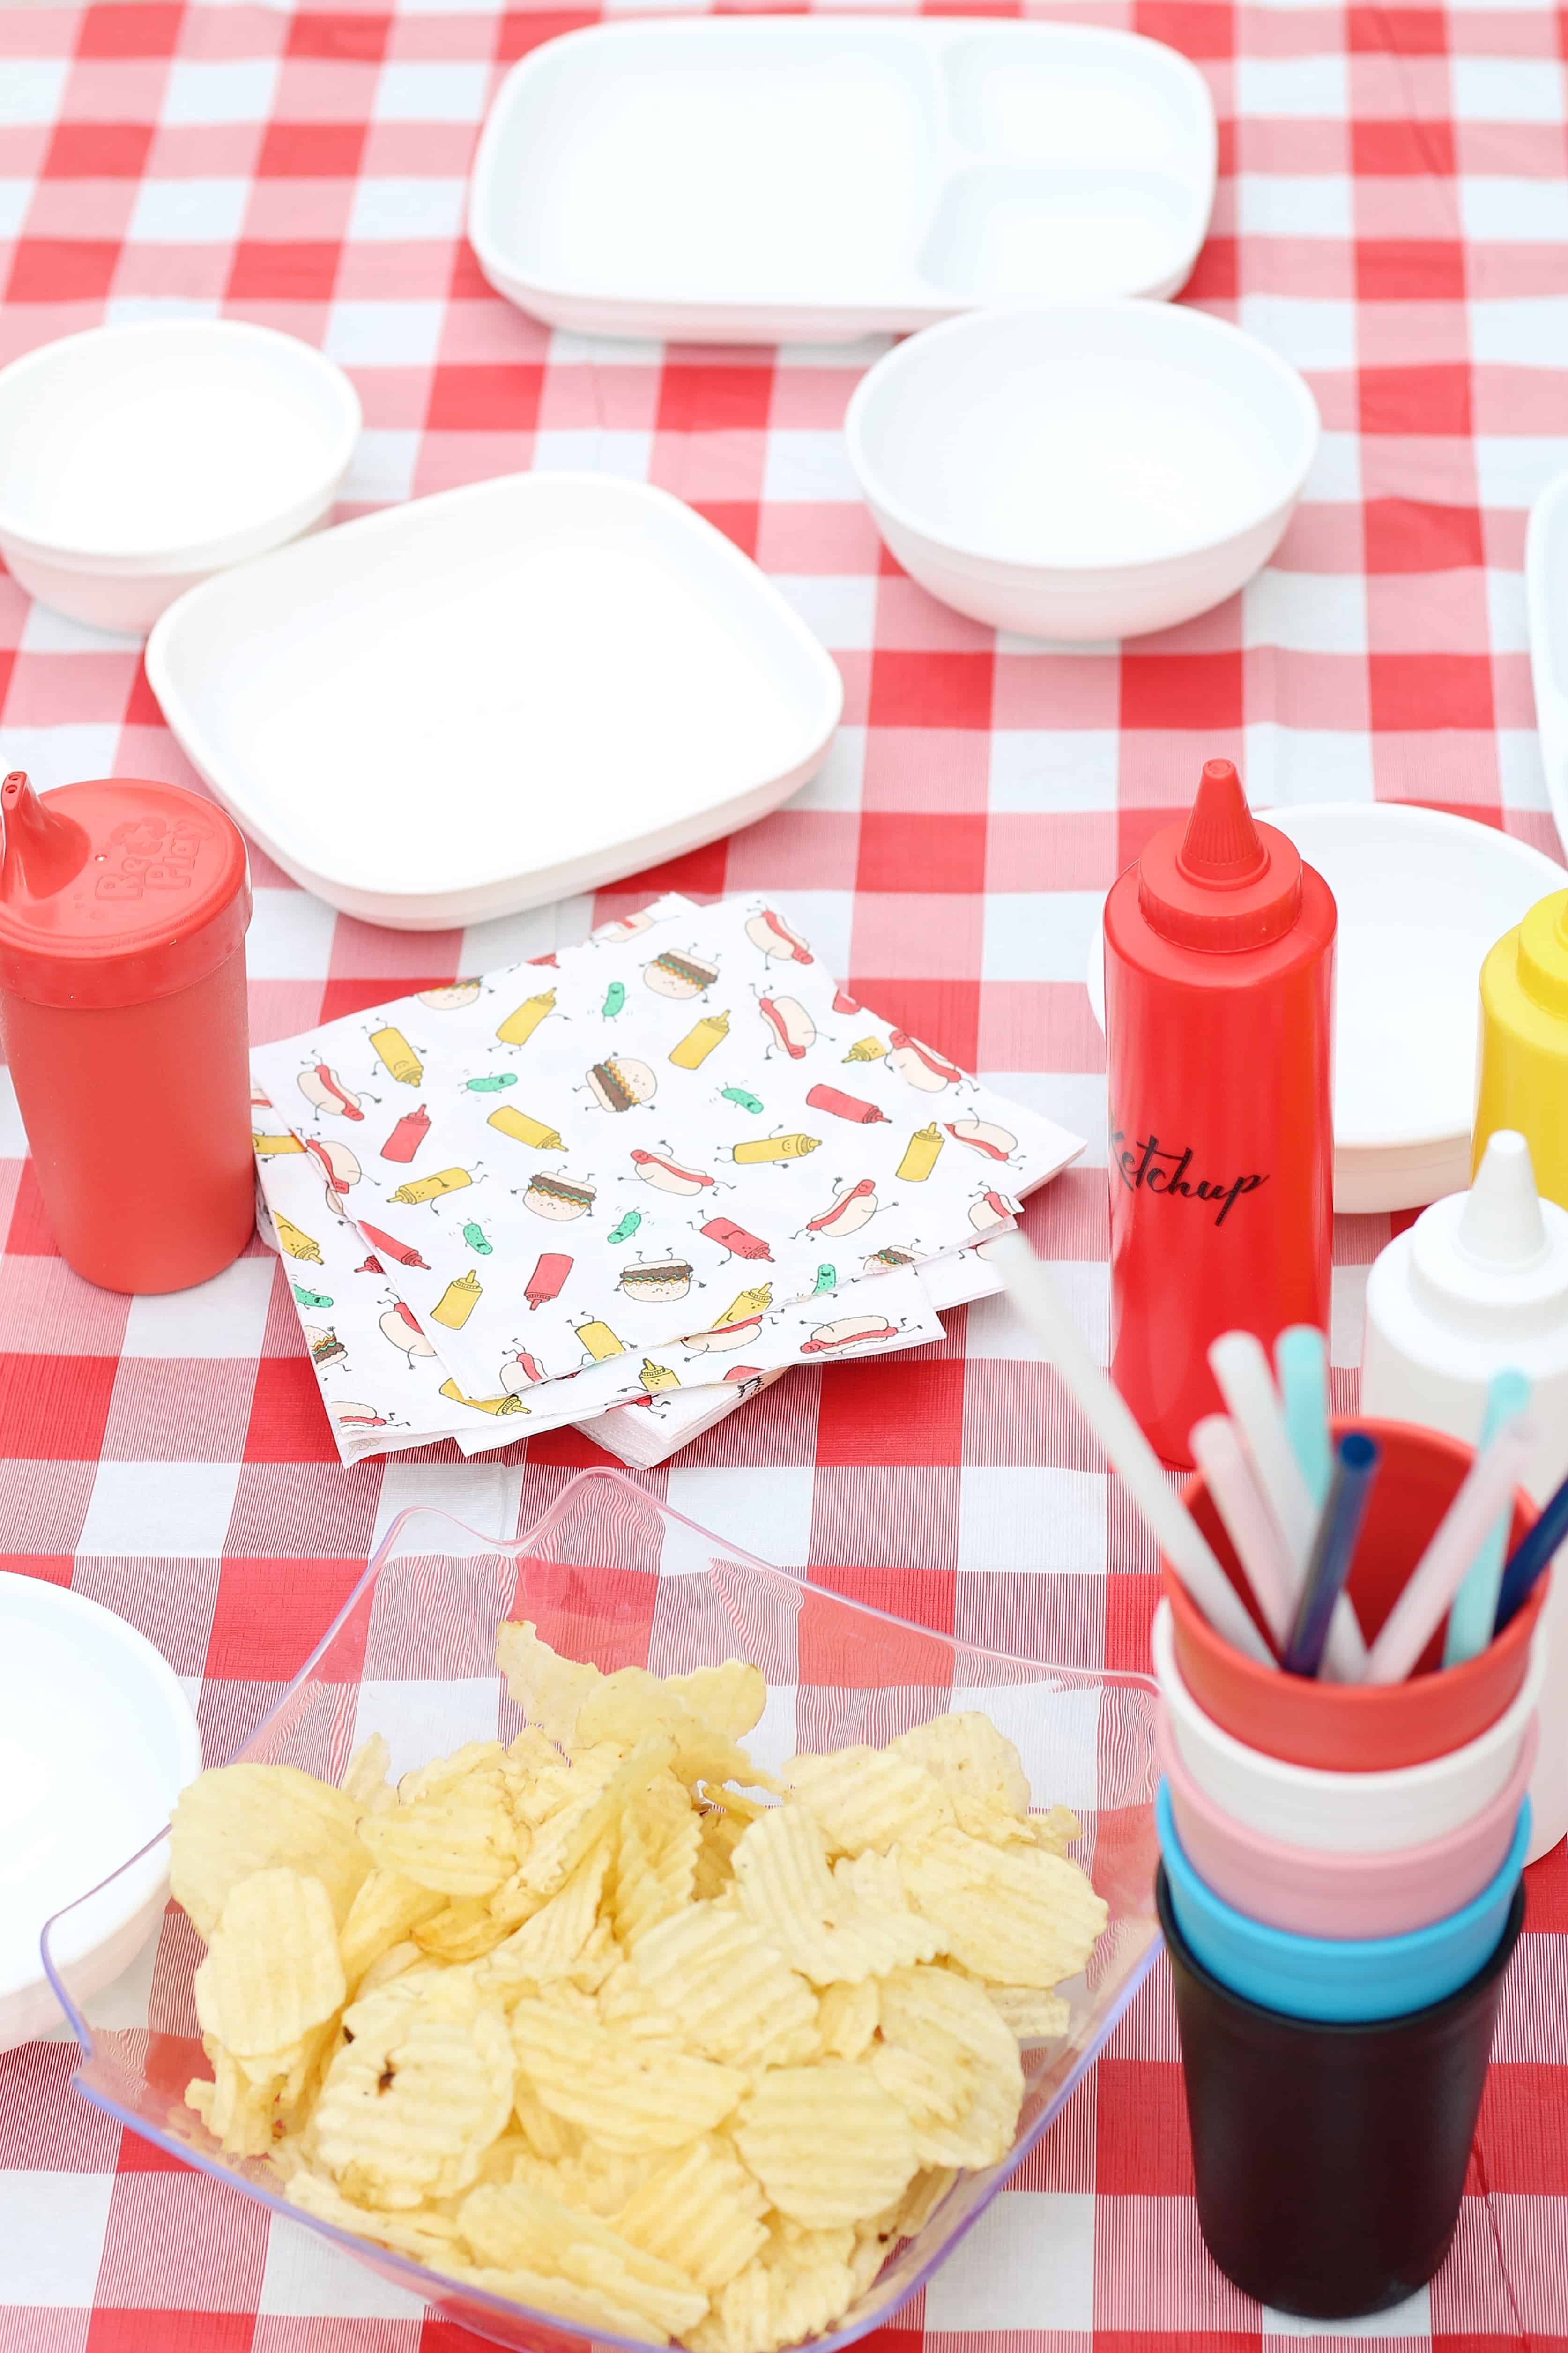
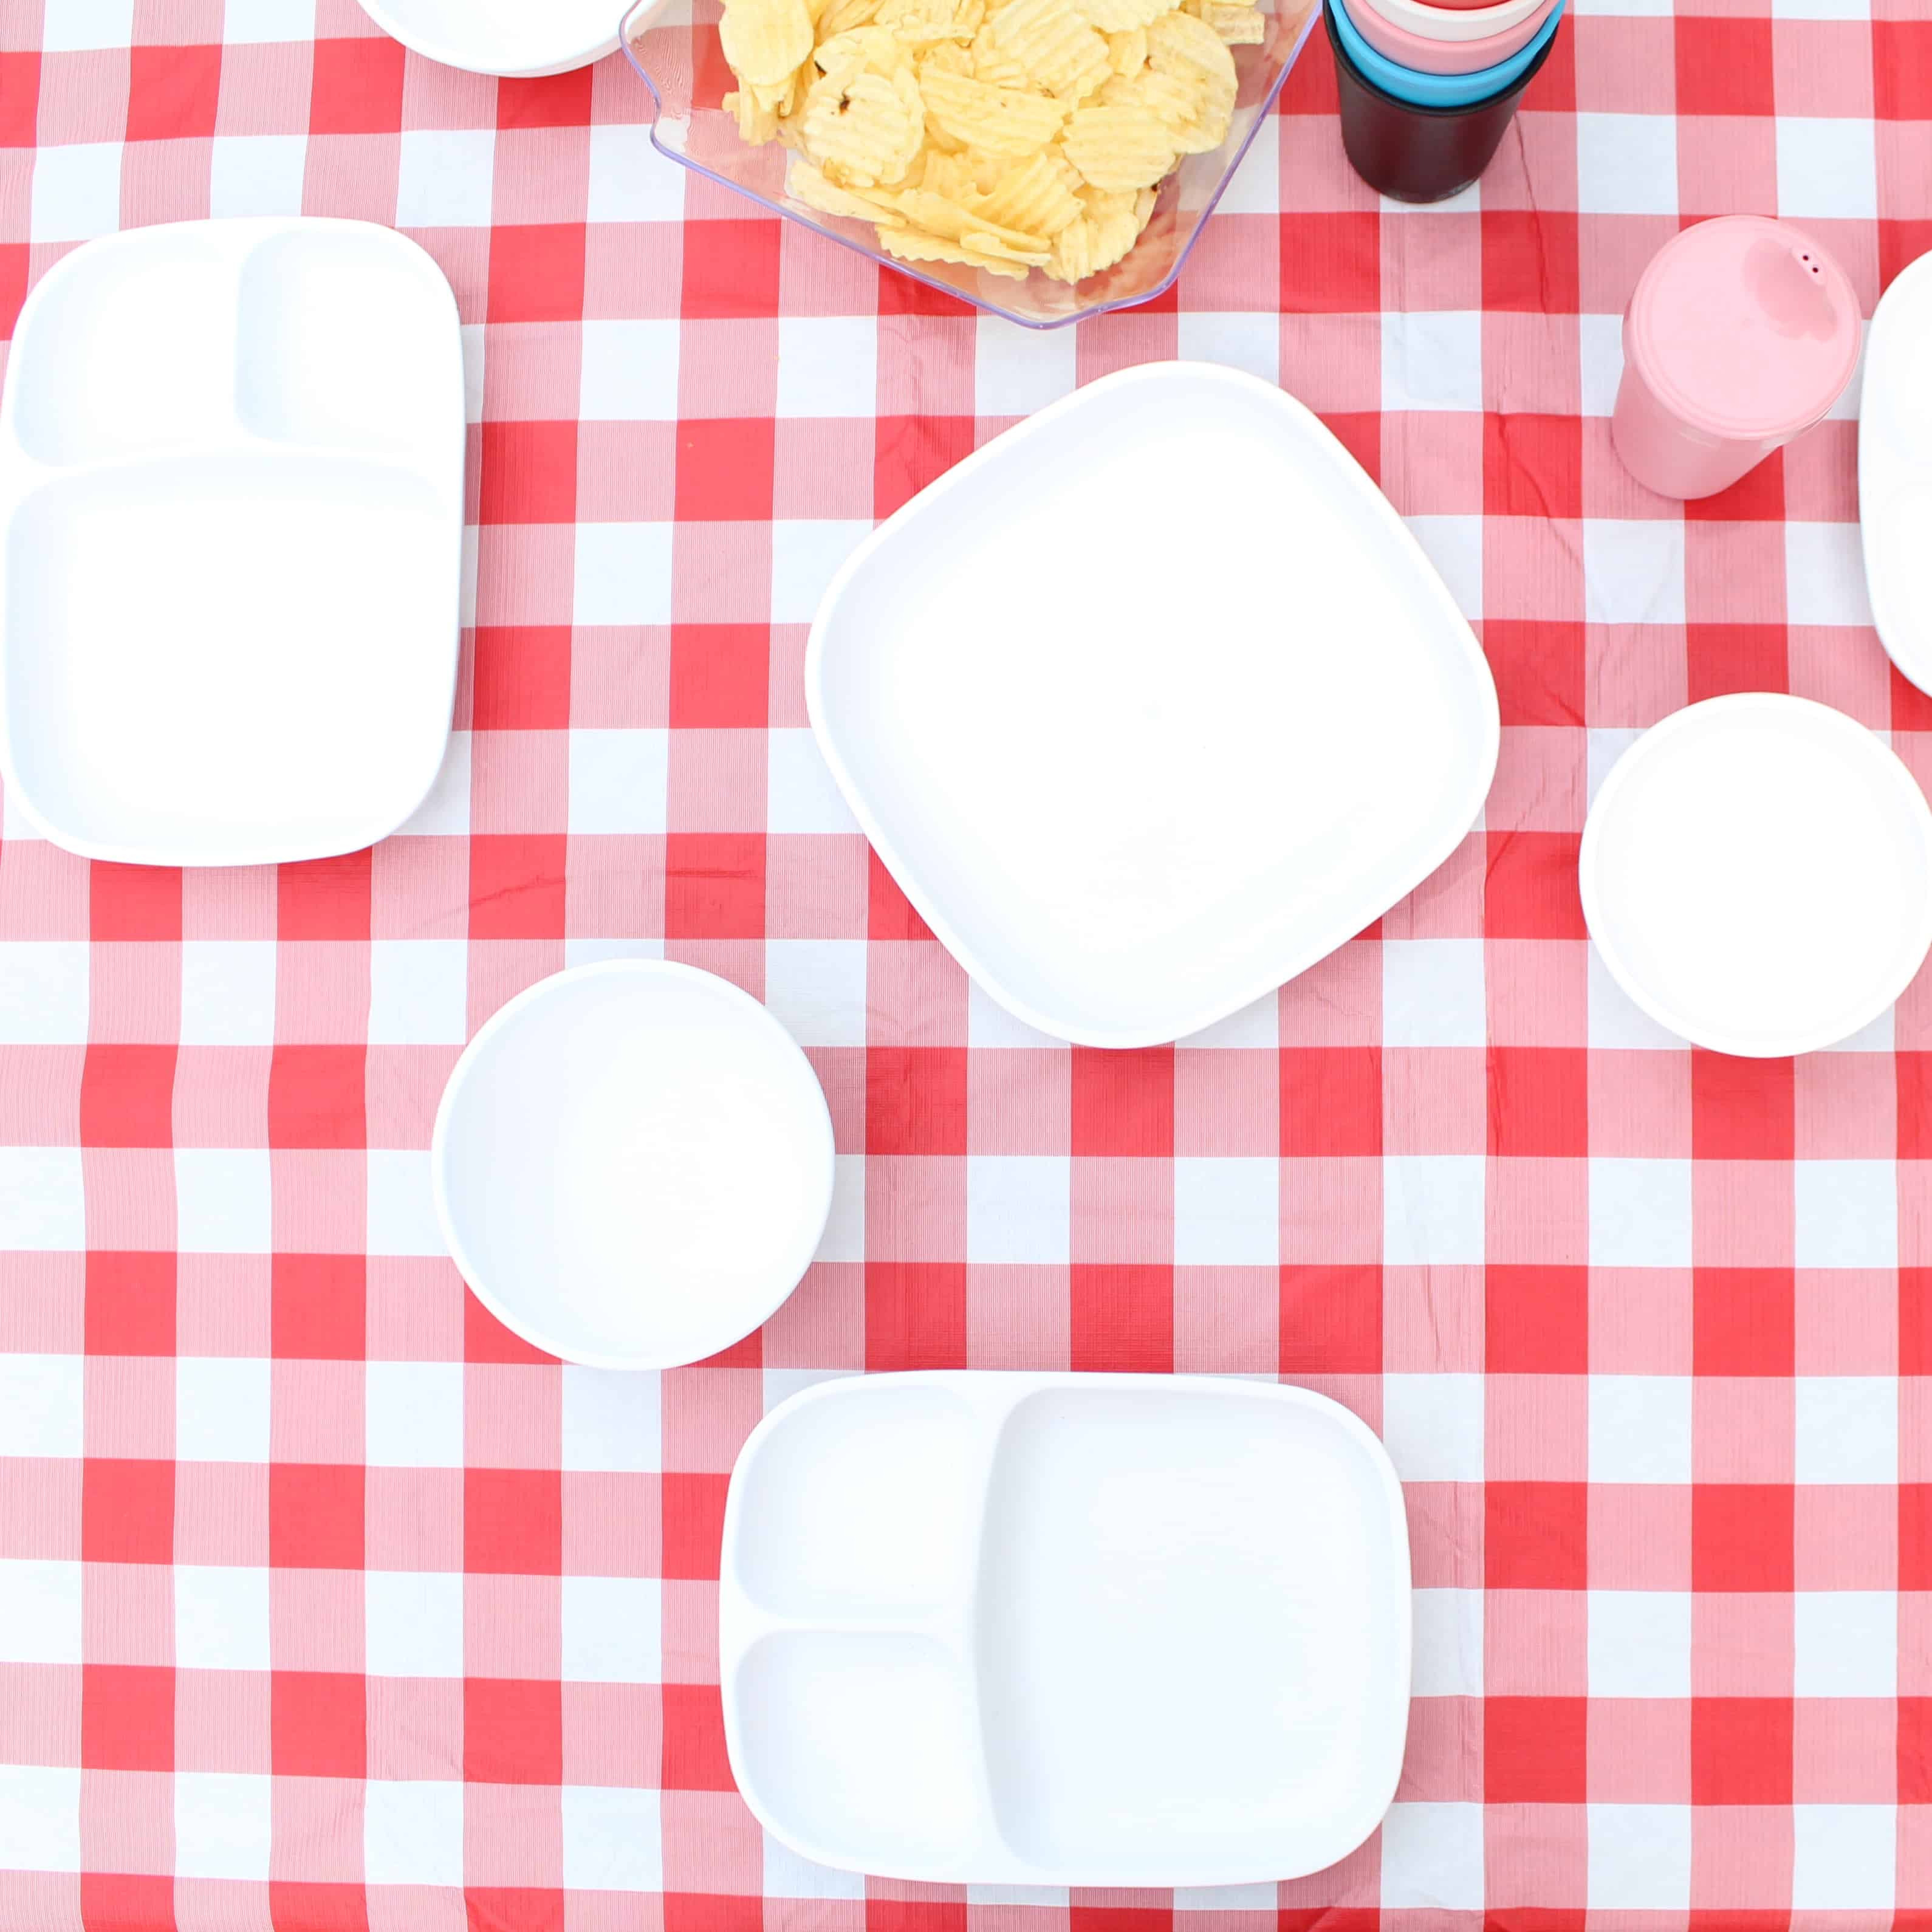
Like I said above, my in-laws have a pool so for us we have a stash of what we use on a multiple times a week basis ready over there, but I also like to keep a bag ready with pool side meal staples incase we head to our gym or neighborhood pool to eat! One of my absolute must haves this year has been the new adult tableware from Replay Recycled.  I am sure if you have been reading my blog for long you will know that my kids ONLY use Replay Recycled (check out their cupboard here!), so when I found out that the adult tableware was becoming a reality I was so excited!

We are able to throw in plates for the family into a bag, and they won’t break, and I Love that the large plates and bowls can double as serving dishes! Once you have your tableware, make sure you keep a plastic baggie (to keep them dry) of napkins, packets of condiments depending on your plan, an easily cleaned table-cloth so you don’t have to clean those outdoor tables.

white divided replay recycled plates on red and white table cloth

eating pool side

plate of food pool side

Pool Side Meals

Now for meals. I know the easy idea is to grill, but sometimes we don’t want to get out of the pool long enough for that.  So here are my go to pool side meals – some require a kitchen, and some are totally portable:

  • Frozen or Delivery Pizza – KIDS LOVE a pizza party
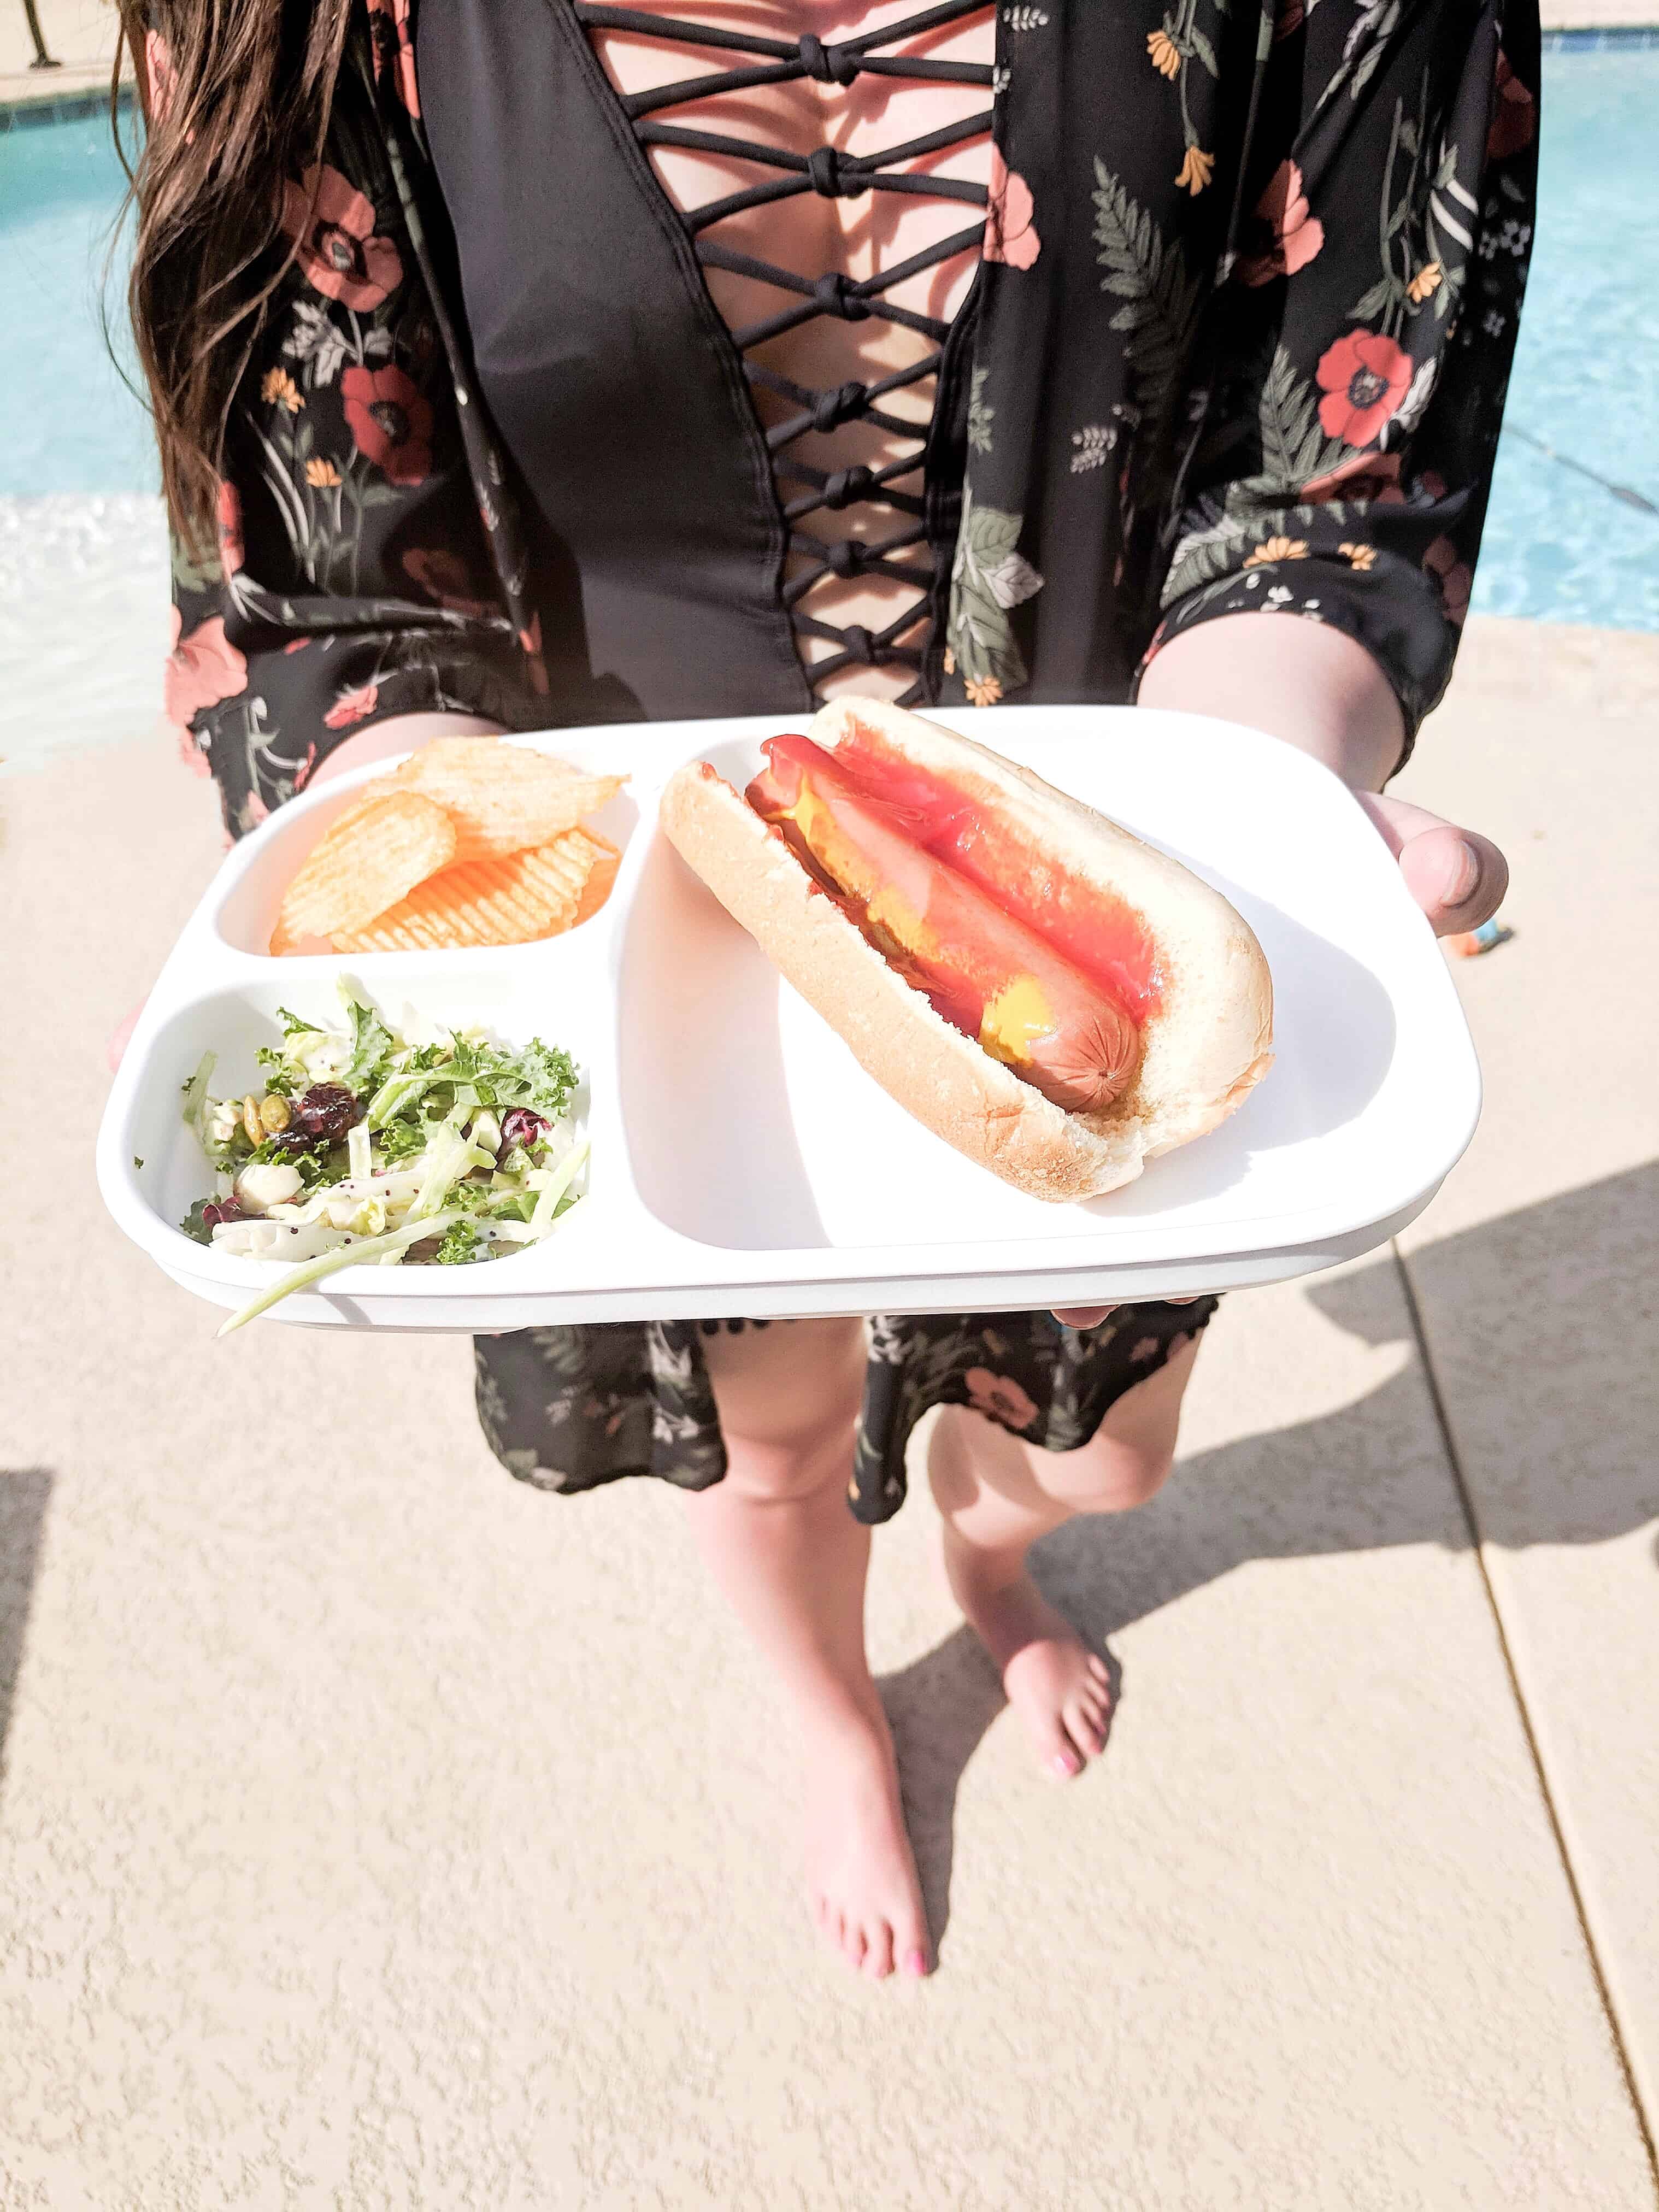
  • hot dogs
  • Lunchables – I love that the kids can each pick their favorite and its such a treat for them.
  • Pre-made Salads for mom and dad with PB&J for the kids
  • Watermelon
  • Messy chips – again such a treat for kids and pool side is the time to eat them
  • Pasta Salad with a protein in it for an all in one meal!

pool side meal

table scape with red and white table cloth

For us dining pool side is all about easy, balance, and safe.  We don’t do any glass/breakable items, we try to have something pre-made or that can be made in one quick step (IE frozen pizza in the oven), and we try to keep it fun. We don’t eat things like chips at home, so when the kids get them pool side they LOVE it.

For all the tableware you saw in this post make sure you head to Replay Recycled.  The adult line will be launching this summer and you won’t want to miss out.  There are Adult bowls, Divided Trays (which you will love for your kids and pizza!) and Large plates!! I know we will be stocking up on even more, because we can’t stop using them!

table scape on red and white table cloth


Let me know in the comments below what your go to meals are pool side incase we need some new fun ideas this summer! And make sure you pin the image below so you can find these ideas later when you need them!

pool side meals


SaveSave

SaveSave

SaveSave

DIY

Trash Can Planter Hack

I have been wanting to update our front porch for some time now, but because we previously had large bushes right in front of our house it made little sense to spend the money.  A couple of weeks ago we had those bushes removed, so it was time to update the front porch just a little bit, and this trash can planter hack was born.

this post contains affiliate links

front porch with large gold planters | Trash Can Planter Hack

Trash Can Planter Hack

  I am sure if you follow my other decor posts, you have gathered that I tend to like a more modern, clean, simple look, so I wanted 2 large planters.  

If you have never shopped for large planters before, just a FYI they are expensive!! (we are talking $80 plus for the size I wanted).  With some brainstorming I decided to try something out, and this blog post was born.  Read below to find out how that whole patio was done for $100 due to my trash can planter hack.

If you’re into decor hacks, be sure to check out this post with some of my post popular IKEA hacks!

large gold planter and layered rugs | Trash Can Planter Hack

Trash Can Planters

For my planters I purchased these from At Home ( these on Amazon  or black) they are 56 quart trash cans.  In order to make them heavier I put a couple of old bricks in the bottom of each, then filled them a little ways up with packing peanuts in order to not use so much dirt.

front porch with layered rugs | Trash Can Planter Hack

I have 1 $9 Fern In each planter to save money but still make an impact.

‘HOME’ mat 

Under mat — I think that the layered front rug look makes a huge impact for a small price.  If your top mat is smaller you could do a smaller mat under! Be sure to check out this post for other buffalo check decor options too!

front patio with layered rugs | Trash Can Planter Hack

front porch with large gold planters | Trash Can Planter Hack

I would love to see if you use my trash can planter hack and which trash cans you use! I have been wanting to add some more to the back patio and I think matte black would look amazing!

Pin Below for Later

front porch with gold planters | Trash Can Planter Hack

SaveSave

Kids Printables

Free Preschool Printables

I will be the first one to admit that my kids go to preschool for a reason: I am not great at teaching them academic skills, but I know that with summer around the corner I need to come up with some ways to keep the kids engaged all summer, and keep them learning!  Especially with Jack starting kindergarten in the fall, summer school work packets are going to be a must this year.  I am excited to have teamed up with a couple of lovely ladies to bring you all some free preschool printables for all your littles to use this summer too!

This post may contain affiliate links

toddler boy playing with blocks

Free Preschool Printables

When I decided to put together school work packets for the kids I knew just who to go to for advise and help.  If you don’t follow Melissa and Alison on Instagram, you’re missing out.  Both ladies have young kids and love to share the preschool activities they do at home with their children, which are honestly SO INSPIRING.   

Both ladies were teachers before having babies of their own, so they know their stuff, so these free resources are not only fun but truly well thought out from a teachers perspective!   So, with that being said, I am SO grateful they shared a few ideas with me for this post, but be sure you head to their blogs to get WAY more ideas!!

Melissa’s blog // Alison’s Blog

I am going to share how we are using these packets in our home in this post, but also am attaching all the free preschool printable’s you can click and print. 

printable sheets

How I am I using the printable’s?

I did a post a couple of weeks ago about a schedule for summer for my kids.  They are working on school work every morning while we get things ready for the day. I have taken most of the printable’s above, and laminated them.  For the activities that the lamination worked for I figured that was less work for me as the summer goes on. There are some days where the activities will also include simple things like working on writing 3 letters on paper.

Each kid has a binder and I will pull the pages they are to do out each morning.  I am hoping this keeps things organized and simple to keep us doing it all summer!

If you need a laminator we have this one and love it, and you will likely want these extra sleeves

Also I am not a fan of normal dry erase markers for my kids because they aren’t washable, so I keep a pack of these on hand for activities like this

*updated – although I still love to laminate, these little dry erase pockets are also a great option for those of you looking to not waste paper over and over.  You simply pop the paper in the sleeve and are ready to go!

Shop Helpful Items Below


Free Preschool Printable’s

Each of the links below will take you to another page.  When you go to print there will be SEVERAL PAGES per activity.  It kind of seems confusing when you first click on it, because the cover sheet is not actually the activity, thus I have gotten some questions on this!

I have added some more free printables for kids to this page! Check that frequently for more items, and be sure to print out the most recent new post that will help work on emotional intelligence with your kids. 


free preschool printables

Click to Print Below

Flower Petal Play Doh Counting Mats

Flower Petal Count & Color Popsicle Color Words Pattern Practice

Pattern Practice

Popsicle Color Words

Sunglass Number Match

Rainy Day Pack

All printables on this link 

I would love to see you and your little ones using these free preschool printables, so be sure to tag me on Instagram if you try them out, and I hope you enjoy!  These are a great way for kids to fight bordem so really will be a great option for you if you are stuck inside!

Pin the Photo Below for Later

Free Preschool Printables

Products we Love

Baby Clothes Basics

This post is sponsored by Carter’s; however, all thoughts and opinions are my own

Walker is creeping up on 1-year-old.  HOW. How has it been a year since he was born? I have already started planning his party, and am really just trying to soak in these last few days of him as a baby.  With the other two I was excited for the next thing, and really rushed into the mini big people clothes, and all that came with them getting older.  With Walker you find him in onesies half the time because hello – BABY THIGHS.  The Carter’s Little Baby Basics line has been my go to for him the past year.  I feel like after 3 babies I really know what Im looking for in baby clothes, and what works best, so I wanted to do a quick post on baby clothes basics!

baby in white carters onsie sitting on bed

baby laying on bed in carters onsie

Baby Clothes Basics

I am all about easy, comfortable, but also love some great neutrals for my boys, so the Boys and Neutral options that the Little Baby Basic’s line from Carter’s offers have been perfect for me.  They have sweet little sayings, sweet print’s that don’t distract from the baby, and soft comfy fabrics.  Their Little Baby Basics line for baby girls is equally as perfect, and has been a go to for gifts for me (even if walking into that side of the store instantly makes me want another baby girl!!) .I think for me the number one thing about baby clothes is that they need to be versatile.  In the first couple of years they are still sleeping so much of the day, so clothes they can sleep in, play in, eat in, and so on are so important.

baby sleeping in crib in blue onsie

baby butt In onsie

When it comes to my thoughts on baby clothes basics, I also am all about easy. I want options I can mix and match for Walker.  If he spits up on his top I would prefer to be able to use the pants for the rest of the day unless a ‘situation’ arises.  You also want easy as far as putting clothes on and taking them off.  Easy for diaper changes is a MUST, or he isn’t wearing it.

baby sitting on bed in white onsie

baby standing in crib

baby laying in grey shirt

If you are looking for baby clothes to fill your baby’s closet for their first year, or you are looking for the perfect baby shower gift, the Carter’s Little Baby Basics line is so well thought out and versatile that it make it fool-proof, and takes so much of the guess-work out of “will this work well with a new baby?”.  Be sure to find a store near you here, and let me know what you end up with in the comments!! I would love to hear what your must have baby clothing features are when you’re shopping!  Do you follow some baby clothes basics rules?

baby standing in crib

DIY

Large Framed Engineering Prints

We finished our dining room recently, and hands down my favorite part of the room is these large framed engineering prints.  They are SO inexpensive, but make such a huge impact in the room. So I thought I would share how I did these for roughly $25 per frame – photo and frame included!

this post may contain affiliate links 

Large Framed engineered prints

Large Framed Engineering Prints

If you are new to my blog, then you may not know that I am the queen of EASY decor and DIY projects. My goal is always to make a room look finished and polished without spending a fortune.  

I firmly believe that a home that is well decorated doesn’t have to pop right out of the Pottery Barn catalogue. I believe that you can mix the right DIY’s and inexpensive items into your home, and those can make a huge impact for a small price tag.  

This was a project I had been wanting to execute for a LONG time, and just wanted to find the exact right spot.  And boy, did I find it.

large framed prints in dining room

I truly think that the size of these pictures for scale on the wall is what makes the inexpensive nature of them work so well.  Adding such large scale artwork really makes the room look polished and put together. 

Also – I know that some would say that you shouldn’t have family photos in your formal dining room, but this is my house and this is what makes me happy.  I love the way it looks and thats all that matters. 

Large framed engineered prints

Since doing this – it has gotten super popular and I see it all the time, WHICH I LOVE!! Be sure to tag me @arinsolange on Instagram so I can see what you all do!

How to Make These Large Framed Photos

You need to first pick your frame.  I went with this one from IKEA for $20. The frame we chose is 24×35 for reference.

We added a 4th baby this past year, and it was time to add her to this wall, and in doing so I realized that they no longer have the exact frame, but one that is a bit boxier.  I went ahead and ordered 4 brand new frames and will update the post when they get in. 

Then choose your photos.  You need to use high-resolution photos.  So unless you have a camera that takes those, plan to use photos from a professional shoot.  This is a really important step because if you don’t do a high resolution photo your pictures will be really grainy. 

large framed prins on dinging room wall

Order engineering prints.  I ordered mine from Staples online for roughly $4.  Engineering prints are on paper and not necessarily photo quality (in fact you will get a warning not to order photos when you’re ordering but be a rebel and do it anyways).  

I have heard some feedback that sometimes they wont let you order these, and other times they will.  I am about to order all 4 of our kids pictures again, so yet again I will report back on the end outcome!

 Note: I believe they don’t offer the exact sizes of many frames.  If you choose a photo with a good amount of negative space you will be fine to trim the photos!

Dining room with large framed engineered prints

Tada – that’s it.  Seriously you guys, its honestly that easy!! And I love that the photos can be changed out for $4 as my kids grow! Let me know if you have any questions on this.

 I know it was a super simple little how – to, but it really makes a statement!  Make sure to check out the rest of our dining room for how I tied in these large framed engineering prints, and subscribe to see more great DIY posts like this!!

Other Posts You’ll Love

We have since updated the dining room and I will be sharing all the details on that here soon and will update the post with all the details – but if you are going to IKEA and looking for another great IKEA hack,  be sure to check out how I turned a simple IKEA piece into this gorgeous cane cabinet!

IKEA CANE CABINET HACK

ikea cane cabinet hack

PIN THE POST BELOW FOR LATER

I hope you enjoyed this post on how to make your own large engineering framed prints. If you are inspired to recreate this DIY, be sure to tag me so I can see your great work!

If you have any questions about this tutorial, please leave them below. Follow me on Instagram @arinsolange for more easy DIYs to help your house feel even more like a home.

large framed black and white photos on wall | Large Framed Engineering Prints
DIY

Dutch Door Easy DIY Tutorial

We did an easy DIY Dutch door at our last house as a creative way to baby proof our house, and it was honestly one of my favorite little updates to our house. This blog post will walk you through how to update your current door to turn it into a dutch door at your home!

this post may contain affiliate links

basement dutch door

Dutch Door

When babies get mobile we get creative –  for us it meant this DIY dutch door. This past winter our third born, Walker became mobile, and with the cold winter air we were all cooped up in the house.

 The older kids are hitting an age where they are more capable of playing in the basement on their own, but still at an age where I prefer to hear what they are up to.  Leaving the basement door open wouldn’t be an option, so we decided that our best option was a DIY dutch door.

What is a dutch door?  

A dutch door is a door that is separated horizontally and can function as a normal door, but can also be opened only on the top half only for an open air function with separation still there.

bright living room space

Why are Dutch Doors So Expensive?

Initially when we thought about doing a dutch door in our home we looked at purchasing – but it was so much more expensive than a typical door. When you are purchasing a dutch door it’s more expensive because:

A: They are typically solid core doors – that is much more expensive than your typical hollow core interior doors on current homes.

B: They require more hardware – between the latches and the hinges and such there is just more to the door!

Transforming your current door into a Dutch Door

Because of the expense of buying a dutch door we decided to go transform our Current door into a dutch door.

When it comes to home decor and home choices one thing I am VERY passionate about is making our home both functional for our kids and us as adults, but also beautiful all at once.  I want the kids to learn, grow and play in our home, but also don’t want to battle clutter. 

I have made very purposeful choices in both decor and baby proofing that has allowed us to all exist in our home happily and this dutch door choice was just the latest in those choices.

open dutch door to basement

What You Need

When it comes to turning your current door into a dutch door you don’t need much – but the project will look different if you have a hollow door vs a solid one. 

I am going to walk you through how we did this with our solid door – we were doing a basement door so in most homes that will be solid, but if you are looking to do a hollow door I will give you a solution! (or you can always buy a solid door to start from)

Supplies:

4 Total hinges – you likely have 2 or 3 on your door now. You need 4 total when this is done!

Shims

Wood Filler

Paint

Latch

Table Saw or circular saw – I linked to ours and we love both!

Electric Sander

dutch door hardware

How to Create your Easy DIY Dutch Door

First things first you want to mark while your door is still hung where your hinges will be added to the door jam and on the door. It is also helpful to mark where you want it to be cut before removing the door.

We personally cut it a few inches above the existing door handle so I could add the latch, but wouldn’t have to worry about the door handle.

white dutch door

Now remove your door and take it to be cut. draw your line and use your table saw to cut the door in half.

Sand it down lightly, and paint the inside the color your door is painted. For us we had to fully painted the door because it needed it.

An option if you Have a Hollow Door

If your current door is a hollow door you could cut off just over a half inch, and add a .5 inch piece of wood to the top of the bottom piece. Give it a small over hang for style, and use wood filer in the top piece of wood to give the appearance that it is solid!

Hanging and Finishing

When you hang the door, expect to need to do some hinge adjustments to get the door to swing freely well.  That was a bit time-consuming for us on tightening and loosening screws to get it working smooth. Once you have things where you want, give the doors and the opening a coat of paint.

We then added our hardware after it was dry. We did a simple latch on only the outside (upstairs) and added a knob style handle to the top door as to not have too many handles going on!

basement dutch door

Other Posts You’ll Love

If this simple DIY was something you liked – check out these posts for some other posts that I think you will love!

Painted Tile Floor | DIY Built-ins | Wall mounted Easel (seen in the images in this post) |

To see another dutch door – my friend Val did one in her kitchen remodel and it is gorgeous!

Pin the Image Below for Later

If you enjoyed this tutorial for an easy DIY dutch door, or want to find it for later be sure to pin the image below.

Little girl coloring on a wall mounted easel

Family

Creating a Summer Schedule

In the past year, I have gone from being a full-time stay at home mama of two kids to a work from home mom of three.  That means a couple of things: 1. I am insane and exhausted, and 2. It has meant a lot of new planning and organizing of time around our house.  We are about 2 weeks out from summer vacation for my kids, and one of the things I am working on is creating a summer schedule that we can all stick to as a family to help summer be both fun for the kids and myself, but also not a stressful mess where I lose momentum for work!

brother and sister laying down coloring | Creating a Summer Schedule

 Why I am making a Summer Schedule

I am going to include a free printable at the end of this post that you can print and hang for your own schedule.  Mine will likely change from time to time, and my schedule will probably not work for you, but I think that kids that have been in school are year really do thrive on routine, and if you work from home, time to get work done still has to happen, so if you can make a schedule and stick to it, your kids won’t suffer from your work, and vise versa.  My kids are up early, and although they will play well on their own, they start to fight if they are bored, so I am hoping this gives them daily motivation, as well as weekly motivation to behave, as well as allowing them to know when they are playing alone it’s not going to be hours, but instead a set time.

Our Summer Schedule

Wake up 6:30 AM (I wish this wasn’t true)

6:30 – 7:15 Eat breakfast, get dressed, + morning routine and chores

7:15 – 8:00 – Work on homework packet (check back next week for that post)

8:00 – 9:30 Play in basement

10 – 12 – Go to Gym (mom will work out for one hour, and do work for 1 hour)

12:15- 12:45 – lunch

1:00 – 3:00 – all kids in bed for rest and or nap

3 pm – 5:30/6 – Fun time or outing (play dough, play outside, zoo, pool, and so on)

5:30/6:00 – dinner

6:00 – 7:00 – bath/shower, bedtime routine

7:00 bed

Looking at the Schedule

The areas in purple like this  are time slots (aside from before the kids wake and after bed) that I can get work done.  Some of that will include blogging, but it might also mean laundry, cleaning or bills depending on the day.  

My hope when creating this schedule is that it breaks up the day, and that the kids can see what is next so that they know what to expect.  Leaving the afternoon open for activities also allows for incentive for them to have a better day leading up to the activity, and hopefully with my workout and work done, will allow me to fully enjoy and participate in the fun this summer.

I am going to go ahead and address the 2 hour gym time slot that I might get some backlash for (not that I owe anyone an explanation, but more so I can explain and maybe give others a good idea like this if it works for you). Sam and I were talking about getting some childcare this summer.  There is no way that I can fit all my work in, and be a good mom while only relying on naps.  Naps are unreliable, and I plain old have too much to do in that time frame.  When we were talking about what time of day to hire someone we quickly realized that we were struggling to come up with one big chunk. Rather what we realized was that if we doubled our gym time so that 1/2 could be spent working and 1/2 working out, the kids would get more socialization and fun, we would save a ton of money, and I would be away from the kids for less time but accomplishing the same thing.

I know that the schedule above won’t work for everyone, but I hope that whether you’re a work from home mom, or a full-time stay at home mom, this example schedule will help you design your days and weeks this summer so you can all enjoy your time!

Printable Summer Schedule

To keep yourself accountable, and because you may not have the exact same schedule every day, use this free printable below to help you keep your schedule handy. I plan to fill ours out the night before, and the ‘to do’ section can have what I need to accomplish (aside from the obvious) during my work times.

Print Yours Here

todays agenda free printable | Creating a Summer Schedule


Home

Designing a Butler’s Pantry

Thank you California Closets for sponsoring this post.

Sam and I have been on a mission to update our home for the past 2 years (you can check out the house at move in and 1 year update here! Two year update is yet to come).  If you follow along with my blog you know that there are two things that matter to me in my home: I want it to look good and, I want it help our lives to run more smoothly. That said, when I got the opportunity to work with California Closets  on designing a butler’s pantry I couldn’t wait to tackle one of the least functional areas of our home!

california closets magazine flatly

Although this process has been on my wish list for our home, I really had no idea how to make it happen without losing too much space, what to expect on an expense for a project like this, so it was amazing to sit down with a California Closets expert, Tiffany, from our local St. Louis location and have her look at my space, talk to me about my wants, needs, vision, and budget and really walk me through every step of the planning and designing process.  I really got a first hand look at how a California Closets consultant will work with you to create your space to fit your needs on your budget.

KonMari Method

One thing that came up during my consultation was that I really do try to be somewhat minimal.  That I don’t like extras, and I feel that makes my home more enjoyable for myself and my family, and it was amazing how that fit in so well with the KonMari method of organizing, and after doing some research I realized that TOTALLY fit exactly how I like to do things. You can learn more about the KonMari method and Marie Kondo in the video below in this post.

Although the butler’s pantry design was amazing and something we hope to complete in the next year or two, it was also great for my consultant to talk to me about going through my pantry, keeping the things that bring us joy and happiness FIRST, then purging things we didn’t need and didn’t bring us joy second.  I got great tips on organizing my items into bins to keep them more organized, but also to help me see what is needed on a grocery store run at first glance.   I am so happy with the simple organization hacks shown below that are helping us keep things running more smoothly until we take the plunge on the butler’s pantry!organized pantryorganized pantry

Organized pantry


Designing a Butler’s Pantry with California Closets

During the consultation after speaking about what I wanted and envisioned in designing a butler’s pantry,  and giving my consultant a rough budget she was able to on the spot give me a rendering of what the end product would look like.  To me that was such a big deal.  Being able to see that she could make my vision come to life in the budget I had in mind with just a few minutes was so awesome.  We were even able to look at the end result for drawers and realize that omitting a level of drawers for taller bottom drawers would be a better fit for what was currently in our pantry.


California Closets cupboard ideas

I flipped through the virtual showroom while the design process was happening and was able to look at other areas of the home that California Closets can tackle and was amazed by the wide variety of spaces and areas that can be more efficiently designed and organized by them, but also how these spaces can be done in any home to make your home more efficient. I always had a vision that California Closets were for the elite, because they really do such gorgeous work, but the fact that they can make all homes with all budgets work so well was such a great eye opener for me that will definitely have me calling them back over for more spaces.

I know many of you come to my blog for my organization tips and tricks, and I can’t say enough amazing things, or urge you enough to reach out to your local California Closets store to have a consultant come and help you on your next project!  The process of designing a butler’s pantry would have been so much more difficult without their expertise and I am so grateful for that!

Flatlay of California closets magazine with fruit


I was selected for this opportunity as a member of CLEVER and the content and opinions expressed here are all my own.

SaveSave

SaveSave

SaveSave

SaveSaveSaveSaveSaveSave

SaveSaveSaveSave

SaveSave

SaveSave

SaveSave

SaveSave

SaveSave

Uncategorized

April Instagram Round-up

Because I know some of you blog readers don’t follow me on Instagram and Facebook (but you should.. I mean I’m full of daily updates for you all haha). I am going to try to do monthly round ups of my favorite posts from Instagram here on the blog!!  Check out this months Instagram round-up!


matching mom and daughter

siblings in a line sister and two brothers

We had a great, but cold Easter this year.  We all had to do some last minute outfits, but they looked pretty cute none the less.

cuddle and kind dolls all lined up

The sweetest doll in the middle if I do say so myself

dining room with dark ceiling

Check out the full post for this dining room reveal here

toddler girl at table wearing plum tutu

My favorite day of the week will always be Ballet Tuesdays

woman in pink skirt holding pink balloons

Forever my favorite day of the year — my birthday of course haha!

baby boy in rainbows and romper

10 month April showers baby photo

Celebrating April showers and 10 month old Walker

toddler girl in clementine dress from tea collection

But this cute girl is loving the spring bringing in sunshine!


Be sure to check back next month for another Instagram round-up, and if you don’t already follow me, give me a follow to see all my posts!

SaveSaveSaveSaveSaveSave

Organization

Spring Cleaning Checklist


Spring has finally sprung,  and I am about to start some major spring cleaning.  I always make a point to do a huge spring cleaning weekend before the kids are out of school, or the pools open so that its off my plate and I can focus on the kids and having fun in the summer.  I wanted to share with you all my Spring Cleaning Checklist.  

House decorated for spring


Spring Cleaning Checklist

The Checklist below will include areas to clean as well as areas that I like to focus on cleaning out and minimizing.  Things tend to stack up in the winter, but I want to also talk about what you should be focusing on in this time.

One thing that would be super helpful to use along side this is my friend Jen and my free downloads for a declutter program you can do in 6 weeks or less!

Kitchen

The biggest things with the kitchen are to really empty things out and start fresh.  Clean out your cupboards, fridge and freezer, and get that oven clean!

I know for me, doing the self clean cycle in the winter isn’t happening thanks to the smell, so once warm weather is here, that is one of the first things to be checked off my spring cleaning checklist!

When it comes to the freezer – if there are items you haven’t used all winter you likely won’t eat them, so throw them out and get ready for the next season. 

Bedrooms

Bedrooms get really dusty in the winter, so be sure to REALLY dust well.  Move beds and dressers out and get the dust behind them because that will help your air quality in your house.  This step is such a pain in the butt, but so needed after the long winter.

This is a space that you also should really focus on decluttering when it comes to spring cleaning – if you didn’t wear something all winter DON’T KEEP IT! Make some room in your closet!

Whole House

Make sure that you really really clean the areas you normally don’t have time for.  Last weekend we rolled up our rug, took it outside and shook it out, and swept and mopped under it.  After the long winter it was so gross to see how much dust was living under our living room rug alone!

It is also stuff like wiping down banisters and baseboards and touching up paint that will make your house look cleaner, and more put tighter for the season ahead!  

Bathrooms

Things you may not think of in bathrooms – if you have decorative towels that aren’t used, make sure you wash them during this time.  It is also a great time to combine all those half bottles of conditioner, and really clean out old products. 

A reminder that bathroom products shouldn’t be kept for forever, so make sure you clean them up!

Blue cabinets in bathroom

Laundry Room

Get your machines, and behind them in TOP RUNNING ORDER.  Washers and driers work better when they are clean and taken care of, as well as don’t pose the risks they pose when you haven’t done this.  So DO IT. 

Dining and Living Areas

Here is where the rug thing comes into play.  But also a really big part of those areas is to clean your decorative items.  I know it seems silly, but if you  live in a house for years and years, those items will get gross.

I also make a point to clean anything I take on and off my shelves for holidays, so remember to do that as the year goes along to make this step less daunting. 

white brick fireplace with basket

Storage Areas

If things have been put ‘away’ without getting put fully away, take this time to get everything in bins that are labeled.  Clean things well and sweep the storage area.  It isn’t an area that needs to be kept squeaky clean, but we bought our house from people who didn’t seem to have EVER cleaned it, and it was horrible.

Playroom

The playroom will be a lot of the other cleaning tips, and a lot of decluttering.  Winter is hard on toys with kids being trapped inside more with cooped up energy.  Get rid of items missing pieces and such.

If you keep blankets and throw pillows in the area it is also time to wash those for the coming season.

Garage

GET THIS AREA CLEAN – you will spend so much more time in the garage and outside in the coming season.  I have a round up here with some great garage organization items, but sweep it up, spray bug and spider spray and get things cleaned up well!


spring cleaning checklist


Free Printable Spring Cleaning Checklist

Spring Cleaning Checklist Printable


For me spring cleaning means a bit of deep cleaning and a bit of purging those extras.  I think that half the battle on cleaning is making sure everything has a place to keep things clean for the next time.  

What things are on your spring cleaning checklist that I maybe should start adding to mine?  If you have questions or need any extra help when it comes to your spring cleaning be sure to leave me a comment below!  Enjoy the list and HAPPY CLEANING!

SaveSave

Organization

Garage Organization Favorites

Organizing your garage and storage room are not the most glamorous areas of your house to organize, but I thought while I was sharing my spring cleaning checklist, I would also share some of the organization items I have purchased for those areas to help keep them clean this summer.  Check out my garage organization favorites in this post!

garage organization


Garage Organization Favorites

1 // 2 // 3 // 4 // 5 // 6 // 7 // 8 // 9 // 10 // 11 // 12 // 13 // 14


A few notes on the above items – we have been using #3 for years and LOVE it for our kids toys and balls.  We load it up and roll it out to the driveway or backyard for the kids to play!

We have #14 all over our garage and storage room and love them!

I will do a further post on #13 but use them all over the house.  We use them to organize most small items we own!


Let me know if there are other things you love to use for garage organization!  Those areas are so important for us to keep organized or I feel like we spend so much time re – cleaning!

SaveSave

Products we Love

Mom Travel Favorites

I have been meaning to do this post for a while now.   We have been traveling more and more with the kids as the years have gone on.  Walker was coast to coast in his first 6 months and we have really enjoyed those memories with our kids.  I wanted to compile a post of my mom travel favorites that I travel with for both myself and the kids,  so here are my travel favorites for moms and kids. Make sure when you’re done reading it, you check out some similar posts linked at the end. 
Mom Travel Favorites

Mom Travel Favorites

1 // 2 // 3 // 4 // 5 // 6 // 7 // 8 // 9 // 10 // 11 // 12 // 13

1 // A small wallet is so helpful.  You don’t need to bring every gift card you own, and it helps because you can keep this handy for security, or if you’re traveling via car, it doesn’t take up as much room in your purse or diaper bag

2 // Reusable baggies are great for a snack that wasnt finished, or anything else you might need on the trip!

3 // Having a reusable charger has saved our butts a few times – LIKE DISNEY

4 // A CUTE backpack diaper bag or purse.  I use this Fawn Design bag, and get stopped by moms, college girls, and everyone in between wanting one for travel!

5 // These disposible diaper bags are my safety net.  Ever had a kid throw up in the car or plane? If you haven’t…I have. Both. So BUY THEM. haha

6 // Packing cubes keep things separated and I especially like them for keeping the baby and I in one bag without mixing our things.

7 // This suitcase is as amazing as it looks.  I LOVE it.

8 // Always take headphones for the kids.  It will save you so much sanity

9 // I always travel with an empty swell bottle.  If I fly I fill it in the water fountain after security. For road trips its just great to have when we arrive to make sure I stay hydrated.

10 // These Rolling backpacks work so much better than kids suitcases for us.  They fit at the foot of the kids carseat or under the seat in front of them on a plane.  bonus is that because they are backpacks we can wear them if the kids tap out on carrying their own luggage.

11 // These are amazing for refilling with snacks and keeping the trash at a minimum.  I start every trip with 3 high full for each kid.

12 // I always keep this in my diaper bag, but if you have to change a diaper on a plane or in a gas station bathroom its nice to only take this little diaper clutch in.  If you don’t keep this in a diaper bag daily, you should!

13 // We are huge Camelbak fans, but for trips I stick to our favorite cups that work best for juice, milk, or water.  If we fly I pour the kids drinks on the plane right into these so I don’t worry they will spill.

 Be sure to check out these other Travel posts (here and here), and I would love to hear if you have any other mom travel favorites that I should try!!

SaveSaveSaveSaveSaveSaveSaveSave

SaveSave

SaveSave