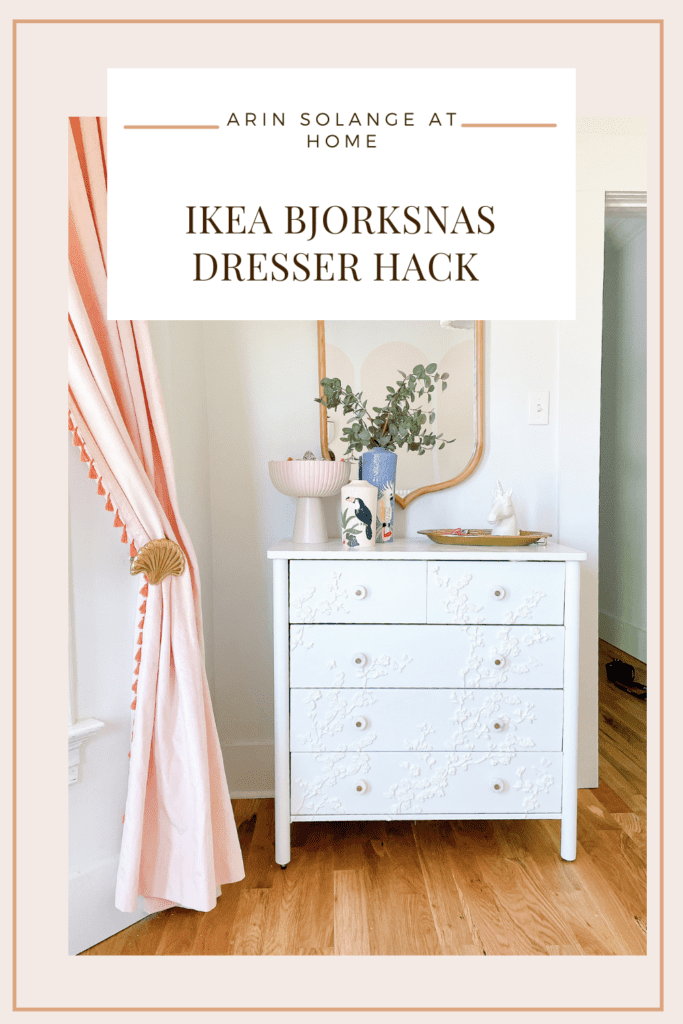
This blog post is months over due, but I finally finished Avé’s IKEA Bjorksnas dresser hack with resin. This was a LONG time coming finding just the right way to update that IKEA dresser for Avé’s room (with a few different looks along the way), so I am thrilled with the end outcome, and excited to share!
This post may contain affiliate links
IKEA Bjorksnas Dresser Hack
Last year when we moved into our new house we needed dressers for 3 of our 4 kids. Our youngest daughter has an IKEA Tarva dresser that I have done a hack on – so I knew I loved the IKEA dressers and qualiy, and the Bjorksnas fit perfectly in both my oldest two kid’s rooms.
For my oldest son – I left the Bjorksnas dresser as is – because honestly it is a beautiful dresser that is a bit more modern and finished than many of the other IKEA pieces.
That said – the Bjorksnas dresser is a perfect dresser for DIY because similar to a couple of IKEA’s other great options, such as the Tarva, it is unfinished wood. The unfinished wood leaves it ready for a DIY without the prep work that many dressers would take, so between that and its great size I went for it.
What to Know about the Bjorksnas Dresser
The IKEA Bjorksnas dresser is a 5 drawer dresser – going 4 drawers up with a split top drawer. When it comes to DIY that top split is something to keep in mind because it could play into some designs.
Like I said above, the dresser is unfinished wood. It comes with leather dresser pulls and is overall a very heavy duty dresser. (Something to keep in mind is that it is very heavy – and many times does need to be put together before putting in the room due to the DIY.)
Working with Resin
If you follow me on Instagram then you likely know that I have fallen down the Resin rabbit hole the past few months, and have used it on more things than I can count.
One of my favorite things to do with Resin is to use it to make molds then paint it. Resin comes in 2 different (or probably more) varieties – One that dries see through, and one that dries white.
The clear resin is a 24 hour dry time and a bit trickier to work with – if you want to read more about working with that resin, and making DIY Resin casted letters I have a resin letter tutorial here.
In this case – we are working with what I call ’10 minute resin’. This is essentially a fast curing resin that dries in 10 minutes but does not dry clear – but rather dries white. This makes is a better candidate for DIY’s like the one I am going to share due to the lack of time.
When I get to the tutorial there will be directions on how to make the molds and work with the resin – but it is important to know that A: Resin can ruin things – so you have to prep your space well, and B: Resin should be kept off your skin if you can, so wearing gloves can be really helpful.
Supplies for This IKEA Dresser Hack
Below is a comprehensive list of everything you need for create this exact dresser hack.
- IKEA Bjorksnas dresser – fully put together without the drawer pulls
- 10 Minute Resin – you will need 1 or 2 boxes of this
- Hot Glue and Hot glue Gun
- Silicone Molds – I used this one and this one. If those are sold out, check out this link for a lot of options!
- Paint – I used Behr Bit of Sugar Cabinet paint because it was left over from painting our cabinets.
- Drawer Pulls of your choice – I have a great round up here of hardware options from Amazon.
- Optional – if you are planning to move the drawer pulls you will need wood filler and sand paper.
DIY IKEA Bjorksnas Dresser Resin Hack Tutorial
Now that you have your supplies – let’s get going on this IKEA hack. This one is honestly REALLY EASY – so if you have been wanting an easy IKEA hack, then this one is for you.
Prepping the Dresser
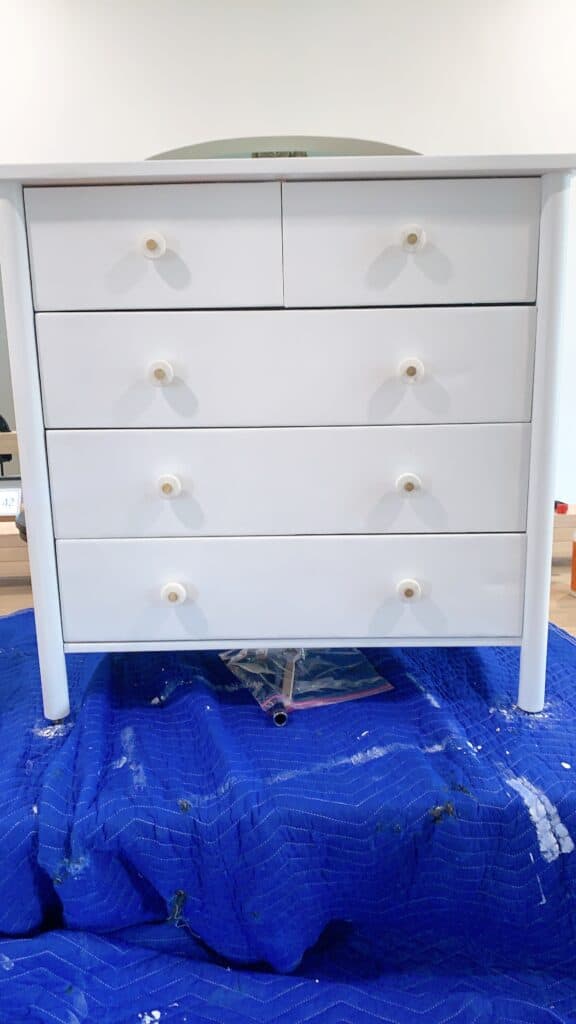
First – Assemble your dresser – Your Dresser will need to be fully assembled before moving forward with anything else in this DIY.
Once it is assembled – IF you chose to change the location of your drawer pulls you will want to fill those holes and sand them down. I personally didn’t choose to do that.
Next up – Paint your dresser. You don’t have to do this in that order, but I found that it made most sense to give the dresser a good coat of paint before adding the resin molds.
Making the Resin Molds
While your paint is drying it is a great time to start making your resin molds. These directions will also be on the box of your resin – so read those over before you work.
First – prep your work station. I tend to put down a trash bag on my counter AND aluminum foil for double coverage. You will need 3 cups for the resin, and something to mix the resin up. Anything you use will get ruined, so I tend to use either party cups, or small shot glass style cups from the dollar store.
To make the molds you will add equal parts of each liquid that came in your box. You will then pour those two together in a 3rd cup and mix. The biggest thing when working with 10 minute resin is that it dries quickly – so you don’t have a lot of time.
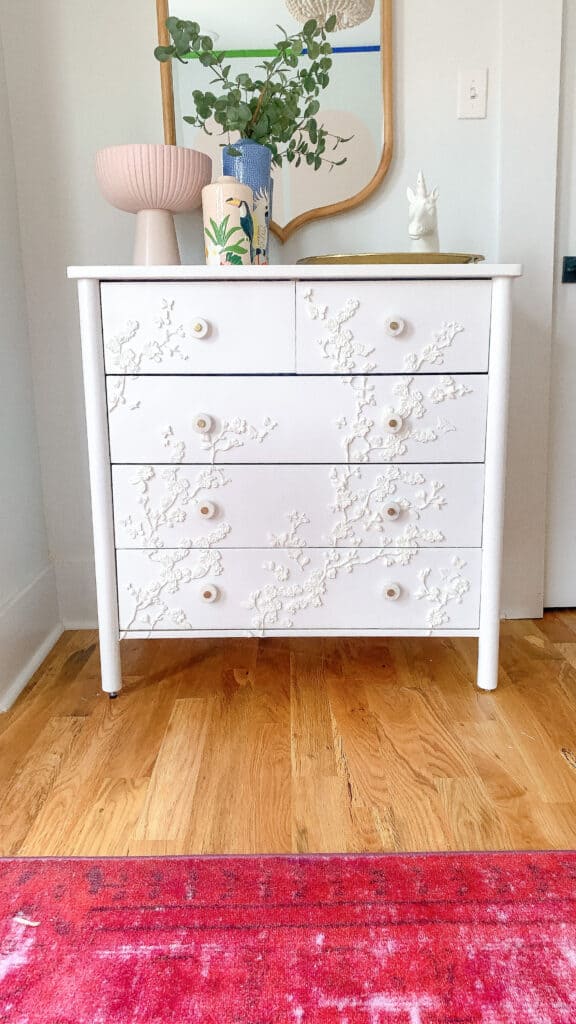
When your resin is mixed – you need to pour it in the molds. You will quickly add it to the molds then let it sit for 10 minutes. With the molds I used I found that I needed to make sure I did plenty of the larger floral collections and not as many of the small ones. Just continue to make these molds and set them to the side.
Adding the Resin Molds to the Dresser
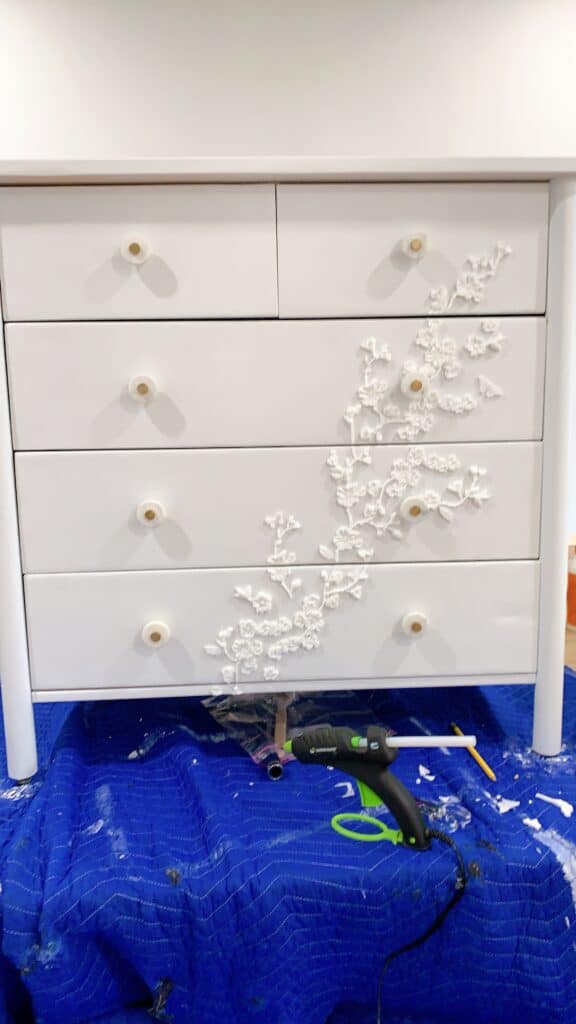
Once you have a good amount of finished resin molds you can start adding them to the dresser. For me – I started down in one corner and sort or worked up, but you can add things in your own pattern. Use hot glue to add them to the dresser.
Keep in mine the drawers being able to open and close. I had to cut some molds in half to split the drawers.
One thing that will help you save on resin is to get a good start on your dresser before you make too many molds. I personally made a lot of the flowers I didn’t end up using and could have saved a lot of resin and time had I started my glueing a bit earlier.
Finishing the Dresser
Once you have all of your resin molds on you need to go through and make sure there are no hot glue strings. This can be tedious but it is super important.
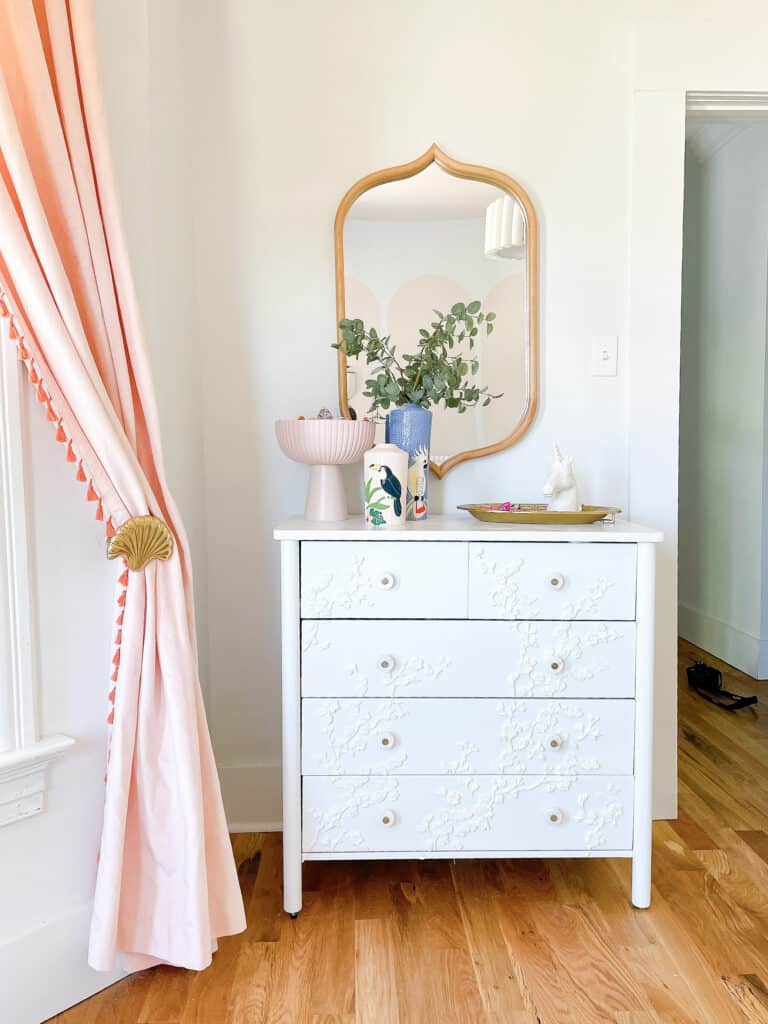
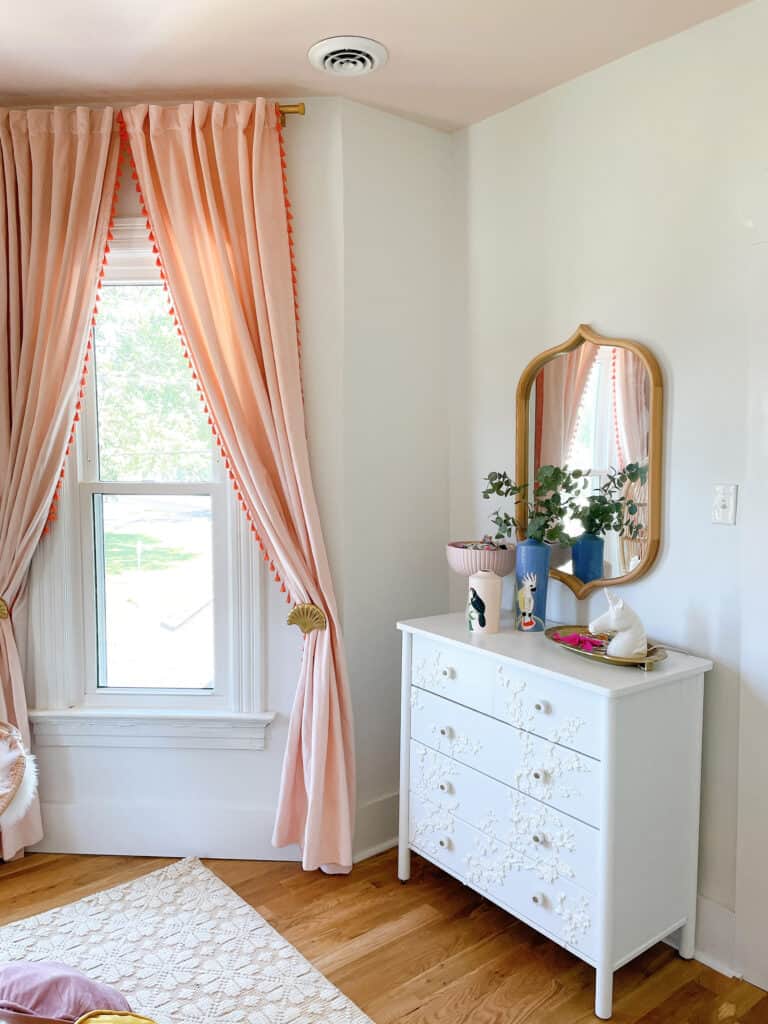
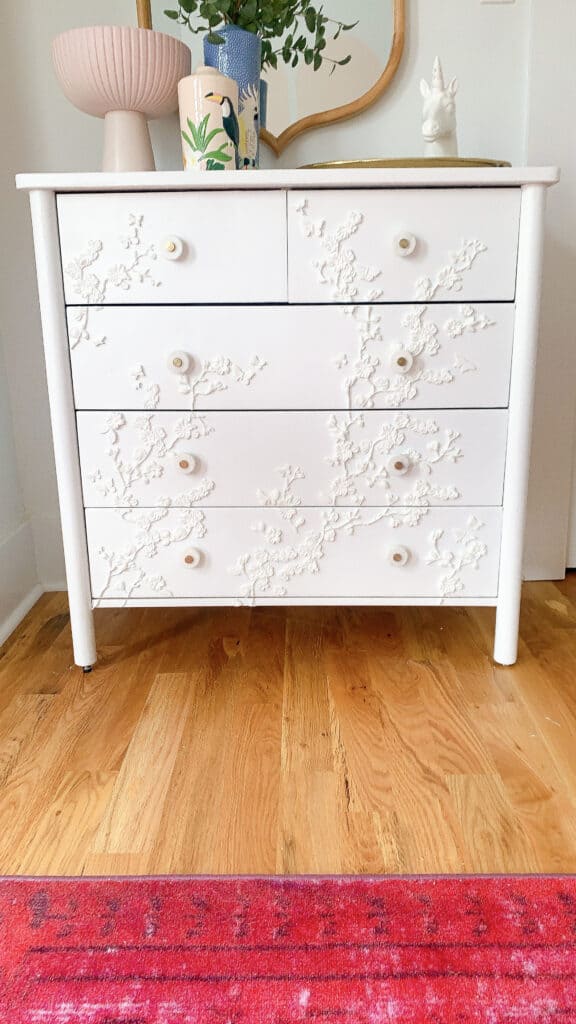
After that is done – give the dresser one more coat of paint so the molds are fully covered. This will give it a look as if it is part of the wood.
Now you just have to add your drawer pulls and the dresser is done. This DIY honestly was a 1 day project for me. I was able to start the paint and resin molds in the morning and finish late in the evening.
Can You believe it is that easy? This is honestly one of the easier DIYs I have ever done and the end outcome does not look that way.

Other Posts You’ll Love
If you loved this post – I have several other great posts that you will love below.
Valspar Dessert Bone Girls room (aka where this ended up) | IKEA Built in hack | IKEA Tarva Dresser Hack | Black and White Wallpaper Boys room with the natural Bjorksnas dresser
Follow me on Social for the Latest and Greatest


Pin the Photo Below for Later
Hopefully you feel confident in doing an IKEA Bjorksnas Dresser Hack with Resin after this post, and I would love to see your end results. Be sure to tag me or message me on Instagram (@arinsolange), and leave any questions you have in the comments below.