Resin letters have been the big thing recently and last fall I was so excited to try my hand at making my own set for my kids. I was shocked at how easy the project was, aside from some little learning curve things to take account for. Now that I have made a few sets I want to share the DIY resin letters tutorial for you.
This post may contain affiliate links
Resin Letters
Resin letters are essentially clear letters that you can use for a multitude of things. I have seen them used in a learning setting, and even as cute ways to decorate a table setting. They make great gifts for kids, and with the holidays coming up this is the perfect time to start making them!
I am not the first to do these letters, and there are tons of amazing small shops that make them beautifully if DIY turns out to be too tricky for you, but if you are up for a day of resin crafts then you will love this tutorial.
I will tell you – this is one of those tutorials that is sometimes about a wash when it comes to cost if you are only doing one set of letters. That said – I think you will get hooked and end up wanting to make more because it is so much fun.
For my tutorial I mixed some other tutorials, as well as found some little tricks that have worked for me over the past year while working with resin, so hopefully you end up with perfect epoxy resin letters.
Working With Epoxy Resin
One thing that is really important to note when it comes to working with Resin is that it is not washable and CAN ruin things. It is not something to just work with willy nilly.
You need to set up a work space that can be left alone for 24 hours, and where if you make any spills you won’t ruin the work space.
Other Resin Projects
Since oringally writing this post I have done a few other resin projects that I LOVE. Check those out here if you want another fun way to use Resin!
DIY Mirror | IKEA hack dresser | Resin Vase
Supplies for DIY Resin Letters
- Epoxy Resin – These letters take a good amount of resin – so if you are planning to make more than one set, or make something else with the resin, I would get a good size bottle. (I recommend planning to do more than one set to make it worth your money in supplies! – Buy from Amazon. – you will spend WAY more getting it at the craft store!
- Letter Mold – I went with this mold. I wanted the letters big enough to be cute and non choking hazards. You could go smaller, but this size ended up cute and fun for my kids.
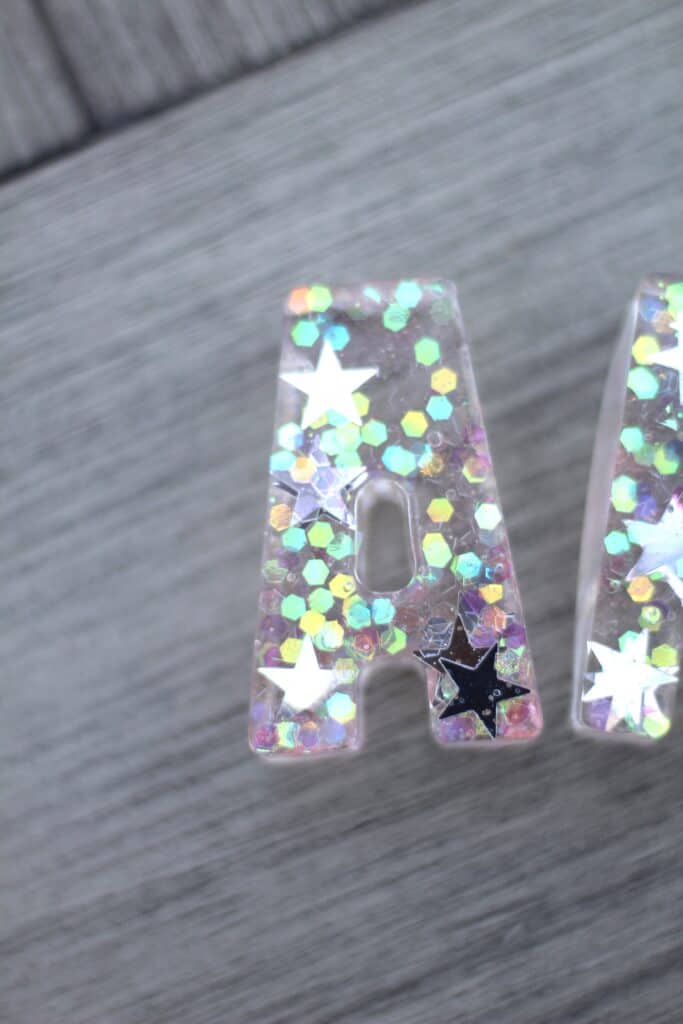
- Glitter – This is where you get to have fun. Pick anything you want. Lots of clolors, make them themed – you name it. You will use more glitter than you think.
- Disposable Cups – You need 3 disposable cups – the resin WILL ruin the cups. Measuring cups are helpful because you need equal parts of both parts of the resin, but I found that using clear disposable cups was just as easy and I just made sure I had even amounts of liquid in each.
- Stir Stick : Think something like like a popsicle stick.
- Tin Foil and a trash bag (or something else protective for your work space) – These little pans are also a great option!
- Rubber gloves are helpful
- Toothpick
Prepping for This Project
Like I said above – prepping your work space is too important. I like to lay down a trash bag, then tin foil. For the letters it can also be really helpful to lay everything in a disposable pan like this incase of spills and to keep little fingers from trying to touch them while they dry.
They also make silicone mats that work great for this if you plan to make lots of sets. Keep in mind that whatever space you set up will need to be left alone for 24 hours.
Making the Resin Glitter Letters
Alright now for the fun! Before you start I have a video on this post showing how I made the letters! Watch that before you dive in.
- Prep your work space and lay your resin mold down flat. It needs to be fully flat and level
- Start adding your glitter. I found that it worked best to sort of layer things…and I would go more heavy handed than you assume you need to go. Keep in mind how many letters you have to do….you don’t want to run out of a glitter after only half the alphabet haha.
Time for Resin
- Now it is time to get your resin ready. Your Resin bottles will tell you how to do this, but I am going to walk you through it here too.
Basically you need equal parts of each bottle of resin. You will put one in one cup and one in another cup then combine in a third cup.
** Thing to keep in mind: Remember not to go over half way on your cups if they are all three the same size. Because you need to pour both in that third cup. That might sound like a no brainer but when you’re in the zone it is easy to forget.
2.Once combined stir – and stir – and stir. You will stir for about 5 min. Scrape the sides, and make sure that there is NO STREAKING (like a white looking streak) when stirring. The streaks will cause soft spots. You are looking for a perfectly clear resin material before you start pouring.
Once you are done stirring you need to move fairly quickly – so be ready to go fully before you start this project.
Adding the Resin to the Letter Molds
This is as simple as it seems – simply add your resin to the letter molds one at a time. If you drip on the mold it is no big deal.
One thing I learned from trial and error was that the letters turn out better if you go about half full on the mold. You do want to pay attention to fill them all pretty equally, but the really full ones were too bulky for my liking. This will also save you a LOT of resin which is the big expense in making these.
Once the resin is in you need to stay by for a bit because you are going to be on bubble popping duty. Small air bubbles will rise to the top of the letters and you will use your toothpick to pop those bubbles. I would stay near by for at least 10 min to keep checking for bubbles to pop!
Once the bubbles are popped your letters are done – well or your part is done. Now it is all about time. LEAVE THEM ALONE. If you know me – you know I tested the time theory (hello not patient) and you really do need the full 24 hours for them to dry. So just leave them alone!
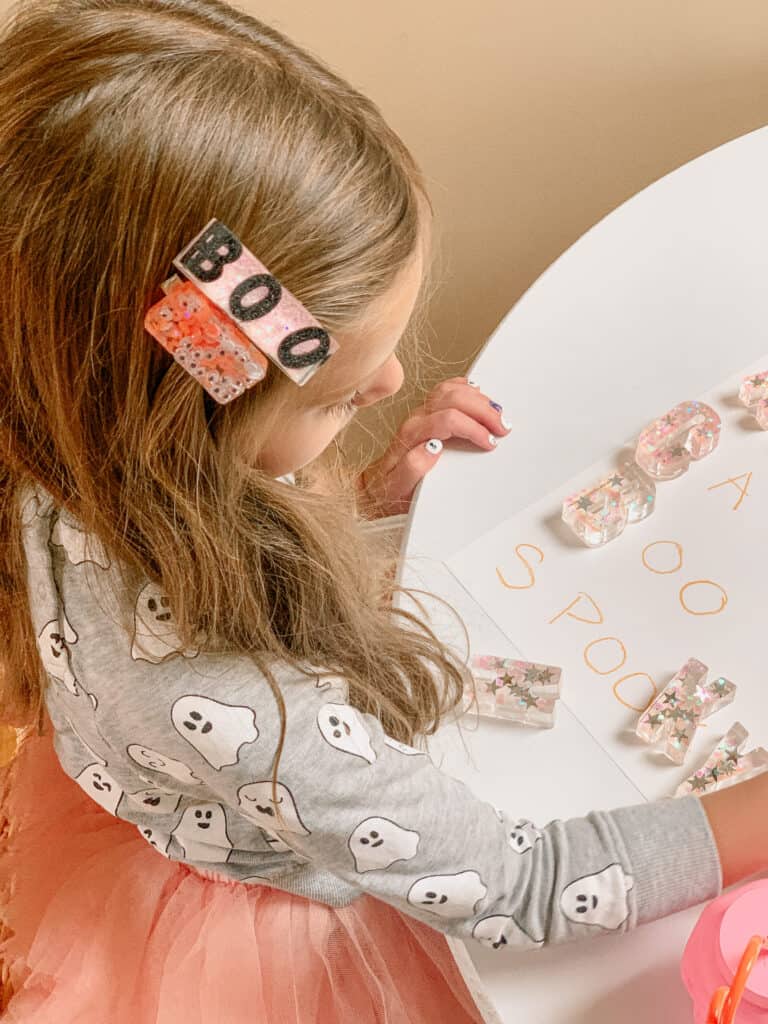
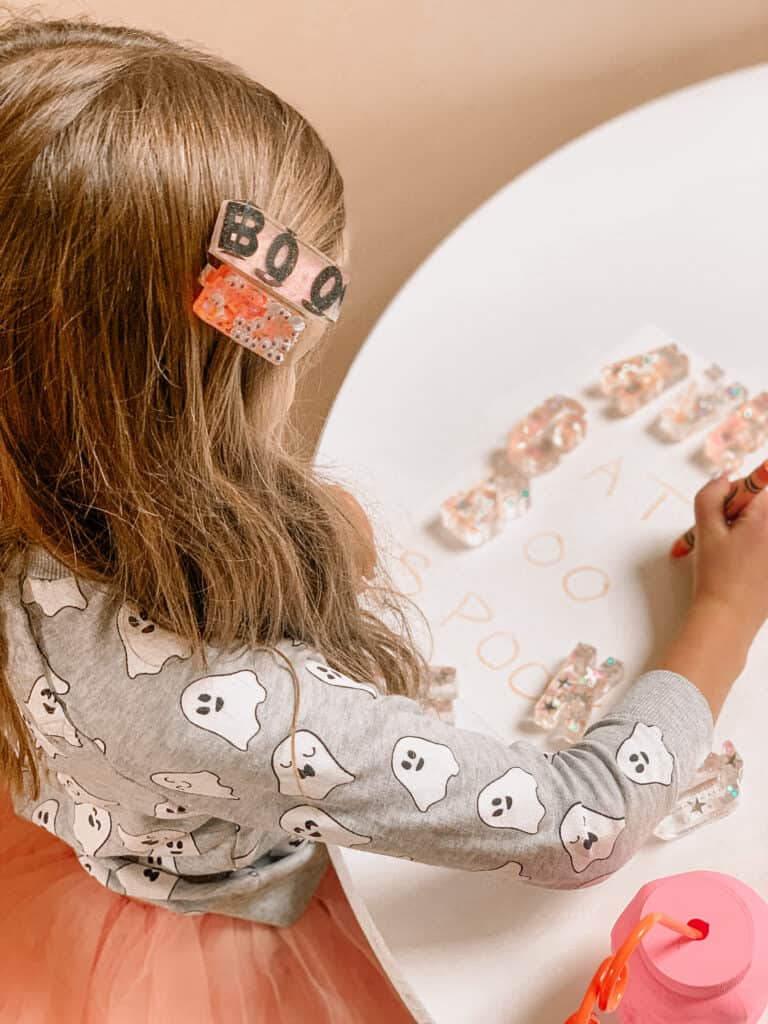
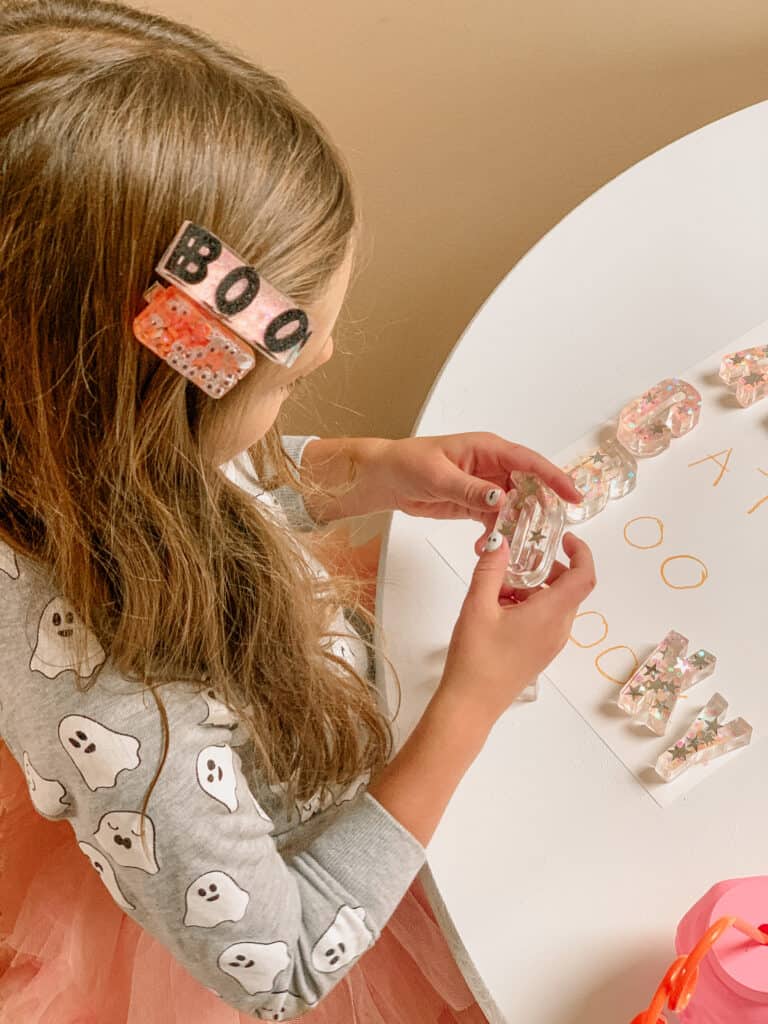
How to Use Resin Letters
You can use these in SO MANY WAYS. I personally worked on writing words for my daughter to lay the letters over which was really fun for her. Letter recognition is so fun for kids – so might as well make it pretty too.
Another option is to add a magnet to the back of these so that you can use them on the fridge or a magnet board as well.
One thing to remember – if you only make one set – be careful to make words with only 1 of each letter. That is part of the reason I think it is fun to make your own so you can have more than one of each letter.
Other Posts You’ll Love
Gifts for 6 Year Old Girls |DIY wall mounted Easel | Easy DIY Kids Table | DIY Abacus push toy for baby | IKEA Play Kitchen Hack
Pin the Photo Below for Later
Hopefully this was an easy to follow tutorial and you feel ready to create your own DIY Resin letters. If you have any questions be sure to leave a comment below or DM me on Instagram (@arinsolange), and be following my stories to see if I can master the magnets.
These are so cute! I can’t wait to try them!
love you!!
Did you have any issues with the letters being sharp? They look great and not cloudy, which some tend to get.
Hi! They definitely aren’t cloudy – which I was scared about. And they aren’t sharp at all. I was a little worried about that, but feel totally fine with Goldie, my one year old, playing with them!
Hi, I had a question about the mold you used. Did you notice that some of the letters are “bulgy”? I have done 2 sets now, and the letters that are thin, like I, T, J, and ones with wider angles, like Y, tend to really bulge out on the sides. After the first set I tried doing the 2nd set in a shallow tray of water, thinking the water might put enough pressure on the mold to have it keep it’s shape, but I had the same issue. I did use a different mold than the one you recommended due to availability at the time, so I’m wondering if maybe my silicon is just too thin? Trying to decide if it’s just a common issue, or if it’s worth it to replace my mold. Thanks!
Hi Jenn – I just checked mine and didn’t see much of that, I don’t know if you do Instagram – but if you wanted to Dm me there I can show you a video of my letters so it helps you decide if a new mold would help? @arinsolange is my handle.
Hey there! I tried my hand at these before I saw your tutorial, definitely only going to fill up half full from now on haha but I was curious if you have any tips on waning up the mold when the resin doesn’t harden (because somewhere along the way I messed up 🤪)
Hi Bailey,
Okay help me understand better what your needing help with.
Just got around to doing these and they’re awesome!! Been wanting to try but was intimidated but they weren’t too tricky at all! Wondering if you had to sand the backs at all? The edges on the back are a little raised and rough. So I’m going to try sanding them. Fingers crossed!!
Hi! I haven’t, but I have had friends who have taken a nail file to the edges to just smooth down that top lip a bit! I am so glad you tried them and love them.