Last week, I announced that there a couple friends and I are hosting a room refresh challenge on Instagram – you can see all the details to that here! But to kick it off, I wanted to share my 3 week refresh project in our new bold pink powder room!
This post contains affiliate links
March Room Refresh Challenge
Like I said before, this is part of our March Room Refresh Challenge with my friends Jen and Chrissy. If you haven’t yet checked out all the details to that challenge be sure you go to THIS POST and read It, but I will also give you a small recap.
From now until March 15th you will pick one area to refresh. Big or small changes are welcome, and encouraged. You will use the hashtag #MarchRoomRefresh on Instagram, tag Chrissy, Jen, and myself. By the 15th you will then submit your room. One winner voted on by our readers and followers will win $250!
Be sure to be tagging and following so that we can share progress on Instagram, blog and email!
This weeks Posts From Jen and Chrissy
Paisley and Sparrow – Jen made changes to her master bedroom. I love how she made things more monochrome and simple to make a big change.
Chrissy Marie Blog – Chrissy updated her Living room with minor changes that made a big impact!
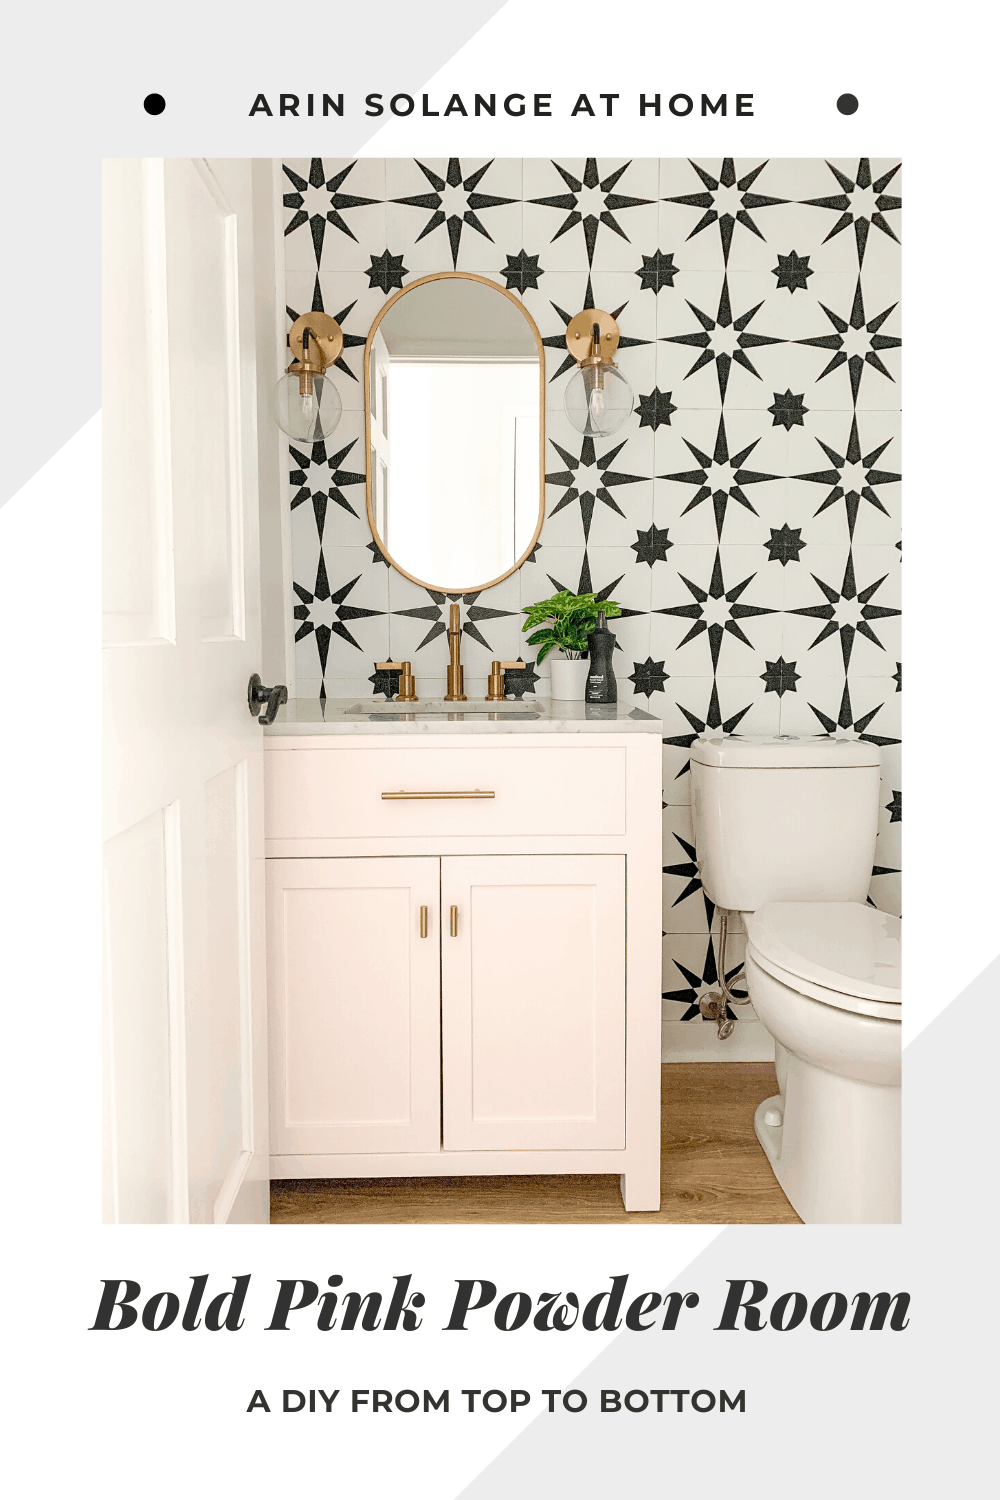
Bold Pink Powder Room
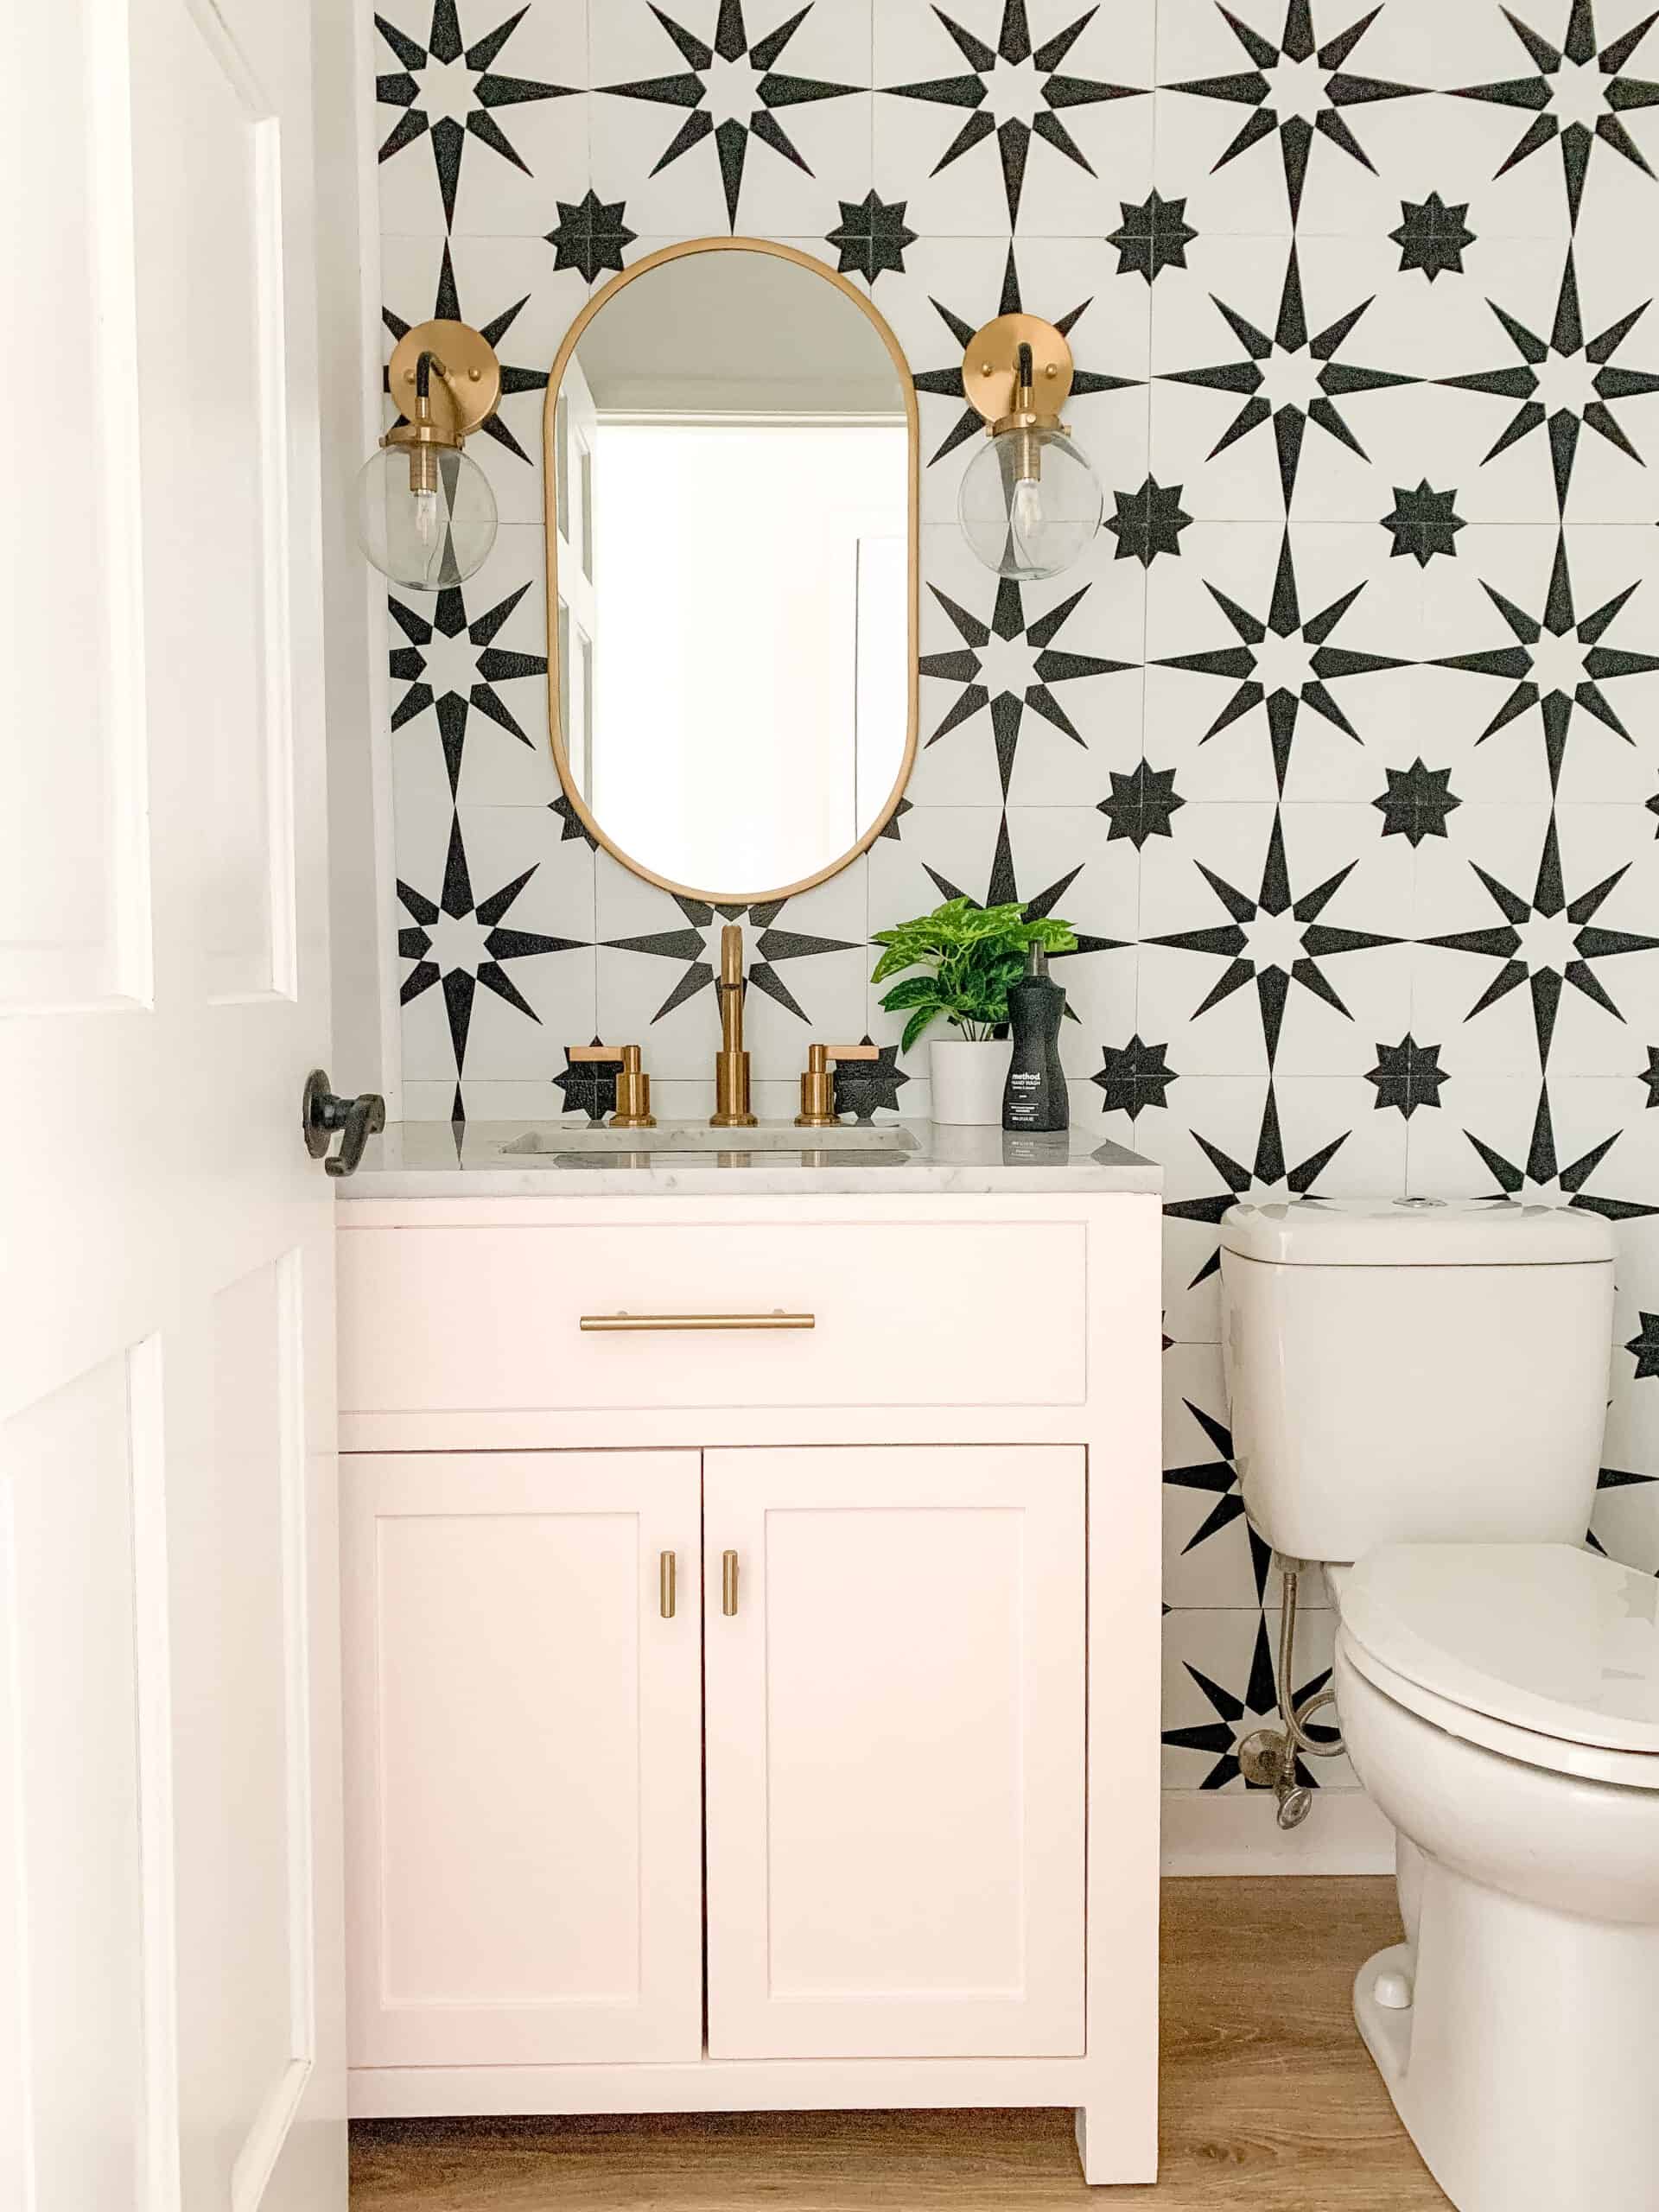
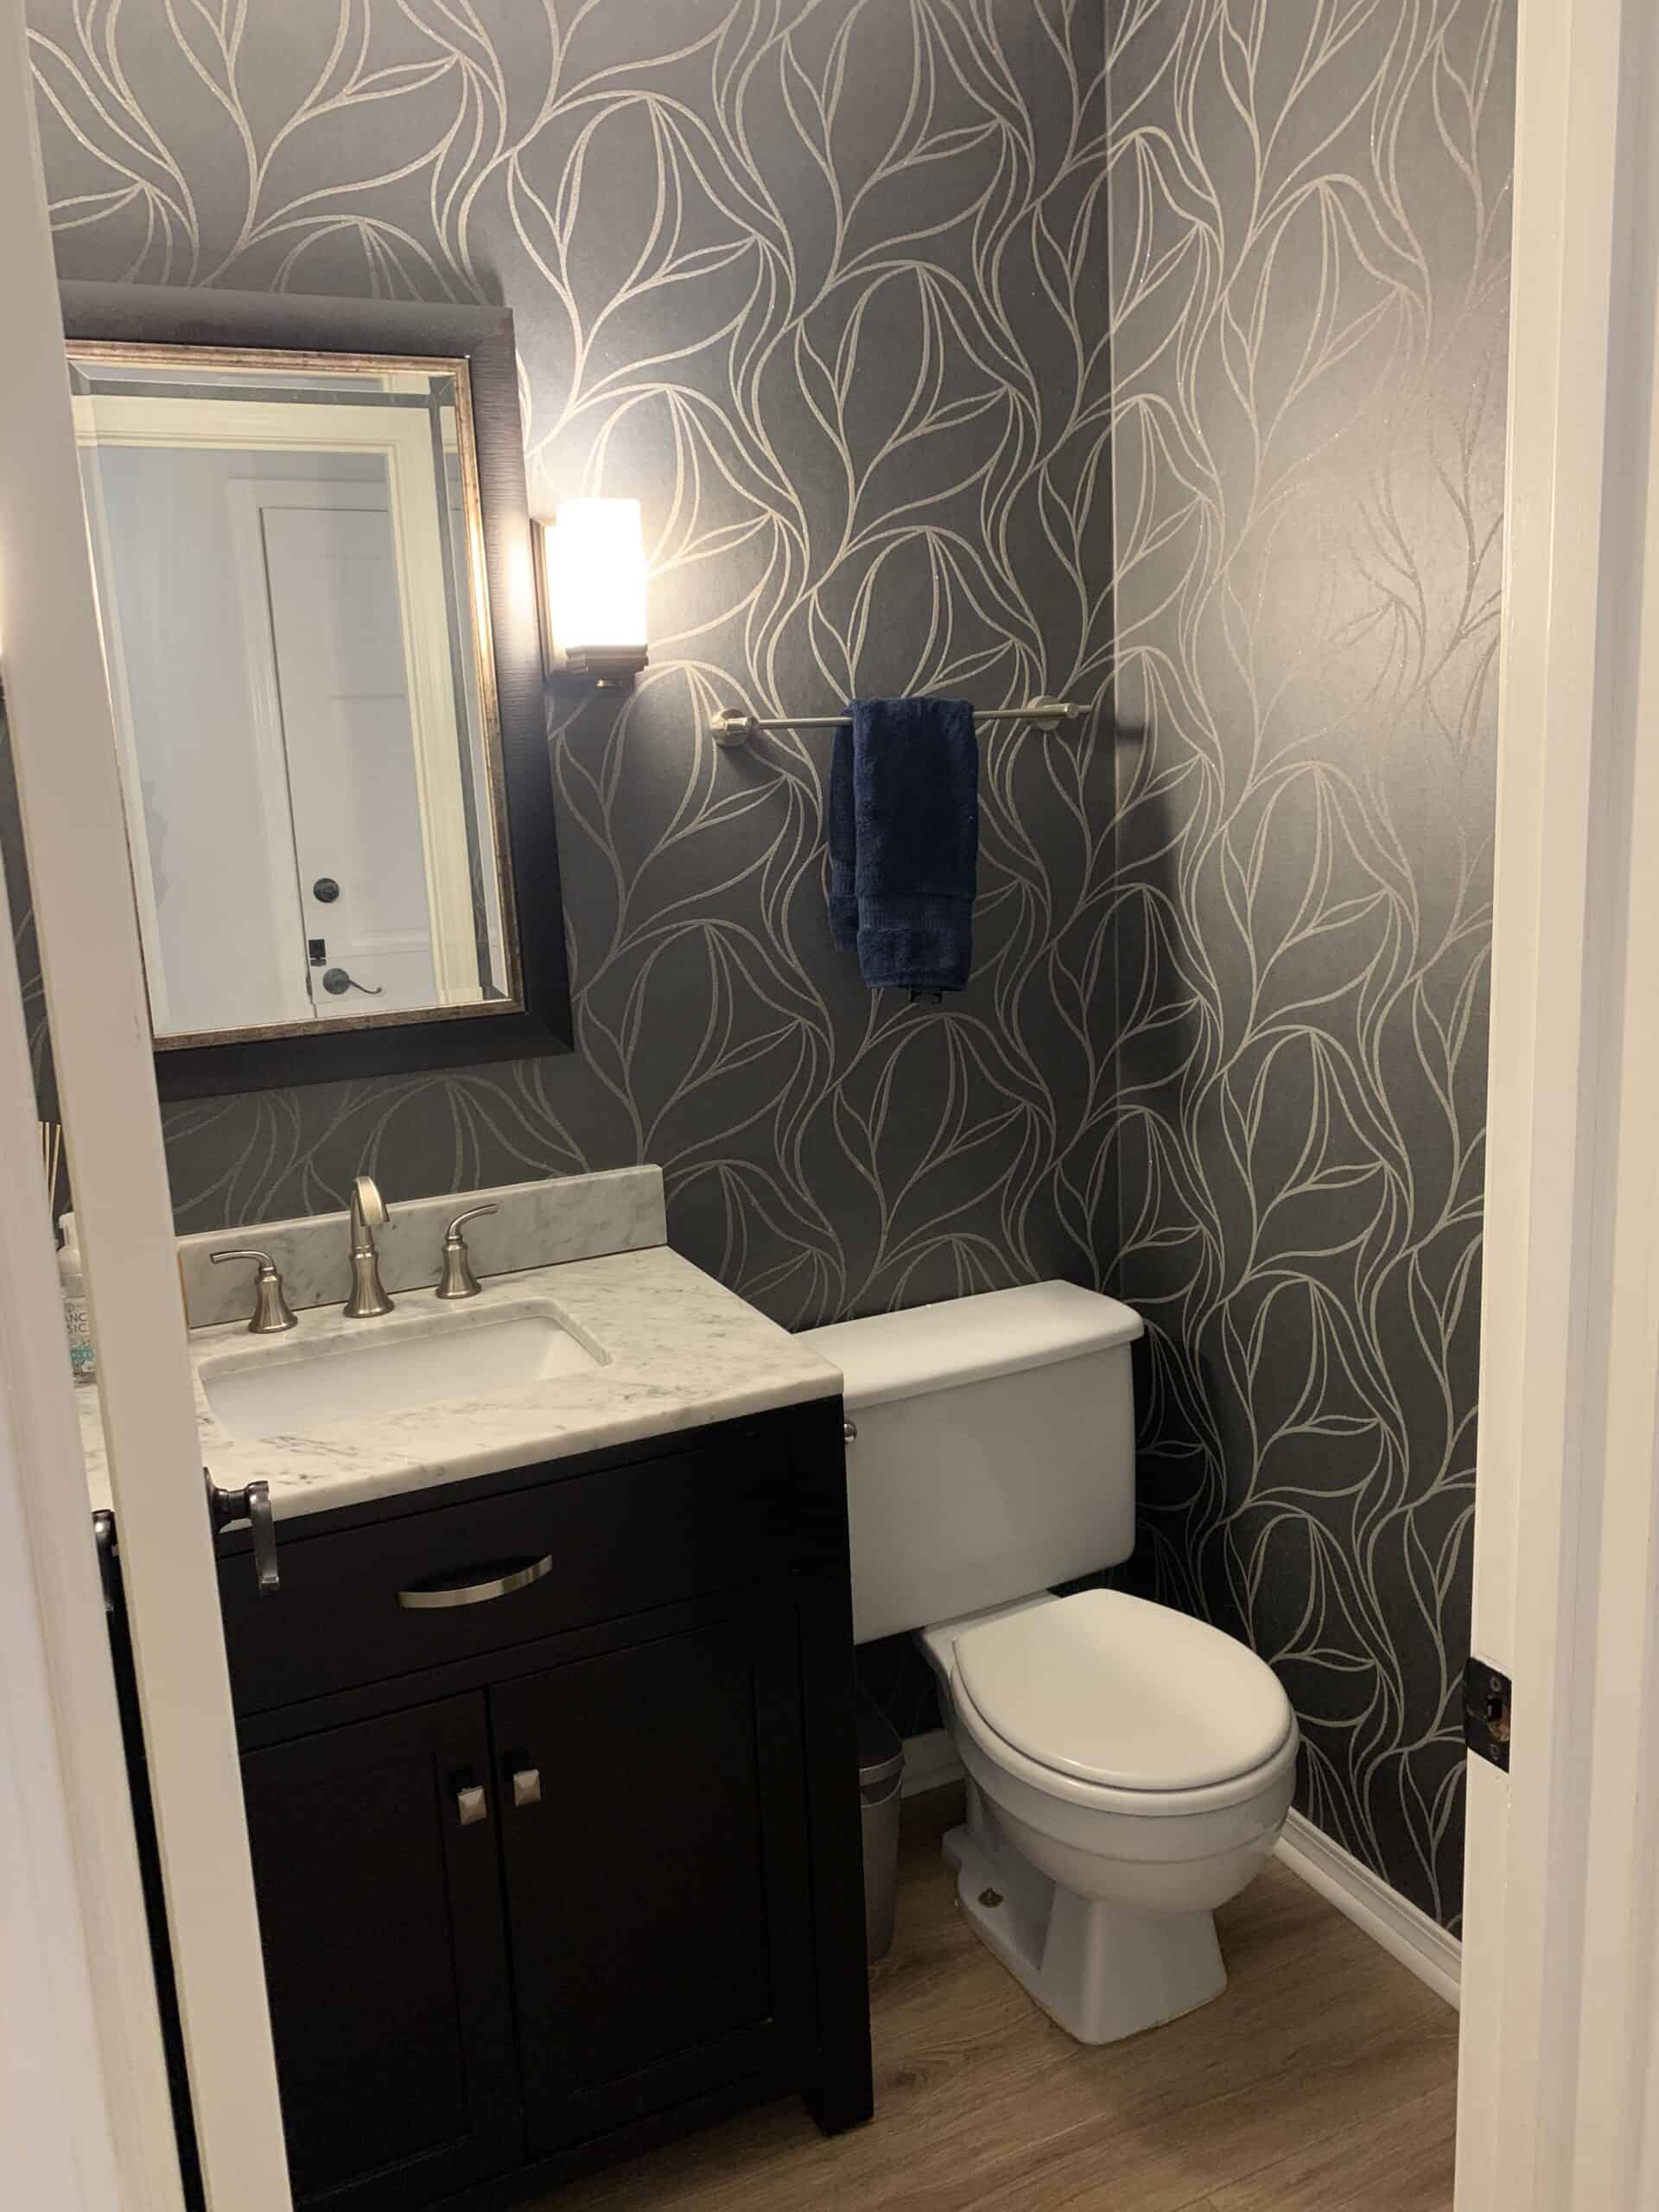
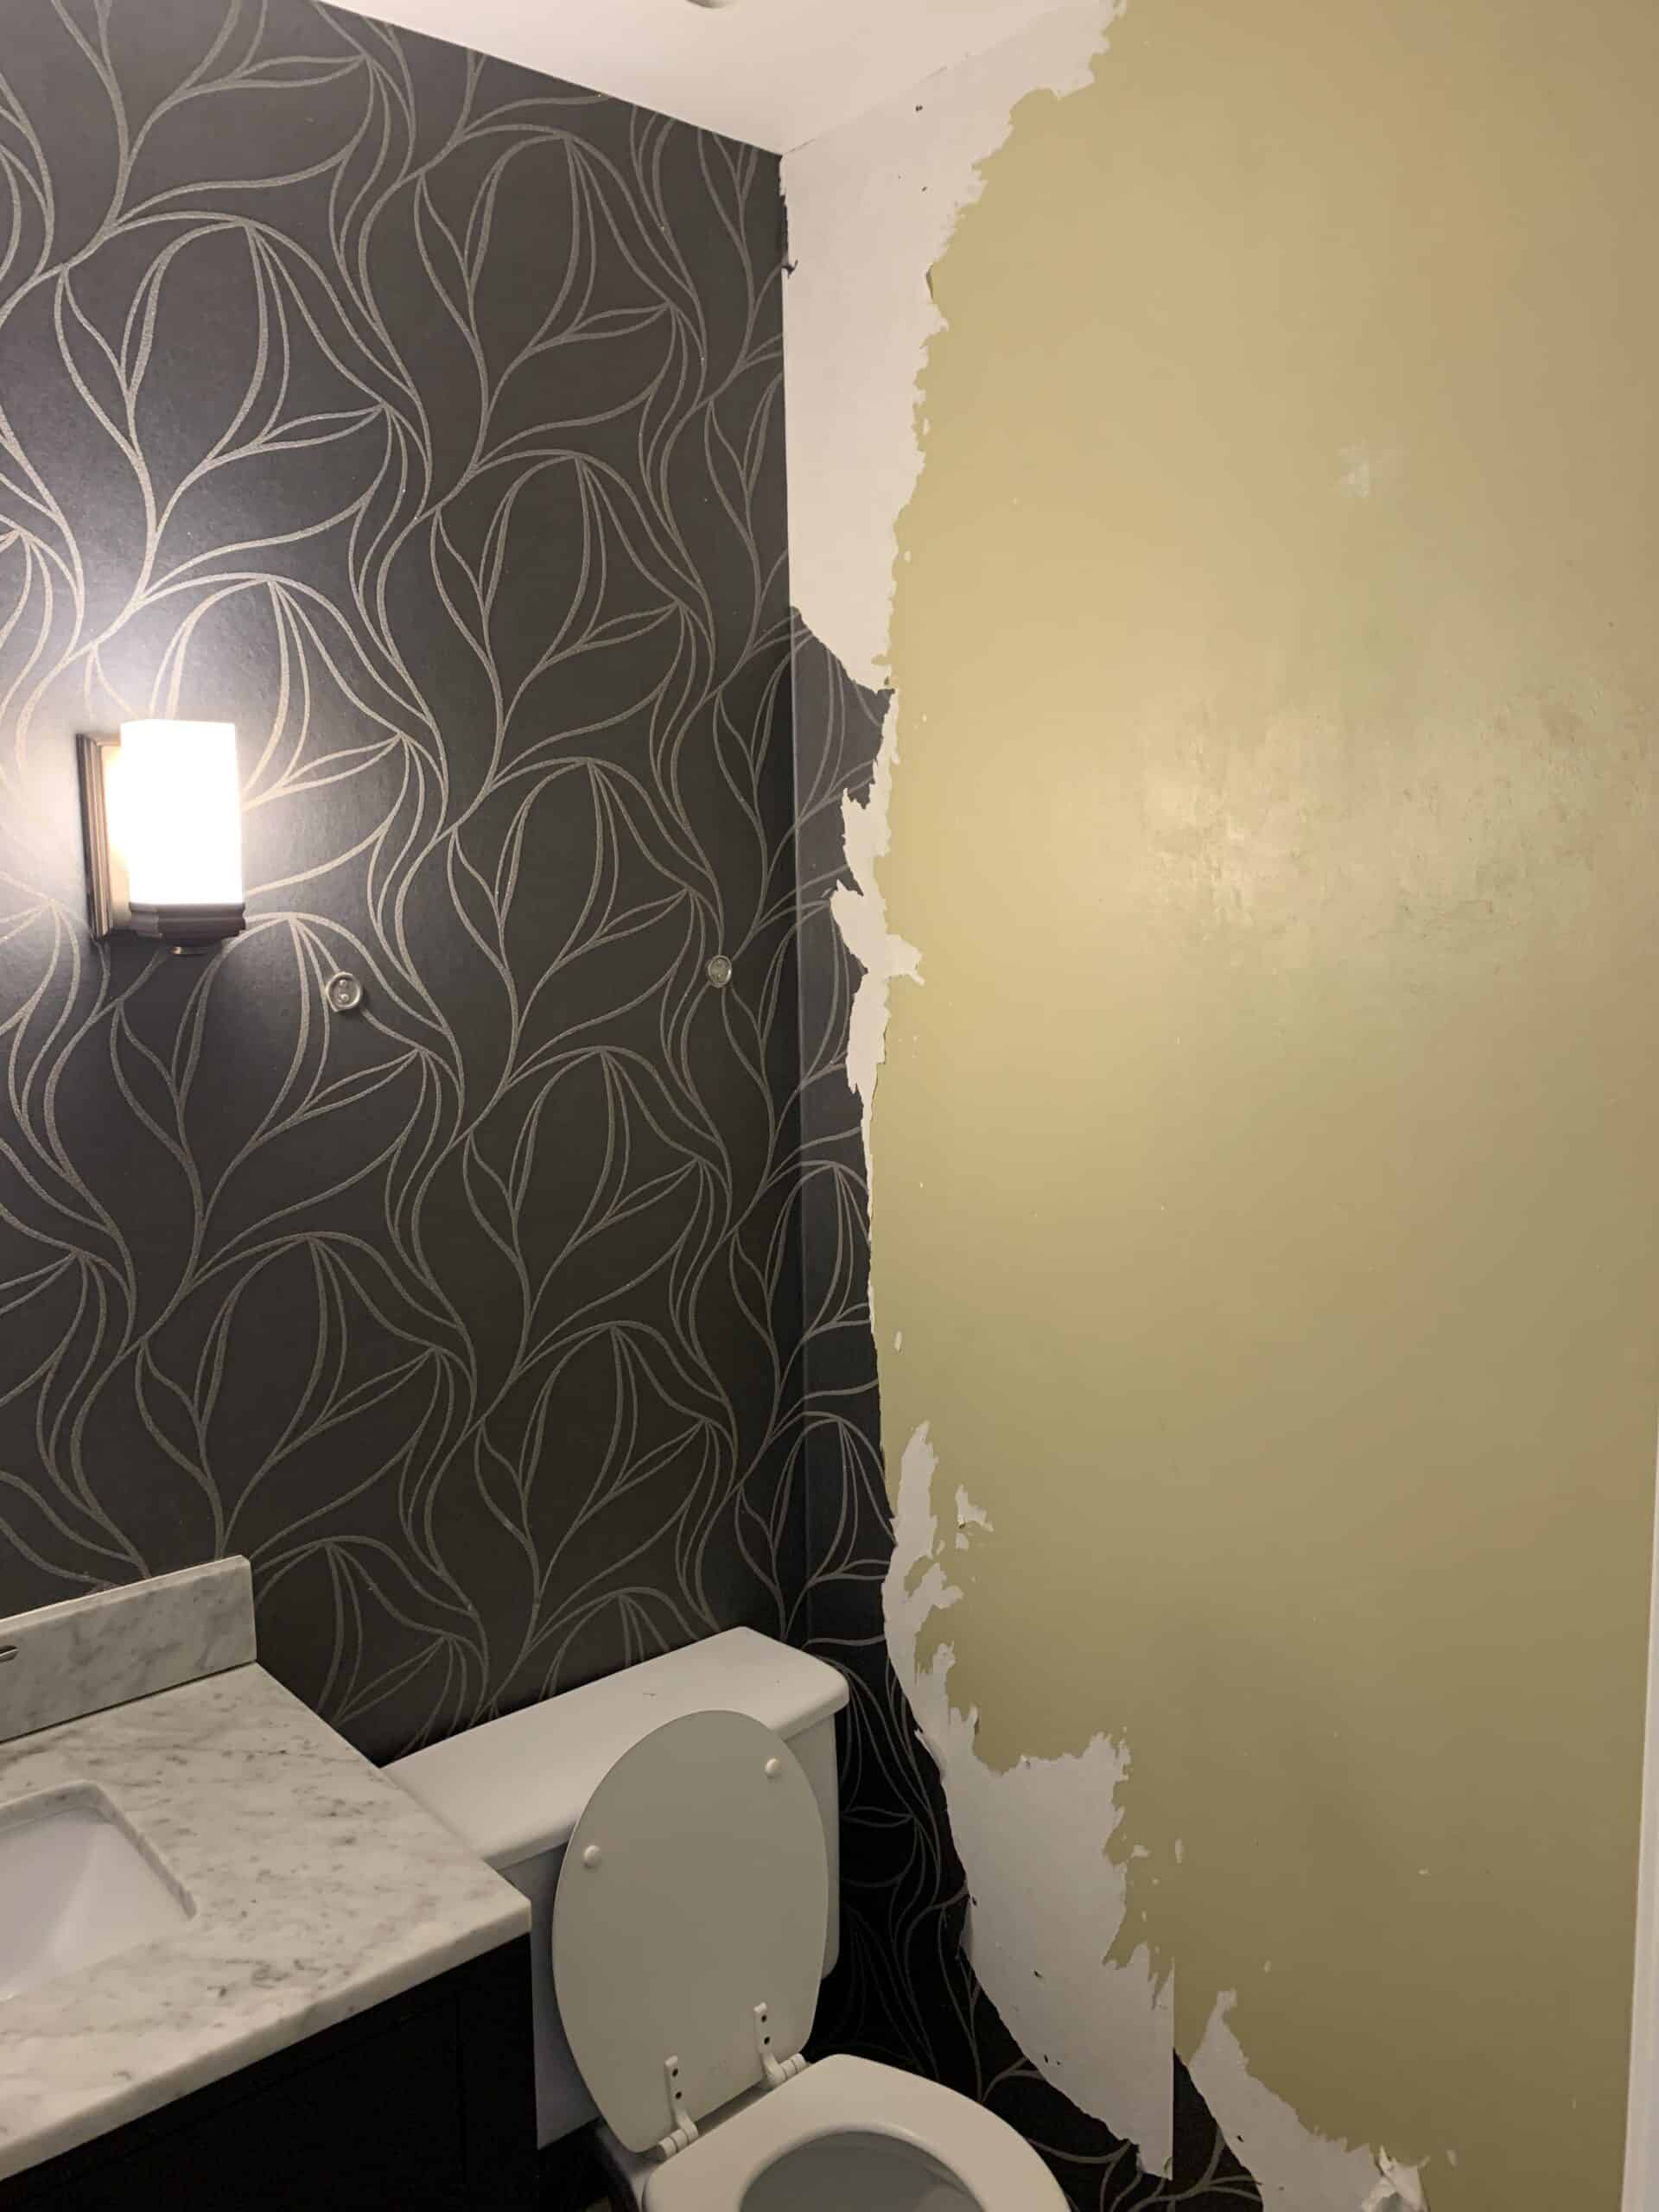
Our powder room has not changed even a TINY bit since we moved in. (well okay new floors, but that is it!). It was 100% not our style, and really dark and dreary for such a small powder room.
Truly the only thing that held us back from doing this bathroom long ago was the wallpaper – you hear horror stories of removing it, and we didn’t want to do it haha. Honestly so much so that probably 9 months ago my husband tore a tiny piece off to see what was under it, and we still drug our feet.
When the thought of a 3 week challenge room refresh challenge came up, I knew this was perfect. I wanted to show a HUGE change in 3 weeks. The end results DID NOT DISAPPOINT.
Video with Tour
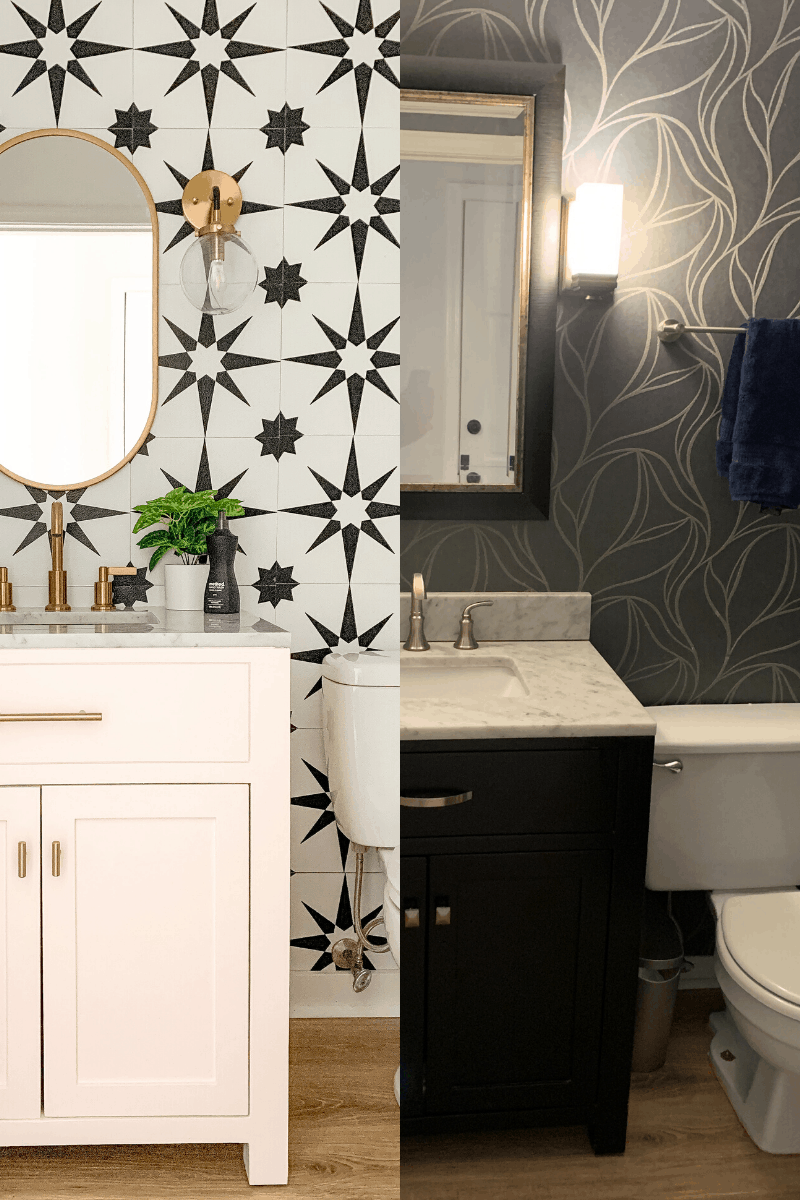
This is the before!
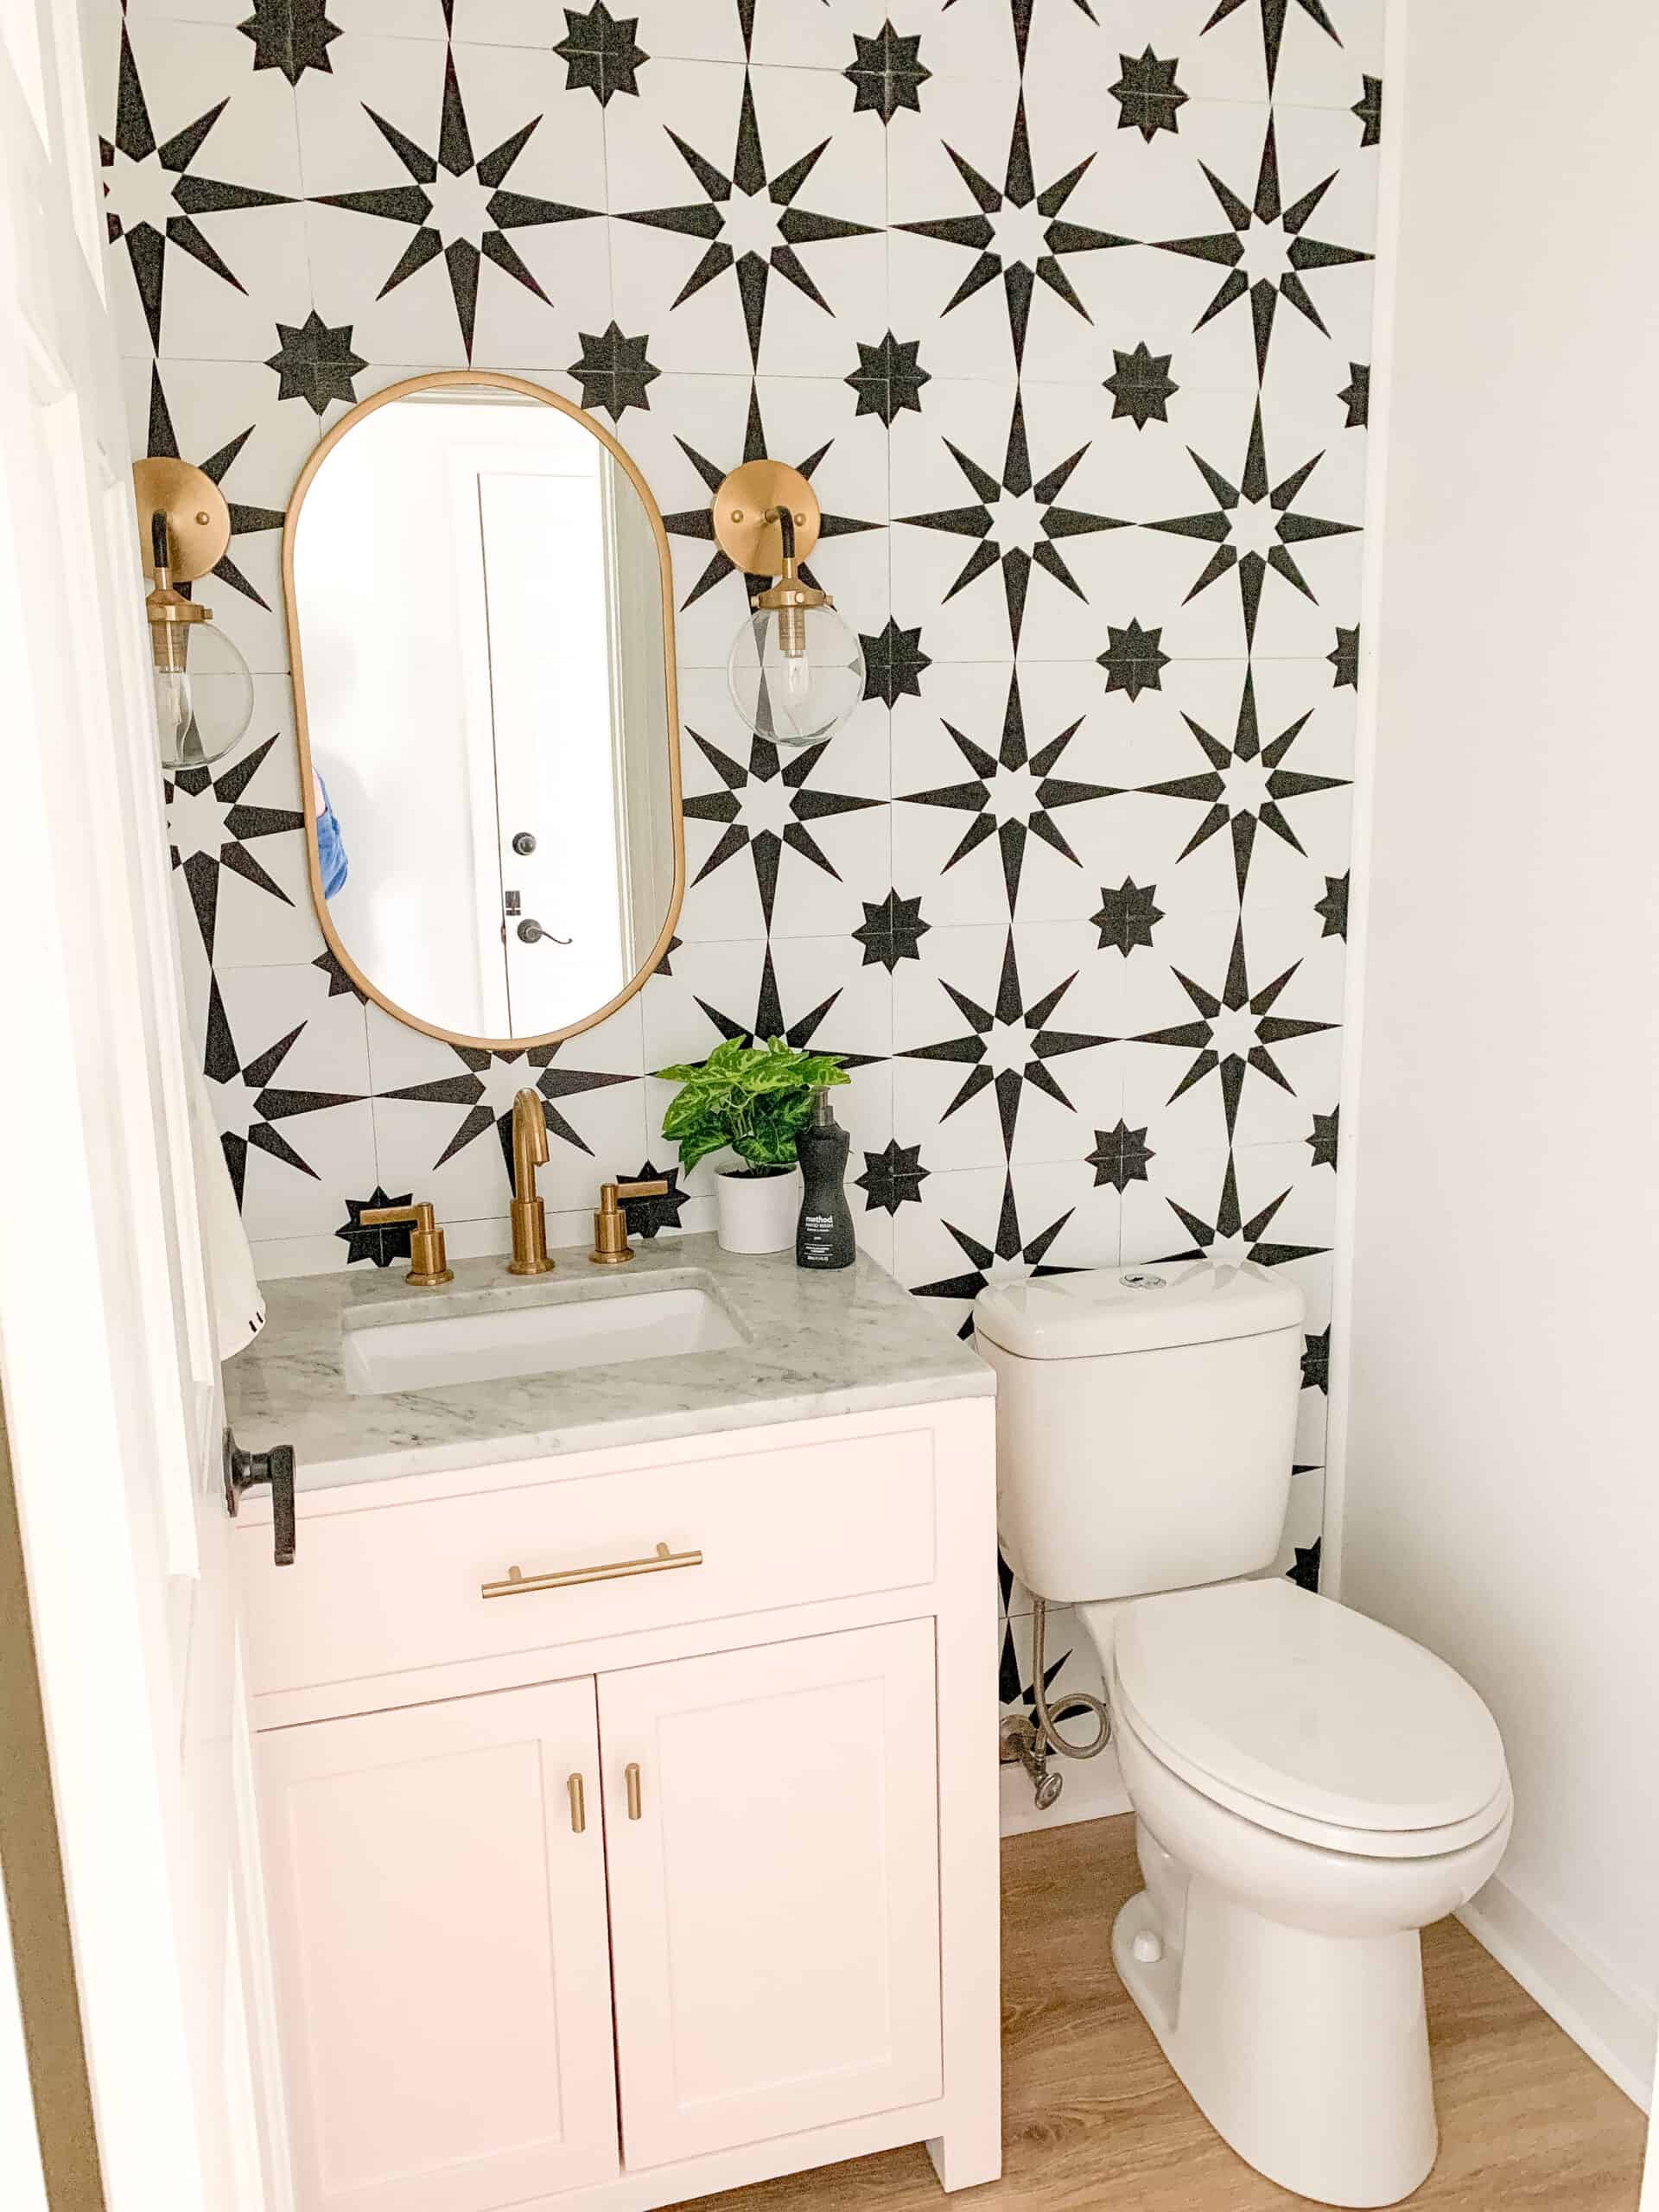
And this is at the after
The Design Process
I am going to show you the mood board I created for this room, which we walked you through via a free document on the original blog post – grab that here!
For me, I normally find something that really gets the ball rolling for a room. One item that is bold and fun, and I go from there. In this case it was these tiles. I found boxes of these basically faux tiles on sale for $11 each, and couldn’t resist, knowing that I would have a place for them somewhere.
I grabbed 4 boxes, and ultimately decide they would be really fun on the wall on the bathroom. The fun part about bathrooms, is there aren’t that many choices that have to be made, especially one this small.
I knew I wanted brass fixtures with the bold wall, and went back and forth on the vanity, but ultimately, decided to go big or go home and do pink. I am a huge sucker for pink, and I knew it was something that could so easily be changed for resale, so we went for it.
Mood Board
One thing I tend to always do for a room is create a mood board. Sometimes seeing items together can help give you direction and keep you on track. This can be in the form of an actual mood board or a Pinterest board. Normally for me it’s the mood board.
Below is my mood board. I will link each item on this board, and then talk to you about my thought process going through it.
To shop this mood board, click on the item you are interested in!

- Rug
- Faucet – This was actually what we went with and love it!
- Toilet Paper Holder – Also our end result – loved the shelf to put flushable wipes for my kids
- The tiles
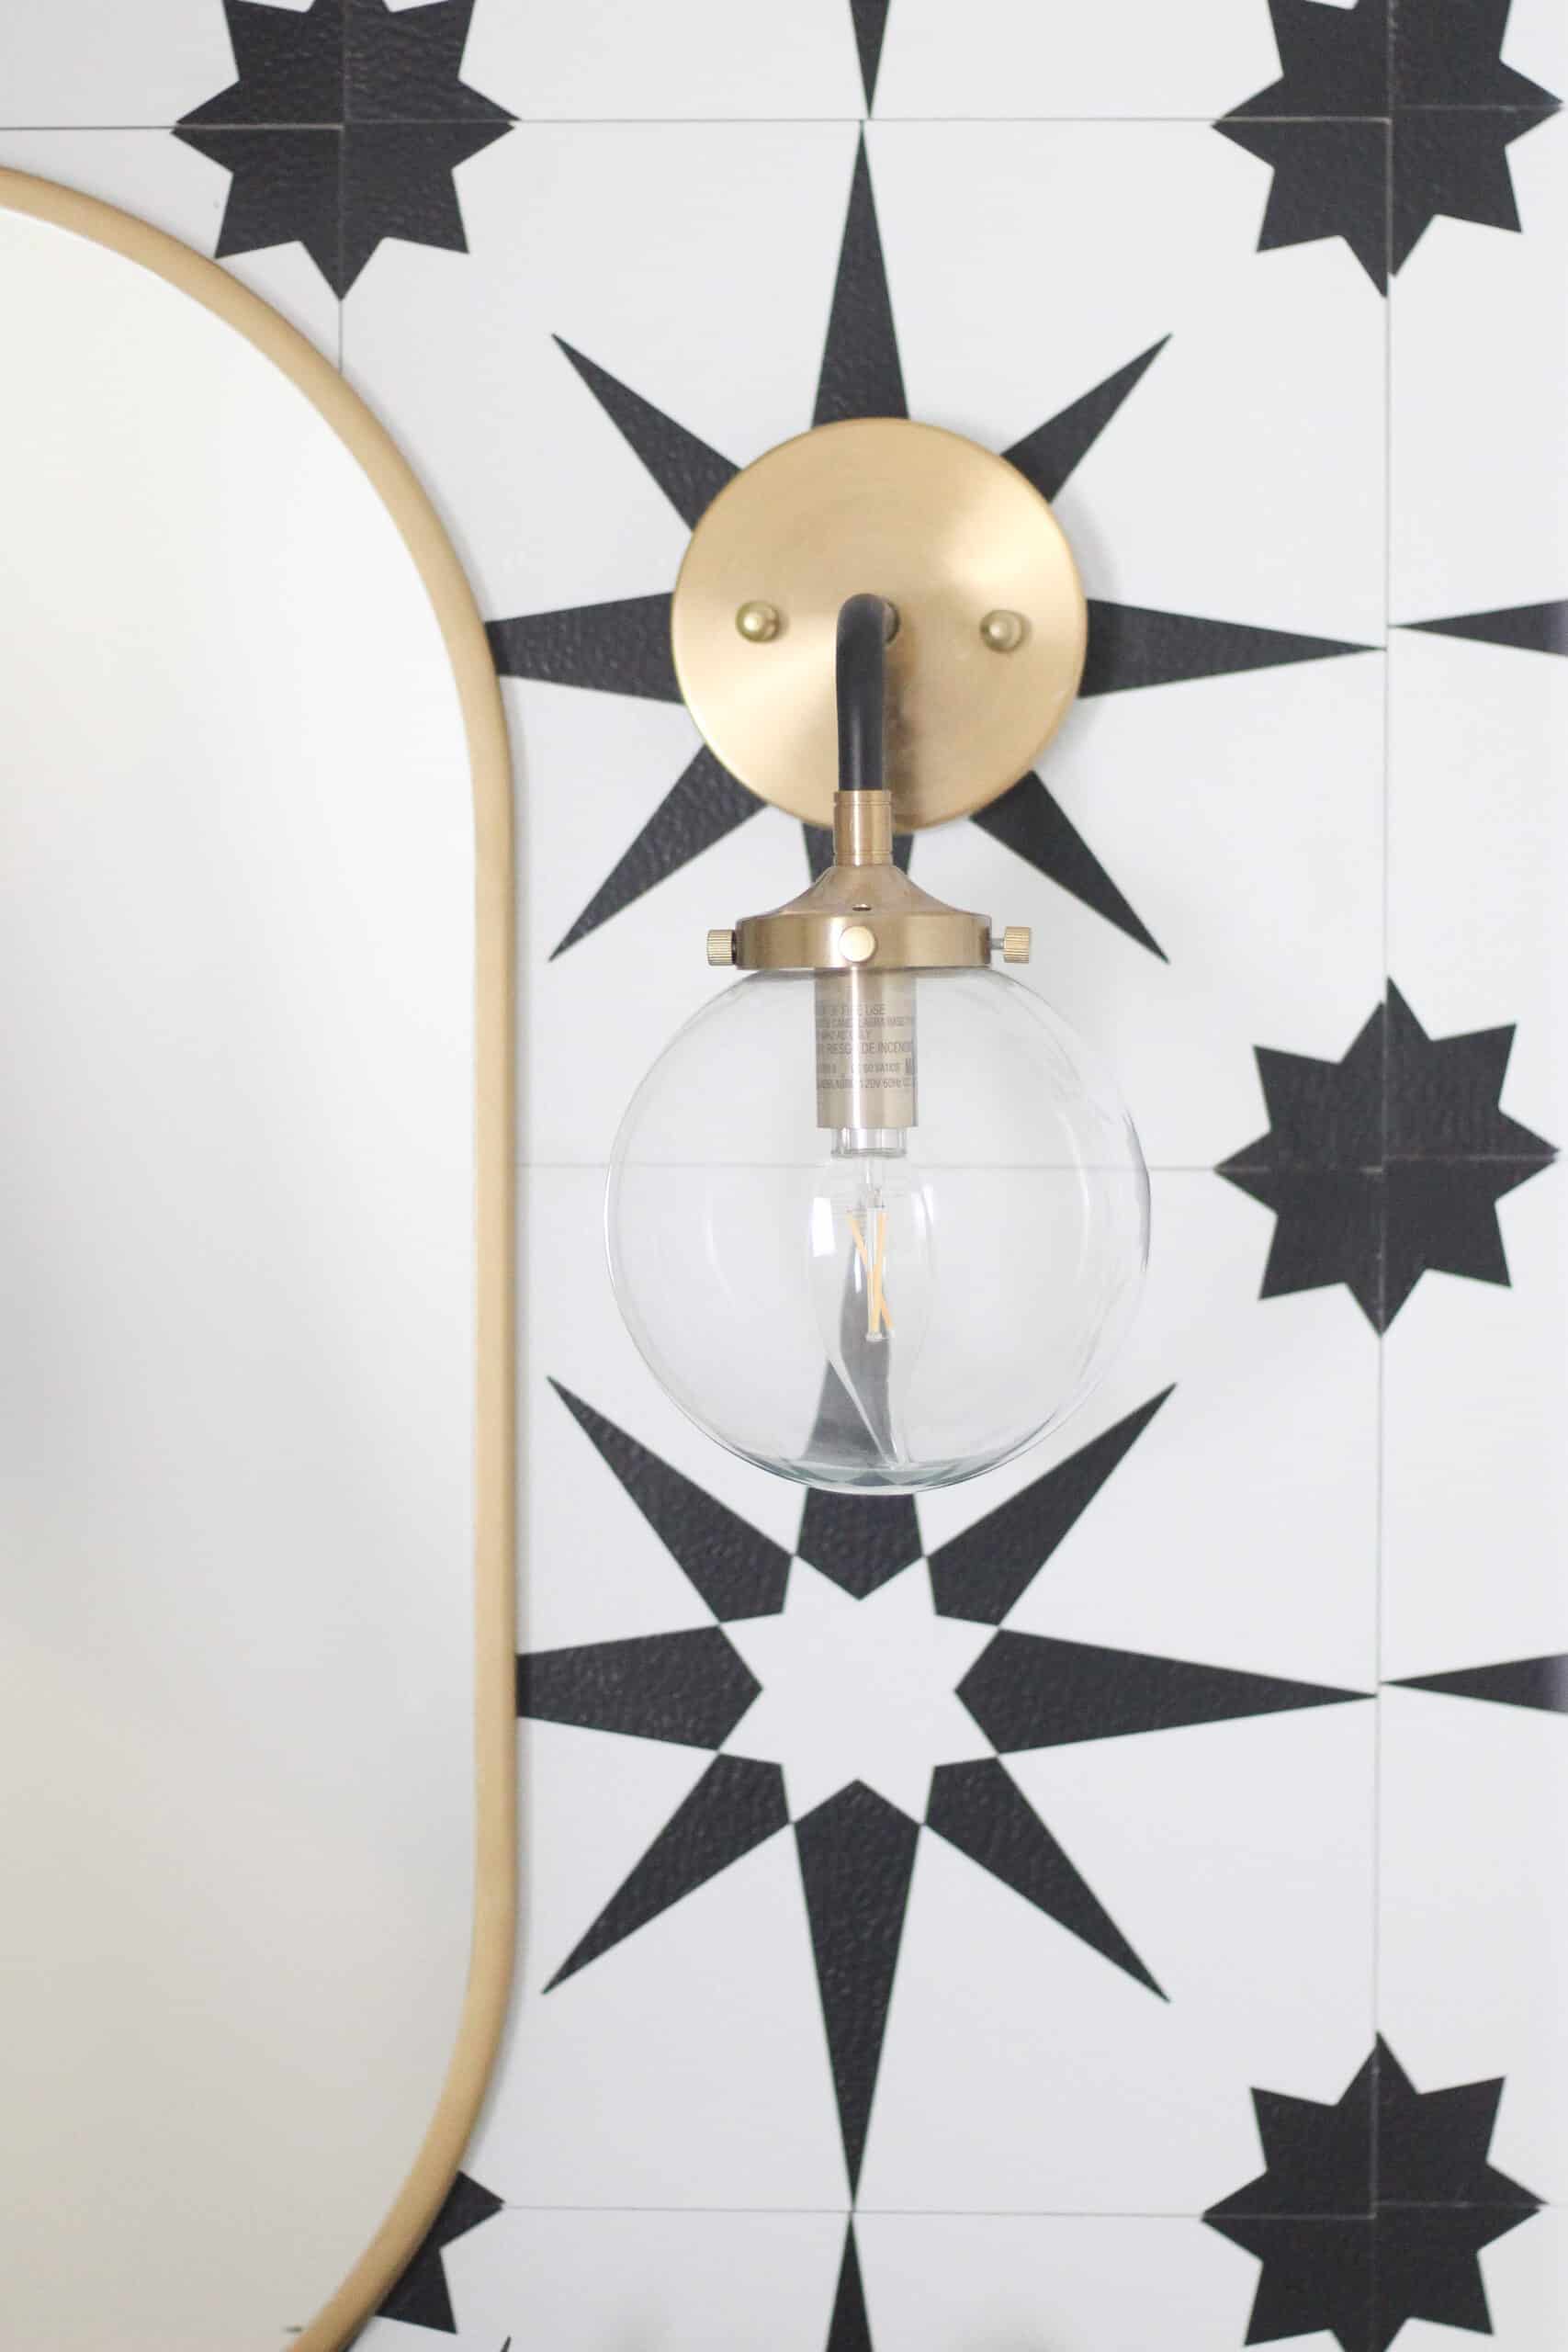
- I loved this look for lights
- The drawer pull we used
- This light has a blush glass to it and its gorgeous – and actually a great price point!
- I loved loved loved this light and will be looking for a place to use it!
- A plant – I used this as a way to see how a pop of green would look
- The paint color we ended with – Glidden Slightly Peach
- Another color I was considering – Glidden Deep Emerald
As you can see – lighting and vanity color were my hardest choices. I knew I wanted some pink in the bathroom, and two of the light fixtures I linked had that pop of pink. Ultimately I found that the one I really loved (with the tassel) wouldn’t fit, and I wanted to go with more of a brushed brass than gold.
I was also torn on emerald or pink for the vanity. I think I was just scared to do pink because of other peoples thoughts, but then quickly. remembered – this is my home! – you will see that some of the other items are in the room at the end, and I incorporated the tiles on the board because I knew they were happening.
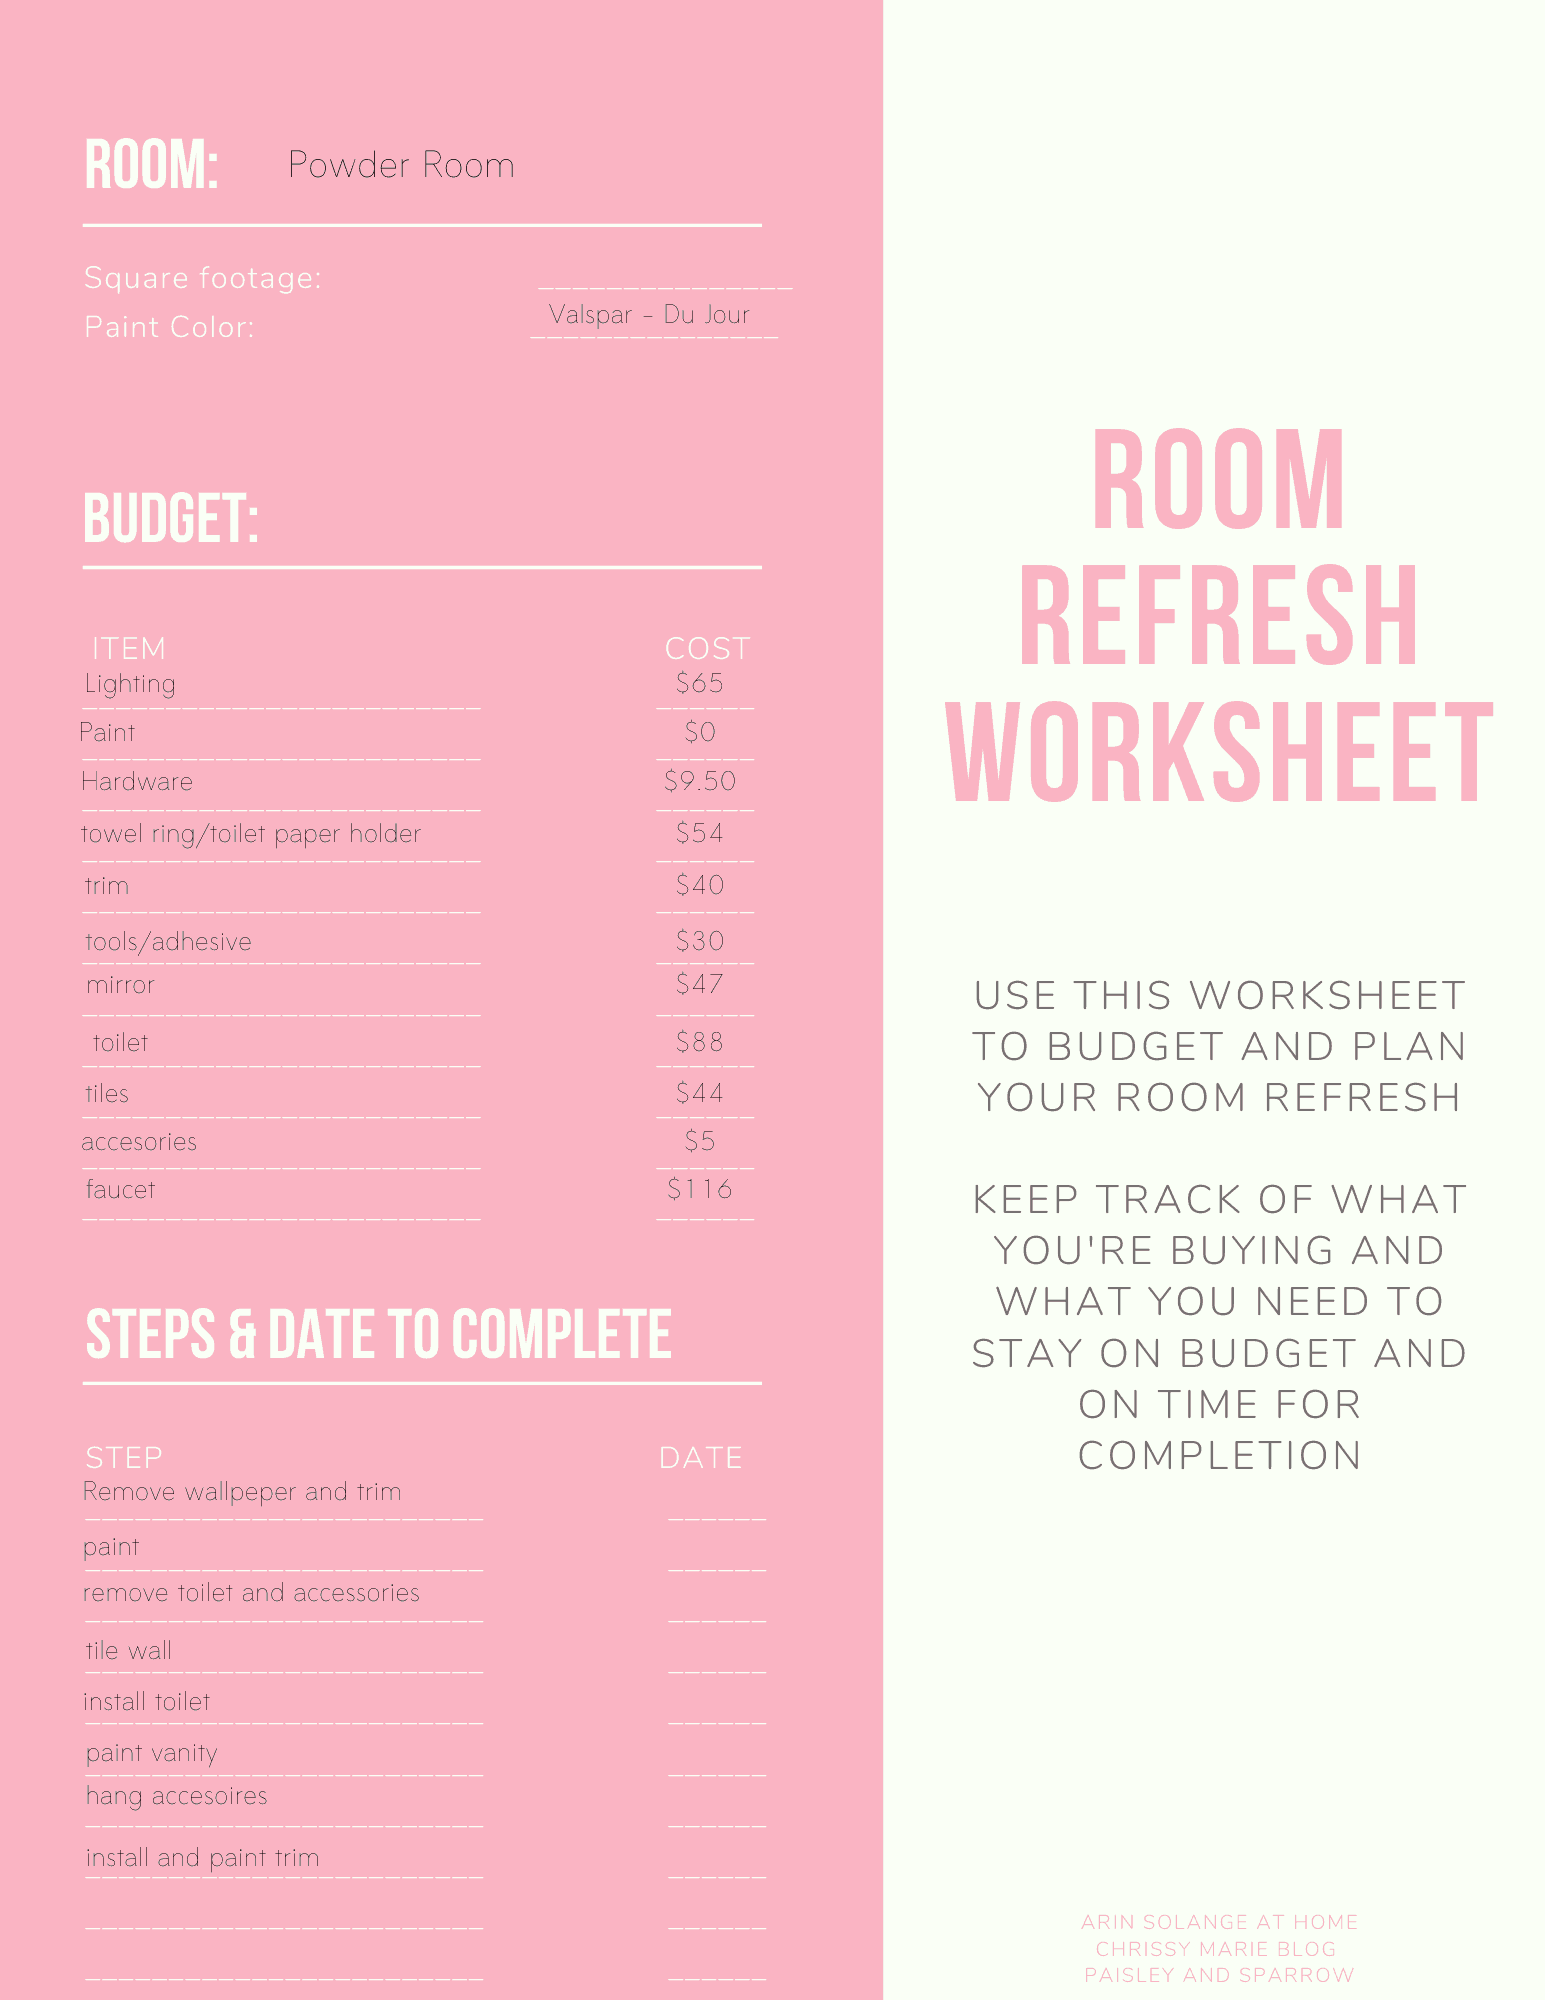
Budget
Something else to consider always when it comes to a room is your budget – I really wanted to keep this to $350 ish. Below I filled out our steps and budget form from the original March Room Refresh Post to show you where we ended up.
For me the budget was not firm, but I try to get a good idea of how much will be spent. We ended up deciding to get a new toilet since we needed to take the old one off, which was an added expense, but worth it for us.
Our end amount spent was roughly: $497
Assembling The Room
So like I said – the starting point for this room was the tile wall. We had to remove the wallpaper that was already there – and PRAISE GOD it wasn’t a horror story, and actually came off rather easily. Once that was done we removed baseboards, cleaned and sanded the walls, and prepped them to be painted.
We painted the bathroom Valspar – Du Jour which is a white we use a lot. Luckily we had it on hand so there was no cost involved. We painted all the walls, then into the corner of the wall with the tile just sort of trimming it out.
Once the walls were dry it was time to tile. We had already removed everything aside from the lights. We decided to move those when needed to give us light to work with for as much time as possible. you will see what I mean before.
Hanging The Tiles
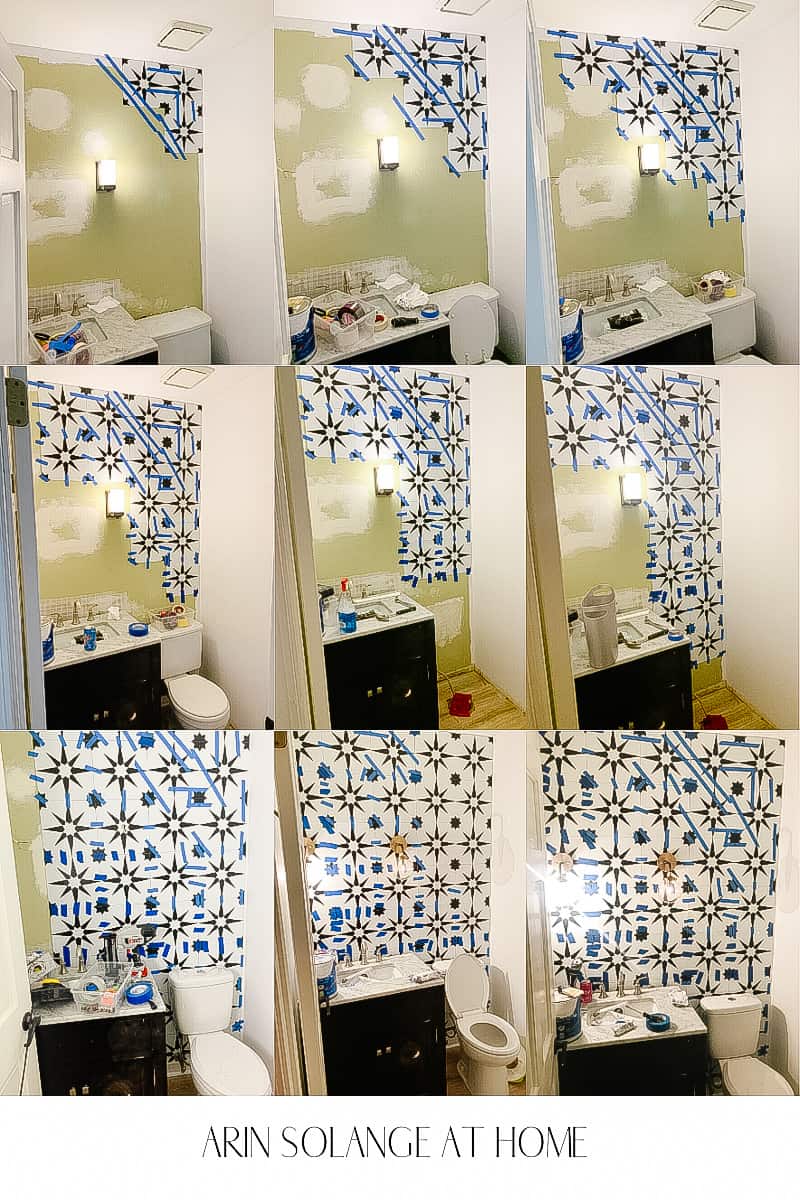
The tiles ARE NOT FOR WALLS. So the adhesive on them doesn’t work for this. We broke all the rules and used THIS adhesive. I have used it before for other projects and know how strong it is.
We hung a few tiles at a time, and used painters tape to keep them in place while they dried. The Adhesive doesn’t take a terrible amount of time to dry, but basically we worked where we could tape the wall then dried tiles working from one corner out.
The tiles are super easy to hang and cut, but it isn’t fast as far as first tile to last because of the drying. It probably took us 4 days to complete the wall (but we had worked activities in there). We would hang a few which took about 10 min then move on and do something else for hours.
The best news is we had one tile with a weird mark we decided to remove after the full wall was done. We were worried it would be a pain, but honestly it wasn’t horrible and didn’t destroy the wall behind it if you are concerned about that!
The Vanity
One the tiles were up, we had to paint the vanity. We went back and forth on buying a vanity, but this one was in good shape, and I love the storage it offers for the space. I also love the sink and countertop, so there was no real reason to spend the money to replace it when we could just give it a coat of paint!
I obviously went with a blush pink, and actually had left over paint from Goldie’s Dresser so just used that. I knew I loved it and it was a great way to save money.
To read more about painting bathroom vanities, you can check out this post – those cabinets are still looking great years later!
Accessorizing
The Details
Lights | Small knobs | Large Pull | Toilet Paper Holder | Towel Ring | Mirror | Tiles | Faucet
Finding the accessories/lighting and all of that was tricky. I wanted to find affordable options, but brushed brass is not all created equally. The first faucet I ordered was too yellow in comparison to the mirror and lights.
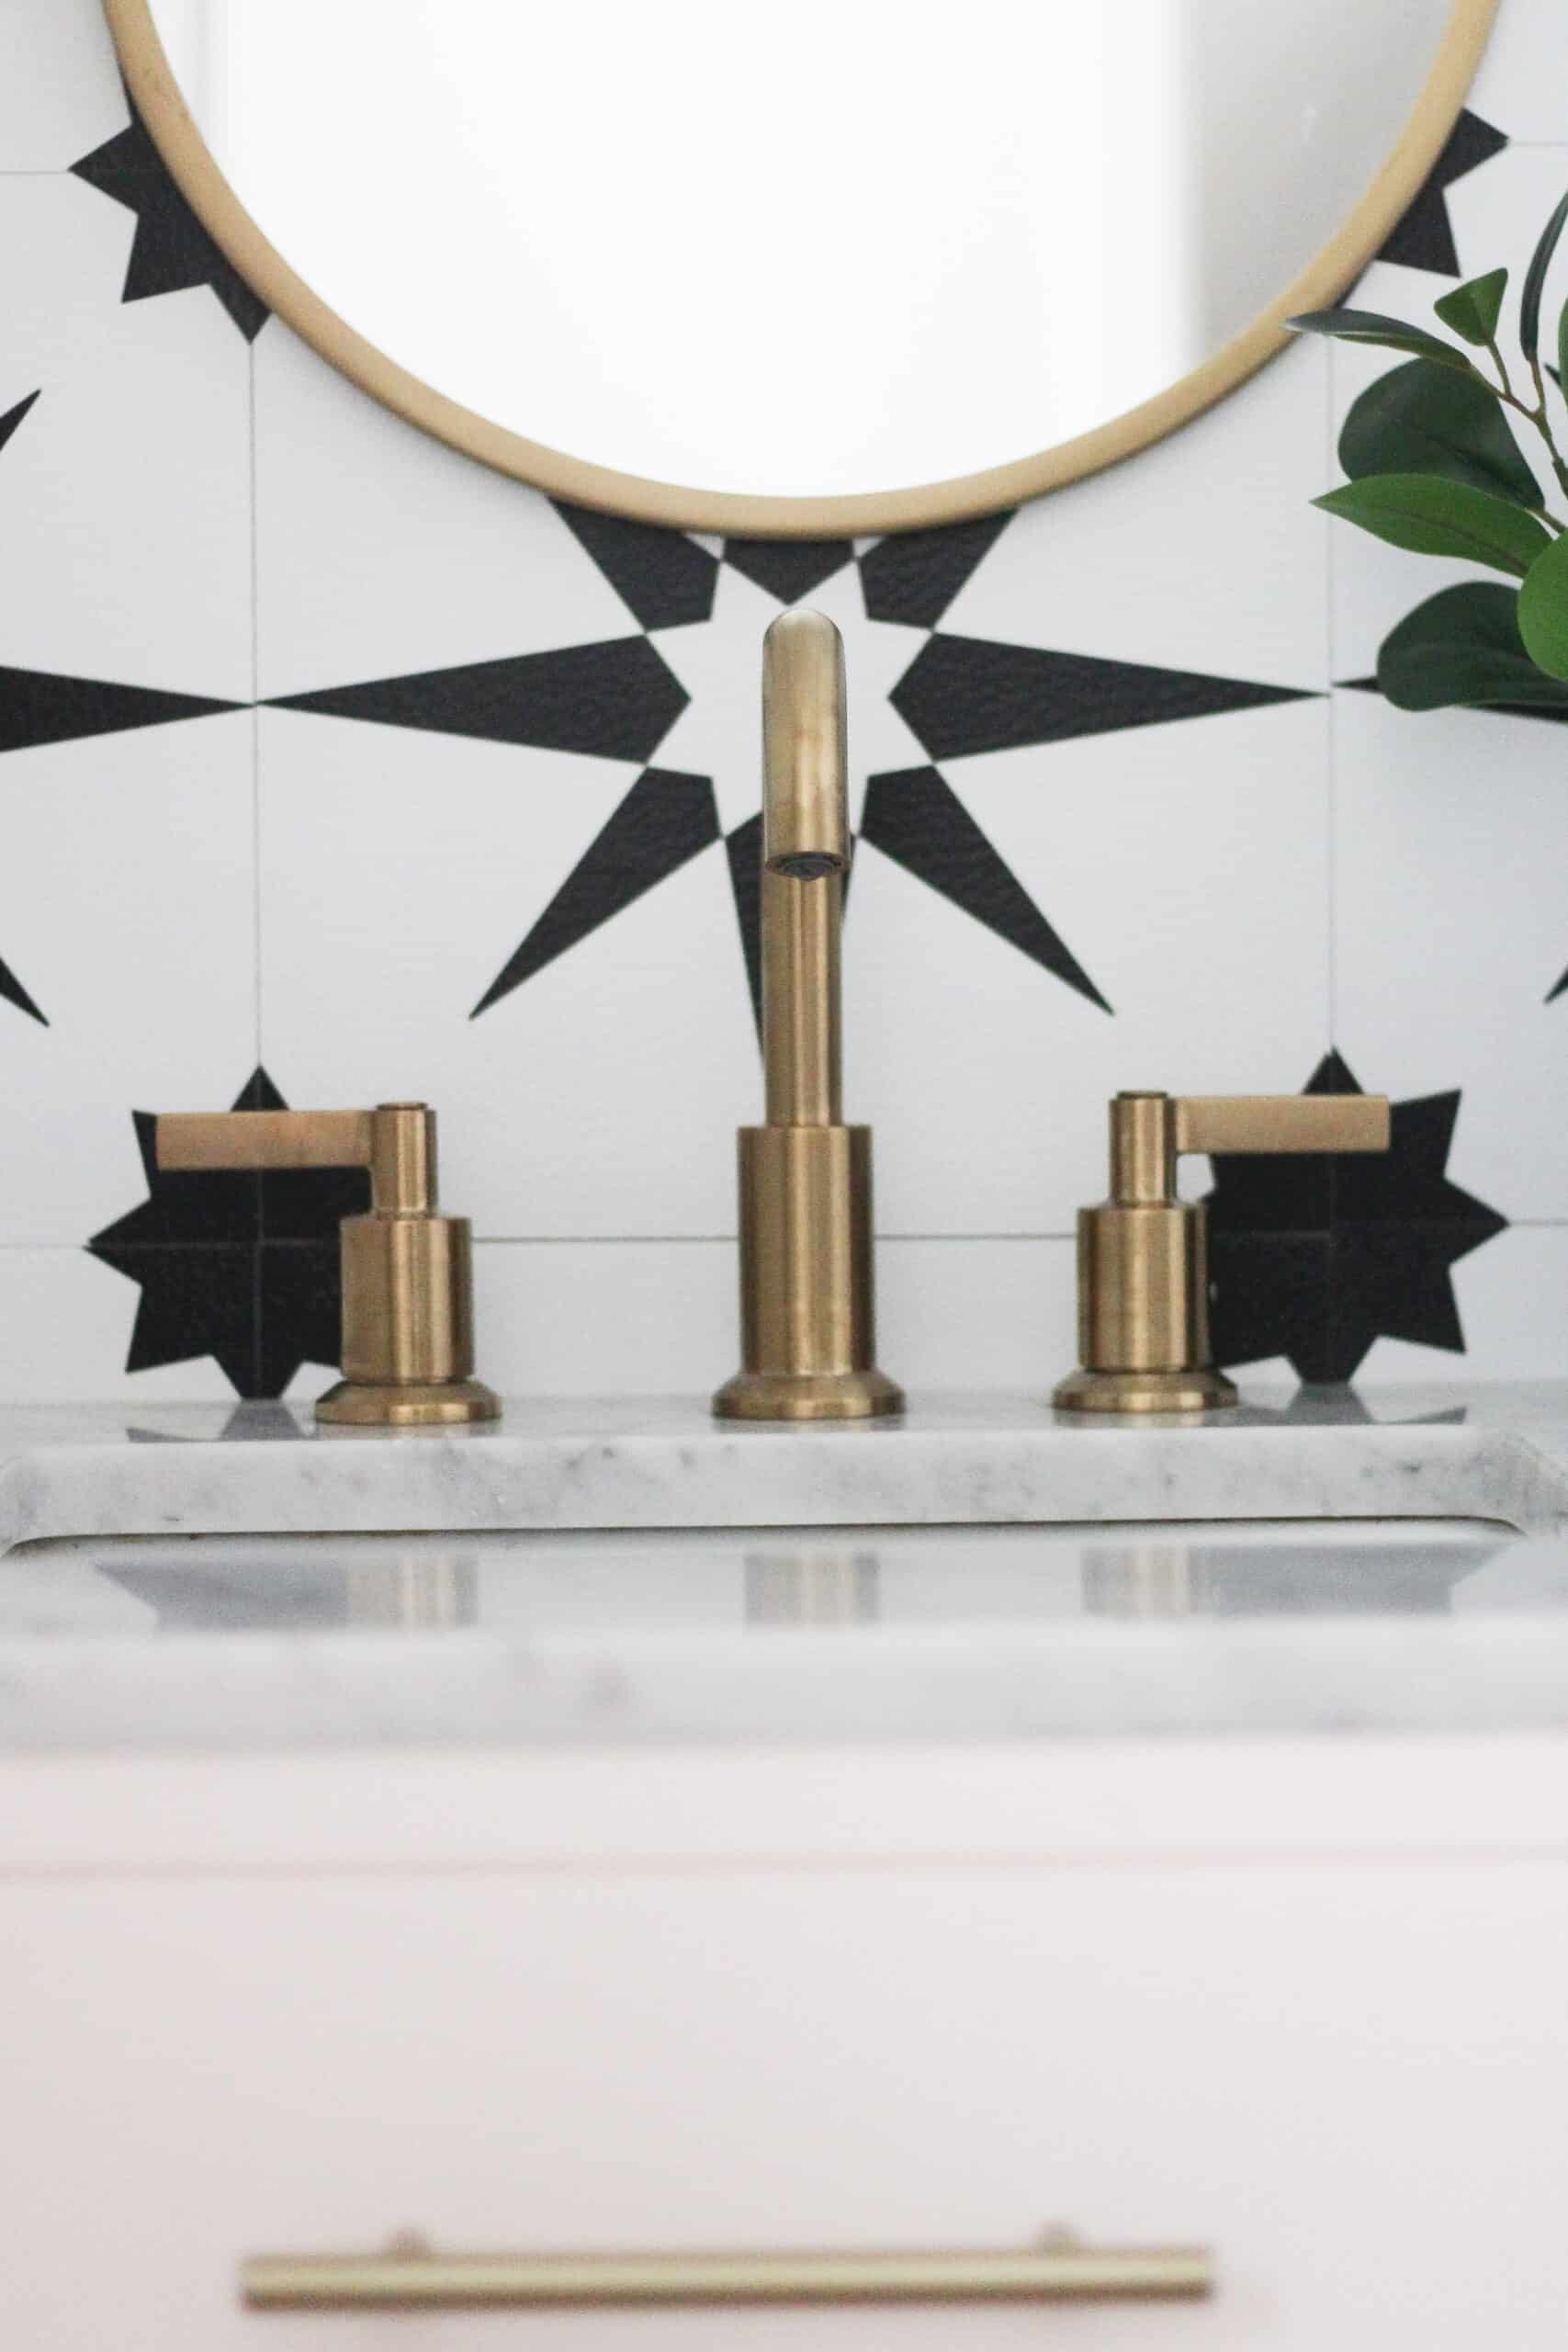
I also had to find lights that weren’t too wide because of the tight quarters. Ultimately I found the lights for $32 each and I love them, and the mirror was a great deal too. The faucet was a bit more of a splurge.
I also went with kind of an odd choice for the toilet paper holder. I loved the idea of these new ones that have a ‘cell phone shelf’, because we have 4 little kids at home, so always have flushable wipes. On the day to day we now have a place to store those, which I LOVE. like can not recommend it more!
I don’t do a lot in terms of decor in bathrooms – this bathroom is small and it just didn’t need much. A small little planter and stems from the Target Dollar Spot did the trick. I would have added a rug, but this is an older home and the doors are so low that we can’t do rugs where the doors swing. So rug-less is sort of our normal.
Overall I am INSANELY excited about the end outcome with this pink powder room, and how big of a change 3 weeks can make. I hope this is inspiring to you all who are joining us in the March room Refresh, and if you have questions along the way (or any time after) feel free to DM me on Instagram or leave me a comment.
Pin Post Below to Find this Pink Powder Room Later
this turned out so pretty! love the gold hardware and lights!!
Thank you so much!! I love how much of a change the gold made too!
Beautiful! How did you hang everything on your tile wall?
Hi Lauren – the tiles are thin so you can screw right through them!