It’s the most wonderful time of year! With the holiday seasons in full swing, I’ve been decking the halls to create a magical experience for our kids. I go a bit overboard with our Christmas display and knew I needed something even more *extra* to make our home over the top.
I had my eye on a life-size nutcracker, but the price tag was insane! So, I decided to make my own. How hard could it be? Turns out it was super easy and a great beginner project. Without further ado, here is my easy DIY life size nutcracker tutorial that will make your home just as special.
This post may contain affiliate links.
Easy DIY Life Size Nutcracker Tutorial
If you are like me and love Christmas decorations, you’ll love this beginner-friendly DIY. I’ve had my eye on a giant nutcracker from Frontgate for years. However, the price tag was insane with it being several hundreds of dollars.
Not to mention, I have a pretty specific color palette I like to follow. While I have a lot of decorations, they all coordinate and match. Finding a life size nutcracker that coordinates with my decor and isn’t over six hundred dollars seemed impossible.
I’m not going to lie, I really put off this DIY project thinking it was going to be too expensive and too difficult to pull off. I’m so glad I gave it a chance. Not only did I spend less than $100, but it was also so easy. Plus, I was able to make exactly what I wanted and bypassed any shipping cost. This easy DIY life size nutcracker tutorial can be done in one weekend.
Make A Plan For Your Nutcracker
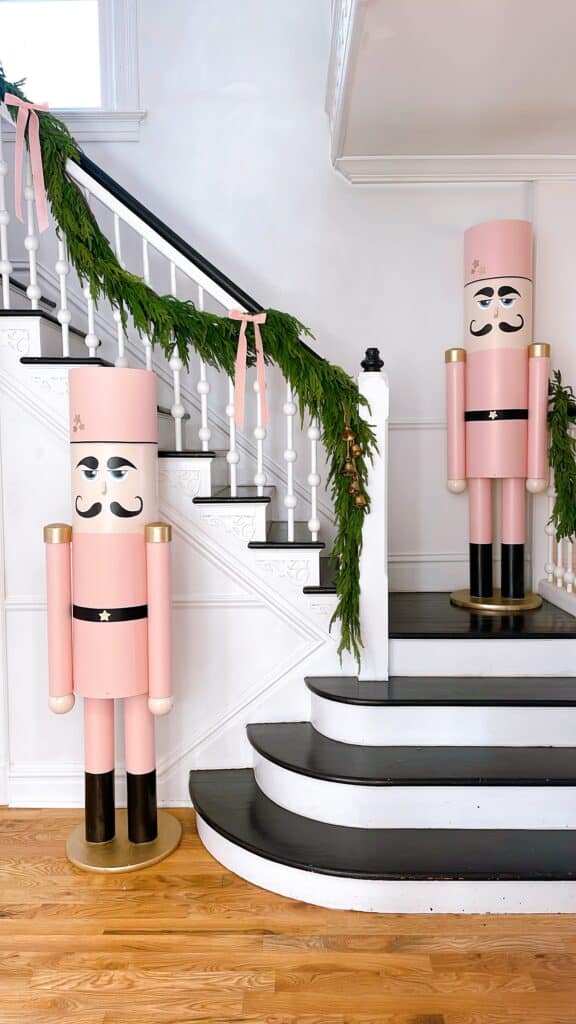
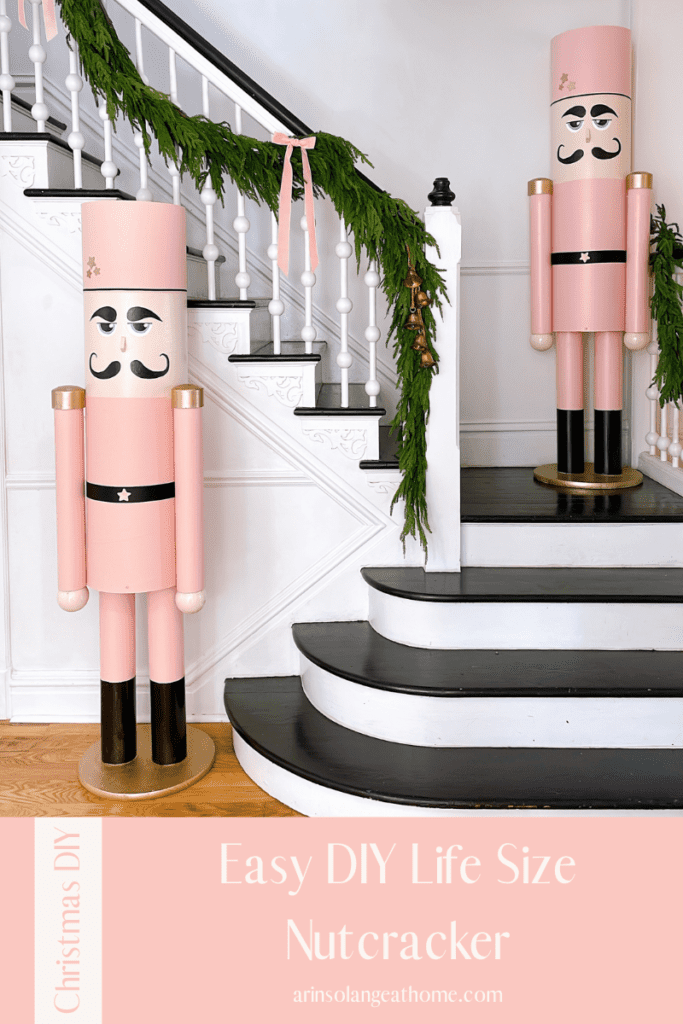
The first thing you’ll want to do is make a plan before you build your nutcracker soldiers. It was important to me that we have a 6 foot nutcracker to make it as realistic as possible. If you don’t have the space, you can always modify these plans to make it fit in your home.
You’ll also want to decide on a design concept. A great idea is to look up nutcracker designs for some inspiration. We opted to go with a pink and gold color palette to match our home.
You can get as detailed as you want or keep it more simple. We chose to keep ours much more simple and let the larger than life soldier speak for itself. But, I’ve seen some really cool designs that incorporate fur or even a toy drum or sword.
My biggest piece of advice is to decide on what you want and execute it. Don’t be afraid to fail, you’re always just one hardware store trip away from the nutcracker of your dreams.
Gather Your Supplies To Create Your Nutcracker
Now that you have an idea of what you want your nutcracker to look like it is time to gather your supplies. I’m including our list as is, but if you want to customize your own soldier, you’ll need to keep that in mind.
The supplies listed are for one nutcracker. Our nutcracker stands 6 feet tall. The base for our nutcracker is 18 inches around.
Tools:
- Drill
- Saw
- Screws
- Hot glue
- Painter’s Tape– recommend Frog tape
- Paint brushes (keep in mind you’ll need one for detailed work)
Base + Body + Arms + Hands
- Scrap 2×4 (we only needed 1 2×4)- You’ll need 4 pieces that are each 6 inches
- 18 inch wood round base- You’ll need a base with ¾ inch or more thickness
- 12 inch wood round base – You’ll need a base with ¾ inch or more thickness
- 12 inch x 48 inch wide concrete form tube
- 4 inch PVC pipe – You’ll need 2 pieces that are each 24 inches
- 3 inch PVC pipe- You’ll need 2 pieces that are each 24 inches
- 3 inch PVC pipe caps – You’ll need 2 pieces for the shoulders
- Paint
- Gold metallic craft paint (base + shoulders + detail work)
- Black satin paint (legs + belt + face)
- Valspar Quartz Blush (body + hat)
- Valspar New Penny (face + hands)
- Plastic clear ornaments – You’ll need 2 of these for the hands
Facial Features + Embellishments
- Paint
- Valspar New Penny
- Black satin paint
- White satin paint
- Scrap foam – You’ll cut this to become the nose
- Black ribbon- You’ll use this for the hat
- Wooden stars
Assemble Your DIY Nutcracker
I’ve created a helpful video of our nutcrackers in the process of being built. If you get stuck, don’t hesitate to refer to my video in this post to help clarify the steps. You should be able to complete these fairly quickly and easily.
Step 1: Cut Your PVC Pipes & Scrap Wood
Using your saw, you’ll need to cut your scrap wood and PVC pipes if they have not been precut.
Cut 4 pieces of scrap 2x4s at 6 inches (or longer if needed). These 2x4s will be attached to your wood rounds (18 inch and 12 inch).
Next, cut your PVC pipes to 24 inches each. You’ll need to cut your 4 inch PVC pipes to 24 inches each for a total of 2 pieces. Cut your 3 inch PVC pipes to 24 inches each for a total of 2 pieces.
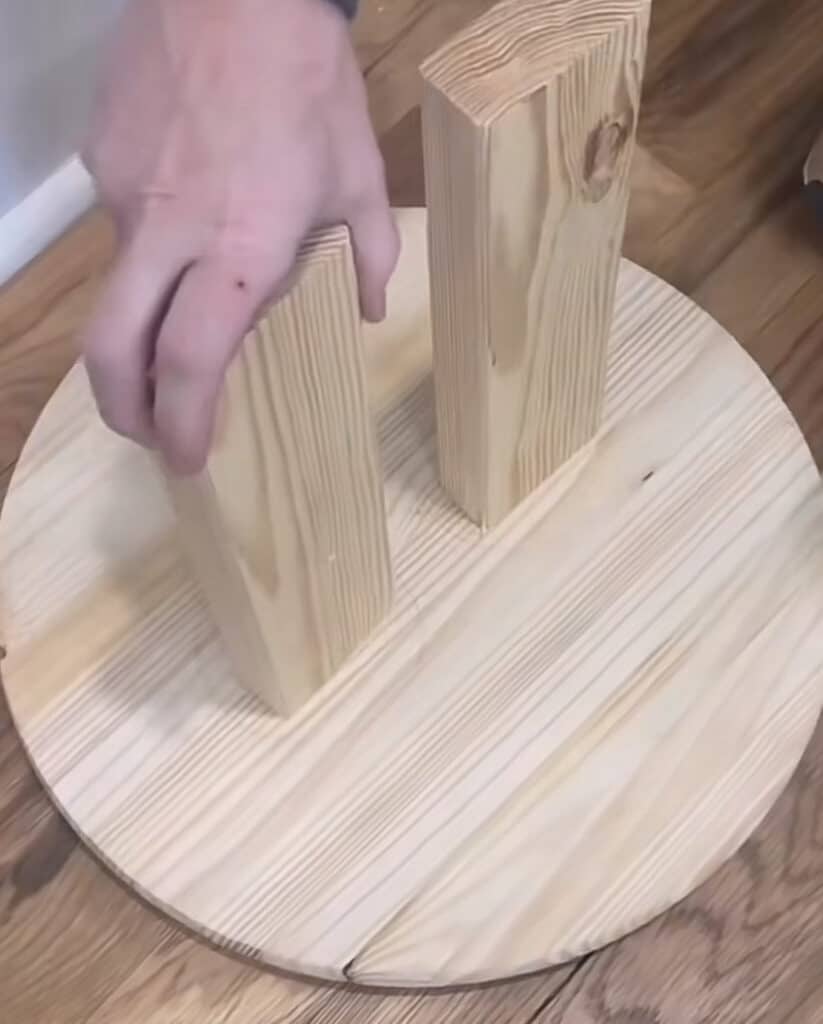
Step 2: Secure Your 2x4s To Your Rounds
Next, using your drill and screws, secure your 2x4s into your wood rounds.
Take 2 pieces of 2x4s and attach them using screws to your 12 inch wood round. Wait to follow the same process for your 18 inch wood round until Step 3.
The wood rounds will resemble a small step stool once the 2x4s have been attached.
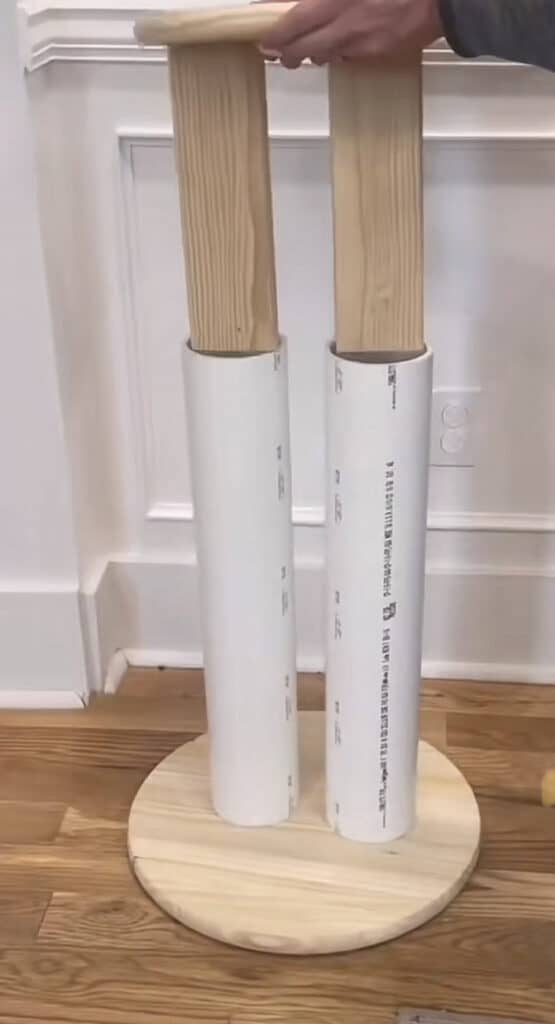
Step 3: Secure Your Base & Build Legs
This next step sounds more complicated than it is. If possible, I’d recommend watching my video tutorial to help you visualize this step.
Set you 18 inch round on the floor, with your 2x4s on top.*Your 2x4s should not be secured yet in your 18 inch wood round.*
Set the 4 inch PVC pipes over your 18 inch wood round base with the unsecured 2x4s in place. The PVC pipe will fit over your 2x4s.
Next, drop the 12 inch wood round that has been secured with your 2x4s into the top of your 4 inch PVC pipes.
Your 18 inch round and 12 inch round should line up within the 4 inch PVC pipes to create your legs. Mark with a pencil where your legs are aligned. You can trace your PVC pipes that will become your legs to ensure they are straight.
Go back and secure your 2x4s to your 18 inch round so that the 2x4s are in the center of your PVC legs. Place your 12 inch wood round back into the top of your 4 inch PVC pipes and you now have aligned legs!
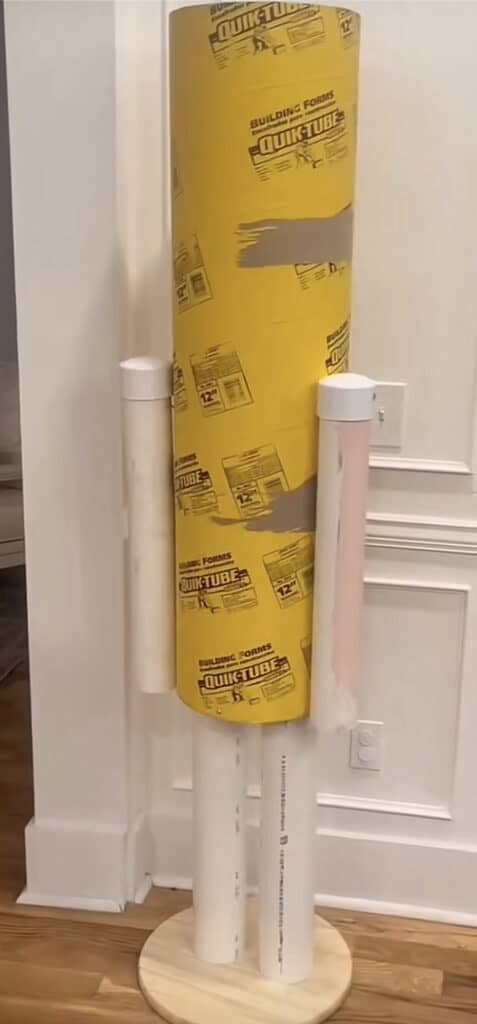
Step 4: Attach Your Body
Grab your significant other or a friend to help you complete this next step. You’ll need to grab your 12 inch concrete form and place it over the 12 inch wood round.
One person will need to hold the large concrete form steady, while another person carefully drills through the concrete form into the wood round in 4 different spots.
Step 5: Attach Your Arms
Take your 3 inch PVC pipe pieces that are cut to 24 inches each to create your nutcracker arms.
Line up the PVC pipe with the bottom of the body and drill them into the body from inside the PVC pipe. This is the trickiest part of the whole tutorial, mainly because you are working in such a tight spot. You will only need to use 2 screws per arm.
Step 6: Create Shoulder Caps
Pop on your 3 inch PVC pipe caps to create your shoulders.
Congratulations, you have an assembled nutcracker!
Step 7: Divide Your Nutcracker Into Sections
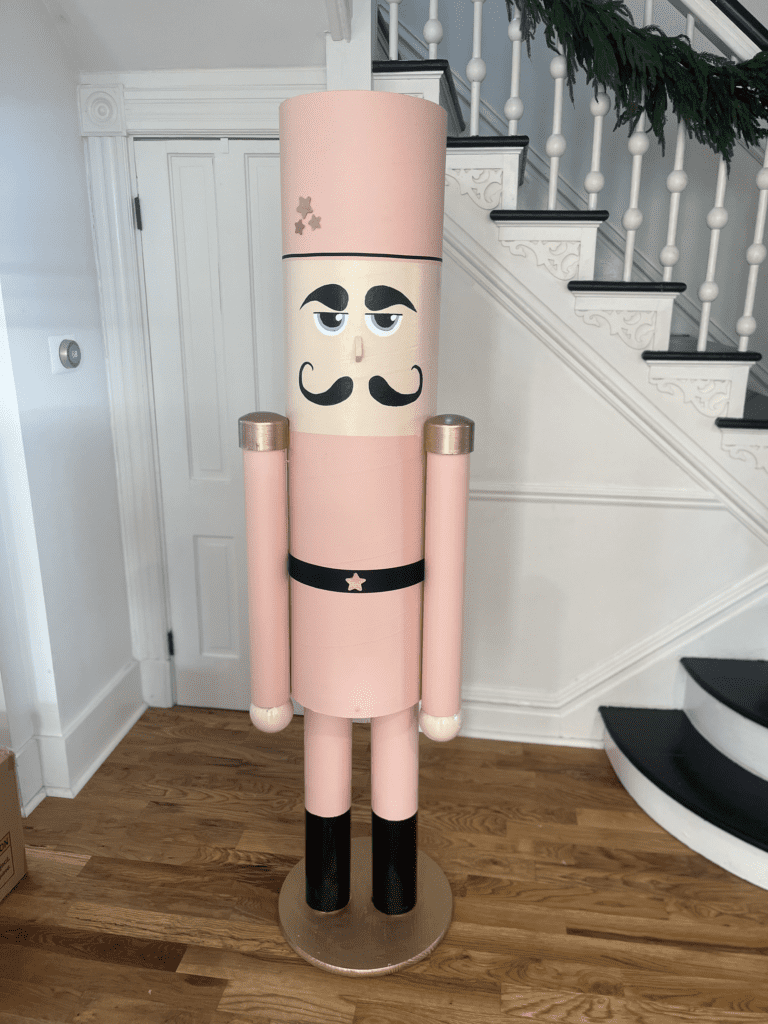
Take your painter’s tape and divide your nutcracker into 3 main sections: the body, face, and hat. You can paint and decorate these sections in your own way. This is where your creative self can shine. Feel free to follow your own design here. I’ll share with you what we did, but you are welcome to change it up to suit your needs.
Step 8: Paint The Body & Hat
I painted the body and hat using the same color: Valspar Quartz Blush. I went ahead and divided the legs in half and painted the bottom half a black satin paint to signal boots, and the top half, the same color as the body.
I also added a little black belt embellishment on the body. You can divide your body using painter’s tape above and below to create a 1 inch thick belt using black satin paint.
Don’t forget to paint your arms too. Again, I used Valspar Quartz Blush.
Step 9: Paint The Face
Next, I painted the face using Valspar New Penny.
Step 10: Paint Your Base & Shoulder Caps
I used gold metallic craft paint to paint the base and 3 inch PVC pipe caps for our shoulders. You can certainly paint when your nutcracker is assembled, or if you prefer, you can paint your 18 inch wood round and PVC caps ahead and time so it is a bit easier and requires less painter’s tape. Alternatively, you can always spray paint your wooden round and PVC caps ahead of time.
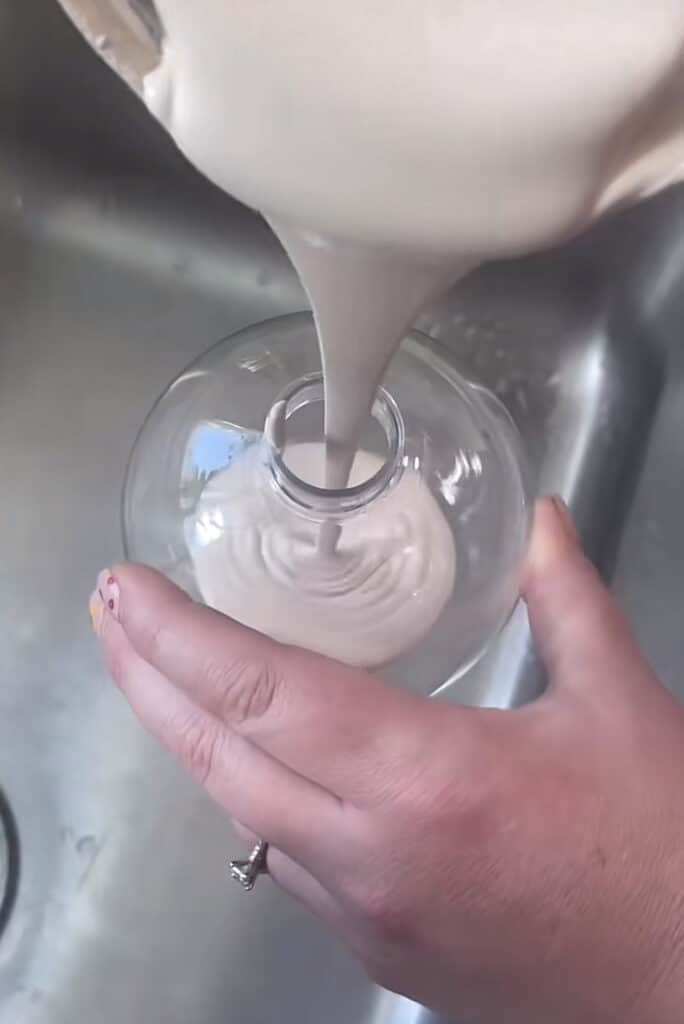
Step 11: Paint & Attach Your Hands
Now it is time to fill your empty clear plastic craft ornaments with skin colored paint. The top of the ornament should pop off so that you can pour your paint inside. Swirl the paint around to make sure it is evenly coated. Next, pop the top back on, and hot glue those to the bottom of your arms.
Step 12: Add Embellishments
You can get as creative and detailed as you want. For embellishments, I found wooden stars that I painted using my gold craft paint. I hot glued them on to the hat, along with some black ribbon to create a timeless look. I also added a star to the center of our soldier’s belt to create a buckle in the middle of his torso.
You can add fur or feathers to the hat if you want to add some texture. For some bling, you could add jewels to create a bit of shine.
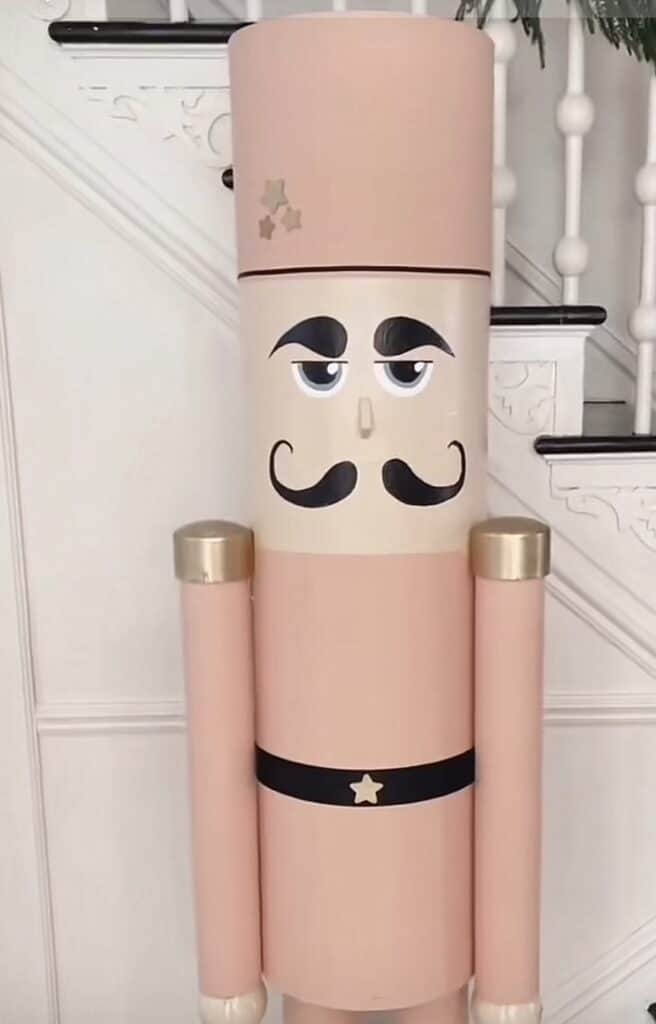
Step 13: Create A Face
This next step can seem intimidating, but it does not have to be. You’ll need to create facial features for your DIY nutcracker.
If you aren’t a great drawer or painter, you can always use decals in place of paint. If you have a cricut, you can design facial features in design space and use permanent vinyl instead.
I ended up free handing the face for my first DIY nutcracker. If you do this, make sure you do it in pencil first! Once I had the face completed, I traced it onto parchment paper and used it to trace those features on to my second nutcracker that I made.
This same principle applies if you aren’t a good artist. Feel free to search for facial feature images online and print them out in sizes that will complement your nutcracker. You may have to play around with this some before you find the right fit. Tape them to the face, and then trace onto parchment paper. From there, you can then trace it onto your nutcracker’s face and paint.
For the nose, I opted to create some dimension using a scrap piece of foam that I cut into a triangle. I painted it the same color as the face and hot glued it on.
Step 14: Show Off Your Nutcracker
You have now completed this easy DIY life size nutcracker tutorial. You have your very own life size nutcracker for a fraction of the cost and customized to your liking!
You can choose to keep your DIY giant nutcracker inside or on a covered front porch! I will say that if you plan on using your nutcracker for outdoor use, you’ll want to pick paint and embellishments that can withstand the elements.
Other Posts You May Like
DIY Pink Santa Mugs | Neutral & Pink Christmas | Merry & Bright Decor
Pin the Photo Below For Later
I hope this easy DIY life size nutcracker tutorial fills your home with the holiday spirit. I can’t believe I waited so long to create my very own. At less than $100, you can create a large toy soldier of your own to guard your home this Christmas. If you have any questions, feel free to leave them in the comments section or DM me on Instagram. I share many more projects and products on both Instagram and TikTok so be sure to follow me in both places!
Hands down, the BEST Christmas DIY project!!
thank you!!
Sooo impressive! Great job! THANK YOU for the step by step detailed instructions AND each step in photos!!! When the sweltering heat subsides I’d love a make one.
you’re so welcome!!
Very cool project! I knew there had to be a lot more to it but I’m shocked how easy! I need these!!!!! LOL 😆
they are so simple!
Hi Arin
I just finished making your nutcracker/ soldier. He is AMAZING!!! I just wanted to say thank you for your FREE instructions. The pictures and measurements were perfect and made this project much easier than I thought.
Thanks Again Mary
aww that makes me so happy!! enjoy them.
Hi, how much paint did you buy for the each? The body, face?
I would do a quart of paint for each – you won’t need the whole thing but won’t need more either.
I love your Nutcrackers
I bought 2 seventy images back in 2003 and I put them at each end of the garage Xma
But I love yours for inside the house
oh I love that!!
For more detail & dimension,,you could glue 4 or 5 dominos for the teeth. Just a thought. I love this tutorial. Thank you. I’m going to ask husband to let’s try this next year since it’s the 17th & I’m just seeing this idea. Yours look really good. Love the colors also. Thanks for sharing.
Thank you so much for sharing your project I can’t wait to build my nutcracker.