Black Friday is here – and whether you are shopping (from home) or you are not big on those sales, I hope you enjoy your weekend. I LOVE a good deal, and have been searching for great Black Friday deals for the new house and for the kids for Christmas, so wanted to round them all up for you!
This post contains affiliate links
2020 Black Friday Deals
I will do my best to update this post all day, but be sure to watch my Instagram stories for more up to date sale info!
Kids Toys/Gifts
For the Home
All Modern – I have been eying so many things from All Modern
Beddys Bedding – BOGO 50% off – I have a full review of them here, and am seriously obsessed with them. I am not sure if my discount Code can be stacked but try ARINSOLANGE
This post is sponsored by General Mills, but all opinions are my own.
Tis the season for baking and eating, right? Today I am going to be sharing a great little hack for changing up your brownies and cinnamon rolls with chocolate peppermint icing. After all – there I nothing better than a simple update to a classic holiday staple to make every moms life easier!
Holiday Baking and Hosting
This year might look different for the holidays for some of us, but there are some things that I think will remain the same.
Those fun festive meals and special treats are a staple at our house, and I wanted to share a great way to get them in bulk then change them up a bit for one time you make them!
Those fun festive meals and special treats are a staple at our house, and I wanted to share a great way to get them in bulk then change them up a bit for one time you make them!
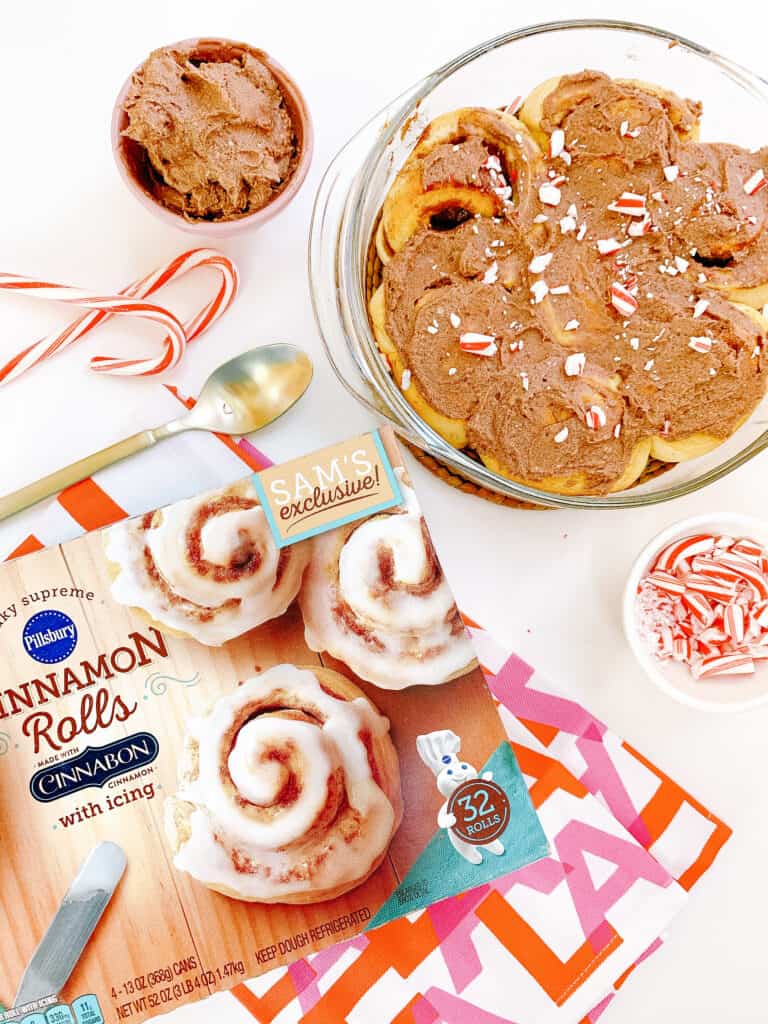
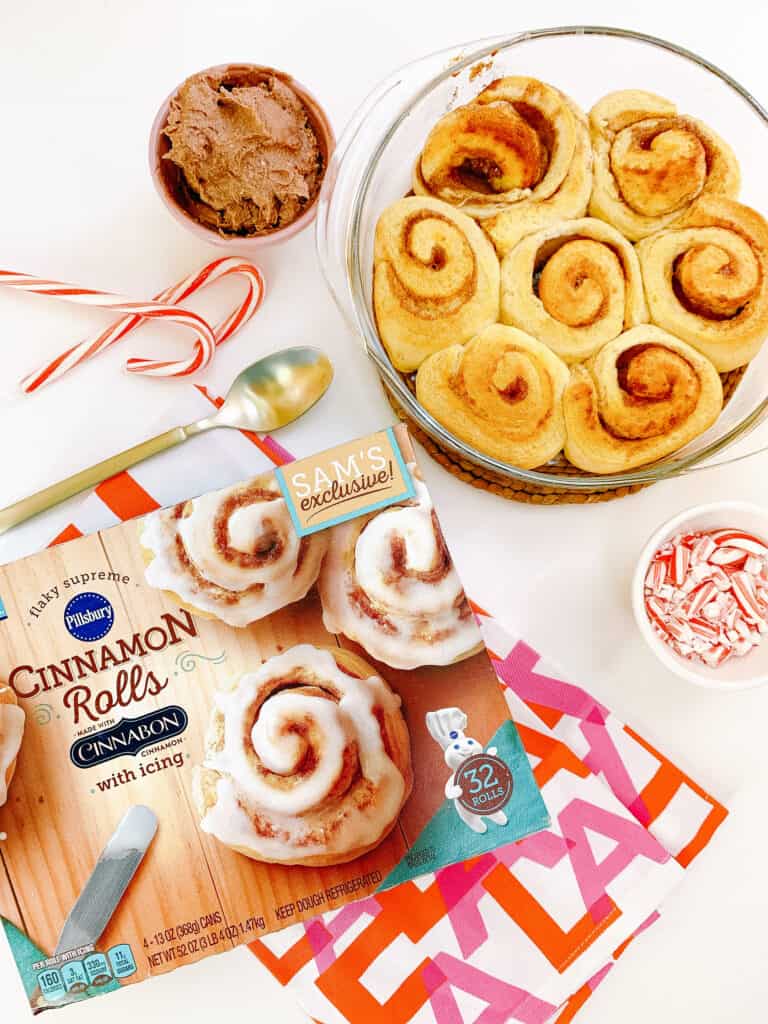
Sam’s Club is our go to for shopping – after all, we have 4 kids! I picked up Pillsbury™ Cinnamon Rolls and Betty Crocker™ Triple Chocolate Brownies for our family to enjoy with all the holiday weekends coming up, but wanted to share a fun idea that will change them up a bit, so you can buy them in bulk!
Chocolate Peppermint Icing
Here is how you make the chocolate peppermint icing for both the brownies and the cinnamon rolls.
Ingredients:
4 cups powdered sugar – softened
1 cup salted butter
½ cup cocoa powder
½ tsp peppermint extract
Milk or half and half
Making Your Icing
Add your softened butter to a bowl and beat until smooth
Add your powdered sugar and cocoa powder
Add a little milk or half and half as needed for desired consistency
Add peppermint extract
A Festive Breakfast
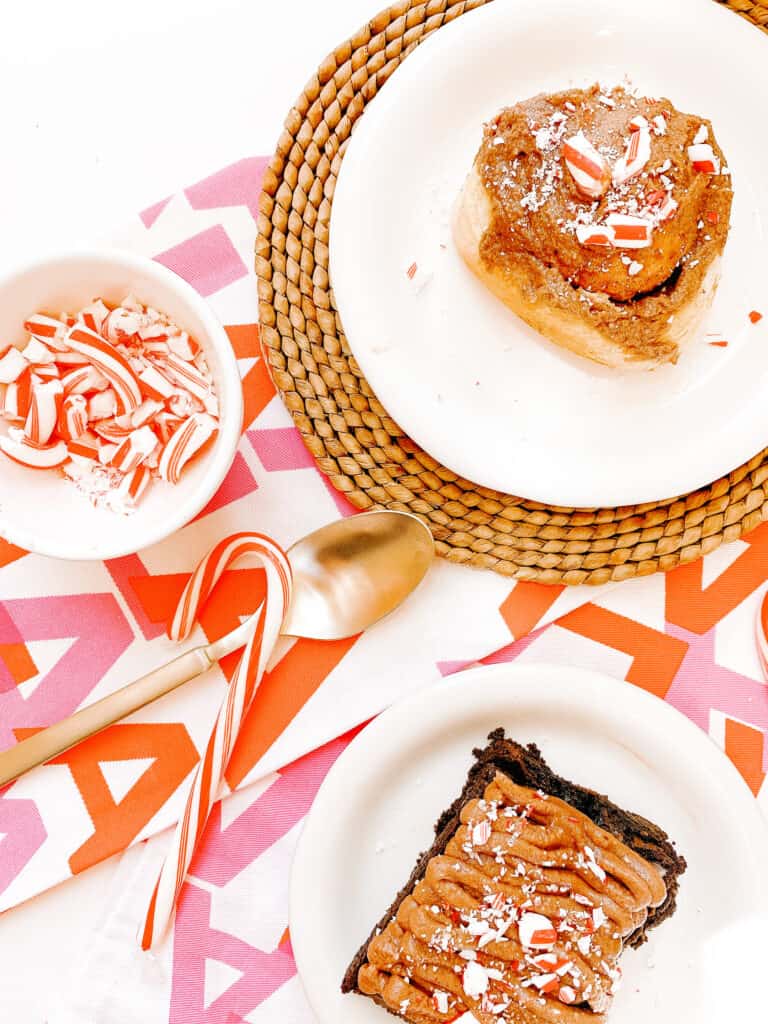
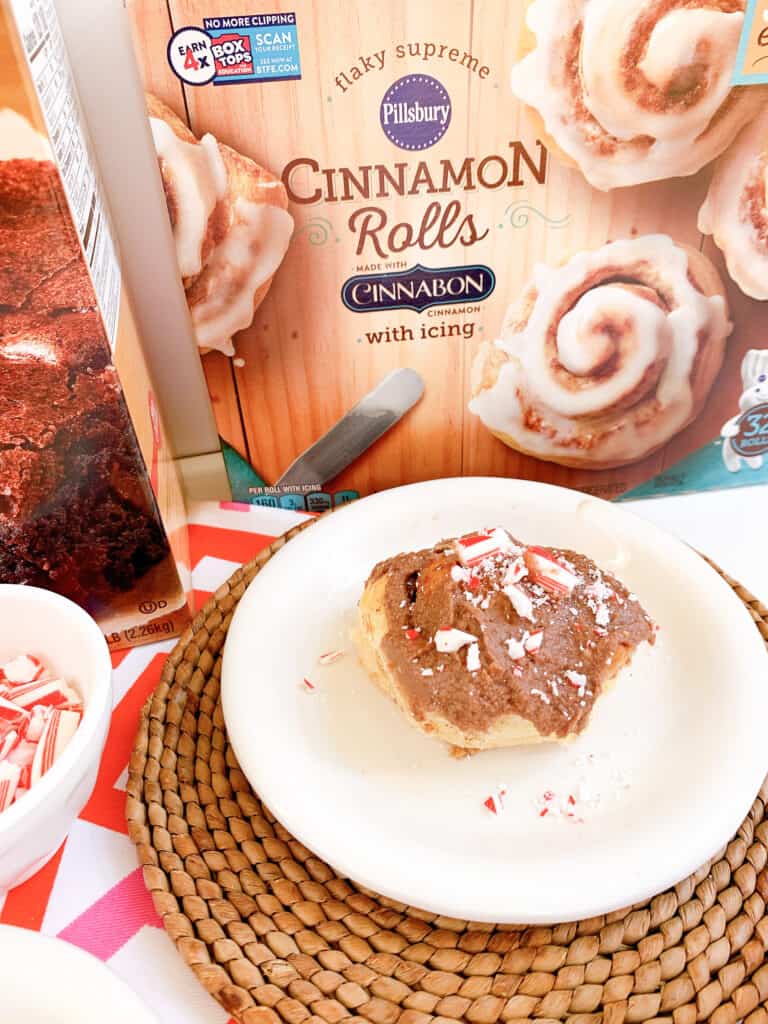
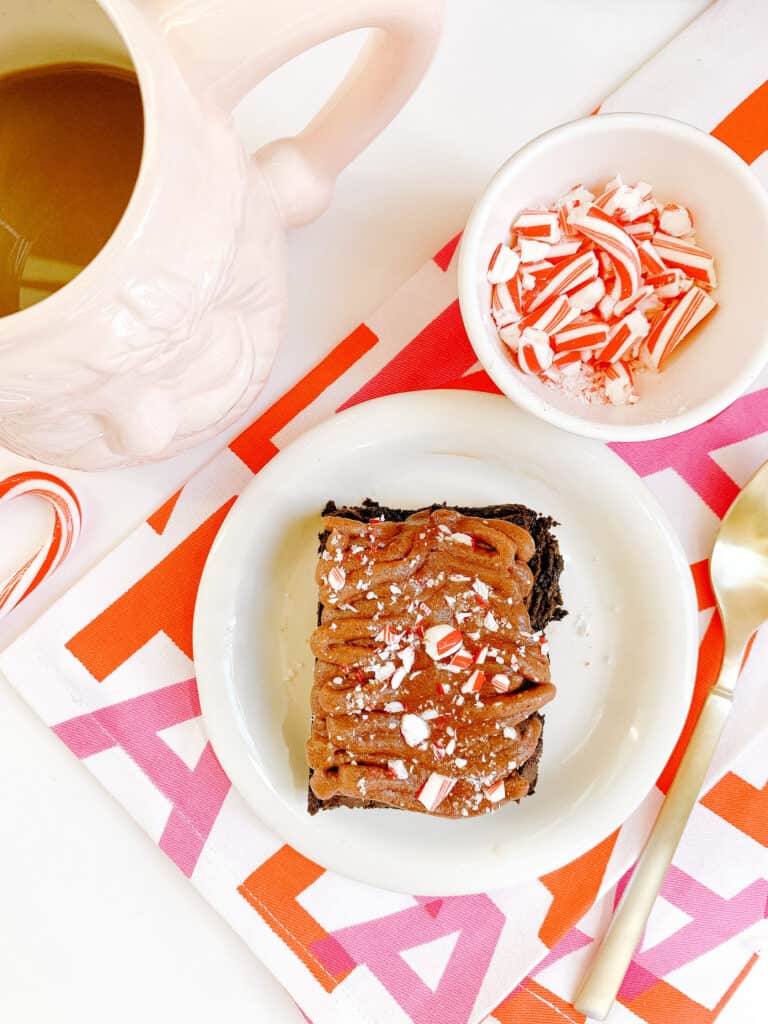
For a festive breakfast this holiday season grab your Pillsbury™ Cinnamon rolls and the chocolate peppermint icing you made above and frost the cinnamon rolls. For added flavor and crunch you can add some crumbled candy canes.
It totally transforms the cinnamon rolls to be a whole new recipe, and will wow your family and friends!
The Perfect Holiday Dessert
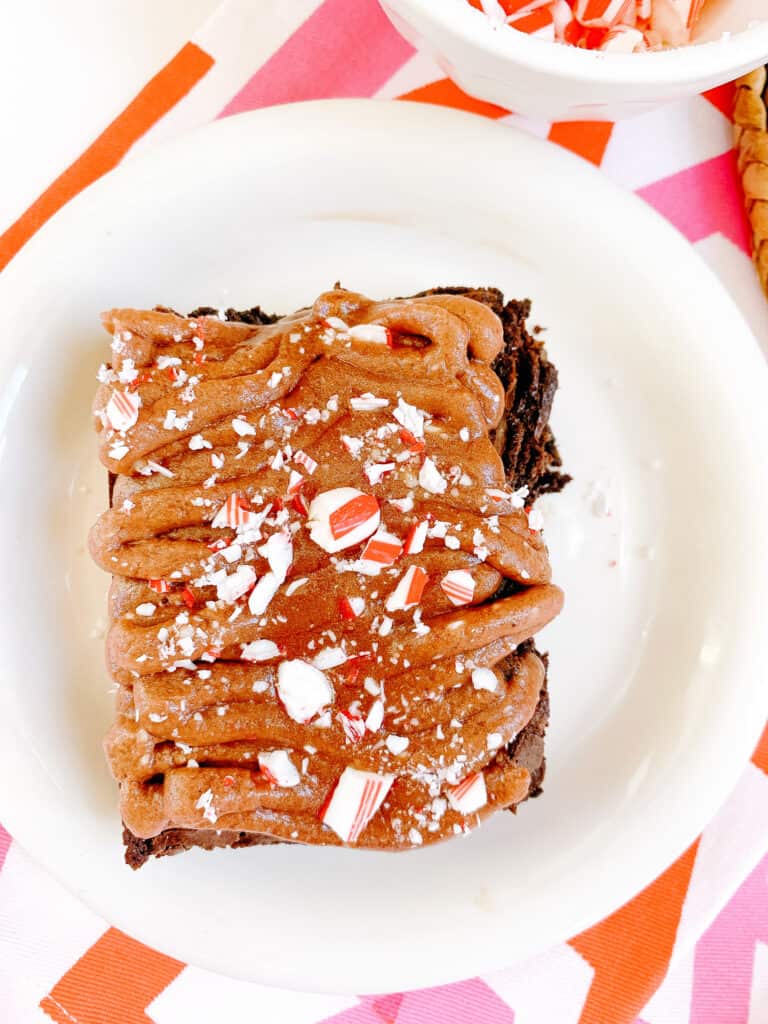
And what should you do with the rest of that chocolate peppermint icing? Grab a bag of your Betty Crocker™ Triple Chocolate Brownies and bake them per the directions on the box.
LET THEM FULLY COOL then top them with your icing and crushed up candy canes. These will literally be your go to holiday dessert, I promise!
Hopefully this gave you two fun and unique ways to use your Pillsbury™ Cinnamon Rolls and Betty Crocker™ Triple Chocolate Brownies. Grab them this holiday season at your local Sam’s Club and you will have enough stocked up for a few great breakfasts and can swing a plate of dessert over to your neighbors.
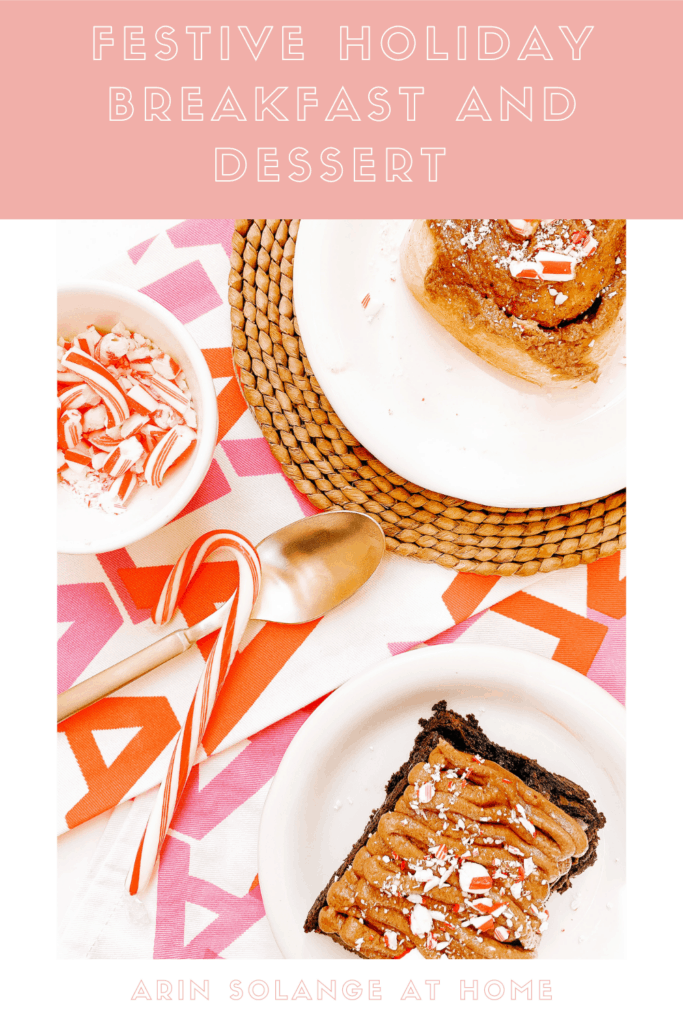
Pin the Photo Below for Later
Hopefully this fun little peppermint icing recipe and the simple ideas for updating your amazing breakfast and dessert products from Sam’s Club gave you great ideas for this holiday season. Be sure to pin the photo below for later, and tag me on Instagram (@arinsolange) in all your festivities!
The only thing better than an advent calendar is an easy DIY Advent calendar. I teamed up on Instagram with a few of my favorite ladies to share some fun Advent calendar DIYs this week – and wanted to share how to do it here!
This post contains affiliate links
What is an Advent Calendar?
Alright before we get to the DIY in this post – lets talk advent calendars in general. What is an Advent Calendar?
An advent is a simple calendar with daily gifts or activities leading up until Christmas. Most of the time these calendars start on 12/1 and the last gift or activity is on Christmas Eve.
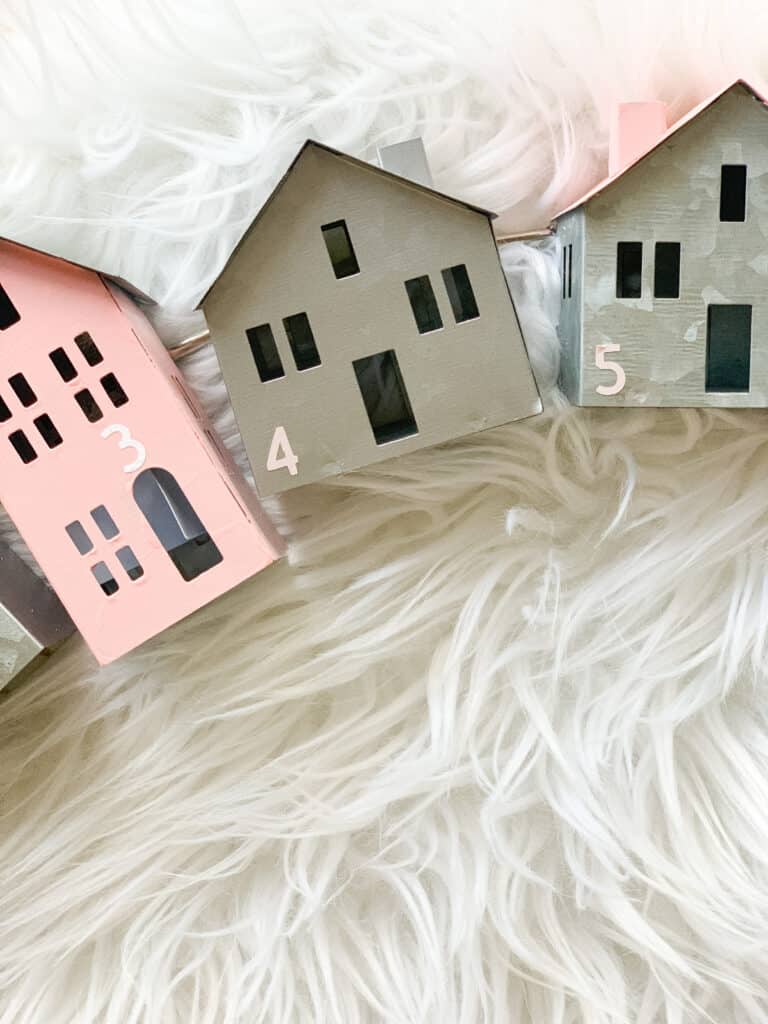
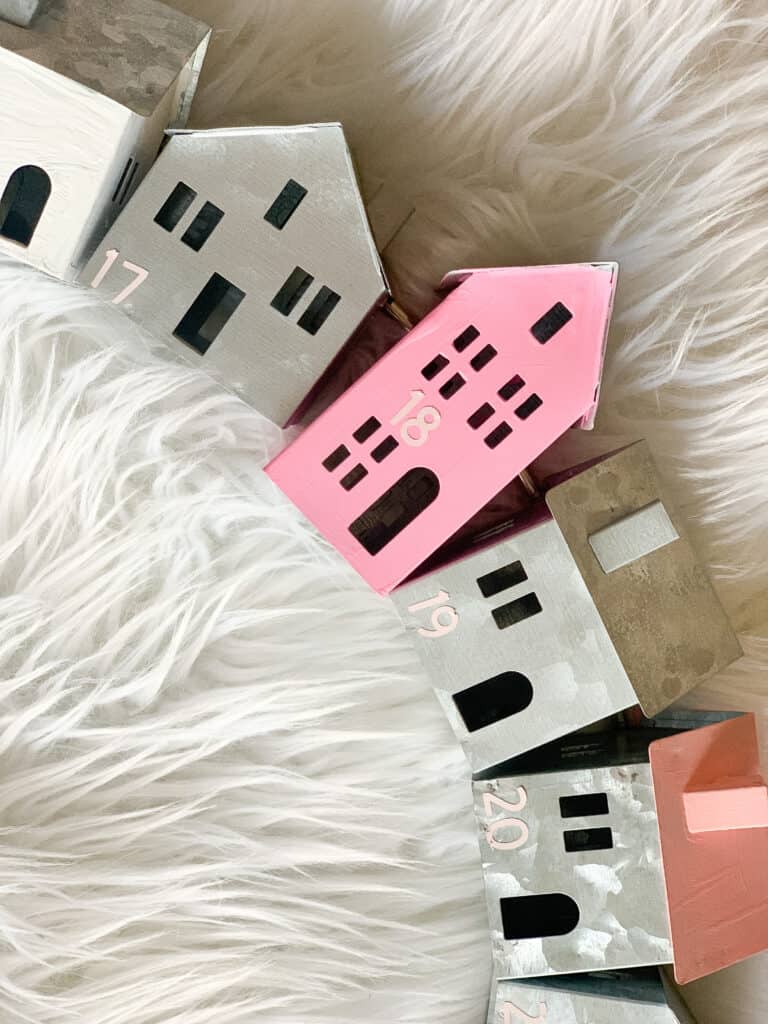
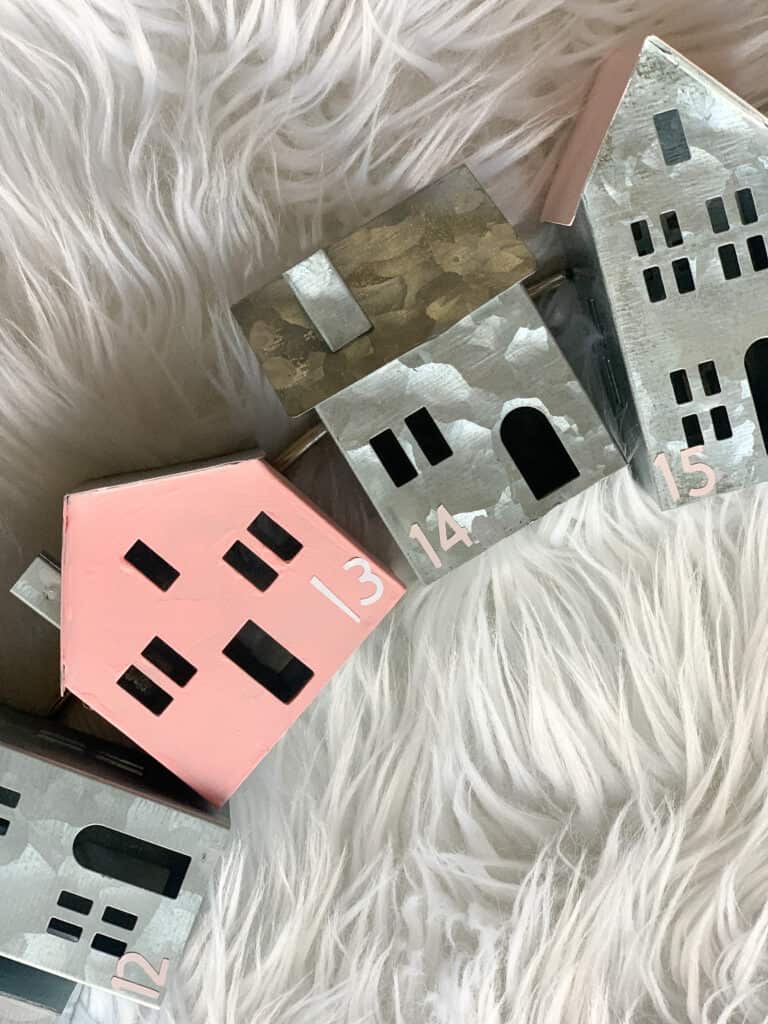
Easy DIY House Advent Calendar
For my little DIY I knew I wanted to do activities not gifts as far as the daily item, but I wasn’t sure how I wanted to display it. We just moved so I knew it needed to be simple and and easy to both display and make.
While I was browsing Target – as one does – I found the cutest little galvanized houses in the Dollar section and I was set!
Below I will share how to make this DIY advent calendar, and everything you need, but as always – feel free to make it your own.
Supplies:
24 small houses – I went with the galvanized metal ones from the Target dollar spot
Large Metal ring – you need to go large – for the exact houses I used I needed 18 inches
String to hang
Paint
vinyl numbers or sticker numbers – I used my Cricut and it works great.
How To:
This is truly SO EASY – but I will give you the step by step none the less.
First pick a few paint colors – paint the body to some of the houses and the roof to others. I did 3 or 4 of each color and did 4 total colors.
Once they are dry (they will need two coats – it’s time to attach them)
Take your E6000 glue and make a line in line with the roofline on your houses going straight across.
Glue them onto the ring – you will want to do this on something paper or cardboard because the glue will go through and you will have to kind of pry it off.
Once they are all glued let the glue dry fully over night.
Now add your numbers – you can use scrapbook stickers or vinyl numbers cut from a Cricut either one.
Now for the actual activities – this can be done in a couple of ways. You can either write activities on paper and roll them up and put them in the houses or you can write them on popsicle sticks and have them go grab the stick.
When you are thinking of your activities be sure to look at the calendar and pick the right ones to go with the right days. IE – movie night might be better for the weekend. Or if you have tickets to something you can keep it a surprise and add it to that days activity.
Overall this was the EASIEST DIY project that honestly was kind of fool proof which isn’t always the case.
Other Posts You’ll Love
Some other posts you will love if you loved the DIY Advent calendar are linked below!
Hopefully you found this easy DIY Advent calendar inspiring and you are ready do tackle your own Advent Calendar this year! I would love to see what you create, so be sure to tag me on Instagram (@arinsolange). Pin the photo below for later!
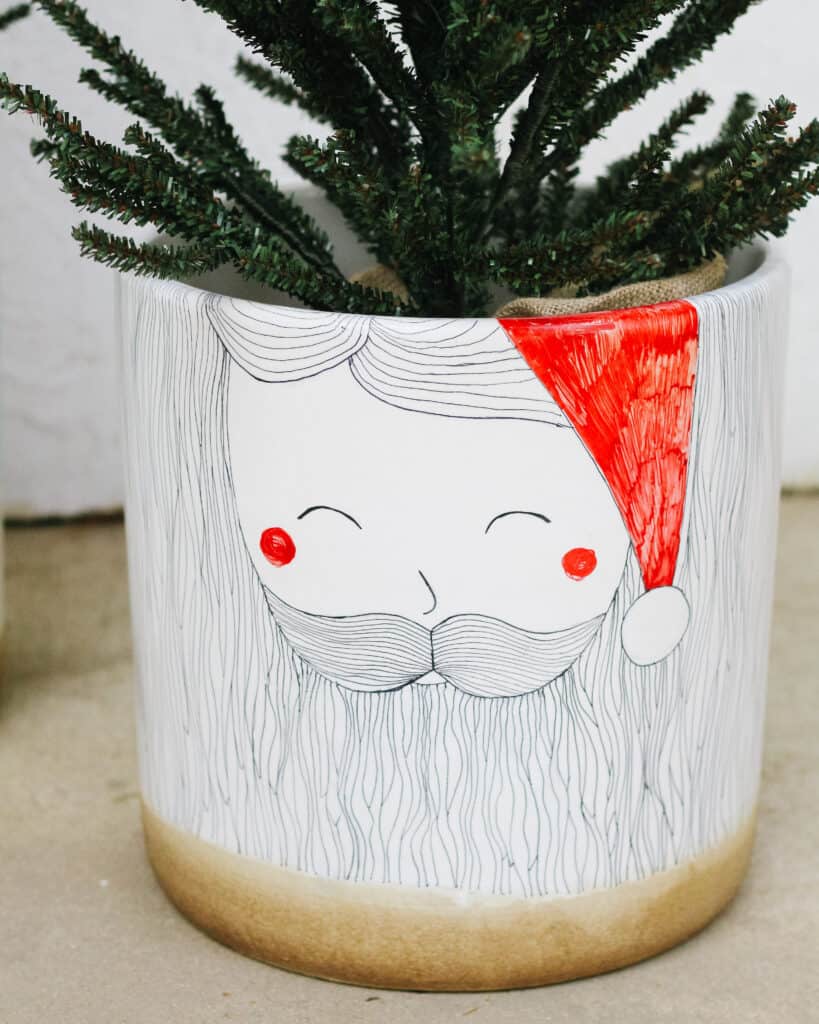
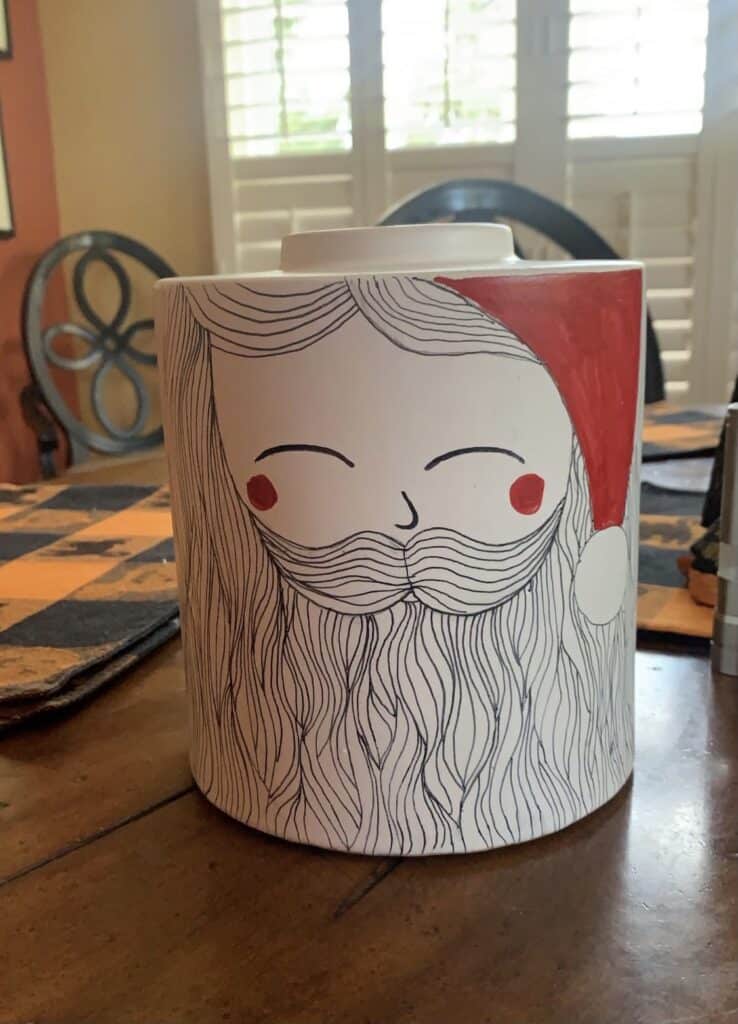
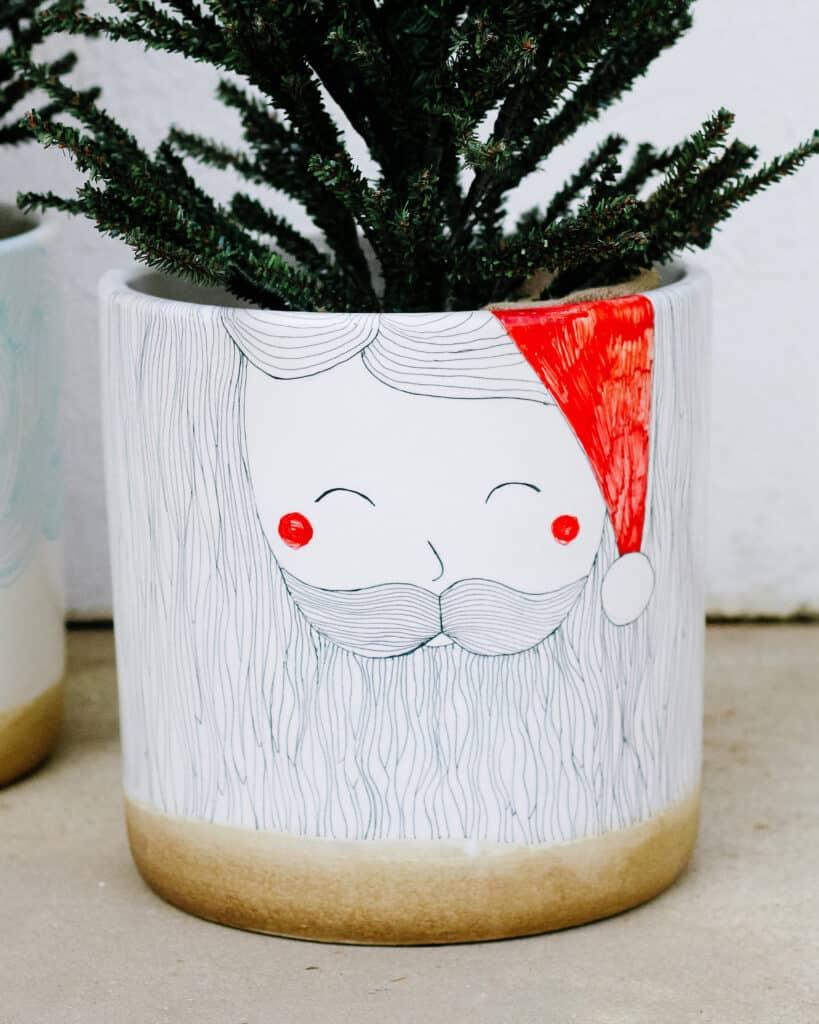
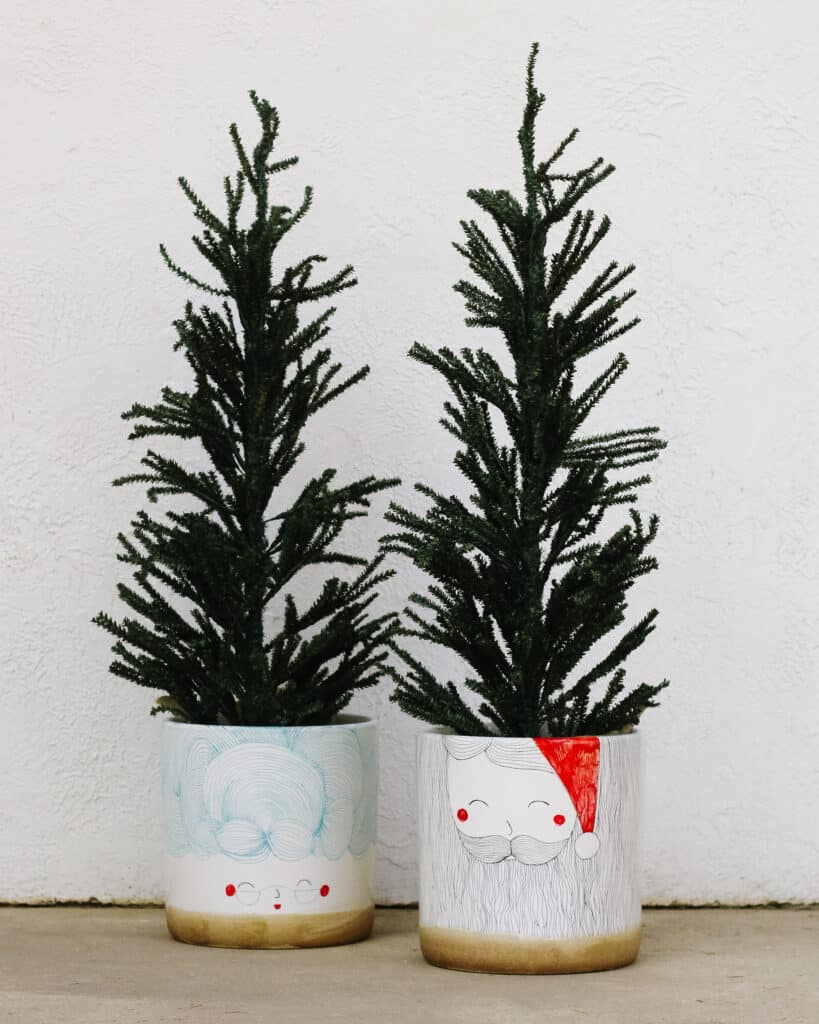
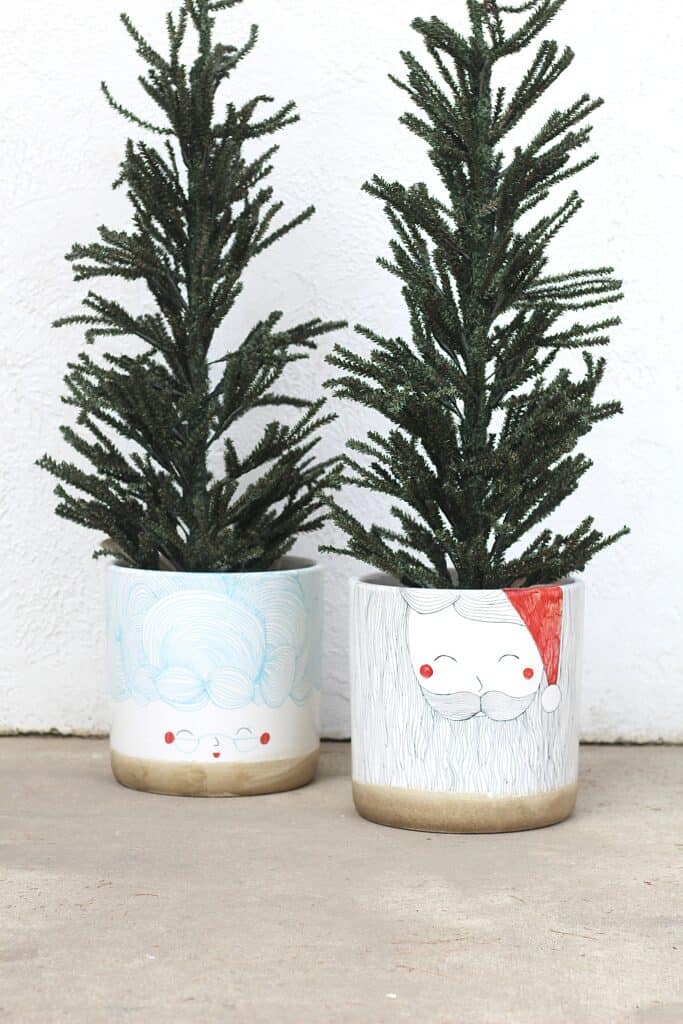
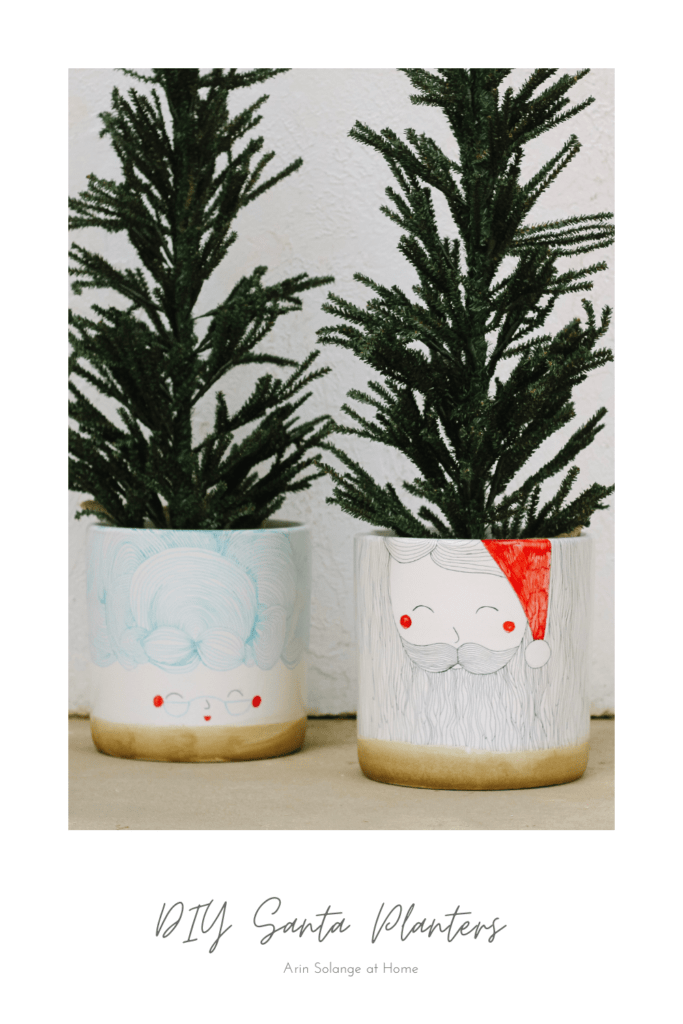
I was dying for some cute Santa Claus planters this Christmas and it turns out that a Santa planter is all but impossible to find. In true Arin fashion that turned into a DIY and I am SO excited to share the full DIY and end results in this post.
this post contains affiliate links
Santa Planter
I am all about great simple outdoor decor for the holidays – and this year with moving that is even more important for me! I wanted to find some cute Santa planters – add a reindeer rug and call it a day.
You would think that was easy right? Well wrong – I didn’t find much online so I had to get pretty creative for these.
The design actually ended up being perfect because I really wanted to do a DIY with these designs this season – I just had to go bigger and better than I was thinking.
My Inspiration
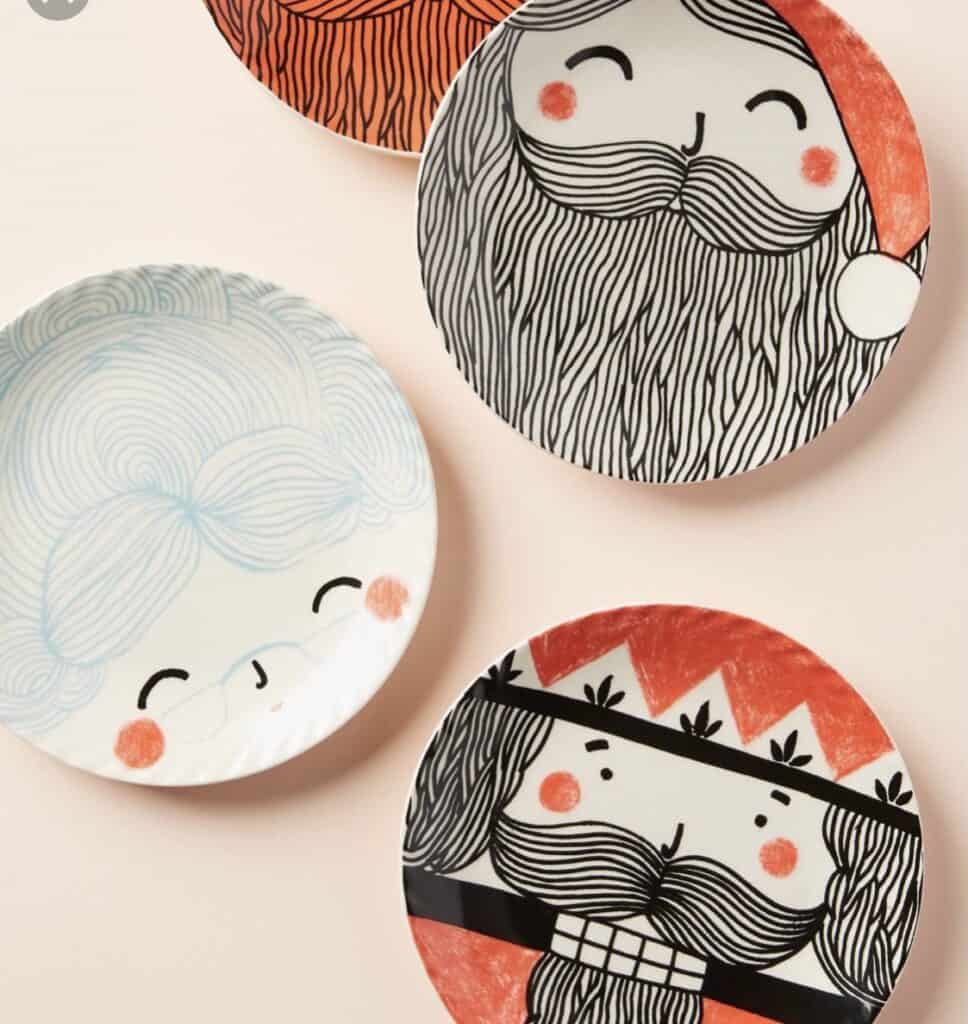
It is worth noting that my Inspiration for these planters was VERY MUCH SO not my design. A few years ago Anthropologie had these gorgeous plates and mugs (shown below) that I had been dying to try to DIY.
I went back and forth on what to do the design on. Ornaments? Planters? Canisters? Honestly the options were endless – I just had to commit and get to it.
What you Need:
First off – you need your surface. I am linking several options below that you can use for your base surface for this project. I went ahead and added things other than planters incase you were inspired to do something else!
It is worth not – I don’t have amazing tips on free hand drawing for this DIY – and that is what you will have to do. I do however have tips on getting started.
Watch this Video for More Tips
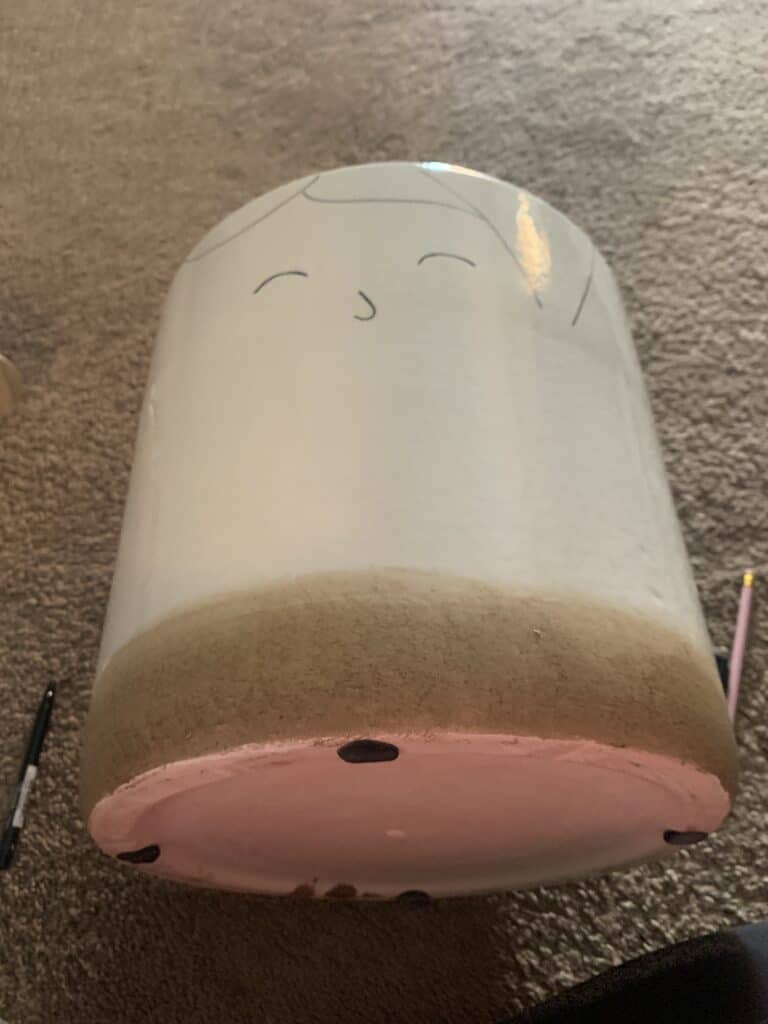
You can lightly sketch with a pencil if you need to – keep in mind that you can’t erase those marks because it will erase your sharpie – so do sparingly.
Start with the face – For Santa I drew the outline of the hair, eyes, nose, mustache, and face shape first. I then sprayed it and let it dry! I did this because until it has been sprayed it can EASILY smudge. So because of that you may way to stop from time to time and spray.
With the beard on Santa take your time. Pay close attention to the inspiration on how to get shorter strands, and just go slow. It is actually not hard once you get a good start!
Once you are done put 2- 4 coats of the sealing spray on your planters!
Be sure to pin the photo below for later to find this DIY Santa planter later. And be sure to follow me on Instagram (@arinsolange) for more holiday inspiration this season!
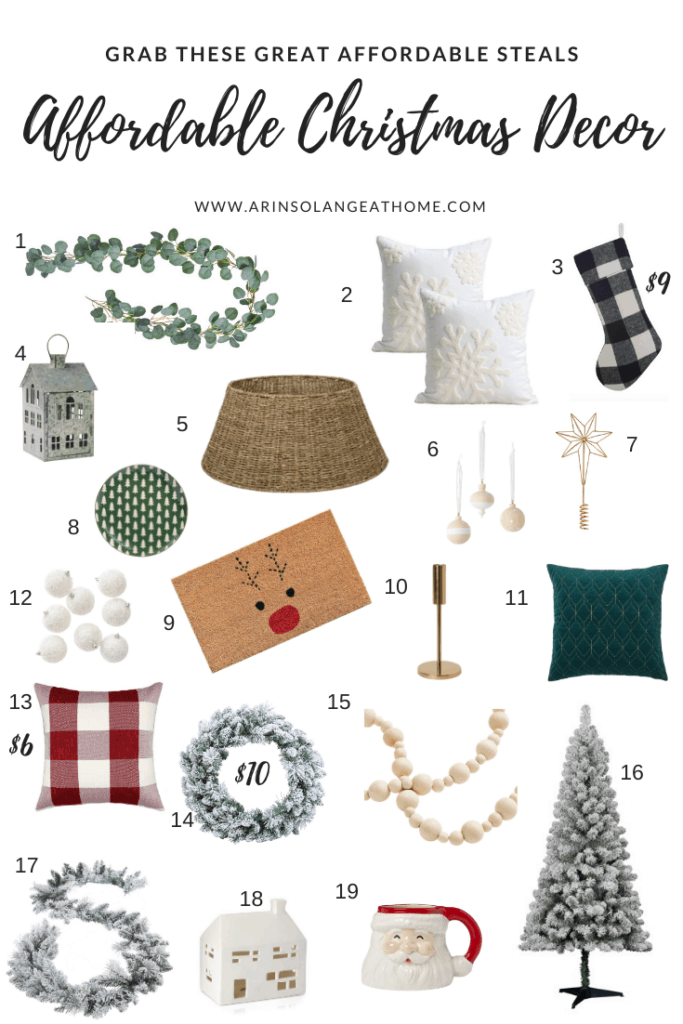
Christmas time is so expensive – and I feel like today we feel like our whole home needs to be picture perfect. I wanted to round up some affordable Christmas decor for you all that would help you decorate and get your home perfect on a budget!
This post contains affiliate links – post was updated 11/2020
Affordable Christmas Decor
Affordable Christmas decor is becoming easier and easier to find – I feel like you can even find great items at the dollar store to add to your decor that will have your home picture perfect.
One thing to note when it comes to decorating on a budget for the holidays is it is helpful to slowly add to collections over the years. For me one thing I do is buy more bottle brush trees each year.
The first year it may look piddly, but as time goes on it tends to be such a gorgeous collection – so make sure you take things slow.
Where to Shop?
Shopping for Christmas decor for me happens ALL OVER the place!! I tend to go everywhere from Michaels, to Walmart, to Target to Amazon! so the round up below is a good mix of great stores and sites!
Hopefully this helped you find some fun, affordable Christmas decor for your home this year. If you have any questions leave a comment below, and be sure to follow me on Instagram (@arinsolange) to see more Holiday decor inspiration!
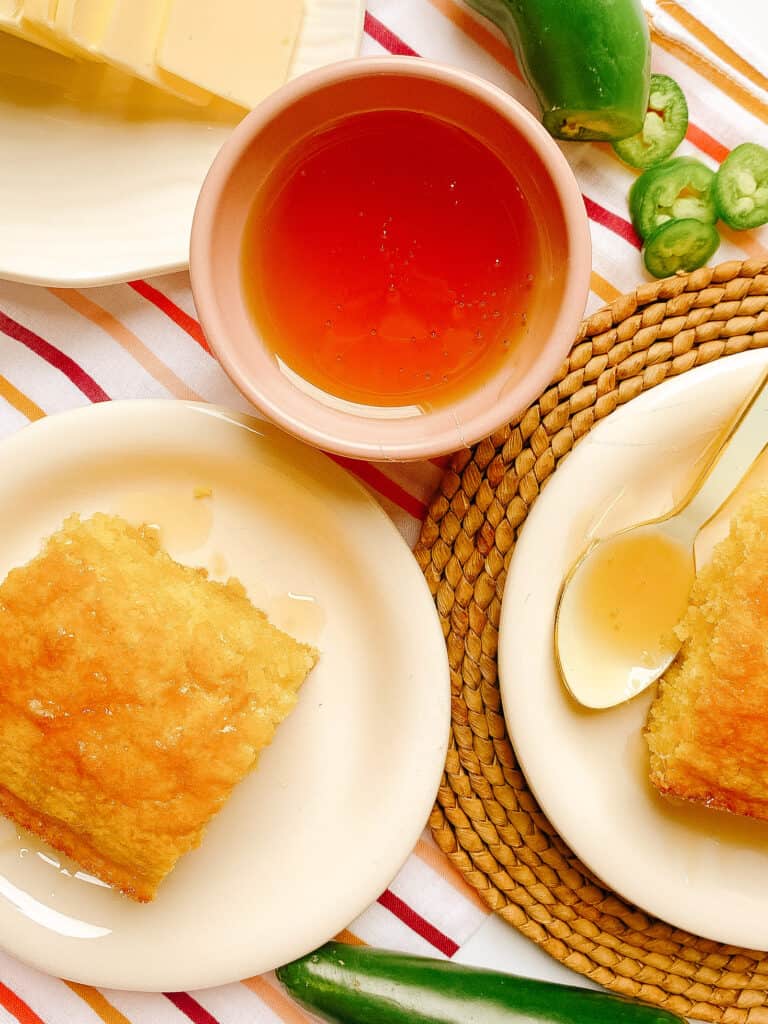
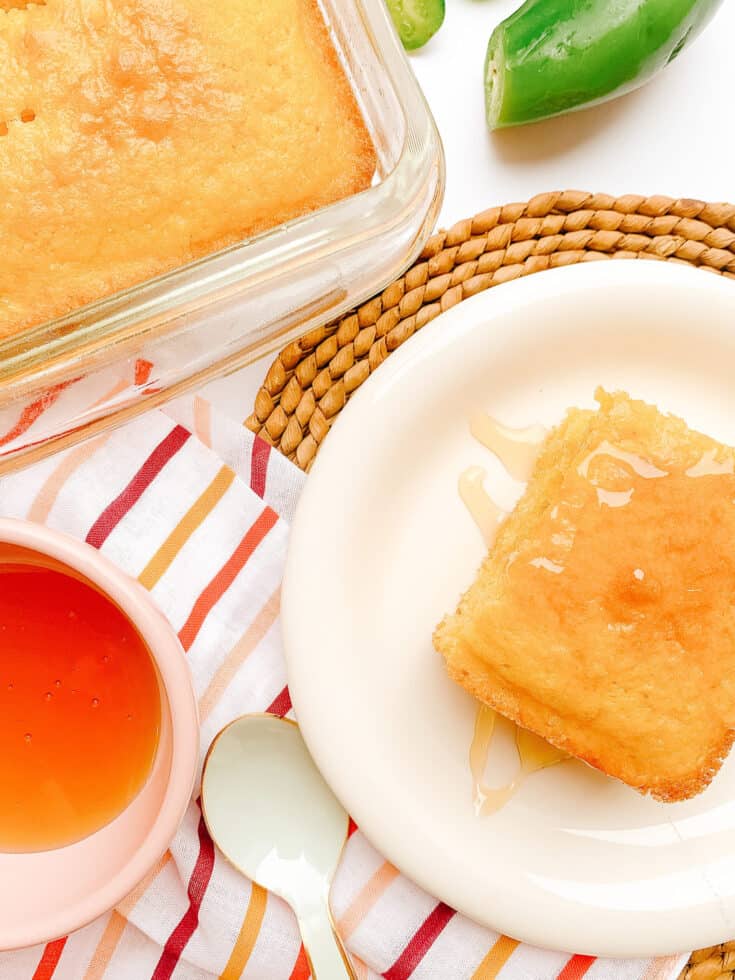
The only thing better than a cornbread recipe is a sweet cornbread recipe, right? I am a mom of 4 – so sometimes I have to come up with ways to make traditional recipes just a little tastier to get those little mouths to give them a try – and this one is a crowd favorite in our house!
this post may contain affiliate links
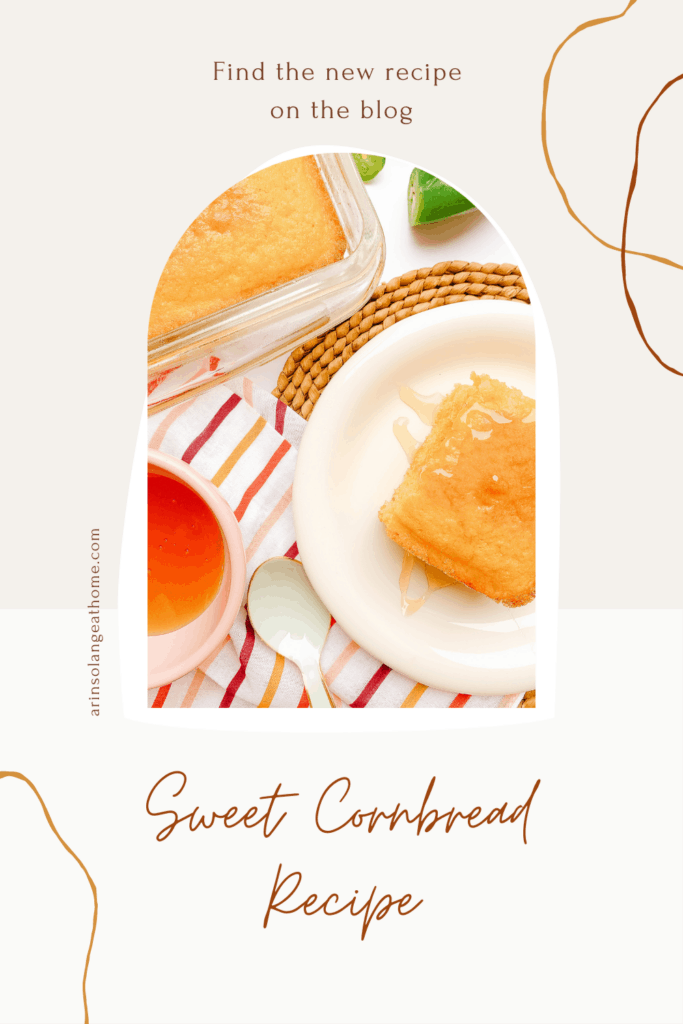
Sweet Cornbread
So when it comes to cornbread recipes – you’ll find the full gamete of very savory, to very sweet. I would be lying if I said I didn’t like a bit of both, but for the sake of what we tend to eat at our home I’m sharing the sweet.
Now don’t be scared – it isn’t overly sweet – I mean a little honey on it is still very welcome. Actually when I first tried a similar recipe it was a bit ‘too sweet’ for me, which is what had me exploring ways to make this a bit more to my taste.
Homemade Cornbread vs Boxed
I have made homemade cornbread a few times in my life and honestly – the box mix is so good and affordable that in my opinion there is no reason to stray.
That isn’t to say I think that a box mix cornbread on its own is necessarily a show stopper, but it is certainly a wonderful base to jazz up how you will – and in this case that is exactly what I am doing.
As a busy mom of 4, although I enjoy cooking – there is no way I can spend hours and hours daily making meals, so I love that this is a recipe that I can put together in about 5 minutes and let bake while I get the table ready for the rest of our meal.
Great meals and great dishes do not have to be difficult or expensive and this is a wonderful example of that!
What to make with this cornbread recipe?
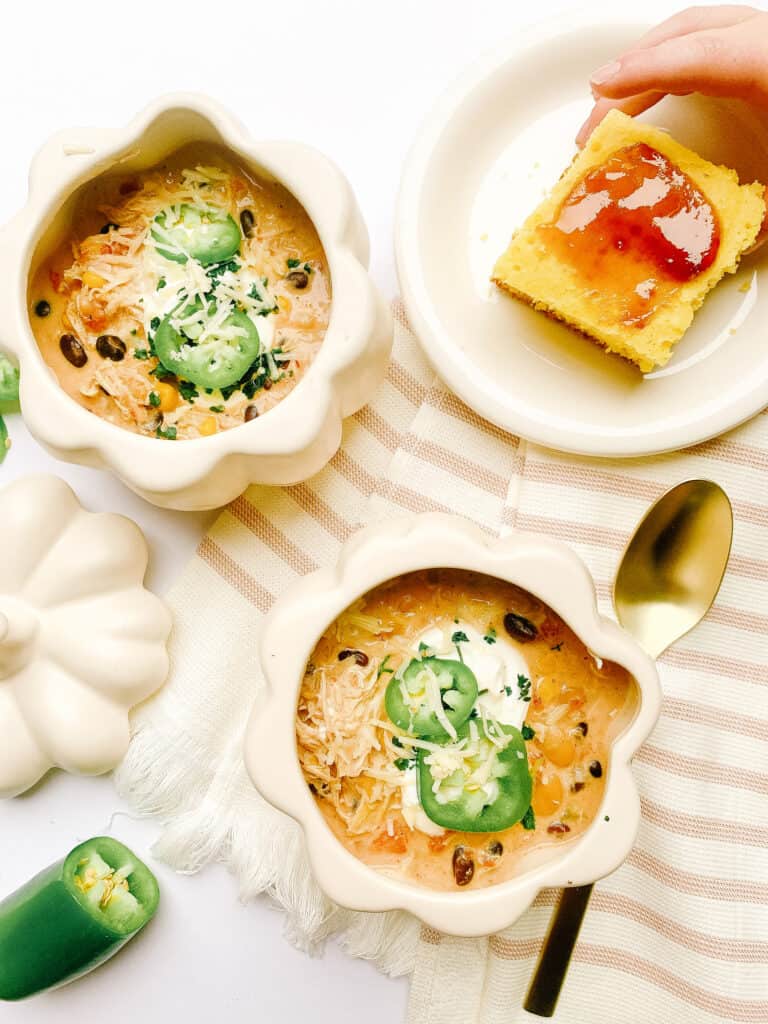
Before we get to the recipe – if you are making this cornbread recipe you should be sure to check out this recipe for BY FAR my favorite white chicken chili. I am telling you – you will love it too!
When I make this cornbread I either make it the night before, or I throw it together about 45 min before we serve the white chicken chili – it is hands down maybe our easiest and most favorite meal in our house.
Sweet Cornbread Recipe
Feel free to print the recipe card below to take with you to the store, and be sure to watch the video if you have any questions – although this is VERY easy.
Sweet Cornbread Recipe
A delicous, easy cornbread recipe that is both sweet and savory. This is a crowd favorite to pair with your favorite meals.
Prep Time5 minutes
Cook Time30 minutes
Total Time35 minutes
Ingredients
1 box Jiffy Cornbread Mix
1 Box yellow cake mix
2 eggs
1 cup mix
1 can creamed corn
1/3 cup oil
Instructions
Preheat the oven to 350*
Pour your box of Jiffy Cornbread mix in a mixing bowl.
Add to that 1 3/4 cups of your cake mix (that is roughly half the box so you can double this recipe with 1 box of cake mix if you wish)
Add roughly 1/2 the can of creamed corn (again if you choose to double the recipe you can use just the one can!)
Add eggs, milk, and oil
Whisk until well combined
Pour into a well greased 9x9 baking sheet
Put your cornbread in the oven for 30 min - start checking at 25 min - you will know it is done when you put a toothpick in the center and it comes out clean.
Allow to cool for a few minutes before slicing and serving!
Notes
This is a recipe that can be added to as you wish - we have added a can of green chilis, or diced jalapenos in the past. Serve with butter and honey or a jam of your choice!
Ingredients:
1 box yellow cake mix
1 box Jiffy Corbread Mix
2 Eggs
1/3 cup oil
1 cup milk
1 can creamed corn
Sweet Cornbread Recipe Instructions:
Preheat your oven to 350*
Pour your box of Jiffy cornbread into a large mixing bowl
Add to that 1 3/4 cups yellow cake mix – that is 1/2 the box (so you could double the other ingredients and use the full box).
Add roughly 1/2 the can of creamed corn
Add to that the eggs, milk, and oil
Mix well with a whisk until daily smooth (it will never get fully smooth with the corn)
Pour into a well greased 9×9 pan
Bake at 350* for 30 min (start checking on it around 25 min – when a toothpick comes out of the center clean it is ready to eat!)
Let cool for a few minutes then serve
This is an easily customized recipe – we have added a can of diced green chilis, and diced jalapeños in the past, and both are wonderful additions to make it a bit more sweet and savory.
Serve with butter and honey or your choice of jam – or honestly this is so good my family typically eats it plain.
Other Posts You’ll Love
I have not been adding recipes to my blog for long, but I do have a few crowd pleasers that ‘everyone’ loves. Be sure to check those out and make them now or pin them for later.
Hopefully you loved this easy sweet cornbread recipe! Be sure to follow me on Instagram (arinsolange) for more recipes and fun, and pin the photo below to find this recipe again later!
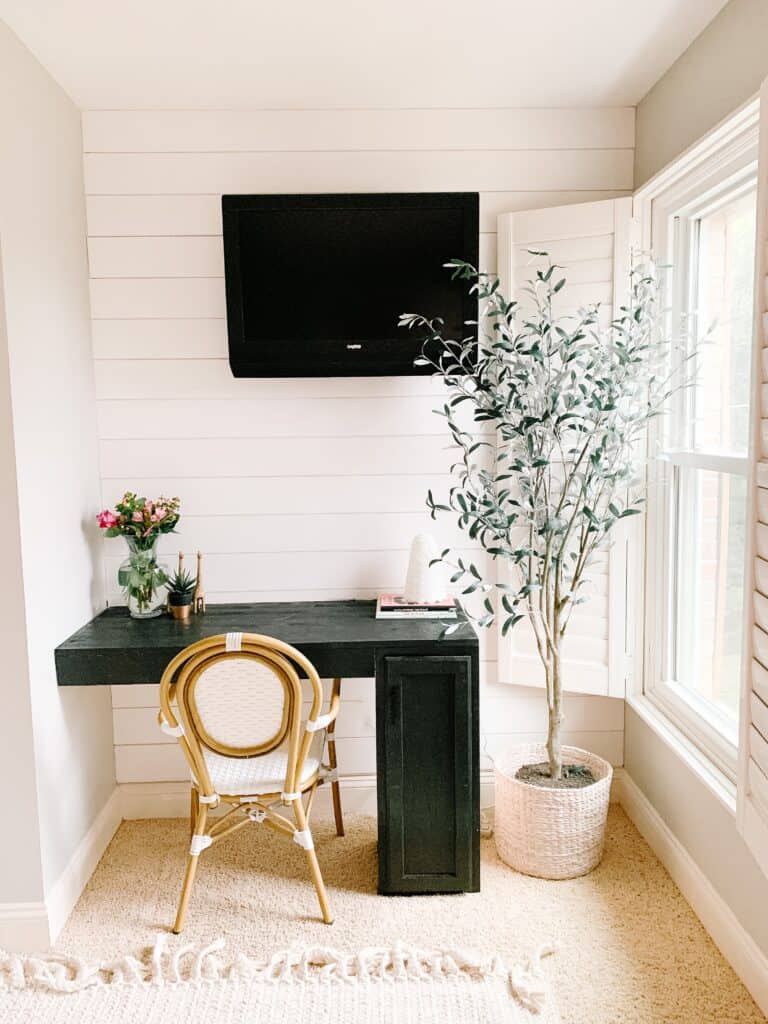
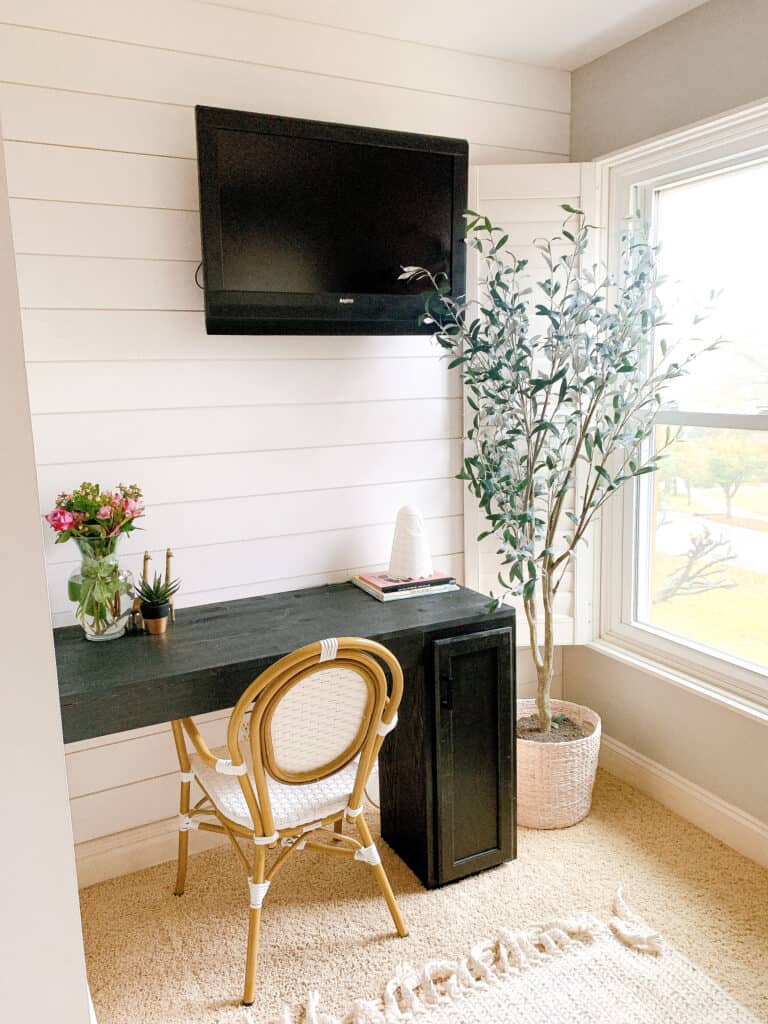
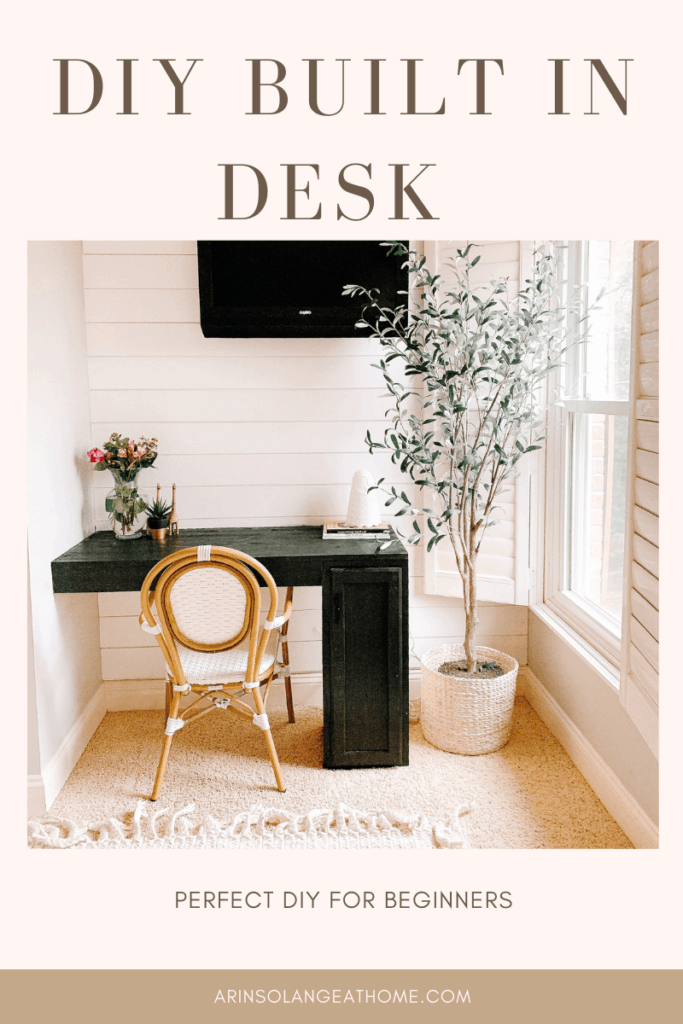
Who has been wanting to build a built in desk for their home? I feel like there has never been a time with a bigger need for desks at home, and because of that I was on a mission to do an EASY tutorial for you guys to fill that need at your house.
this post may contain affiliate links
Built In Desk
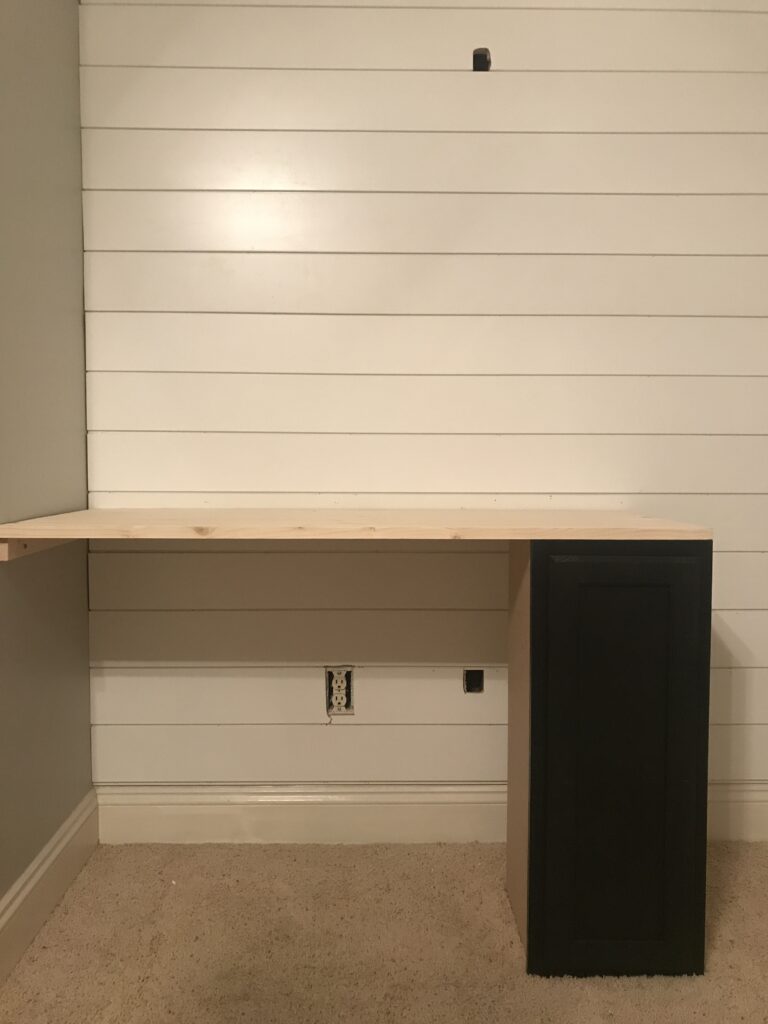
For us we were creating this built in desk at my mother-in-laws house, giving her an inexpensive and streamlined space in a room she has devoted to my kids. (It is the least we can do right?).
Sam and I are probably a solid 7 on the ‘handy’ scale but I wanted this to be a really easy DIY so not too many tools would be needed. I set out to find the products that would end up in the least amount of cuts, and fuss.
Sam and I are probably a solid 7 on the ‘handy’ scale but I wanted this to be a really easy DIY so not too many tools would be needed. I set out to find the products that would end up in the least amount of cuts, and fuss.
How Much Does a Built in Desk Cost?
As with normal desks that will very a lot based on size and how many bells and whistles you choose. Because it is a desk, the depth does need to be a proper desk depth, so you should aim for between 20-30 inches deep.
For us, we spent right at $120 for the desk portion of this project.
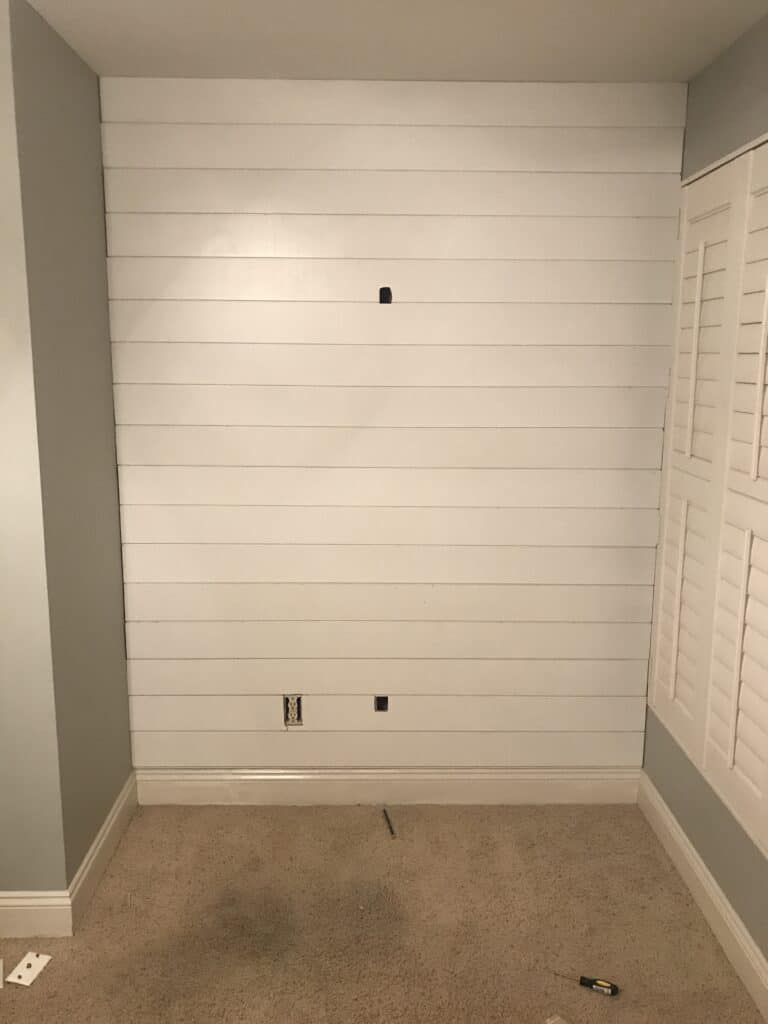
The Shiplap Wall
For the shiplap wall we followed the same tutorial that we did here – however I will tell you that if you are a long time reader you should take a look because we edited the tools for one that made life so much easier.
We also followed the same method we used here for hiding the cords in the wall – so if that is foreign to you and you want to hang a tv check that out.
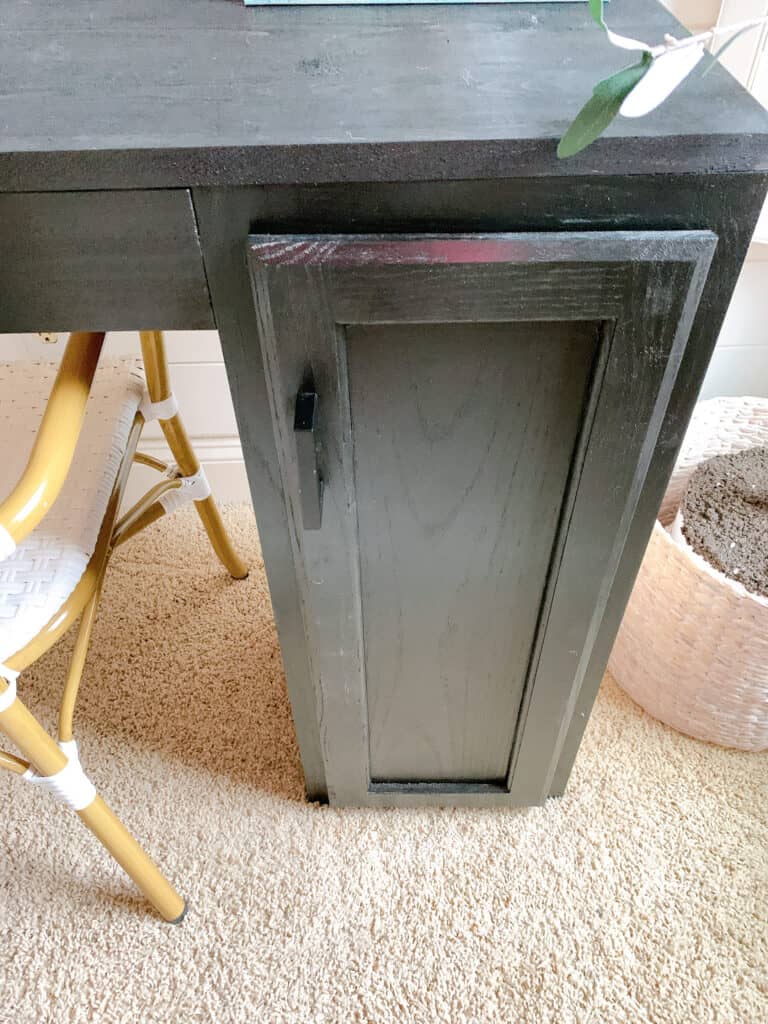
The first thing to do is stain your cabinet and the side pieces. I did 2 coats on everything and let it sit outside for a good 12 hours to dry fully.
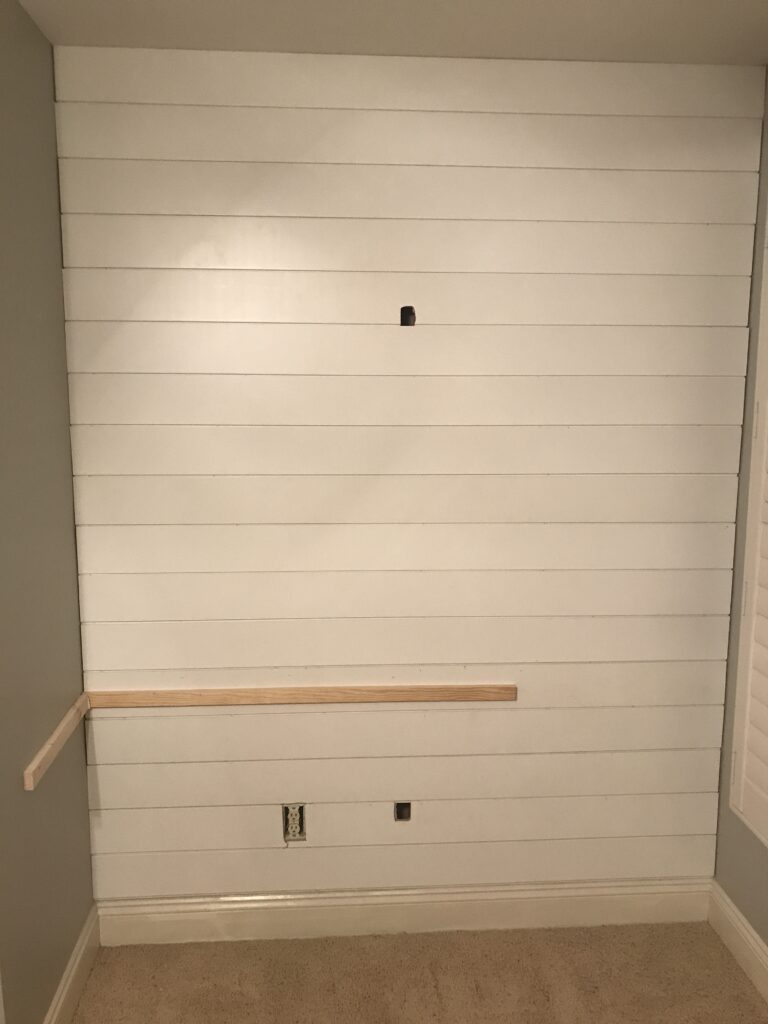
While those are drying you are going to build out your frame – I did a similar project here where we created a floating bench using this technique.
One thing to note – this will not show, so it is all about support. That said – the corner doesn’t have to be pretty and there can be a little gap. The big thing is that it can’t come out further than the table top.
Cut your frame pieces to 22 inches and 45 inches using your miter saw
The top edge to your frame needs to sit at exactly 30 inches because that is how high your cabinet is and that is serving as one leg.
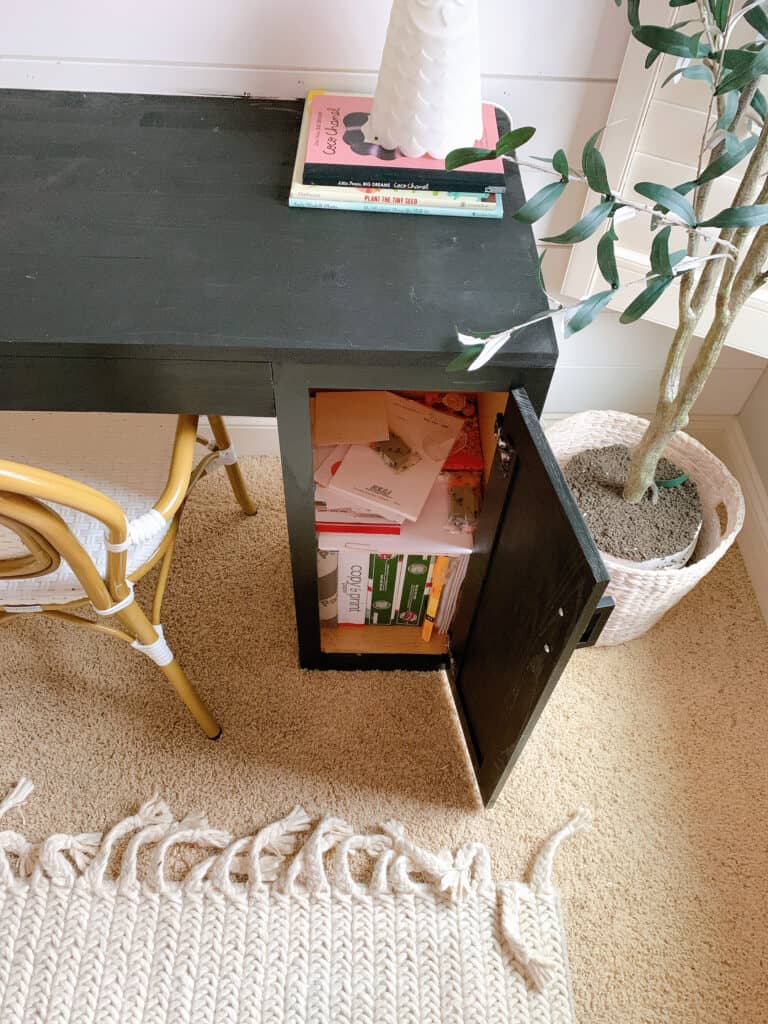
(It is worth noting that you can definitely do this with the supports on 3 walls and no cabinet to save money. We personally did the cabinet for storage and because there is a window in the nook we were working with.)
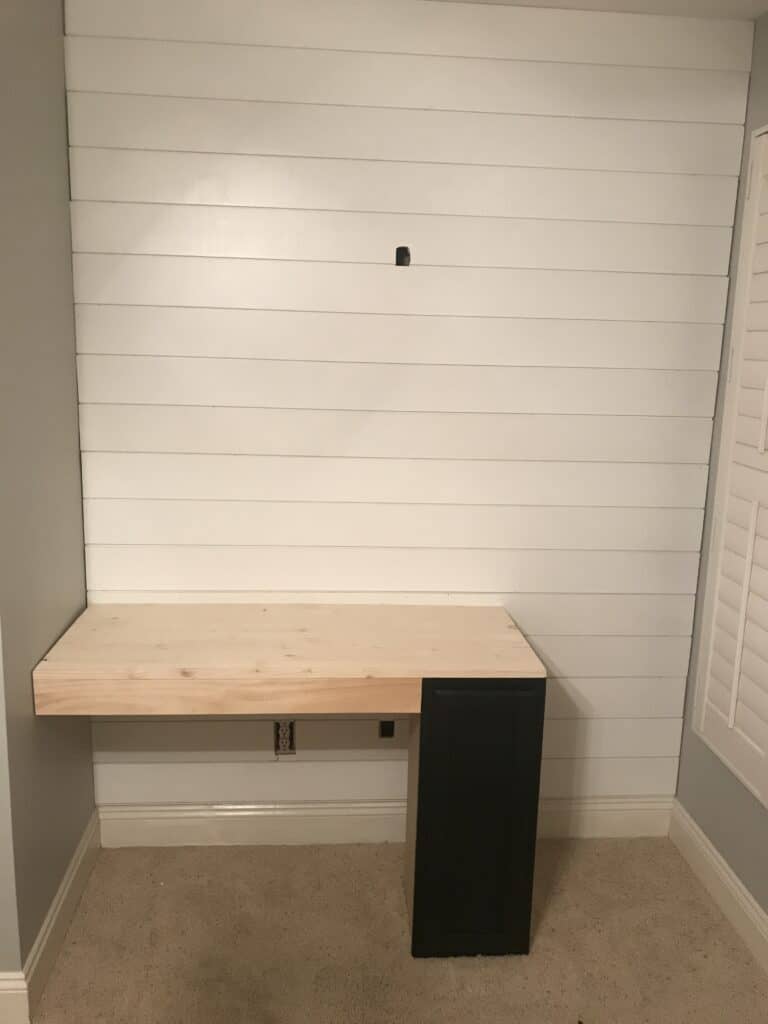
Now bring your cabinet in, and grab your tabletop. Like I said above – we went easy so the piece we bought was already the exact size we needed. we set our cabinet down and rested the tabletop on top of the supports and cabinet.
Move your cabinet to the front corner and once everything is fully lined up you can use your nail gun to nail the tabletop down into the supports and the cabinet. Be sure to nail into the edges of the cabinet – not the middle!
Once your table top is on and secure, grab your front trim piece of wood, and figure out exactly how long you need to cut it to.
Make your marks and cut that piece, then nail that into the front of the tabletop. Be sure to give it plenty of nails.
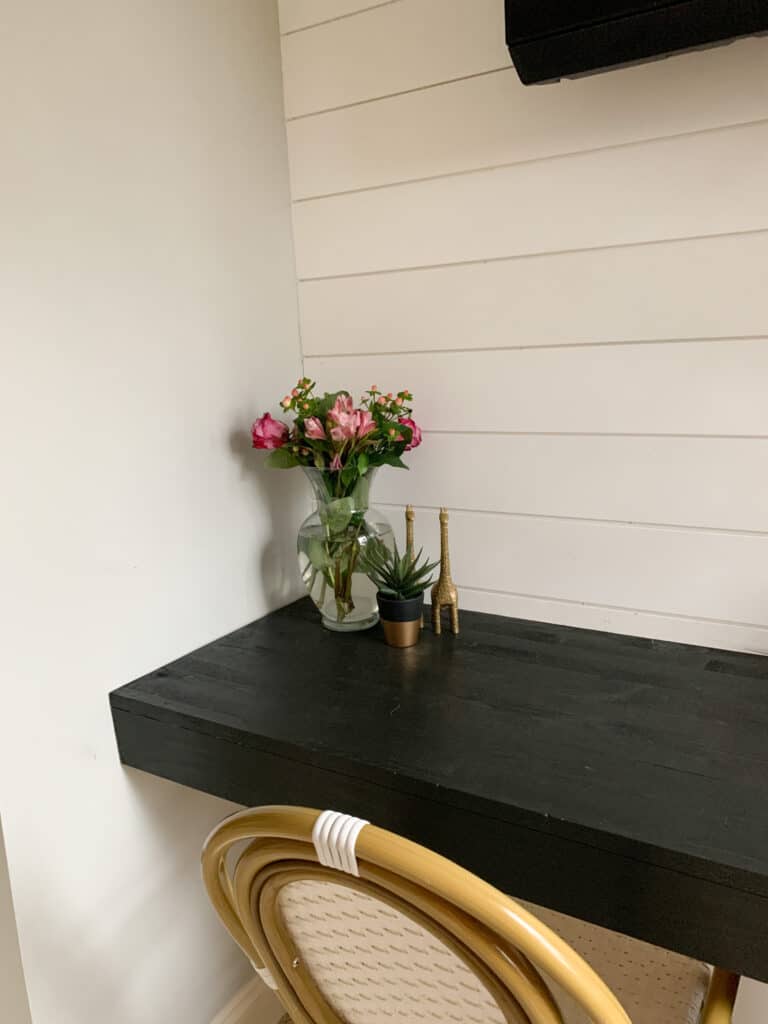
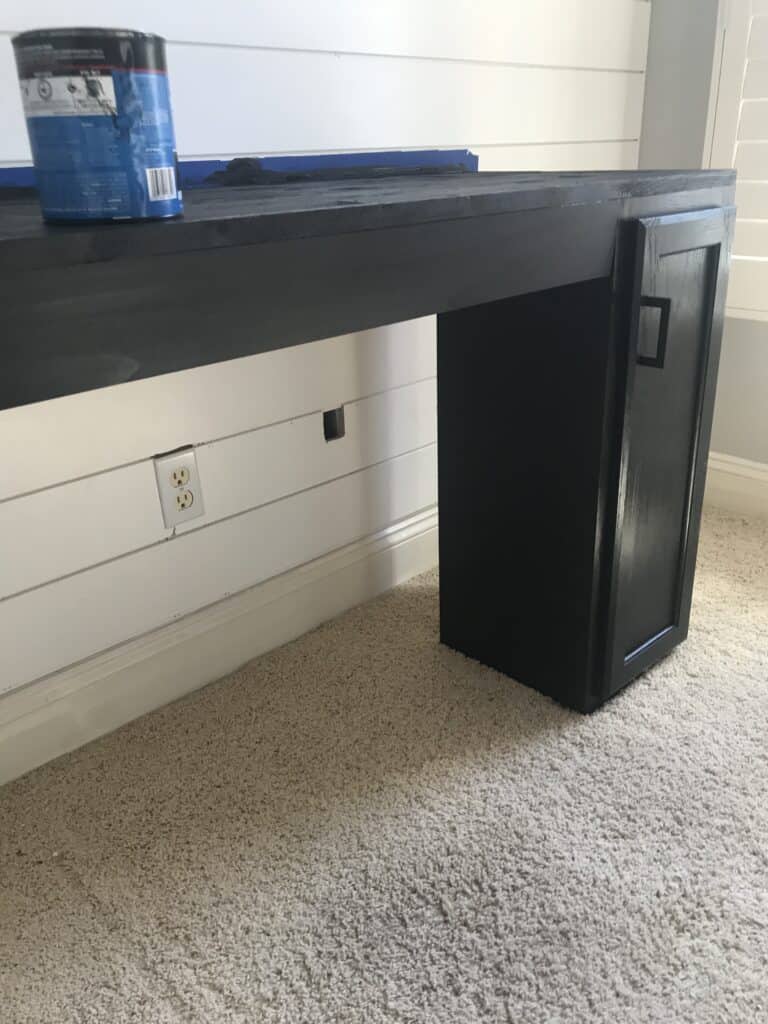
Now you need to use wood filler to fill all the holes from the nail gun. When that is dry sand and paint the table top and front. You will again need 2 coats – and TADA you have a super easy built in desk!
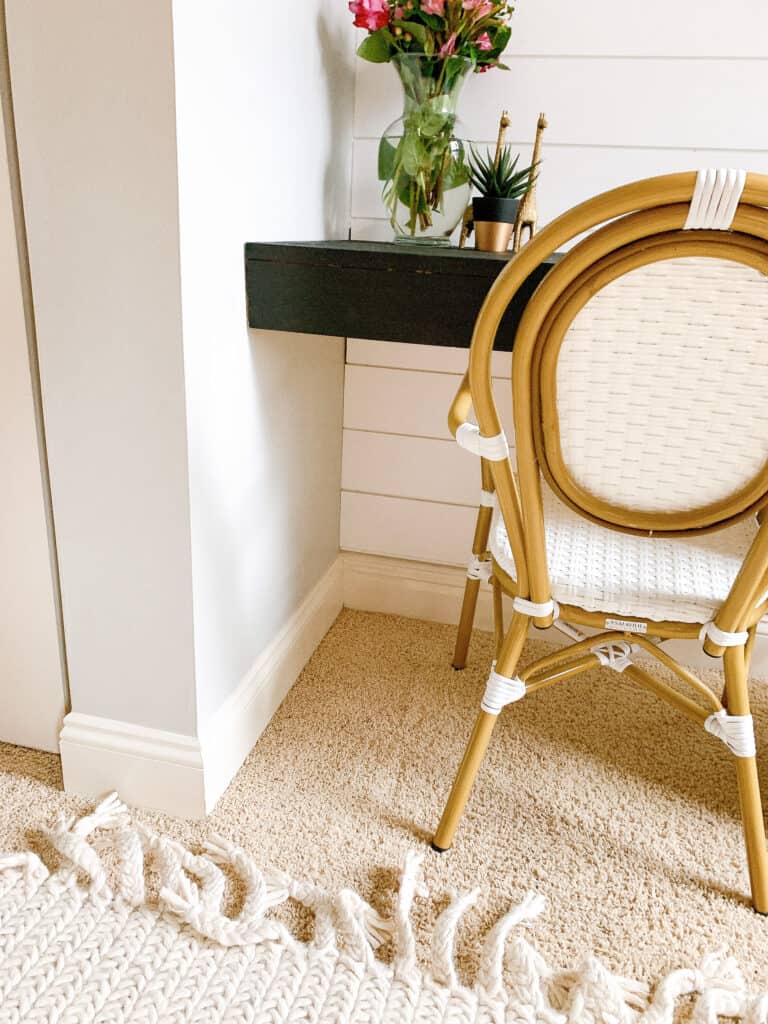
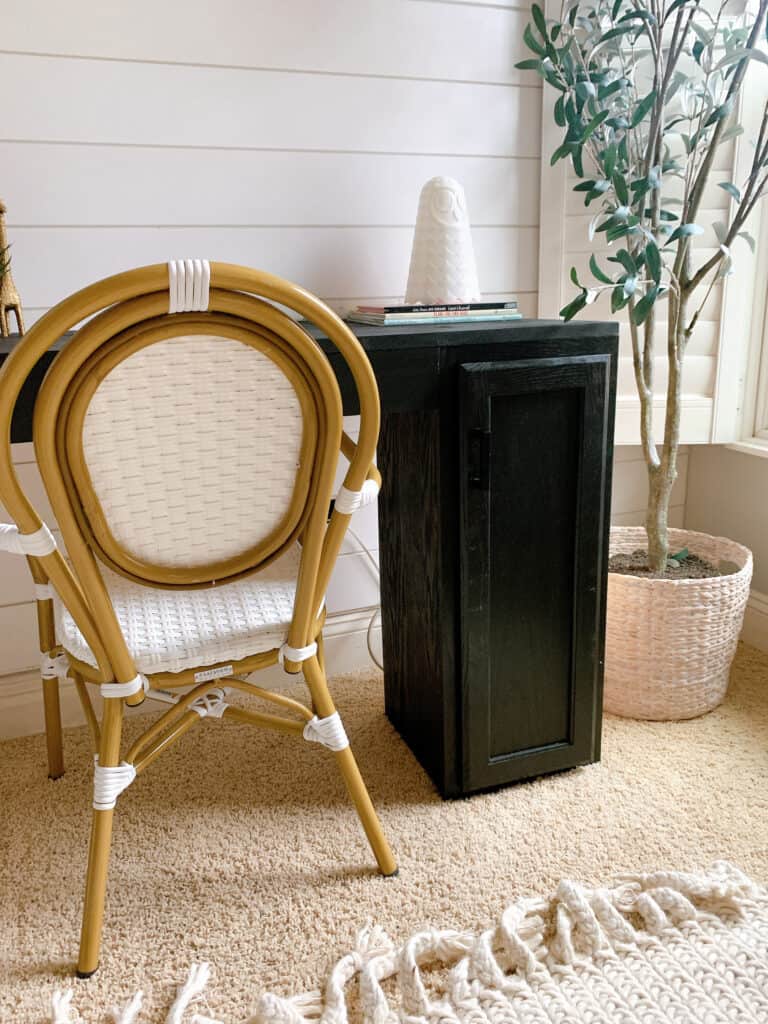
Styling the Space
We personally hung a tv on the shiplap prior to doing this desk portion of this project, so the wall decor was handled.
I added this gorgeous faux olive leaf tree to the corner because I wanted to balance out the awkward space at the end of the nook that needed to exist so the shutters could open.
for the tabletop it will mostly adorn a printer and lots of bills and other fun things, so I didn’t go to crazy.
The chair in this image is one of my favorites – we have several of them and I love that they stack for storage so I have been able to grab extras for spaces like this when they come up.
Other Posts You’ll Love
If you loved this post I am linking to several other great DIY’s below that you will hopefully find helpful!
Hopefully this blog post made it super simple for you to create your own built in desk for your home, and you feel confident in updating your space. If you have any questions always feel free to leave a comment below or reach out to me via Instagram (@arinsolange).
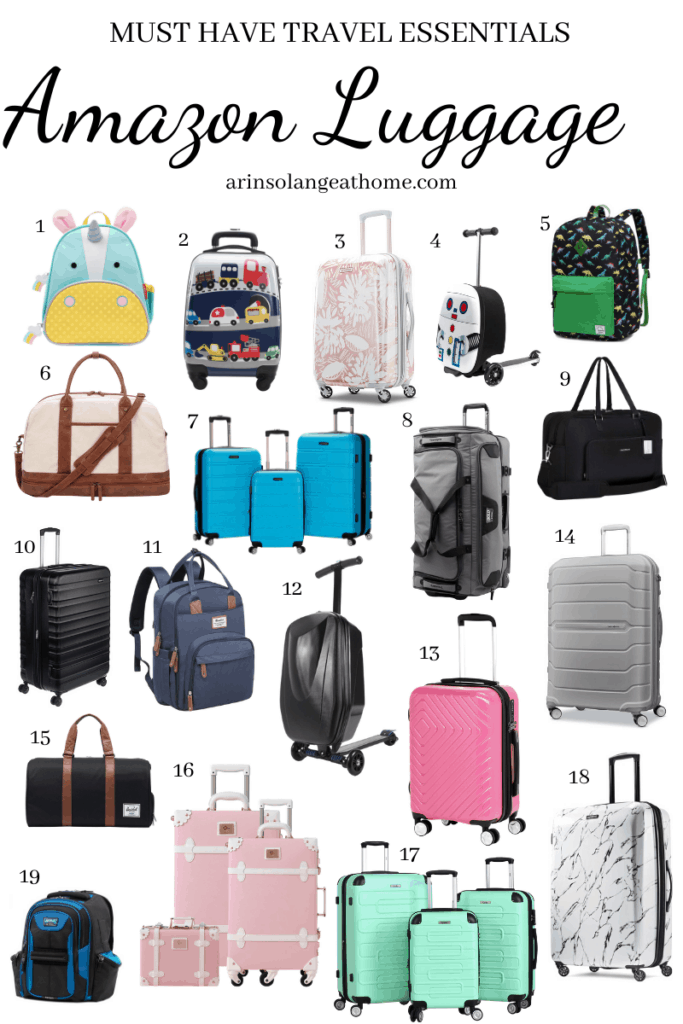
Travel may not be the name of the game these days – but I know we are all itching for that to become a part of our lives this year. As the world starts to open back up and weekends away become a thing again I wanted to round up some of my favorite luggage from Amazon for you.
this post contains affiliate links
Finding the Perfect Luggage
It used to be that to get great luggage you had to spend an arm and a leg and go to a specialty store – but these days getting great luggage is not so difficult.
I’m a mom of 4 – so when it comes to travel for me it is either A- a weekend away for just me when I want to feel stylish and fun, OR B – A trip with my kids where I need some serious function to cut down with the chaos.
In this post rounded up great options for plane or car travel and all of them are available on Amazon. We own a few of the items on the round up and I can’t say enough good things about them.
When we were headed out for spring break last year I found the scooter suitcases on Amazon and had to have them. I was a little worried about how they would work, but they were honestly the best thing ever.
My kids using them at the time were 5 and 7 and both did very well with them – but be prepared for everyone and their dog to stop you and stare. It made for an easier time for the kids to keep up with us in the airport, and they roll well folded too, so when we were in line we kept things closed.
Backpack for adults – if there is one thing I think everyone should travel with it is a backpack. this one has amazing storage because it is technically a diaper bag – but would be great for anyone traveling with kids.
All of these options are wonderful gift ideas or function great things to get before your next trip!
Other Amazon Finds
If this is your first time to my blog – welcome! Amazon finds are something I love digging up, and if they are you thing, I have plenty more after this luggage post.
Check out all my Amazon find posts below, and if you are looking for something specific always just let me know.
Hopefully you found the perfect piece of luggage from Amazon in this post, and are able to find lots of other travel tips while you are here on my blog. Be sure to follow along with me on Instagram for more tips and tricks, and pin the image below to find it later!
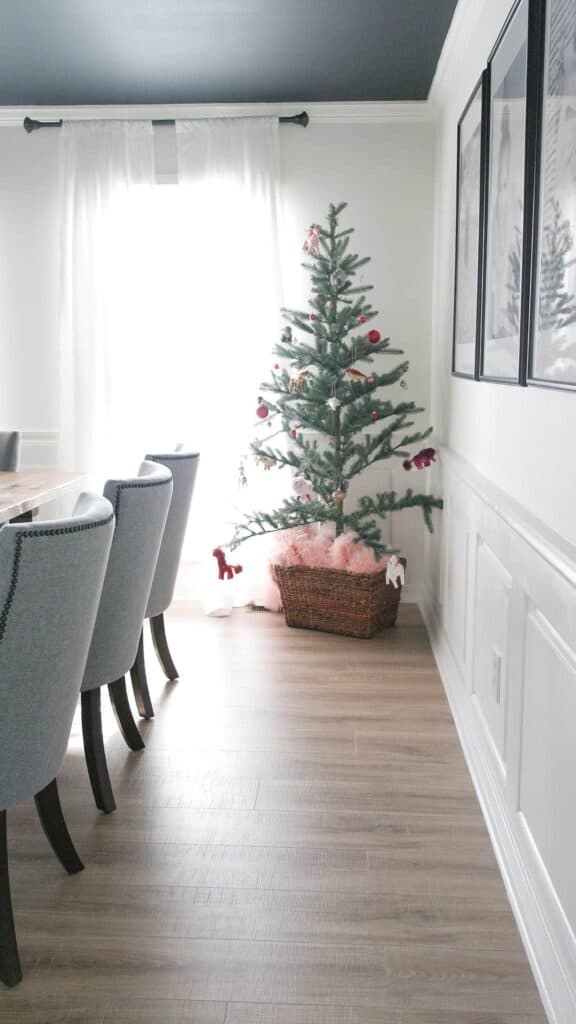
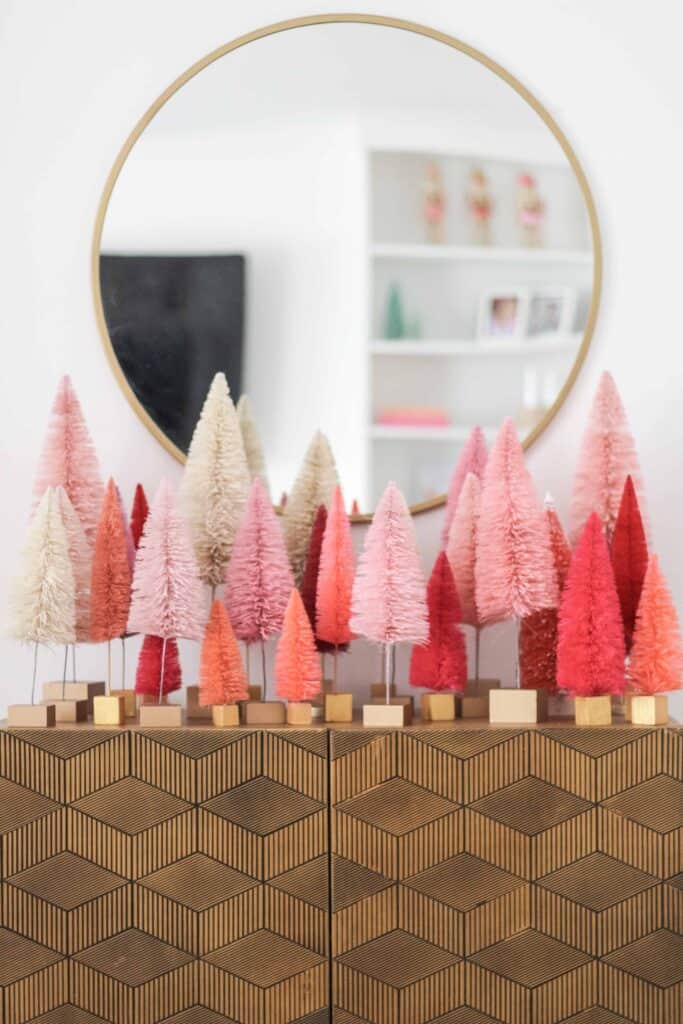
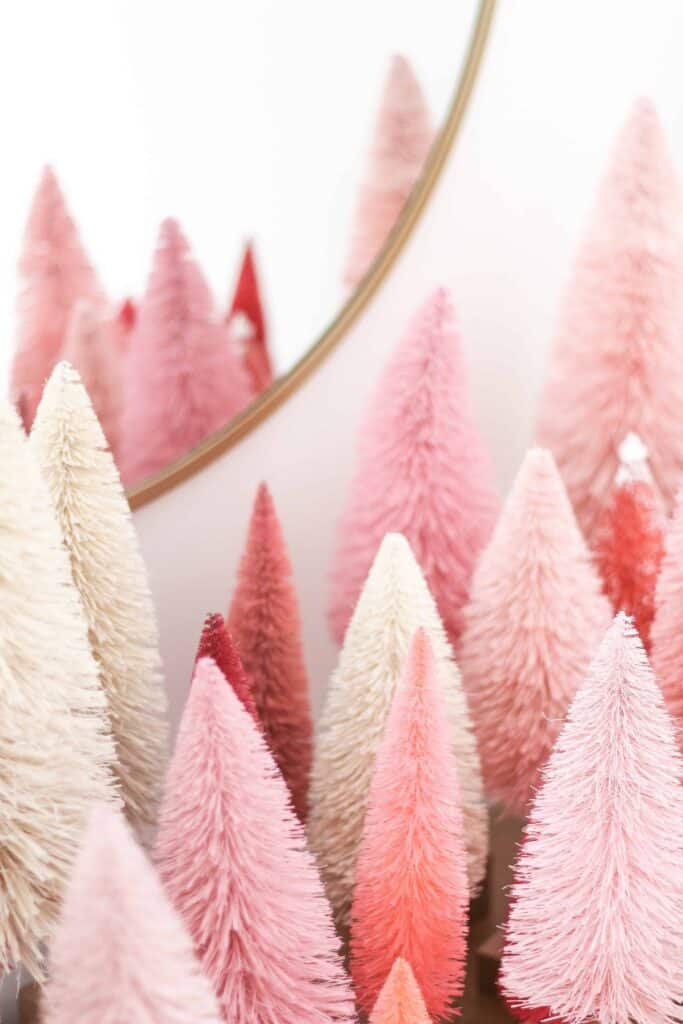
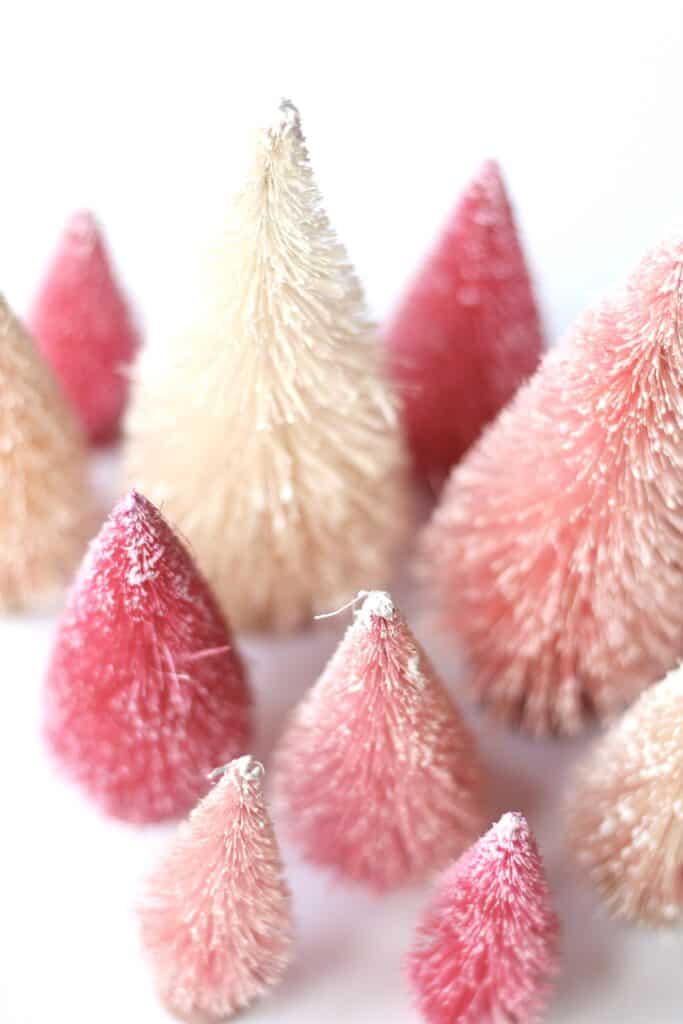
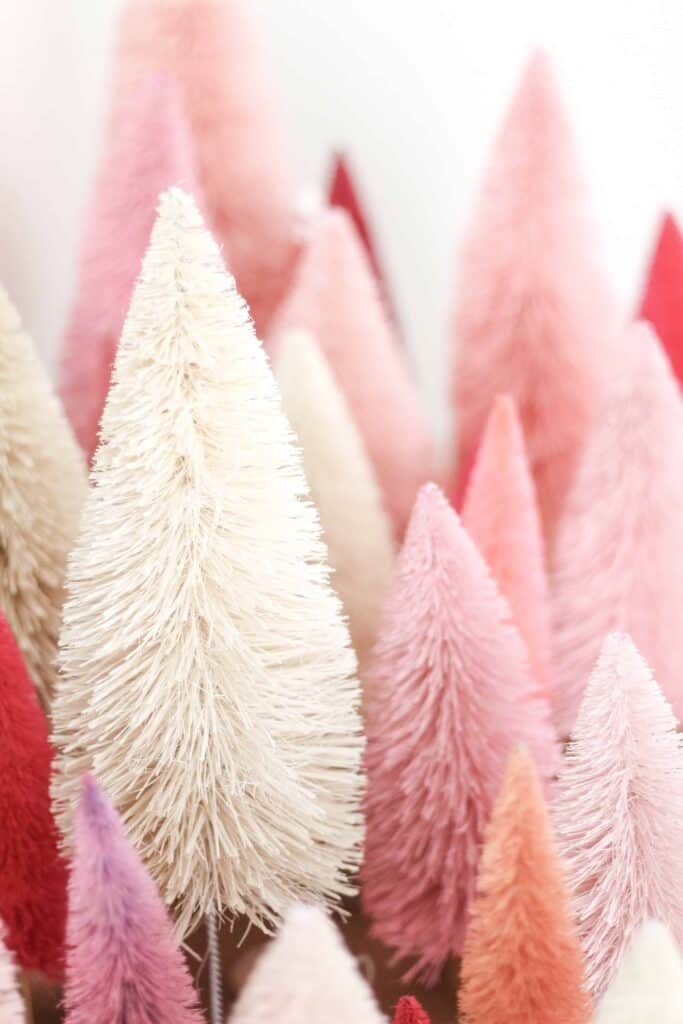
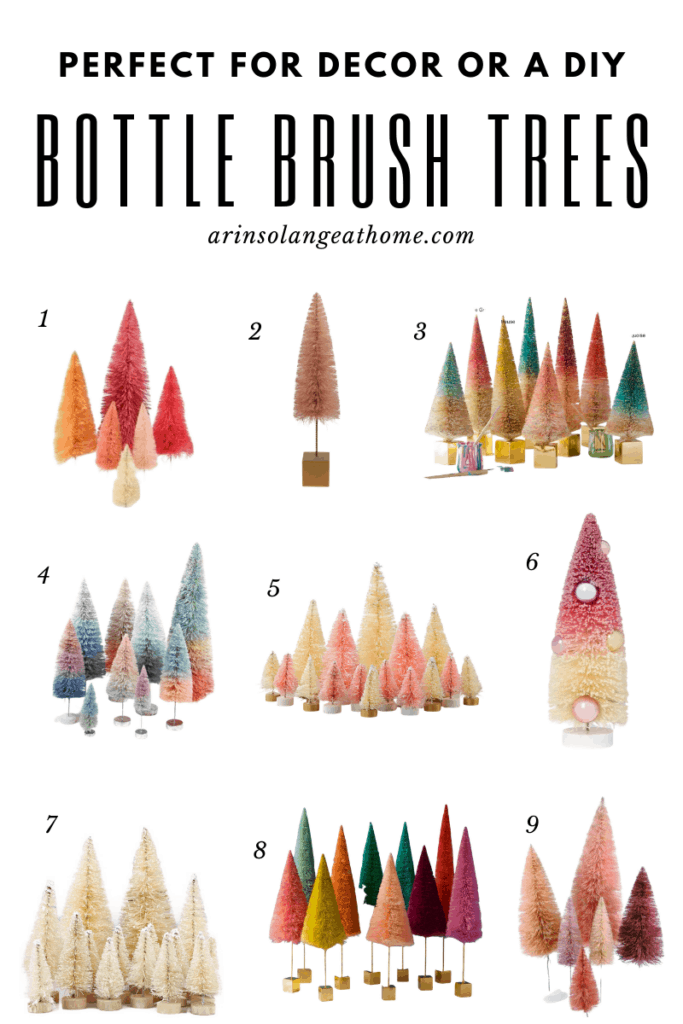
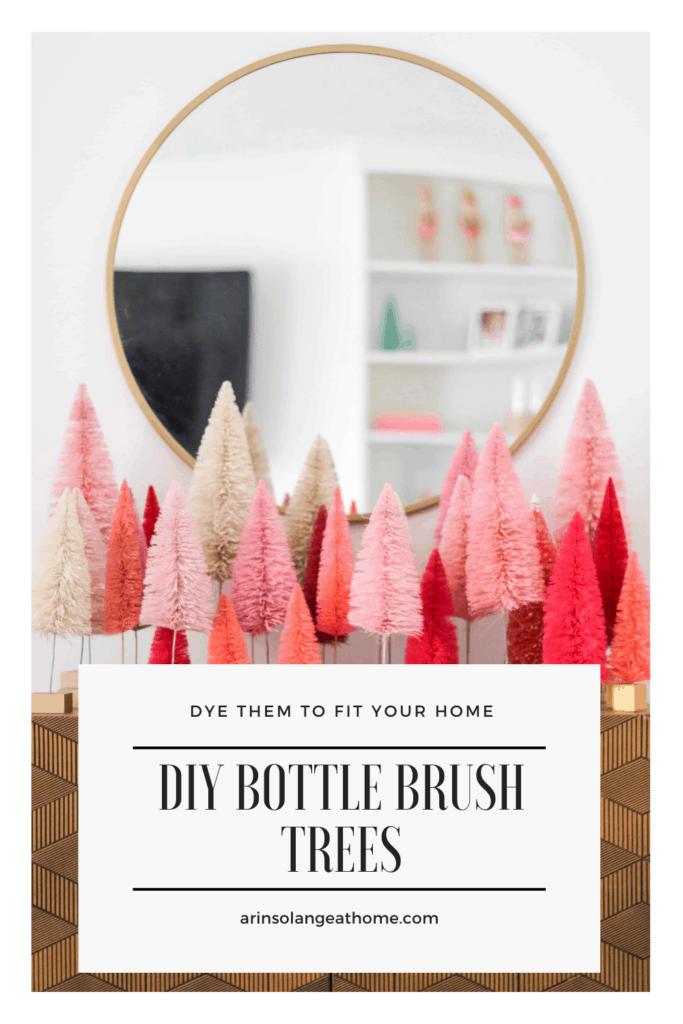
For the past few years bottle brush trees have been my favorite thing at Christmas time. I LOVE finding ways to make my decor for the holidays my own. Sometimes that means the perfect DIY, and these pink bottle brush trees are no exception.
this post may contain affiliate links
Bottle Brush Trees
Bottle brush trees have been all the rage the past few years – after all they are super easy, and typically kind of affordable decor.
I also think they tend to a go to because they are not necessarily holiday specific and can last all winter long if you so wish! They are not super hard to find – but I will link to some of my favorites in this post for diy or ready to go either one.
Another fun thing about bottle brush trees is that they tend to all go together really well even if they are not from one place. They sort of remind me of pumpkins in the fall – a mix of sizes, shapes, and colors is better than one alone!
DIY Custom Bottle Brush Trees
Last year I shared dying bottle brush trees on my Instagram stories. It was such a fun process for the second year in a row – but with a newborn in tow I didn’t have it in me to blog the whole process.
I tend to decorate with a lot of color during the holidays but still lean towards more pink than anything else, so this process allowed me to use affordable trees to make an affordable punch!
I will tell you – in this post I will teach you how to accomplished your perfect color with two different techniques, but am only going to show you 1 way via photos.
Gather your Supplies
Below is everything you need for your custom bottle brush trees – if you don’t have any bottle brush trees I will link LOTS at the end of this post that you can use in the DIY.
I will also talk about some great places to grab them in store and my go to for getting them at a discount.
Supplies:
Bottle Brush Trees
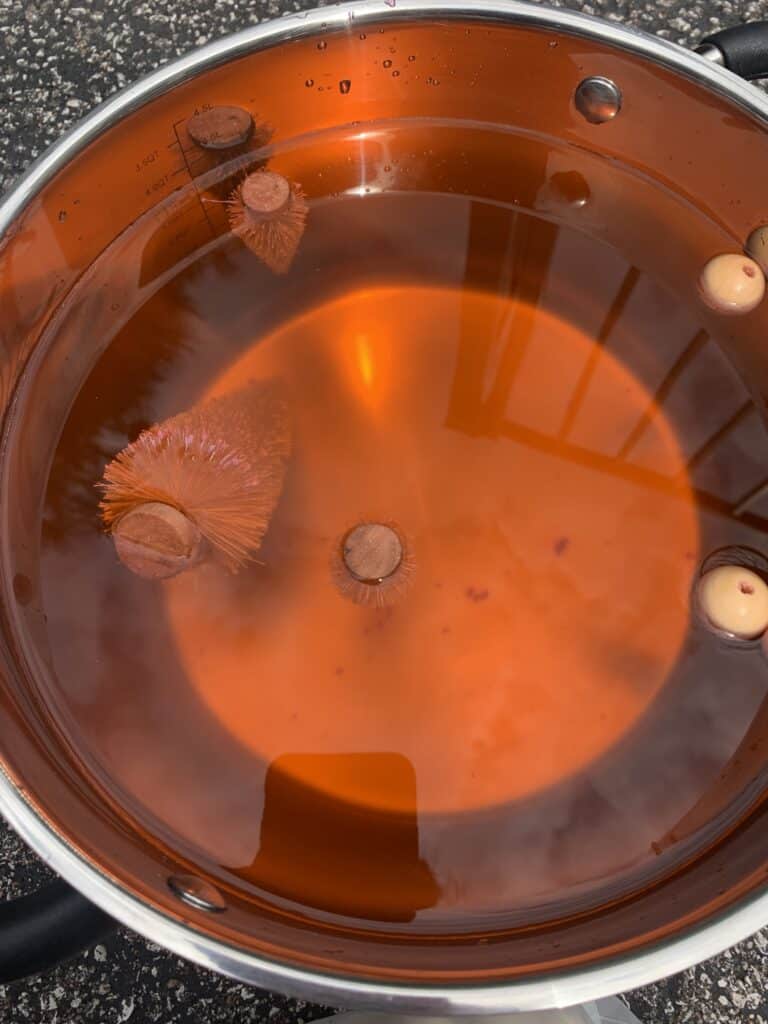
Large Stock pot (something deep is best – I actually used a beverage dispenser container last year.
Rubber Gloves
Paint Stirrer or spoon you don’t mind ruining
Craft paint and or food coloring – This is my go to for food coloring
A towel to let them dry on that you don’t mind ruining
Bleach if you plan to strip any trees
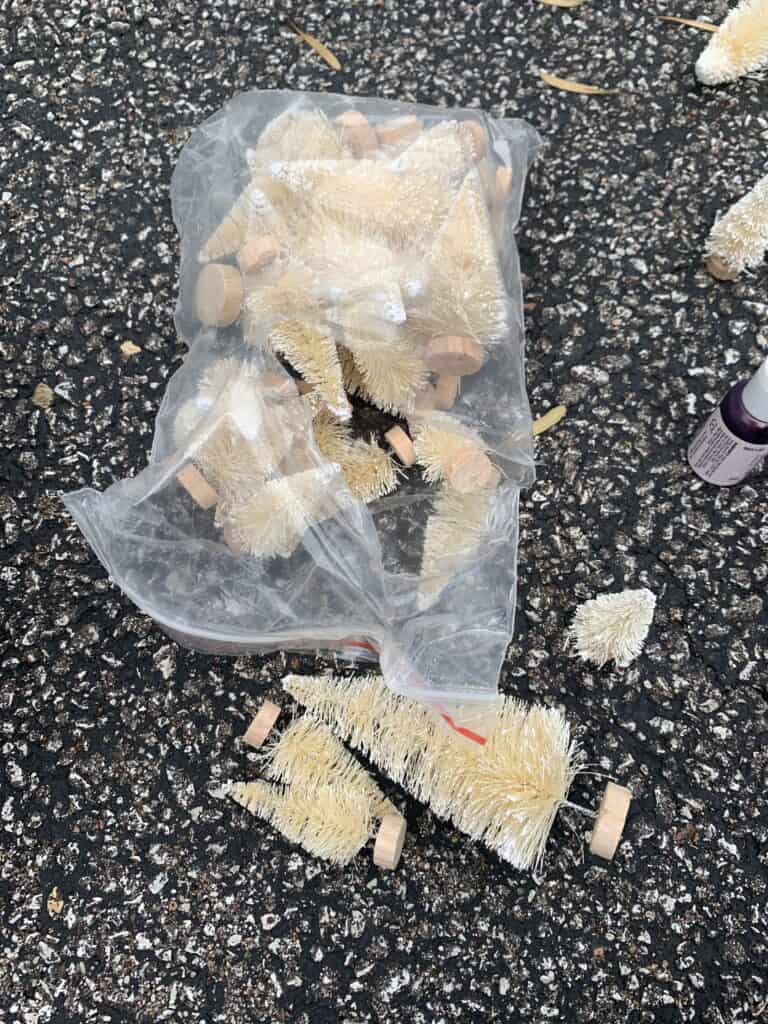
Bleaching Trees Before you Start
In order for this process to work well it is most easily done with white trees or very light trees. One thing I did last year was take some colored trees that I already owned and bleached them in order to do the process below.
They will not all bleach to white, but it will remove a lot of the color, and allow for them to take to the process below for a cool outcome. I actually loved some of the trees that had some color on them more than the white.
The yellow trees ended up coral, and the teal/blue trees ended up kind of purple/pink.
To do this you just need to fill HOT water and bleach (go with a good amount of bleach) in your pot you will use for dying the trees and dip them and rinse. Dip them and rinse. Keep doing that until they no longer rinse any color off.
Now they are ready to dyed once they are fully dry.
Process #1 – Paint Dyed Bottle Brush Trees
Like I said above – there are two processes for these bottle brush trees. 1 is with paint, and the other is with food coloring. I will talk about how to do both and the benefits of both.
For me personally I used a combination of methods, and even mixed the two methods into one for some of my trees last year.
Benefit – Coloring the trees with paint allows for the most custom color. You can get colors that I think are really hard to achieve with food coloring, and in my opinion it allows for more of that modern muted color look.
Con – This method costs more money. It takes more paint to make this work than it does food coloring.
Con – This method takes much more patience. It takes wayyyy longer to achieve the color you are looking for. It is still worth it, but worth noting.
How to Paint Dye your Trees
Fill your container with just enough warm water to cover your largest tree. The less water you do the less paint it will take.
Now you need to decide what color to do first. In my opinion you should do several shades of similar colors when doing this method. So what I did is started with light light pink. I poured a very good amount of paint into my water and stirred it well.
Now drop your tree in and LEAVE. Let it do its thing. Remember I said this method is not fast.
Come check on your tree in 30 min or so, and keep checking until it has achieved the color you were looking for.
Now I would leave that water there and add more color. Maybe a different shade, maybe more of the same for a darker finish, but add more paint. You can of course start fresh with a totally different color but for the best results when doing paint I would do the above method.
Once your trees are the color you wanted let them dry sitting up right for a good 24 hours. Especially with the paint method you want the paint water to dry on the tree.
Process #2 – Dying Bottle Brush Trees with Food Coloring
Option #2 is to use food coloring – this method is easier, and still pretty customizable, but not AS custom. I personally think if you are doing a good mix of trees it is worth it to do some in this method and some in the method with paint.
Pro – You will achieve a darker more vibrant color with this method – so for instance if you are going for hot pink I would do this method for those trees.
Pro – This method seemed to work better for trees with some color still left on them from the bleach method.
Pro – Food coloring dyes the trees MUCH faster.
Con – Getting different shades is harder. Food coloring is more limited!
Con – You need to be more careful and wear gloves or you will have fully dyed hands.
How to Color your Trees with Food Coloring
Fill your same pot with warm water just high enough to cover your largest tree.
Add in a small amount of food coloring in your lightest color. Think through your end idea on colors – you can easily start with say pink, then add some blue to get some purples.
Add your trees and check on them in a few min – the food coloring will dye them quickly.
One thing to note – I personally found with food coloring you can play around with time more. Leave some in for 3 min and some in for 30 min with the same batch and you will get a different outcome.
Again you can add new colors and more dye an continue to get new shades and colors.
Once they are done set them on a towel to dry for 24 hours.
That is it – making them custom is easy as can be. It isn’t the cleanest, fastest process, but it is easy and truly a DIY anyone can do.
Where to Buy Bottle Brush Trees
Alright as fun as making these are – you need to find the bottle brush trees first! Plus I know sometimes you just aren’t a DIYer and want to just buy them. I have you covered on both fronts.
Affordable Places to Get Bottle Brush Tree’s For Dying
First – Hobby Lobby. Hands down my first rec. They have great sizes, and come in plain white, but also have lots of fun colors you can use as is, or bleach first. I did a mix.
Target dollar spot also has them yearly, and so does Walmart – Most of the time I bleach these to dye. Keep in mind the more plasticy feeling ones are much harder to dye and won’t bleach.
Amazon – Amazon has some great packs of plain white bottle brush trees – I will link to them below.
Hopefully this post was super helpful in finding the perfect bottle brush trees for your house this holiday season, whether that means making them or buying them. Be sure to pin the photo below for later, and follow me on Instagram for even more holiday inspiration!
This post on Walmart+ was graciously sponsored by Walmart – thank you for supporting the brands that support this blog.
Life is just a little busy for me right now…just a little, so I am SO excited about an amazing new membership that is about to transform my life. Walmart recently rolled out Walmart+ – their new membership that is here to make all us moms breathe a big sigh of relief!
Goodness knows that 4 kids alone has been a lot but this past year, trying to juggle my business, the kids and their activities and appointments, plus renovating a home, has been A LOT. It has also meant A LOT has fallen through the cracks, much to my dismay.
We are headed into the holiday season, so that means things are only going to get busier for all of us, and this membership is only going to save my butt more often.
Delivery has become my go-to in all aspects of life, so when I found out that Walmart was launching Walmart+ and that one of the benefits in my area was free unlimited delivery ($35 minimum, restrictions apply) it was a no brainer for me to sign up – because delivering birthday treats while I am at dance class and finishing a deadline is basically saving my life this year.
What is Walmart+
Walmart+ is a membership where you’ll receive a few additionalbenefits when you shop with Walmart.
After those two weeks you can choose to pay monthly ($12.95) or yearly ($98). – The annual plan comes to roughly 2 dollars per week ,(based on 52 weeks) and will pay for itself in 2 deliveries per month (based on standard $7.95 delivery cost).
Benefits of Walmart+
Free unlimited delivery – Groceries, toys, clothing, and much more can be delivered. There is a $35 minimum and some restrictions apply. Delivery times vary but can be as soon as same day, and you are given a 1 hour delivery window.
Member pricing on fuel – every little bit counts and your savings of 5 cents a gallon will happen at Walmart and Murphy gas stations.
Mobile scan & go – Sometimes I like to browse the store, or just get out of the house, so when you head into the store you can simply scan your items on your mobile device for a fast, easy check out experience!
Have your Holiday Left on Your Doorstep
Okay you can’t deliver your entire holiday… you have to bring your own holiday cheer, but we all know that Walmart is a one stop shop, and I want to show you some things that can be delivered to you with Walmart+ to show you how easy it is.
Keep in mind you can add all your grocery needs to this order and you will be ready to celebrate with those you love most so you have more time to focus on enjoying your loved ones.
Simply click the item you are loving on the image below to shop
With the round up above I would personally lay down my table runner for texture, then add your lambs ear garland on top. Add in some white candles, and your table will be festive, yet not overdone so there is room for all your simple white serving pieces as shown.
Add in some texture with wood and metallics and you will have a holiday everyone will gush over and you may not have set foot in the store to make it happen!
I am excited to hear how Walmart+ helps you as a busy mom entering the holiday season. Leave me a comment below with your favorite feature, or any other hacks I should implement to get myself on track and ready to tackle the holiday season!
This post is going to be a landing page for Amazon Prime Day October 13 – 14, 2020! Hopefully it serves as a helpful way for you to find all the things you are shopping for! A few disclaimers on this post:
I do earn a small commission when you shop the links in this post or in my Instagram stories. I am beyond appreciative of that.
On that note – know that the last link you click when you check out will give that person credit – do with that information as you will, I just think sometimes people want to know how that works!
I will do my best to update this post with links and deals – it will be a simple post with mostly only text, and all ads will be turned off to make it easier for you to shop.
All of this will also be linked in my Instagram stories and highlighted – I am hoping this helps if you are a desktop shopper
And above all else – PLEASE DON’T LET THIS POST, MY STORIES, OR THIS SALE MAKE YOU FEEL PRESSURED TO BUY THINGS YOU DON’T WANT TO BUY. MY GOAL IS TO HELP YOU FIND ITEMS YOU HAVE BEEN WANTING OR HOLIDAY GIFT IDEAS AT A DISCOUNTED PRICE – NOT TO PRESSURE YOU TO SPEND MORE.
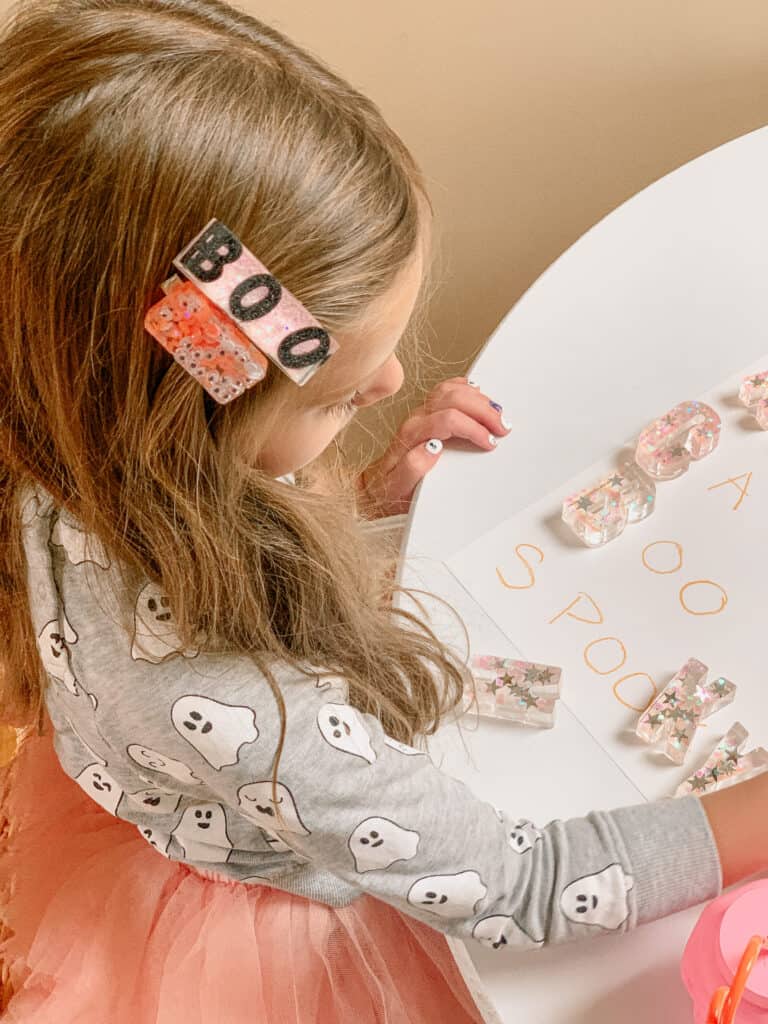
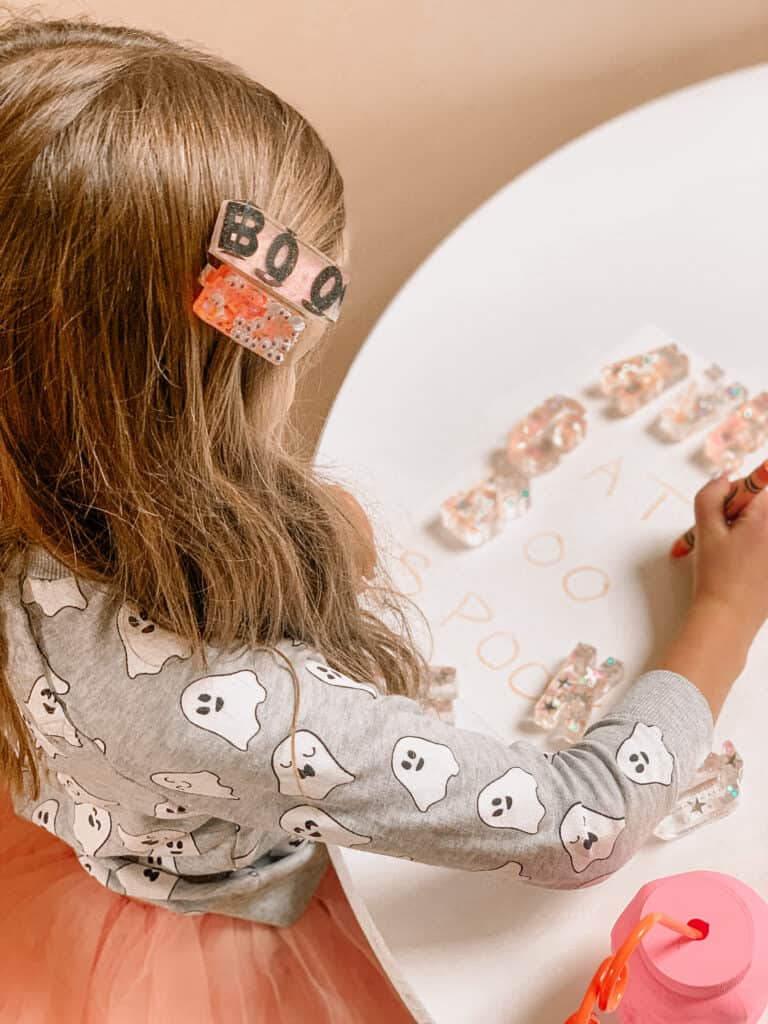
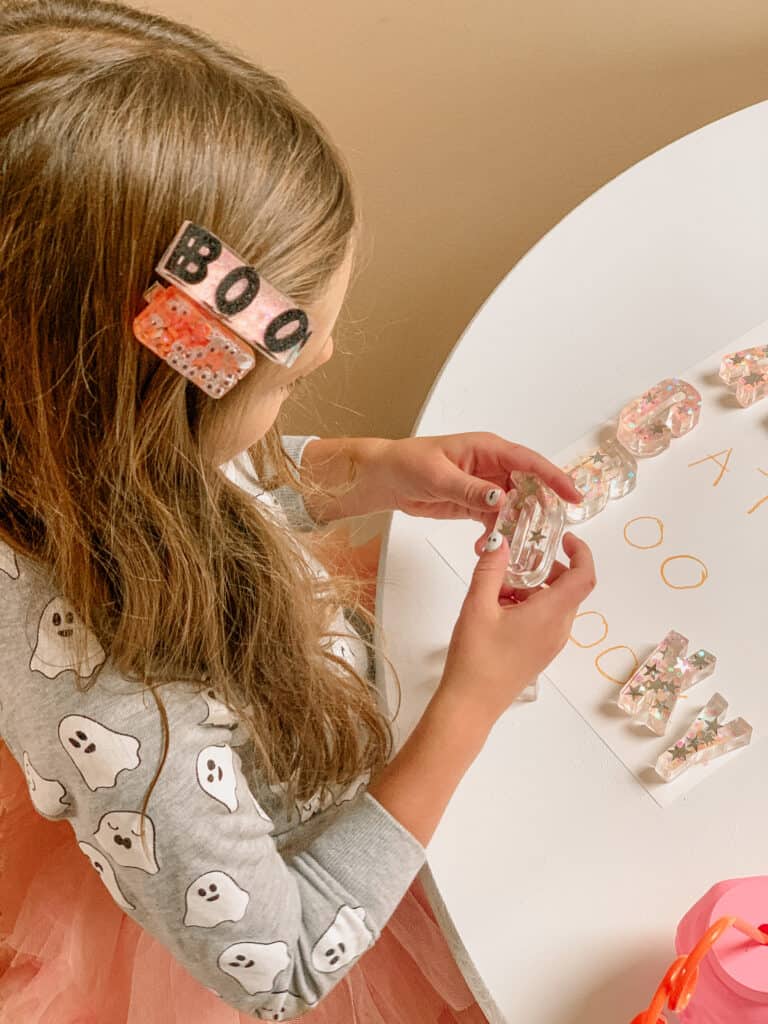
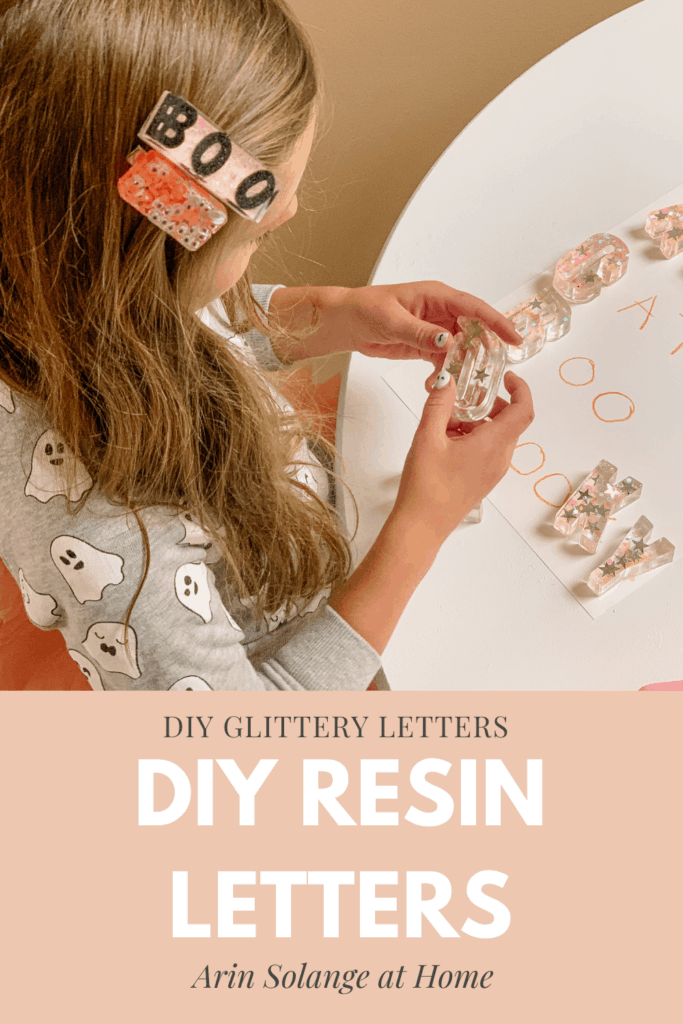
Resin letters have been the big thing recently and last fall I was so excited to try my hand at making my own set for my kids. I was shocked at how easy the project was, aside from some little learning curve things to take account for. Now that I have made a few sets I want to share the DIY resin letters tutorial for you.
This post may contain affiliate links
Resin Letters
Resin letters are essentially clear letters that you can use for a multitude of things. I have seen them used in a learning setting, and even as cute ways to decorate a table setting. They make great gifts for kids, and with the holidays coming up this is the perfect time to start making them!
I am not the first to do these letters, and there are tons of amazing small shops that make them beautifully if DIY turns out to be too tricky for you, but if you are up for a day of resin crafts then you will love this tutorial.
I will tell you – this is one of those tutorials that is sometimes about a wash when it comes to cost if you are only doing one set of letters. That said – I think you will get hooked and end up wanting to make more because it is so much fun.
For my tutorial I mixed some other tutorials, as well as found some little tricks that have worked for me over the past year while working with resin, so hopefully you end up with perfect epoxy resin letters.
Working With Epoxy Resin
One thing that is really important to note when it comes to working with Resin is that it is not washable and CAN ruin things. It is not something to just work with willy nilly.
You need to set up a work space that can be left alone for 24 hours, and where if you make any spills you won’t ruin the work space.
Other Resin Projects
Since oringally writing this post I have done a few other resin projects that I LOVE. Check those out here if you want another fun way to use Resin!
Epoxy Resin – These letters take a good amount of resin – so if you are planning to make more than one set, or make something else with the resin, I would get a good size bottle. (I recommend planning to do more than one set to make it worth your money in supplies! – Buy from Amazon. – you will spend WAY more getting it at the craft store!
LetterMold– I went with this mold. I wanted the letters big enough to be cute and non choking hazards. You could go smaller, but this size ended up cute and fun for my kids.
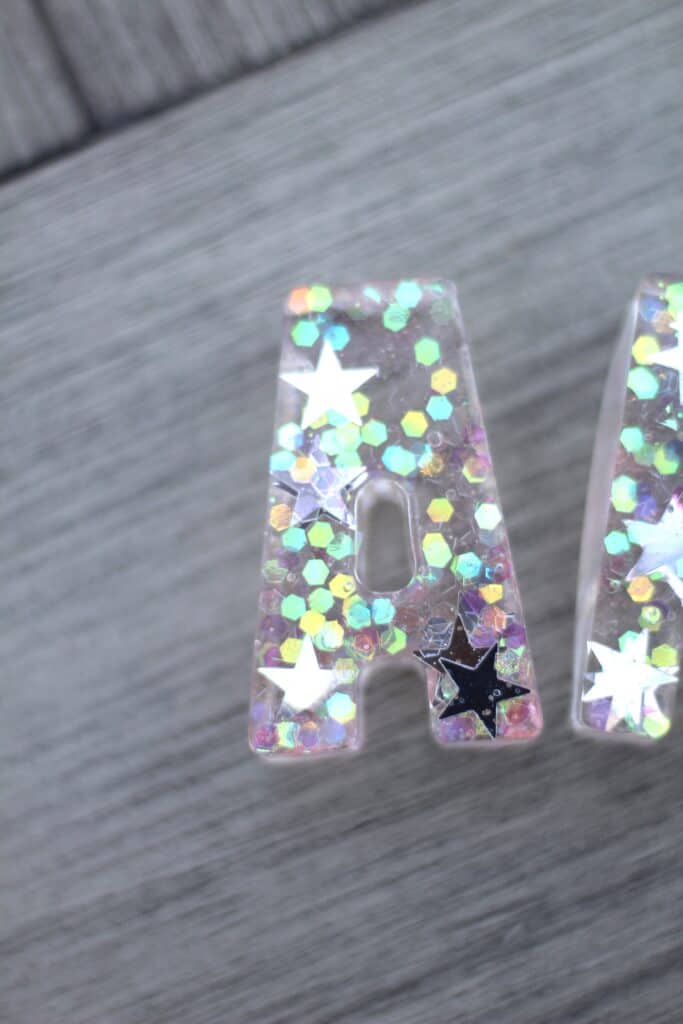
Glitter – This is where you get to have fun. Pick anything you want. Lots of clolors, make them themed – you name it. You will use more glitter than you think.
Disposable Cups – You need 3 disposable cups – the resin WILL ruin the cups. Measuring cups are helpful because you need equal parts of both parts of the resin, but I found that using clear disposable cups was just as easy and I just made sure I had even amounts of liquid in each.
Stir Stick : Think something like like a popsicle stick.
Like I said above – prepping your work space is too important. I like to lay down a trash bag, then tin foil. For the letters it can also be really helpful to lay everything in a disposable pan like this incase of spills and to keep little fingers from trying to touch them while they dry.
They also make silicone mats that work great for this if you plan to make lots of sets. Keep in mind that whatever space you set up will need to be left alone for 24 hours.
Making the Resin Glitter Letters
Alright now for the fun! Before you start I have a video on this post showing how I made the letters! Watch that before you dive in.
Prep your work space and lay your resin mold down flat. It needs to be fully flat and level
Start adding your glitter. I found that it worked best to sort of layer things…and I would go more heavy handed than you assume you need to go. Keep in mind how many letters you have to do….you don’t want to run out of a glitter after only half the alphabet haha.
Time for Resin
Now it is time to get your resin ready. Your Resin bottles will tell you how to do this, but I am going to walk you through it here too.
Basically you need equal parts of each bottle of resin. You will put one in one cup and one in another cup then combine in a third cup.
** Thing to keep in mind: Remember not to go over half way on your cups if they are all three the same size. Because you need to pour both in that third cup. That might sound like a no brainer but when you’re in the zone it is easy to forget.
2.Once combined stir – and stir – and stir. You will stir for about 5 min. Scrape the sides, and make sure that there is NO STREAKING (like a white looking streak) when stirring. The streaks will cause soft spots. You are looking for a perfectly clear resin material before you start pouring.
Once you are done stirring you need to move fairly quickly – so be ready to go fully before you start this project.
Adding the Resin to the Letter Molds
This is as simple as it seems – simply add your resin to the letter molds one at a time. If you drip on the mold it is no big deal.
One thing I learned from trial and error was that the letters turn out better if you go about half full on the mold. You do want to pay attention to fill them all pretty equally, but the really full ones were too bulky for my liking. This will also save you a LOT of resin which is the big expense in making these.
Once the resin is in you need to stay by for a bit because you are going to be on bubble popping duty. Small air bubbles will rise to the top of the letters and you will use your toothpick to pop those bubbles. I would stay near by for at least 10 min to keep checking for bubbles to pop!
Once the bubbles are popped your letters are done – well or your part is done. Now it is all about time. LEAVE THEM ALONE. If you know me – you know I tested the time theory (hello not patient) and you really do need the full 24 hours for them to dry. So just leave them alone!
How to Use Resin Letters
You can use these in SO MANY WAYS. I personally worked on writing words for my daughter to lay the letters over which was really fun for her. Letter recognition is so fun for kids – so might as well make it pretty too.
Another option is to add a magnet to the back of these so that you can use them on the fridge or a magnet board as well.
One thing to remember – if you only make one set – be careful to make words with only 1 of each letter. That is part of the reason I think it is fun to make your own so you can have more than one of each letter.
Hopefully this was an easy to follow tutorial and you feel ready to create your own DIY Resin letters. If you have any questions be sure to leave a comment below or DM me on Instagram (@arinsolange), and be following my stories to see if I can master the magnets.