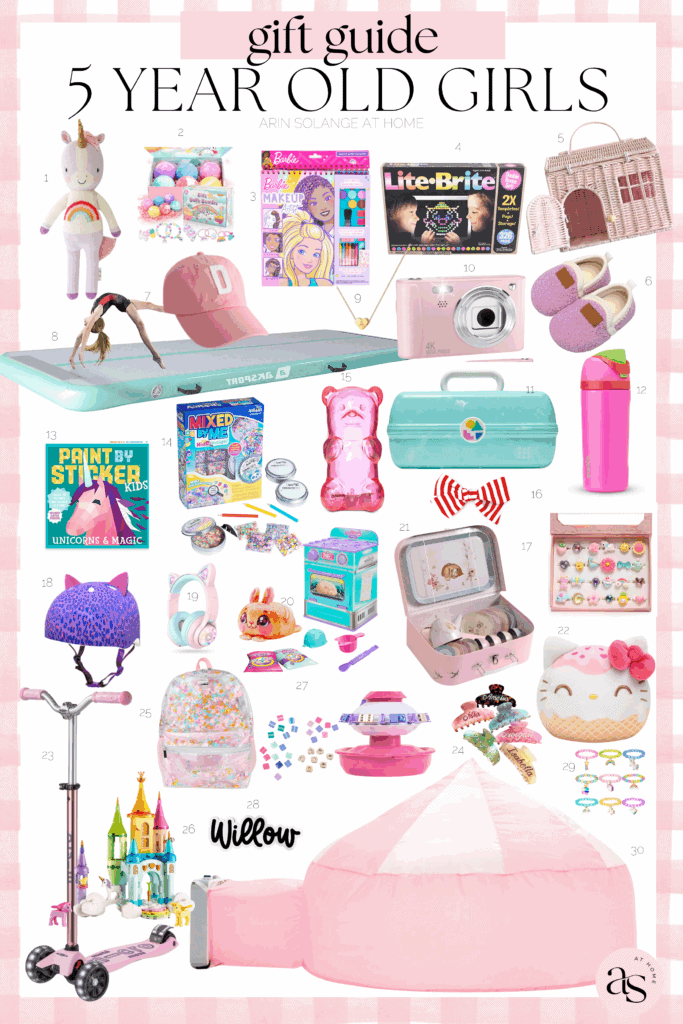
Best gifts for a 5 year old girl… how is that even on my radar? My sweet Avé turned 5 this month, and I always put so much thought into what I get her for her birthday and Christmas. I rounded up the best gifts for a 5 year old girl for you guys to shop for your own kids, or other 5 year olds in your life.
This post contains affiliate links – post originally written in 2019 and updated in 2025
Best Gifts for a 5 Year Old Girl
5 year old girls are so much fun! I feel like shopping for Avé was so much fun for this birthday because she was able to handle about anything – but wasn’t ‘too old’ for much.
A bit of a ‘the sky is the limit’ type shopping year, and we had so much fun finding the perfect gifts for her to love!
When I am rounding up gifts for these gift guides I put so much thought and effort into finding you unique items from a wide price range. My hope is that you can send this to family and shop it yourself all year round to get the little lady in your life great items that will fill different needs.
Other Gift Guides
I have worked hard in the past year to streamline your shopping for your whole family! Be sure to head to this page when you are done shopping and bookmark it for gift guides for your whole family.
I update these guides often and add more from time to time, so keep an eye on the page,
It has been FOREVER since I did a blog post like this. I mean remember back in the day when Insta stories weren’t a thing, and in order to get more than a snip-it of life you had to read peoples blogs?
I won’t say I am bringing it back – but things have been so scatter brained, and life is such chaos right now that I don’t really feel like I have had time or space to give good updates on Instagram –
That and right now I am just struggling in that space – which normally means I make things worse before it gets better.
House Updates
I have been asked so many times for updates on the house – so I feel like streamlining that answer will help. We have some super fun behind the scene things happening which have kept me from sharing everything in real time.
For me that has come with it’s own set of struggles – and honestly I think most of the time I feel like it was the worst choice I could’ve made career wise. But I also think it was the best choice I could have made as a mother – and that is my priority.
That doesn’t mean it feels good and is just easy as can be tho. I am used to sharing everything in our lives. I love doing that, and intended to do so when we dove into this house, so navigating things feels messy and HARD.
What I can tell you is – we are on track to move in in about a month maybe 6 weeks. I can also tell you that is about 4/5 weeks later than we thought so thats also been hard. We chose to pack certain things, and get a 2 bedroom condo thinking it would be until the beginning of October not November – that means I packed things I need and it has made things so hard.
When we move in I can not share everything instantly, but there will be lots of decorating rooms, updating bathrooms, prepping and decorating. So there will be lots of content.
What is up With Work
Life has also been HARD and weird on the work front. If you are reading this you likely follow me on social – so hi!! I have spent the last 3.5 ish years building this blog and social platforms – but in the past 1.5 years my blog has been my biggest focus.
For me my blog is MINE. I own it and can do sort of what I want. Work put in = results and eyes on content I work hard on.
That said – I love Instagram. I get to truly connect with the people I am creating for. The people I am finding the Amazon finds for, or the people I am working hard to create the DIY’s for – I get to talk to you, and see what you create based on those tutorials.
But at times it feels pointless – like no matter how hard I work on a project no eyes see it. I am VERY BIG on being authentic. I won’t share a tutorial or claim an idea as mine if it isn’t – and that isn’t the world we live in. In the blogging world most of what I do is copied and mirrored and it is rare that the credit comes back. Which becomes so stifling to my creativity.
And if I am being honest I am struggling with the fact that it feels like I am kind of in my own world on there.
Not the amazing holiday crafter – just the holiday crafter that does a couple really great projects. Not the home decor blogger that only shares that content – because honestly I LOVE sharing the diy sides of it. Not the DIY amazing badass, because honestly I truly love the mix. And I love sharing creative content in small form too. Just a bit of all of it and not quite hitting it out of the park on any of them.
That might seem weird to say but I also think sometimes it is helpful for you to all hear that from me. To hear that myself and probably other women you follow have these seasons of self doubt. That seeing that number on Instagram sometimes feels like more of a failure than a success when it doesn’t grow as fast as it should.
It’s a weird life when one of the bigger avenues of your job airs your ‘success’ for the world to see.
So all in all this job feels hard. I know some of it is the season of life we are in. Which is humbling, truly. But incredibly hard, and just has me all kinds of lost.
Family
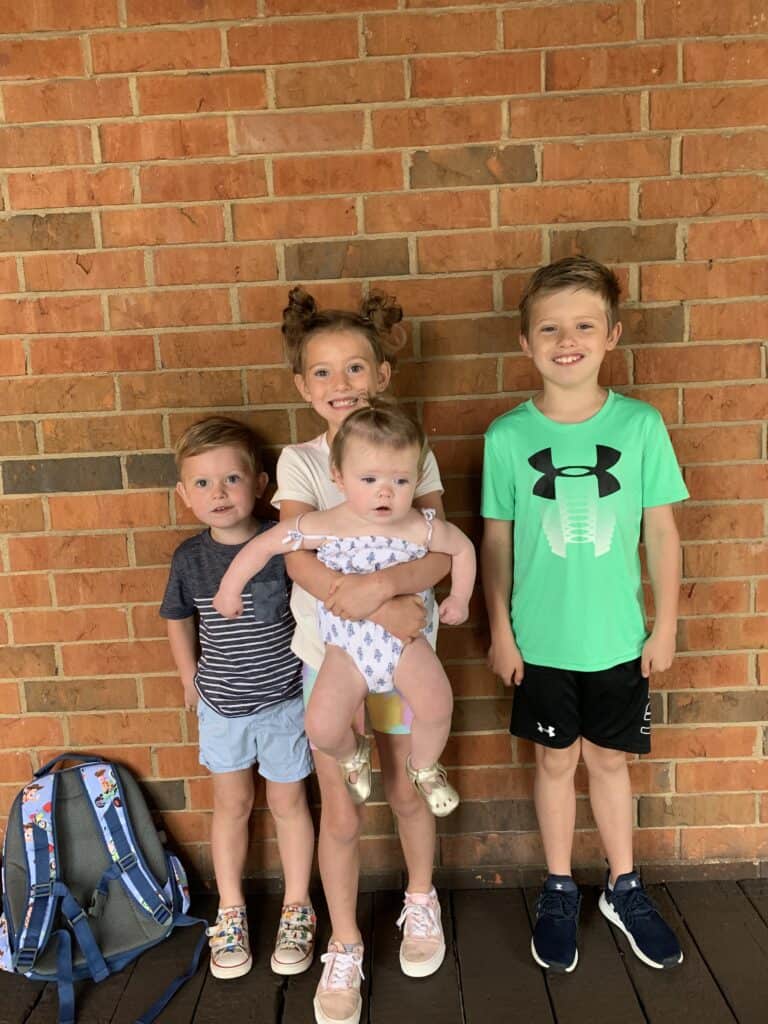
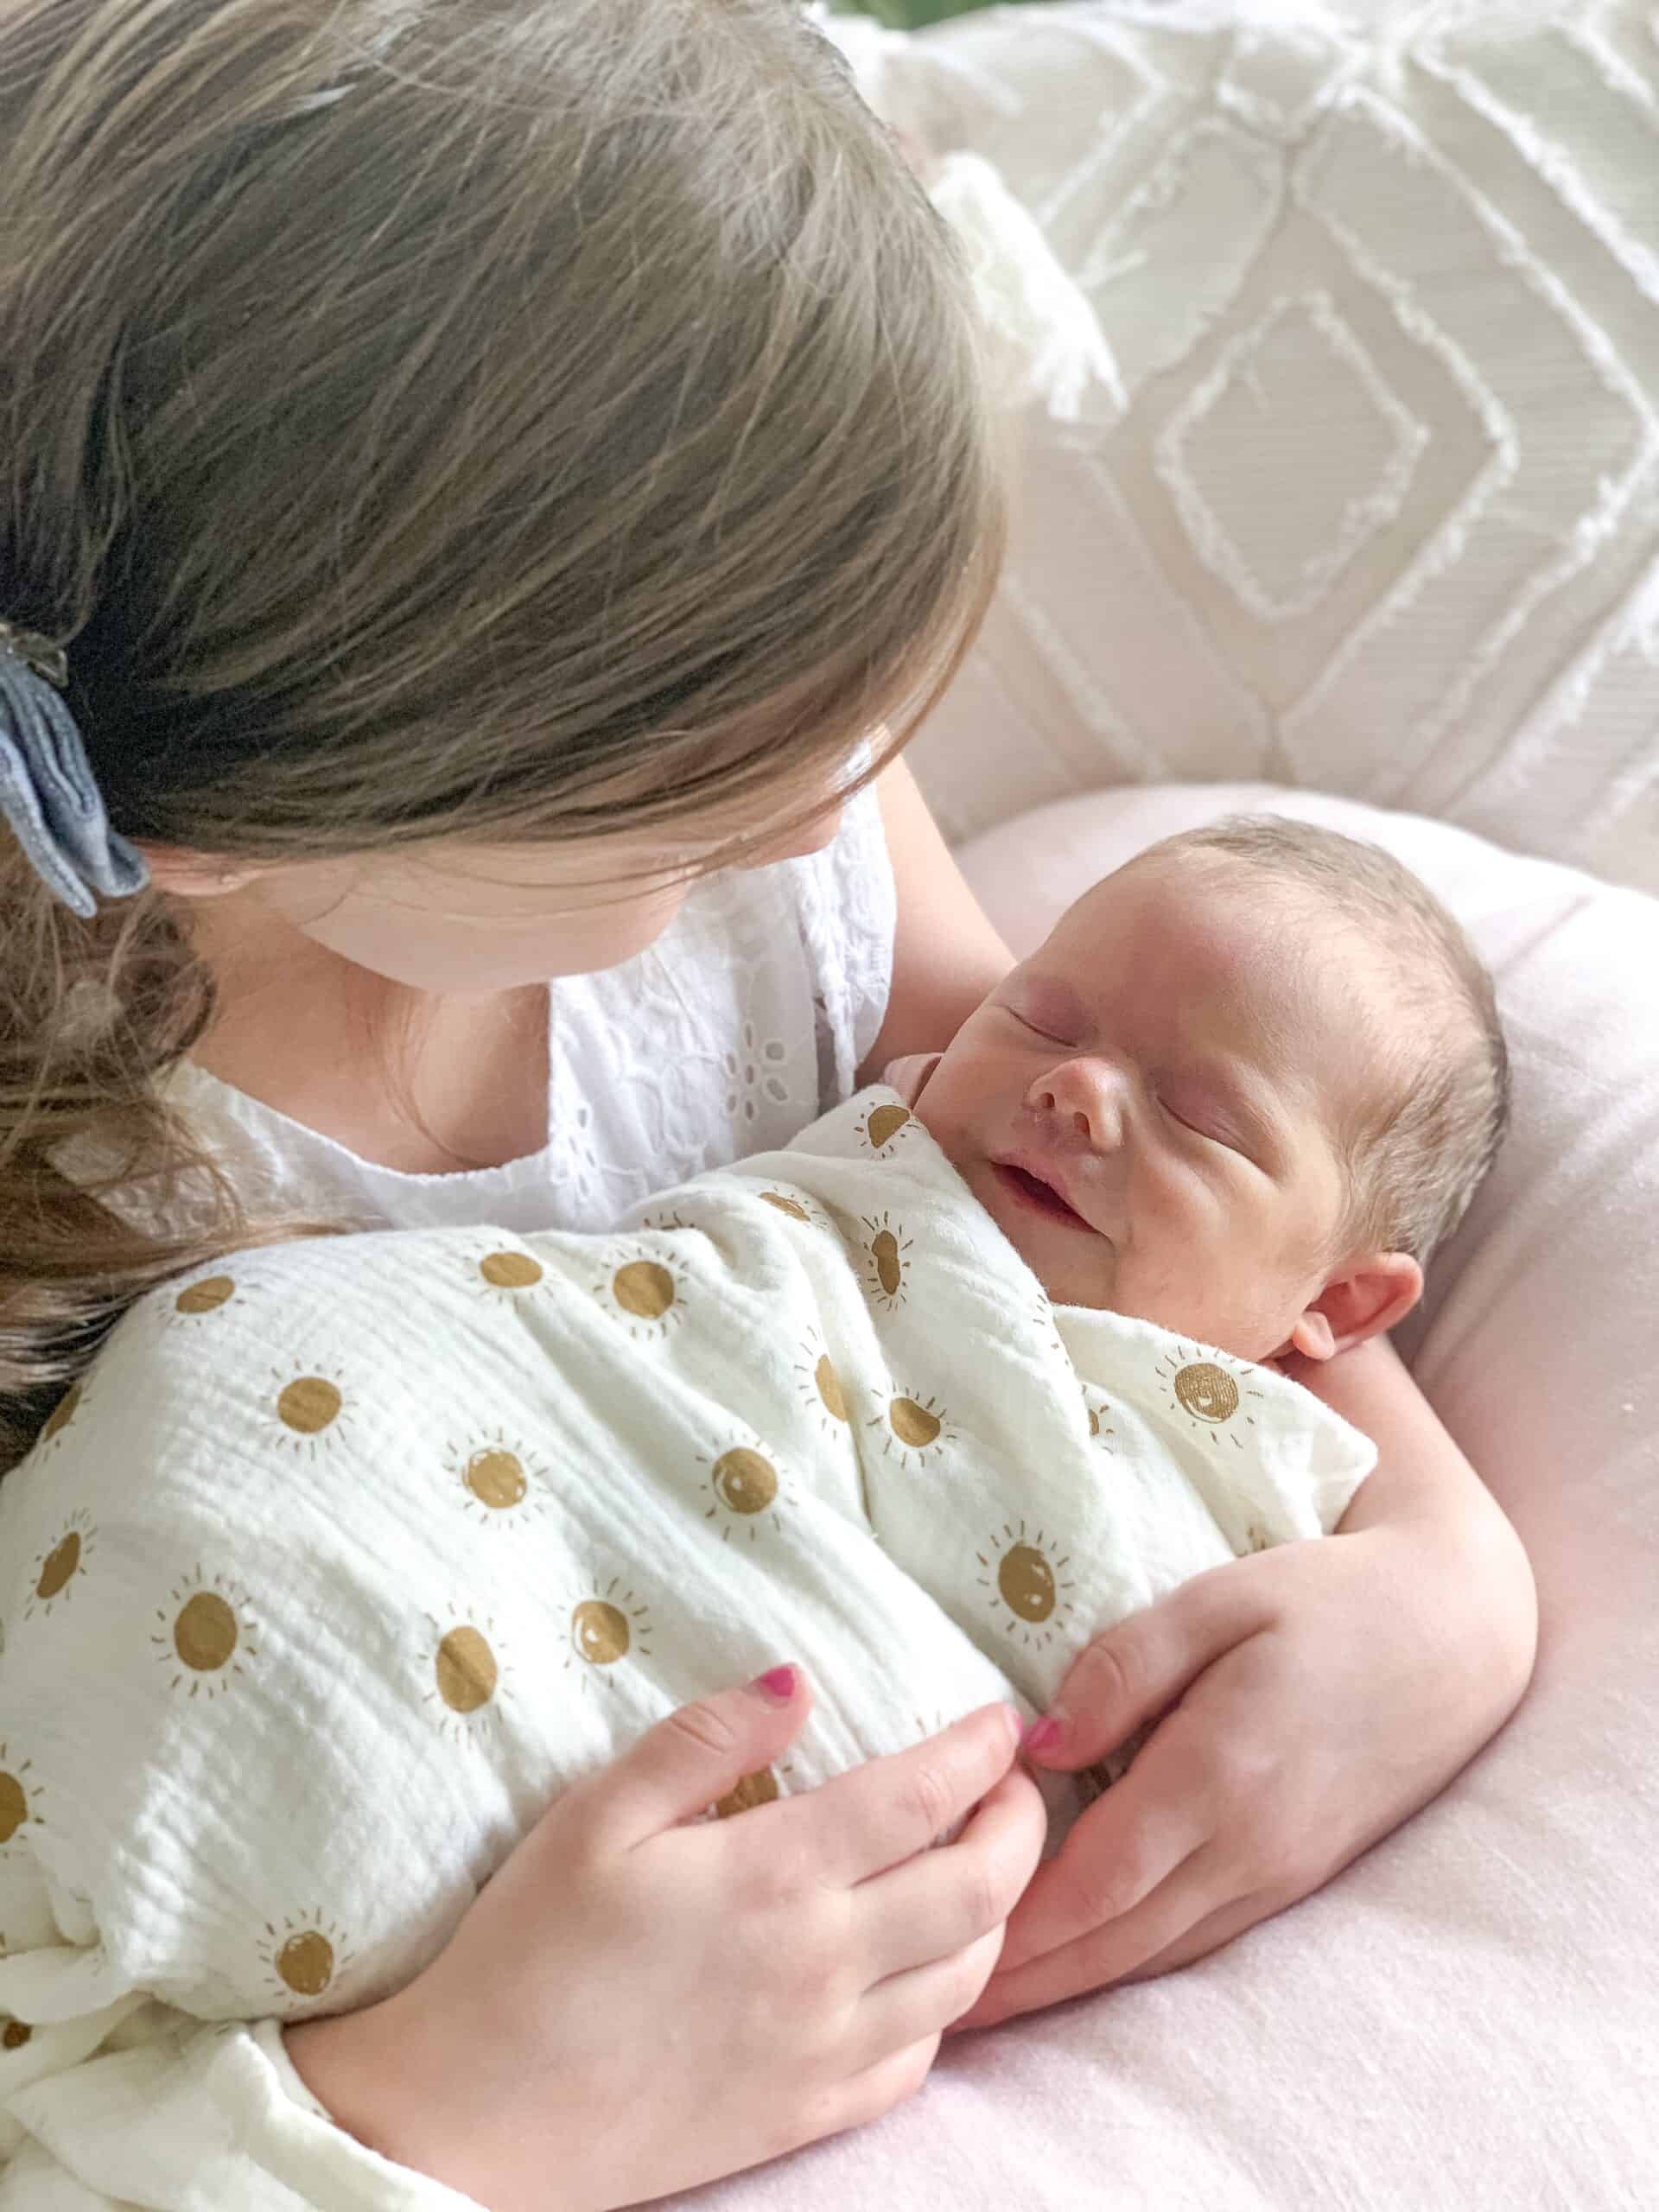
Aside from me – updates on the kids. They are all doing great. Our sweet Jack is doing much better – his school has been great about helping us and being patient with him as he gets used to a new year during a HARD YEAR.
The kids have been surprisingly resilient – and the older three are sharing a room well. Avé is definitely struggling the most – but is so much of me, where she keeps it inside. I know she has some anxiety about if this was the right choice, which breaks my heart for her.
But I know those fears will dissipate as time goes on.
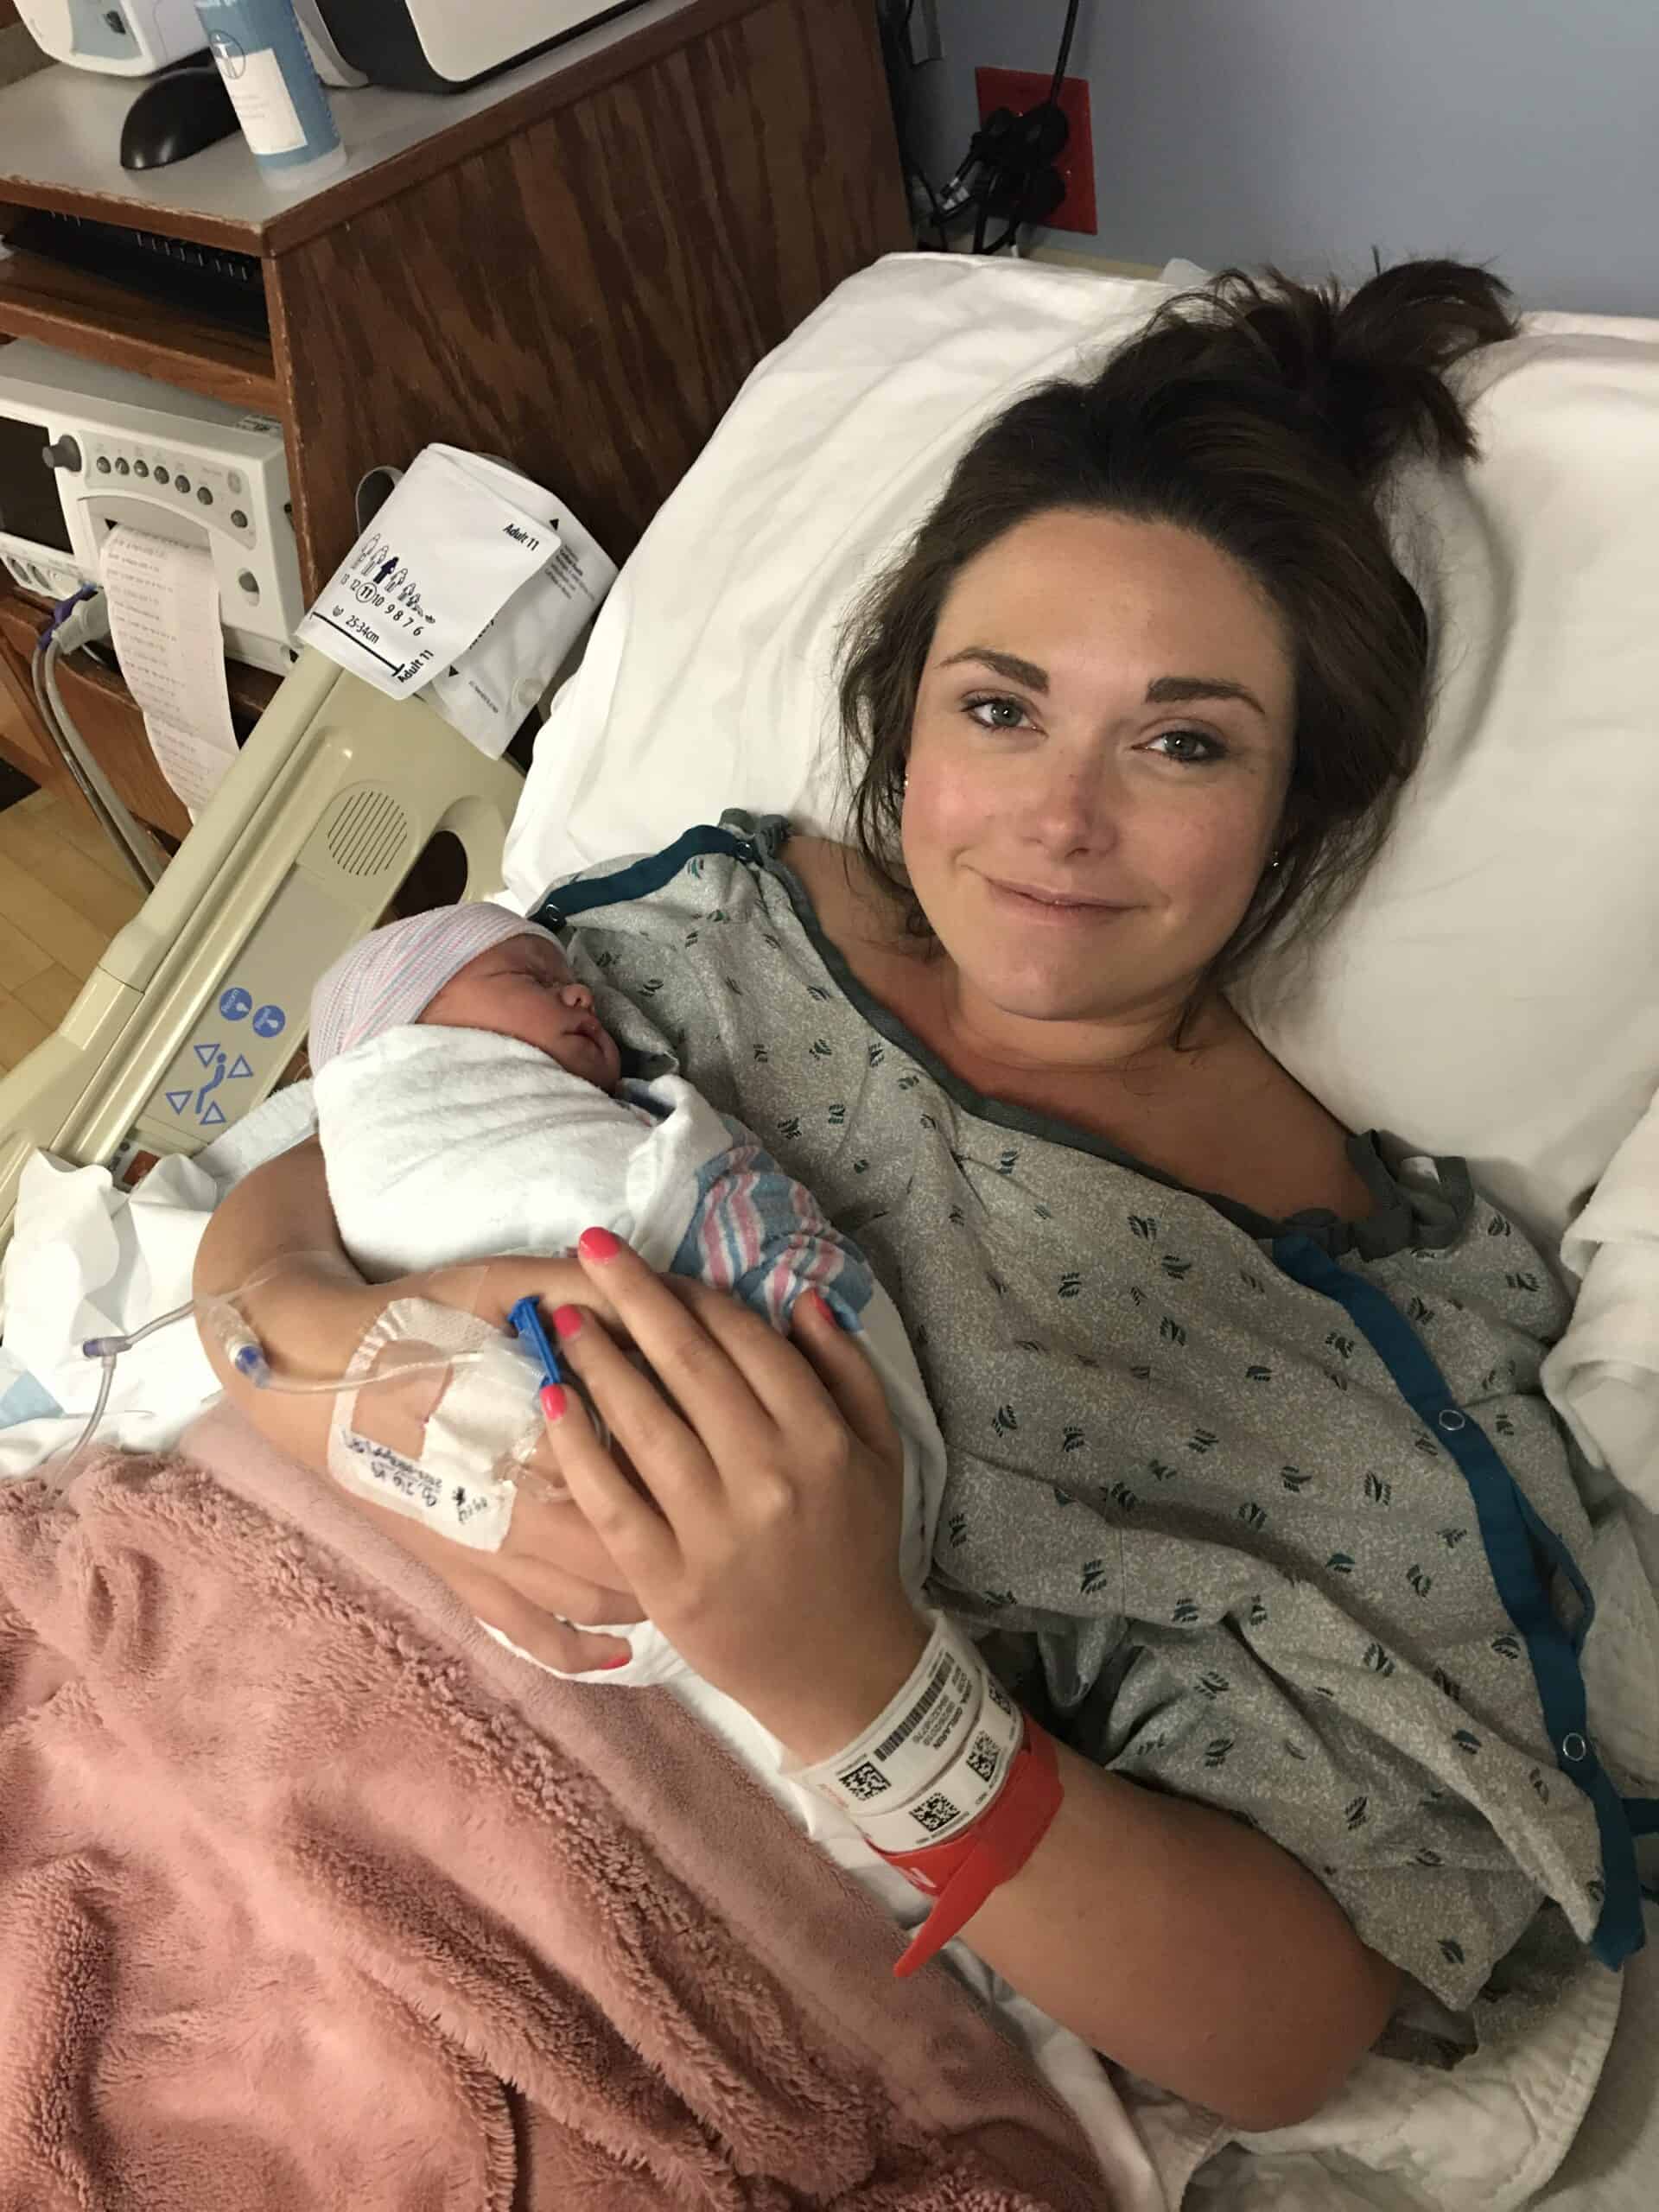
Goldie is doing great – you know other than that she doesn’t sleep haha! She is such a light sleeper, so even though the dock a tot in the packnplay did help, I think we wake her up. Because I am a literal tornado in bed.
We have 3 birthdays in our house in October, and I am anxious as to how I can make those special when I feel a bit scatterbrained with our lack of organization in life, but I am sure they will be filled with sugar and presents which I know is all they really care about.
All in all – I have so much to be thankful for. This is a HARD season. A season of growth in so many ways, but also will reap huge rewards. It is a season that is forcing me to work harder, and reassess which I pray will pay off down the road.
Hopefully this gives you a better look at where I am. Where my head has been. What I am processing and why things might seem just a MESS on Instagram.
We are so thankful for you all – because if you’re reading this and made it this far it is likely because you love our family well, and have been such a huge support allowing me to share my passion and dreams.
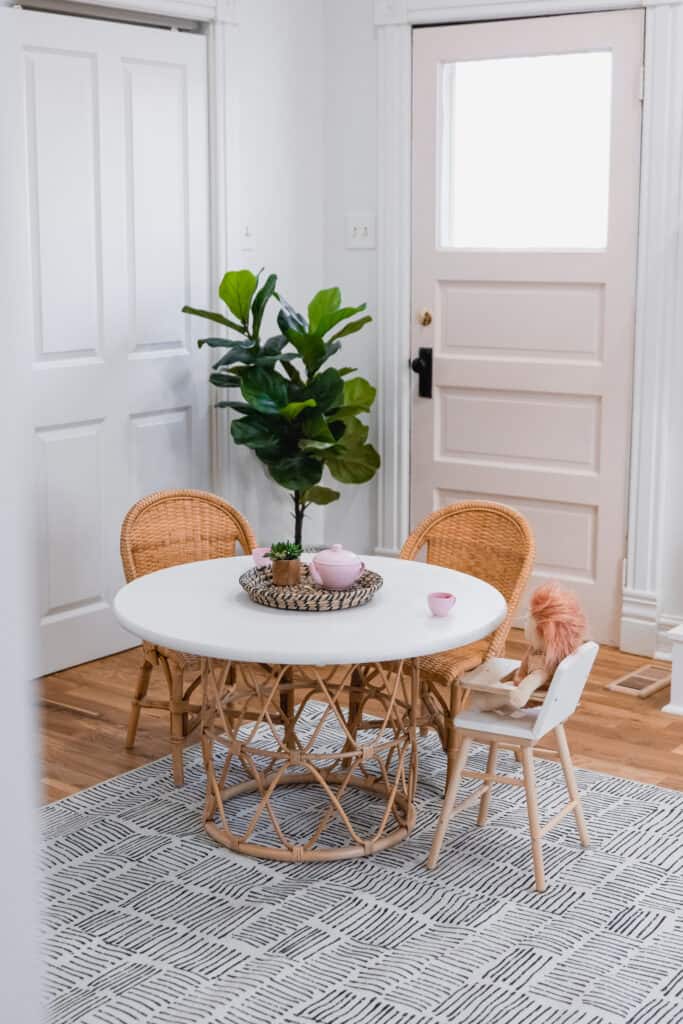
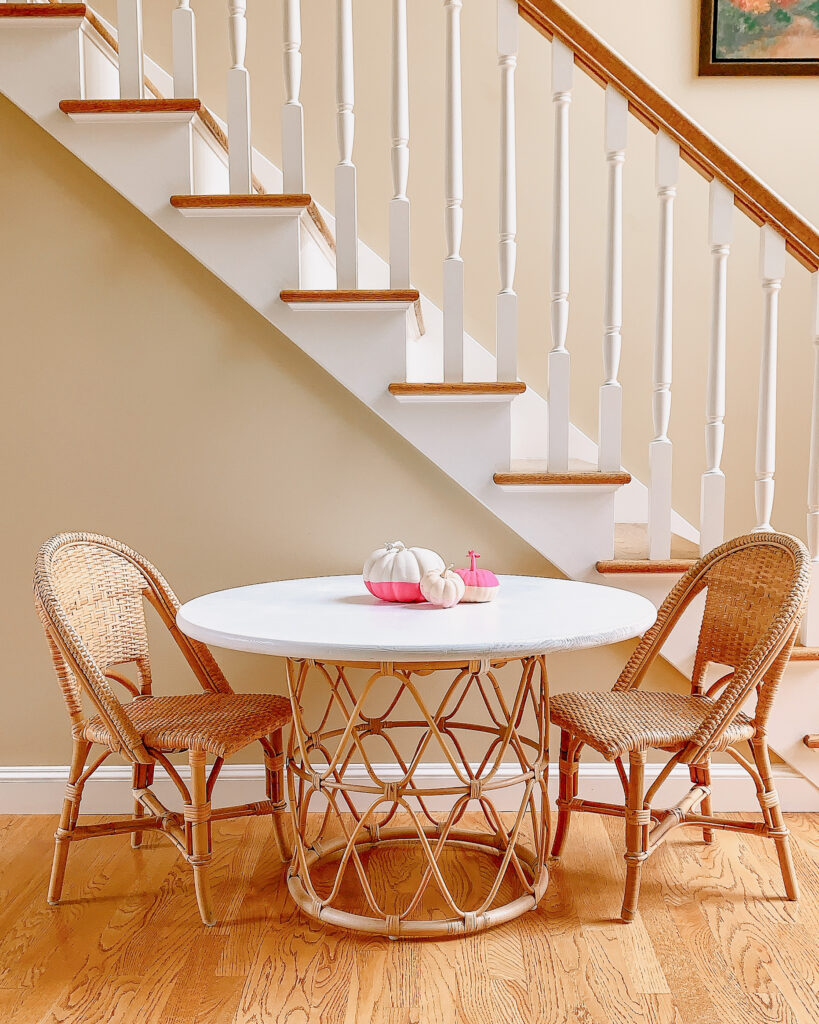
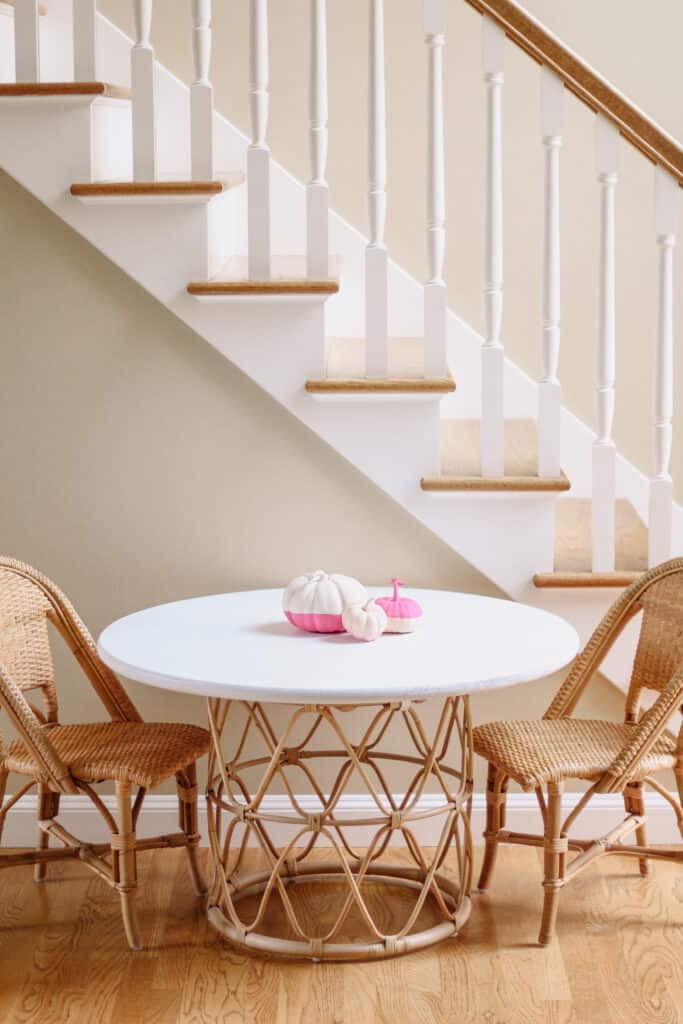
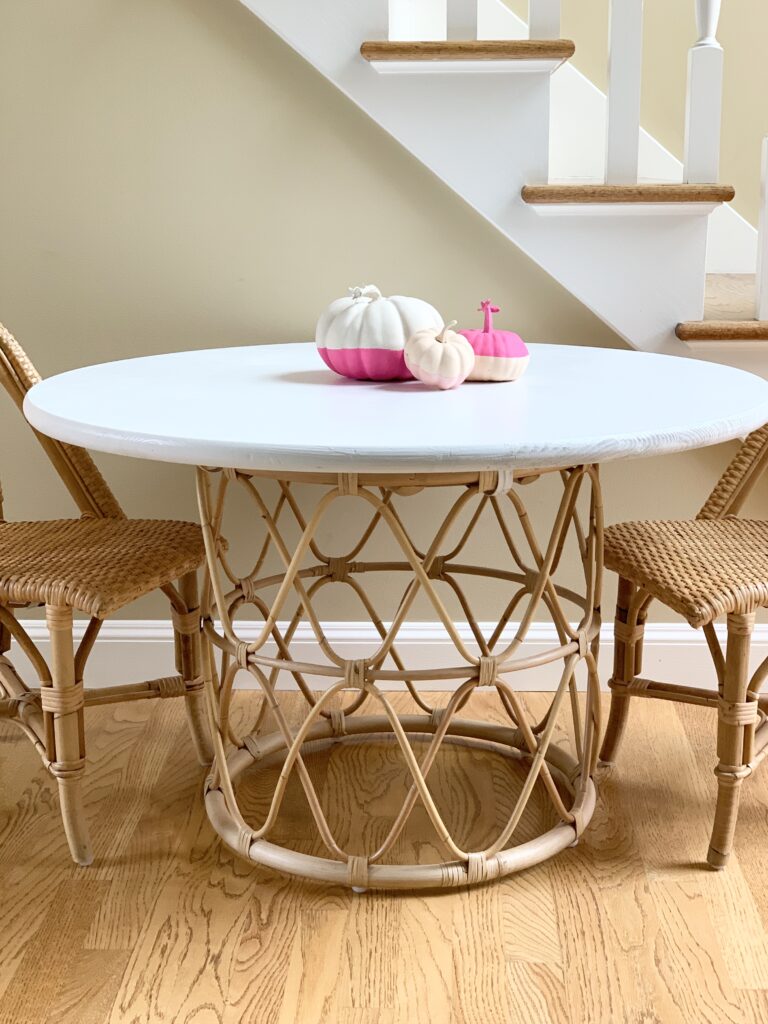
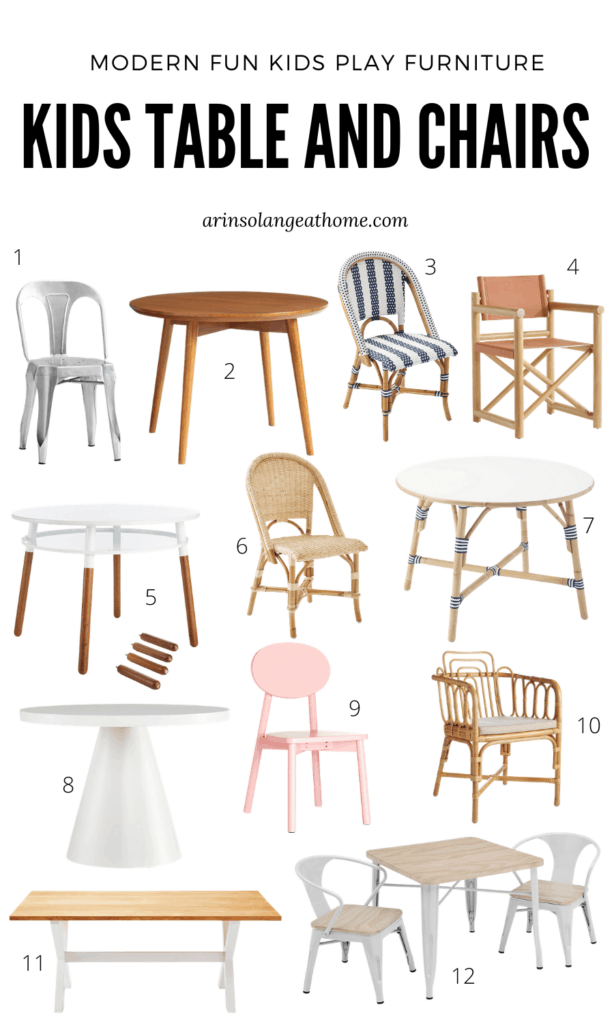
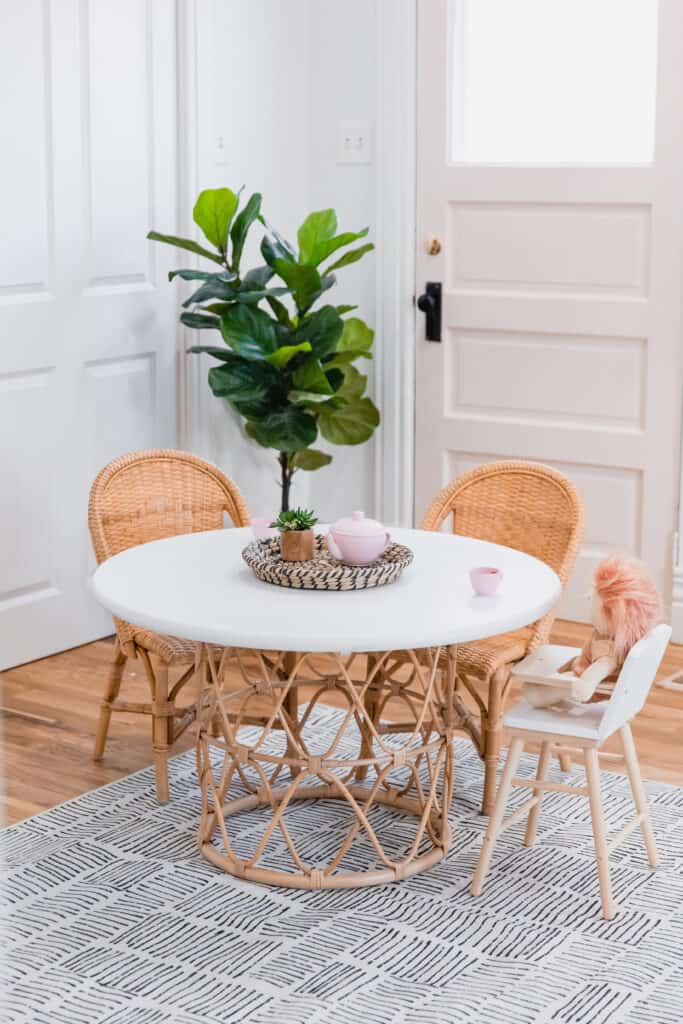
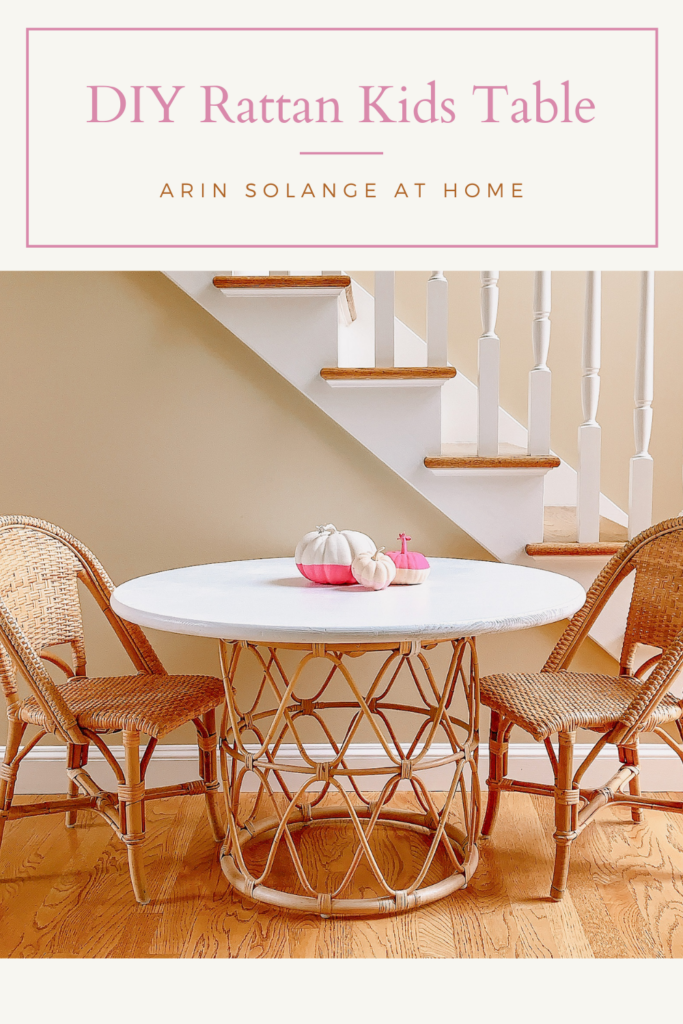
I am SO excited for this DIY rattan kids table. I have literally considered probably 10 different ideas for a kids table for our new house – because I was DETERMINED to find a unique round option. I am going to walk you though this DIY in this post to help you create your own kids table.
This post may contain affiliate links
DIY Rattan Kids Table
Last year we got these gorgeous rattan kids chairs, knowing that I was going to change the kids table when we moved. I wanted something a bit bigger for the 4 kids, and was leaning towards a round table for the new playroom.
The table won’t sit against the wall in the new house so I felt like round would be a fun change from what we had previously had and would look great sort of ‘floating in the space’.
This DIY was REALLY easy – and honestly is one that any of you could do, so follow along with the post to create your own, but incase DIY isn’t your thing – I rounded up some of my favorite kids tables ready to buy at the end of the post.
Supplies
Below is the list of everything you need to create your rattan kids table.
End Table or super study basket – I personally went with THIS end table based on the look. You really need the end table to be as close to 20 inches tall as possible. 20 – 22 inches high is ideal.
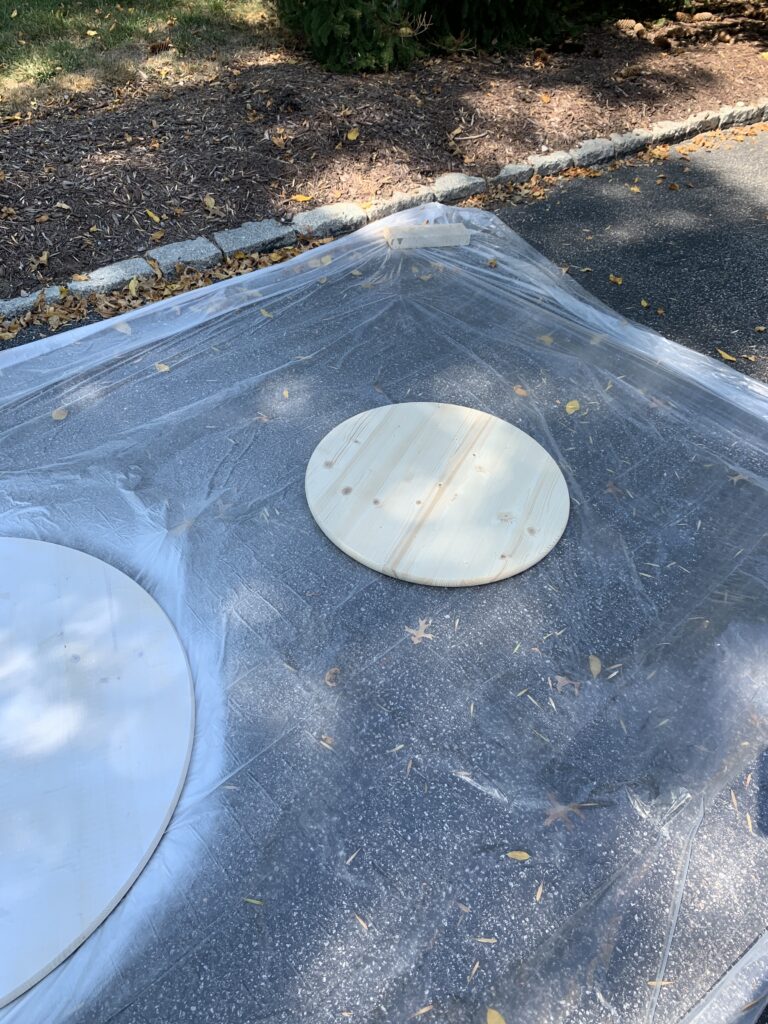
Alright this is truly SO easy, But I will give you the step by step on creating this.
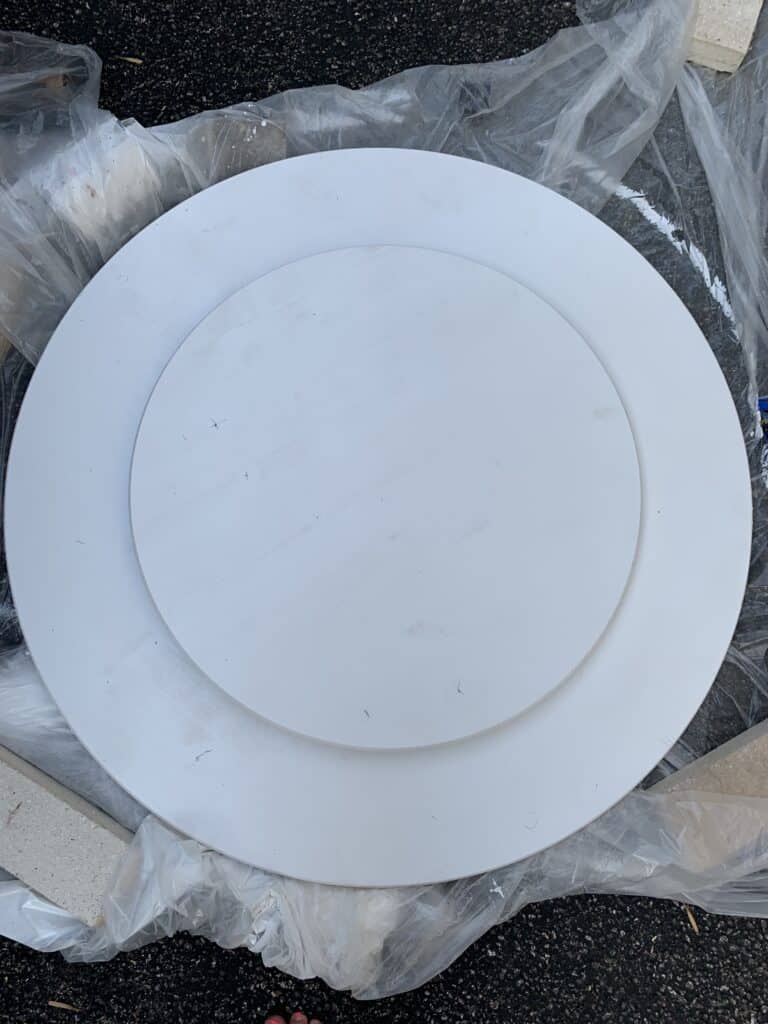
Paint 1 side of each of your wood rounds. Make sure you paint the sides of the smaller one during this step, but don’t worry about the large one.
2. Paint your brackets – you can either dip them in your paint if you don’t have white spray paint on hand, so you don’t have to buy an extra supply, or you can spray them. I honestly found that dipping them gave them great coverage. If you do this just put on gloves, dip your brackets then set them out to dry fully.
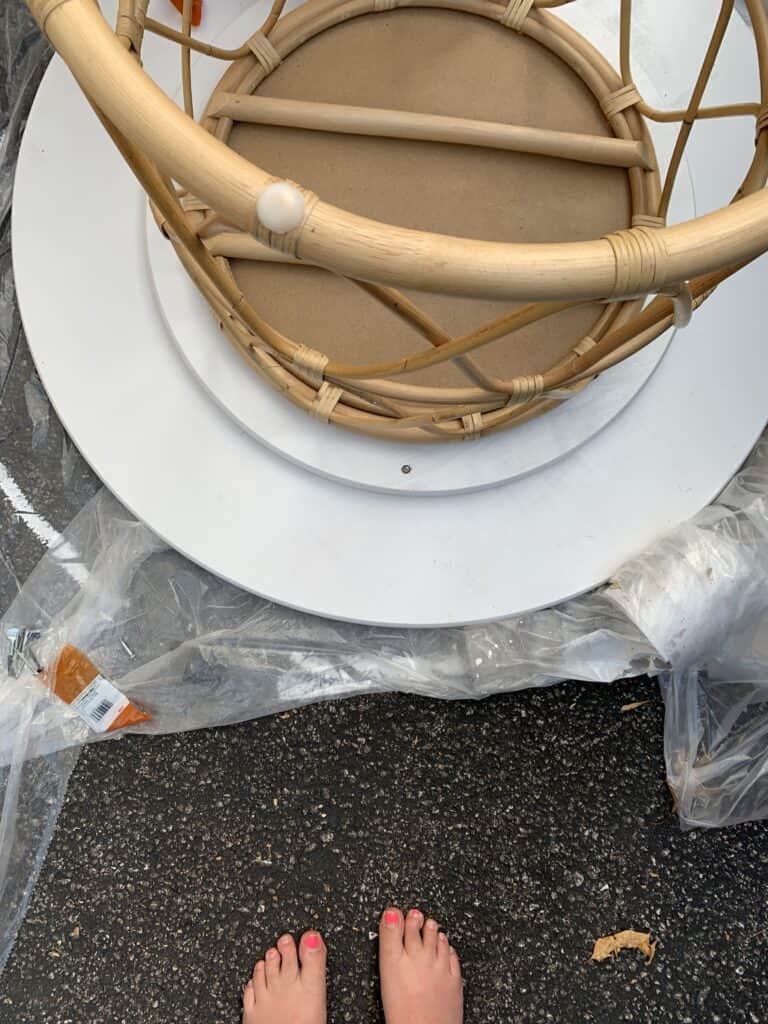
3. Now you can assemble. You are going to lay your LARGE wood round down on the ground. Center the smaller one in the middle with the UNPAINTED side down (no need to paint it – it will never be seen) and use 1.5 inch screws to attach the two wood rounds. I would use 4 of these screws.
4. Next center your site table in the middle of the smaller wood round, and grab your 4 brackets and 1 inch screws. Use the brackets to attach the rattan table to the table top. Now you can flip your table and start finishing the table top.
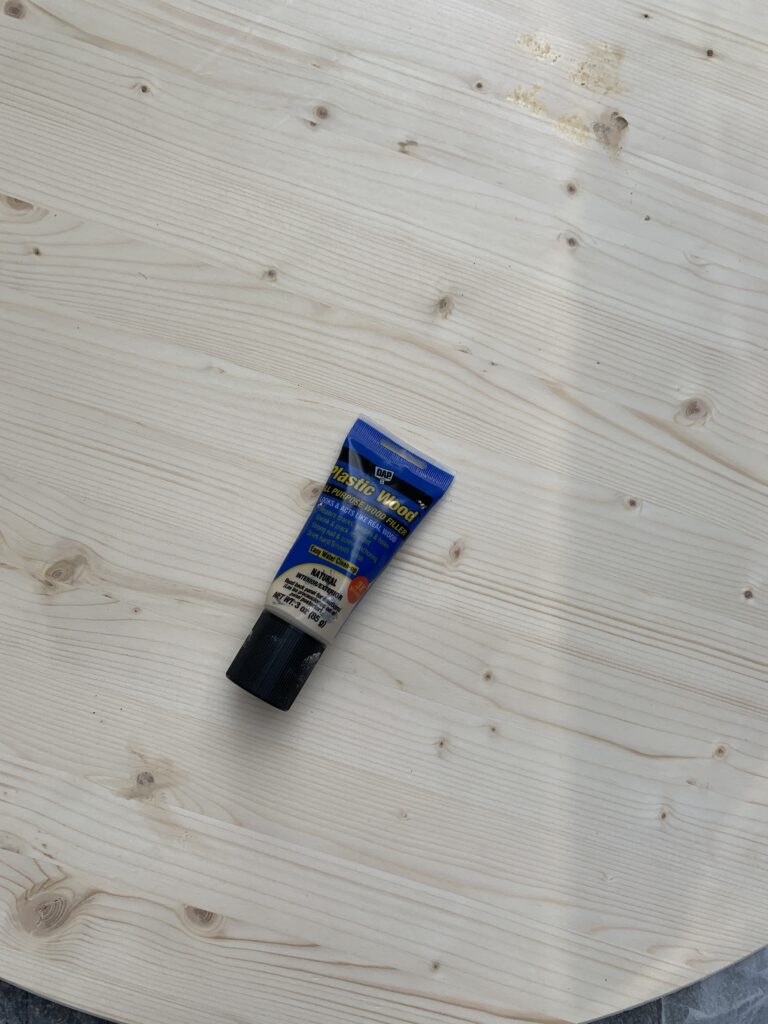
5. Once the Table is flipped and assembled use wood filler to fill ANY cracks and imperfections in your wood. Let that fully dry.
6. Sand the table top down, and wipe clean.
7. Now paint the top of the table and the side.
Once fully dry sand it lightly, wipe clean and repeat. I personally did 3 light coats of paint on the top.
That is it – this was a really EASY DIY – I spent more time coming up with how to do the project than actually completing it.
I have personally LOVED having unfinished wood as the base to my kids tables. We have had a solid wood table since Jack was a baby and I have sanded and repainted and stained so many times. It allows for them to create and be messy!
Other Great Kids Tables and Chairs
DIY isn’t everyones thing – I mean this wasn’t necessarily a huge BUDGET SAVER DIY. It was more so a way for me to accomplish the exact look and function I was looking for.
I rounded up some other great gorgeous play tables and chairs below that you can use to elevate your play space or living space. Remember – sometimes being a mom means finding a great spot for something you will use daily, and investing in making it fit your home.
In our last two homes I have found spots in our main living areas for our kids table to stay, and I loved how much the kids used it. This time when we move into the new house our playroom is on the main floor so it is not as much of a necessity.
Hopefully this helped you find a great kids play table, or you feel ready to tackle the DIY Rattan kids table. If you have any trouble always feel free to comment below or DM me on Instagram (@arinsolange). I would love to see your creations – so make sure to tag me on Instagram!
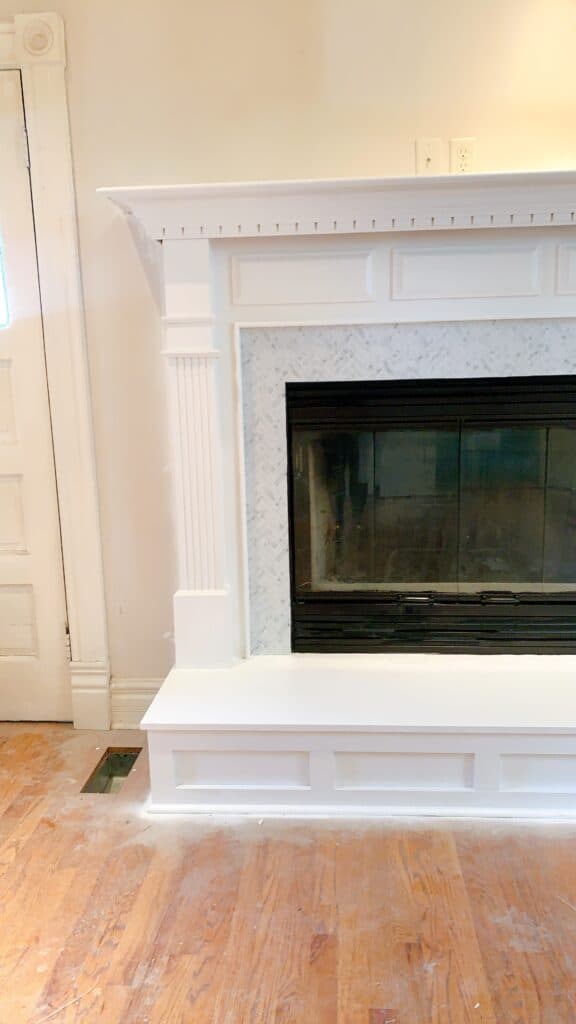
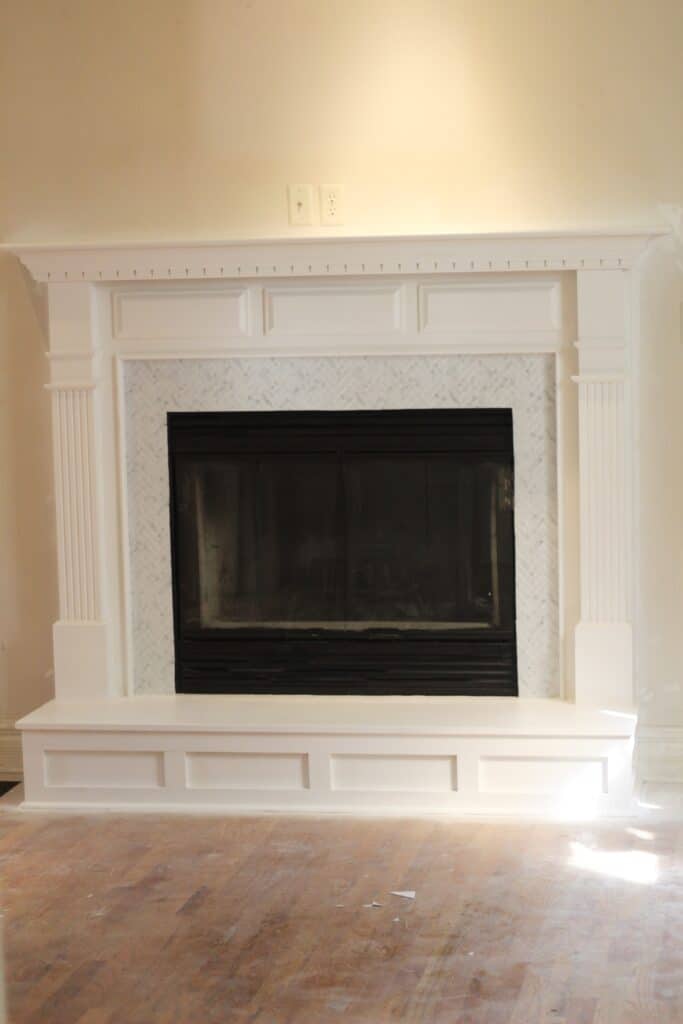
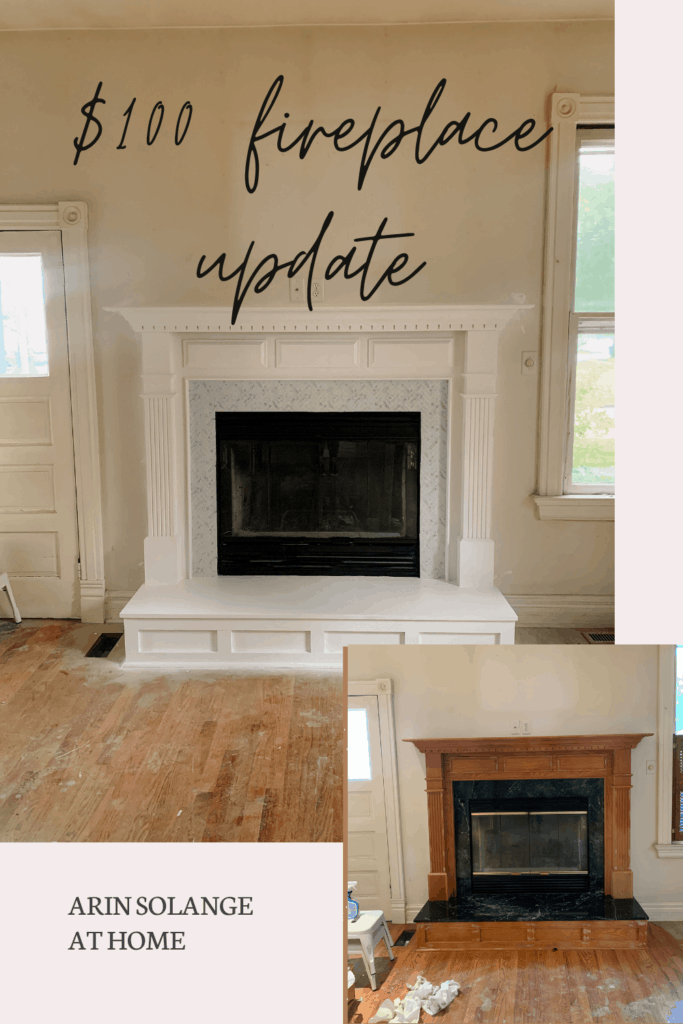
Peel and Stick backsplash has been on my list to try and review for you guys for a while, but I really wanted the right project to try it on. When we bought our new house I knew just what to do and set out to do a budget fireplace update utilizing the tiles.
this post may contain affiliate links
Peel and Stick Backsplash
Before getting into the budget fireplace, I want to talk about peel and stick backsplash. Incase you’re wondering what that is, it is essentially sheets of a thicker sticker material (so it is textured some like a normal tile) that is made to look like backsplash or tile.
There are several prints and patterns you can go with, and they all pose some unique things to keep it mind when you are using it, so be sure to read the how to closely in order to not waste any of the tiles.
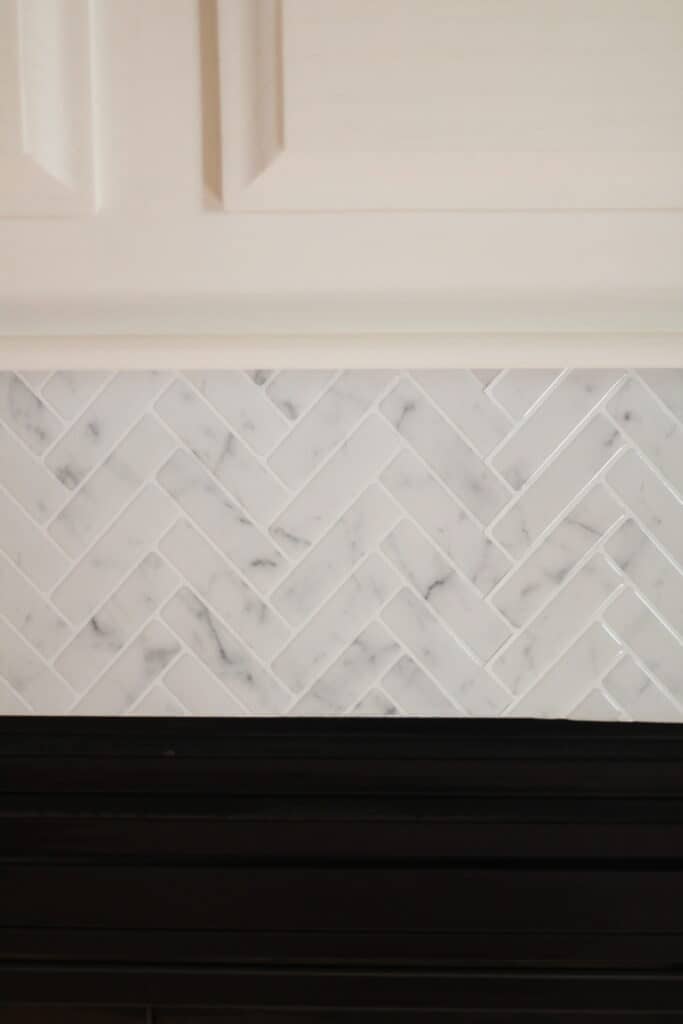
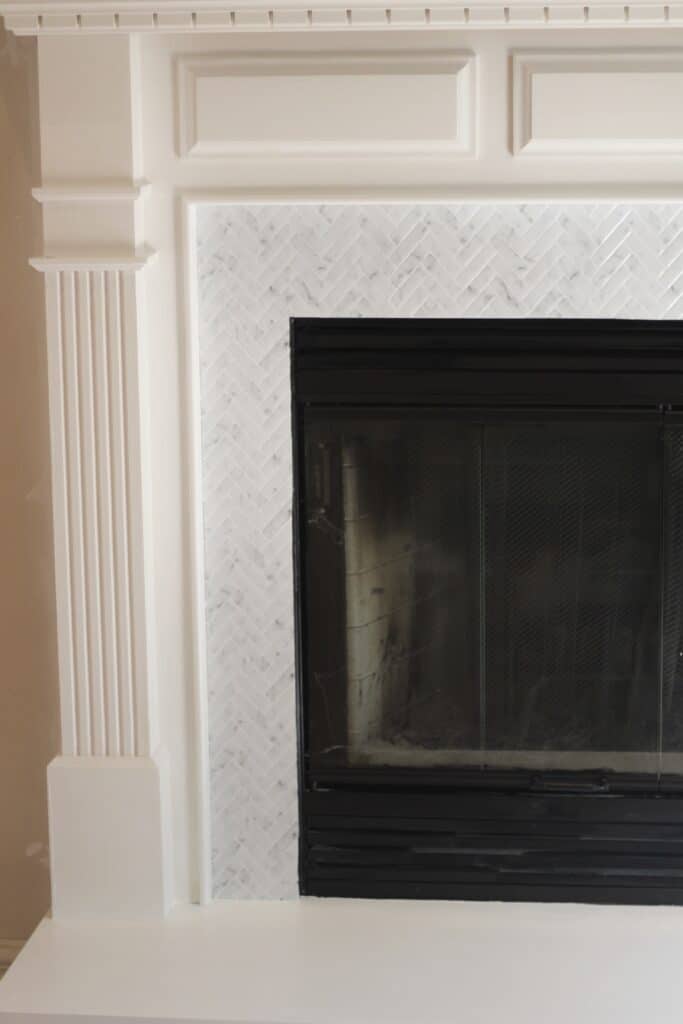
I personally went with a herringbone pattern peel and stick backsplash that was really muted in color, and from every review had REALLY great stick, and looked very realistic. I figured why not try?
Budget Fireplace Update
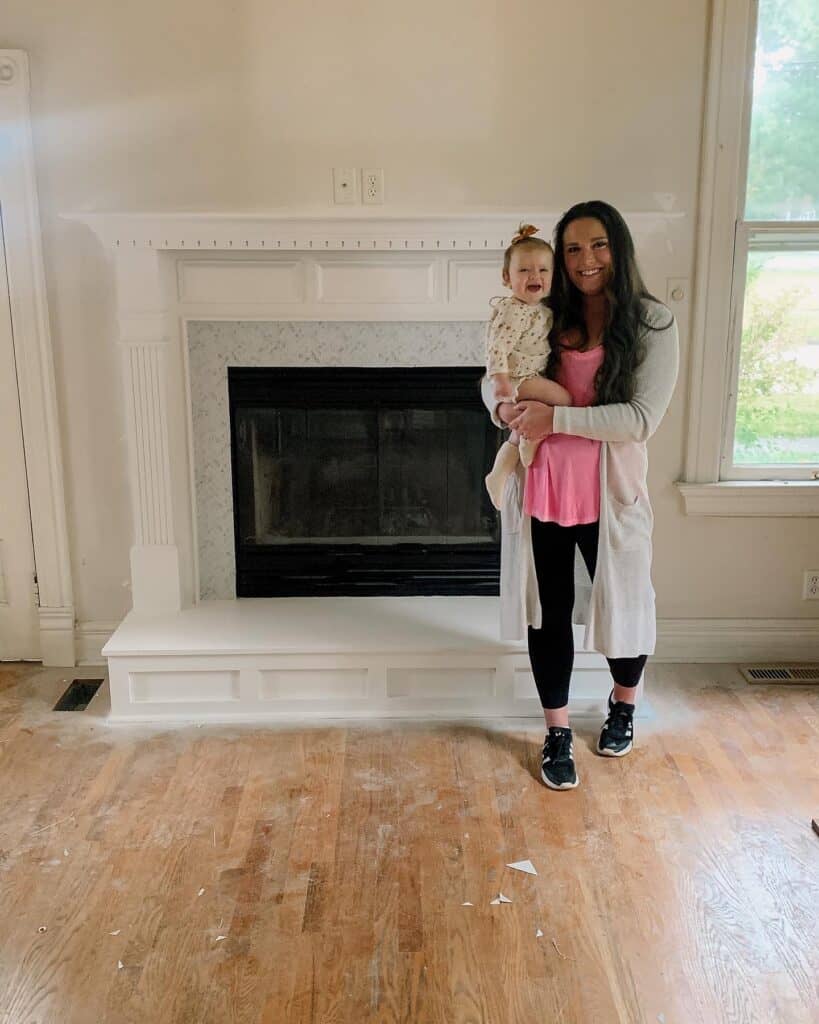
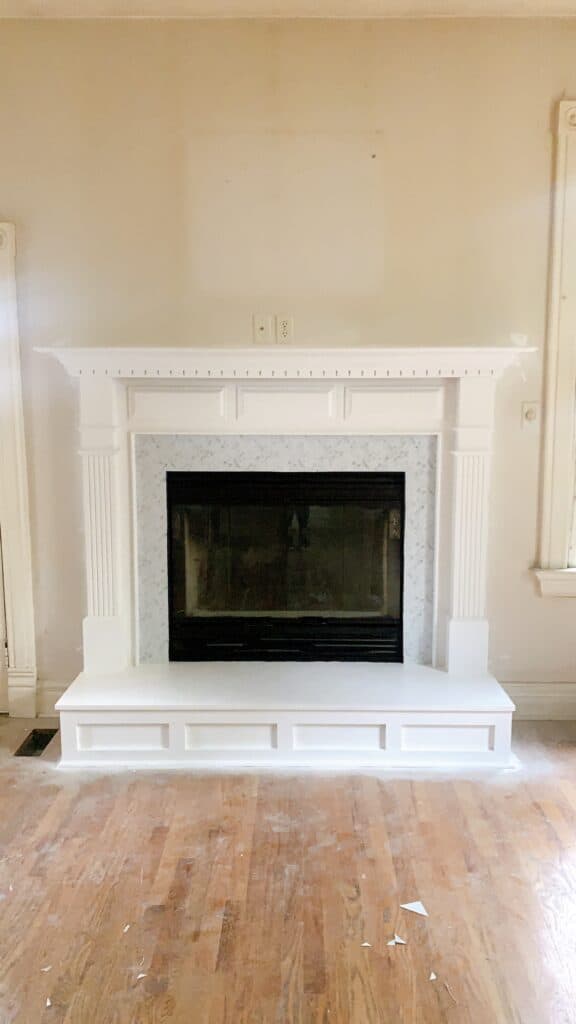
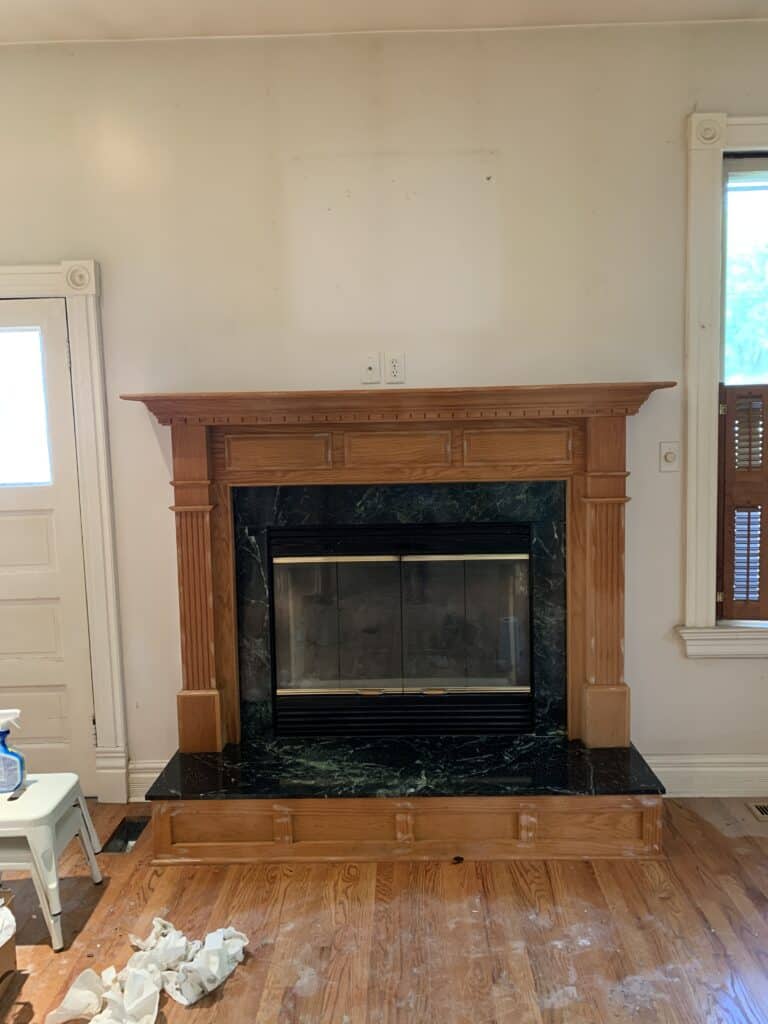
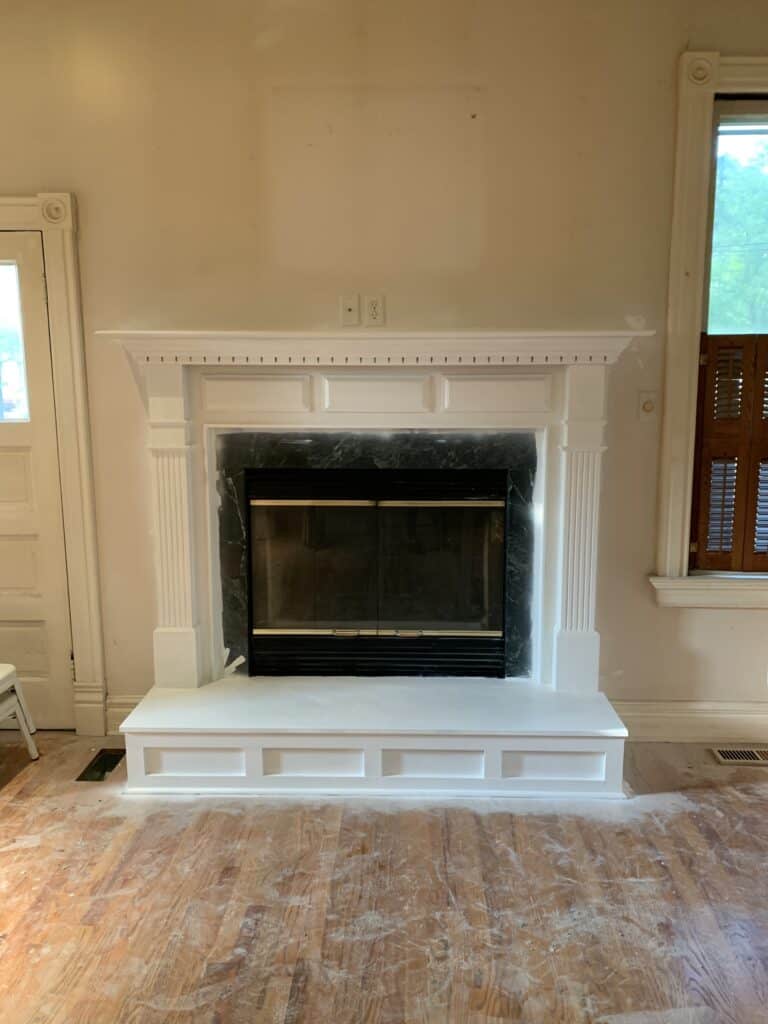
So incase you are new to my Instagram or blog – my husband and I recently purchased an 1860’s home to renovate. We are doing the bulk of phase one with contractors because we needed to get the house livable before moving in.
before
That also means that we are throwing the majority of our finances at phase one, so we will be working hard to do the rest of the rehab on a tight budget! My goal with the fireplace was to update the space on as close to $100 as possible.
We did it before the floors and walls were painted so we could be a bit messier and the professionals would be the ones who had to be careful, so keep in mind the rest of the room is still in its original – nicotine covered state ha.
In order to update the fireplace 3 things needed to happen:
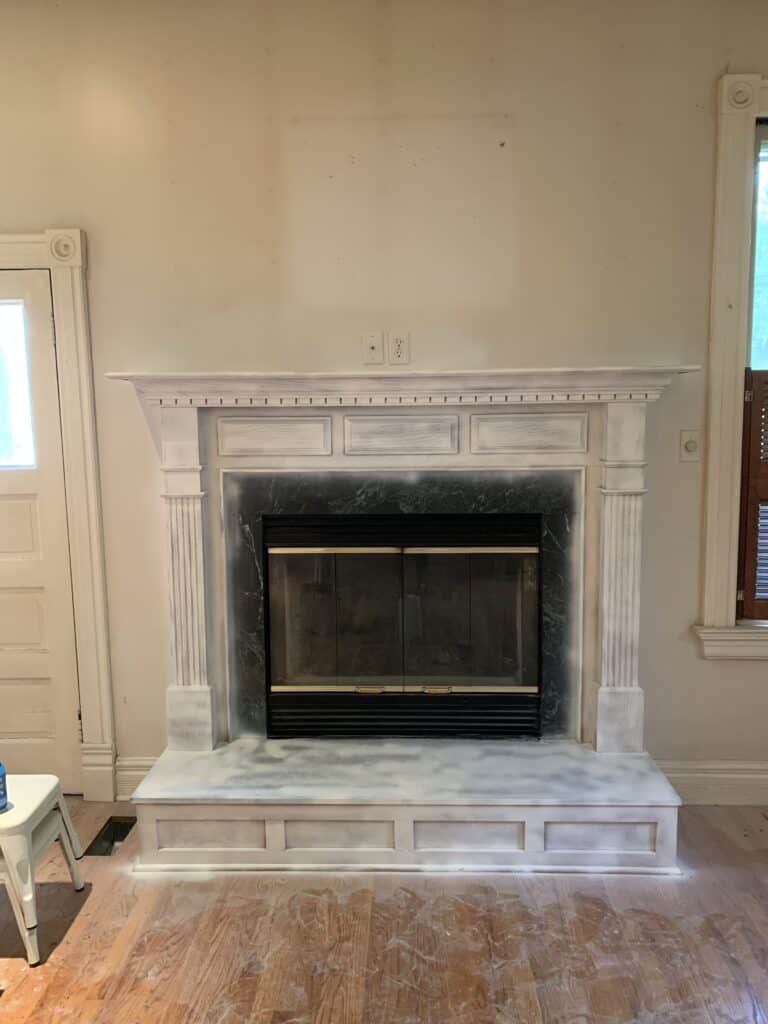
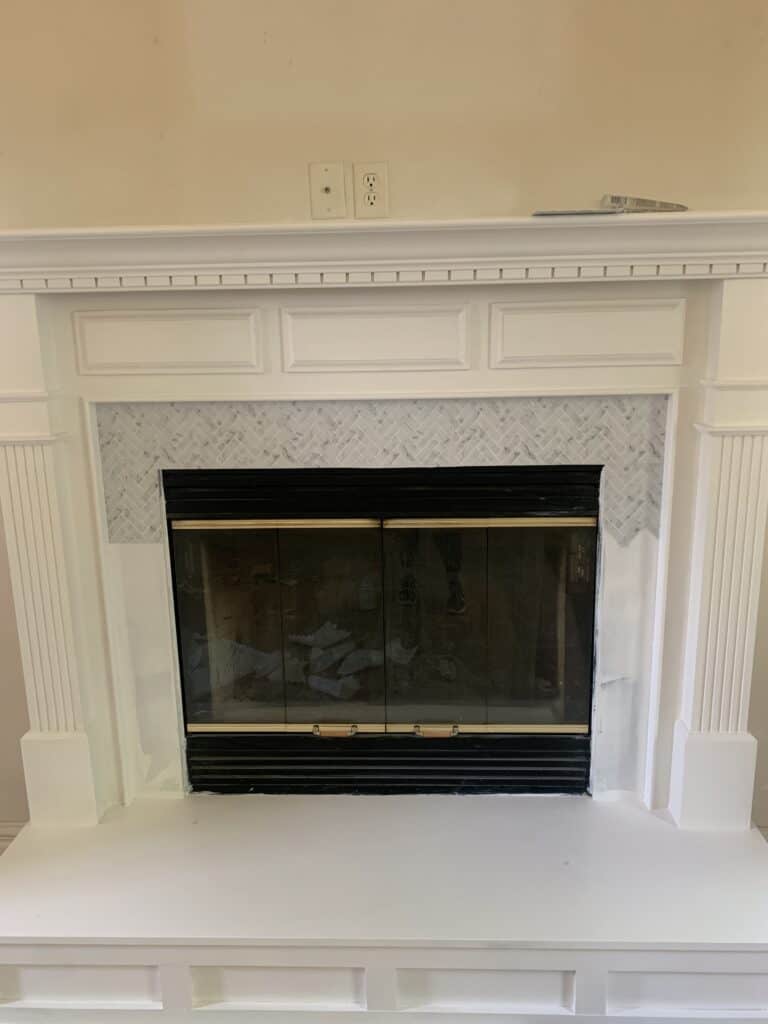
The fireplace needed to be painted white. It was a very outdated wood color, and we opted to go white for a clean look.
The green marble, although pretty didn’t fit what I was going for in the room, so we opted to cover that – which is where the peel and stick backsplash tiles came in.
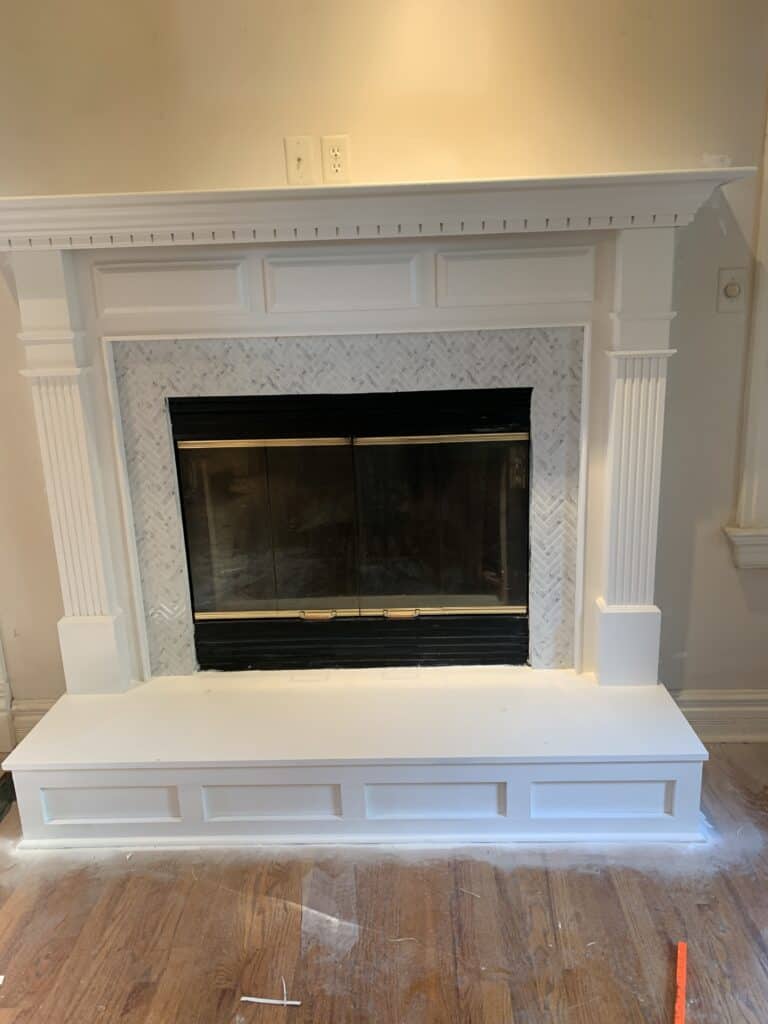
And last but not least – the gold on the fireplace was making the space look dated, so that needed to be painted black.
First Up – Painting the Fireplace
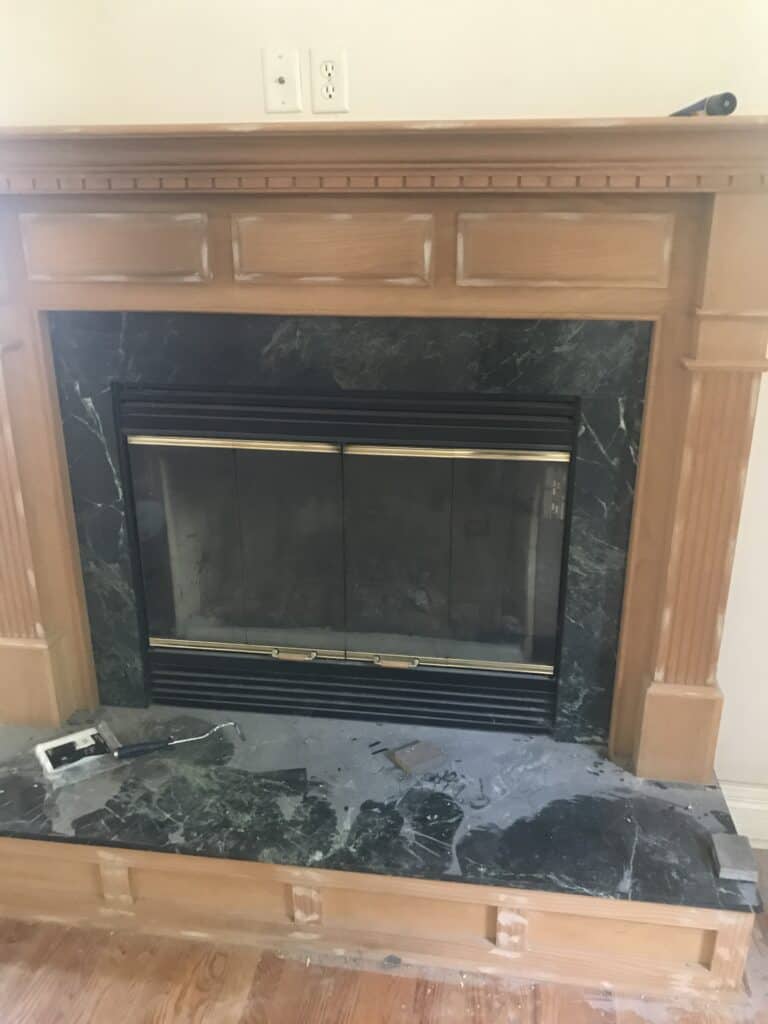
First up was painting the fireplace – we followed a very similar method to painting our kitchen cabinets (see that post here!), and actually used the same paint.
There were tons of holes from a nail gun that needed to be filled with wood filler first too, so that was an important step. After that we did a spray primer which saved a ton of time, and made for easier application of the paint.
I actually decided to paint the marble that was on the top of the step up as well for a couple of reasons. I felt as though getting the peel and stick backsplash to look as good in that area was going to be tricky, and I heard that its not super easy to clean, so didn’t want it where my kids would be sitting and standing.
Painting the tile was just was easy as the wood and you wouldn’t have the slightest idea it was a different material in person after it was painted. Once the paint was fully dry we set out to do the tile.
Installing Peel and Stick Backsplash
This was not hard – but there are some really big things to keep in mind. Some of these things are things you should keep in mind no matter the pattern, but I will be talking through the exact steps on the herringbone backsplash I worked with.
What Supplies Do you Need?
Marker
Box cutting knife or detail knife
scissors
ruler
Things to Know Before you Start
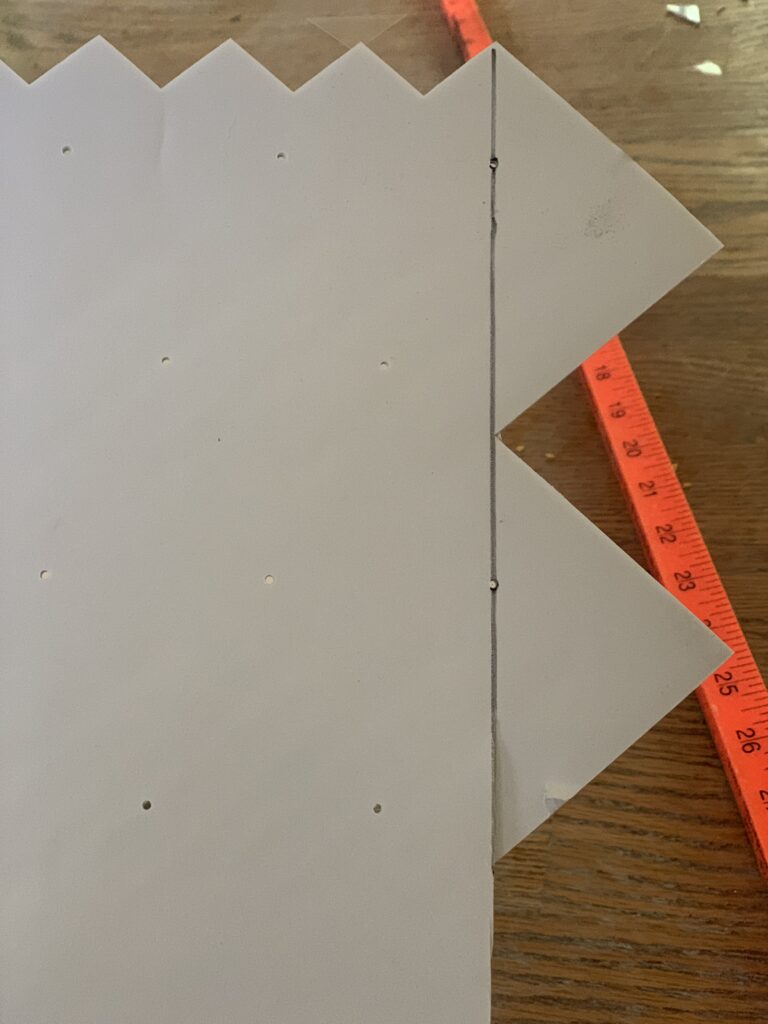
There are a few things to keep in mind before you get started. These are things to remember when it comes to ordering and or before you measure and cut each sheet.
There is an up and down to the sheets – for the one I used I went with the top being the side where there was a ‘grout line’ as the first thing. On the other side the tile would have been first. I don’t think there is a right or wrong, but you need to stick to the same one each time.
You will lose a lot of tile just to pattern line up. So don’t think you need just the exact amount of square feet your space is.
It is easier to line up well if you don’t cut a straight bottom line, but are matching a point into a negative space.
How to Install Peel and Stick Backsplash
Now that you know those few little things – you should be ready to start installing your backsplash.
First things first pick a corner. For me I started in the top left. I took my first tile and I cut in a straight line to get the tile to squared off left side and top (when you get them they will be jagged with the lines of the tiles).
First things first pick a corner. For me I started in the top left. I took my first tile and I cut in a straight line to get the tile to squared off left side and top (when you get them they will be jagged with the lines of the tiles).
Remember where you cut them down to because you will do the same with the next tiles. IE for me I didn’t measure but rather cut down to exactly where a straight line could form.
here you see how I cut the left side straight – I ended up realizing that was wrong and removing that one. You want to leave it like the bottom of the right side.
Remember where you cut them down to because you will do the same with the next tiles. IE for me I didn’t measure but rather cut down to exactly where a straight line could form.
For me because the area I was tiling wasn’t huge I used a blank sheet of paper and traced my space to cut out the corner so I could utilize as much of that tile as I could. That was literally the only tile where had to cut the right and left side straight. LEAVE the bottom side in the triangular shape.
Measure your space and use a detail knife to cut the piece in a straight line. You can use scissors too, but I felt as though the tiles I did with the knife looked better.
For me I went across the top of the fireplace first, then down the right side, then came back and went down the left. The trickiest part of going down the right side is you will have to likely cut from the right and left of each tile to line up your pattern.
You will have to both cut from the sides but sometimes cut down into the top as well. It is sort of like a puzzle, and don’t be shocked if you mess up a piece or two.
Applying the tiles is pretty easy. They are VERY sticky. When I placed each tile I nearly overlapped them and pushed them to the side or up to make sure they were SO CLOSE that you couldn’t tell there was a difference in the tile.
One thing you can do when it is done – which we did, was then take a clear silicone caulk and go around your edges. BE CAREFUL. I read reviews that the caulk doesn’t wipe off easily, so if you are nervous and think it isn’t needed – just skip that step!
Painting The Fireplace Metal Black
Last but not least on this project was painting the fireplace metal all black. It was already mostly black with gold – which is pretty normal for an older fireplace, and it is a really easy inexpensive update.
All you need is THIS paint, a brush, and possibly some painters tape.
One thing to know is this is OIL BASED PAINT – so don’t get it on your skin – it is a pain to get off. I would also use a disposable brush if it’s just this project you will be doing.
this was BEFORE the last step which was the black paint
You can either remove your doors and paint the gold – or in my case I simply opened the fireplace up and gave it a coat, let that dry and did a second coat. It was REALLY simple and updated the fireplace in a BIG way.
Overall this is easily a 2 full day project – for us it took longer because we don’t live in the house yet, but it is not super daunting.
Hopefully you feel more confident in installing peel and stick backsplash and doing an easy, inexpensive fireplace update after reading this post. If you have any questions leave me a comment below or DM me on Instagram (@arinsolange), enjoy your DIY update.
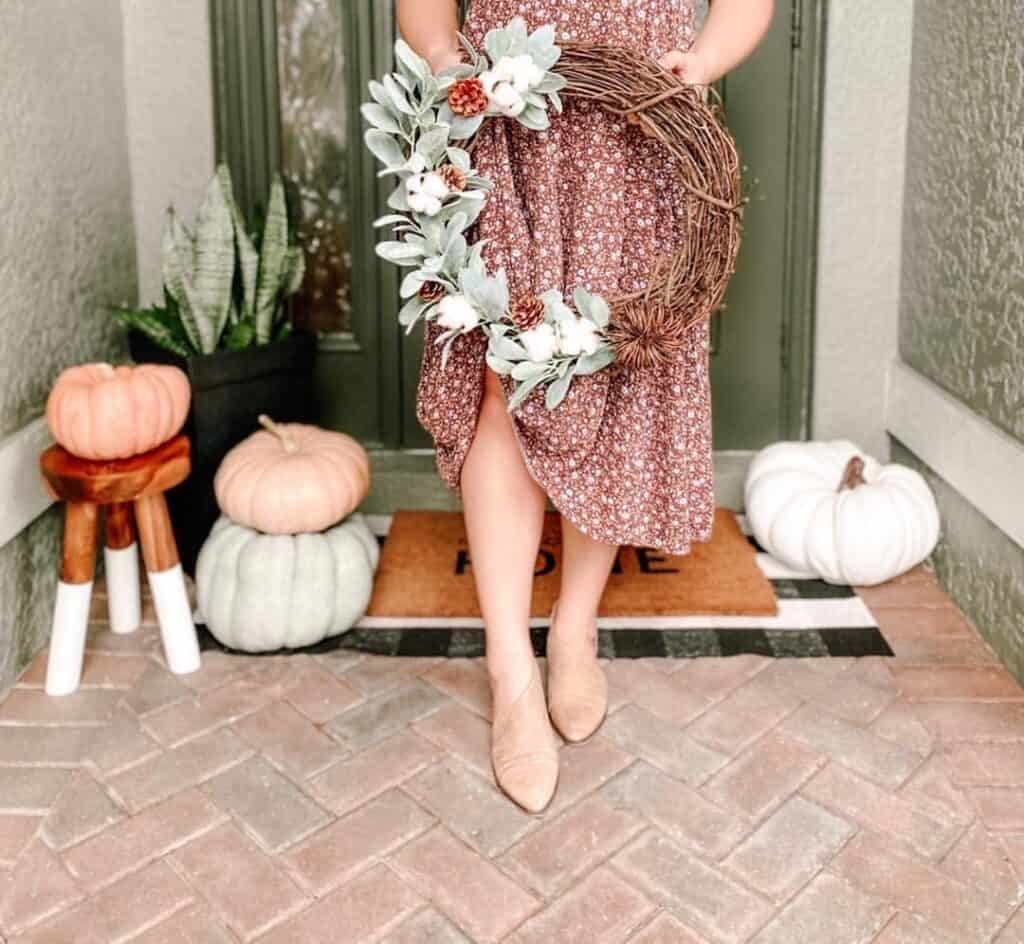
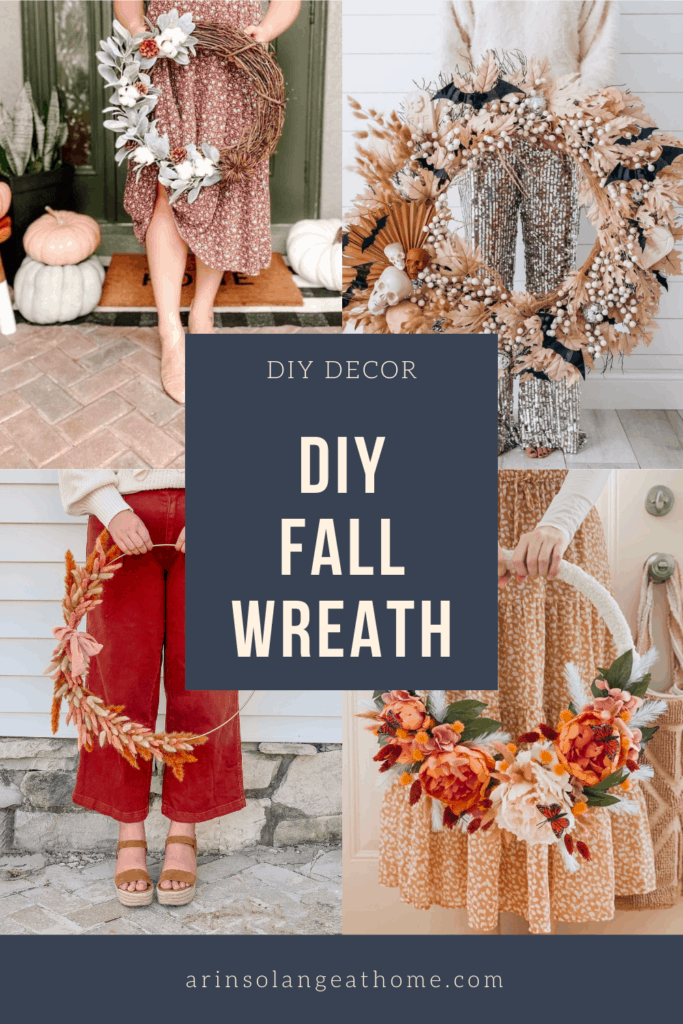
Today I am going to share an EASY DIY fall wreath. DIY wreaths can be tricky – if you are looking for an exact look they are a great option, but they can also be so expensive and difficult, so I really wanted to share an option that was not.
This post may contain affiliate links
DIY Fall Wreath
like I said above – a DIY wreath isn’t always super affordable. Sometime you spend more on supplies than if you were to buy it. THAT SAID – I still love making my own. I just thin its worth noting.
Before you start any fall wreath you will want to plan what look you’re going to go with because that can make a difference on your base. If you are doing tons of foliage sometimes it’s best to use a simple pre-made wreath as your base.
There are also cases for metal frames, foam frames, or the simple metal loop. That’s for sure the biggest thing to question for things first!
Once you figure that out you can start planning your wreath and gathering supplies. Pending the style of wreath it is worth noting that you will probably need more supplies than you think!
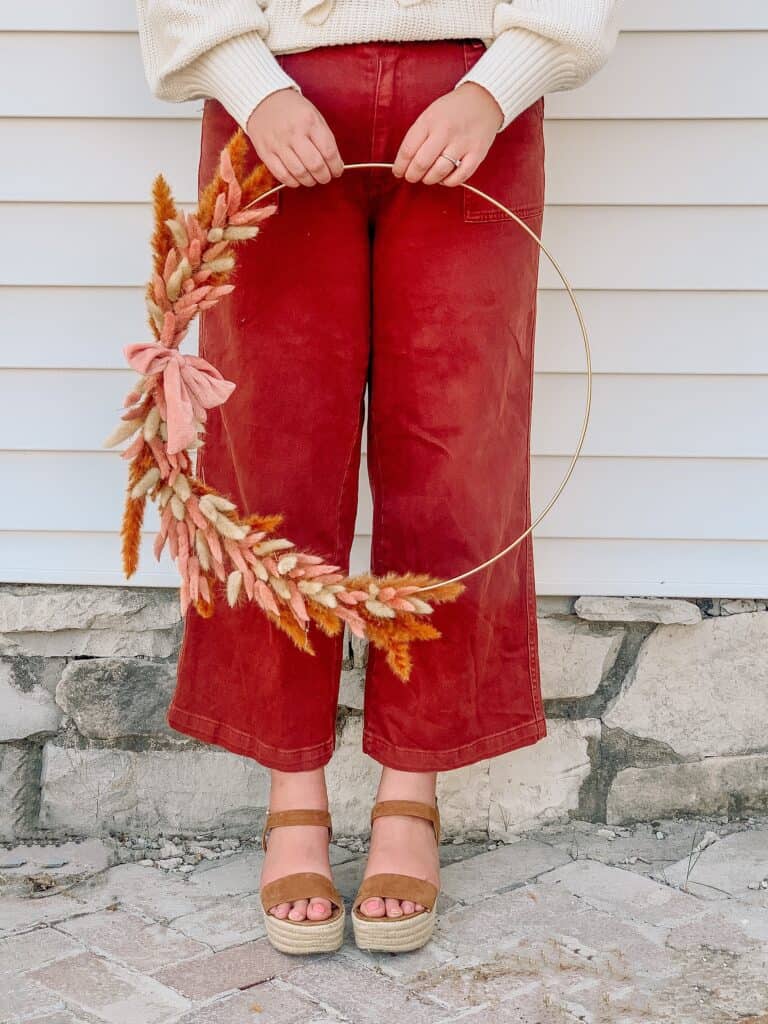
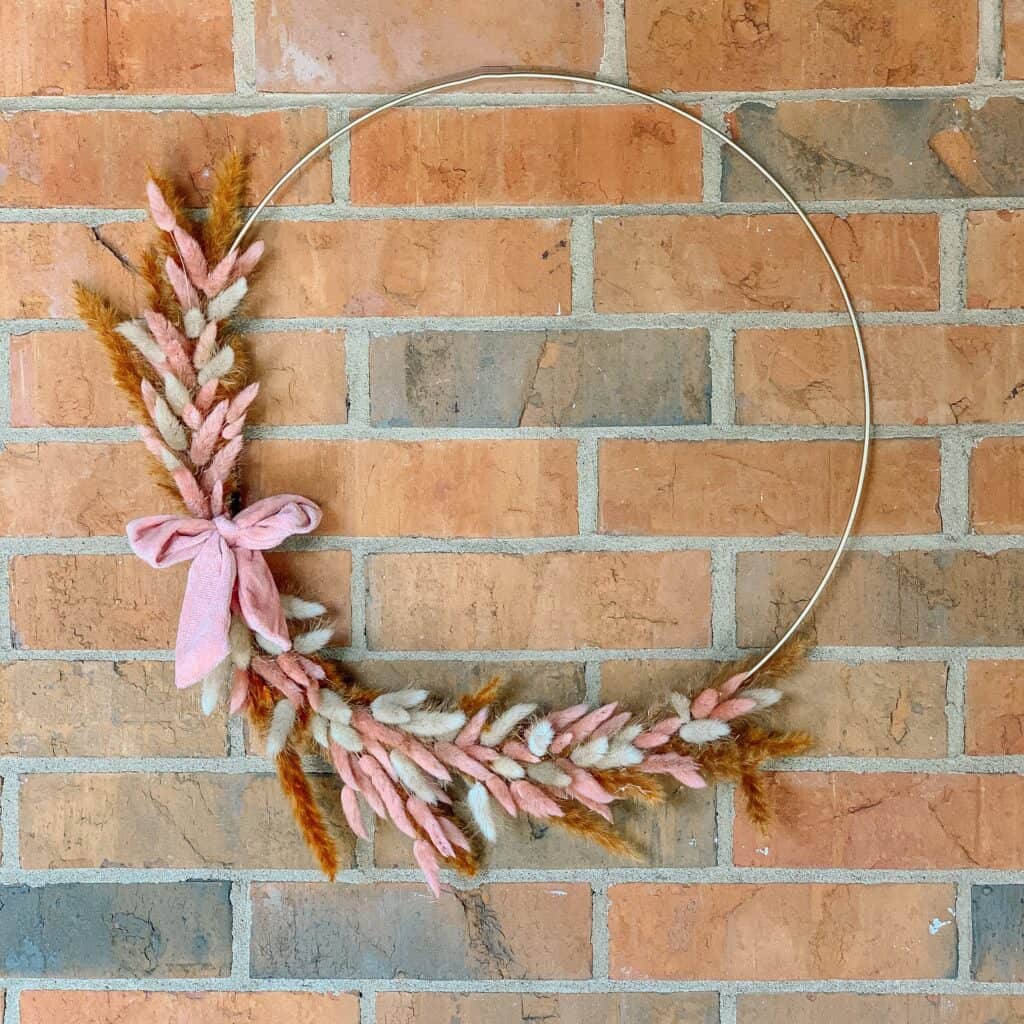
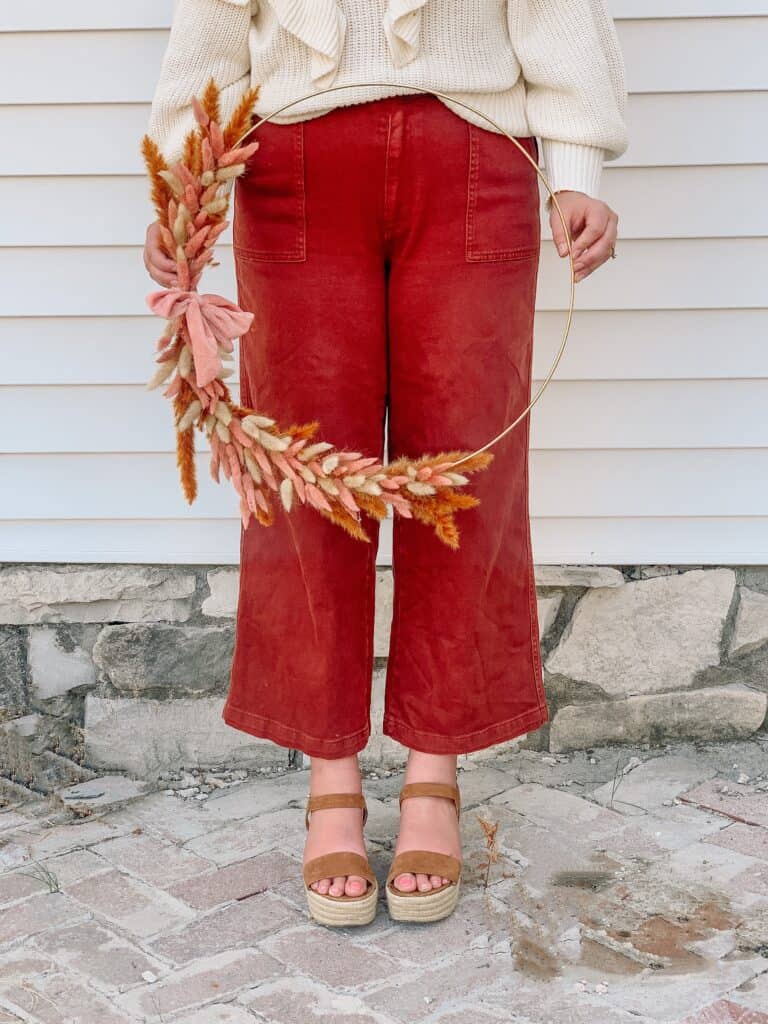
Pink Bunny Tail Wreath
I knew I wanted something super simple for my wreath. I have been loving bunny tails, and actually originally wanted to do something really bright, but as always for me when I am making a wreath I changed my mind mid way.
I wanted my wreath to feel dainty, but still feel like fall, and the end result did that for me! I am so happy with how it turned out and can’t wait to hang it on the new house.
Supplies
What do you need to complete a wreath like this? I will share exactly what I used – but I will also say that with all wreaths there is a level of uniqueness and you can improvise on supplies.
If you started with the silver hoop and you want it gold – be sure to spray paint it as your first step. If your hoop is gold to start with then you’re set.
You are going to work from 1 ‘center point’ on your wreath going opposite directions with all of your greenery from that spot (this will be where your ribbon goes!)
First start with the orange grass or whatever you chose as a grass. Wheat would be beautiful here too. Use small pieces of floral wire to attach the pieces so they hug the wreath form but also stick freely towards the end. You will be able to hide the floral wire in the next step.
Be sure to add some to the inner part and some to the outer part of the hoop. I do think adding more to the outside is better – but do what you think looks best to you – after all that is why you’re making your own!
I went roughly 10 inches ‘up’ from my center point and 15 inches down. I didn’t want it to be even, but just use your best judgement. You could go slightly longer with each.
Once you have added the grass it is time to add your bunny tails. I cut the bunny tails so they only had about a 1 – 3 inch stem and attached 3 or 4 at a time with floral wire. I did that all over the areas I had already added the grass.
Once things look pretty full its time to start hot gluing more on to keep things looking full and hide the wires. Cut the stems FULLY off the bunny tails and slowly start gluing them on. A little hot glue goes a long way with these guys.
When you’re fully content with your wreath it is time to add your bow – as I said above I ended up going with a scrunchie because – A: I don’t tie bows that well, and B: it was less expensive than buying really nice ribbon.
I simply cut the scrunchie in half and left only enough of the band to wrap around the wreath at your center point.
The last step is hairspray. – I know this sounds so odd, but those fall grasses shed like crazy so if you take your finished wreath and give it a good spray of hairspray it will stop shedding and last much more!
And THATS IT! It really is that easy. Doing a DIY Fall wreath doesn’t have to be crazy expensive or hard. And if you’re like me and simple is your thing that can still happen.
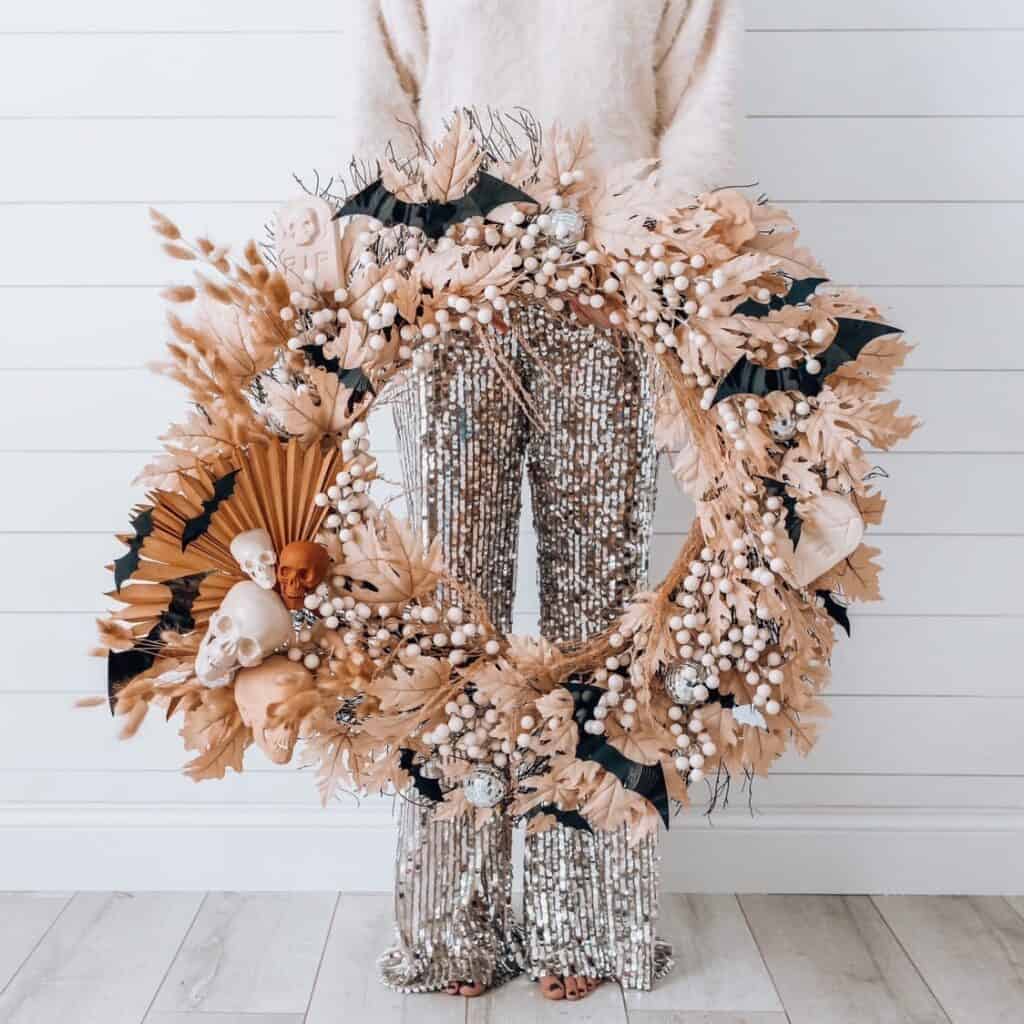
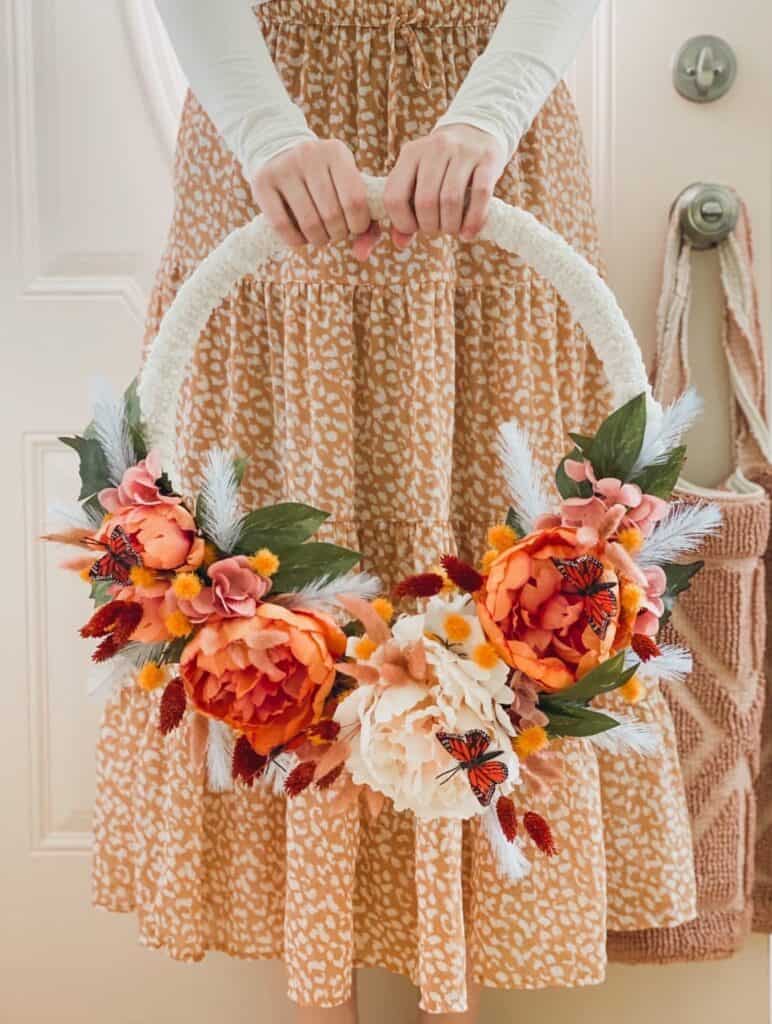
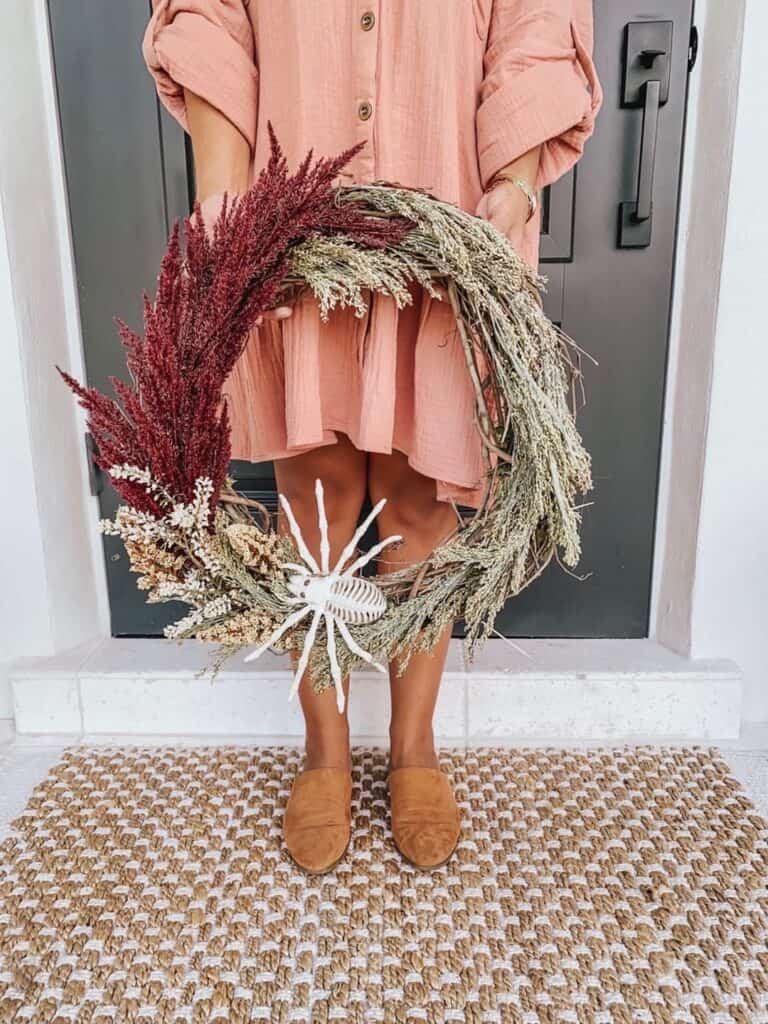
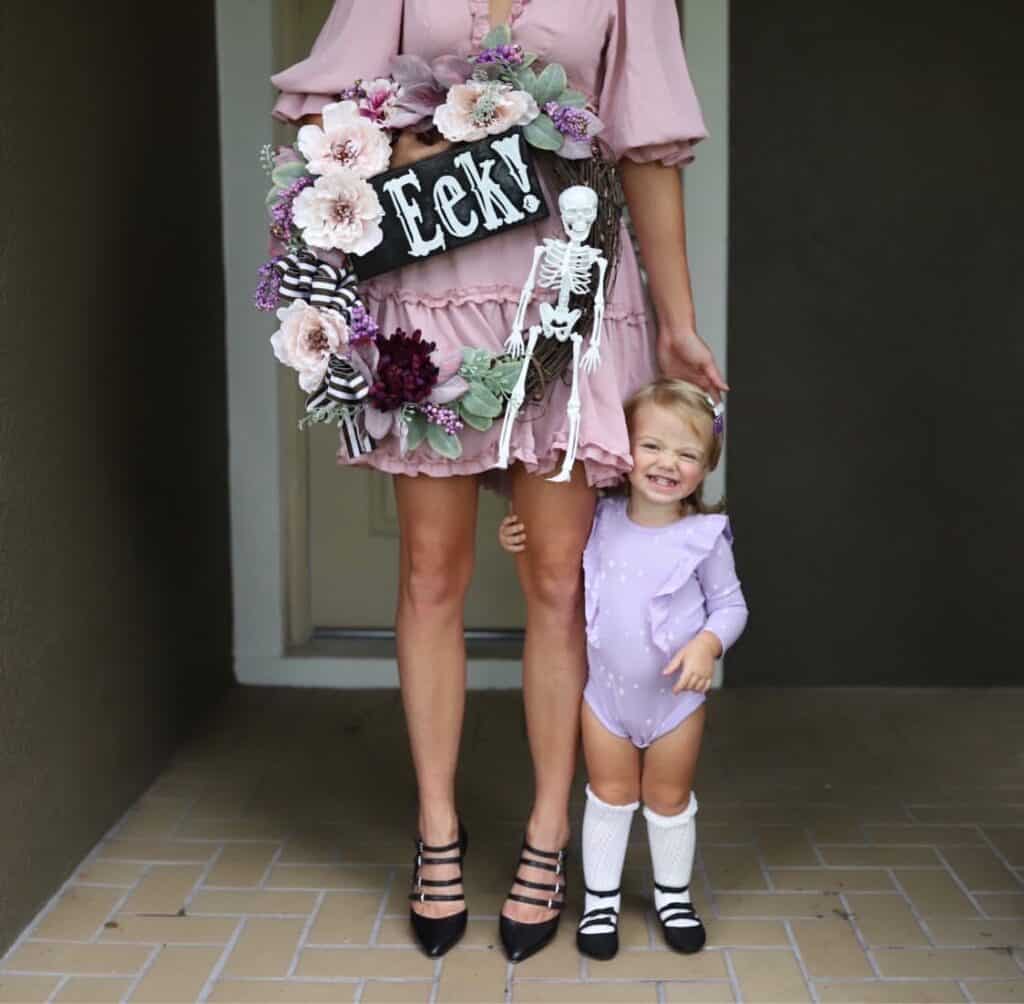
Other Fun Fall Wreaths
As an added bonus I teamed up with several other ladies to give you even more fun DIY fall wreaths that you can try to recreate. Most of these ladies have highlights on their Instagram or a blog post where you can find the how to!
Hopefully this gave you some great inspiration on doing your own DIY Fall wreath and you are able to create one you love! I would love to see what you make so be sure to tag me on Instagram (@arinsolange) or comment below!
Easy, inexpensive fall decor tips were the goal of my day today. I was looking back over past years fall decor because we are in transit this year, and I likely won’t decorate for fall, but when it comes to decorating I have some tips on making your house fall ready year after year!
This post may contain affiliate links
Fall Decor Tips
I have been doing really similar fall decor year after year – because let’s face it. I don’t want to spend a ton of money on new decor when it is only up for a couple of months!
I wanted to say some easy and inexpensive ways you can tie fall decor into your current home decor seamlessly, because it doesn’t have to be a huge deal, and you can do simple updates that you can add to yearly to slowly grow that fall decor stash.
In this post I will share several round ups of decor in 4 categories that I think can really help make your home feel more warm for fall, but I also want to share ways you can incorporate them, and ways you can change them up yearly.
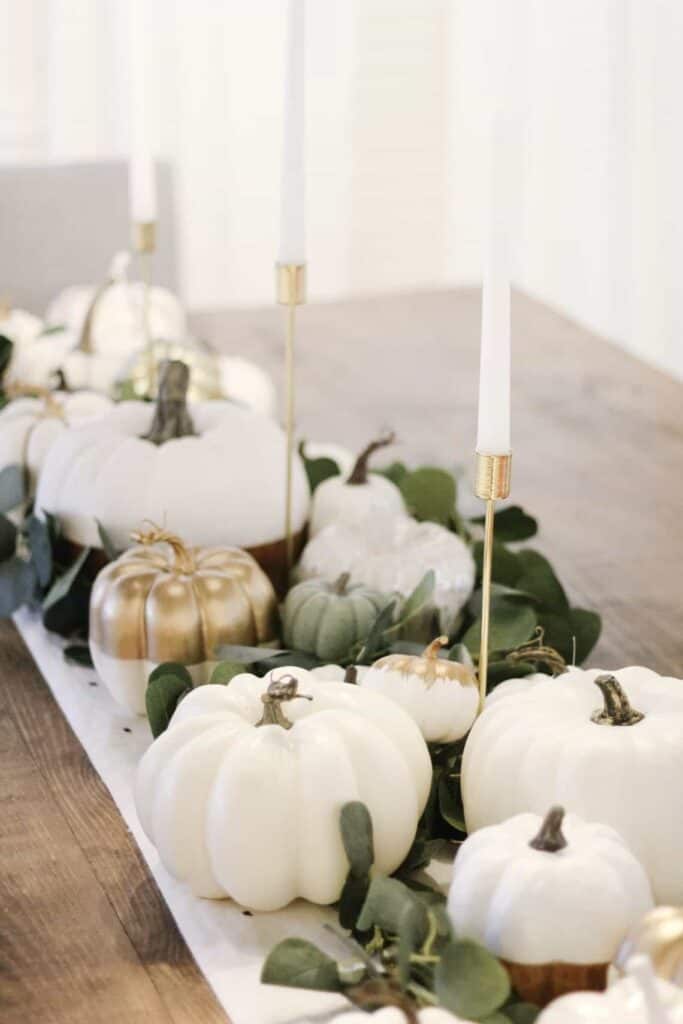
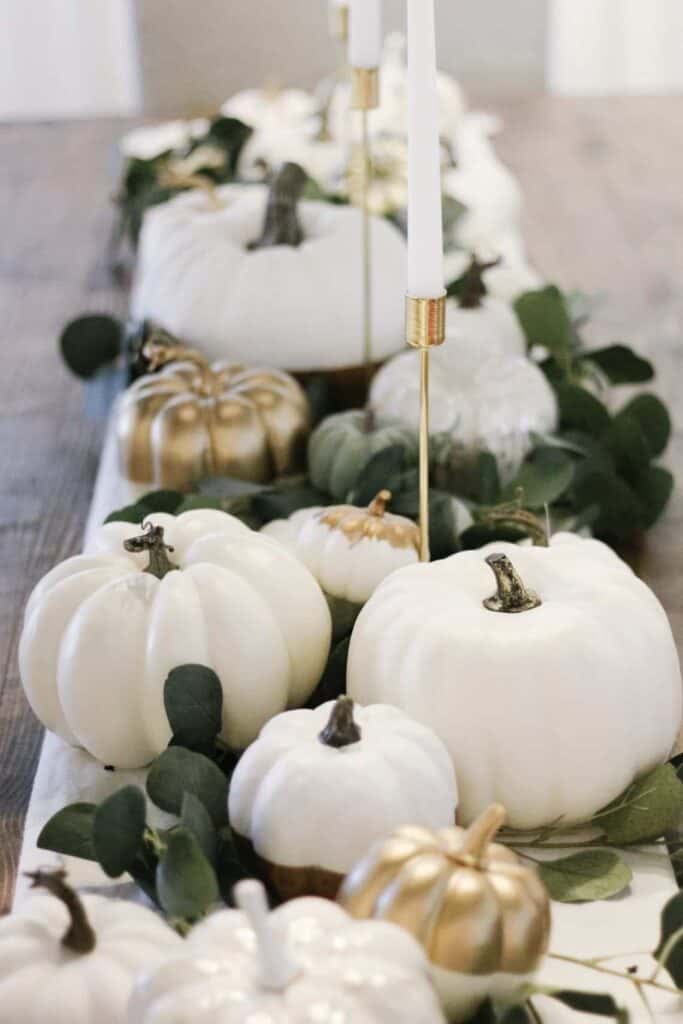
Pumpkins
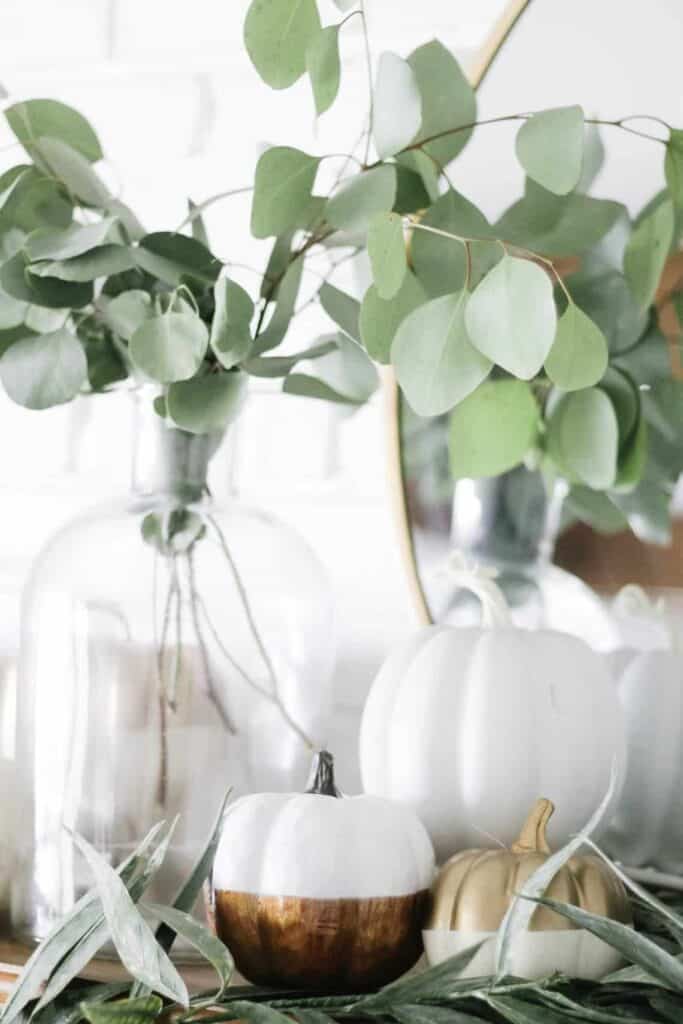
One thing I didn’t round up was pumpkins. I use them GENEROUSLY in the fall. I honestly have been adding to my stash for years and have an embarrassing number of neutral pumpkins.
My suggestion on the Pumpkins is to slowly add them, but always get 2 or 3 minumum in each style. You can easily sprinkle them all over your house, and if you stick with a neutral color-scheme it won’t feel busy.
I also highly recommend mixing textures and such on the pumpkins – you don’t want 50 plain white pumpkins with nothing going on on them.
Move Things Around
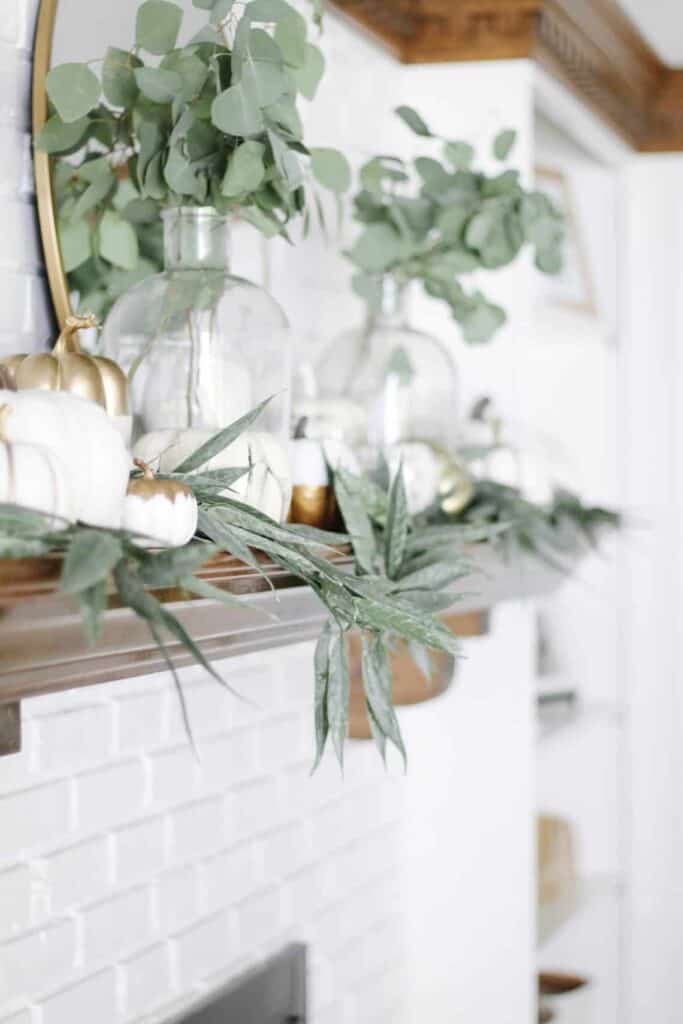
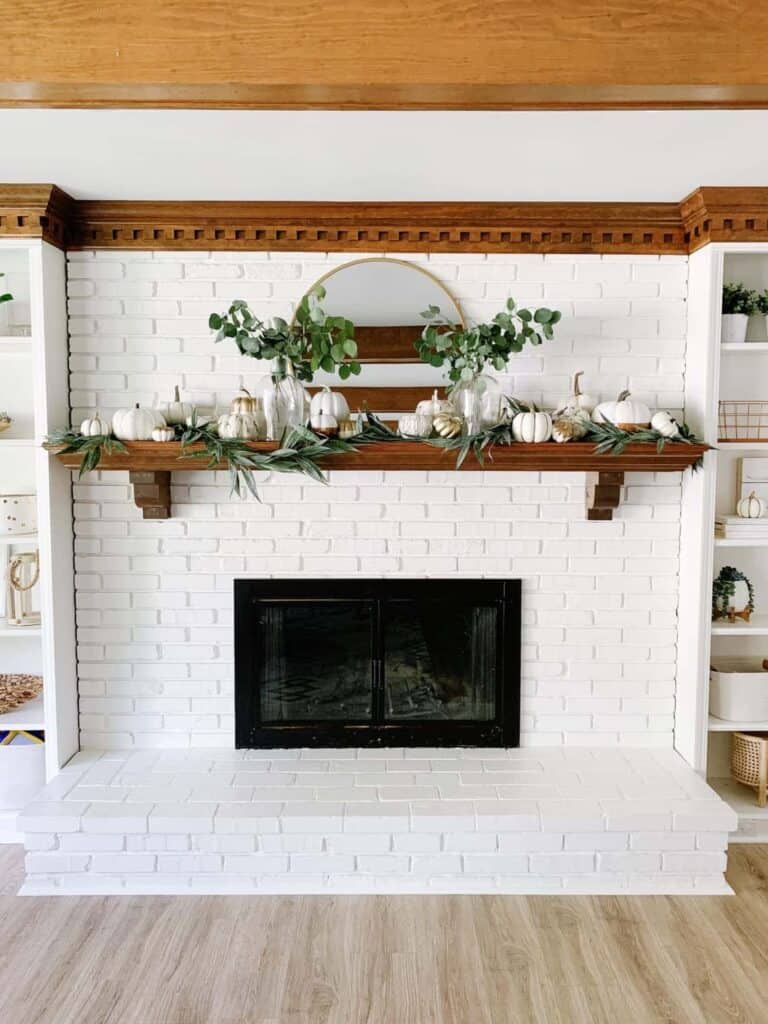
Your decor doesn’t have to look the same just because you use the same things each year. 2 years ago I used white pumpkins to cover my mantle and incorporated greenery with garlands.
The next year I used those same pumpkins and greenery and did a table-scape in my dining room. Move things yearly and you won’t have to invest in a ton yearly.
The next year I used those same pumpkins and greenery and did a table-scape in my dining room. Move things yearly and you won’t have to invest in a ton yearly.
But on to those investments – lets talk textiles, wicker, pots/vases, and greenery. I am going to walk you through 4 round ups and talk about what to pick for your home!
When it comes to fall greenery – you can incorpprate your typical greens, but I also love tying in some more ‘fall tones’ with the greenery and stems as well.
When going green stick with things like eucalyptus and dainty greens, and you can tie in fall ribbons or texture like velvet for the wreaths so make things feel more like fall.
Buy these for your mantle, your table, or to add to vases. They are such a great way to invest in things that won’t go out of style! Shop the items I picked below.
Mixed greens – this is a gorgeous choice for your mantle or to tie greenery into your table. If you do a garland just add some stems in to keep things looking full and natural!
Olive Leaf tree – this is great year round but such a good faux plant for fall. I just grabbed this one and it is gorgeous.
Another great way to make your house feel more warm for fall is to change some of your glass to a colored glass (greens and browns). Make sue your planters and pots have good texture that add warmth.
You can also change out some candle sticks from white to black, buy some fresh new candles in warm colors or black with great scents for the season and you will warm your space up in no time!
Wood Candle Sticks – using candle sticks that add warmth and texture are an easy way to change up your decor for fall.
These vases are gorgeous – they are a little less dark than some of the other colors, so if keeping things more bright and airy is your thing these might be great options.
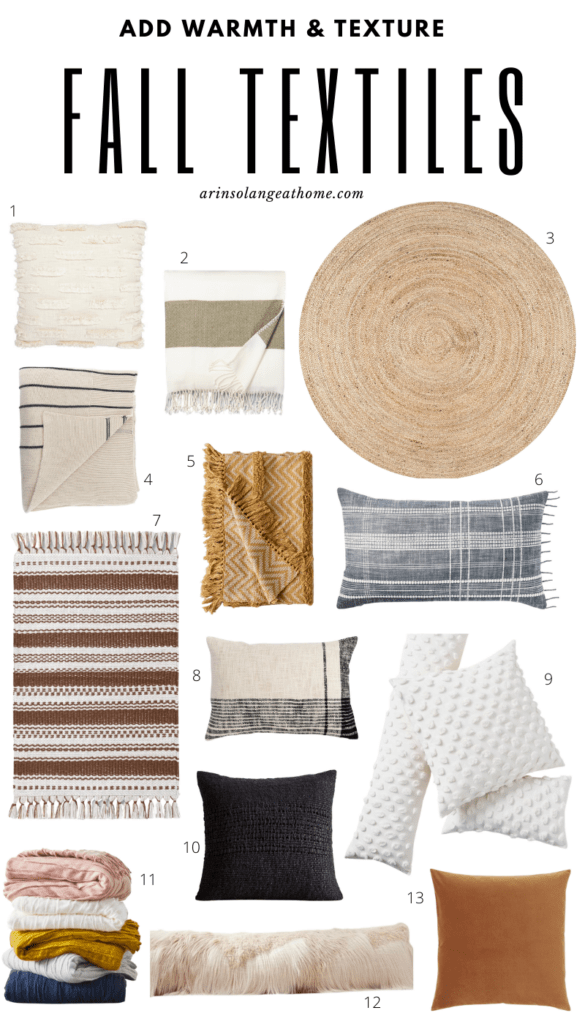
Textiles are normally a quick way we all change things up for the season, and for good reason. They pack a huge punch in your house. Add in new throws with texture – they don’t have to scream fall in their print or color.
Do the same with pillows. Mix your textures and you will be shocked at how bright and light you can stay in the colors. Take the textured white ones from this round up – you can easily tie those into your year round decor, then pair them with a velvet pillow on the couch for fall and winter to warm them up.
Accent rugs in your entryway, kitchen and by doors are another great way to change things up seasonally, and the above round up has great options!
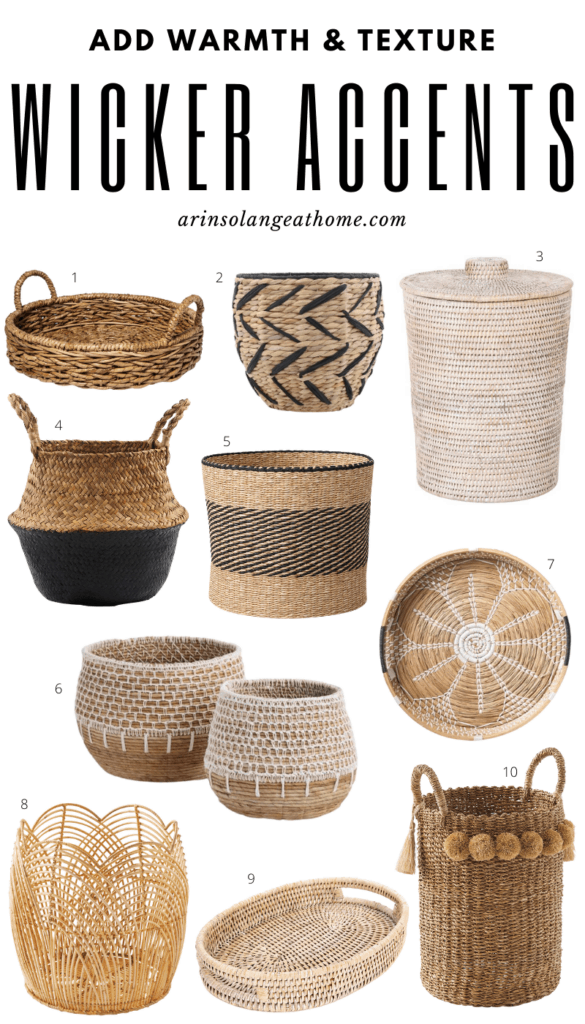
Wicker – here is a super simple tip. I am a HUGE fan of wicker year round, but when it comes to fall you can add just a little more wicker to warm things up.
Add them to areas you maybe would normally keep empty. I am all about minimalist decor, but for fall think adding a little extra will keep things warmer.
Wicker Tray – I have this tray and use it year round on my counter or table and love it!
Hopefully if you tie some items from all of these round ups together you will have fall decor you love. Remember – you don’t have to buy it all every year, and if you commit to one look you can add slowly.
Hopefully if you tie some items from all of these round ups together you will have fall decor you love. Remember – you don’t have to buy it all every year, and if you commit to one look you can add slowly.
If you are looking for easy and affordable fall decor tips later pin this photo so you can find this post. If you have any questions comment below or dm on on Instagram (@arinsolange). HAPPY FALL!
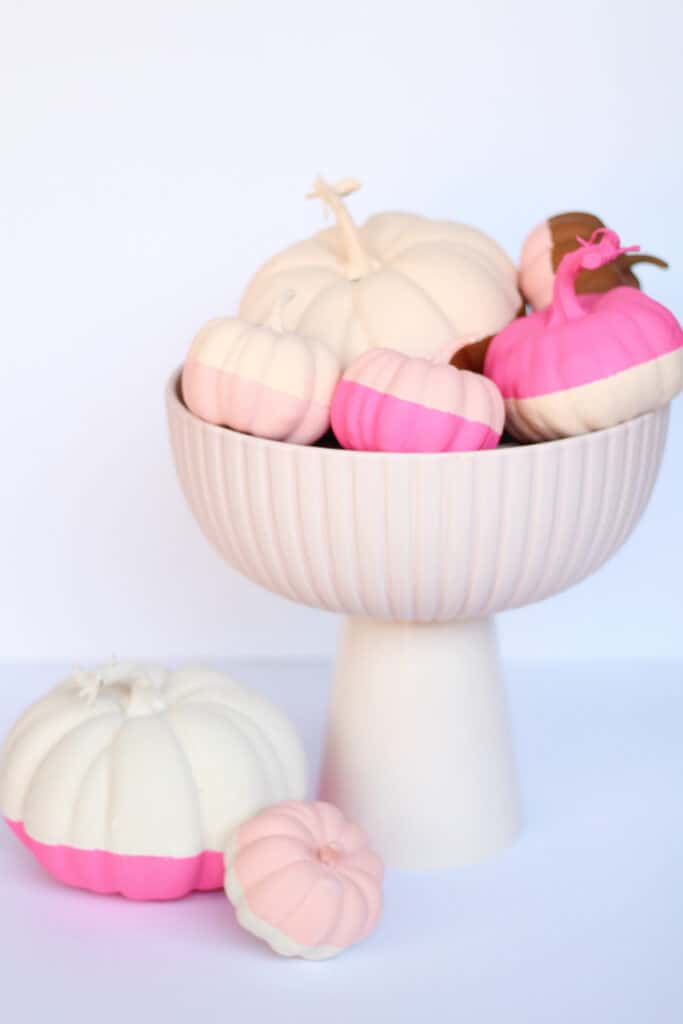
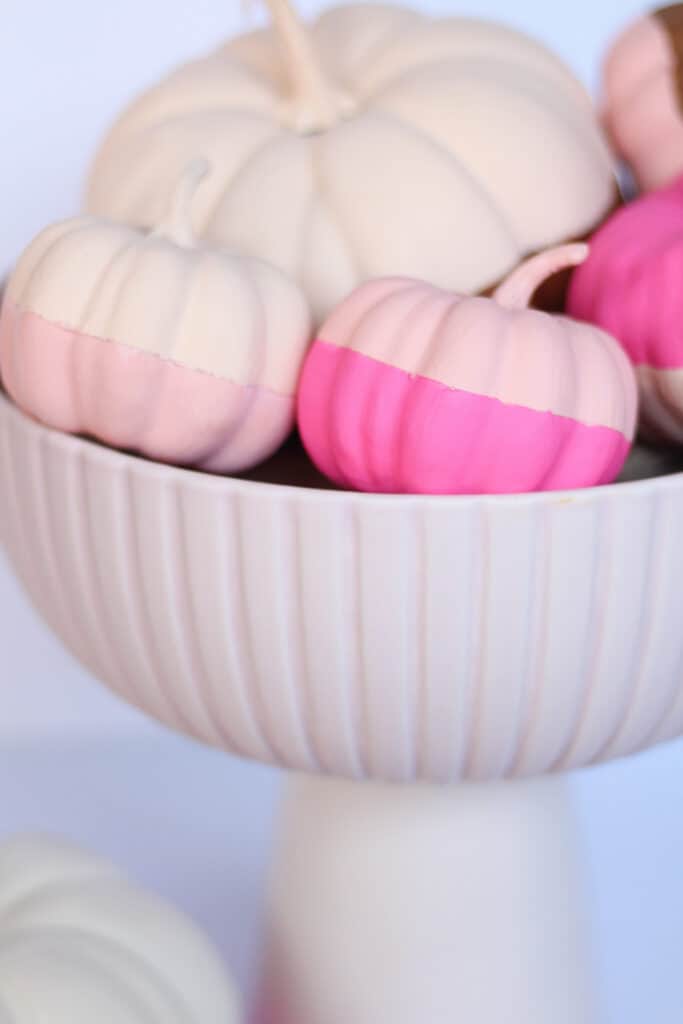
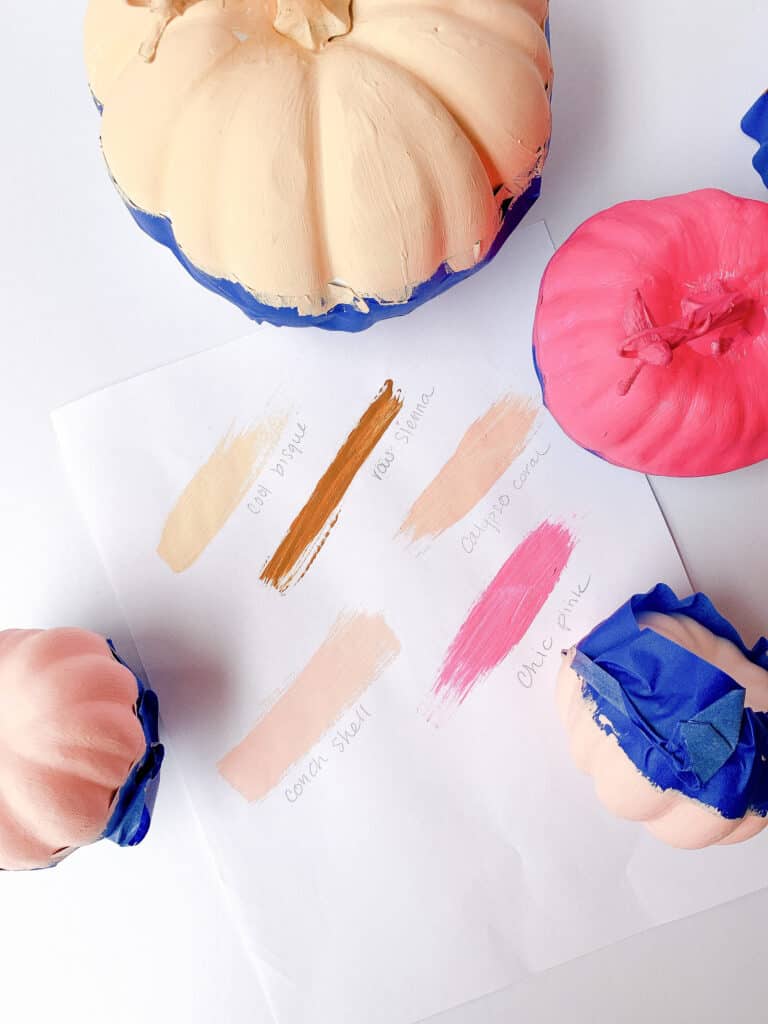
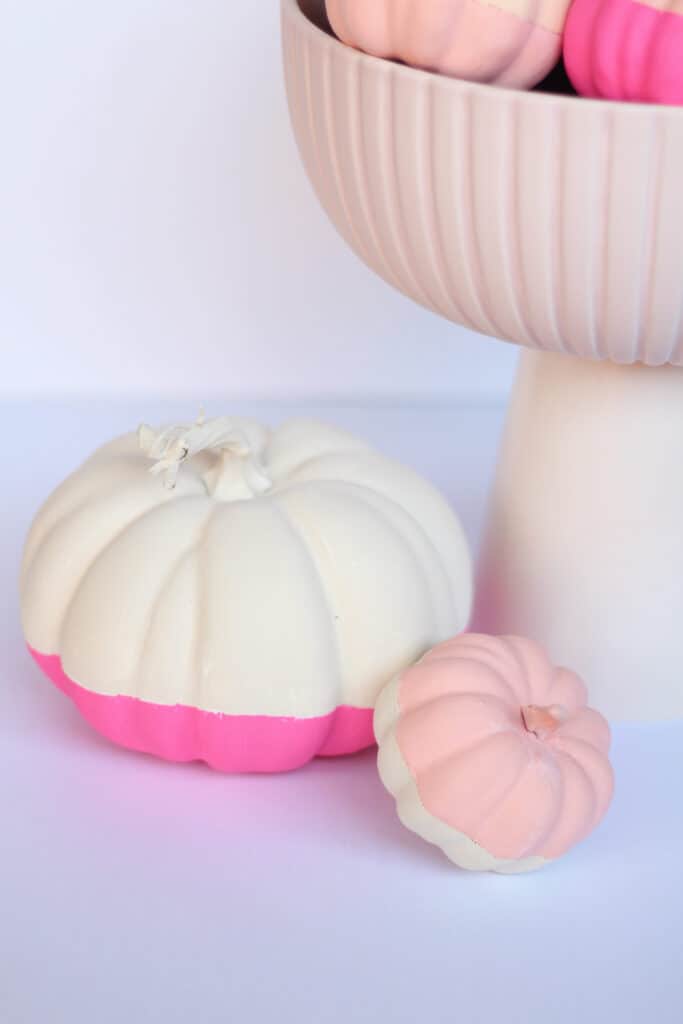
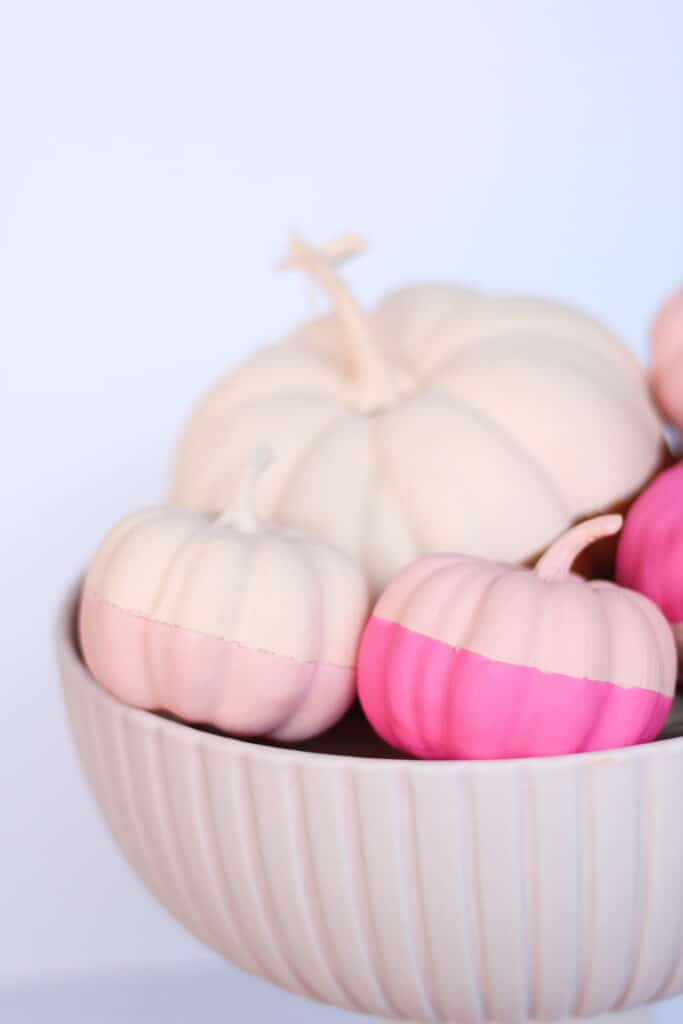
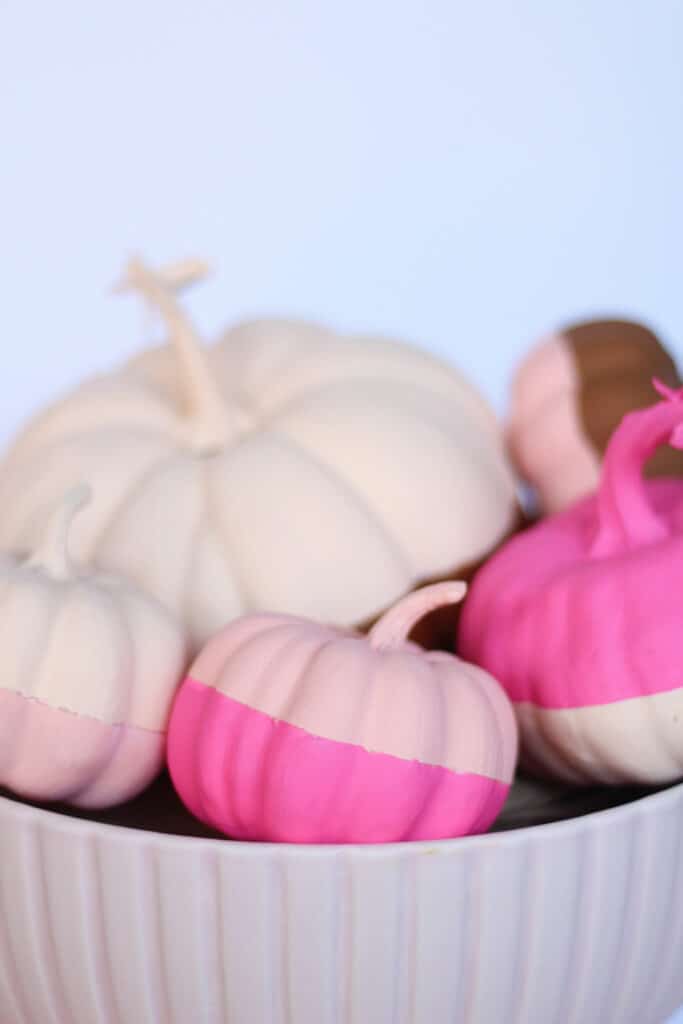
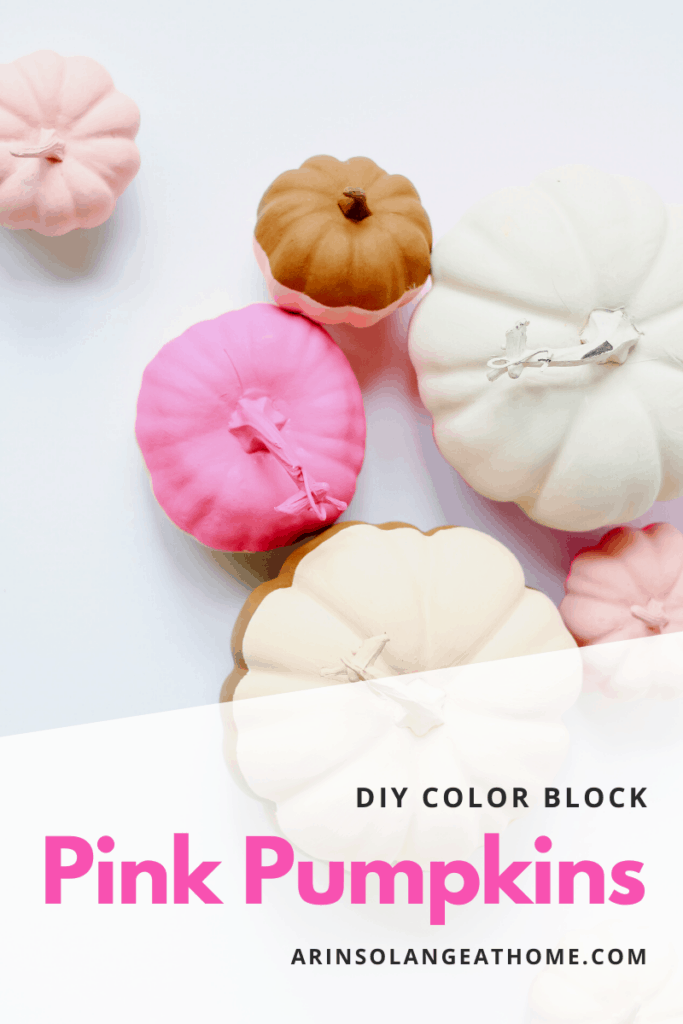
Pink pumpkins are almost always my thing when fall comes along – I mean I am a pink girl through and through. This year I wanted to give you a fun – EASY diy with color block pumpkins – but will also be sharing lots of other pink pumpkin fun!
this post may contain affiliate links
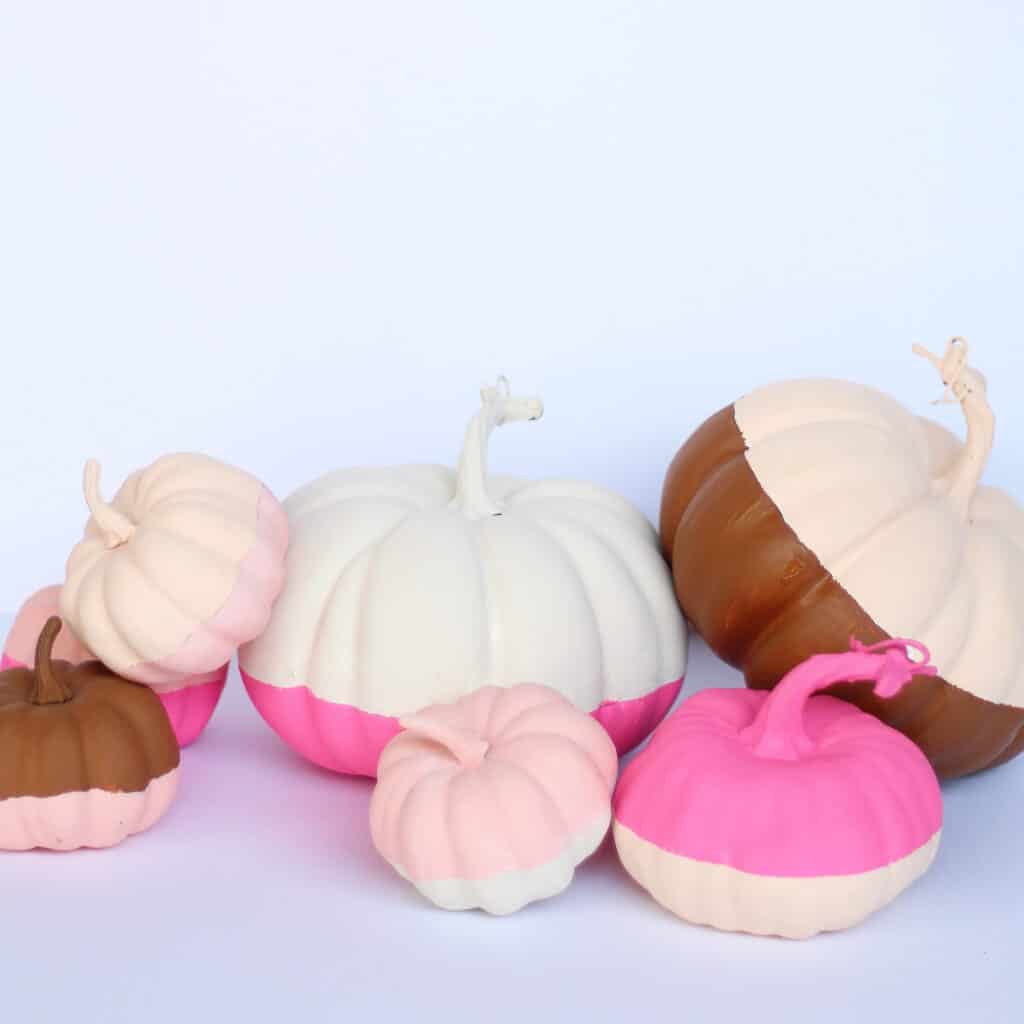
Pink Color Block Pumpkins
When I was figuring out something fun and easy for DIY pumpkins this year I figured who doesn’t love a good color block look?
This DIY was beyond easy and so much fun – plus I can use these in a birthday party coming in a few weeks.
When it comes to doing anything color blocked like this I highly recommend you using a few colors in several different combinations to keep things matching.
In this case I went with all pinks and one brown. I waned the contrast of the brown – and since they weren’t going to be decor in our home brown was a fun change for me. (I am normally team black and white!).
What You Need
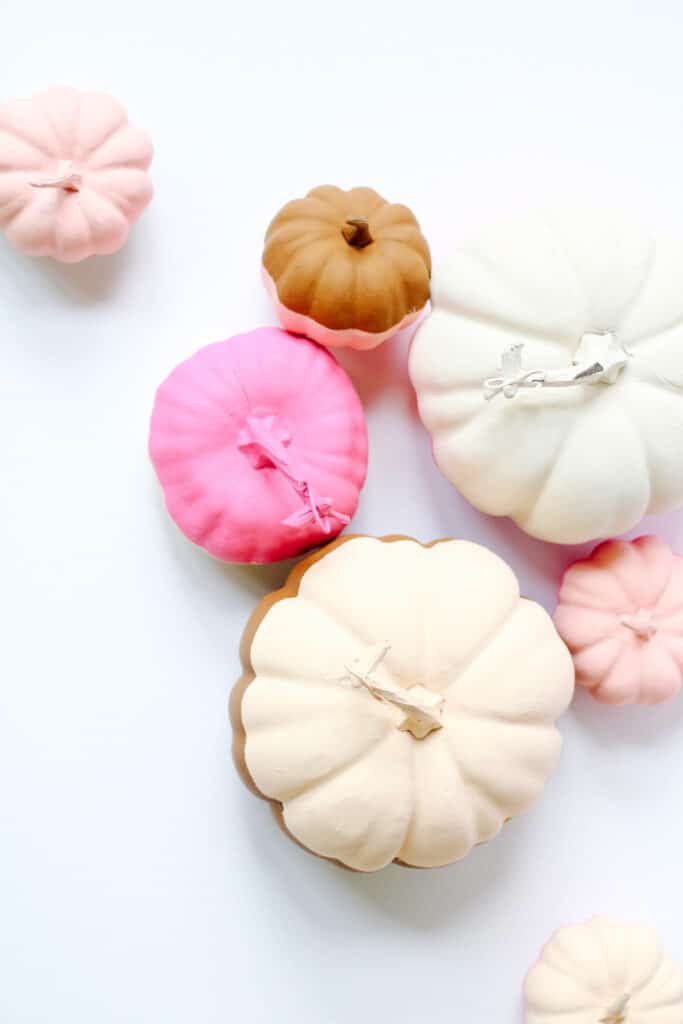
When it comes to creating these you need very little! I personally used several different sized pumpkins because I already owed many, but I also used a new pack from Amazon – and as a bonus I will be sharing how my friend Jen used the same pumpkins in a DIY.
Pumpkins – Here are the ones from Amazon (smallest ones seen) But here are some other options too if you want to vary your sizes too. Here and Here.
Painters Tape
Paint – I used several different craft paint colors that I will list below, but just use what makes your heart happy!
How to Make your Pink Color Block Pumpkins
I wasn’t joking when I said this is really easy! All you will need to do is place your painters tape to block off one side. Paint the top or bottom (whichever is fully showing) and let it dry.
Once done carefully paint the other side. you could place painters tape back down but didn’t find that was needed. Both sides will likely need 2 coats of paint!
Colors I used
Incase you are hoping for these same colors I personally used:
If pink pumpkins are your thing and you loved this DIY I rounded up some other pink pumpkin decor. I know DIY isn’t everyones thing. I also know that if you want to tie these color block pumpkins into your decor you will need other great finds.
If you enjoyed this post and want to find it for later be sure to pin the image below! If you have any questions on these color blocked pink pumpkins leave me a comment below or DM me on Instagram (@arinsolange).
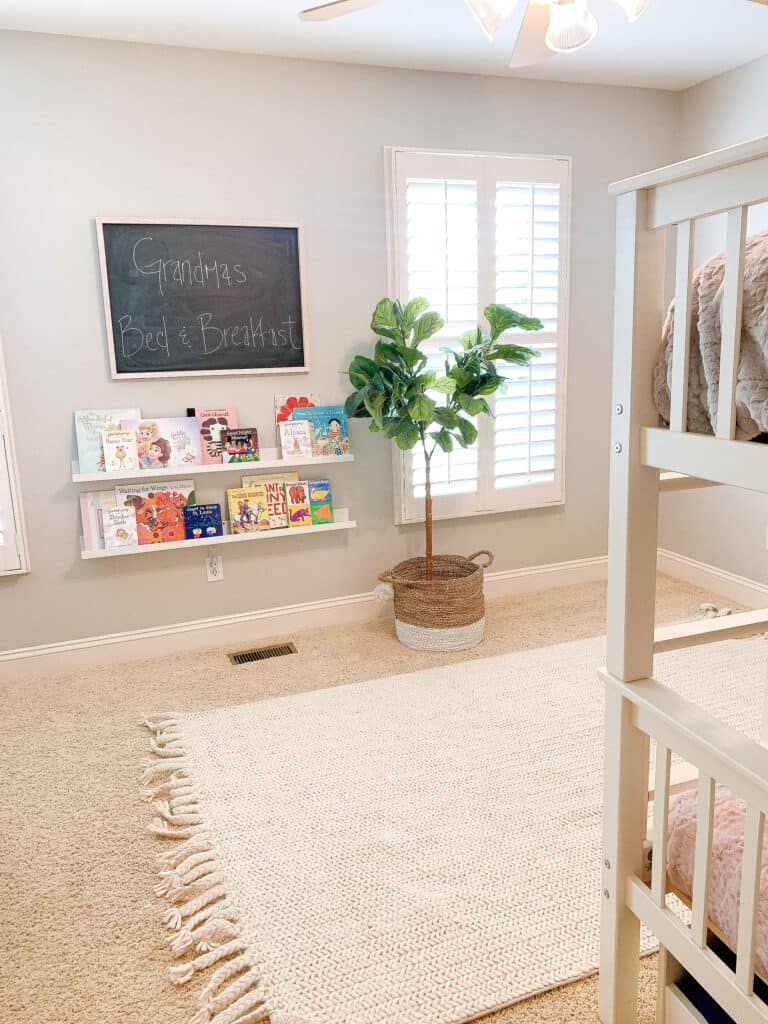
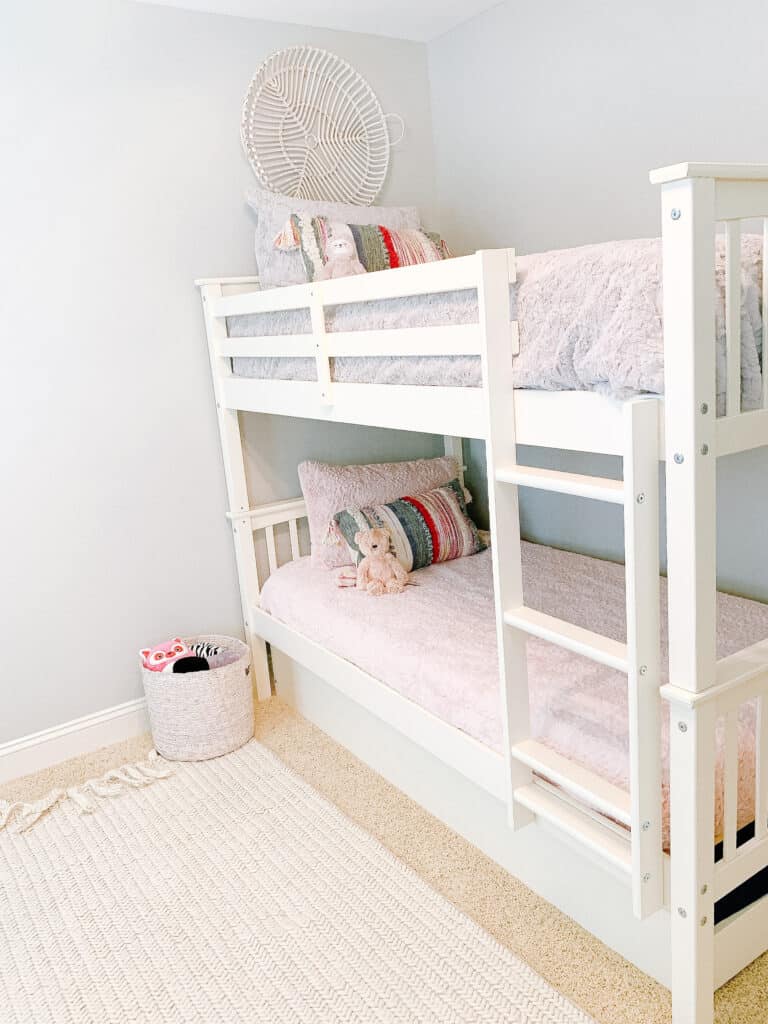
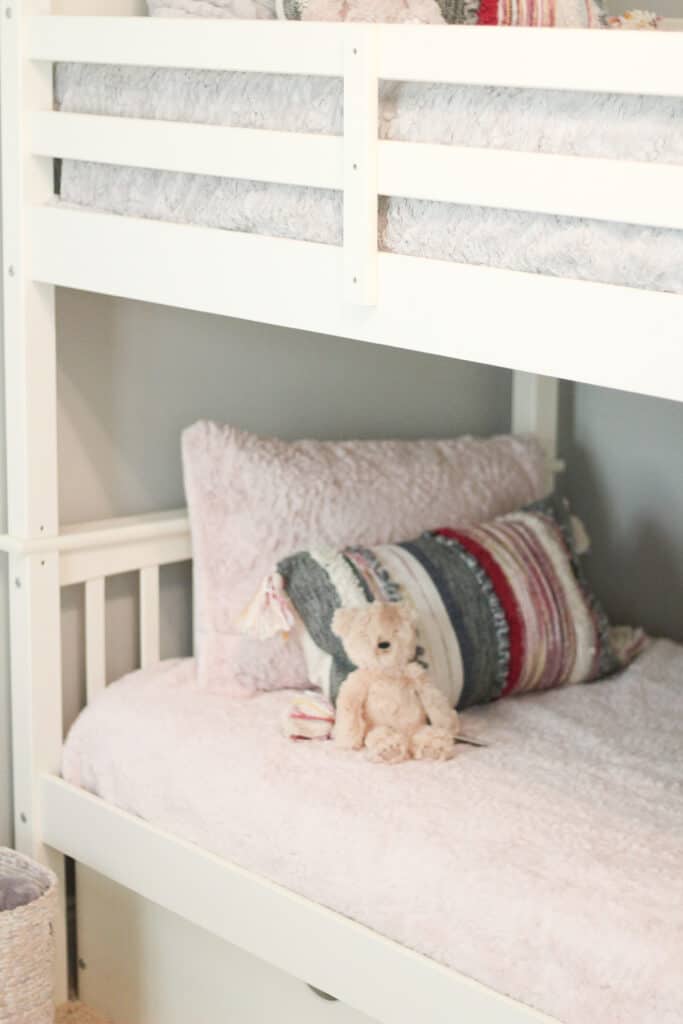
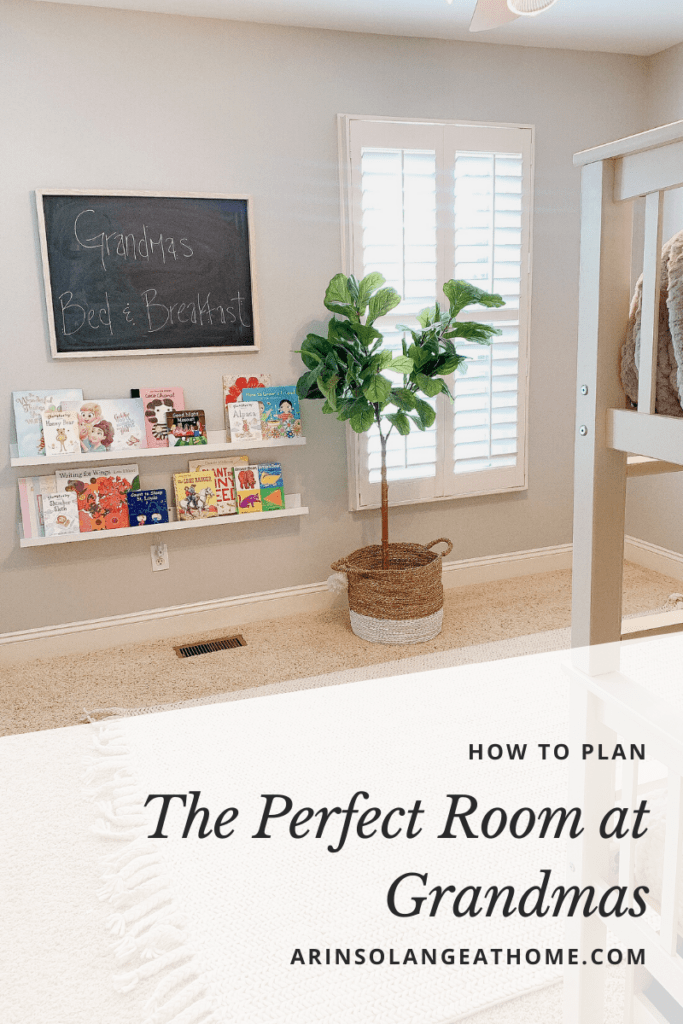
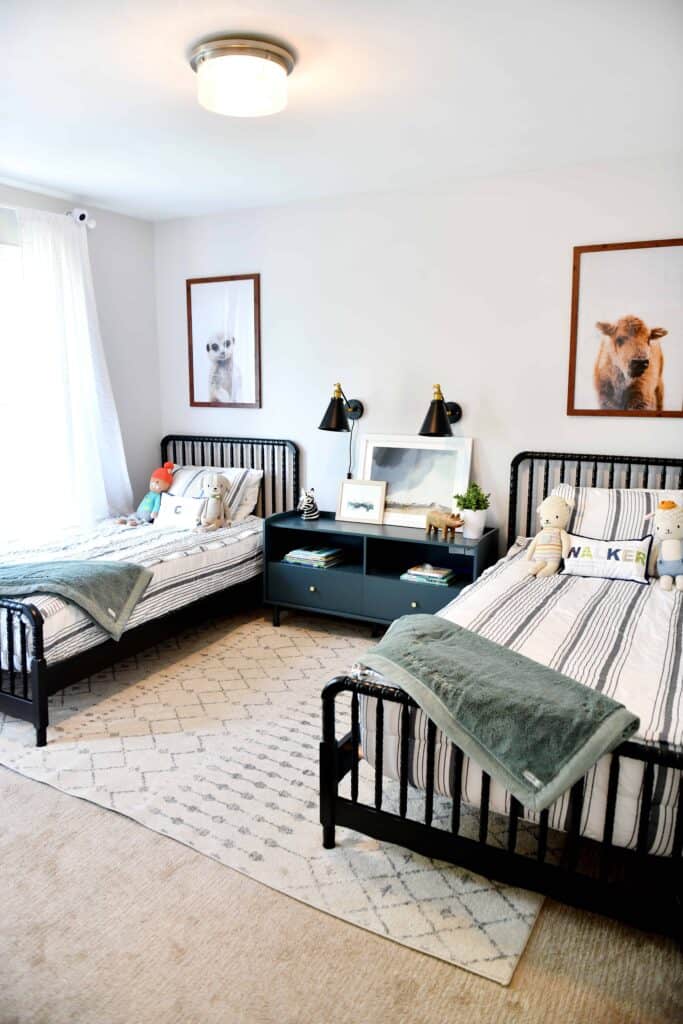
If you have been following me for very long you likely know that Saranoni blankets are one of my all time favorite products. I have been itching to put the finishing touches on a room at Grandmas house for my kids (and future grandkids), and when they came out with bedding I knew it was the perfect time!
This post may contain affiliate links – bedding was gifted to me by Saranoni however all opinions are my own
A Room at Grandmas
My kids are spoiled rotten, and my mother in law has created a space for them at their home that is just perfect.
A couple of years ago she grabbed the perfect bunk beds with a trundle in order to fit all 3 kids (this was pre Goldie!) and it is the perfect space for them to come stay or at least rest for nap time.
I have been working on making the space more functional and comfortable for my kids, because they aren’t used to staying away from us, so for me comfort is key in that room.
They do also have a playroom in their house, so I didn’t have to make the room check every box for kids, but overall do want it to be a room that they can be in to get out of everyones hair if needed as well.
I have one more DIY surprise coming in the room that you will have to look for, but for now the room is great, and is the perfect space for the kids.
Saranoni Blankets Bedding
When Saranoni came out with their new bedding it was the perfect time to finish this room. Our whole family (us included) use Saranoni blankets at home exclusively, so I knew this would make it feel like home.
The new bedding comes in several colors and you can get shams, covers, and pillow cases, and they are honestly SO COMFORTABLE. I have friends who I have convinced to switch to Saranoni from other popular blanket brands because you guys – THEY ARE THAT GOOD.
When it comes to kids bedding comfort and ease of use in my opinion are the most important things, so this totally covers that – and as a bonus they will work as great blankets if the kids do a movie night or anything else at Grandmas house!
Purposeful Storage
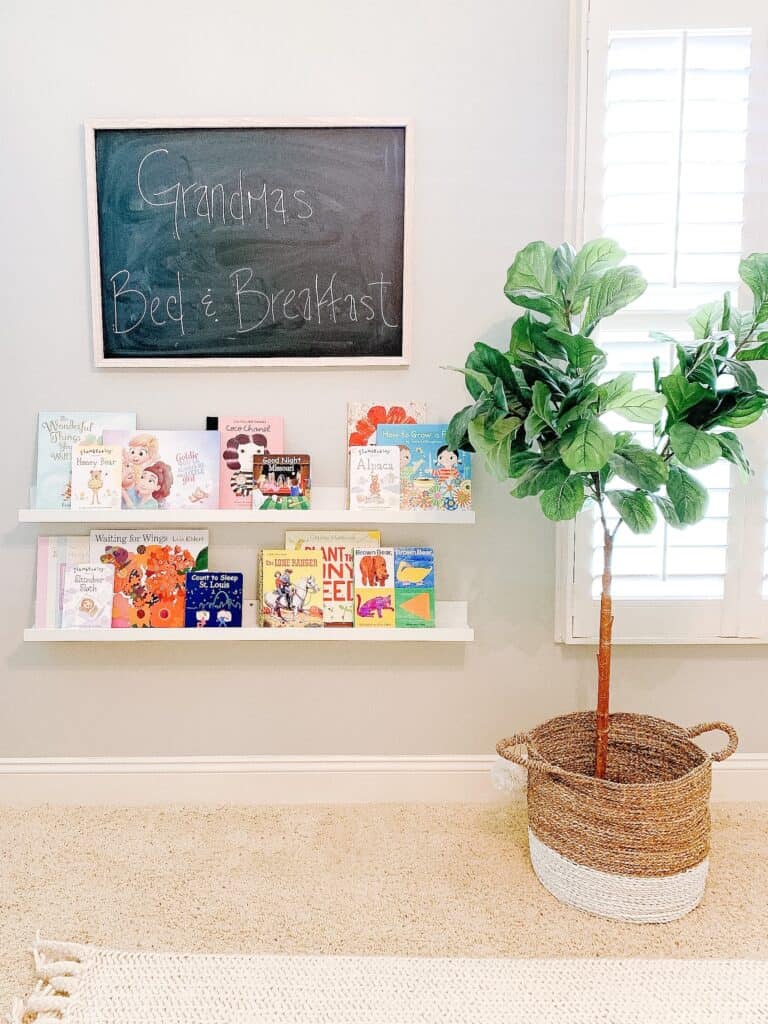
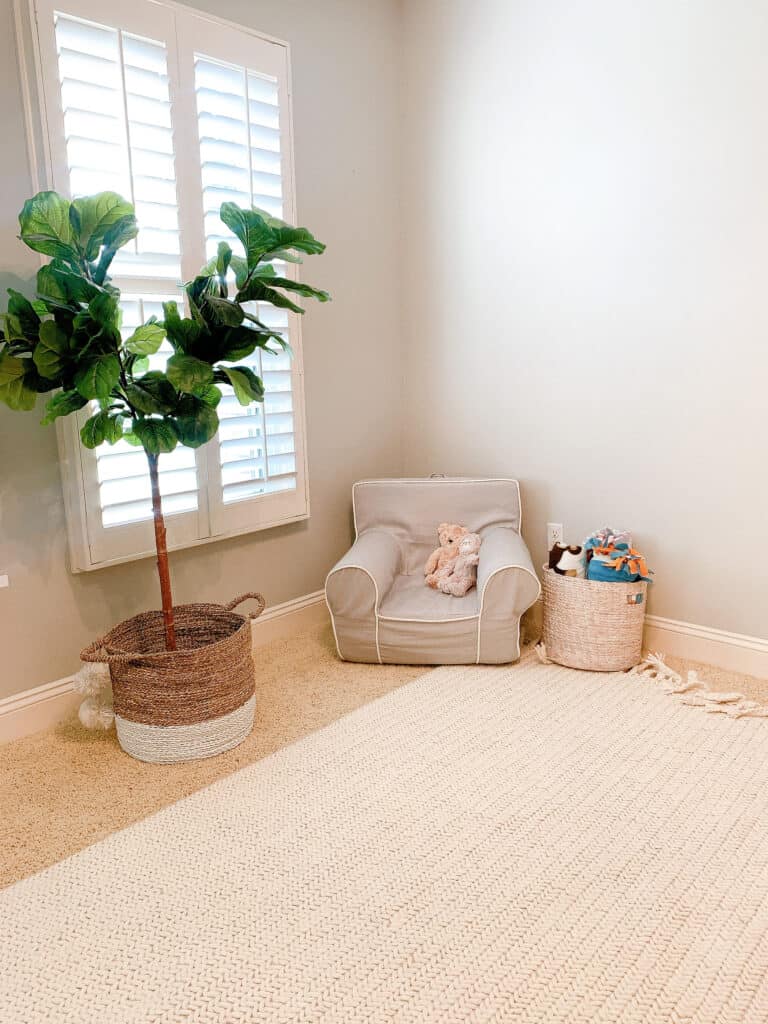
Something else I think is really smart is to have some purposeful storage in any room. This goes for Grandmas house or home.
In the case of this room I went with these books ledges that you have seen in many of my other rooms here on my blog. I also added a basket for stuffed animals and other blankets and such.
You will have to stay tuned for the next phase of this room – which will include a TV area and desk/table.
Part of the reason for the desk/table set up is so there is a good place to put luggage below and lay out their clothes or personal items when they come to stay. As opposed to a room at home where a dresser would be great, an area for function but not storage is better in this case.
Other Details
As for the other details in the room we went simple and clean. I hung a wicker basket over the beds, added a chalkboard that the kids can use, but also serves as cute decor, and added warm textures.
The rug was actually a rug that used to be in Avé’s room before we moved – see here. It is perfect for a gender neutral space and comfortable. I also added some gorgeous throw pillows that are gender neutral but added a pop of brighter color.
I didn’t want to do too many pillows and such because it is a kids space. I figured with one throw pillow it can be put at the foot of their beds when they are sleeping!
To see some other kids spaces I have done – check out the posts below. I tend to go a bit more involved in my own home of course, but I loved that this showed how you can easily create a pretty, simple space without spending a ton of money or adding a ton of extra decor.
If you are looking for this post on a simple room at grandmas house featuring Saranoni Blankets bedding later – pin the image below for later. As always if you have any questions be sure to leave a comment below or DM me on Instagram, and I will be sure to get back to you!
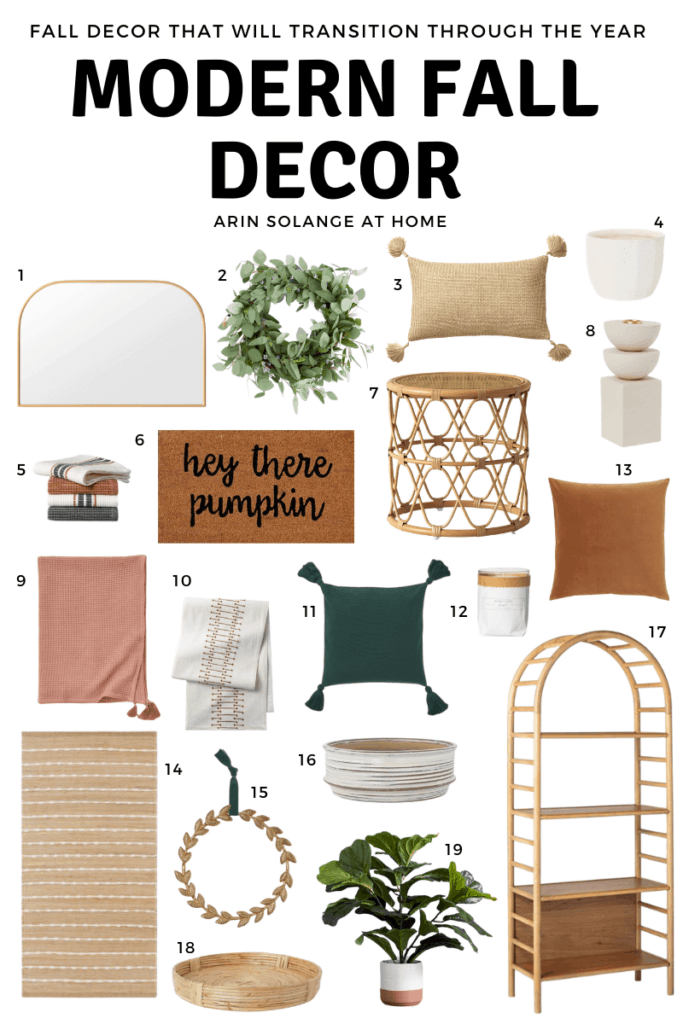
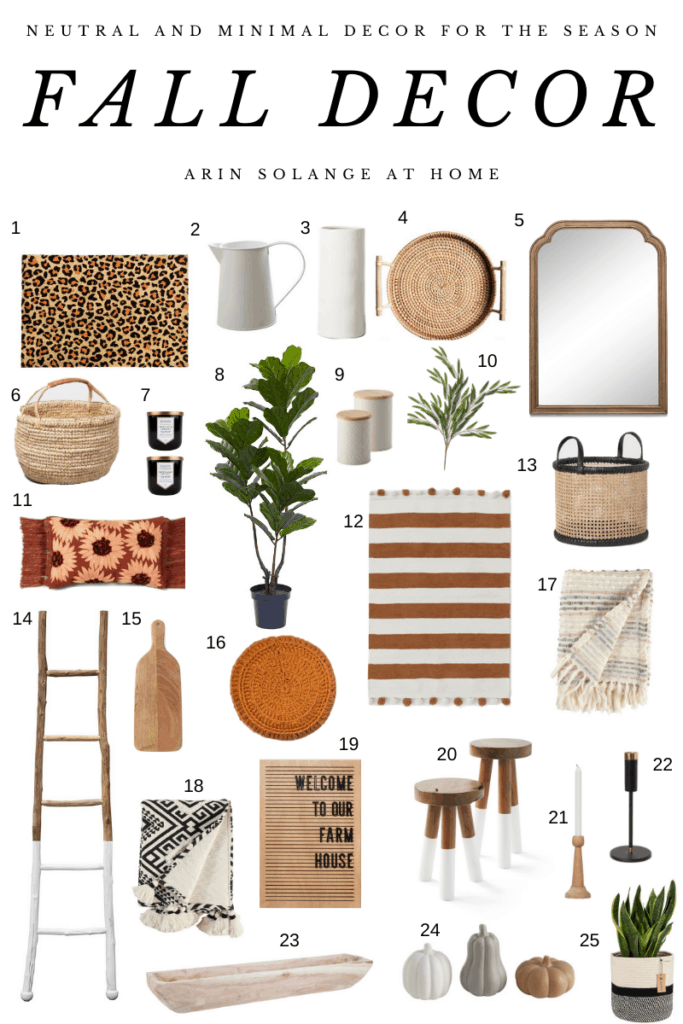
Fall decor is always one of my favorite things to decorate. I know so many of you are already jumping into fall decorating, so I wanted that to be my first decor post to get up for you all this month. Today I am sharing some Modern Fall Home Decor that you will LOVE!
THIS POST CONTAINS AFFILIATE LINK – this post was updated from 9/19 to 9/21
Modern Fall Decor
I find that modern fall decor can sometimes be hard to find. Decorating for fall months tends to lean heavily towards the farmhouse look (which I also love, but it is just not how I decorate).
I rounded up some great decor options that will help you warm up your space for fall and make it perfectly cozy and ready for the season, while still keeping a more neutral, simple, modern look.
Most of this can be used year round if you would like, which is typically how I like to shop. I don’t like to have to store too much, and want items that can be used and incorporated throughout my house for multiple seasons.
If you have any questions let me know, and be sure to check out this other fall decor post from last year. Nearly all of it is still available and links have been updated for lots of fall decor options!
Fall decor is all about layering textures. Adding in simple elements like candles, warm throws and unfinished wood can be a great way to make your house feel warm for the holidays.
I also love that if you go with a lot of these items they will transition year round! Be sure to follow me on Instagram to see how I transform my modern, natural space for fall.
I don’t think that decorating for fall has to mean clutter and lots of oranges and browns, and I will show you how I accomplish keeping things neutral in my own home!
To me – natural woods, and browns that are found in wicker or rattan are a great way to warm a space up while still sticking to a cool pallet for decorating
For this fall decor round up you will see lots of natural textures that bring in the natural warmth.
Gold Arch Mirror – This comes in gold and black and I am obsessed with it.
Wreath – I love a good faux greenery wreath and this one would be gorgeous inside or outside. I do think when it comes to faux greenery sometimes it is worth it to spend more and get great quality.
Rattan style pillow – we have this and it honestly can look perfect year round!
Planter – this is GORGEOUS. It is a great white piece that will look good in the fall due to the texture.
Most of the round up below from last year is sold out – however I have included the links to the items that are still in stock. I still LOVE so much of this gorgeous decor.
I know so many of you are probably on this post from finding this one on Pinterest, so I wanted to leave it up for inspiration and link to the items I could!
If you have any questions please feel free to leave me a comment or DM via Instagram, and if you incorporate any of this into your modern fall decor make sure you tag me so I can see how you styled it!!
Pin the Photo Below for Later
If you are looking for this modern fall decor later be sure to pin the photo below – I update this post yearly so you will find new decor you Love each time!
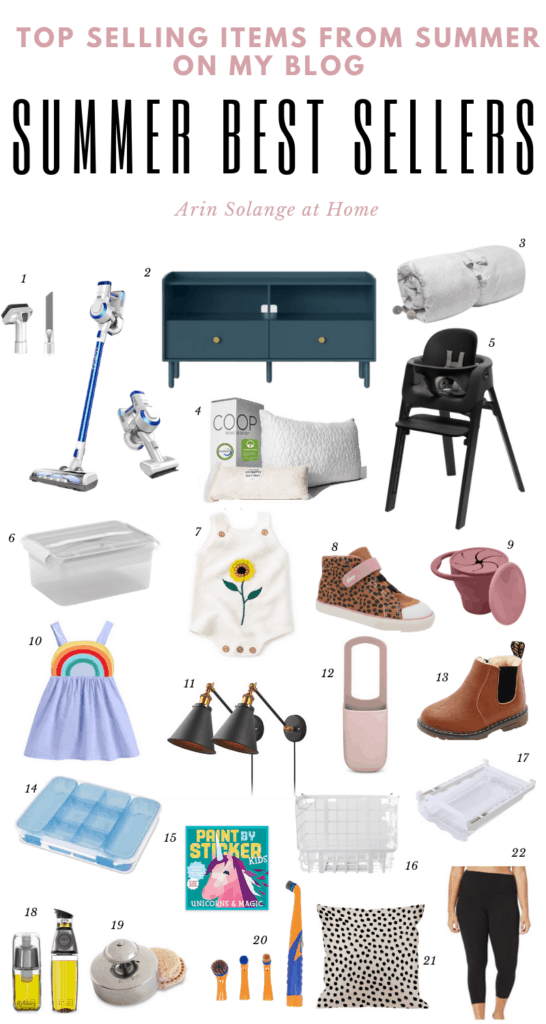
One of the things I have been wanting to do is give you best seller blog posts a few times a year. I think showing where some of my best selling items are and directing you to one blog post might be a bit easier for you and me long term.
this post may contain affiliate links
Best Sellers – Summer 2020
What a time summer 2020 has been – and these best sellers are a bit more all over the place from future ones because I haven’t done this before.
I plan to do this seasonally, but these were my best sellers from April – August.
See all other details in this post linked here – lights and hardware are also high selling items from Amazon
As a bonus – I teamed up with 4 other ladies to share their best sellers this year and we are going to giveaway one of our top sellers to each of you. For my best seller I will be giving one winner who follows on social a cutie holder and snack cup!
Sleeping mats – We are currently using these, but every time I share them they are a huge hit.
Coop Pillow – I have shared on social a few times that neck and shoulder tension are huge issues for me. I got this pillow a few months ago and it has been a game changer for me.
Leggings – I wore these today. They are super comfortable and I prefer them over my Lululemon ones that are twice as expensive.
A couple of items that I didn’t add to that round up were the cane from the DIY in the photo above and the chairs – Check out the DIY post here, but hands down that is my biggest seller.
Hopefully you found some items you love and are able to incorporate them into your home and your life. Be sure you are following along on Instagram so you can be entered to win the items from this weeks giveaway!
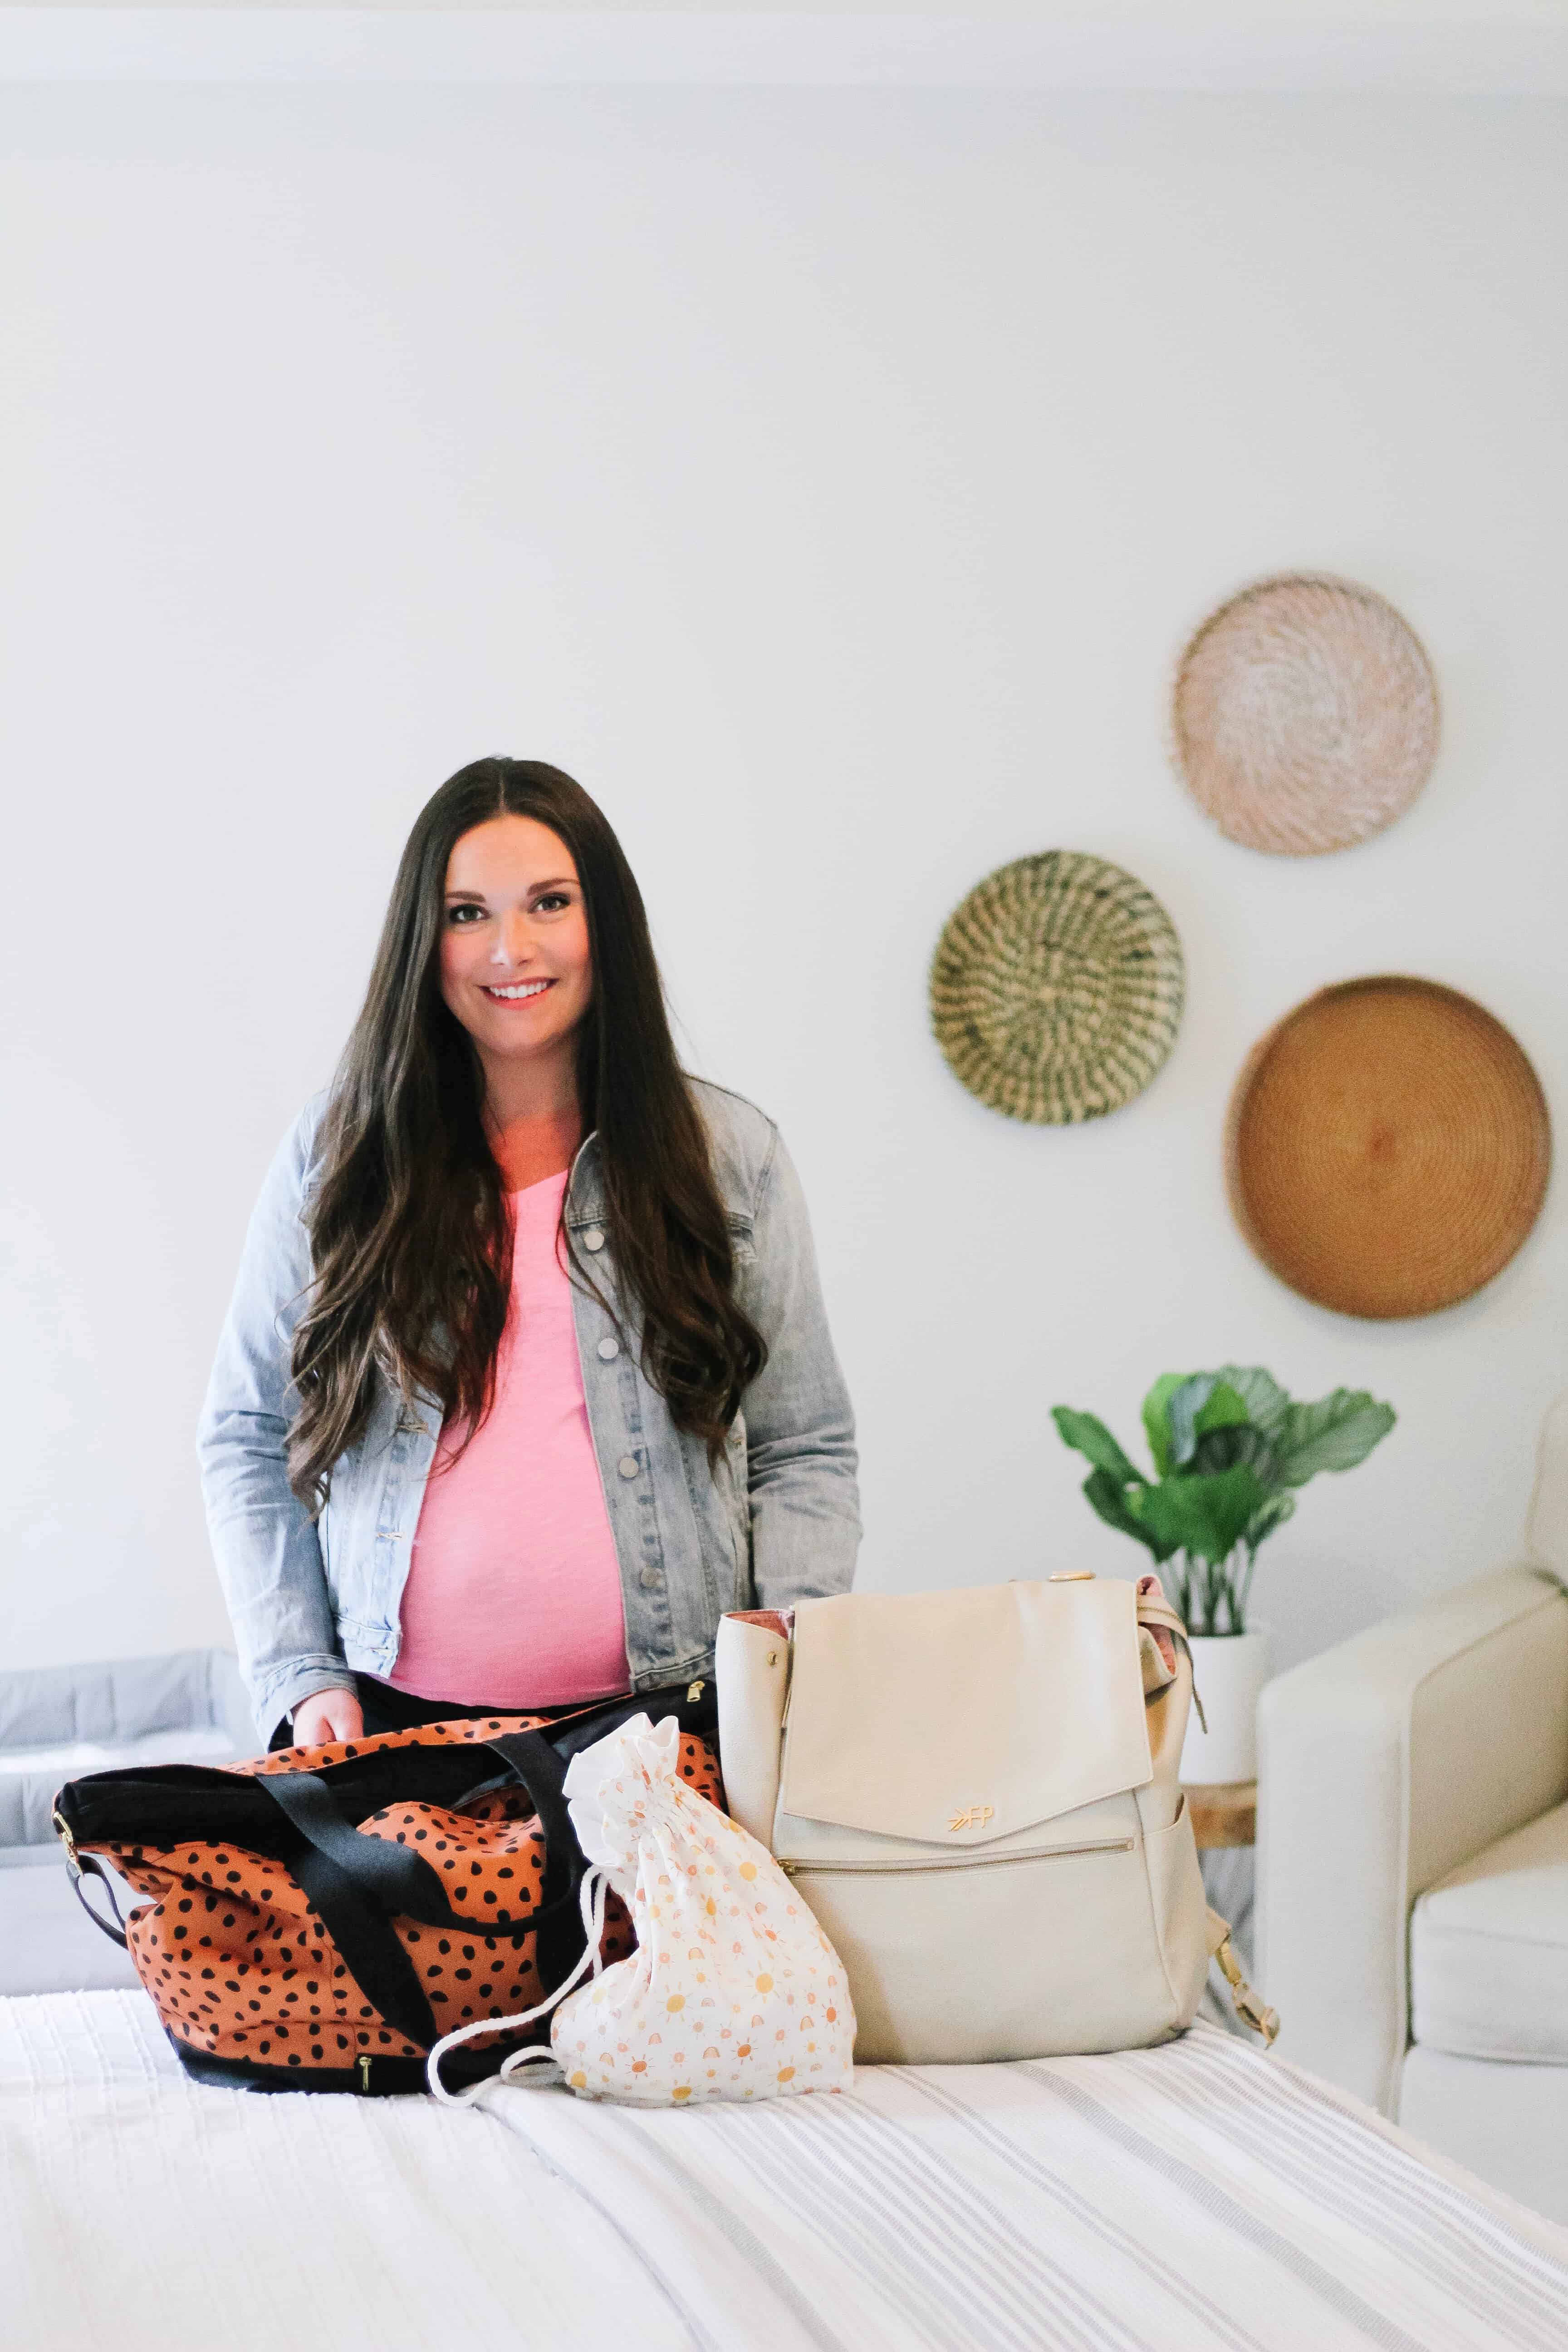
Hospital Bag Checklist – What to Pack in Your Hospital Bag-What Moms Really Need
I am 4 babies in at this point – and every time I think to myself ” I need a hospital bag checklist” when it comes time to pack that bag. I think every mom, no matter how many babies we have had, sort of worries about what to pack in their hospital bag.
It’s totally normal. So now that I have had 4 babies I am updating this post – talking about what to pack, and what not to pack. C-section or vaginal. I have done it all, and hopefully can guide you through the next steps.
This post may Contain Affiliate Links – originally written 7/19 updated 9/20
A Hospital Bag Checklist
Those few days in the hospital having a baby and recovering are filled with lots of aches and pains and the last thing you want is to ‘not have’ something you wanted. I am a list person so a hospital bag checklist was a must for me!
That said – one of my biggest pieces of advice for moms is DON’T STRESS. The hospital has everything you NEED, and in most cases if there is something you wanted someone could likely bring it to you in exchange for baby snuggles!
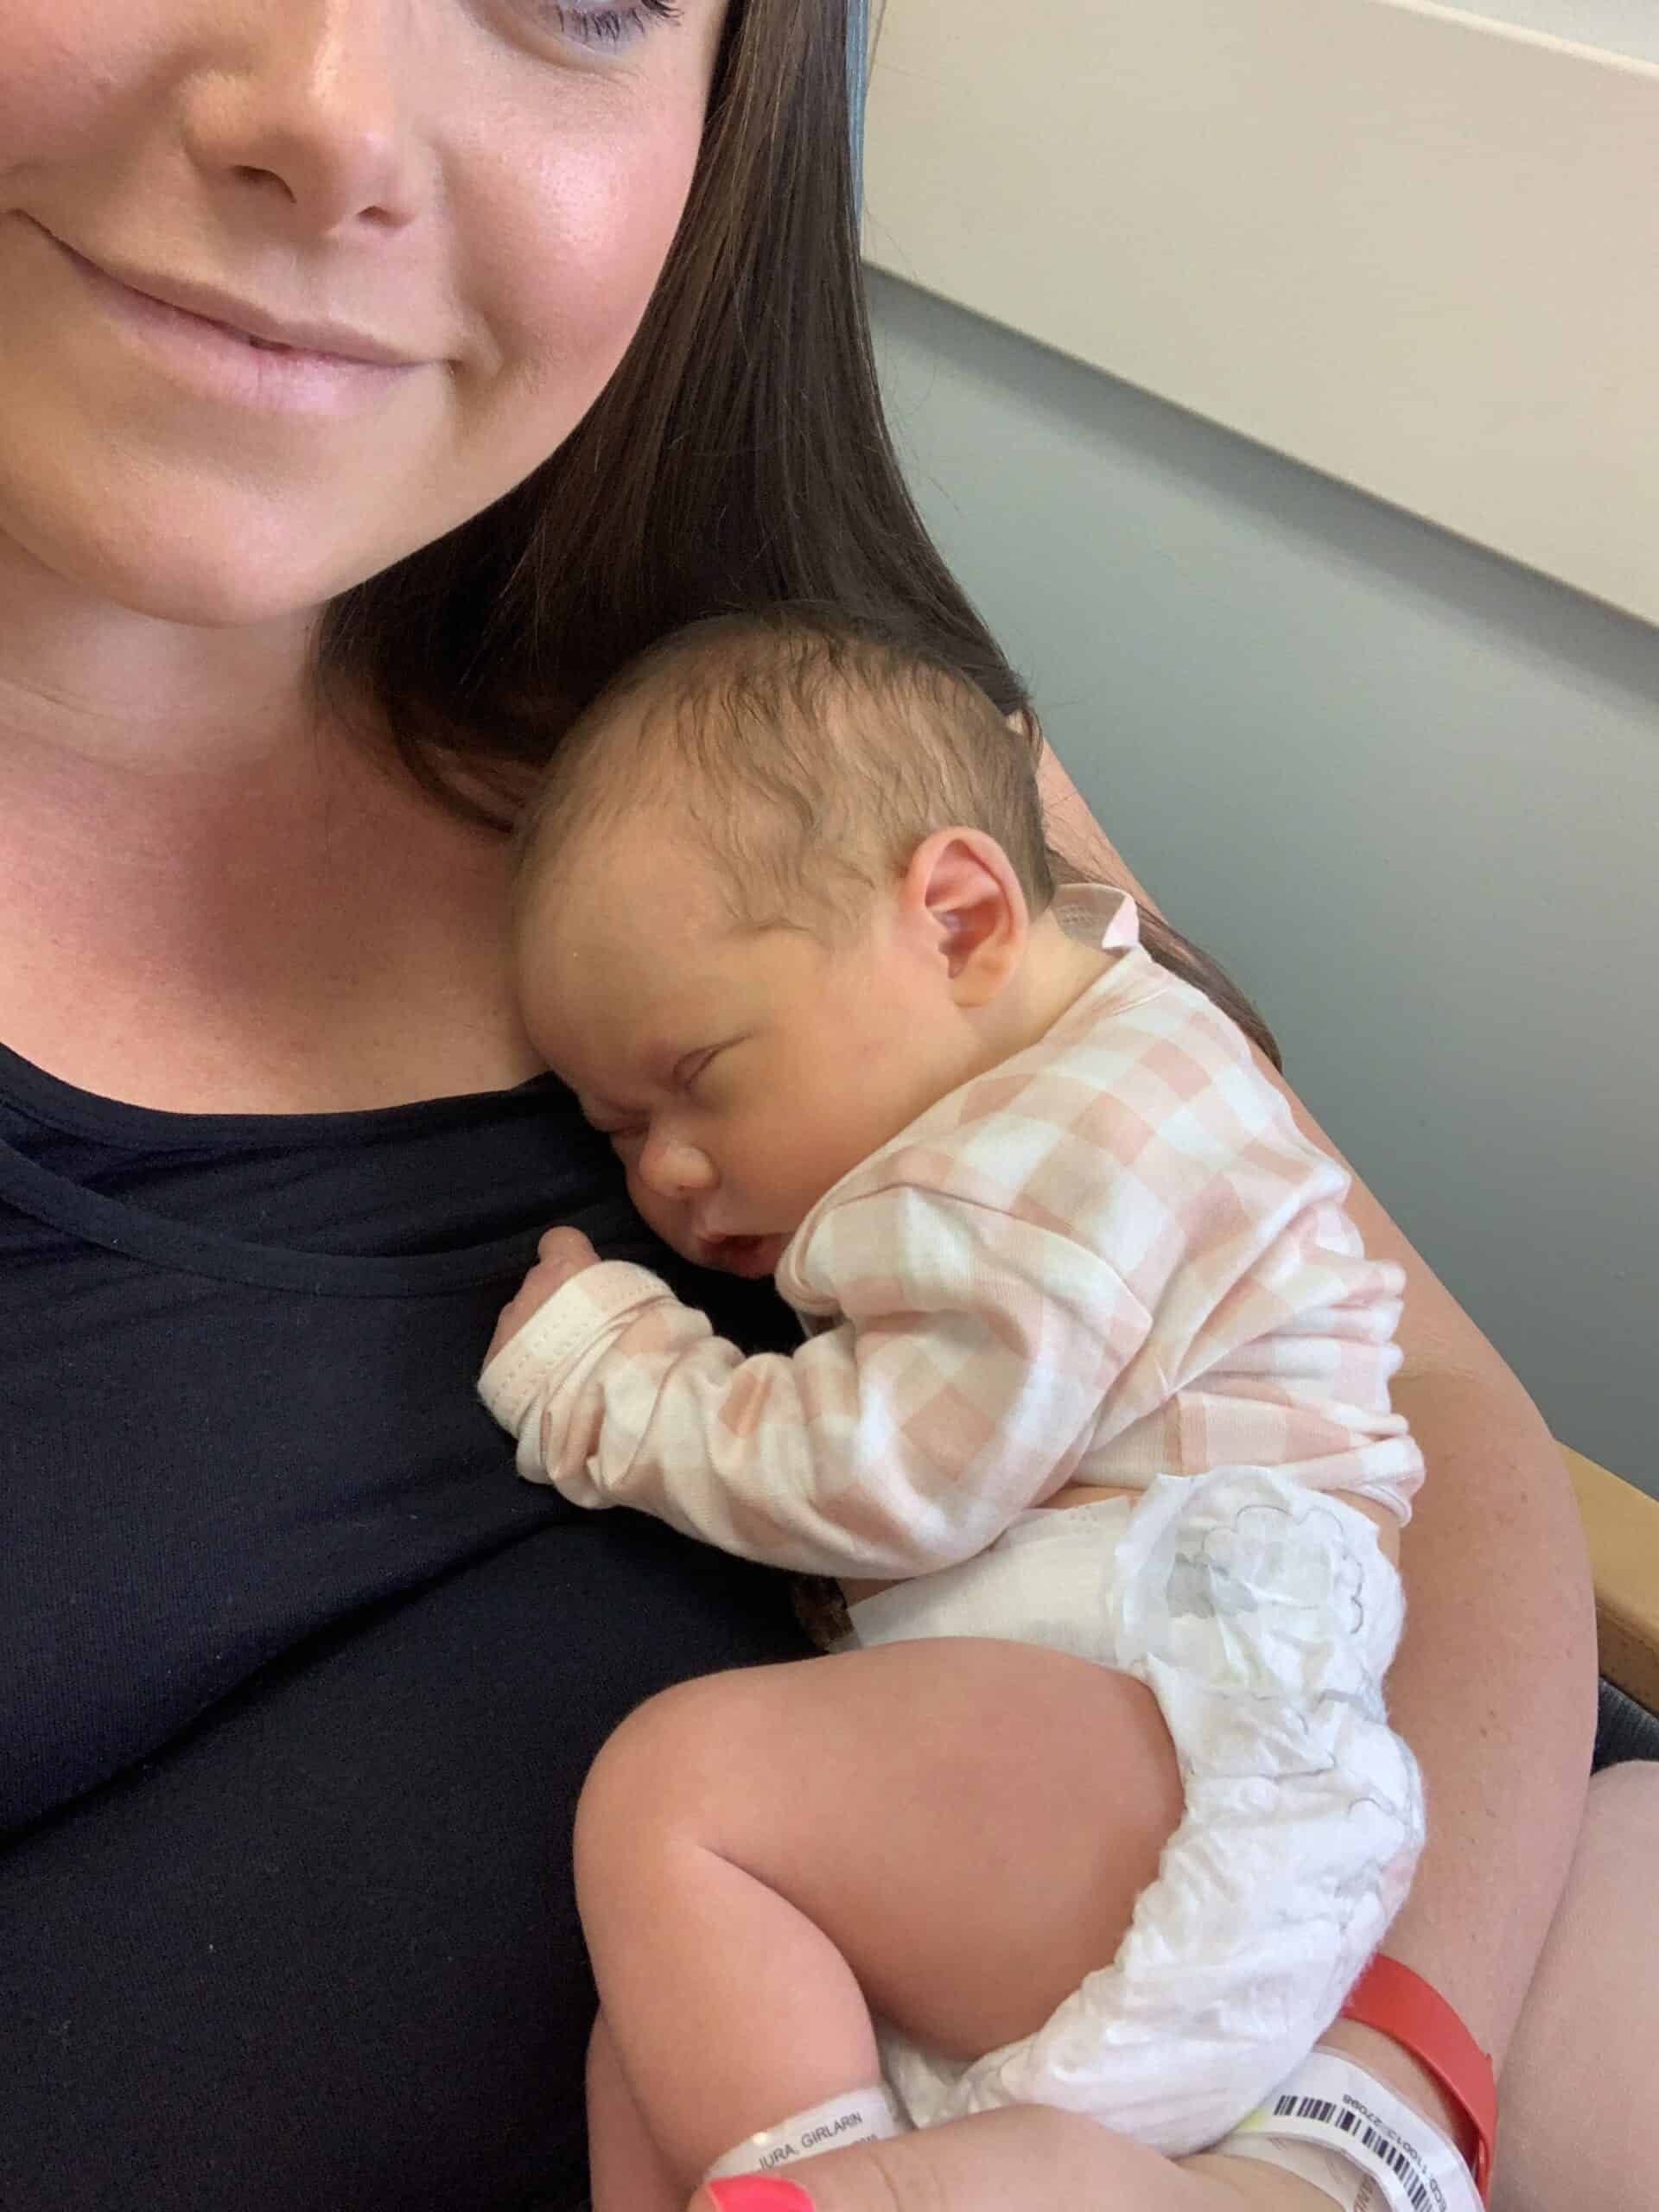
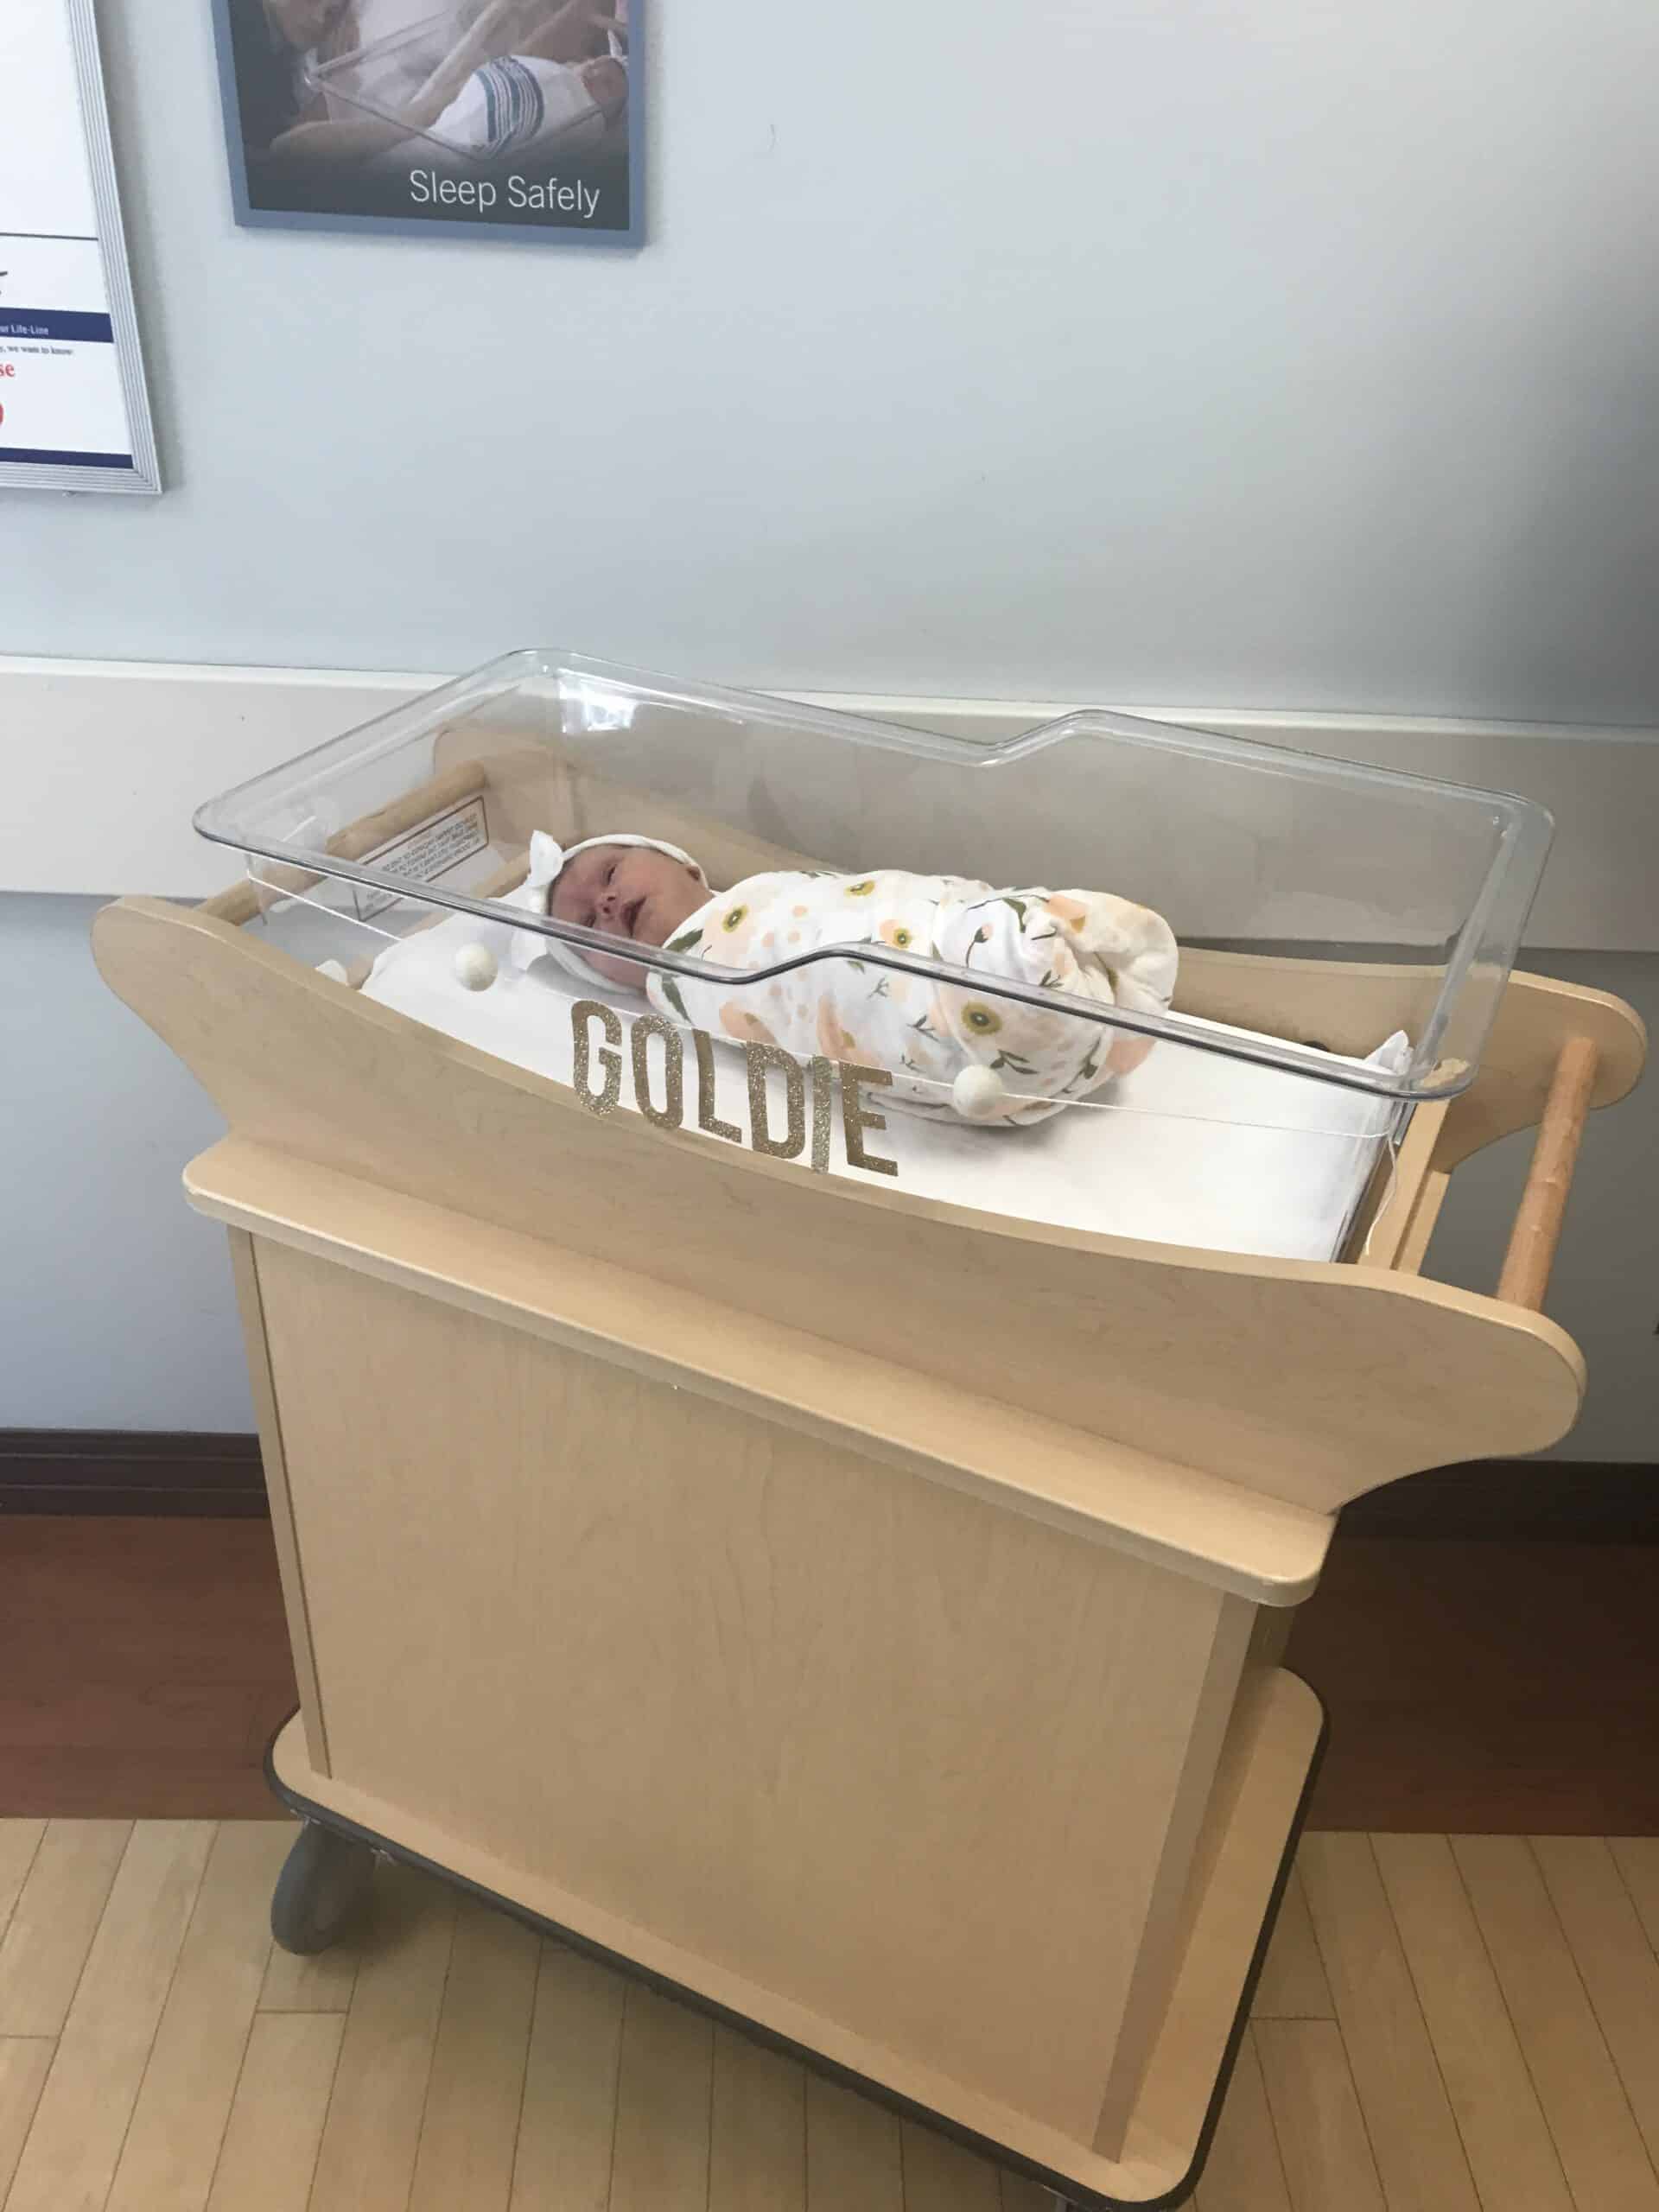
I am updating this post after having my 4th baby. I have had 4 babies in different seasons, and the last one ended in a pretty bad emergency c-section. Because of that I felt like this post needed to be updated with info that would help moms NO MATTER how the delivery of their baby goes.
What Should You Pack in Your Hospital Bag – Breaking Down the Hospital Bag Checklist
Okay so there are needs and wants. Some people want to look picture perfect and get great photos in their time in the hospital. Other people just want to bring only what they need for their time there. There is no RIGHT way to do it.
I will tell you that I am a bit of an in between. Comfort and function come first, but I also blog and take pictures as my job, so bring a little of that stuff too. I will make sure to break that down in this post!
Most Important Thing – Paperwork!
You need insurance cards, drivers license, and pending the hospital sometimes forms pre filled out. Be sure you have also registered if you need to online – sometimes that makes it easier and quicker when you arrive.
Another thing on the printable list is to have cash – this can be helpful for yourself or your partner to grab snacks in the vending machines.
shown – sign, and headbands that are linked
What to Wear:
For yourself clothing is the biggest thing! Remember – the hospital has almost everything you NEED. I am going to break down EXACTLY what I take in the clothing department on your packing list, but my suggestions are to keep things easy, comfortable, and stick with black bottoms.
Pajamas
I have felt really different after each baby, so I always bring a pair or shorts or PJ pants and then leggings. I never know if I will prefer the feeling of one over the other, so I just like to have both. Either way I suggest black just incase there are any bleeding issues.
One thing I would suggest is a nightgown as well. This one from Target is great. After my 4th I had a c-section and had to wear compressors on my legs (I have had a blood clot after 2 of my other kids, so it was extra important.) Having on a night gown made that a bit easier. All in all – options are great, so you may as well throw one in.
Nursing Options
A great nursing tank is wonderful at the hospital. I personally never did a nursing bra while there just stuck with the tank tops that kind of had the built in bra feature and forgot the bra. You are topless and nursing so much of the time there really is no point.
I linked these pajamas below – but they are great for nursing a baby without buying nursing specific pajamas.
wearing favorite nursing tank
Other:
You also want to bring slippers or sandals for walking around the hospital halls. If you want bring some comfortable warm socks (but the hospital also provides those!).
I also always bring underwear for the way home. I rock the mesh panties from the hospital during my stay, but I prefer to leave in my own. That is optional, but in the images below are the postpartum panties that I have purchased for this time around.
One thing I will note – Buy panties that come in several different rises. When I had Goldie via c section for a while I only wanted really high waisted underwear because anything else really bothered my incision.
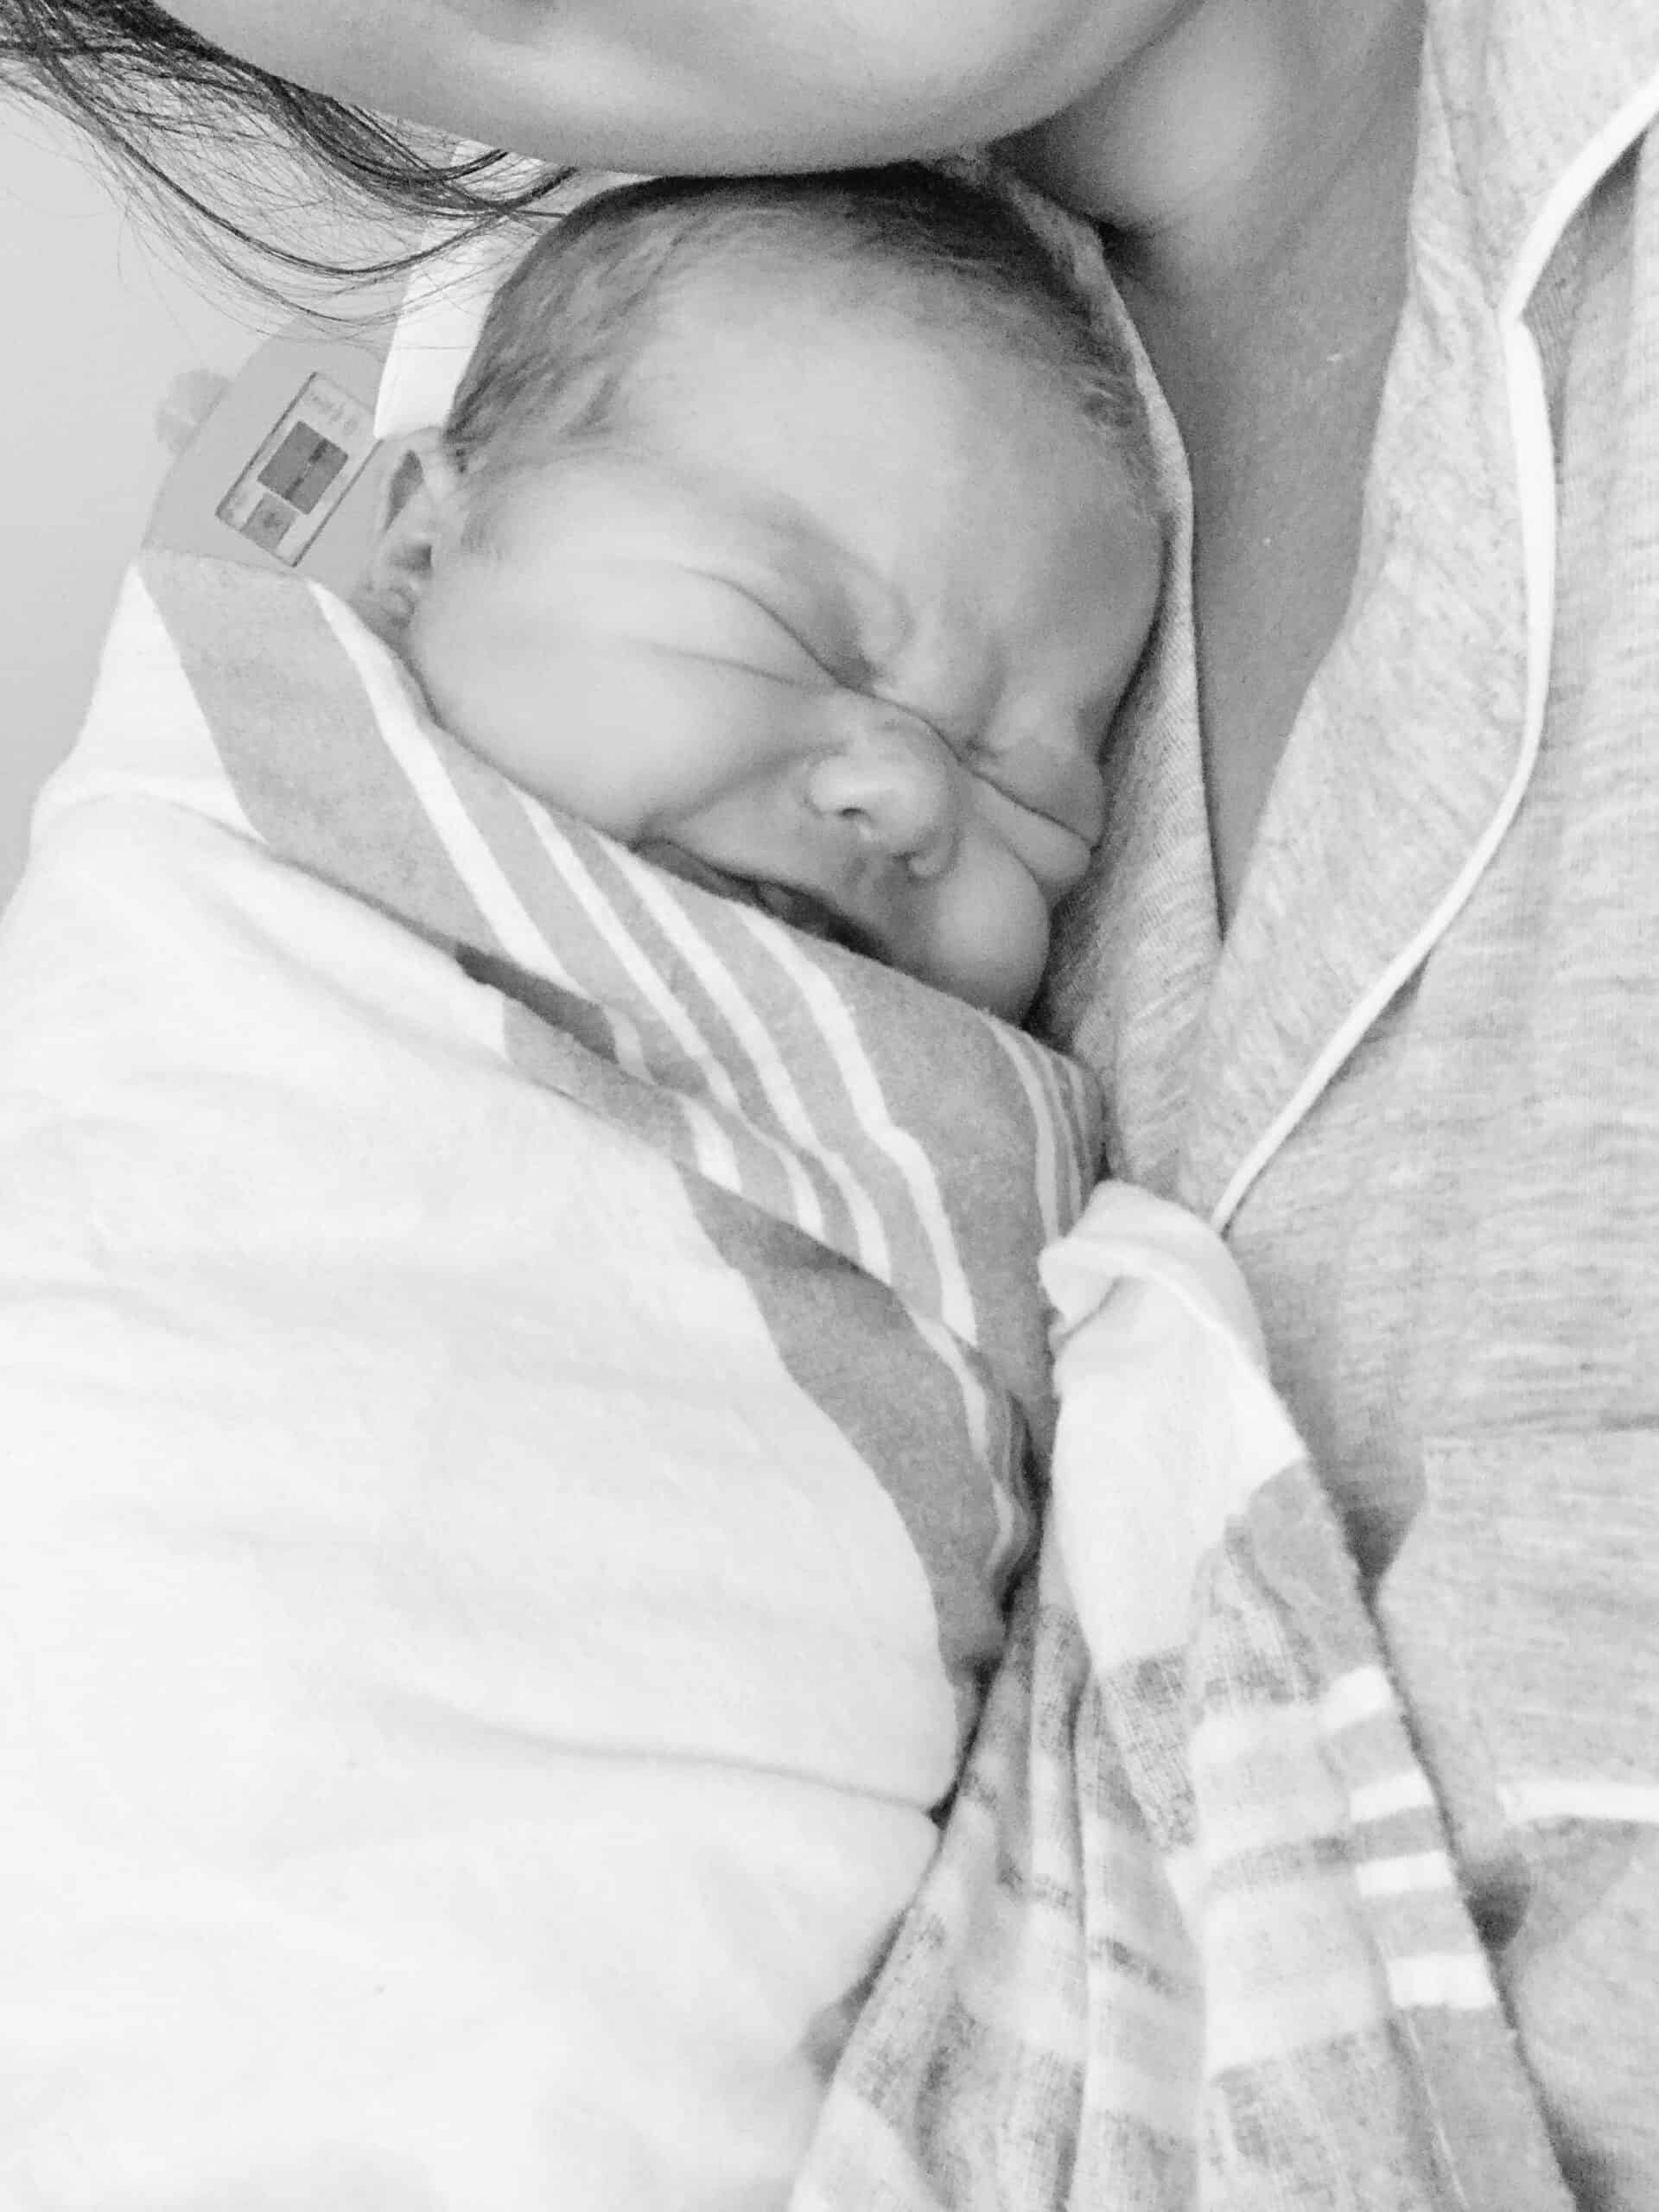
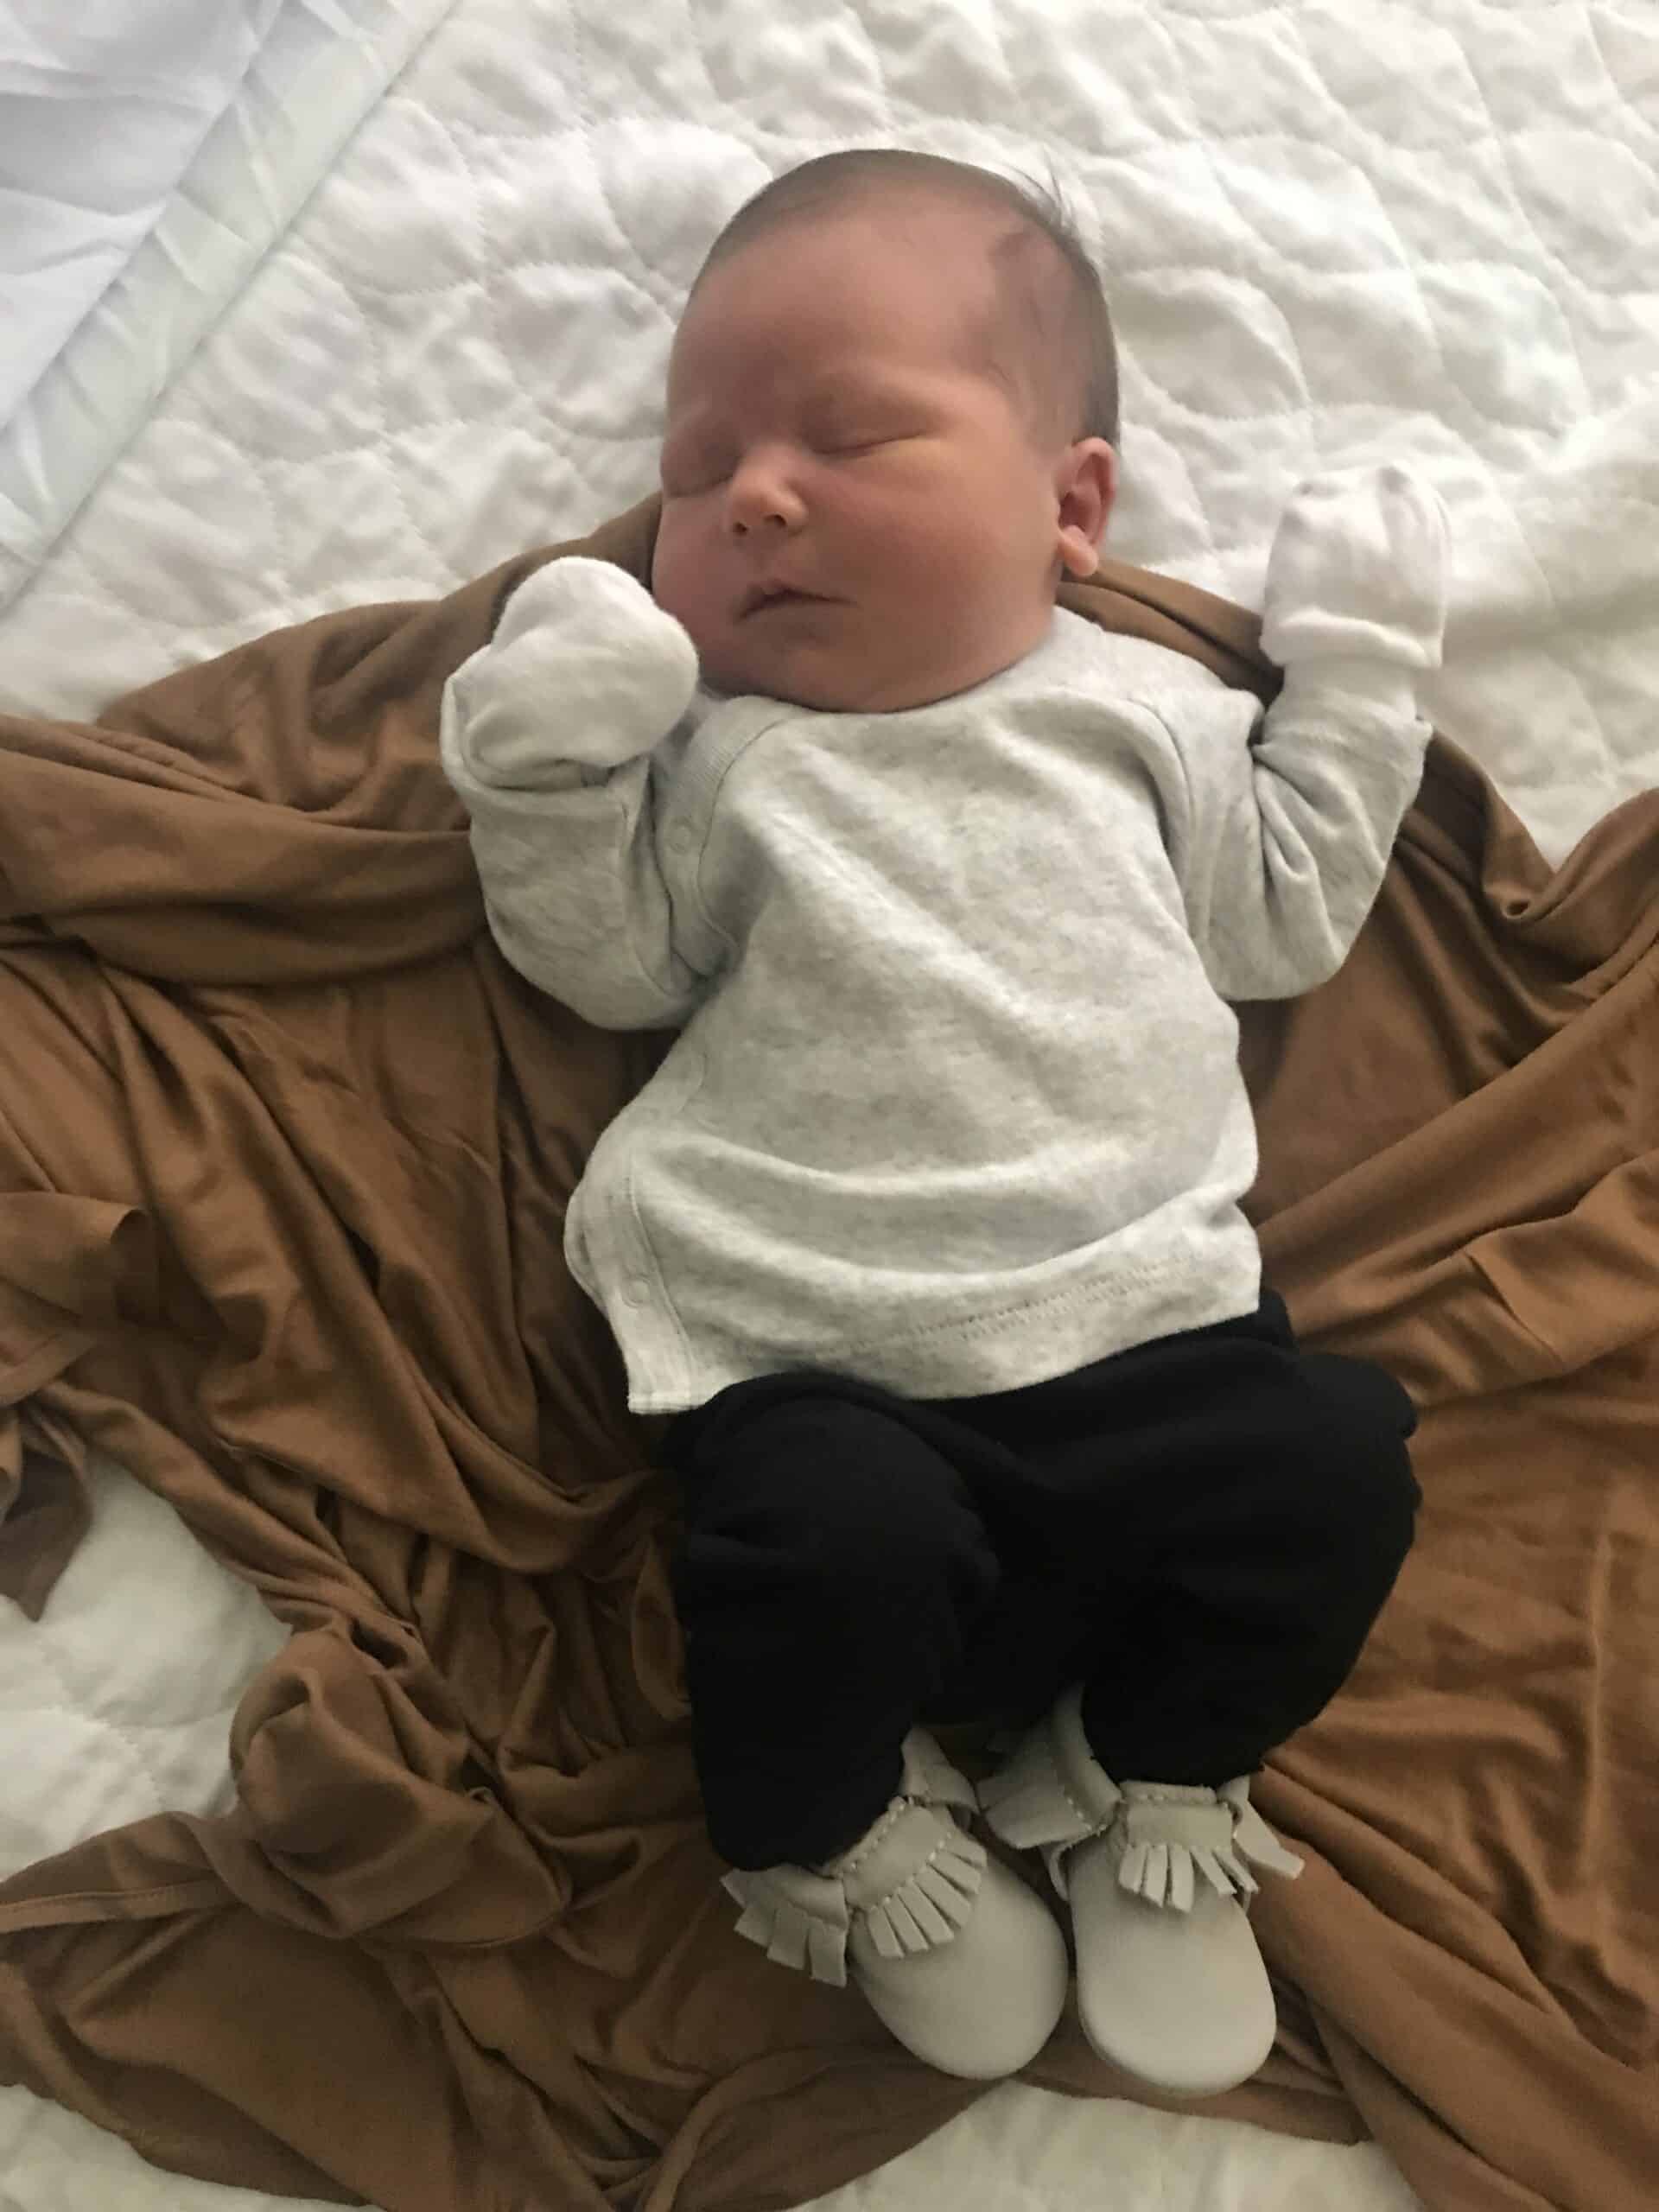
This was right after my 4th with a whirlwind c-section. I had my blanket that is linked.
A light weight robe can be nice – again optional but I did really like that when I showered after having my babies. I ALWAYS suggest that moms take a shower, wash and dry and fix their hair and do all of that before they go home.
Take a bit of time while tests are being run and the baby is being checked out to just take care of you, but keep in mind that it might be painful and you might be slow moving so having a robe for ease after is sometimes better.
Another item I brought after each baby was a belly binder of sorts. I never used a technical one for postpartum but just basically Spanx! Now keep in mind if you are having a scheduled c-section that will be given to you, so don’t worry about buying one.
Boppy pillow is especially helpful for siblings to hold baby
Last, is to bring something to wear home. I normally wear leggings, a tank and either an open sweater (BUT NOT IN THE SUMMER) or a kimono. I like to have something covering my lumpy pad-butt in leggings, but by no means think its a fashion show.
Go comfortable, and understand you will likely have barely lost any weight when you leave. Just have something you feel comfortable wearing home. (Sometimes due to the IV fluids I leave the hospital feeling puffier and bigger than when I arrived….which never feels great, but its a reality!)
Shop a Few Ideas
Electronics:
You want to have your phone chargers of course. Other than that, I think bringing a laptop or iPad for watching tv shows is nice, and I always bring my nice camera and charger! Another fun optional item that we may bring this time is our daughters Polaroid camera and film to take some fun pictures.
Shop a Few Ideas
Toiletries:
Bring anything toiletry wise that you would bring on a 2 day trip. I bring all my hair stuff because honestly you will have some down time with the baby getting tested and checked in the nursery. It is really nice to get fully showered and ready one time with help from the nurses watching the baby before you’re home and on your own.
The packing list will have this broken down better incase you want a full breakdown!
As a side piece of advice, one thing I always do when I am prepping my hospital bag is buy extra of almost all makeup. I know that sounds excessive, but I love that when I get back from having the baby I have a backup of all my favorites for those newborn days.
One thing to make sure you have is CHAPSTICK – your lips can get really dry in the hospital.
To see all my makeup and beauty product favorites check out this page.
Shop a Few Ideas
Other Somewhat Necessary Items:
A blanket from home can be really nice while you’re there, and I personally think you should bring your boppy (or other similar) pillow. I also always bring my babies baby book to get a second set of footprints done right in the book.
For my favorite blankets I always buy Saranoni. Seriously, I feel like I am a blanket hoarder, and they are the BEST.
Shop a Few Ideas
For the Baby:
I pack my bag, then a separate diaper bag for the baby when I come to the hospital. Typically I do some kind of bag for me then load the diaper bag up for the baby.
Understand that 99% of this is ALL OPTIONAL. They will have everything you NEED for the baby. That said, I always bring at least 1 swaddle blanket, 2 outfits, and a hat or headband.
Depending on the going home outfit sometimes that includes shoes and such, but I suggest 2 outfits for heading home is because with Jack we did just 1 and he pooped all over it before we even left haha! So start the backup packing life.
(as a side note – no its not in your bag, but I will also remind you that you need baby’s carseat to leave the hospital)
Shop a Few Ideas
Optional:
Some other fun optional items include: Anything for announcing the name, and doing fun photos. I am doing this adorable banner from Glitter party co and SO EXCITED ABOUT IT. (don’t forget a roll of tape if you go this route). I also am doing the name bow below.
Like I said above, the baby book is optional, but I personally think such a great way to track those first days. This time around I went with this one and it is my favorite baby book of the 4 I have so far!
Shop a Few Ideas
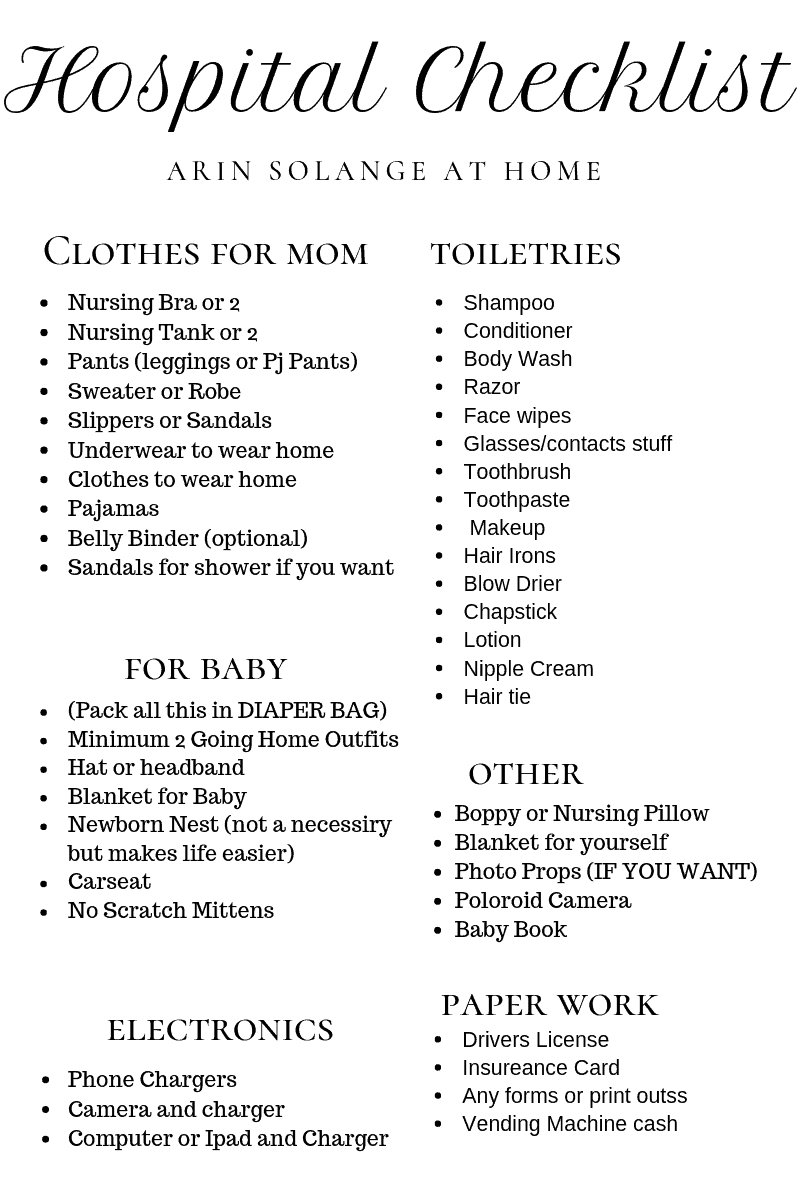
PRINTABLE HOSPITAL BAG CHECKLIST
The hospital bag checklist below can be printed and set aside for you to use when it comes time to pack!
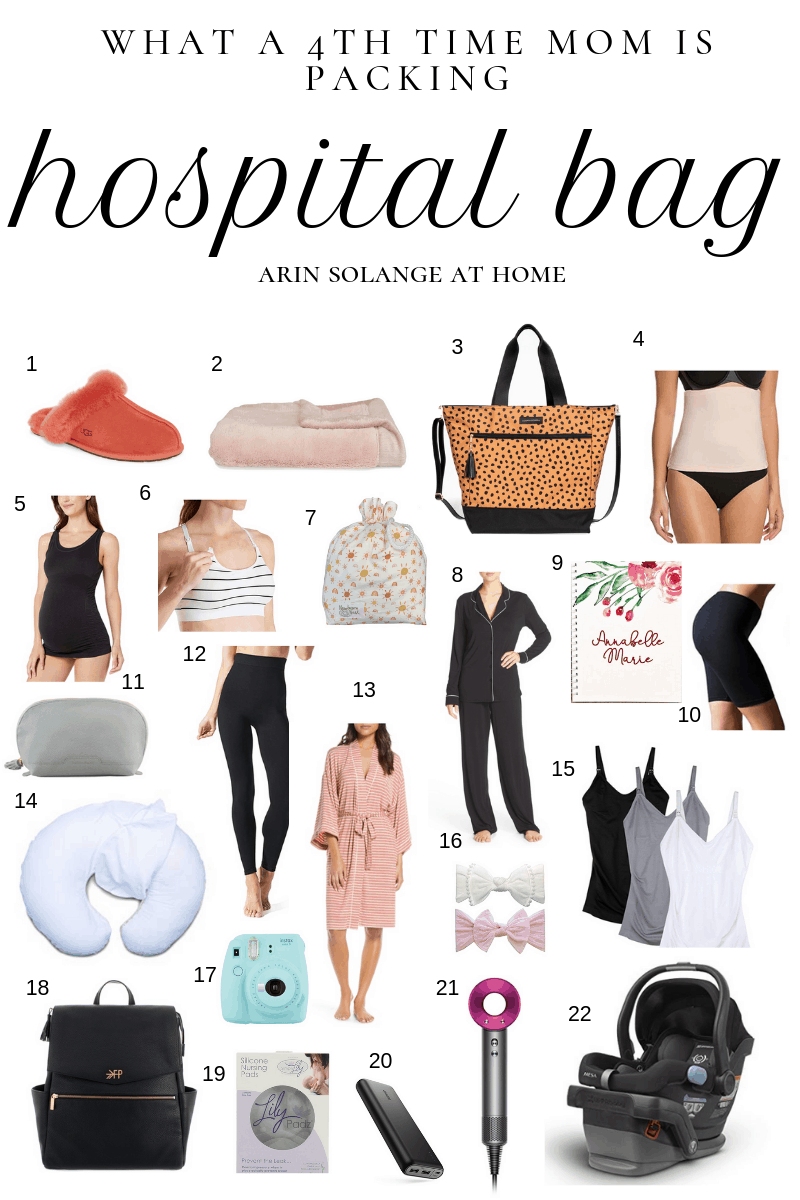
And because I know that sometimes what we really want is just to click and pack – so below is what went in my bag, as well as the bag itself for baby number 4. This is my true round up of what moms really need in their diaper bag.
Slippers – I packed my Ugg slip on slippers and loved them.
Blanket – these are by far my favorite blankets ever – the best blankets!
Bag – I have two of these bags and stand behind them being the best bags for all things – I use them all the time to load up with stuff for my kids to go places – so it is a bag that will serve you well after.
Belly Binder type spanx – I feel like it is worth noting that this is not to ‘get skinny’ – I just personally liked the feeling of being more sucked in because the loose belly feeling was hard for me.
Nursing Tank – this was by far my favorite tank with Goldie and it can be worn pregnant too.
Nursing Bras – I bought this three pack and they were SO COMFORTABLE. Hands down the best nursing bras I have ever tried.
Pajamas – these are the best ever! Honestly these are my favorite pajamas for nursing and even just in general!
Baby book – I love having a baby book. I always bring it so I can get foot prints!
These are my favorite shorts for under dresses but were great under night gowns and such too! They help keep things felt sucked and tucked but also keep you cool. I wore them a lot under dressses for the postpartum time too.
Tank Tops – these are the best 3 pack of tanks for nursing.
These headbands are one size fits all – they are the best the whole first year and fit newborns which I can’t say is true for a lot of headbands.
Camera – we brought our kids camera to the hospital and it was so fun to capture some special pictures!
Diaper bag – I have been using this diaper bag since my 3rd. I swear to you I have tried them all and it is the BEST bag. I have a full review of it here if reading more about the bag would be helpful!
Lily Pad Breast Pads – These breast pads are seriously the best ever. I have used them with all 4 kids and they are great. You just wash them each night.
External charger – this was one thing that I swear was the best thing to pack with my last baby. Sometime there isn’t a plugin very convenient so I brought this external charger fully charged and it changed my phone the entire time I was at the hospital. It was especially helpful with my 4th when I had a c-section because when my husband was gone I could still charge my phone.
Dyson hair dryer – I know this is a splurge, but this has been my fav item for years. That said I stand behind packing your blow drier if having a good one helps. IF NOT don’t pack one – your hospital probably has one!
Carseat – we splurged and went with this carseat with Goldie and it was the best, but either way make sure you bring the carseat you have for baby.
Hopefully this helps you with what moms really need in their hospital bag, and gives you fun ideas of what to pack. Like I said in the first paragraph, never stress this because the hospital will provide you with anything you forget!!
Once baby is here be sure to check out this tab to see everything I loved month by month with baby #4!
This was truly a round up of what moms really need in their hospital bag, and hopefully having a printable hospital bag checklist will be helpful in your packing and last weeks of pregnancy. If you have any questions leave me a comment below or feel free to DM me on Instagram (@arinsolange).
Talk about a long overdue post. But also in some ways a post that never HAD to be written. I have gone back and forth on how much to talk about Jack. How much to talk about the struggles we’ve had and the journey we have been on as parents.
I have struggled with how to share his story, and our story in a mutually beneficial way. How to protect him, but also be vulnerable and open.
My Sweet Boy Jack
3.5 years ago I decided to start a journey in blogging. A journey to share our lives and to share all the projects and DIYs I was doing. 3.5 years ago I had no idea that hundreds of thousands of you would read these posts monthly and so many of you would join in on our lives.
With that has come some struggles.
I am a very open book. But that is 99% of the time filled with positivity and sharing the strengths of my kids. However that is such a small part of our story and I never want to portray a perfect life that isn’t our reality .
My hope is with this post I can explain a bit more of what our lives as parents have looked like, and where the struggles and triumphs have been.
I remember when Jack was maybe 1.5/2 near the beginning of this journey I followed a mom on Instagram who wrote a blog post. It is forever a blog post that is stamped in my brain. Her words were beautiful, but more so I knew I was her.
That in a few years I would be in her shoes, and it gave me hope that I desperately needed at that time.
The pain and the isolation that have come with parenting Jack aren’t new. I know if you follow me on Instagram and tuned in this week you might think these struggles are new, but that is far from the truth. But also – you may be my friend in real life and have no idea.
I have gotten great at hiding this struggle and pain. For Jack and myself. .
I THRIVE ON POSITIVITY. So now am trying to find a way to interweave that with the realness that is sometimes hurt. But also with the positivity that is being Jack’s mom.
Because – if you read only one portion in this blog post read this. Jack is the light of my life. Every hard moment that has come with raising him has come with 100 moments of pure joy. I wouldn’t trade him or the life I have raising him for anything EVER!
We had Jack at 23. I had one friend with a child at the time, and was pretty much blind in the parenting game. By my 25th birthday things got hard. I was worried about his language.
I was already pregnant with Avé and if I could explain to you the pain 18 months – 2.5 ish were in raising him, I am not sure I could put it in words.
I became secluded as a mom, and in reality that has become much of how parenthood has remained for Sam and I. If you have a child that struggles you may know what I am talking about. It is isolating – you avoid situations to protect your child and to protect you.
We have closed doors on friendships, or come across as the parents that don’t seem to want to come – but really it was because we were in a silent struggle. It has made Sam and I stronger, but I would be lying if I said it was easier.
Even the the women I consider my closest friends in the world only know to some degree how deep this pain has been. Because I have gotten SO GOOD at protecting him above all.
And sometimes that has meant at the degree of putting on a brave face on the hardest days.
So here we are – Jack is nearly 8. Things sometimes feel easier and sometimes feel harder. The decisions seem bigger. But my hindsight is bigger.
My confidence in raising him has grown and I have learned to sleep through the night instead of letting fear keep me awake for weeks on end.
My biggest fears with Jack were that he would never be attached to me. That I wouldn’t know he would love me. That he wouldn’t say mama. I waited over 2 years to hear my first baby say mama. If I could pull 24 year old Arin aside and tell her what Jack looks like now I know she would smile and sleep.
Every. Single Day. He tells me ” I love you more than anything else in the entire world.” with a huge hug.
He loves me. He loves God. He loves his family. He has joy beyond measure in the things he loves. So those are the thing that matter.
But because I can only hope I can help another sweet mama that can’t sleep tonight, I want to share a bit more about Jack below. The good and the bad. The real Jack.
So, I would like you to REALLY meet Jack
He loves what he loves. He loves what he knows well. He is very very smart on certain things like animals. He knows everything about animals.
If you meet him you will likely think he is just like every other 7 year old boy.
His language has caught up well but sometimes he still struggles.
Riding a bike is really hard for him. . But riding a scooter isn’t. So in true Jack form he rides the scooter instead and chooses not to let him bother him.
Jack is very easily distracted. He trys to focus and sometimes does well but sometimes the sounds and the distractions of the world are bigger for him.
Jack can struggle with normal social lines. Just a little too silly. Just a little too full of stats on something and not noticing he is ‘annoying’ someone.
His feelings are BIG. Our favorite thing from Jack is that we hear ‘best day ever’ weekly from him. But on the other side sometimes things will lead to a ‘worse day ever’ more often than we would like.
Eye contact is hard. He will do it because it is polite. But sometimes it comes with extra blinking because it’s hard.
You might think he doesn’t want to follow the rules. Sometimes that is true because he is a little boy. Sometimes tho the rules are truly hard for him to remember or understand.
Being outside – digging in the dirt, swimming, running. Those things are fun, but they help him too. Moving his body helps him to focus.
When the tears start – they last longer than you might think they should. He feels things bigger than most which if you ask those close to him will be an asset someday.
When things don’t go as he planned he gets extra frustrated. It is hard for him, and sometimes he reacts in a way that puts eyes on him. That is even harder for him. Learning to handle those big feelings are really hard.
He loves zoo books, drawing, making comic books, coloring, anything his siblings want to watch on tv, and hunting bugs.
His memory is insane
He is the best car rider we have
He rarely complains about a situation but if he doesn’t like it he will REALLY complain.
Self control is hard.
His family is VERY important to him. The people he loves he loves big. We as his parents say the world would be downright perfect if everyone loved people in the way he loves Goldie.
Fine motor skills and language have been hard for him.
Gross motor skills once he masters them are areas he excels.
He has worked hard daily to be brave.
He has worked hard to hit every one of those ‘wins’ and they haven’t come easily.
All in all – I hope that paints a better picture of that sweet boy. If I could explain to you the light he is, I would have written this so much more eloquently but I can’t. Jack will no doubt go far in life.
That is something I worried so deeply about years ago.
But sometimes finding the path for him and the path that means for our family doesn’t come easily. Sometimes making sure he will go far AND BE HAPPY is my biggest fear.
Navigating how to protect him. What does that look like. Where is that line. That is hard as a mom.
But from the bottom of our hearts – we are thankful for you. We are thankful for this tiny army of people who I know love him well. Who I know pray for him, and for us.
Who I know can see him for who he is. I say all the time. I want to find a tribe who loves Jack and loves him and us for who he is in his entirety, not despite his hardships.
So if you are a young mom reading this with a child you are struggling with – know that it gets better. Somehow our love for them grows daily.
Somehow God paints a picture every day that shows they were given to us for a reason. It doesn’t always seem easier. It definitely rarely seems fair, but you got this!
And to all the moms – remember we need to be there for each other. We need to be there for each others kids. This world is hard. Be the light in the world that is maybe needed in someones life and you don’t even realize it.