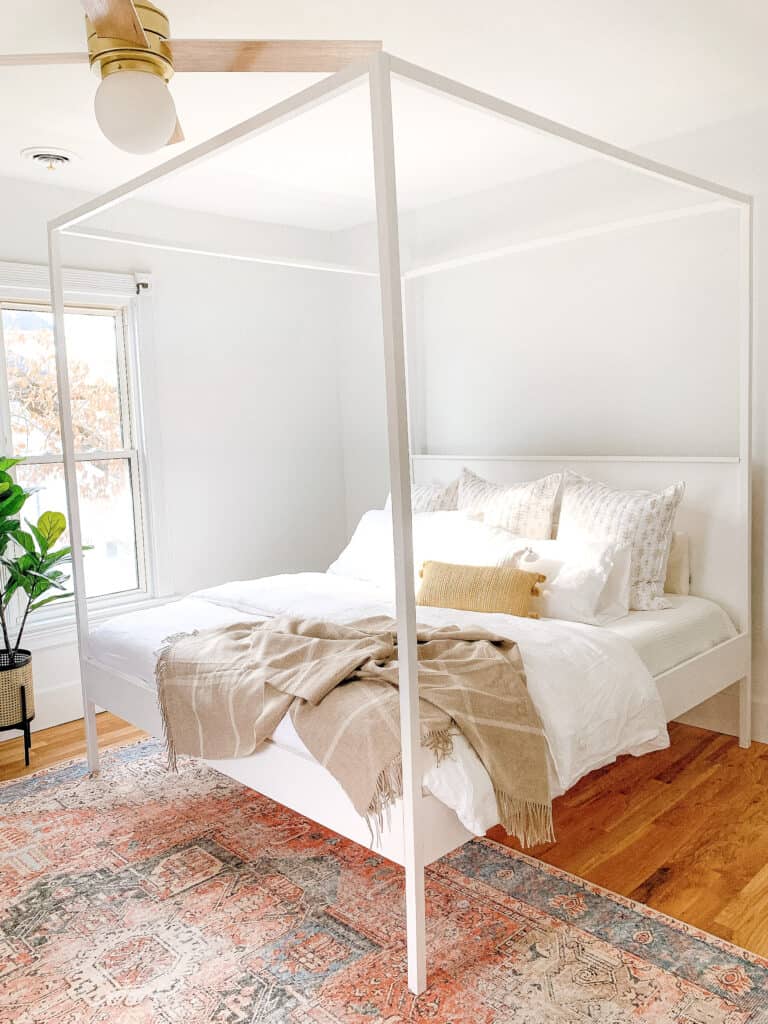
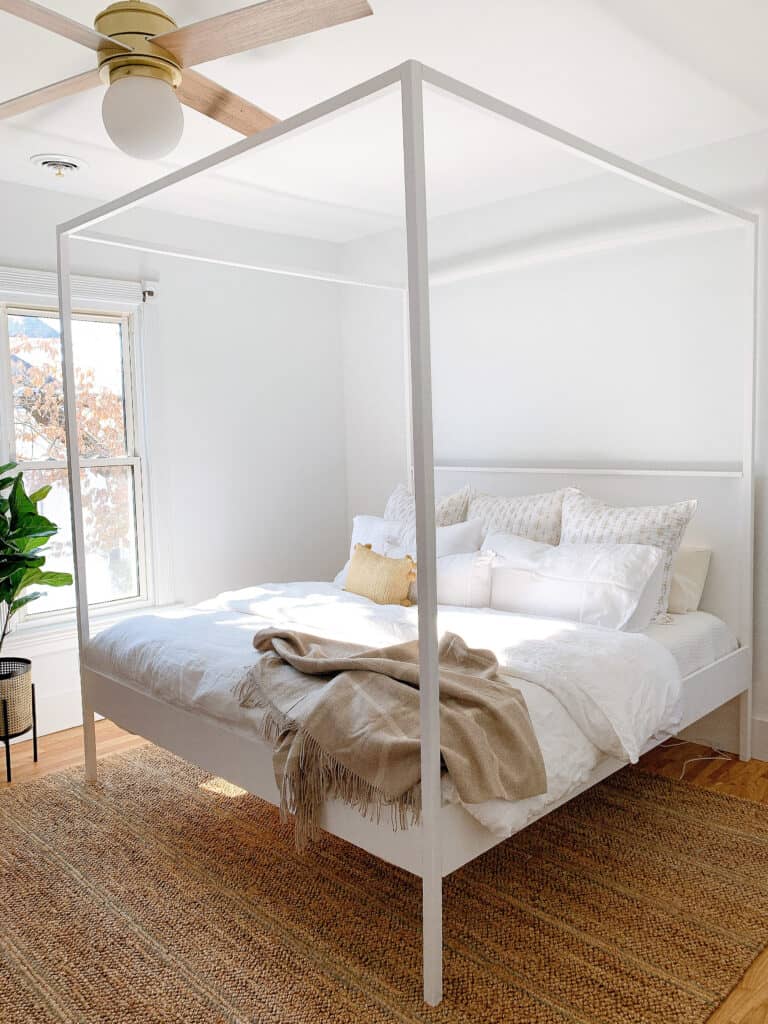
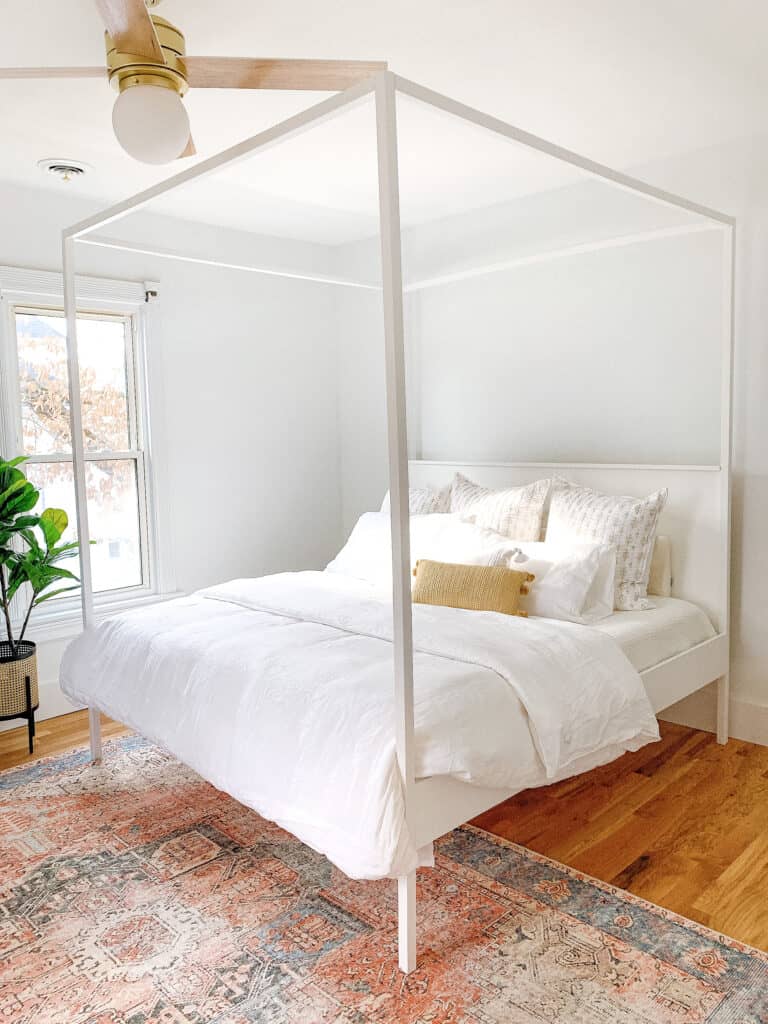
New year, new projects!! I am SO excited to share a how Sam and I made our DIY King Canopy Bed frame this past week. The end results exceeded what I expected, and I am beyond in love with the bed!
This post contains affiliate links. We are not professionals but simply a couple that loves to DIY – Use this tutorial at your own risk. We personally used these exact steps for our bed and are loving the outcome but you are making a bed at your own risk.
King Canopy Bed Frame
So those of you who don’t know, my husband and I moved into a new home a month ago. And when I say new – I mean new to us. We purchased an 1860’s historic home and have been on a mission to bring it back to its full glory.
While much of the renovations are done, we are still hanging out with mostly empty rooms – so that means it was time to get to some projects. We had been sleeping with our mattress on the floor for almost 2 months and I was OVER it.
I really wanted a king canopy bed frame. I had a few that I had been eying and was deciding what to pull the trigger on – HOWEVER we had a couple of things holding us back.
A: Price – I have expensive taste, and was really struggling with the idea of spending the amount asked for the beds I loved. and
B: Having a 150 year old home comes with some amazing perks – but also comes with some tricky things. One of those tricky aspects is the tall skinny stairs. It makes getting furniture to the upper level very tricky.
Our big concern with a king bed was the headboard. I just didn’t know how that would ever fit up those steps. SO….What did that lead us to? A DIY.
My Inspiration King Canopy Beds
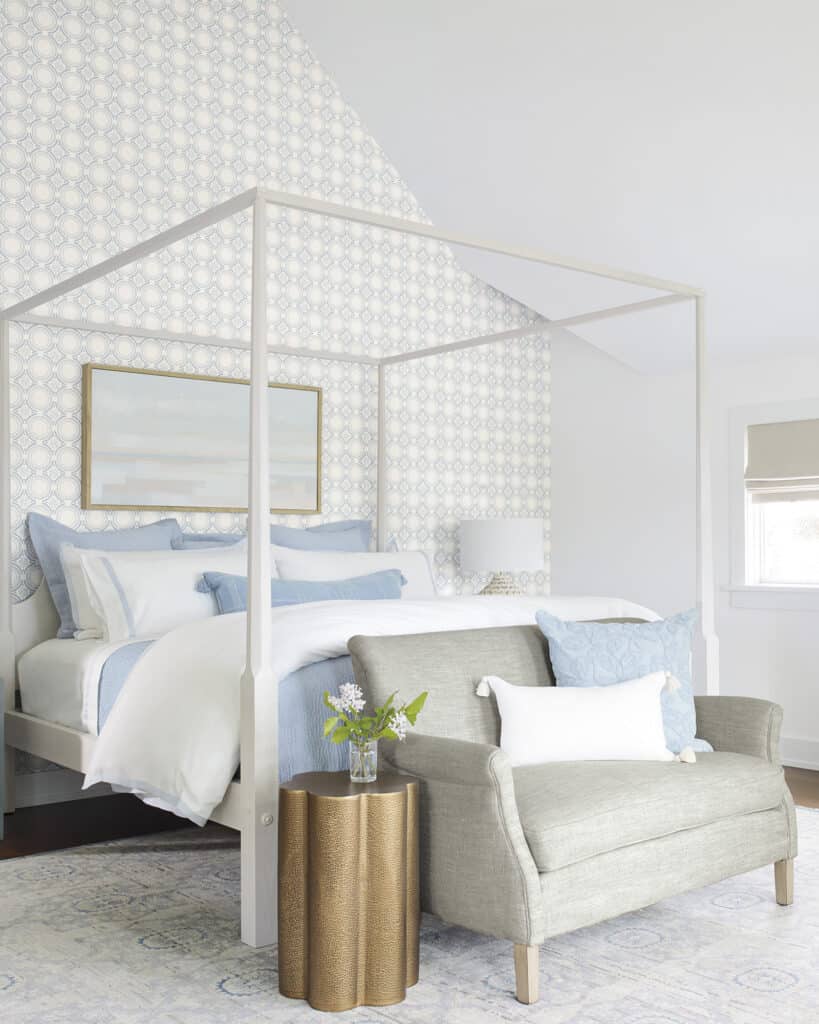
I was in love with the two beds below – both are beyond gorgeous and would be amazing in any home.
First up was the below bed (picture is from their site). It is gorgeous and ended up being our main inspiration.
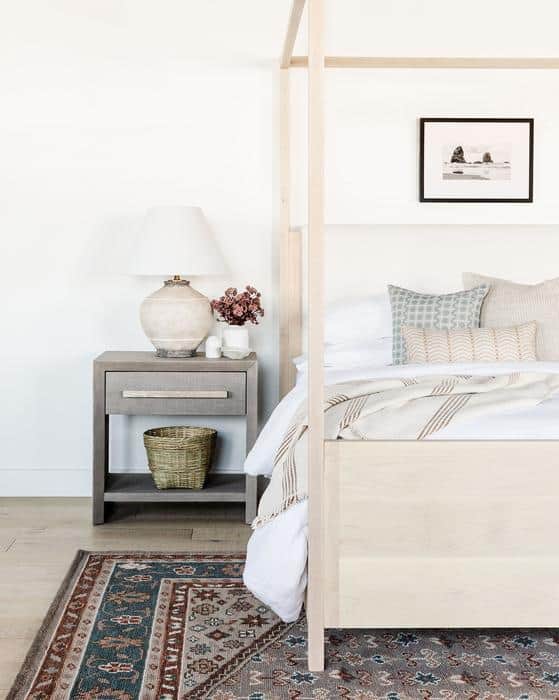
Next up is this gorgeous bed (photo from their site) – I loved the mix of the natural wood and headboard. I will talk more about the choice I nearly made for our headboard based on this gorgeous bed.
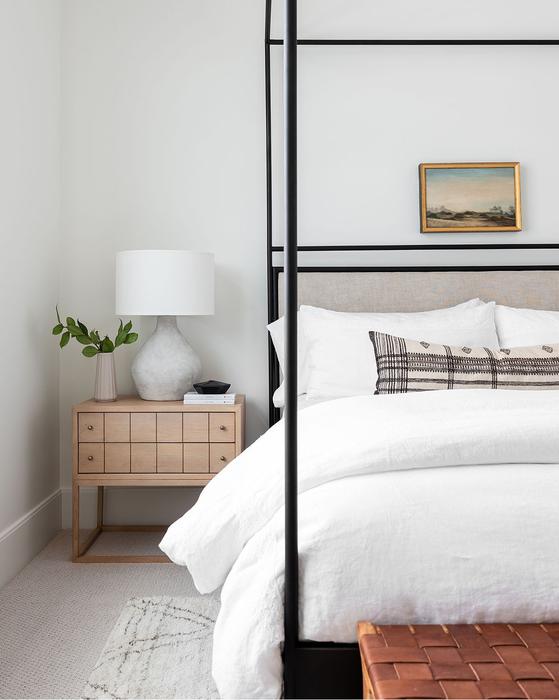
Lastly, This black bed (photo from their website) was a huge favorite. I went back and forth on white or black for our bed because I loved the black on this.
All three of these beds are in the $3000 range for a king sized bed. I can honestly say they are all probably of the highest quality and from brands that do not make anything poorly. That said – No matter the price I don’t think they would have made it up those stairs.
Lets Make a DIY King Canopy Bed Frame
One thing to note – there are a few minor things we did in photos (like used a diff board in one spot) that we would have done differently should we have done it again. We also would have added pocket holes at a different time. We learn while making these tutorials.
Clearly I ended up deciding to go with a DIY, and you guys we are beyond in love with this bed! Below I will give you the tutorial as well as a printable shopping list for your lumber to help while you’re shopping.
I am going to talk you through a couple different options for the headboard, as well as talk about lumber choices you can and should make pending your end results.
For another option for a king bed check out the tutorial by honey built home. We used portions of her tutorial for our own, however found that some aspects didn’t work for us. Her end results however were beautiful!
Some Things to Consider Before You Get Started
Okay there are two big questions you need to answer before you start shopping.
- Are you planning to paint this, or stain/leave natural? If you plan to leave this natural or stain make sure when you are purchasing lumber you go with a natural wood color and grain that you like, and you need to stick with ONE KIND OF WOOD ( Ie – Oak, Pine, Cedar). This is very important. If you are planning to paint that is not of importance.
- Do you plan to follow my exact tutorial, or do a padded fabric headboard? Both are options – and I will go through some options on that below – but if you plan to cover the headboard plywood or something inexpensive is an option.
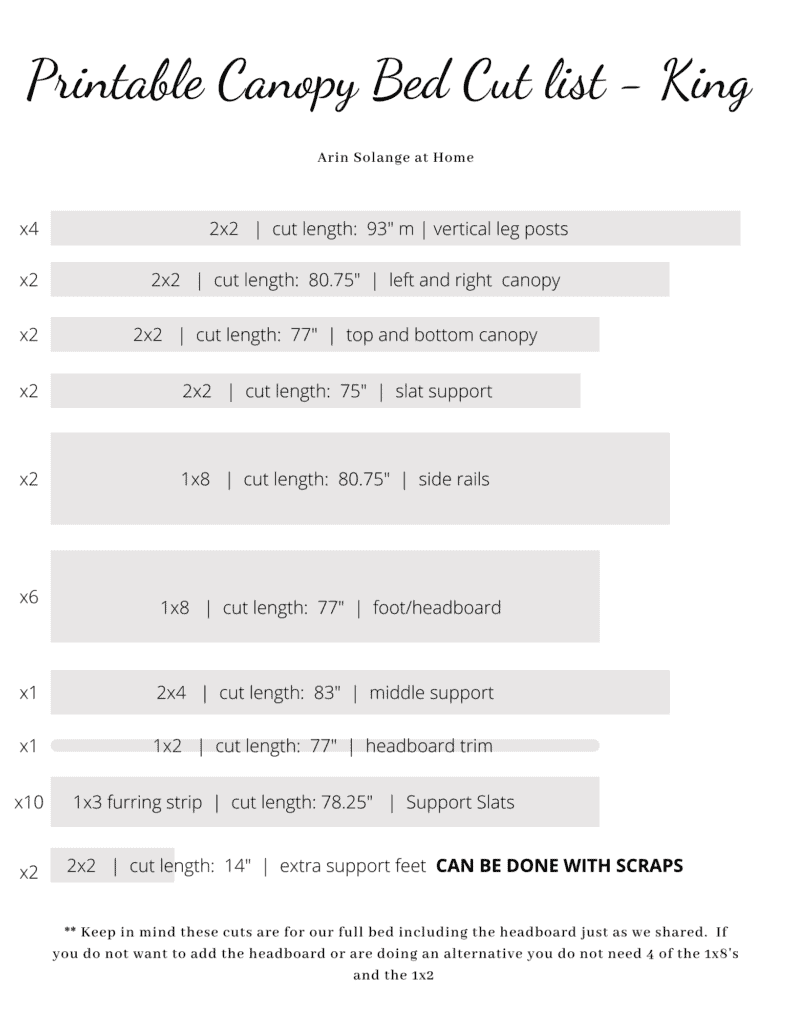
Lumber and Cuts
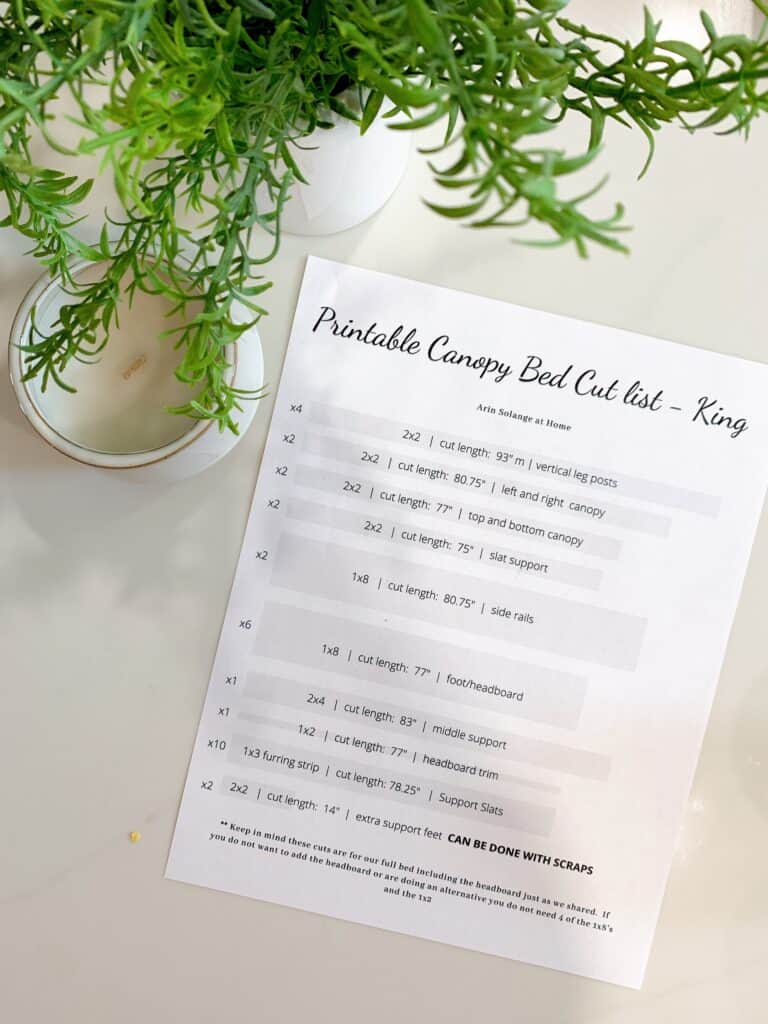
I will list out tools below, but below is your lumber and cut list. You can simply use it on here, or you can print it out for use at the store and while cutting.
Tools and Supplies
Aside from your lumber below is a list of the supplies we used. You can pay extra at your hardware store to have your lumber cut to length so if you do not own these tools bring in your cut list for them to cut them.
- Kreg Jig – VERY Important on this project
- Miter Saw – this is ours. It is very affordable and we love it.
- A table saw would be helpful for the 1×8 boards but is not totally necessary. You can use your miter saw.
- Electric Sander
- Drill
- 1 inch Kreg screws
- 1 1/4 inch Kreg Screws
- 2 1/4 inch screws (just a few)
- Wood Glue
- Paint – we used Behr Satin paint in Bit of Sugar (quart is plenty)
- Measuring Tape
- Level
- Tiny bit of wood filler
- Optional – nail gun ( hammer and nails needed if not)
- Foam Paint rollers and brushes
Creating your DIY King Canopy Bed Frame
Below are the steps for creating your king canopy bed frame. If you have any questions be sure to leave me a comment below or DM me on Instagram and I will do my best to answer.
I also have a video where I walk you through the bed when it is finished. Hopefully seeing it up close helps answer some questions you may have.
1 – Cut all boards to length. You can wait on the 1×3 and 2×4 if you want. Those boards won’t need to be sanded, and incase your measurements are off at all on the other boards it will be helpful to make sure that length is perfect for your project.
2 – Sand everything EXCEPT 2 – 2x2s, 1x3s and the 2×4
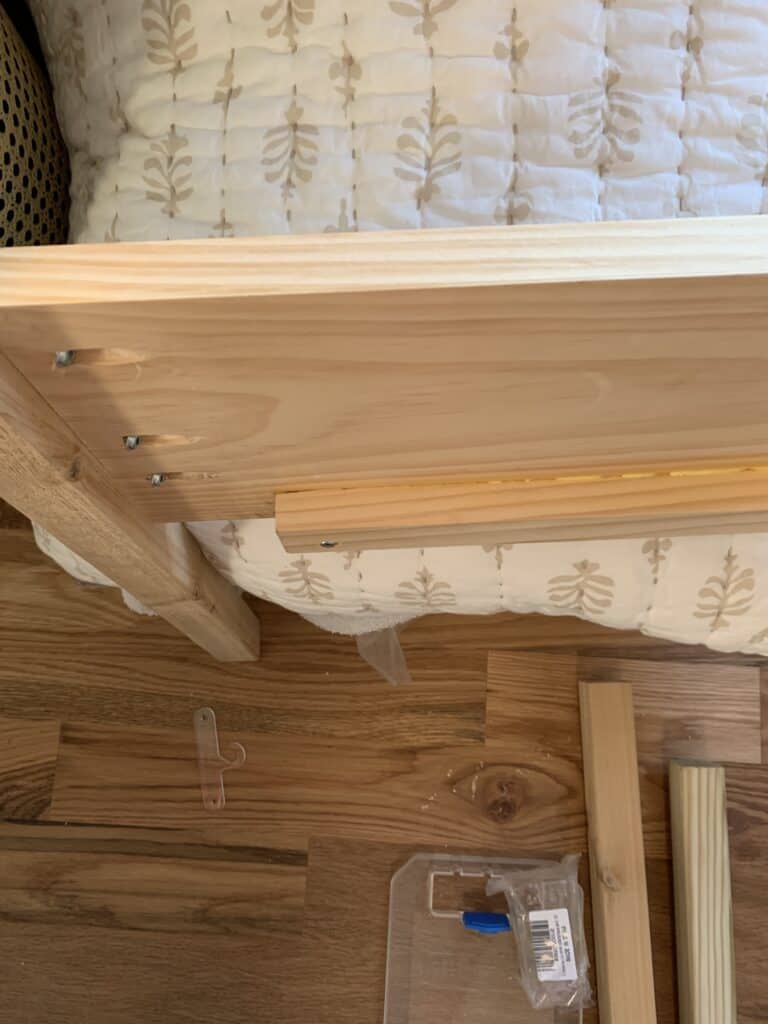
3 – Adding your pocket holes to your 1×8 boards. You want to take your 1×8 boards and add SEVERAL pocket holes on the inside (i.e. just do it on the same surface on both ends). The reason for doing more than necessary will make sense later.
4 – Attaching your slat supports to the side rails. Take your 1×3 side rails and your 2×2 slat supports (these are the 2 2×2’s that you didn’t have to sand).
You are going to use wood glue and 2 and 1×4 inch screws to attach the 2×2 to the bottom of your 1×8. The 2×2 should run flush with the bottom edge of your 1×8. MAKE SURE THIS IS ON THE SAME SIDE OF THE BOARD AS YOUR POCKET HOLES.
5. Now it is time to attach the side rails (your longest 1x8s) to the foot legs (your longest 2x2s).
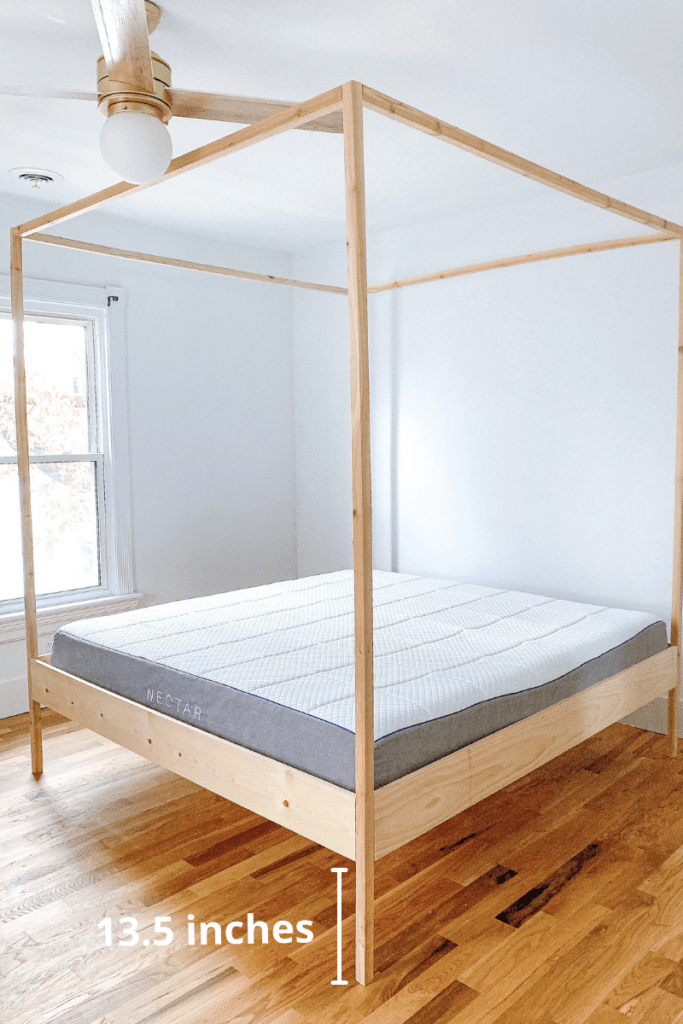
Decide how far off the floor you want your bed to sit. This is all preference, but we personally didn’t want our bed too low to the ground so the BOTTOM of our side rails sits 13.5 inches off the ground. (see image below for reference)
Line your 1×8 up to the 2×2 and using 1 1/4 inch kreg screws attach your boards with 3 screws. You likely have 5 or 6 pocket holes – and this is on purpose. When you attach your foot board you want to drill in in spots that don’t line up so your screws don’t run into each other, so don’t over do it.
Do this on both ends so you have a huge H – then repeat and do the same thing with the other side. If you are confused with how we lined up the 2×2 and the 1×8 be sure to reference the video.
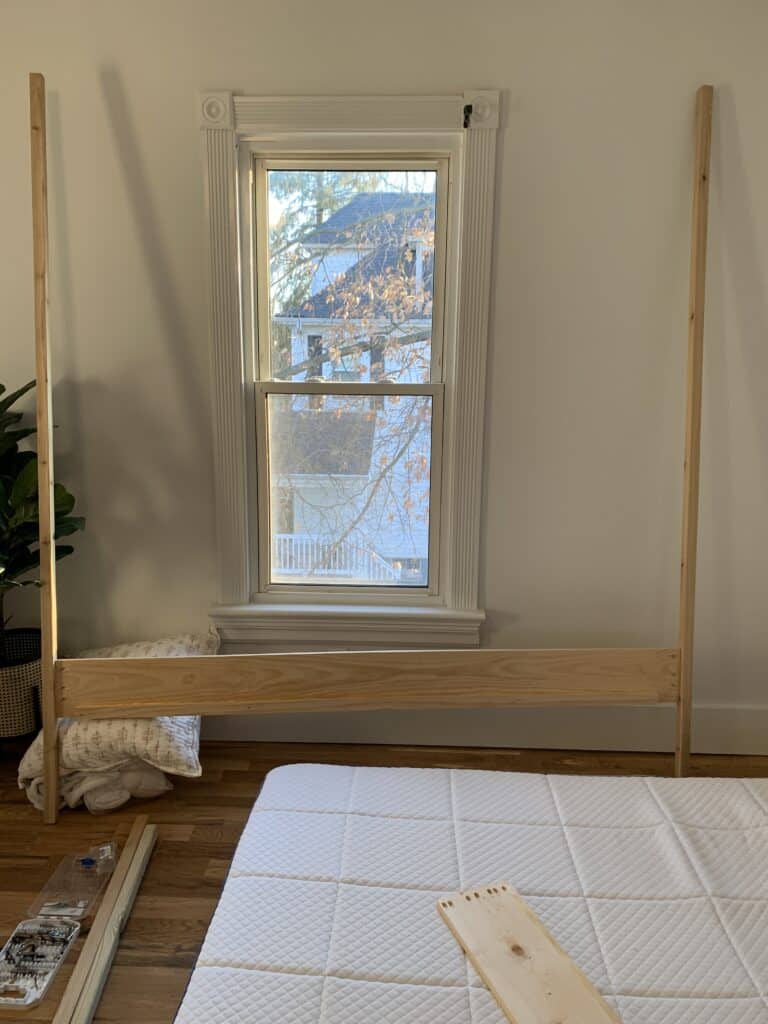
6 – Attaching your foot board/headboard. Now this part is a bit tricky and honestly takes two people for balance. You are going to lay your 1×8 foot board on the floor as well as your 2×2 that is attached to your side board. Have someone else balance the large ‘H’ in the air and attach both your footboard and headboard piece.
Now you should have all but the one side attached. Again with help from someone to balance things flip things and attach the leg supports to the last 1×8 side support. When this is done you will have what you see below.
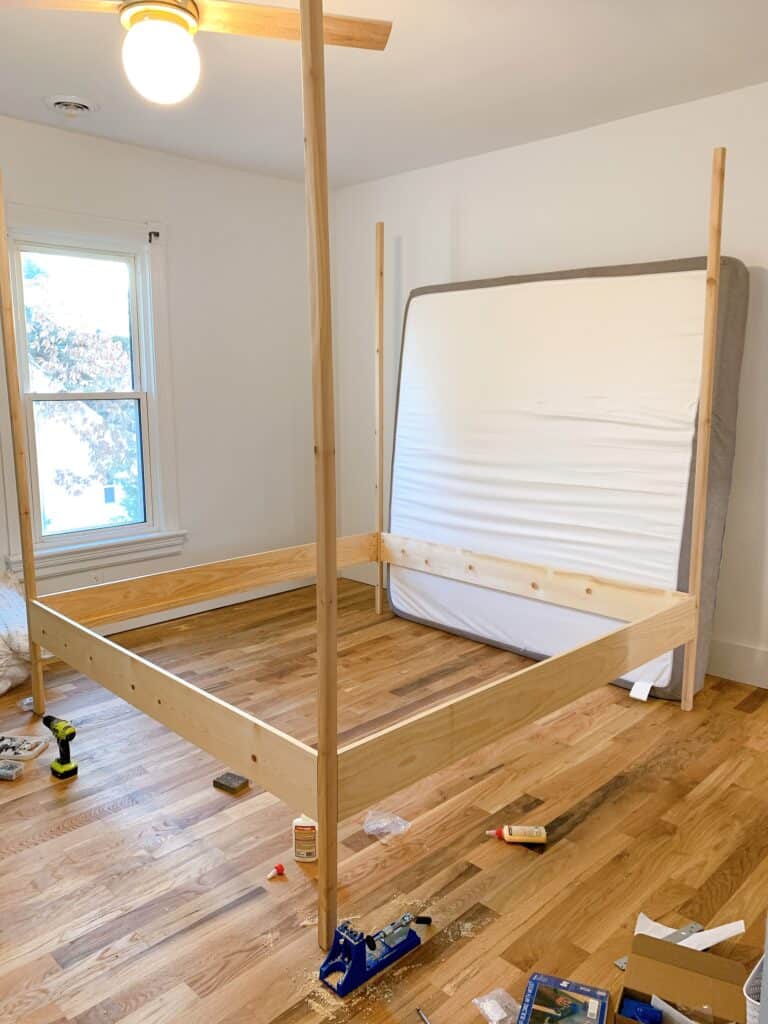
7 – Now that you have a bed that looks like it has goal posts on both ends and you need to add the canopy pieces. You need to take your 4 additional 2×2 boards and add a pocket on each end. (pick one surface and add one pocket hole to each end of each board)
Now with someone helping to balance your board on the other end, get up on a ladder and place the side of your 2×2 with the pocket hole on the top side where it will never be seen. Using 1 inch Kreg Screws attach the horizontal boards to your verticals to create the canopy.
The next steps do not have to be done before the headboard – BUT I will list them first because the headboard is not something you have to do/you could choose to do a different method.
7. Adding your slats. Cut one slat then test it it out. If it works, cut the other 9 and spread them out evenly along your bed, resting on the 2×2 supports that were added to your side rails.
Screw your slats into place with the 1 1/4 inch screws.
8. Adding the 2×4 support and legs. ** This step will require you to lay under the bed to attach. If you won’t fit, you may want to measure and add this before adding your slats on. This was just our personal method.
Add 2 pocket screw holes on each end of your 2×4. Attach the 2×4 to the headboard and footboard while laying under the bed with 1 inch kreg screws.

9. Adding extra support legs. Pick 2 places towards the middle of the bed ( not in a slat) to place your extra support legs and using a 2.5 inch screws.
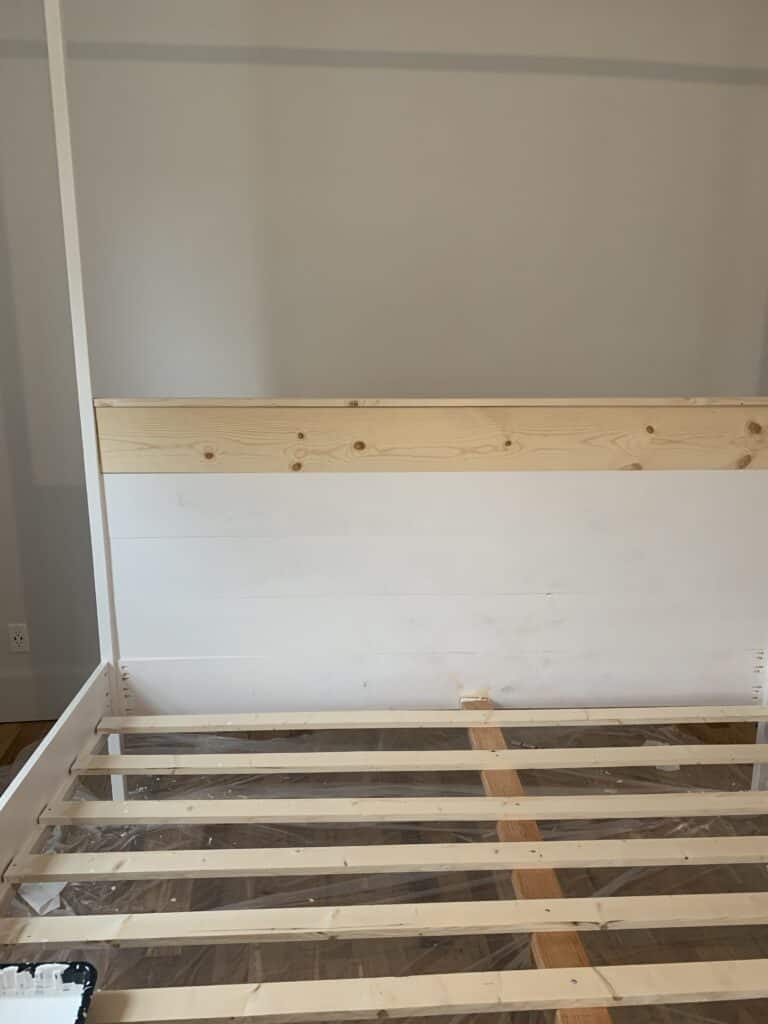
At this point you have a fully functioning bed! You can stop here and paint. Or you can continue on and add our headboard or check out some of the other options for headboards.
Adding a Headboard
I went back and forth when it came to the headboard. Initially I thought I would add something padded to be more like the look of bed #2 from the start of this post.
After we got going on it, I loved the clean and simple look and decided to just stick with all wood and am so happy with the end results. I will walk you through my personal method, but also talk about an alternative you could do in nearly the exact same way.
At this point in the DIY you should have 4 1x8s left and 1 1×2.
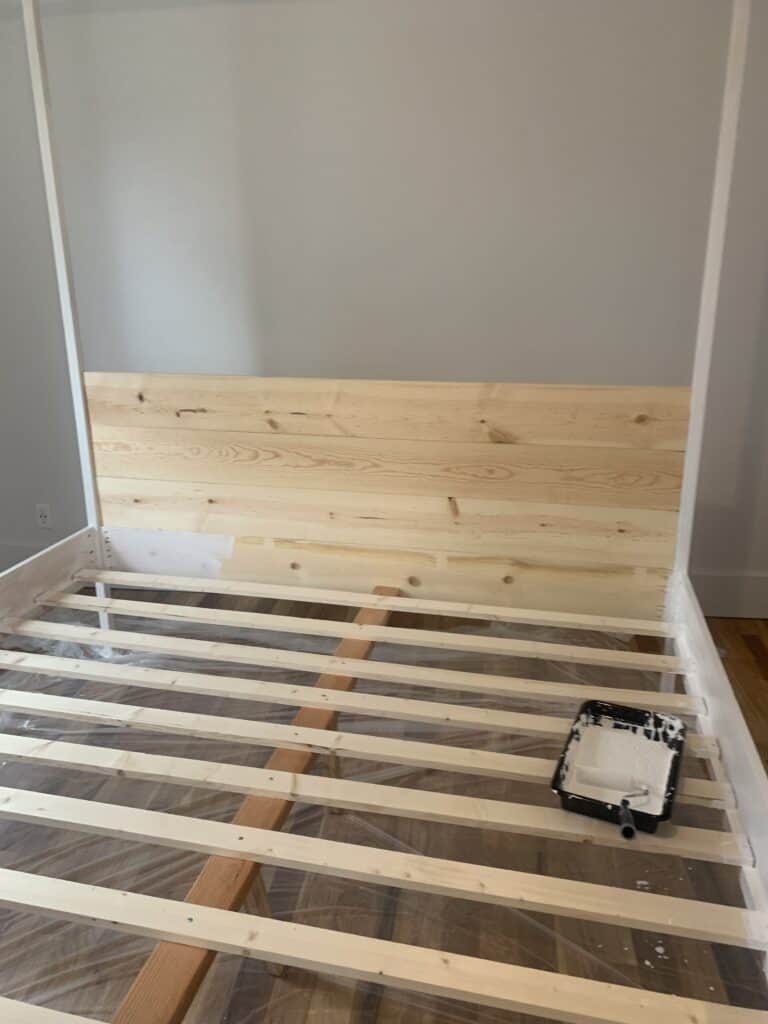
For us added 4 pocket screw holes along each end our 1x8s and 4 pocket holes running along the bottom of the 1×8 as well.
Starting with one board we set it on top of head support board, and carefully lined things up with the back side of the 2×2 support. Using 1 inch pocket screws attach the first board of your headboard into the support. These 4 boards will be ‘pretty’ on the opposite side of the rest of the boards you have done.
Once the board is attached on both ends, use 1 inch pocket screws to attach the bottom of that 1×8 to the top of the other 1×8. Be very careful not to come through the front of your headboard.
Repeat this with all of your 1×8 boards.
The last step is to add some wood glue to the top of your last 1×8 board and attach your 1×2. We personally lined things up in the back so there was an overhang to the front of the bed, but that is personal preference. We then used a nail gun to nail the board in, but you can use a hammer and nails if you don’t have one.
Use a dot of wood filler to fill those spots and sand before painting.
Padded headboard alternative using the same supplies.
If you prefer the look of a padded headboard. Cut your headboard boards 1.2 inch shorter. Take each board individually and wrap in two layers of batting and one layer of fabric.
Use a staple gun and attach at the back – you will then have 4 long skinny padded boards that can be attached in a layered fashion and attached to the headboard using metal ties or brackets and you will have a totally custom look.
Painting the DIY King Canopy Bed
Now you have a completed bed. If you also want to paint your bed, We personally used Behr Satin paint in Bit of Sugar. This was the same color we painted our kitchen cabinets last year and I loved it.
We used a combination of small foam rollers and a paint brush to paint, and most of the bed took 3 coats to get a great finished look. Between coats, take a sanding block if you have one to get a smoother finish.
And that is it! You now have a finished bed. Our bed personally cost us around $300 exactly – which in my opinion is a great cost for our end results.
Other Posts You’ll Love
Ceiling Fans for Bedrooms | DIY Closet Shelves | DIY Kids Table | IKEA Built-ins | Cane Cabinet Hack
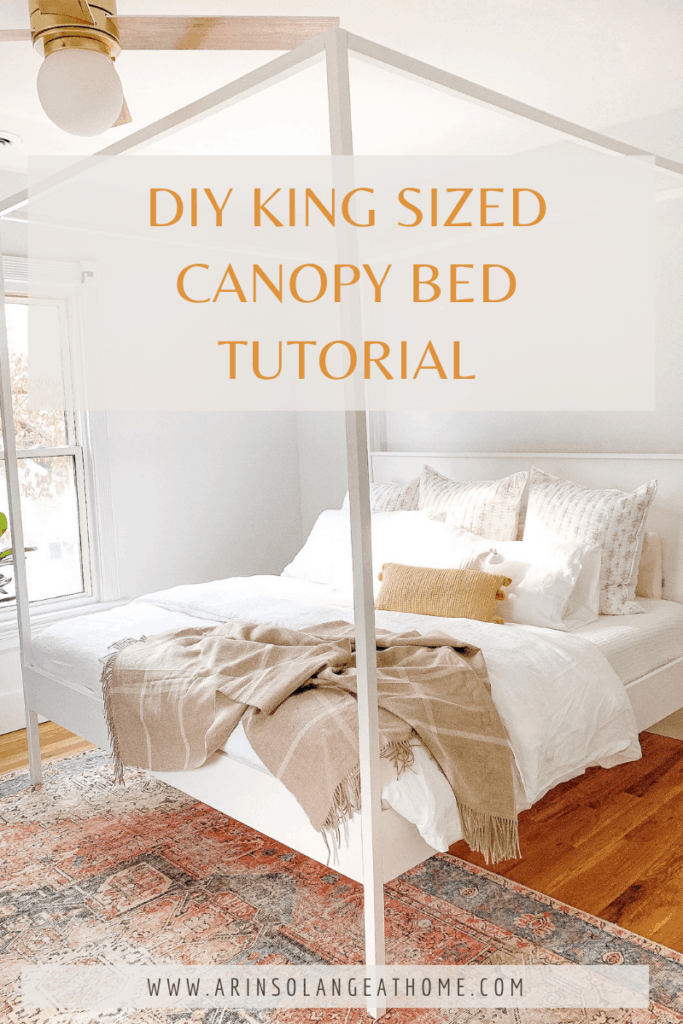
Pin The Photo Below for Later
Hopefully this gave you the perfect plans and inspiration for building your own DIY King Canopy Bed Frame and you feel ready to tackle the project. If you have any questions be sure to leave them below, and don’t forget to follow me on Instagram (@arinsolange) for more inspiration and project this year.
What was the total cost of this project?
Hi Luna,
We payed under $300 – I just didn’t put that in the post because lumber prices continued to rise after that and have since dropped a bit. I would say $300 or less is probably fairly accurate.