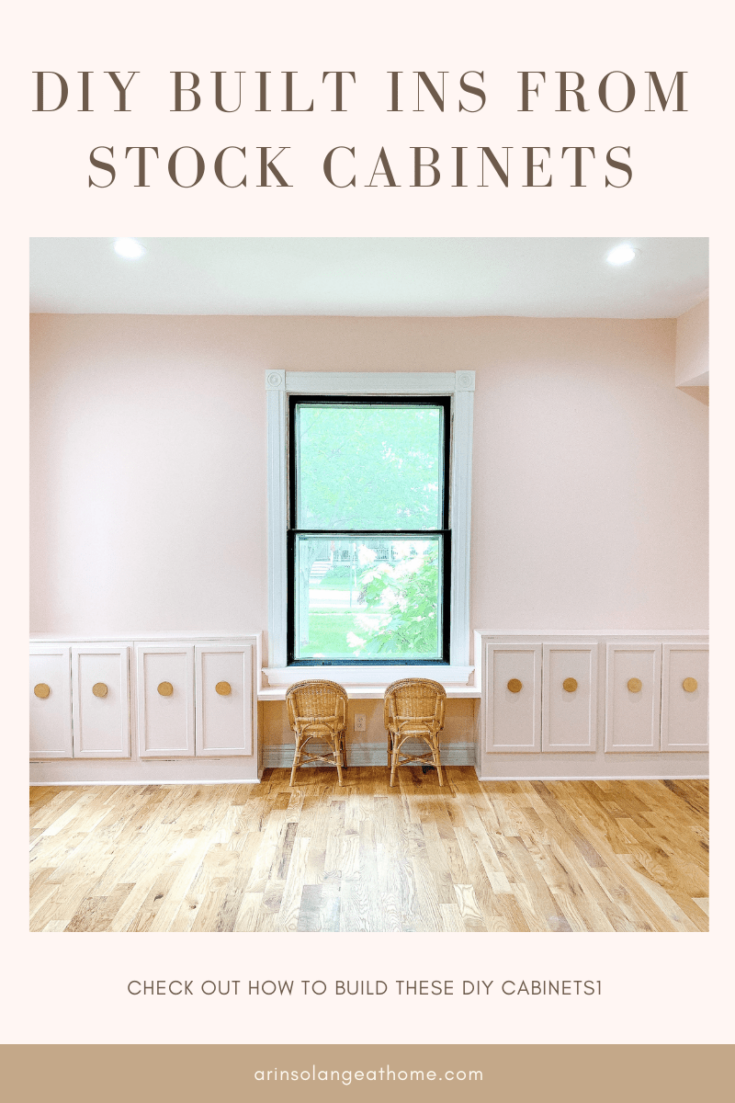
I have been DYING to do this DIY since the moment we moved into our house last fall and I finally convinced Sam on a whim to help me tackle them! We did DIY built in cabinets from stock cabinets and they were start to finish done in just a couple of days – so today I will walk you through doing your own!
This post may contain affiliate links
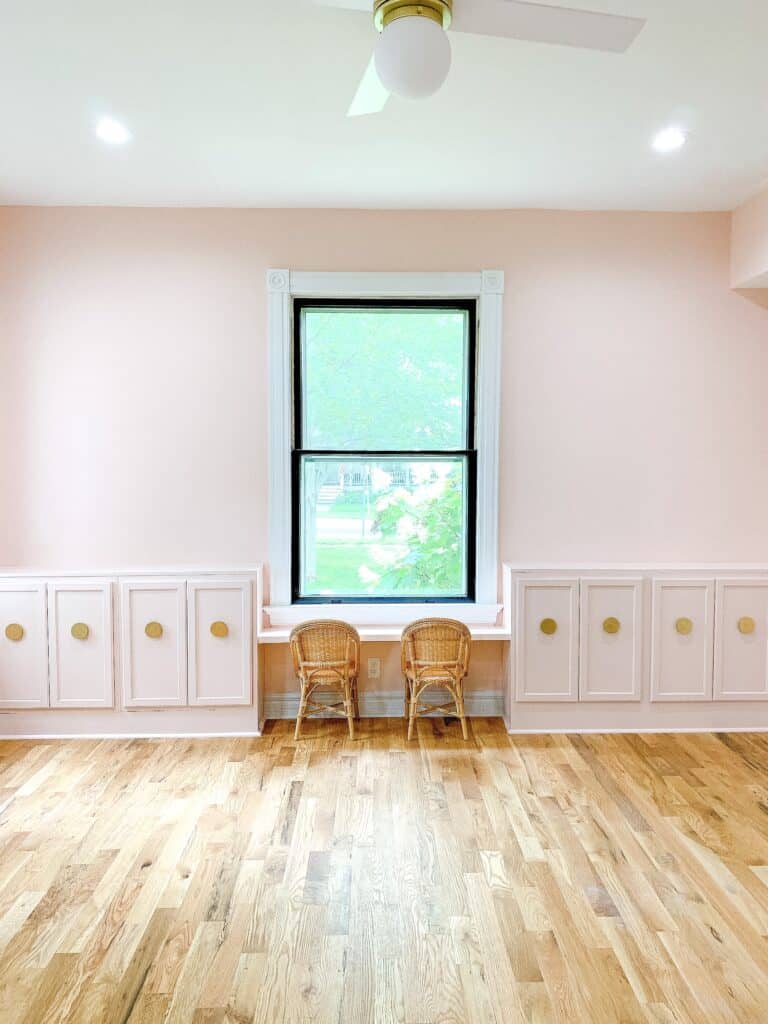
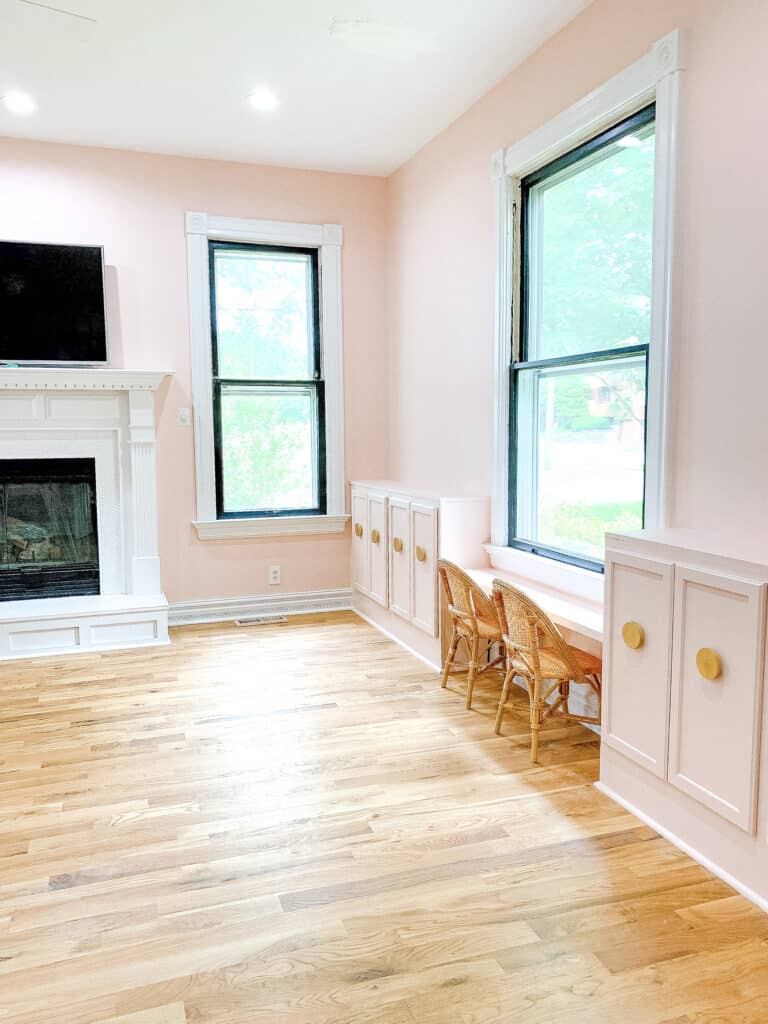
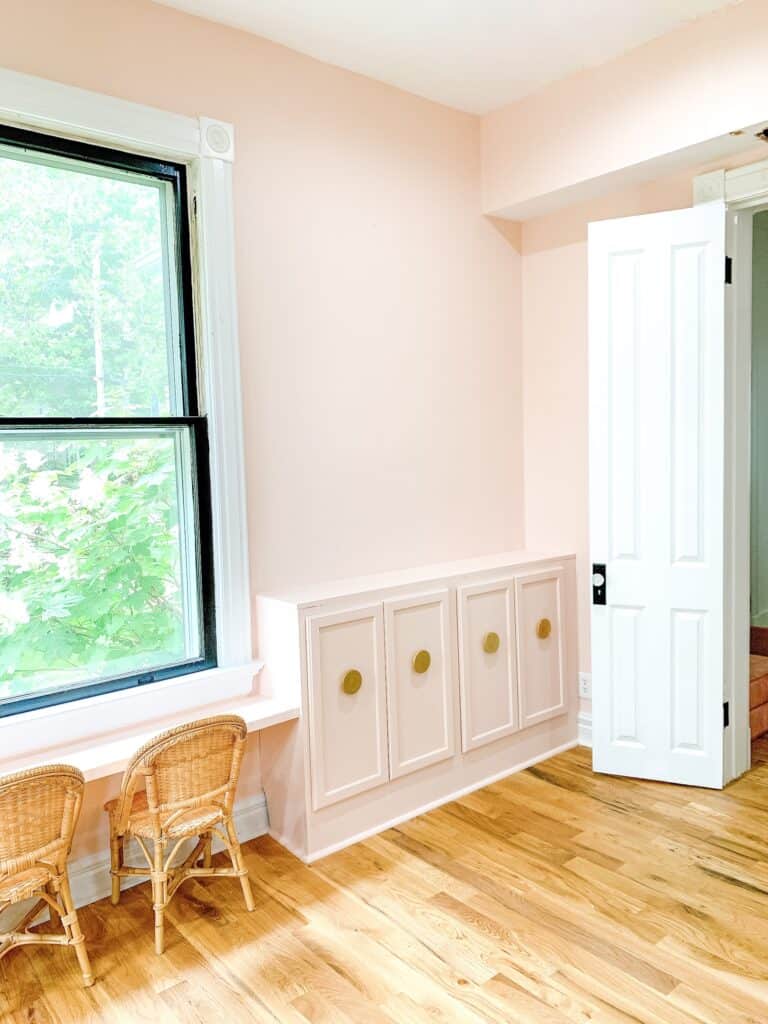
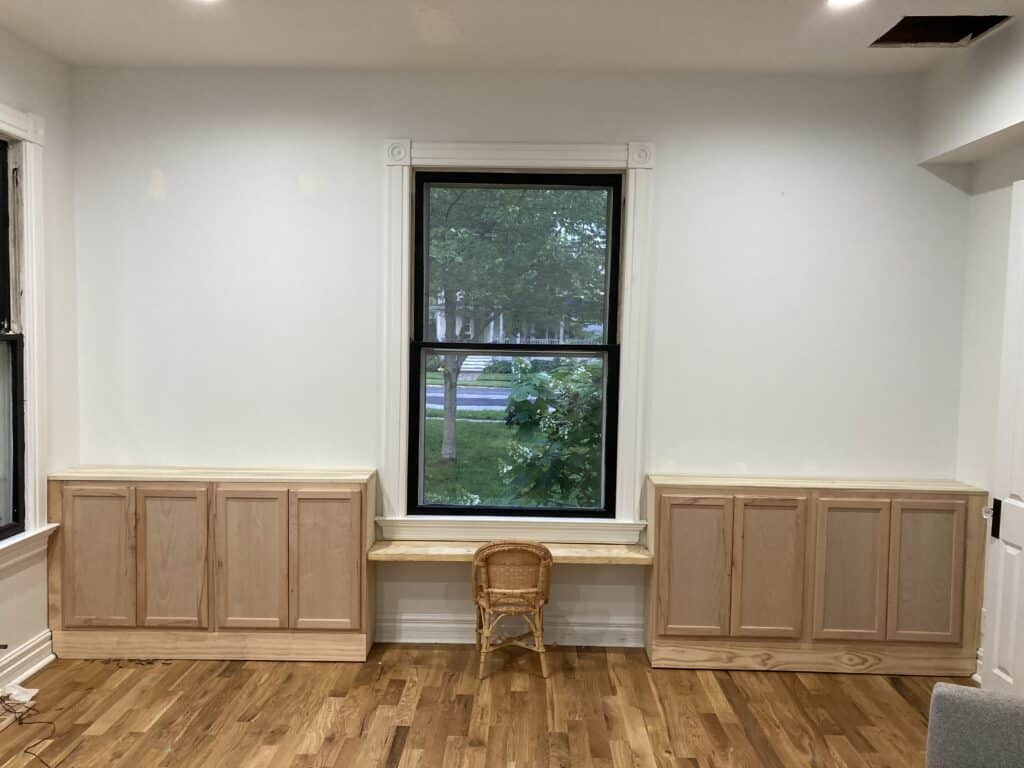
DIY Built in Cabinets
This is not my first rodeo on DIY built ins – in our last house one of my first BIG DIYs was DIY Built in Cabinets from IKEA Billy Bookcases and they remained a favorite project until we moved.
These tutorials are all a bit unique because they have to be modified for your space – but this time I went into the tutorial knowing that which was helpful.
I went back and forth this time on whether to make this an IKEA hack like I have done in the past or not, and ultimately decided to use stock cabinets from the hardware store instead for two reasons.
- IKEA is struggling BIG TIME to keep things in stock – I always aim to create tutorials that will help you in your life, and if you can’t get ahold of the pieces from IKEA it is in no way helpful.
- Not everyone has an IKEA close to them – so I also knew this would be a tutorial that would allow for more people to do it. So you non IKEA people win on this one! (price was nearly identical so that didn’t play a factor).
Why I Wanted Built in Cabinets:
In our last house our kids had a large basement playroom which meant toy storage didn’t have to be amazing because I could forget the playroom existed from time to time.
Fast forward to our current home. We are currently renovating an 1860s home where the basement resembles more of a dungeon, so the kids playroom is on the main floor. That means that I need things to be pretty – because otherwise I will lose my marbles.
The room serves several functions as well with a guest room when guests come, and more of a TV/hangout room for our older kids, so I have been getting creative in in the rooms function so that Goldie and Walker still have ample toys at their level, while they aren’t everywhere.
Level of Difficulty
This is always one of the number one things I am asked on DIYs – especially larger ones. Because lets face it – they are a bit daunting. So lets get that out of the way – as well as coverage of what tools you need so you know if it is going work for you!
Skill Level – Low Intermediate
You will need to be comfortable using a drill, a miter saw, circular saw (or you can pay for this cut at the hardware store) and a sander
DIY Built in Cabinets from Stock Cabinets Tutorial
Now lets get to the tutorial – Total cost for us was roughly $500 but lumber costs change CONSTANTLY so your price will vary.
Also as stated above – these tutorials are all specific to your space – you will HAVE TO measure your openings and may not want to do the little table space like we did – I will walk you through the measuring, but it will likely not be the exact same as mine!
Supply List Cabinets Only:
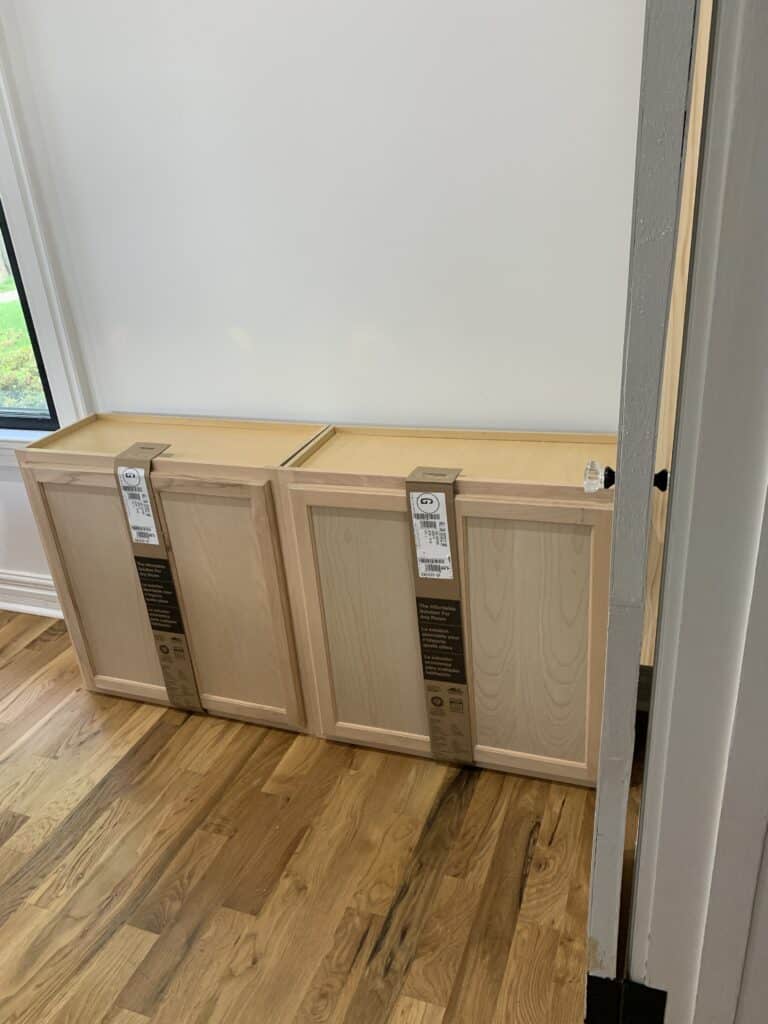
- Upper Cabinets – You want the maximum number of cabinets that will fit butted up to themselves in your space. For us that was 4 sets of these cabinets. Each cabinet measures 30 inches wide.
- Lumber for between the wall and cabinets – for us that was a different piece on each side. On either side of our windows it was 63 and 64 inches. You want a piece of lumber to fit in that space – ours worked well where we could buy the pieces but if not purchase a 1x however wide board and either use your circular saw or have the hardware store cut it into strips to fit.
- Bottom Trim – We personally used 1×6 trim for this – that was because we have VERY tall trim in the house and it looked good to add height. I would say for a traditional house I would use a 1×4. You need enough length to go the full bottom of your cabinets. Your base piece needs to be as tall or taller than your baseboards to keep the rest of this tutorial with no notifications!)
- Quarter Round – optional but was best for us because this is an old house with uneven floors.
- 1×24 poplar for the counter tops – THIS IS IMPORTANT – this only works if the 1×24 is true width of 24 not lumber measurements. Because you will need this cut in half at 12 inches wide each for your counter top to the cabinets. (length needs to cover the cabinets and added space at the ends.
- 2.5 inch Screws
- Wood filler
- Caulk
- Wood Glue
- Paint – mine are satin Sherwin Williams ‘Romance’
Added Supplies if you are Adding the Center Table like we did:
- 2×12 for the length of table top you need
- Brackets – we actually had these on hand and used them and LOVED them. If you don’t want to spend that you can use traditional brackets.
- 1 piece of side pieces for the cabinets
Tools:
- Level
- Drill
- Stud Finder
- Miter Saw
- Circular Saw (if you don’t own one – you can get those cuts done at the hardware store so I wouldn’t stress that!) – If you don’t have a circular saw or a miter saw however, this deal is amazing on the duo!
- Nail gun is very helpful
- Multitool is very helpful!
DIY Built in Cabinets from Stock Cabinets
Watch me create DIY Built in cabinets the easy way - using stock cabinets from the hardware store. Adding Built ins doesn't have to be hard!
Materials
- Cabinets - you will need the maximum number that will fit your space with some space left over.
New Group
How to Create your DIY Built in Cabinets
Alright now lets get to your actual creating of these beauties – I am going to walk you through your measurements and things to keep in mind first then the post hardware store run tutorial.
Measuring your Space/ Things to Consider
If doing ONLY built in cabinets: measure the full length of your wall and divide that by 30. You will need the maximum FULL number that you found.
So if your wall measured 188 inches 188 divided by 30 gives you 6.26 – so you need SIX cabinets. The excess 8 inches will be filled with lumber.
If you are adding the table: It is the same general idea – just measure how many cabinets can fit MINUS what will be tabletop!
Things to consider:
The cabinets are 12 inches deep – windows or doors/ outlets on the walls adjacent that will be affected should be considered.
Height of windows above – if you have to adjust to different cabinets for height do so.
Attaching the Stock Cabinets
First things first – go along your wall and make some marks ABOVE where you will be adding cabinets where the studs are – if you do this all at once you will be able to get your cabinets up quickly.
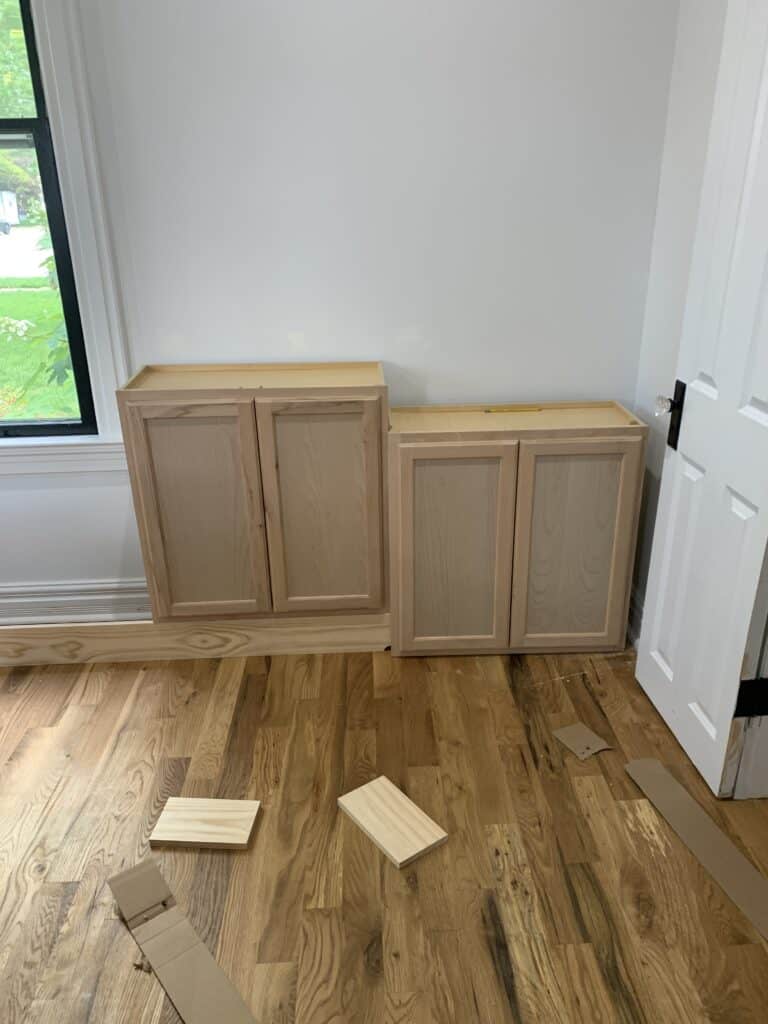
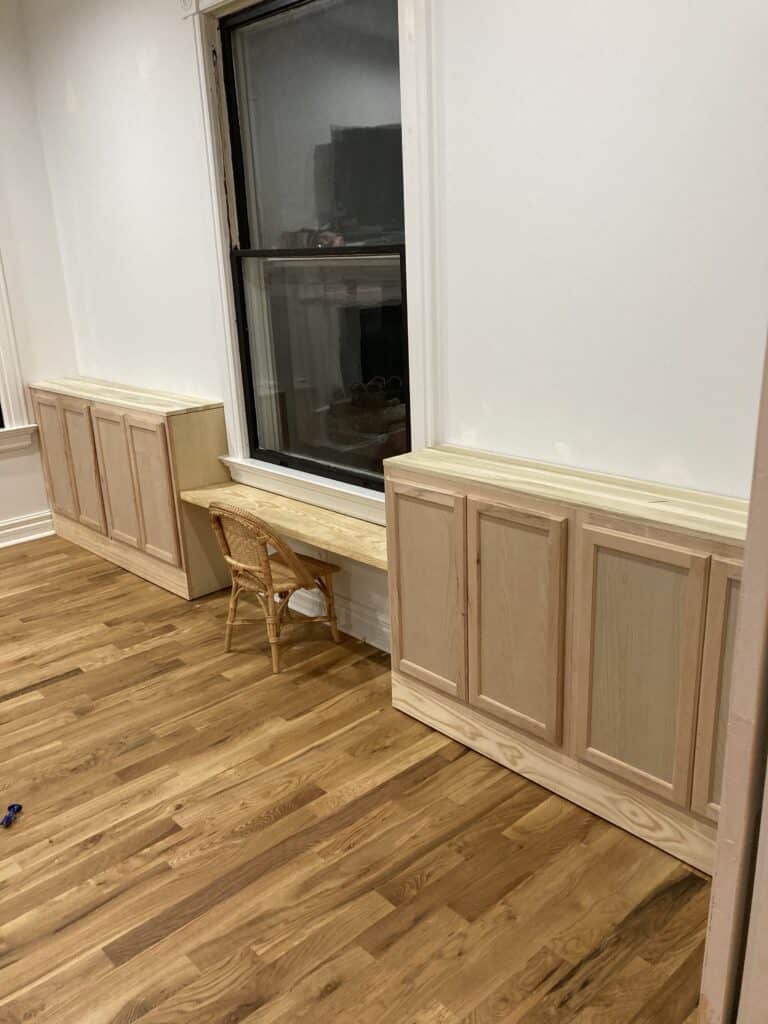
Starting with your center most cabinet (for me that meant one of the cabinets closer to the window) get your cabinet in place on the wall RESTING on your baseboard in the back. Attach it to the wall inside the cabinet with 2.5 inch screws into the studs. You will want to use several screws.
Moving outward from that one continue on doing that – but your cabinets up to each other so they are even in the front and and top and get all cabinets attached to the walls.
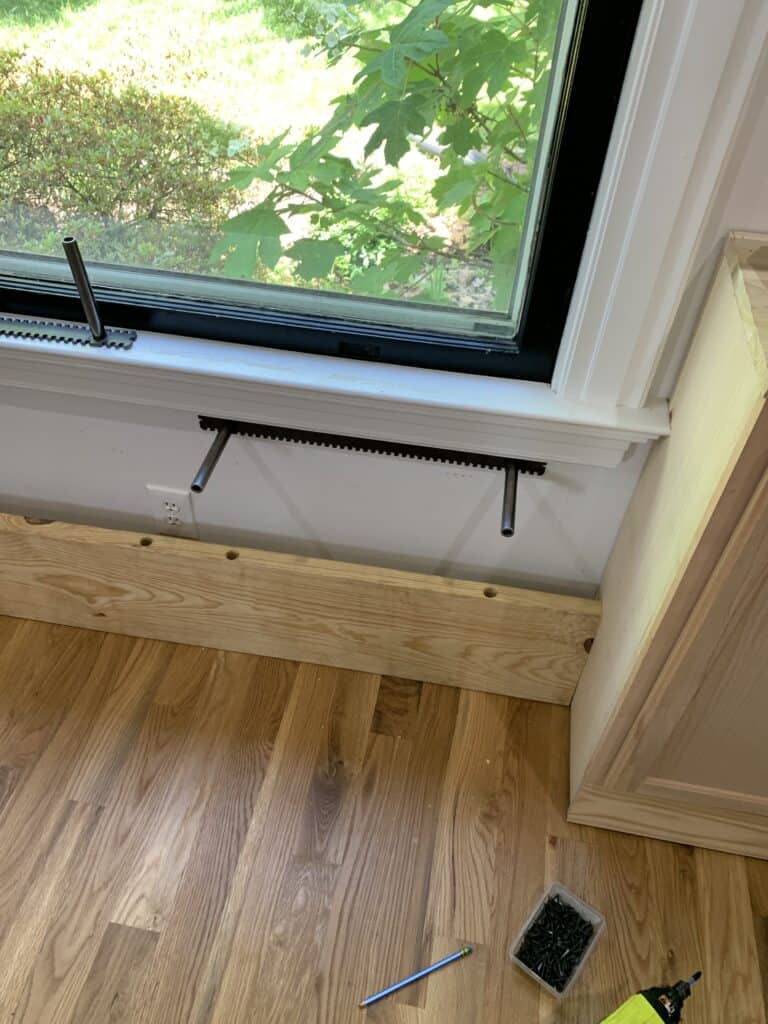
Adding the Trim Work and Top:
Now you are going to start making them look built in. Take your bottom piece of lumber and slide it under the cabinets – The goal is that it’s a tight fit – but if it isn’t your quarter round will hide any gap to the floor.
You will cut this piece to the length needed to go from the end of the cabinets to the baseboard (so under the gap as well). You may need to cut a small notch out for baseboards on the other wall – if you do that is fine – caulk will make it look perfect. You may want to use to your multi-tool to do that cut!
Slide the board in place making sure it is perfectly lined up in both directions and drill in from the inside lip of the cabinets.

If you are doing one long wall of built ins you may need 2 or 3 boards to complete this length. Cut the boards at their meeting place on a bias (or diagonal) for a more optimal seam.
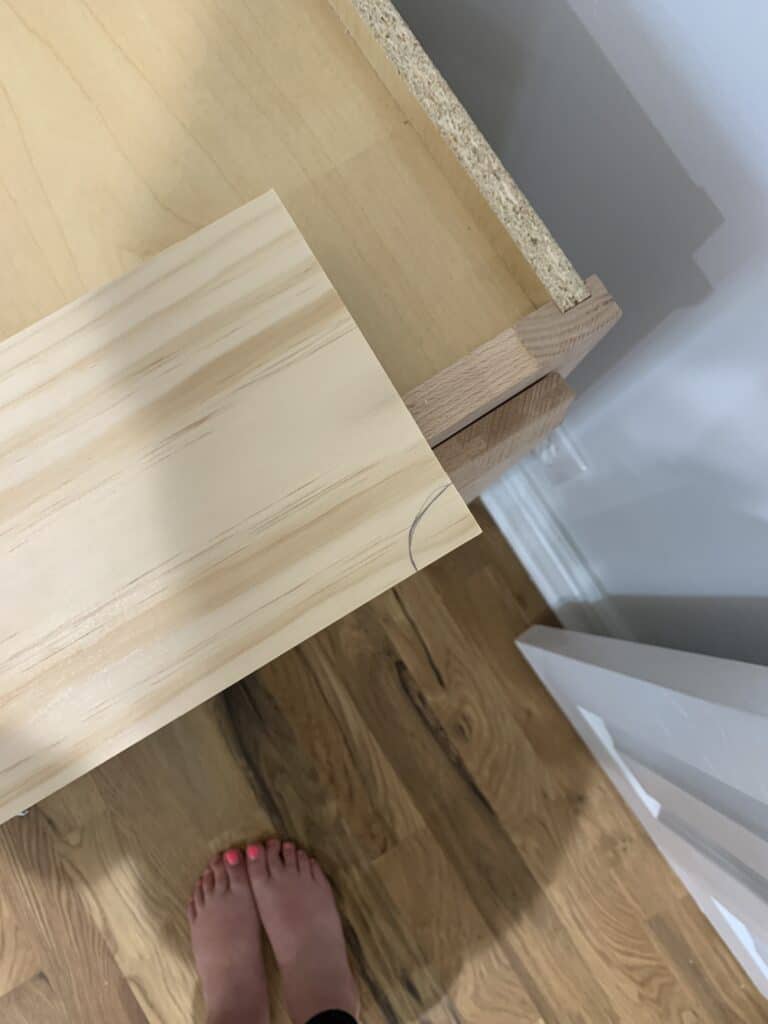
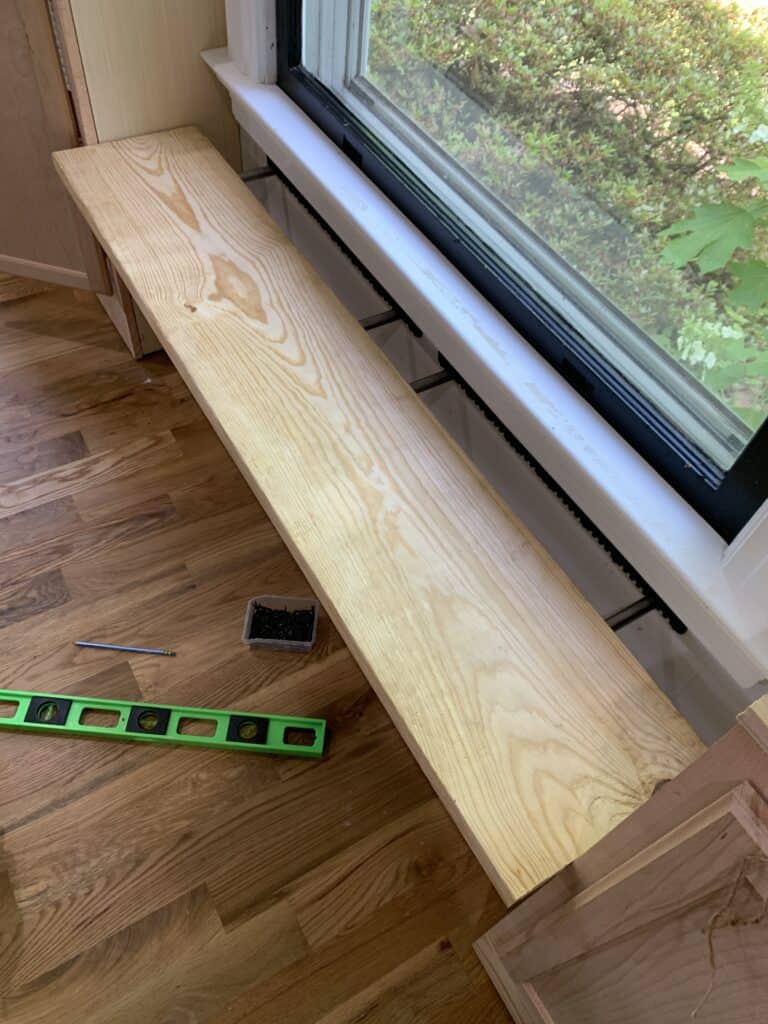
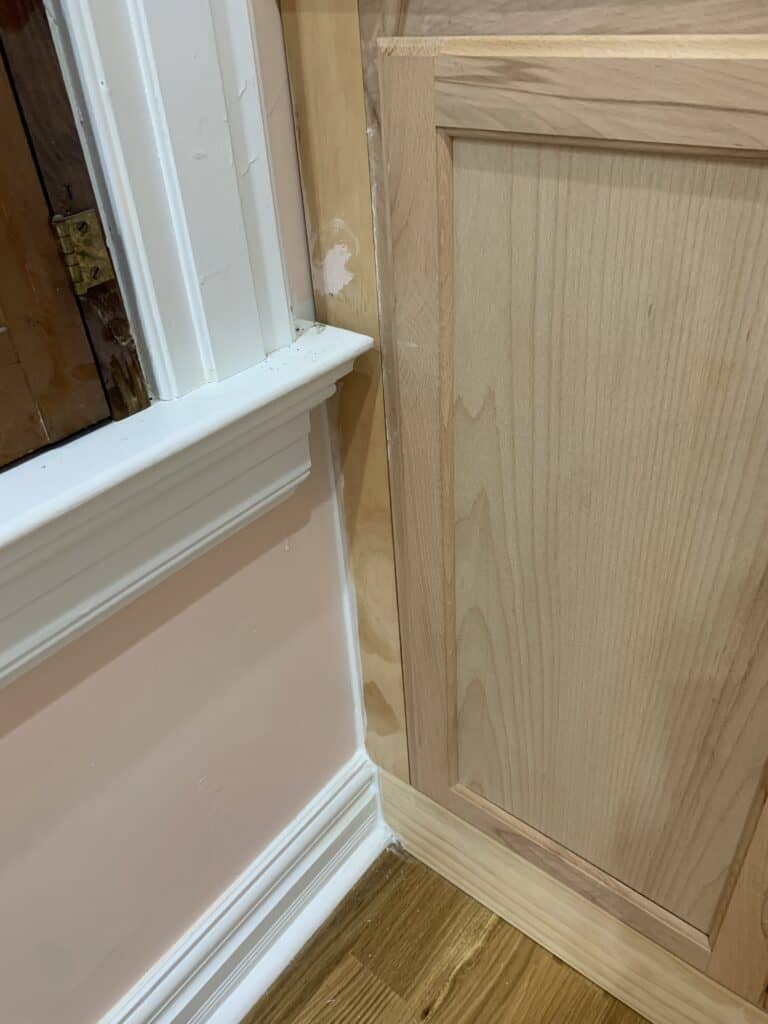
Once that is in it is time to add your side pieces – which in some ways might be your hardest job.
Length should be easily measured but width – you need this to be a tight fit. Like I said we got lucky because exact pieces of lumber fit in, but if not measure your space and cut your 1 by __ board to the width you need.
Slide your board down into the slot – you may need to use a rubber mallet to get it in. once in place coming from the inside of the cabinet doors screw the board in place.
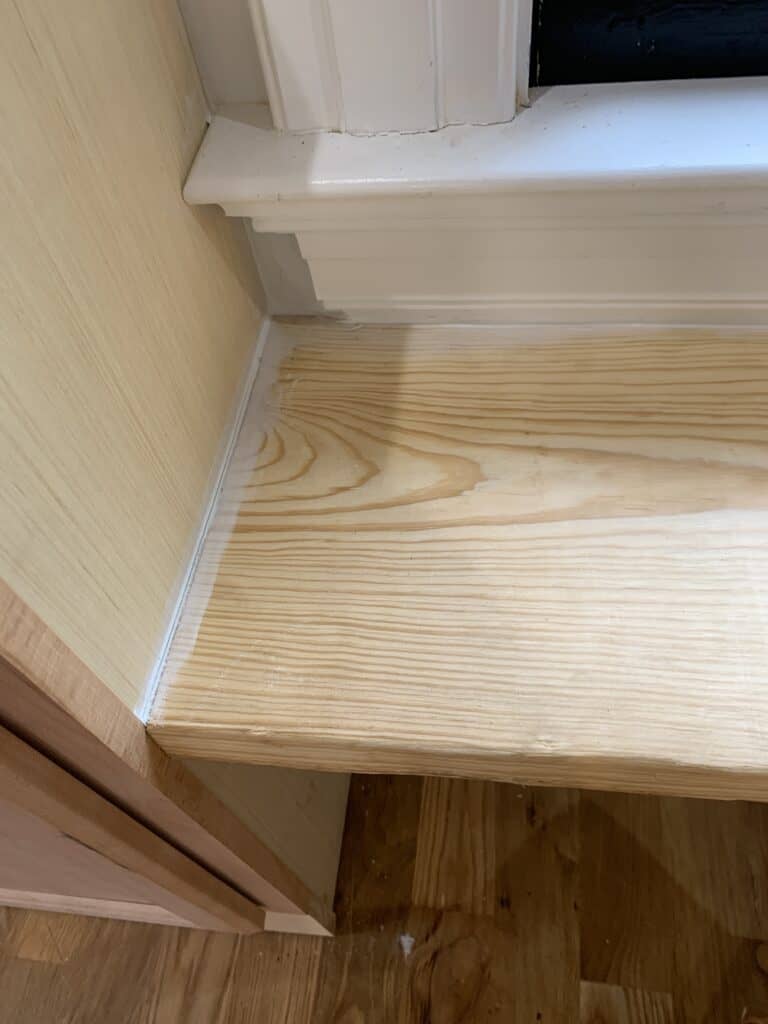
Now for the table top – you are going to take your 1×24 piece of poplar and cut it in half so you have a 1×12. Cut to length and attach with wood glue and your nail gun!
Adding the Table
For us the table made sense for a few reasons. One, Goldie is only 1 and I still wanted her to have a little play table. We sold this one that I made so I knew I wanted something that would fit in the space. Two, we have a huge window in the space.
The method we used for the table will work for a bench as well – it has a high weight threshold. As a reminder – you can come up with a different way or you an use traditional brackets for this. We had the other brackets on hand so it worked great.

We lined our brackets up to the back of our boards and Sam used the tool they came with to drill holes into the board.
Once that was done you hang the bracket – it is IMPORTANT you get into studs wherever you can. These are designed to get 2 screws at least in the studs basically no matter what.
Once the bracket was on we added the side pieces of the cabinets to make them look finished then slid the tabletop on. It was a TIGHT FIT but worked great!
Finish Work for DIY Built in Cabinets
Now you should have what looks like some gorgeous cabinets, but there is some finish work to do.
Adding quareter round to the bottom was needed on ours to look more seamless, and you will want to caulk all your seams around the walls.
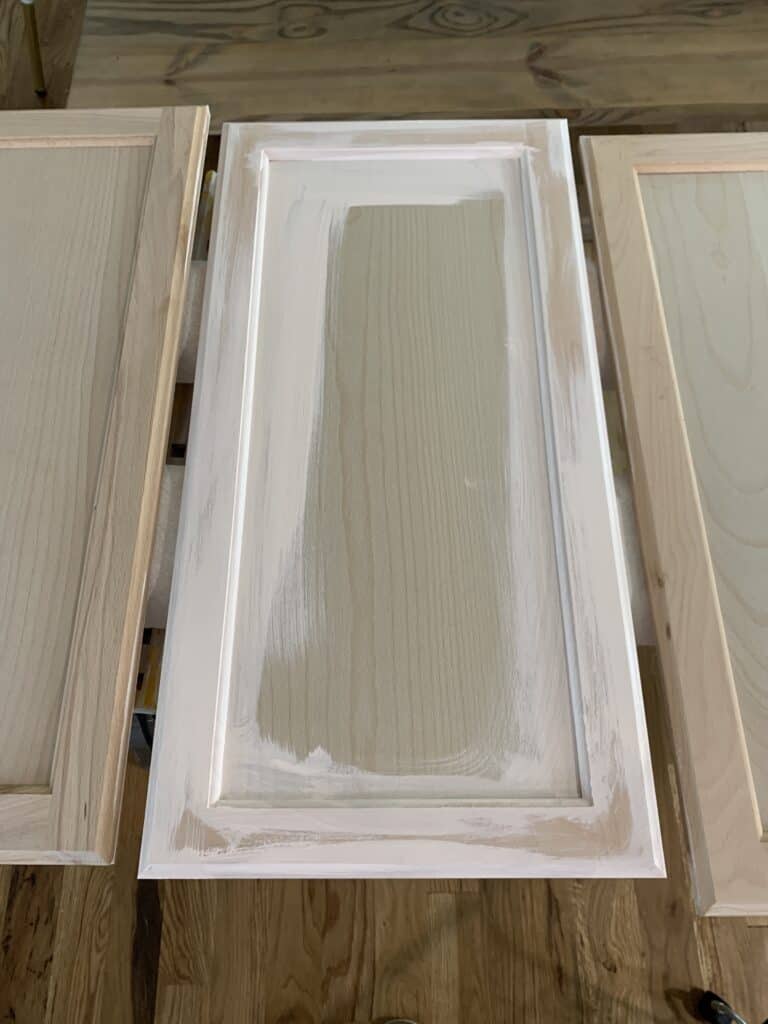
Once your caulk is dry you can give the table top and top of the cabinets a sanding and you will be ready to paint. For painting cabinets you can check out this tutorial – it doesn’t have to be quite so thorough since these are unfinished but will still give you good info!
Last but not least add your cabinet hardware – I wanted something bold but on a budget so will be blogging that DIY later this week if you are interested in the pulls from mine!
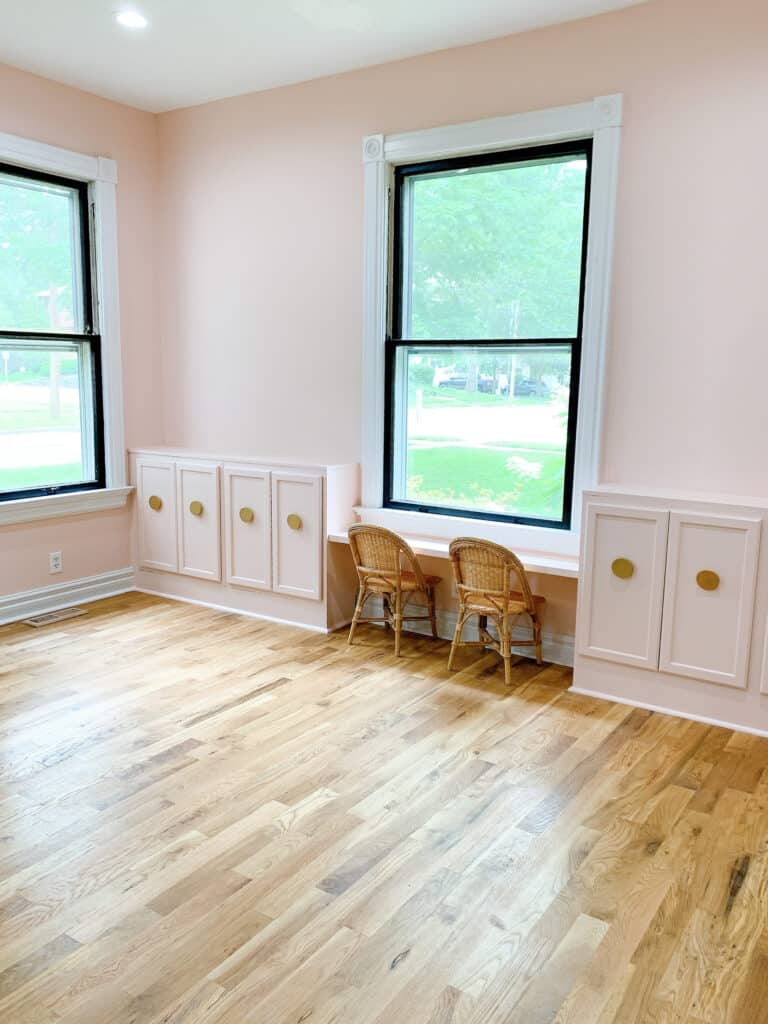
That is it – now you have great storage, a gorgeous new focal area and all of it can be done in a weekend!
Other Posts You’ll Love
If you loved this DIY check out some other posts you’ll love!
Finished Room | DIY Cabinet Pulls
DIY Billy Bookcases Built-ins | Cane IKEA hack | How to paint kitchen cabinets | DIY Canopy Bed
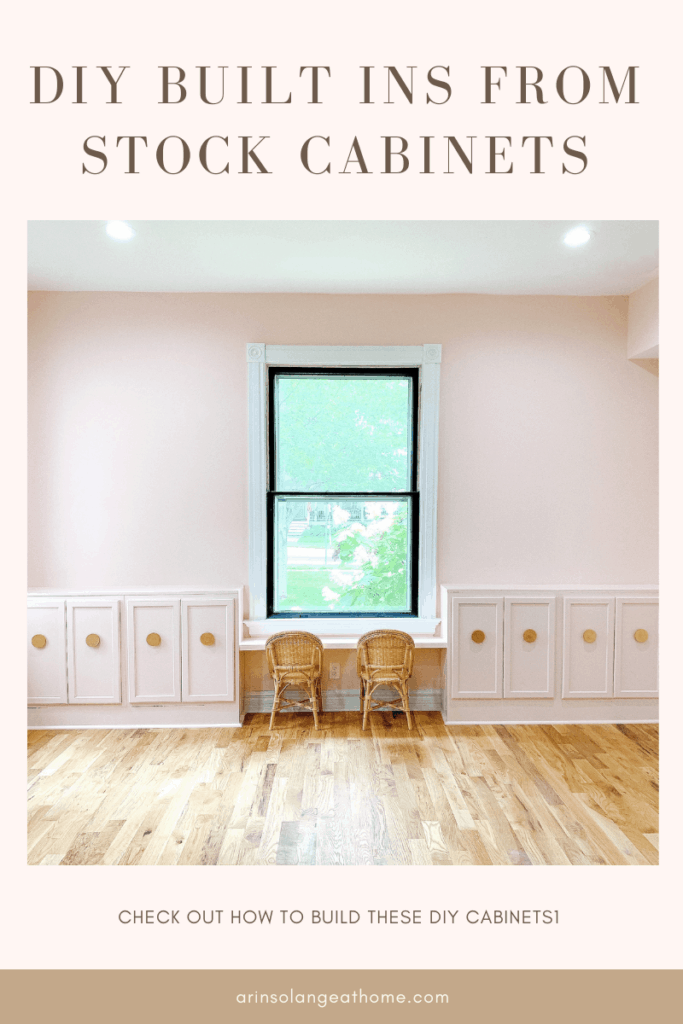
Pin The Photo Below for Later
Hopefully you feel confident and ready to tackle some DIY built in cabinets with stock cabinets and you know exactly what you’re doing. Be sure to pin the photo below for later to find this post, and be following me on Instagram (@arinsolange) for lots more DIY fun!
“1×24 poplar for the counter tops – THIS IS IMPORTANT – this only works if the 1×24 is true width of 24 not lumber measurements”
Any recommendations on where to source this? When I ask places they think I’m crazy..
We get ours at Menards!