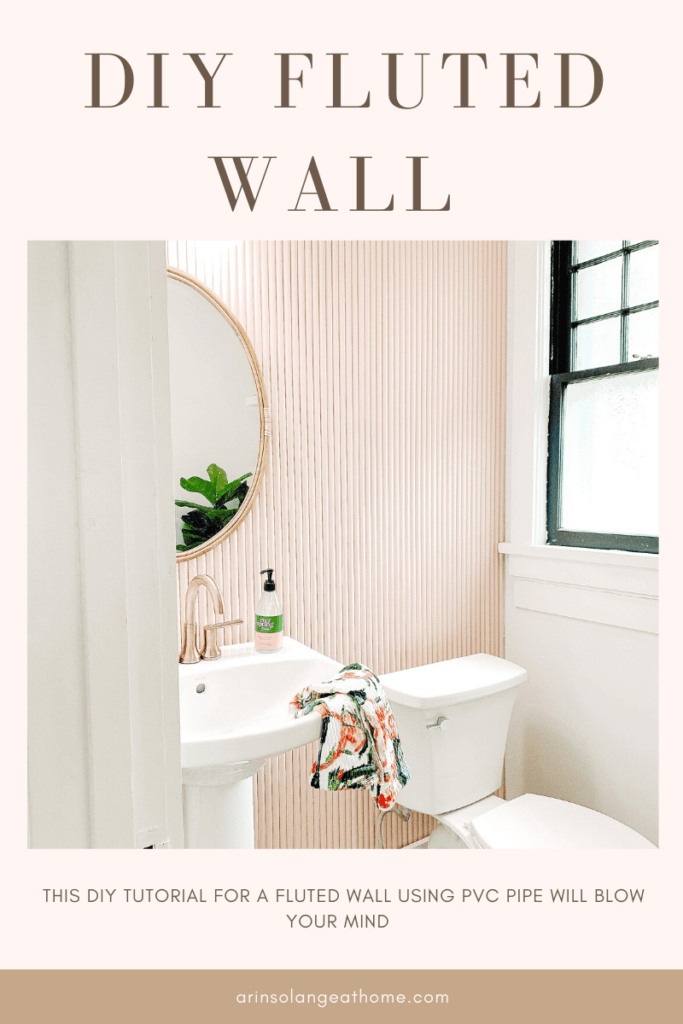
I have been DYING to do a DIY fluted wall and finally found the perfect place to do it! Today I am sharing a DIY fluted wall tutorial using PVC pipe. This is truly a DIY that anyone can do and it will majorly update a space on a great budget!
This post may contain affiliate links
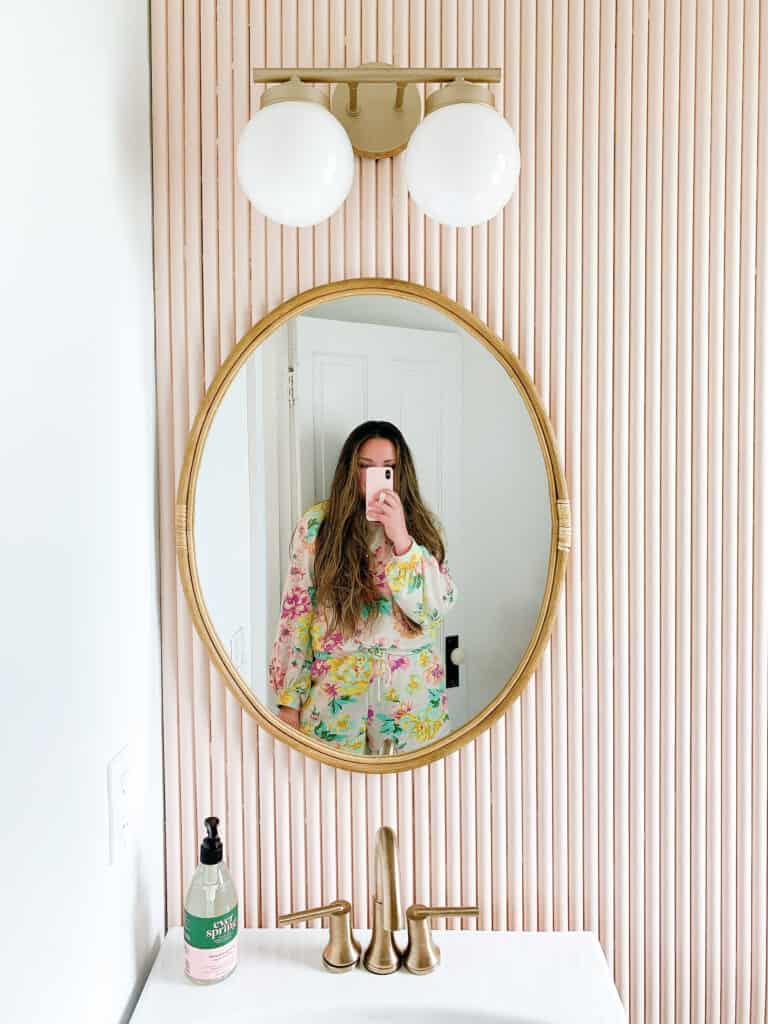
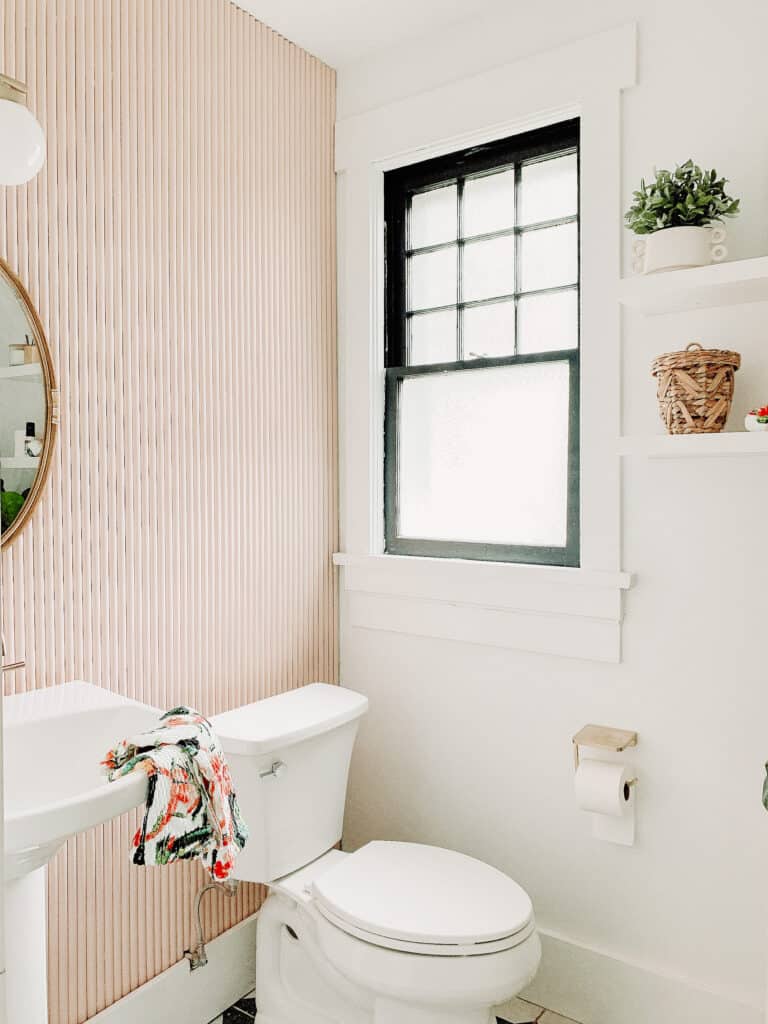
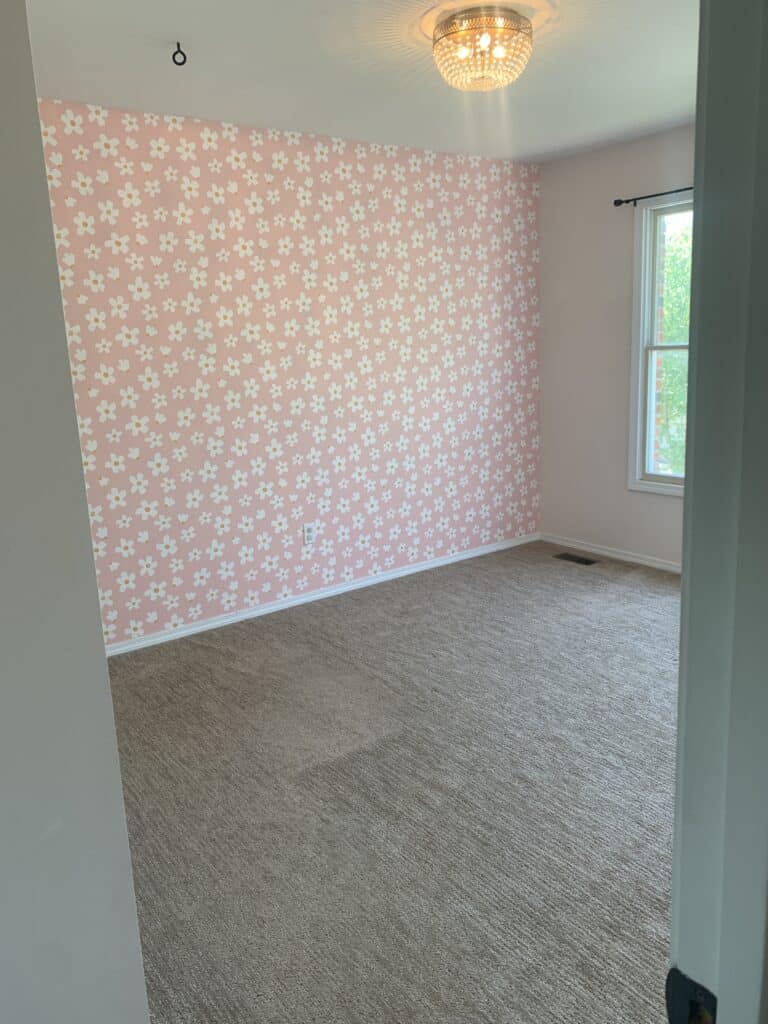
DIY Fluted Wall
Like I said – this has been on my ‘want’ list for so long. The fluted look is really in right now and let me tell you – it lives up to the hype. THAT SAID – it is so in right now that finding lumber is hard. On top of that – lumber is so expensive right now that it makes it hard to justify a modern DIY like this.
As I was walking around the hardware store looking for ideas on what to use for my feature wall I got the idea to use PVC pipe. I won’t lie to you – my husband instantly told me this was a bad idea….but that didn’t stop me from loading 80 PVC pipes up in my SUV to surprise him at home.
All in all this was a fairly easy project that is great for beginners – so I can’t wait to share how it is done!
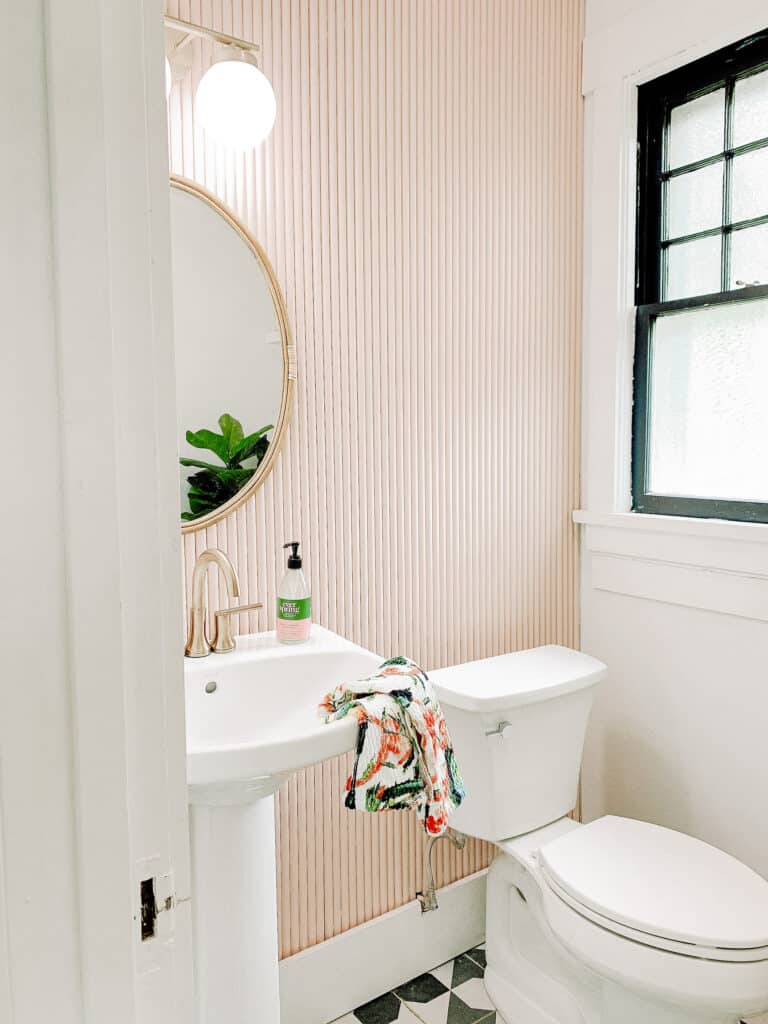
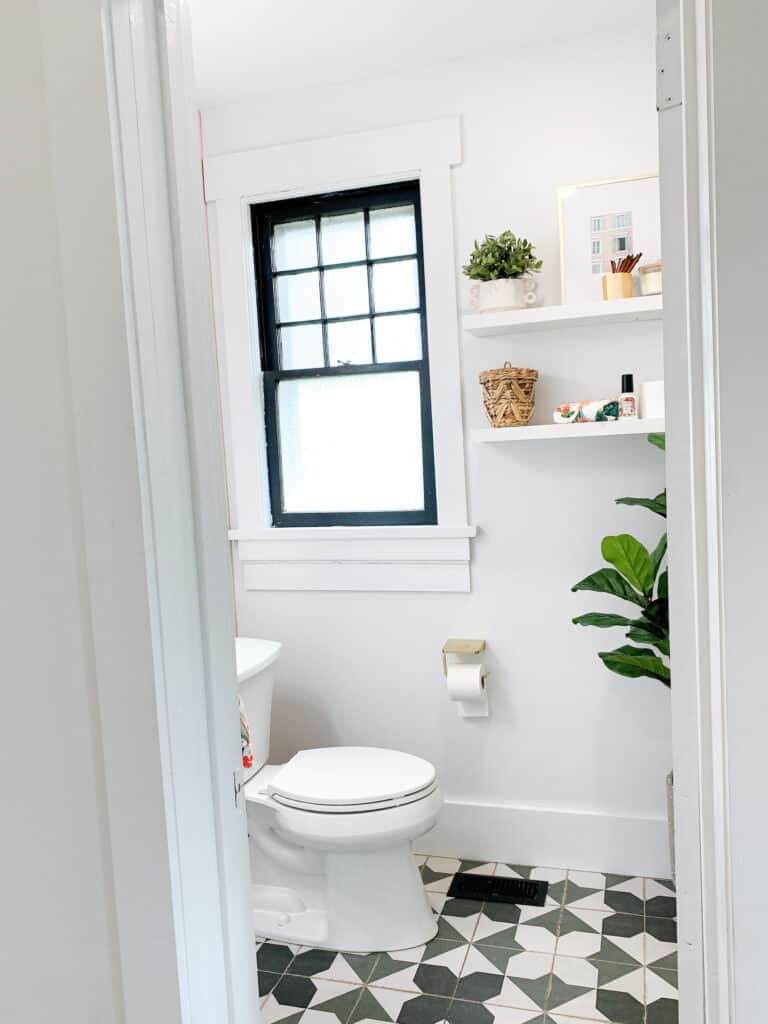
Incase you aren’t a frequent reader or follower of my space – we are renovating an 1860’s home and that means some spaces are just sort of ‘awkward’.
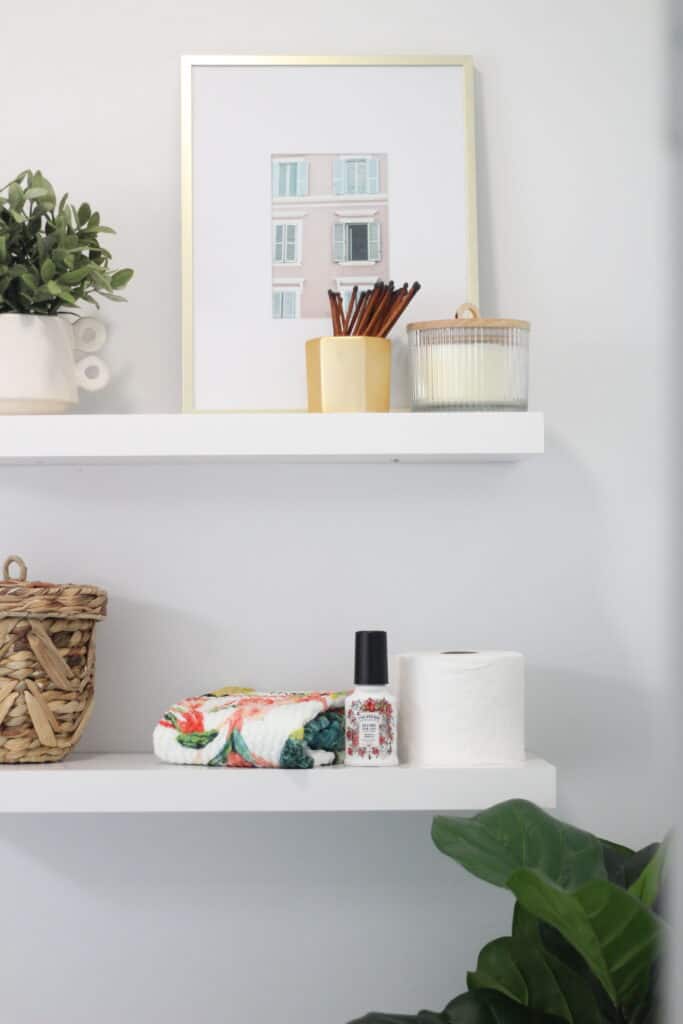
This powder room is good in size but the lay out is funky – so a pedestal sink worked best, and that leaves for no storage and organization. I knew that on top of making the space pretty and fun, I needed to add some function to the space.
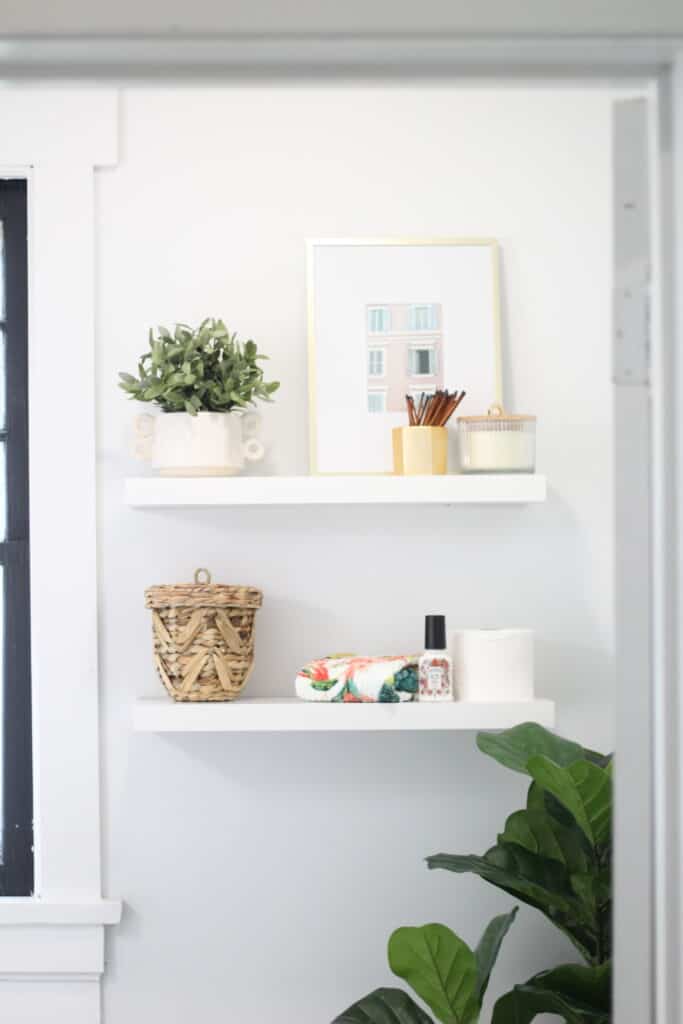
Floating Shelves can be a great way to add to a bathroom and utilize items you need as decor. In this case – we have no fan in the bathroom so out of kindness for others I added Pooperie and matches. I also added an extra roll of TP on the shelf, and a small container for feminine hygiene products.
Those little additions are both pretty and functional. To shop the items they are all linked below!
Now for why you’re here! The DIY fluted wall tutorial! This is a fairly beginner DIY and takes minimal tools to complete.
You can do this many ways, and with any size PVC you want – but keep in mind for a space like a bathroom not to go too big because of the toilet and such.
You can also save money on supplies by personally cutting the pipes in half or finding someone to do that for you!
Supplies for DIY Fluted Wall:
PVC Pipe – I used 1/2 inch PVC – which actually made it a bit wider than that because the size is based on the internal opening width.
Cut your PVC Pipe – if you are finding the bottom behind baseboard it doesn’t have to be exact but does need to be long enough to go behind the baseboards.
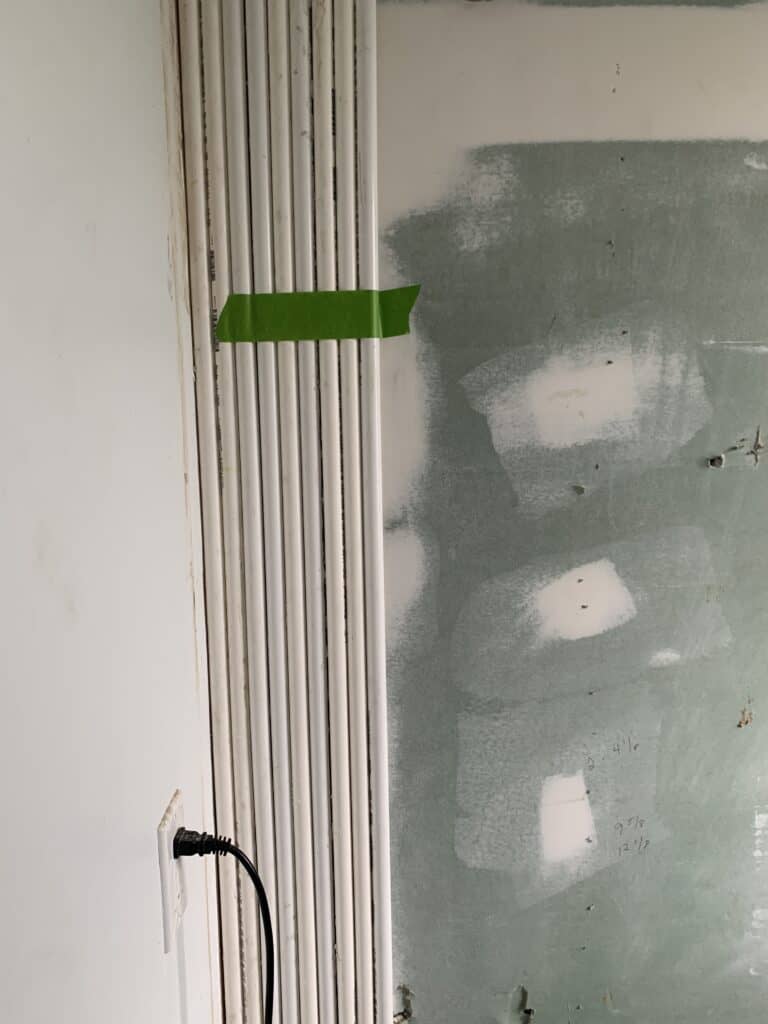
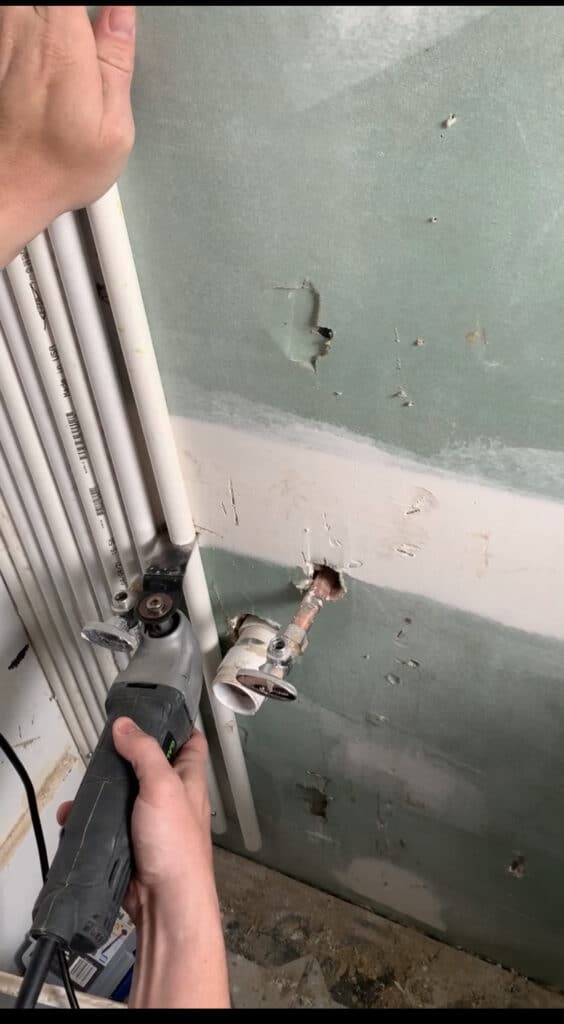
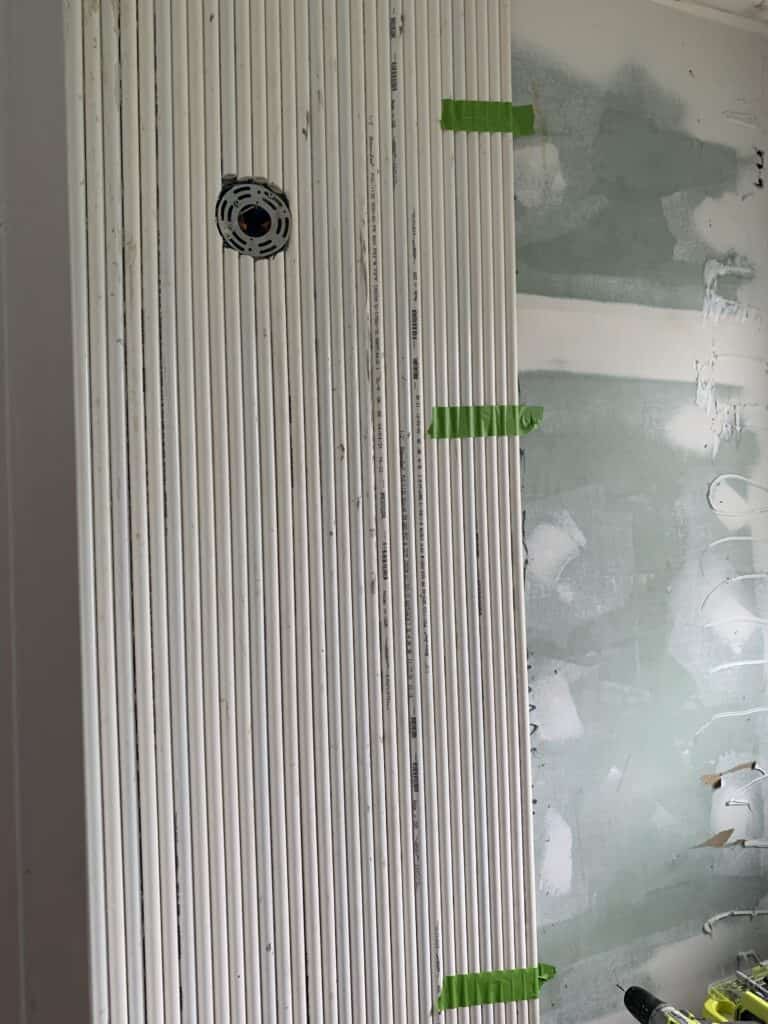
2. Grab your first few and add some liquid nails to the walls in a back and forth method on the wall. You are going to one at a time starting in one corner slide your first pipe tight to the ceiling then add ONE screw at the very bottom where it will be hidden behind the baseboards. ( if you aren’t hiding them behind baseboard you will need to go much slower and utilize painters tape more.)
When you get to lights, outlets, plumbing – anything that breaks up the wall, you can use the multi-cutter to make cuts in the PVC pipe. I personally drew with a sharpie so I could do it at angles where needed as well. Multi tools are inexpensive and super helpful to have – so if you don’t known one you won’t regret it.
3. Once you have 2- 5 up take several strips of painters tape and let those dry!
4. You will continue doing this in “batches” to finish the full wall. When you get to outlets/light openings and so on you will have to cut your piece – I personally did so with our multitool!
5. Once your full wall is up and dry you need to sand the wall well – really scuff the wall up.
6. Give the wall 2 coats of your bonding primer and let those dry fully
7. Now it is time to paint your wall. We did two coats of paint as well.
Hopefully this inspired you to create your own DIY fluted wall with PVC pipe. Pin the photo below for later, and be sure to follow me on Instagram (@arinsolange) for more inspiration!
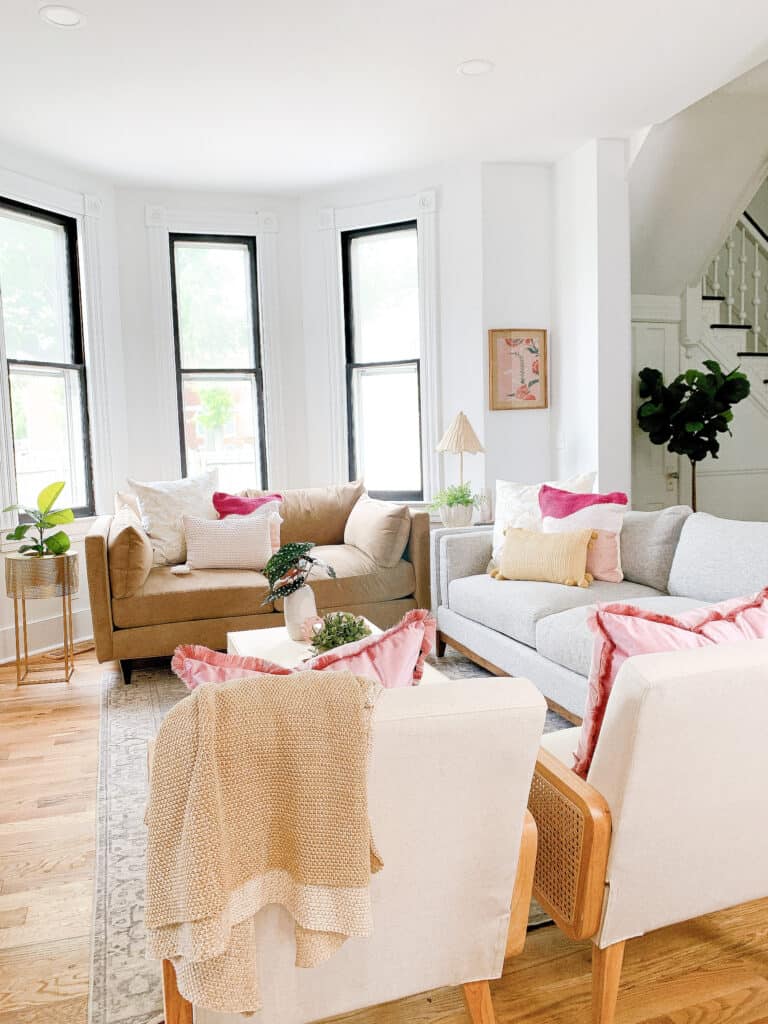
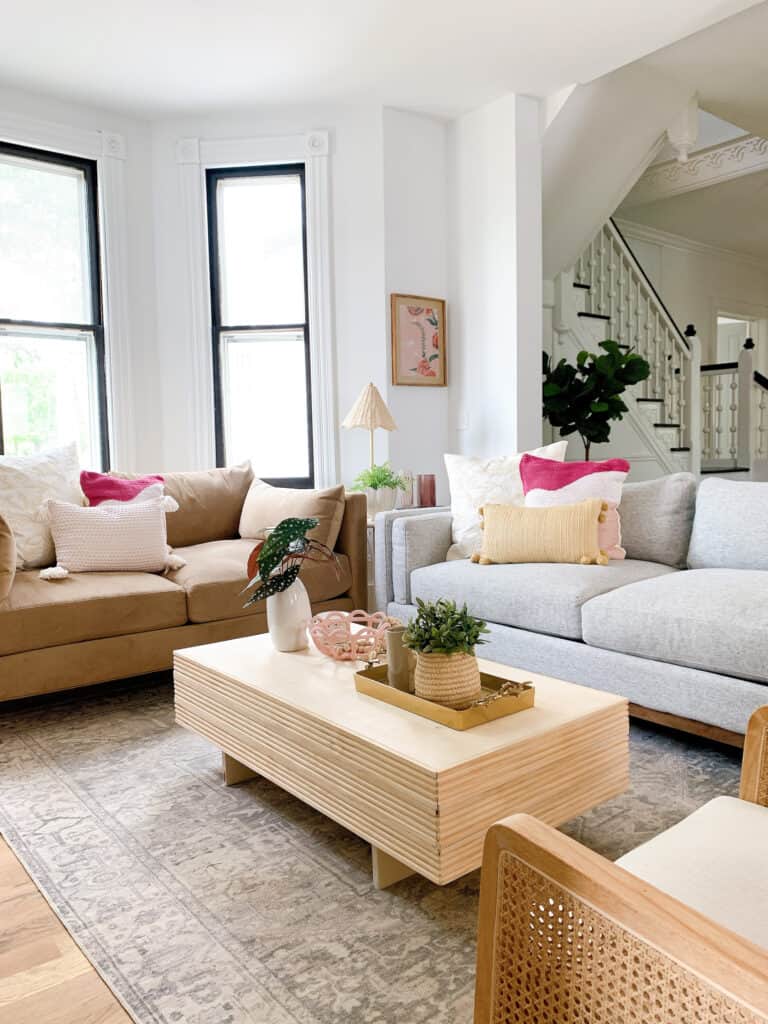
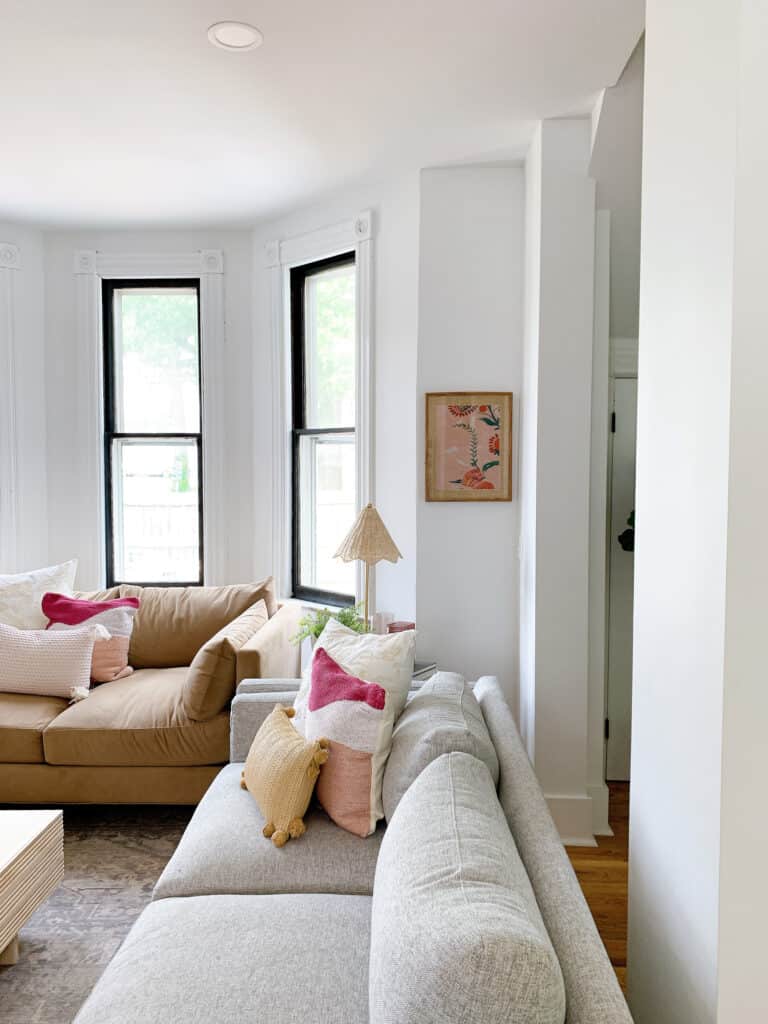
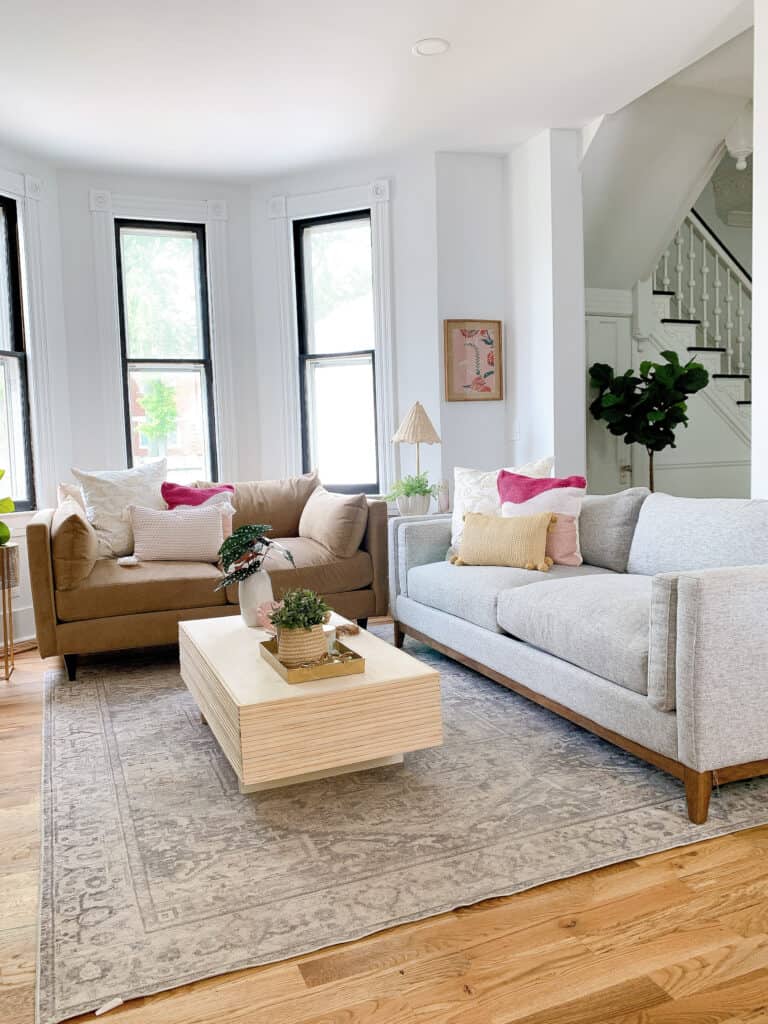
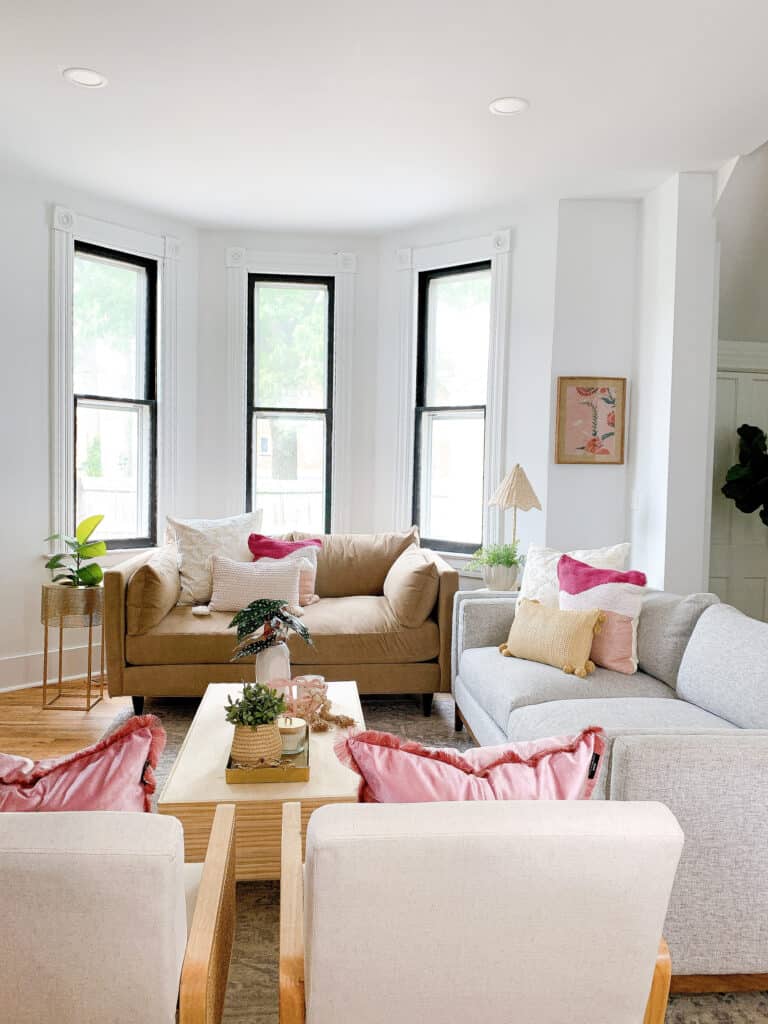
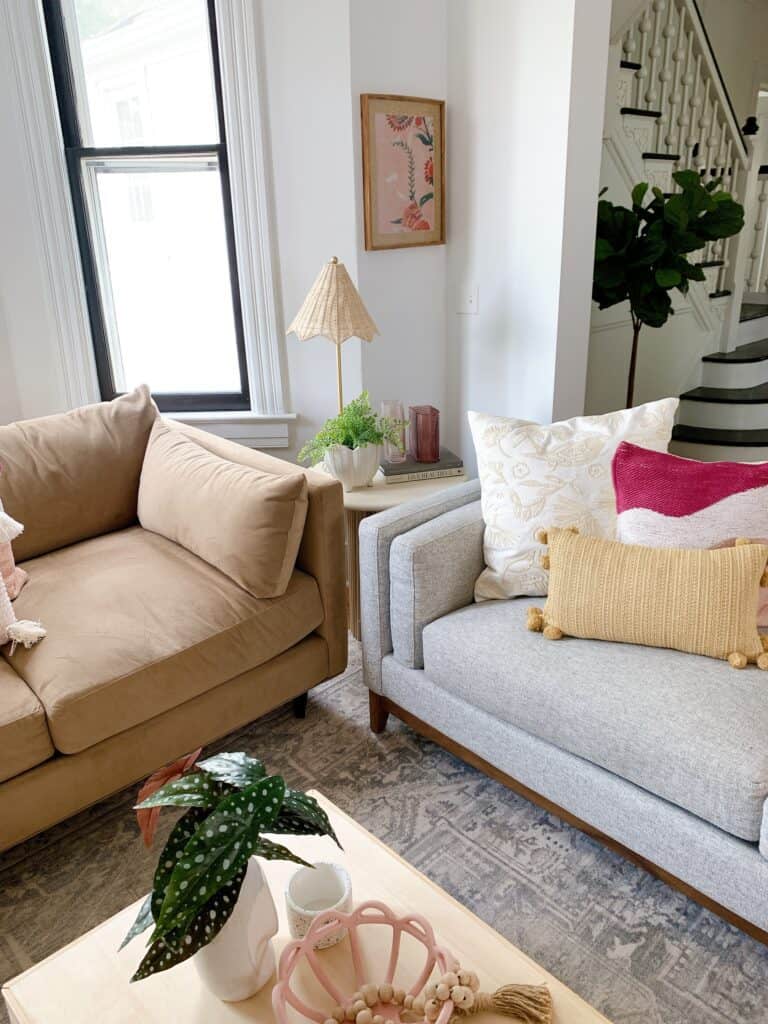
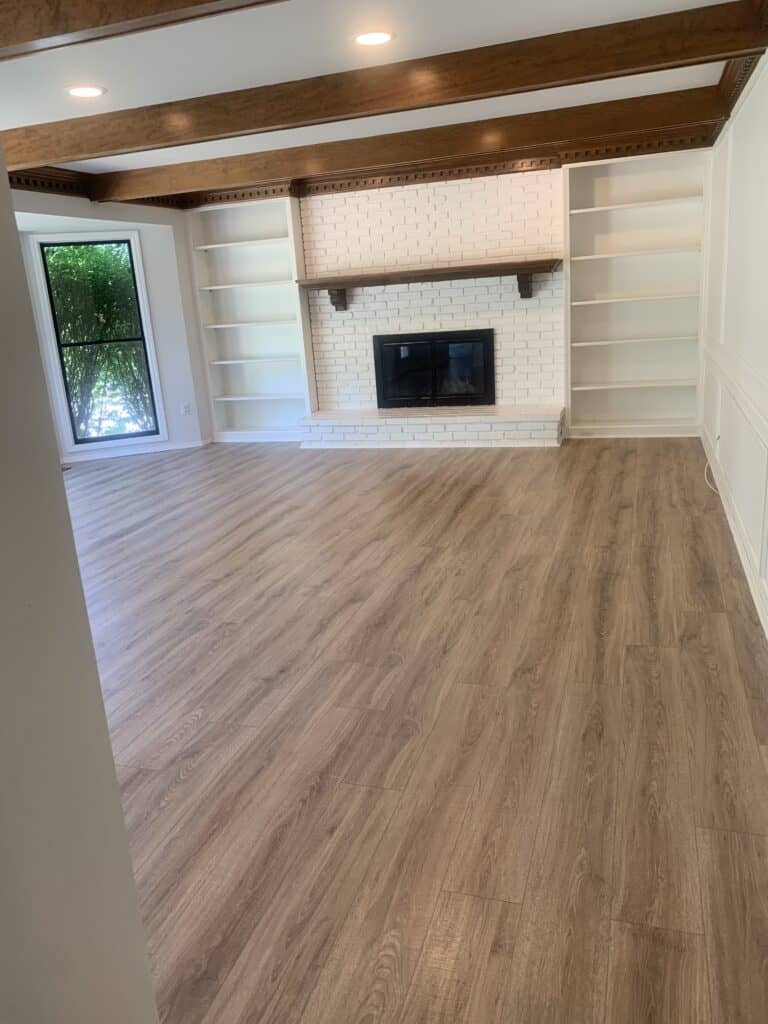
The day has come guys – and I am sooo excited. You all know I was excited to add some gorgeous Jonathan Louis furniture to our family room in this house after how much we LOVED our set in our last home. Well today is the day to talk abut how I created this cozy, vibrant family room with Jonathan Louis furniture, as well as all the details on ordering your own pieces.
This post was sponsored by Jonathan Louis Furniture – all opinions are my own. Thank you so much for supporting the brands that support my blog.
Jonathan Louis Furniture
Before I even get to the rest of the room, I know why you all are here – you want the details on the gorgeous sofas. I don’t blame you – I would too.
I didn’t initially select them based on brand. I was simply at a furniture store and found furniture that I thought was gorgeous and comfortable. But by the time I left I also realized it was likely a brand I loved because I selected the ottoman from a different area than the couches – both being pieces that I loved.
When it came time to move I knew our couches needed to be retired. They fit our HUGE living room in our last house so well, but this house had a very different layout and look and they wouldn’t work in the space.
It was a bit bittersweet, because it gave me the opportunity to try out some other gorgeous pieces from Jonathan Louis and I can’t wait to tell you how I made my selections, as well as how you can order your own.
Selecting and Designing my Pieces
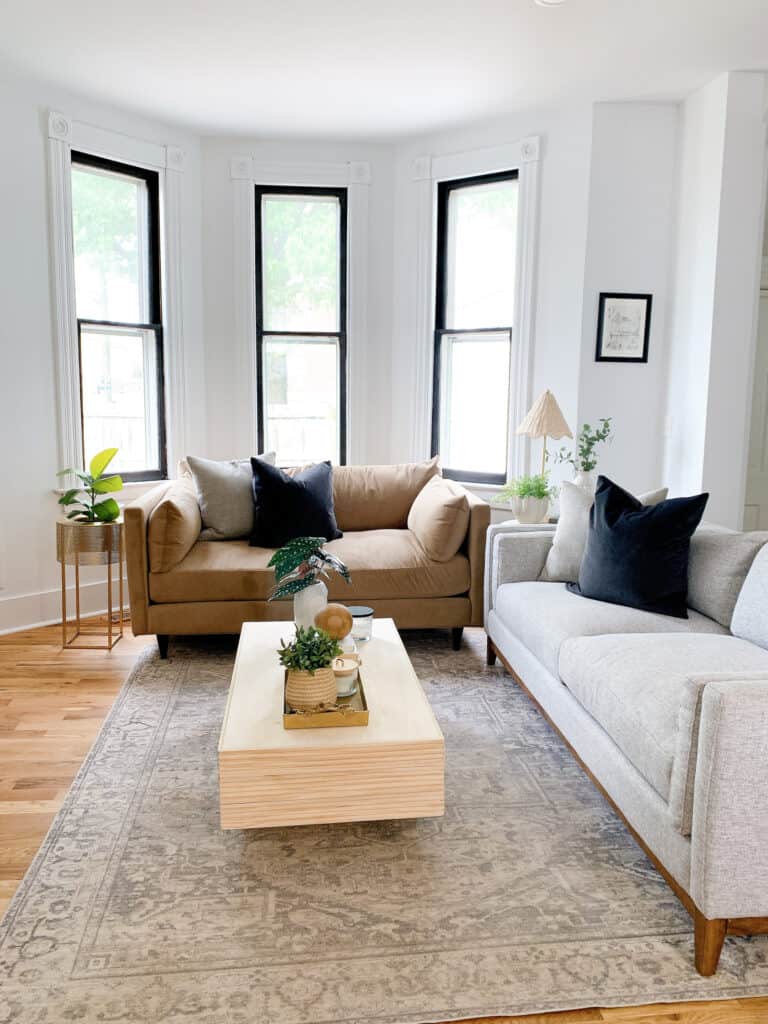
When I was deciding on our family room pieces in this house I knew I wanted a bit of a mix and match look this time. I wanted to use as much of the space as possible, but still have things look polished and not over furnished.
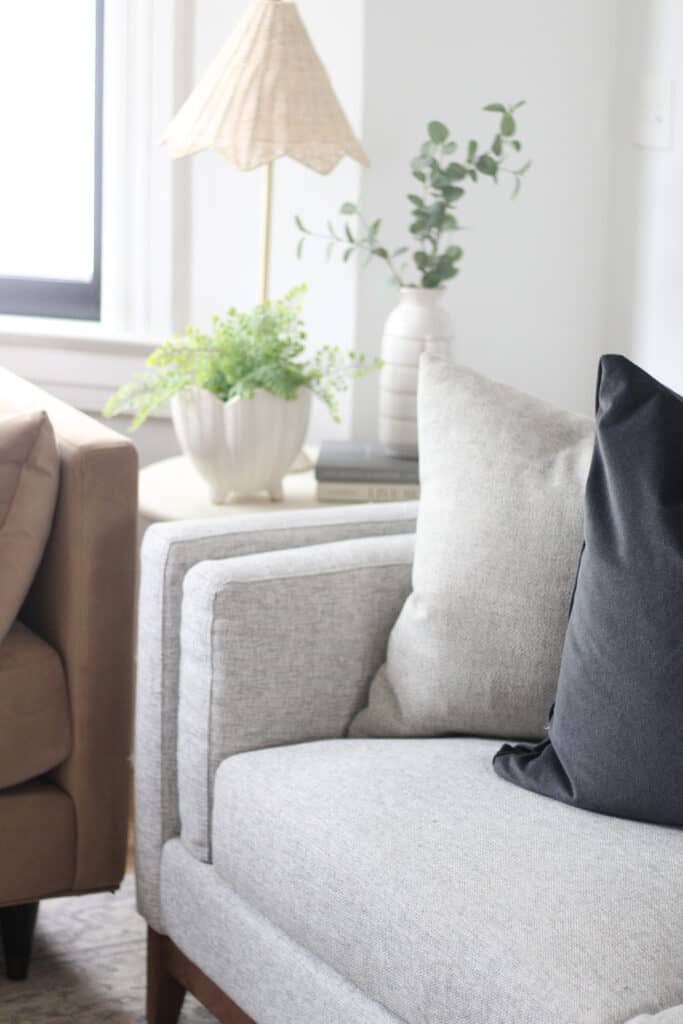
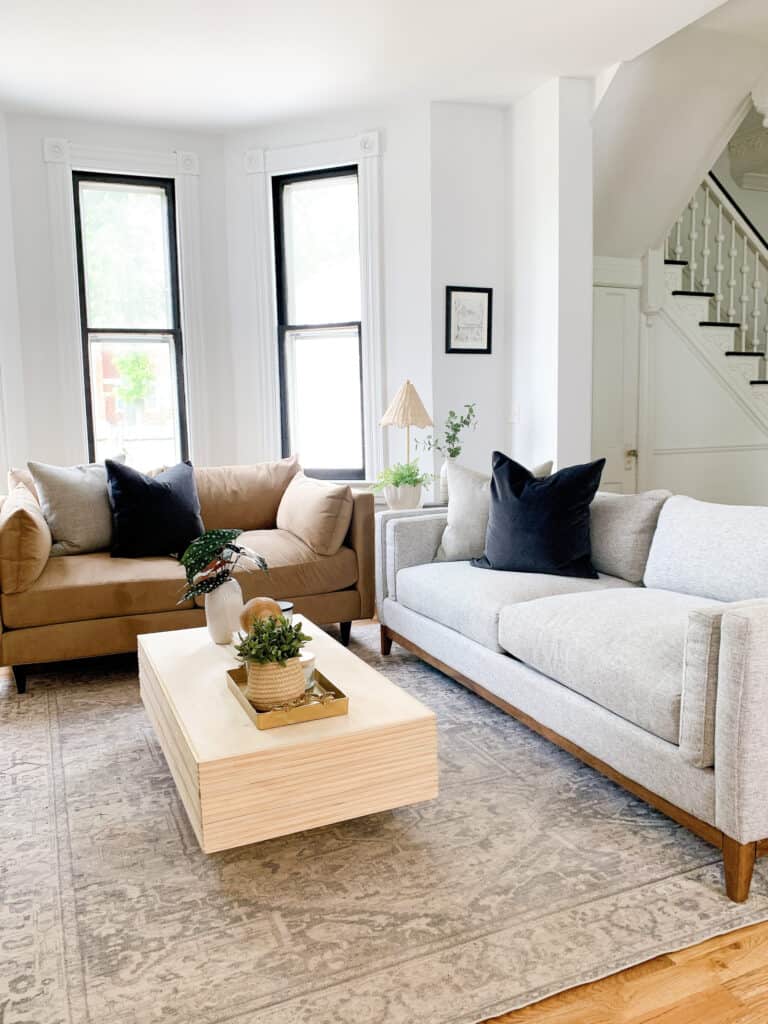
Kelsey Estate Sofa
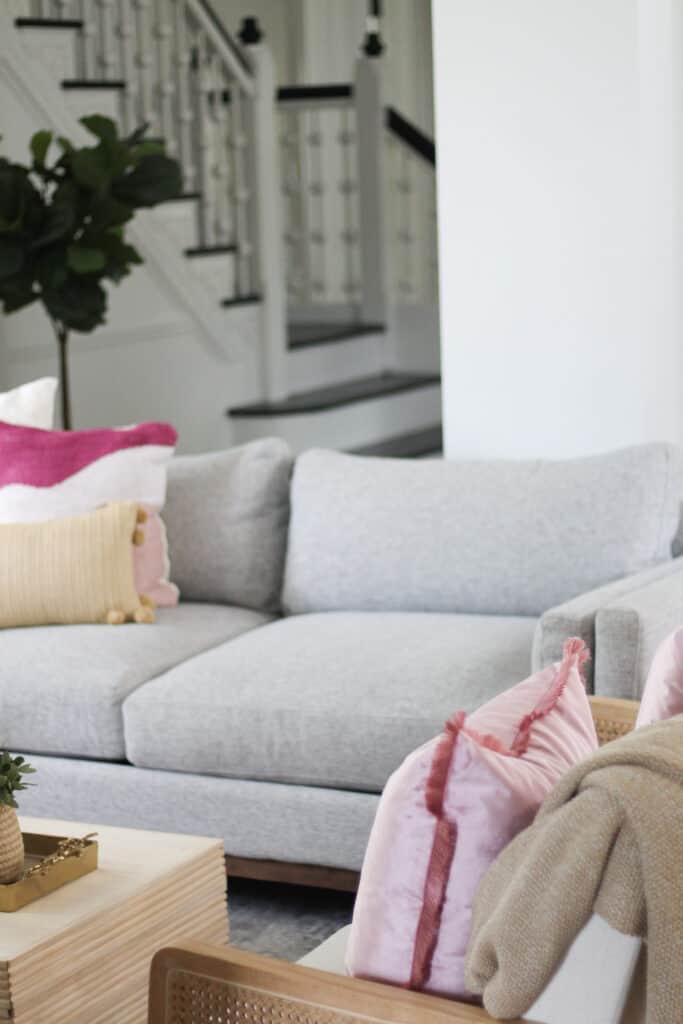
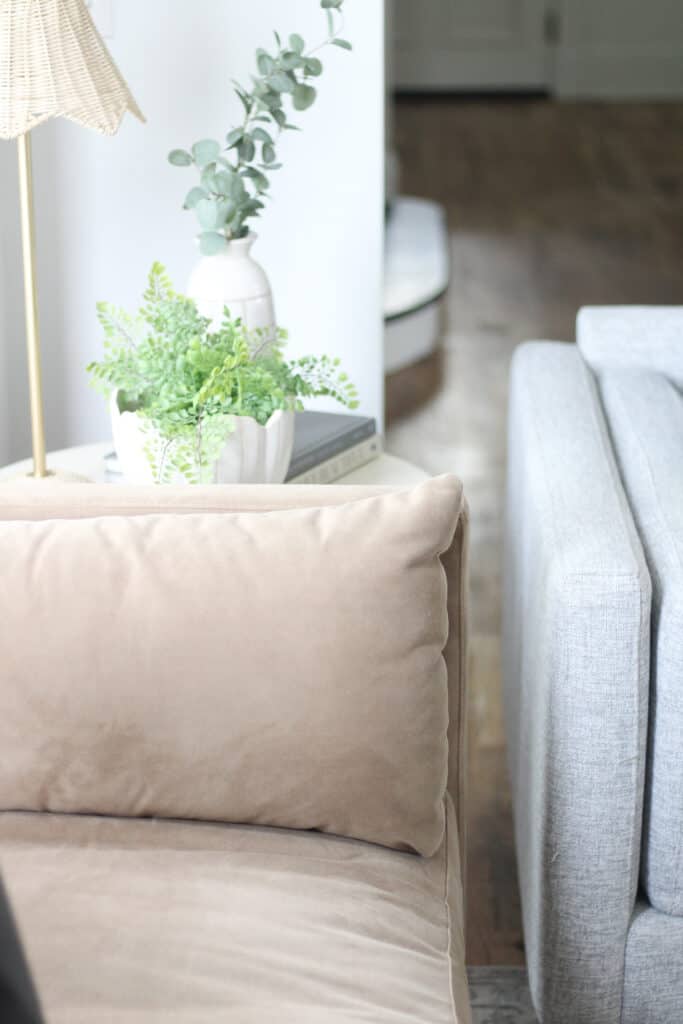
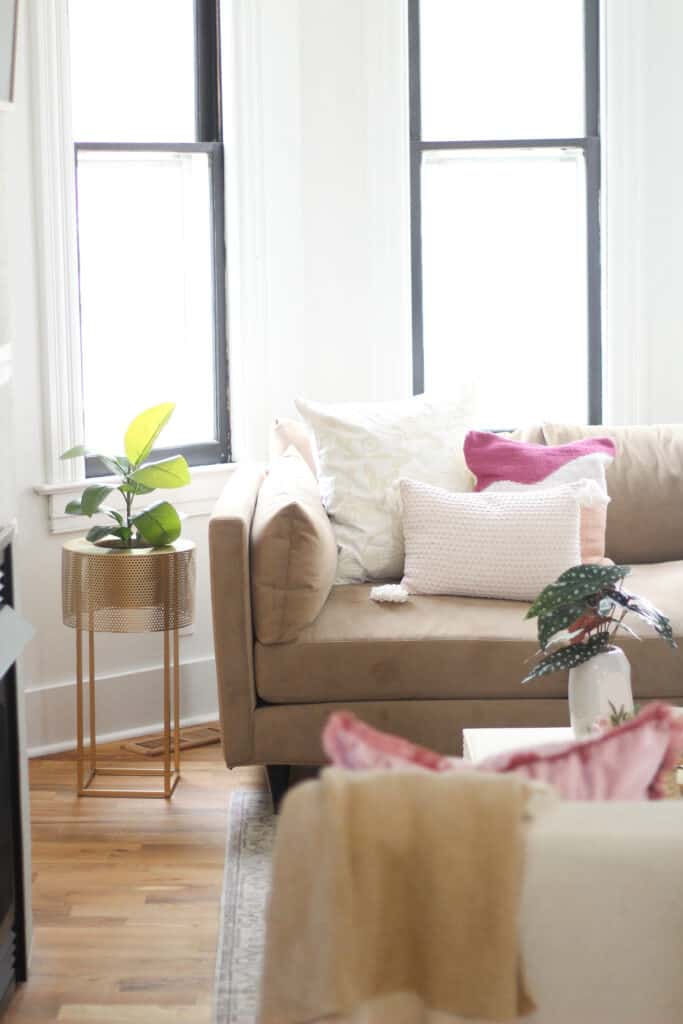
I ended up going with the Kelsey Estate Sofa in Tech Pebble. This is the most gorgeous shade of grey that is a bit more of a course weave that I loved. I really wanted to play with texture, and it seamed as tho it would hold up to my kids well (and I was right).
The Kelsey Sofa is 40” x 89 so we knew this was going to be our larger piece in the room. What drew me to this sofa was the deep comfy seating that was grounded by a rich walnut base. It was such a fun way to marry a more comfortable look with a polished space as well.
The cushions are comfy and oversized, but the arms are very straight and sleek which I again loved in terms of design. It has subtle mid-century modern notes (which you all know I love) but can be very transitional as well.
If you are looking at doing the Kelsey Estate Sofa below are some things to keep in mind:
It includes Pluma Plush pillows that you can customize in any fabric.
There are multiple configurations to pick from including a sectional, estate sofa (pictured in this post) space-saving condo sofa, chaise option, chair and ottoman.
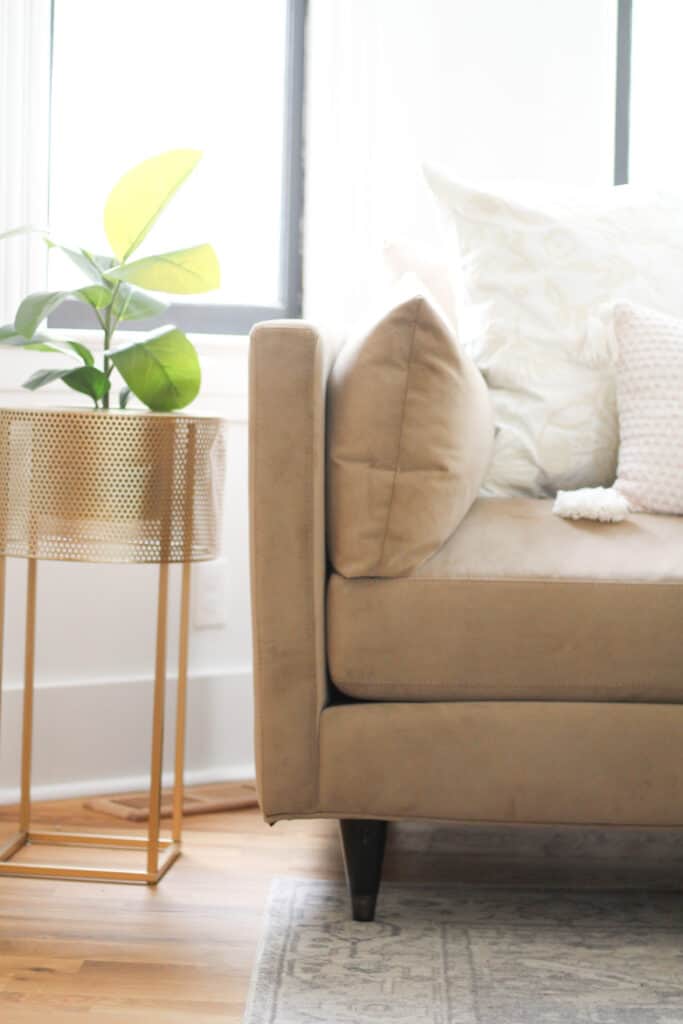
Pia Condo Sofa
And for the other sofa seen in my photos I ended up going with the Pia condo sofa in Bella Coffee. I was DEAD SET on tying in a brownish/tanish velvet sofa and boy oh boy is it GOOD.
The location of the Pia sofa was a bit trickier. I knew I needed something not too long but also could go deeper than normal because it sits in a bay window. The Pia condo sofa is 45” x 71” which fit PERFECTLY in our space.
The Pia condo sofa has deep comfy seating similar to the Kelsey, with a clean and sophisticated body. Below are a few other things about the Pia collection if you are considering it.
Includes customizable Pluma plush Pillows
Brass capped cone legs
There are multiple configurations available including a sectional, estate sofa, space-saving condo sofa, chaise option, chair and ottoman.
Finding a Retailer Near You
Like I stated – this is our second set of furniture from Jonathan Louis, and the first set I bought in store at a local retailer. If you are local to St. Louis shoot me an email and I can direct you to a retailers, but if not you can search for local retailers here.
Your retailer should have fabric swatches as well to find just what you’re looking for!
Mixing and Matching Furniture Pieces with Jonathan Louis
When mixing and matching sofas you want to play by a few rules. Make sure there are enough things that are similar but also enough that are different. You don’t want people to look at the two pieces and wonder if they sent you the wrong one – so you want the differences to be obvious enough in that manner.
On the other side – find some things that coordinate. Maybe It is straight lines. General sizes. The style of the cushions and so on. Below were the considerations I made that helped me decide on the two.
I am leaving color off – because I knew when I was setting out to do this room that I wanted a grey and a coffee color and with Jonathan Louis I knew I could likely make that happen no matter what choices I made.
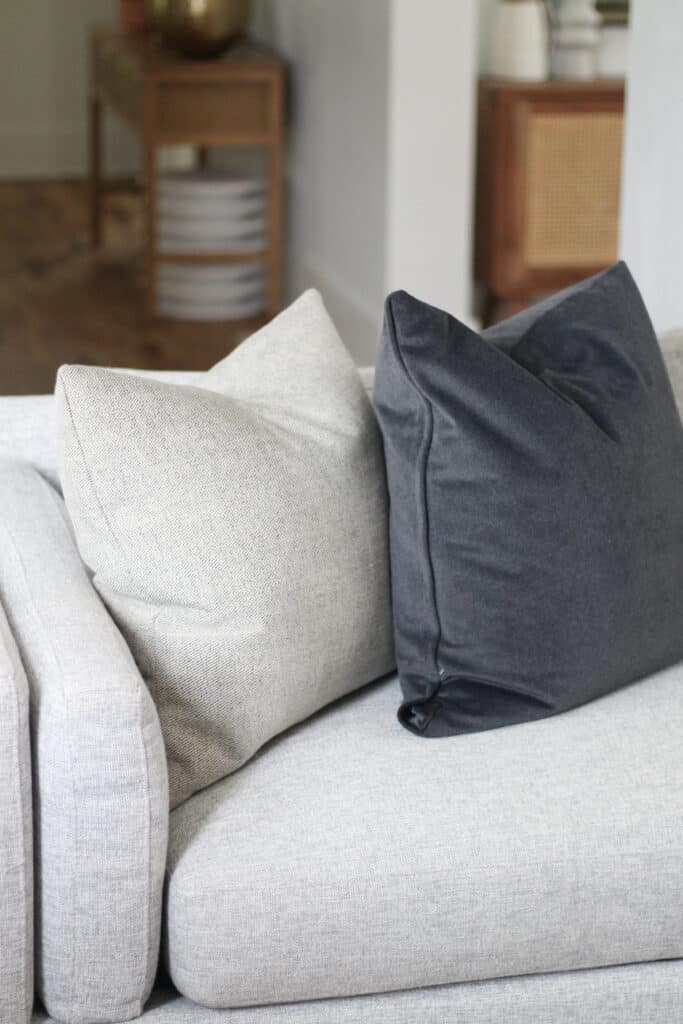
Similarity – the Straight lines of the arms and back. Both had a squared off edge and similar straight up and down look.
Similarity – Both have 2 cushions for the back and two for the seat.
Difference – The legs and base were different in both.
Similarity – both had a bit of an over stuffed and comfortable look that was not sloppy due to the body.
Difference – Fabric – Although I knew colors were going to be different I specifically went with different fabric choices. For one it feels more velvety and the other is a more tech fabric.
Similarity – Height. This was big for me. I wanted the sofas to sit at a similar height for coffee table and ottoman purposes. I knew this would give them a similar ‘weight’ in the room for their sizes.
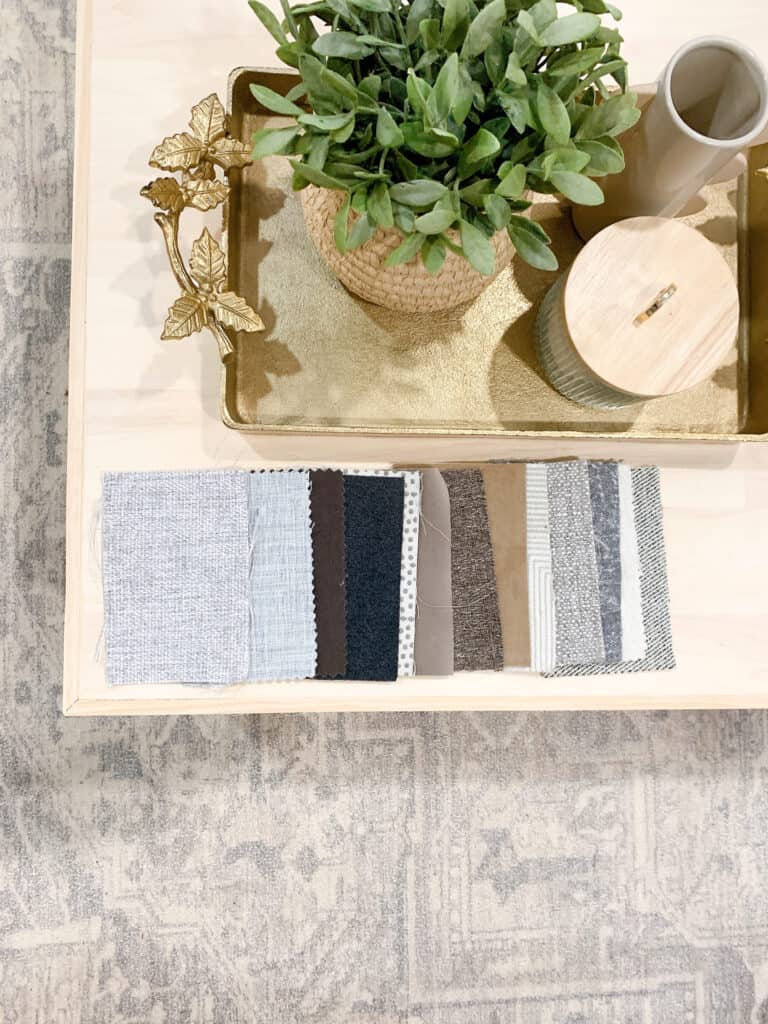
Picking your Fabric with Jonathan Louis
So I have 4 kids. And a dog. And a husband. That means – I won’t furnish my house in a way that won’t stand up to daily ware and tear. One of the reasons I LOVED our last set of couches from Jonathan Louis was the ease of cleaning.
Each fabric before you select it shows how it can be cleaned which is SO HELPFUL in selecting your piece, and honestly – I have found that cleaning every single piece has been so easy.
I was timid and went out on a limb with the Bella coffee and it has been crazy easy to stay clean as well!
Creating a Cozy, Vibrant Family Room with Jonathan Louis
I will be honest – moving in the manner I did this time has made decorating and finding my ‘style’ a bit different than the past. I have wavered back and forth so many times over what I want my overall look and style to be in the house, and am working hard to stay true to myself.
One thing I love about the sofas I chose is that with each wavering idea they have tied in perfectly. I have been able to see how they will grow with my design choices over time.
I decided for this space that I wanted it to be cozy – because it is definitly more of a hearth room than a large living room. It is an area we all pile in and watch tv or sit and chat so comfortable was key. That said – it is front stage and also needs to be pretty.
I went with vibrant and modern pops to pair with the oversized sofas. I have moved around pillows constantly for totally different looks and feels which I think has been so fun.
Adding in some bright colors and pink tends to be my thing and the classic yet slightly modern look to the couches I selected worked perfectly with that look
Look below to see how easily these sofas can transition from a natural space to a colorful vibrant space just by changing pillows and a few decor pieces.
To find the decor pieces that are available the links are below:
I did a DIY coffee table that you can find the post for here that is seriously one of my favorite DIY’s in a while. It turned out exactly how I envisioned and was an easy 1 day project.
Getting creative to add to your space can finish the look and help you fully enjoy your home. One of the reasons I am so drawn to Jonathan Louis is their wide variety of fabric choices with pieces of furniture because I am all about making your room EXACTLY what you picture.
So sometimes doing a DIY is a good way to do that in other ways.
Other Posts You’ll Love
In this Pergo flooring review you will see so many pictures of our last living room set from Jonathan Louis in our last house
Hopefully this was helpful for you when it comes to selecting your own Jonathan Louis furniture and you feel inspired to make a room you will love. Be sure to follow me on Instagram (@arinsolange) to see these gorgeous pieces as we continue to transform this room and home, and pin this photo below to find the blog post later.
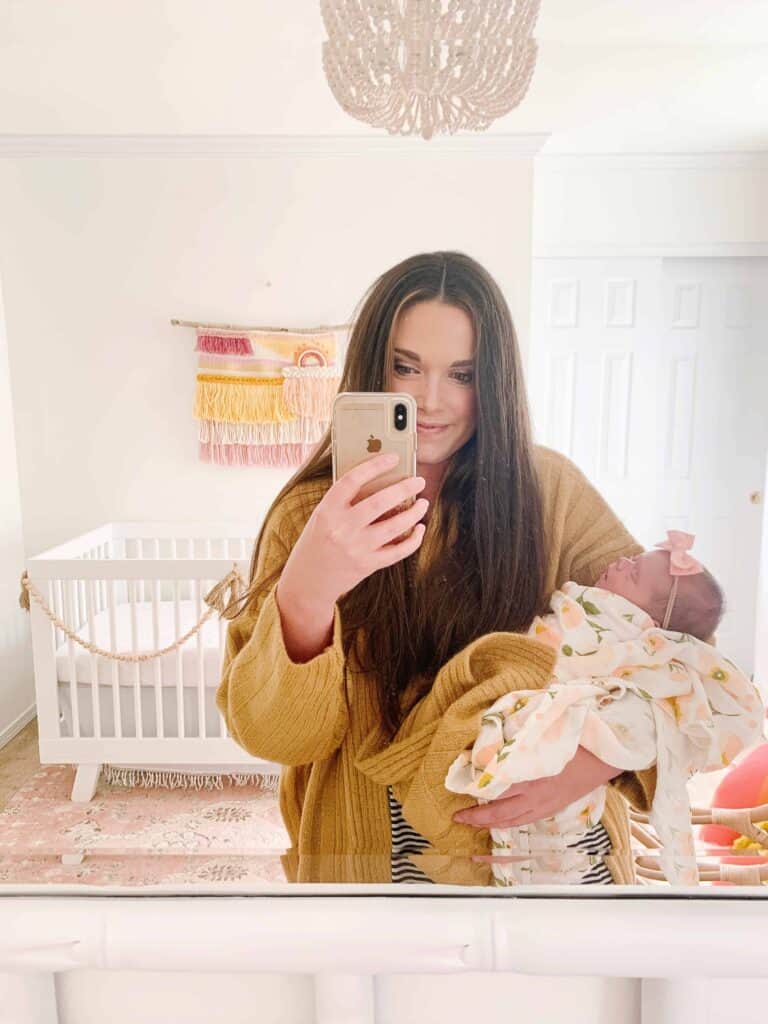
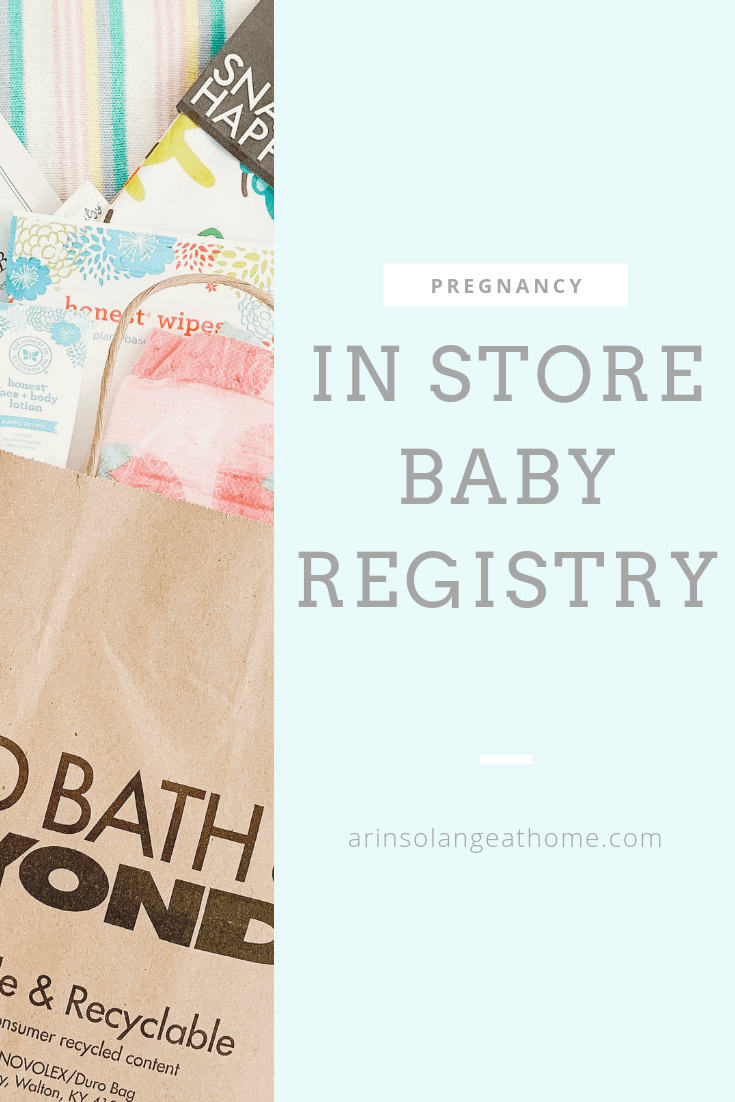
Let’s talk Buy Buy Baby Registry. I am a 4th time mom, having my last baby, and am on a mission to help moms who are expecting their babies know where to register, why to register, and what to register for!
This Buy Buy Baby registry post was sponsored by Buy Buy Baby – as always my options are all my own. Post originally written in 2019 and was updated in 2021.
Buy Buy Baby Registry
Many of my readers, followers, and friends are expecting their first babies, which always brings up the registry questions, and rightfully so. It is hands down one of the most exciting parts about having your first baby. All the tiny and cute things you have been dreaming about and now it’s time to get them!
What to register for and where to register is also a hard question. You want to make the choice that makes the most sense for yourself and your friends and family that will be be using the registry.
I will of course talk you through the ins and outs of registering at Buy Buy Baby in this post, but also want to give you tips and tricks on other places as well. (Because let’s face it – most moms have more than one registry and there are perks to several options!).
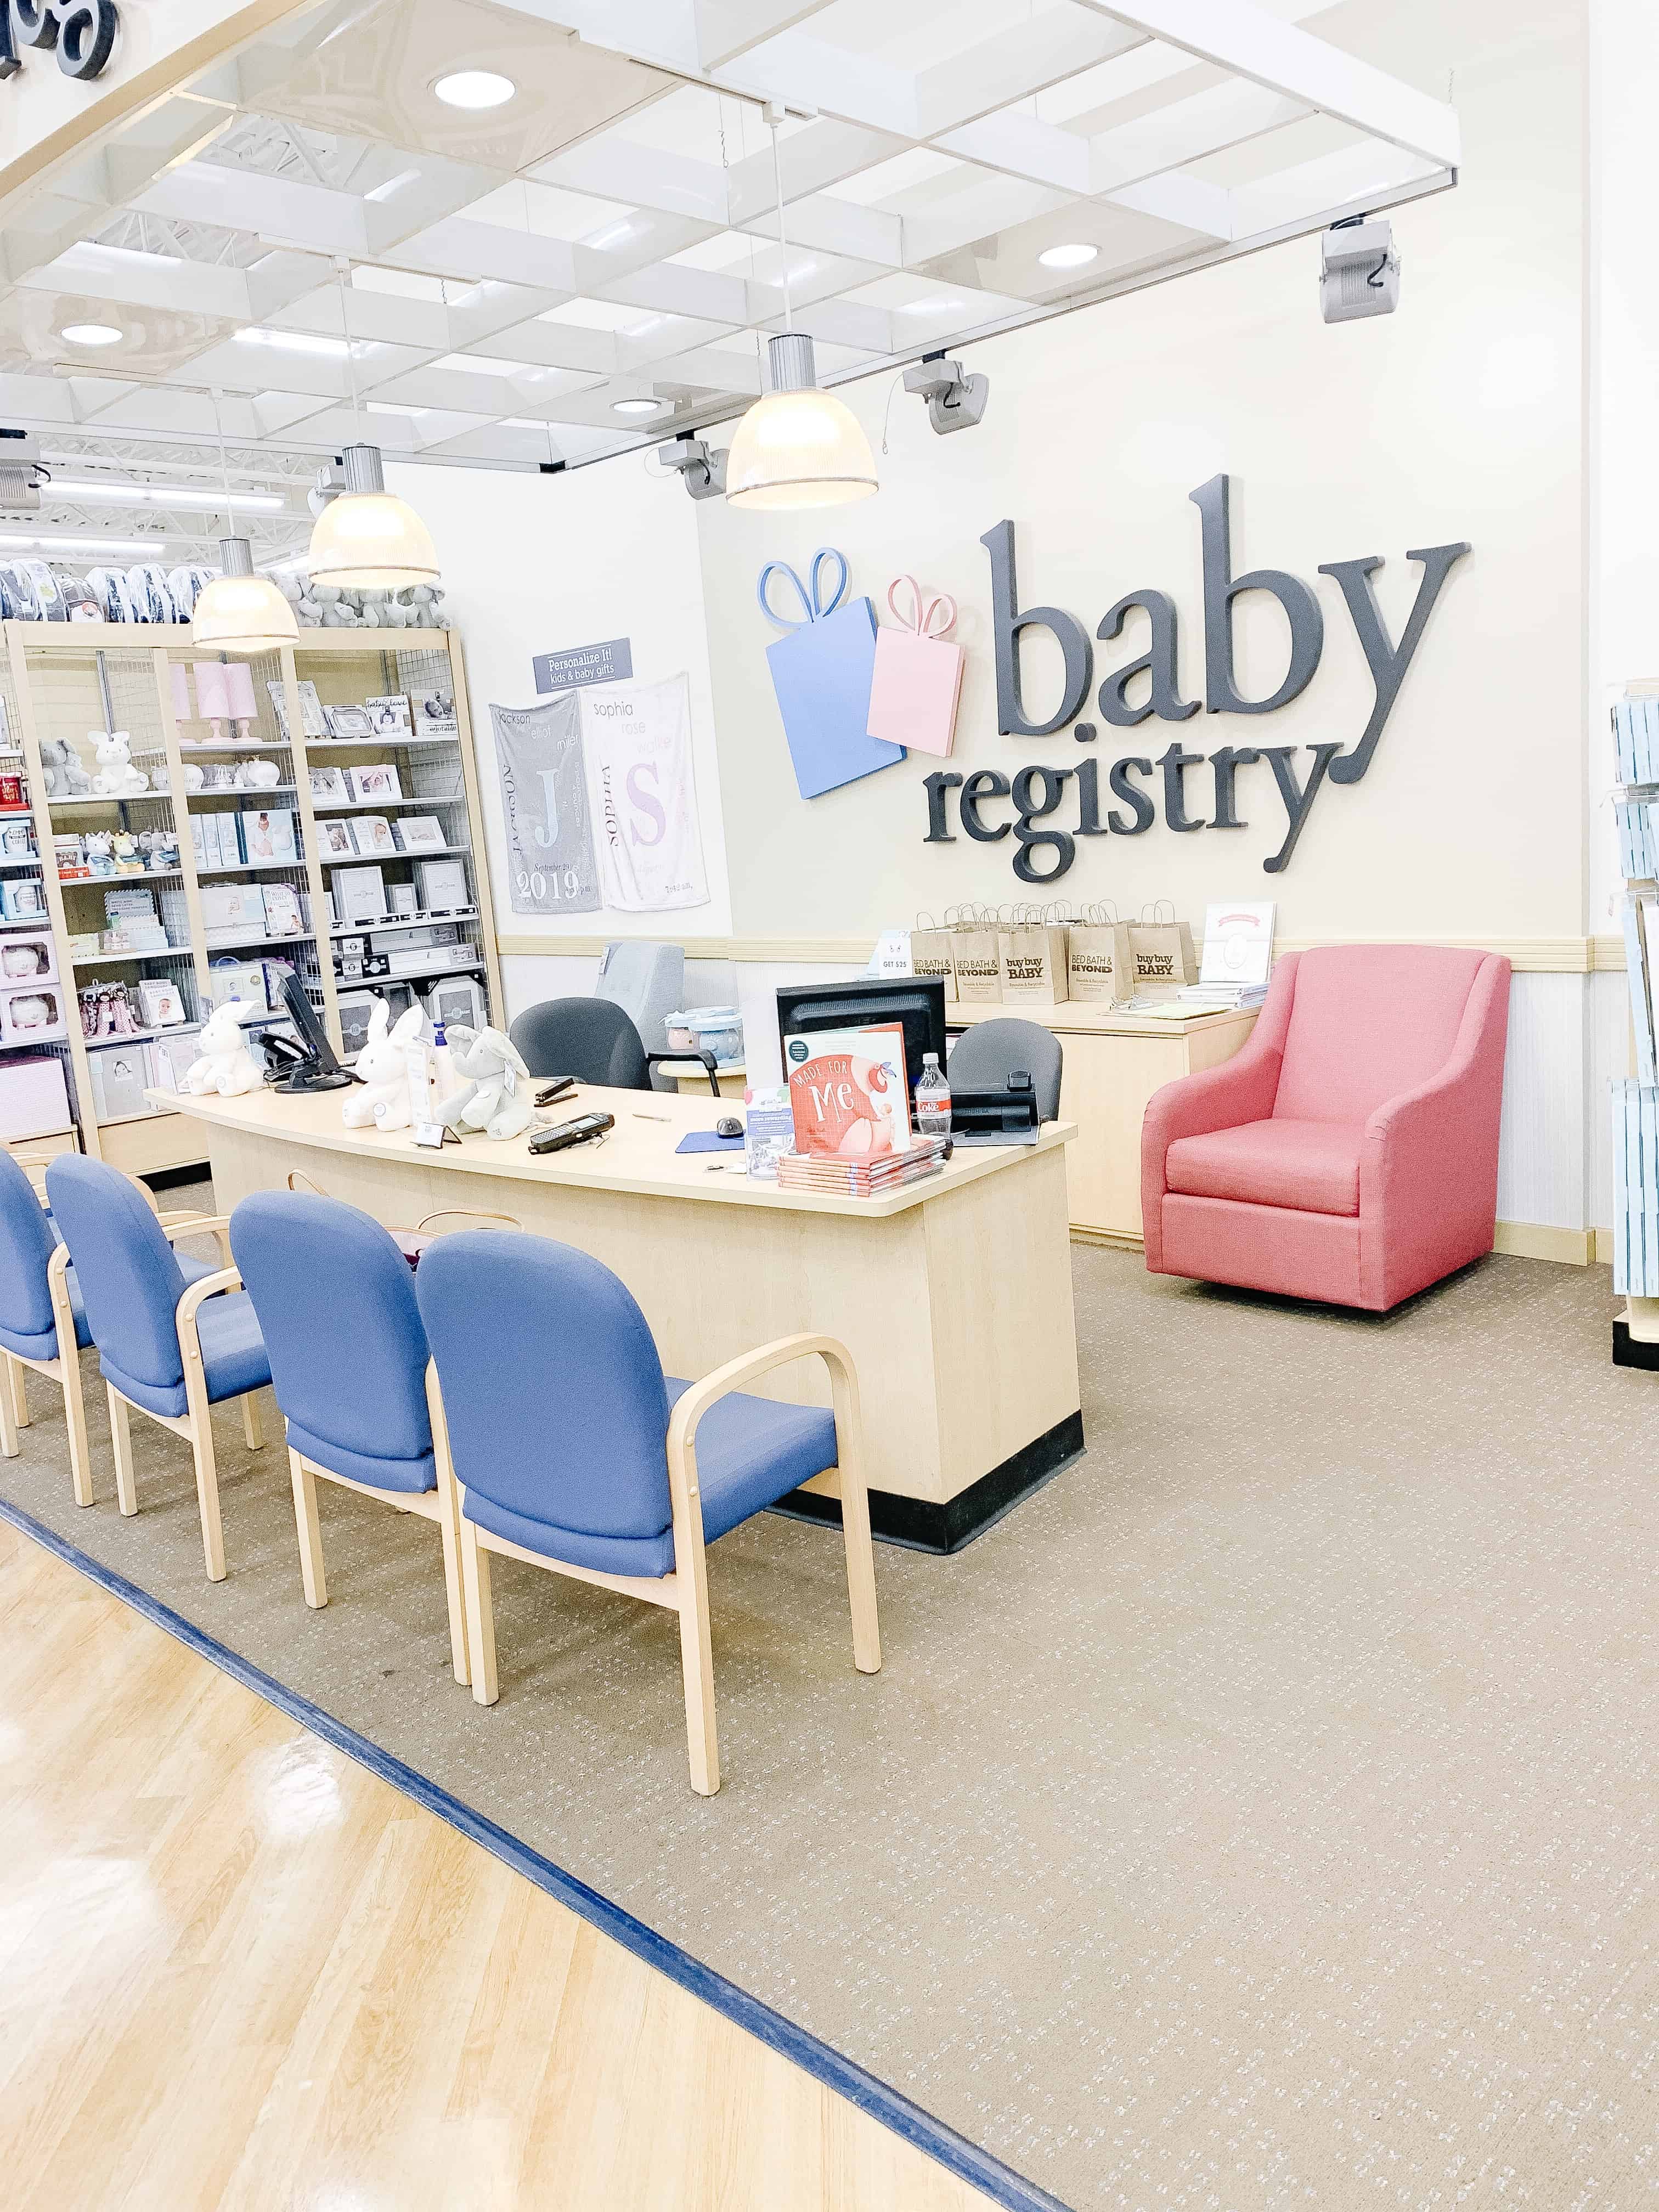
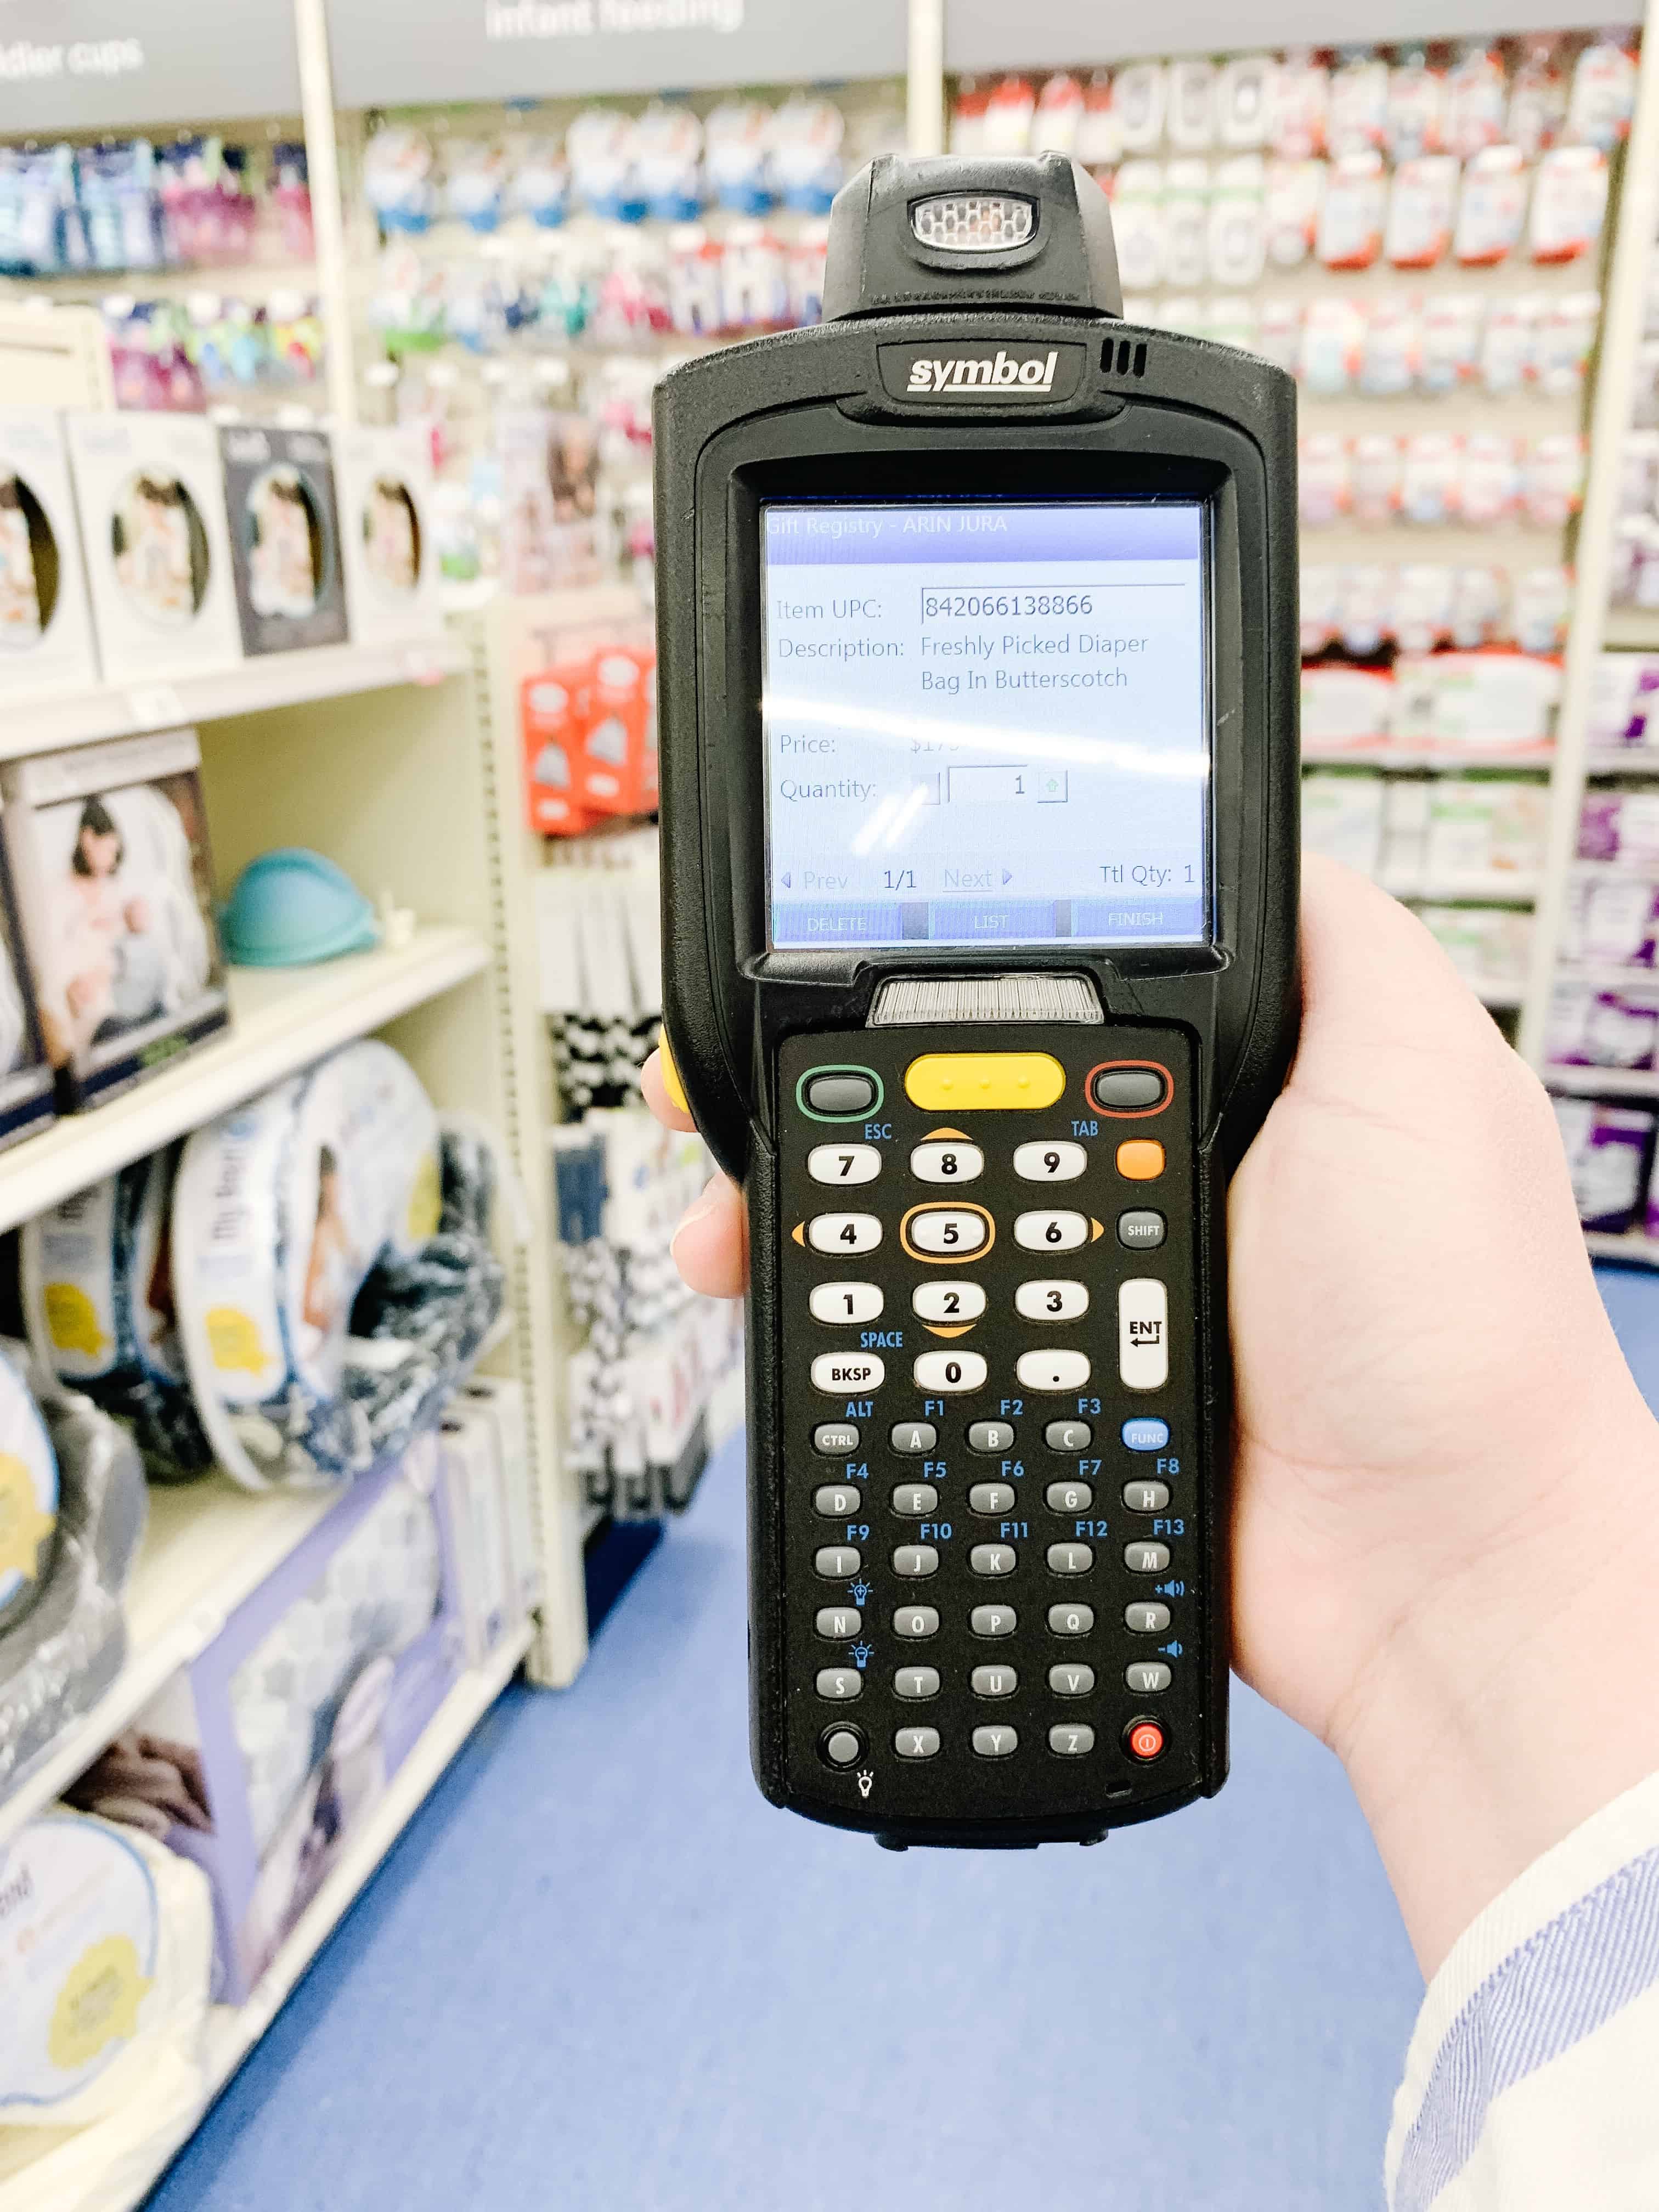
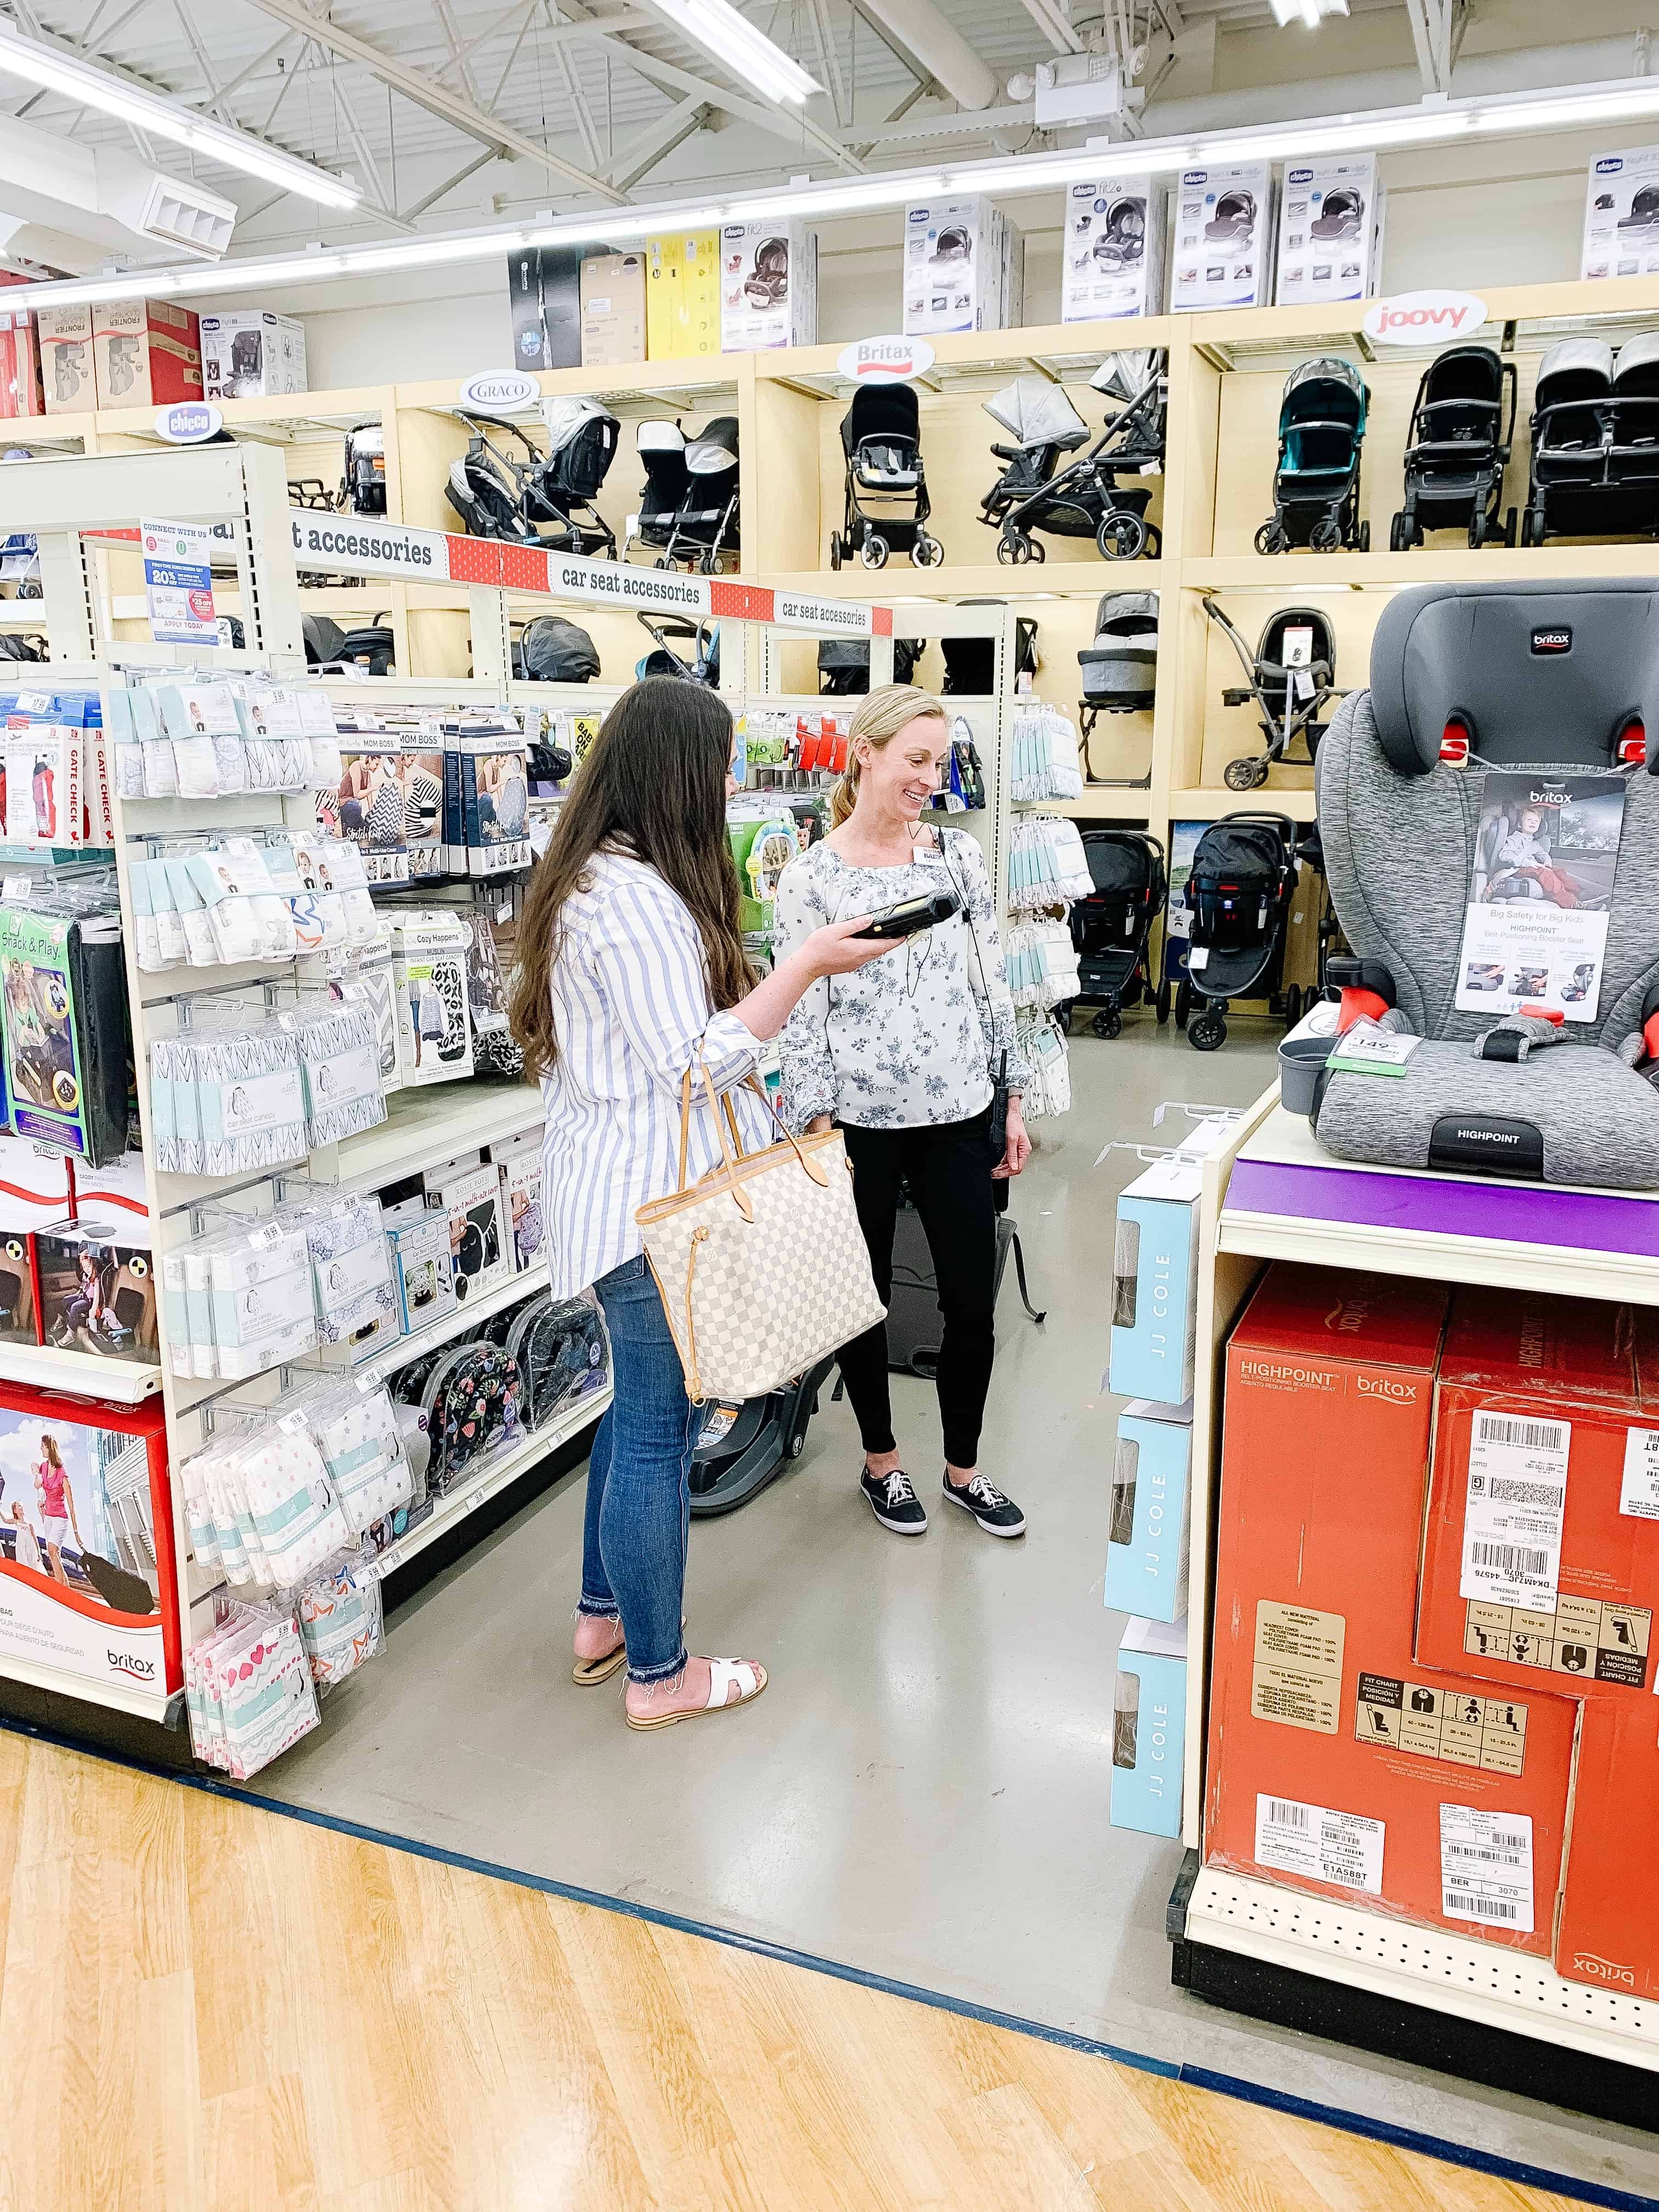
IN STORE Buy Buy Baby Registry
Now a days there are a million options for registering for babies online. And let me be clear – I think that is amazing and has its place. I mean most of your guests will be shopping online as well, and we have become a generation of researching things well without ever having to see them.
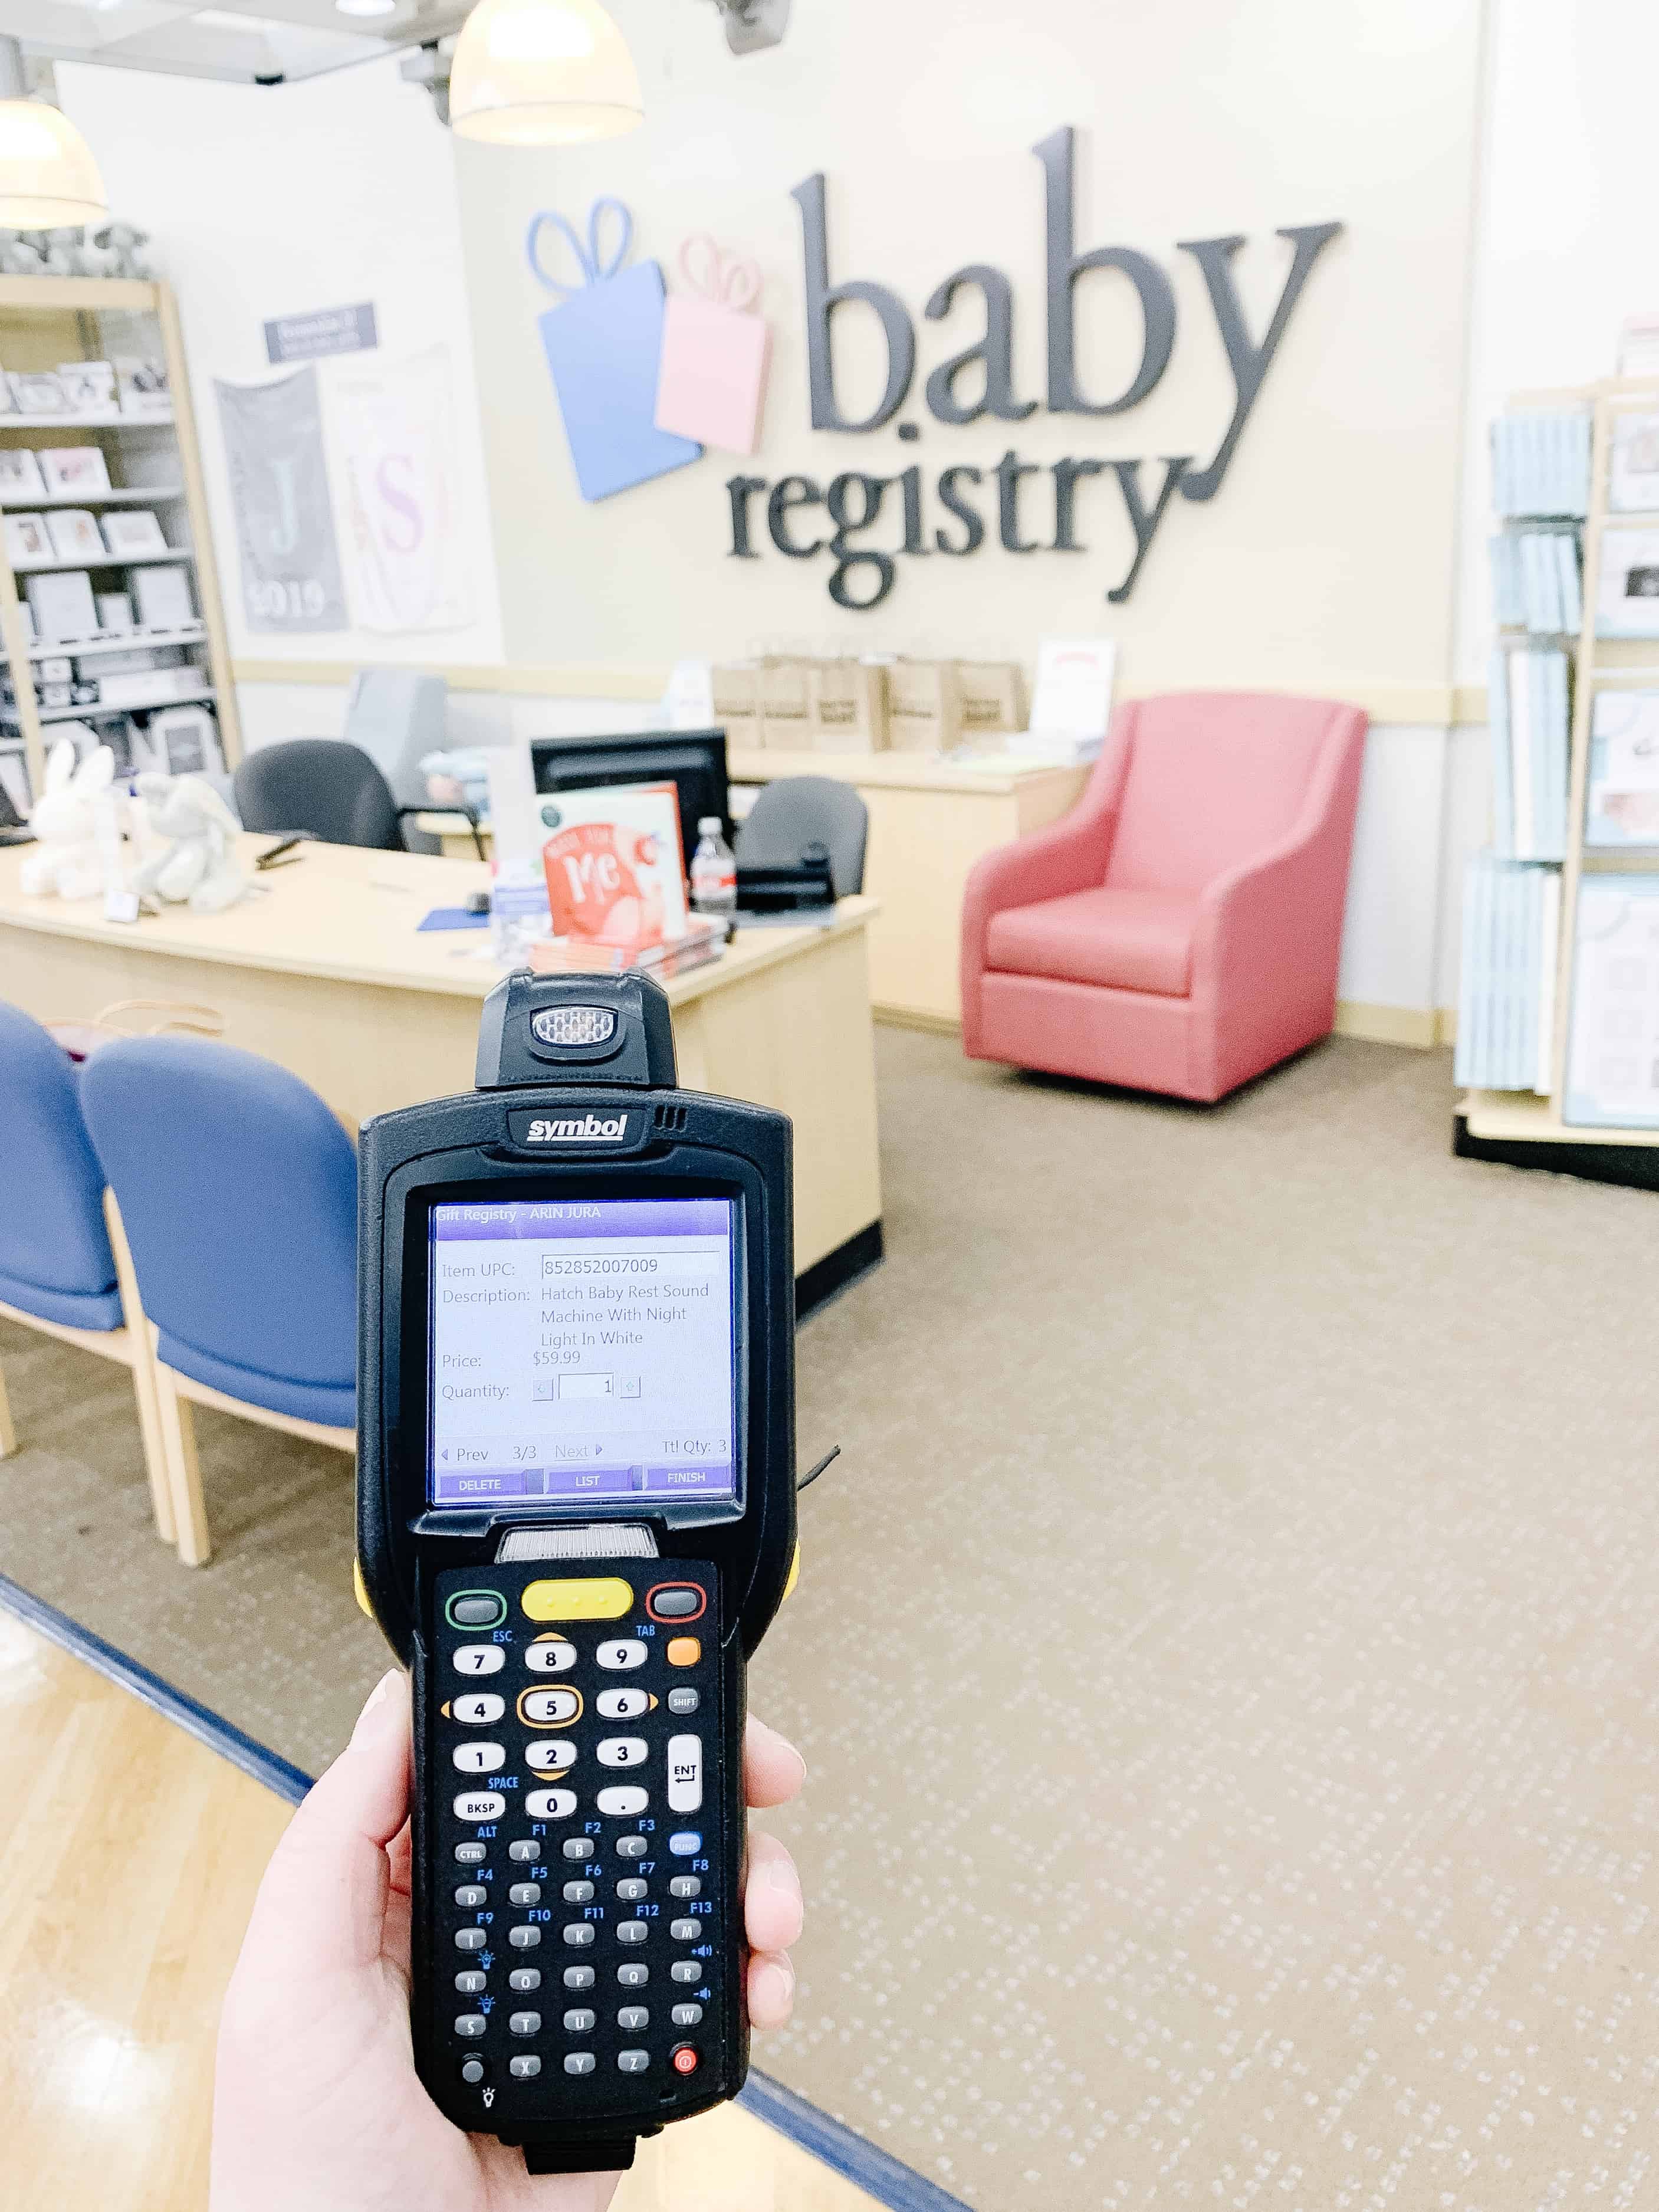
But I want to talk about why it is so important to register in store if possible in this post.. And not just register in store, but register at a store that has knowledble staff about baby gear. Buybuy BABY has been my go to for baby registries since I was pregnant with my first 7 years ago.
Originally it was my choice due to the brands they carried. I knew that I could get some higher end items there, while also getting so many basics.
Now I still like to go because I need to see and compare those new fun items in person. I always see something I haven’t seen before when I go in. Sometimes I want that item and sometimes it sparks my mind to look around at other similar ones.
My big reasons for registering at Buy Buy Baby IN STORE are:
Touch and feel
I think you can check the boxes of things like clothing, bottles, pacifiers and so on while you are registering online. Actaully in some cases it might be less overwhelming to do so.
BUT when it comes to the big ticket items – many times items you will use daily you want to see them in person. For instance – for a stroller it may look great, and sound great, but maybe doesn’t handle well. (I won’t share the brand but I recently received a stroller from a brand that on paper was amazing, and it is GORGEOUS, however it is horrible to use.)
High chairs you want to see the footprint, and bouncers are the same. You want to try the clasps and buckles and just really see how it will work in your life.
Unbiased Answers to your Questions
I will be honest – I a a blogger who has done PLENTY of reviews. I read them and write them, and that means I know that not everyone is totally transparent with their reviews.
Companies can also pay for positive reviews on products online – so although blogs like this and reviews are a great, talking to someone in store who has no reason to sway you between the options is so beneficial.
One thing about buybuy BABY is that their staff is super well trained in their specific department. They have an employee that does nothing but keep the other employee’s up to date on knowledge of all the baby gear.
For me this is so important. I want to be able to ask an employee about a carseat and feel like they really know about the ones they carry, and maybe even some they don’t. I think when they show that kind of knowledge its obvious they are answering your questions well.
In store helpful tools
Another thing about doing a Buy Buy Baby registry in store is that there are helpful tools you can’t find at home.
This is especially helpful in the carseat and stroller arena (also the two items that I truly stand behind saying you need to TRY). Buybuy BABY has weights you can add to strollers so you can see how they really handle.
Here is the thing – all strollers push like a breeze with nothing in them. Thats not always the case when you add in 60 lbs of wiggling children. They also have baby ‘dolls’ that you can fit into carseats to see how they work, as well as a mock seat to a car with latch and all that you can try installing a carseat on.
Prepping to Register in Store at Buy Buy Baby
You can set up appointments ahead of time so you get extra help in the areas you need it. If you know you’re going to be coming in on a certain day they will call you and know your specific needs for the session before you come in and have people on hand. (IE – carseat specialist, feeding experts, design consultant for furniture, and so much more!)
Staff that will help you with what you picked. So maybe you are nervous because you need to see how ____ carseat will fit in YOUR car.
An employee will help you install it so you can see how it will work. To me this is huge. When we welcomed Walker, I had to do 3 across for a while and having carseats that allowed for that was NECESSARY.
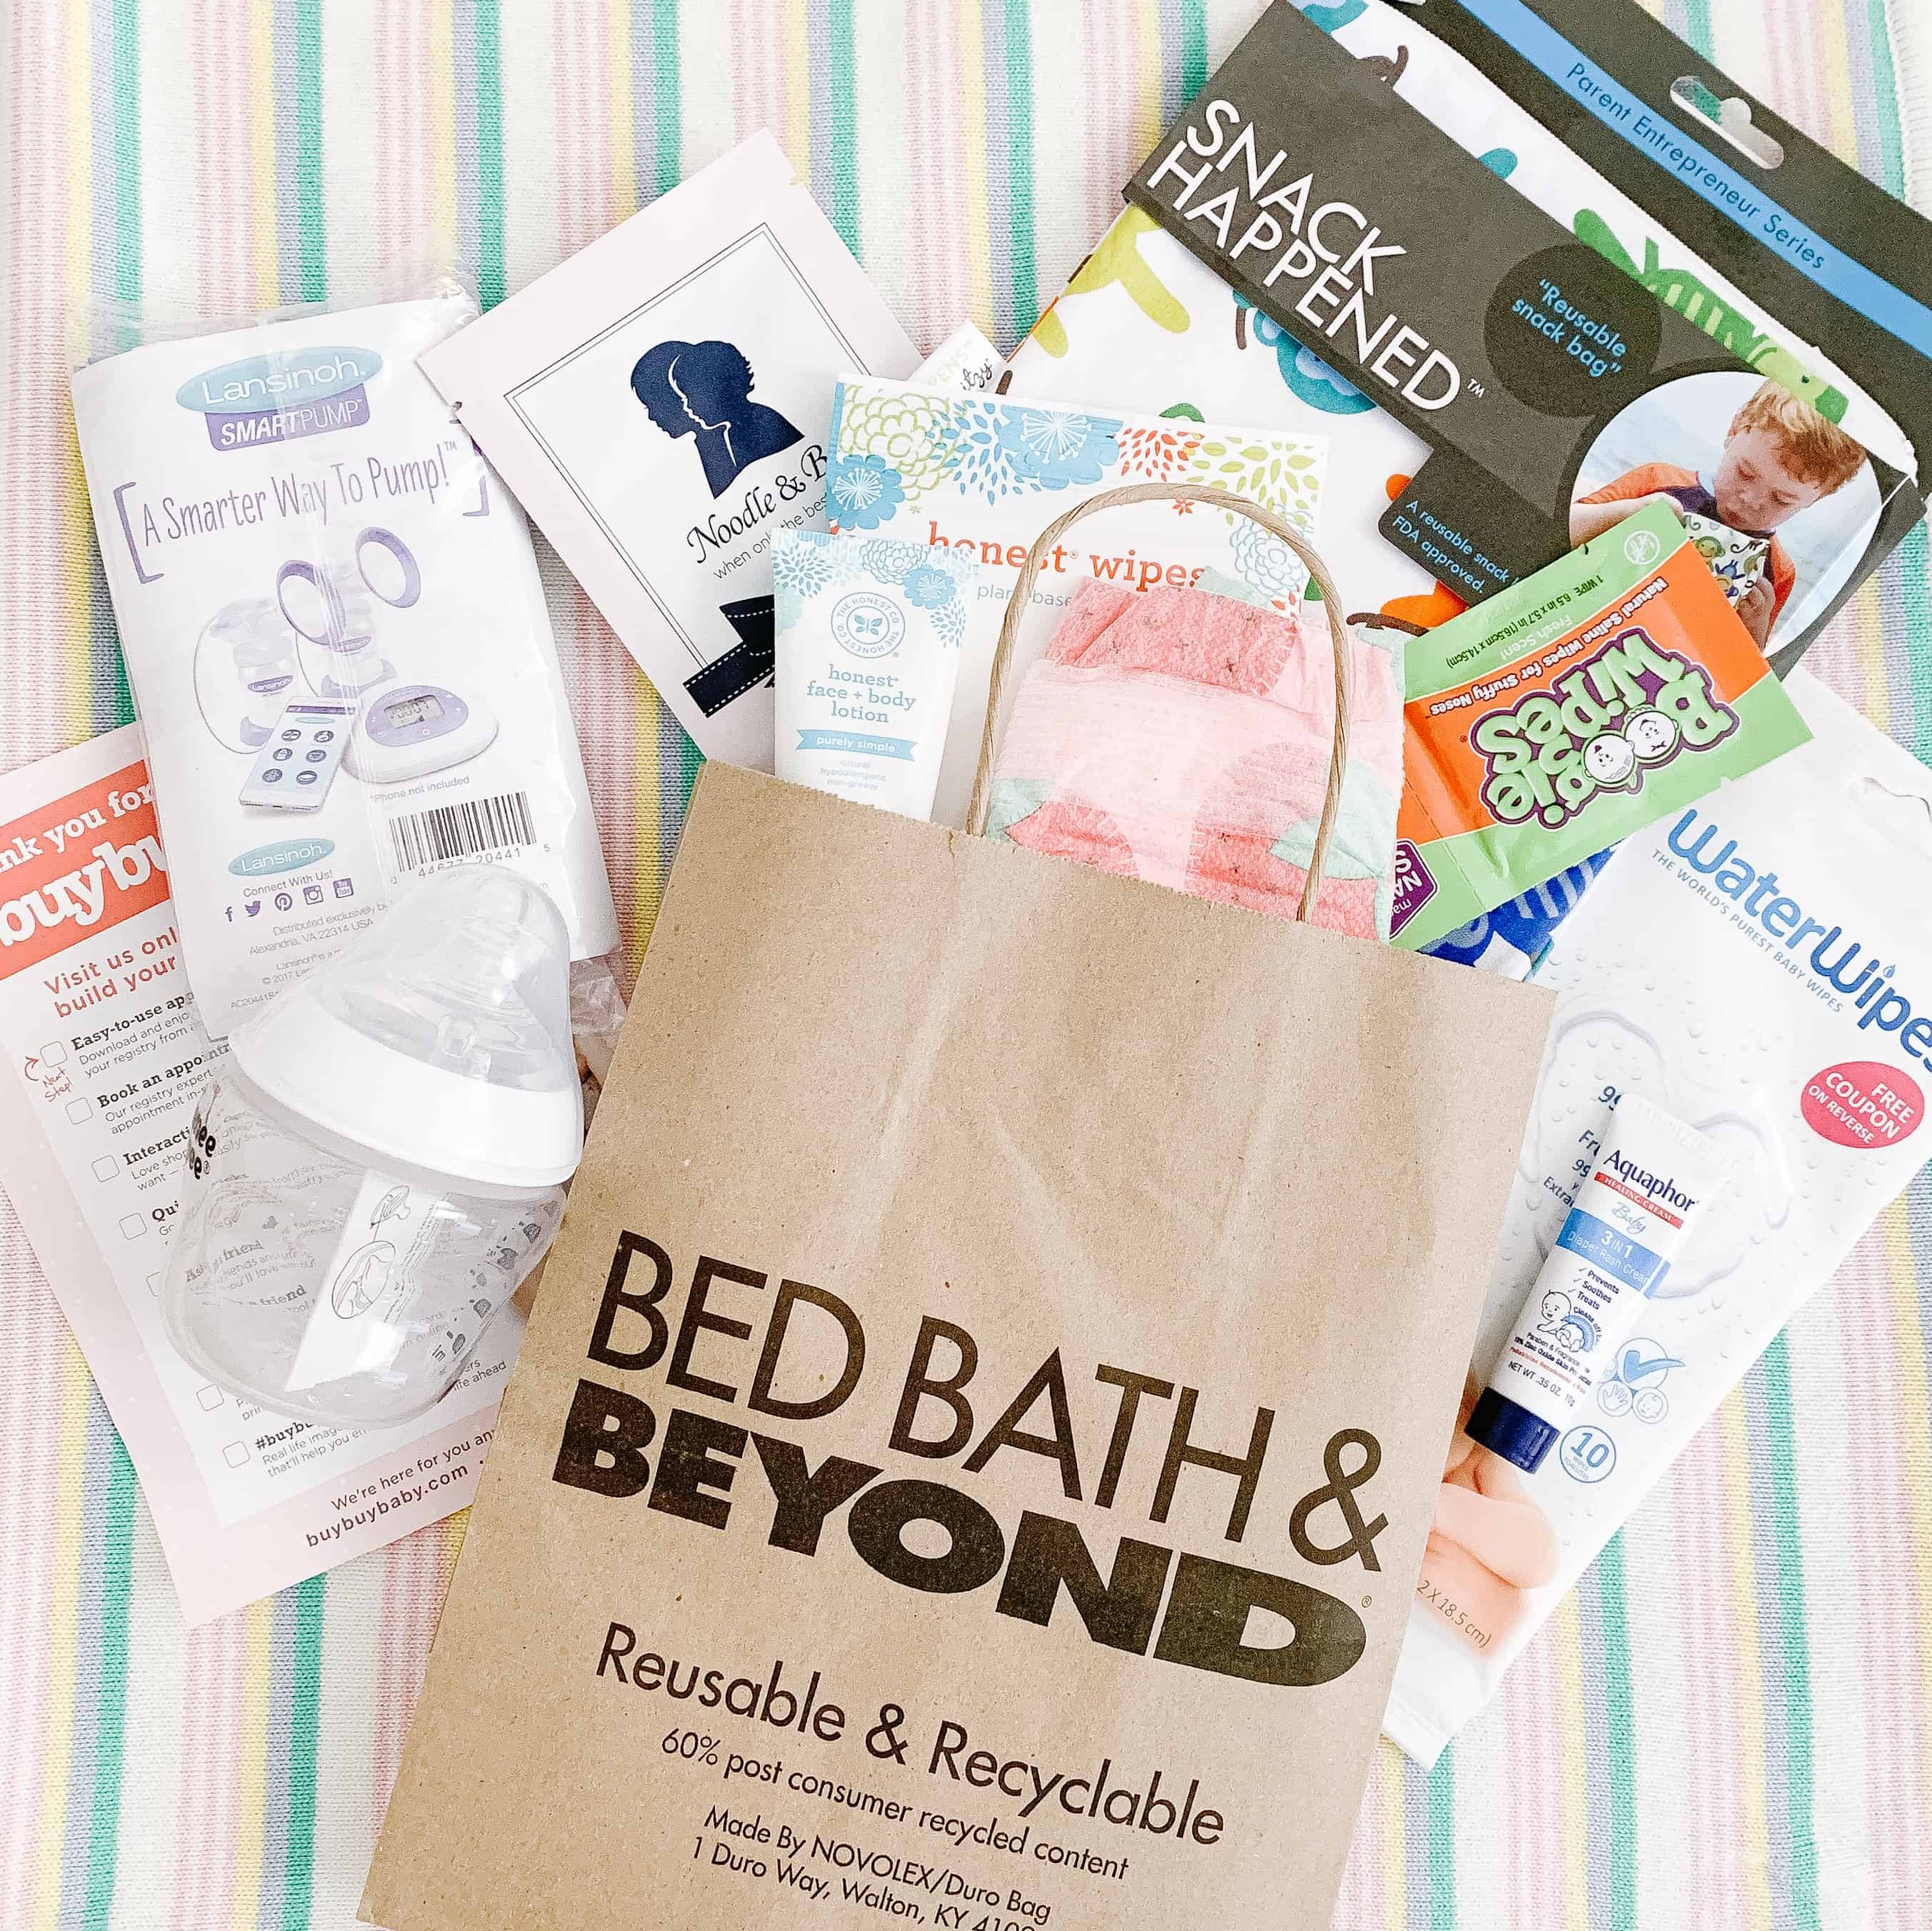
You will get a goodie bag, as well as a booklet really walking you through all the departments. This is so nice, especially if you don’t have time to complete the whole registry in store and want to add most of it online.
Online Flexibility – Buy Buy Baby Registry Online
Okay so here I am writing a blog post on the importance of going in store to register, and I’m going to talk about registering online? Like I said at the start – there is nothing wrong with online. This is 2021, and we all love to complete what we can from our couches.
The perk of registering with buybuy BABY is that you can go in store, touch and feel what you need to, then you can head home and add the rest online.
It also allows for your friends and family to have the same flexibility in shopping for you in store and online. (trust me – if I am invited to your shower, I am buying the gift within 24 hours of showing up, so please give me an in store option haha!)
Other Added Perks
On top of just knowing that you registering for items that you truly want due to the in store experience, buybuy BABY offers some other really great added perks to their registrants.
You will get a completion coupon in the mail towards the end of your pregnancy. You can bring that in and use it one time for 15% off anything left on your registry. There are no exclusions on that coupon, so thats a HUGE deal on brands that are typically restricted. This coupon is good until 3 months past your due date.
You are going to get the same coupon to use online and that one is for multiple uses.
They have a price match guarantee.
If you register for an item and don’t use it, you can return it for up to a year. This to me is HUGE. Also a good reminder to us not to open items until were ready to use them.
You will get a referral code – anyone who uses it will earn you $25!
Registering other Places
Now I am here to tell you how great Buy Buy Baby Registry is and I stand by that. That said – in todays day and age I would register a couple other places – below are my suggestions and tips on why.
Amazon – you all know I LOVE Amazon. Amazon has everything under the sun but also allows for last minute gift givers to stick to the registry. you get the complete your registry coupon that can never hurt.
Target – Super easy on returns and extra gift cards for diapers and wipes is a HUGE WIN!
Baby List – Baby list is a great option! You can register on one ‘list’ from any site – think Etsy, small shops, Nordstrom and so on.
If you have any questions on registries be sure to shoot me an email or comment below. I will be working on several more posts like this for my pregnant followers and readers, but in the mean time if you’re looking for some great items to add to your registry check out this post!
Some of My Favorites from my Buy Buy Baby Registry
Clearly this will only barely touch on some of my favorite items – but if you are looking for a good starting place with your registry below are 15 of my favorite items from Buy Buy Baby.
I am also linking to SEVERAL other posts I have done giving full reviews of some great pieces of baby gear.
Hopefully this helped you feel prepped and ready to do a Buy Buy Baby Registry, and you are excited for your experience. Be sure to pin the photo below for later to find this post, and follow me on Instagram (@arinsolange) for more helpful information!
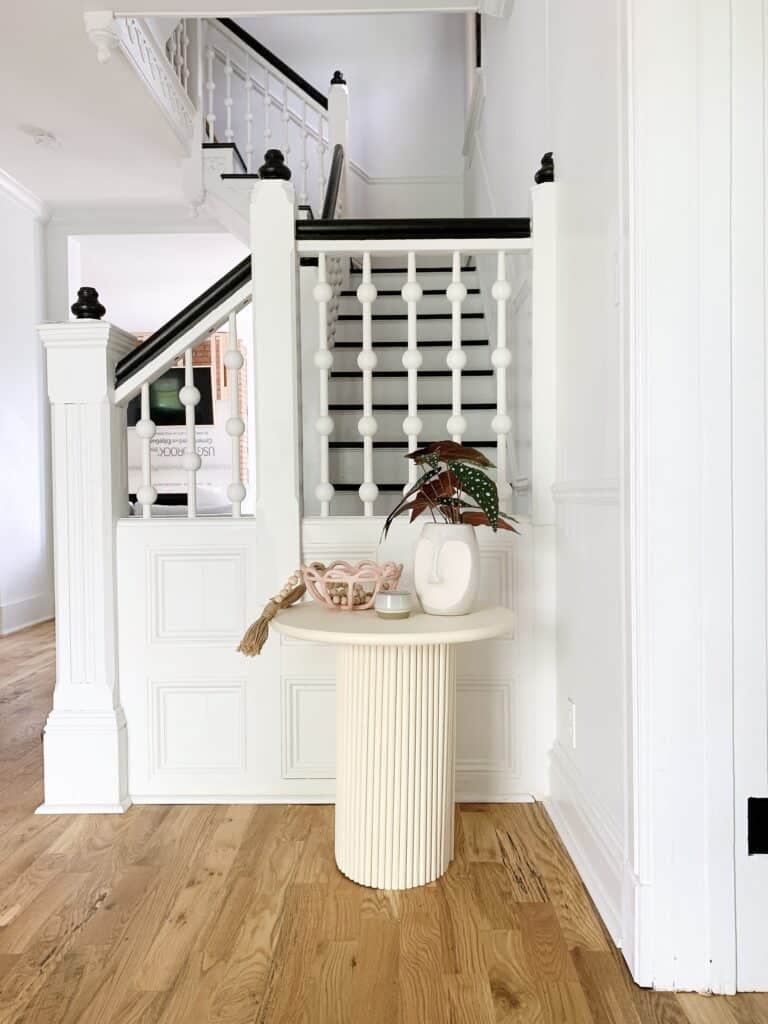
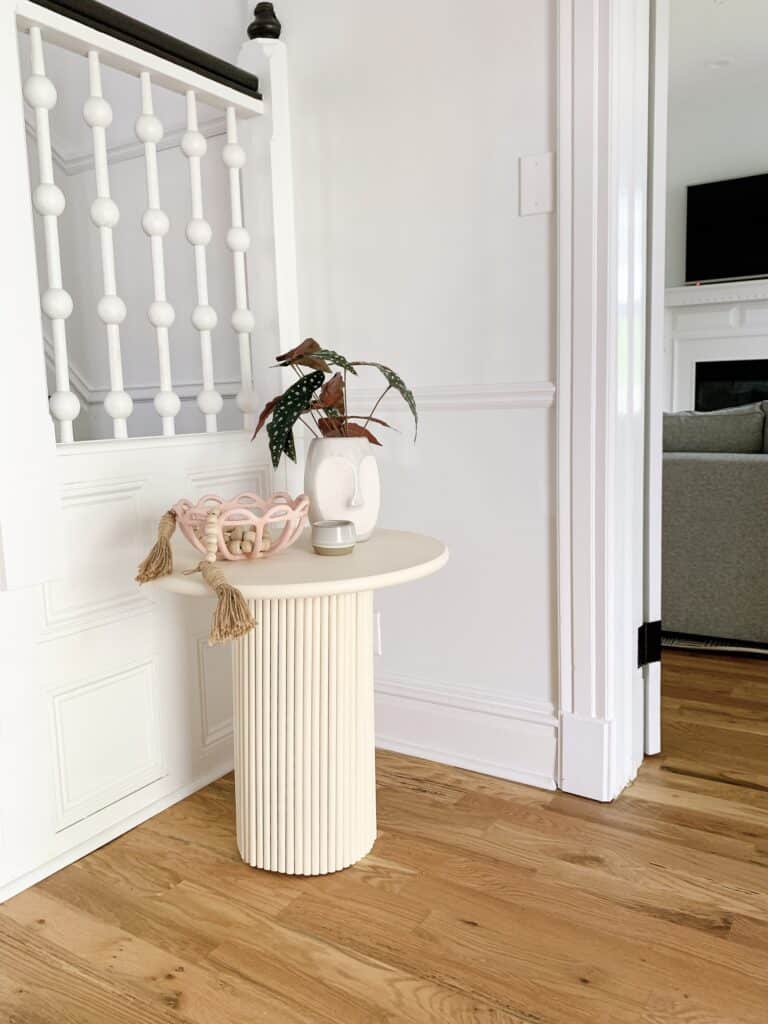
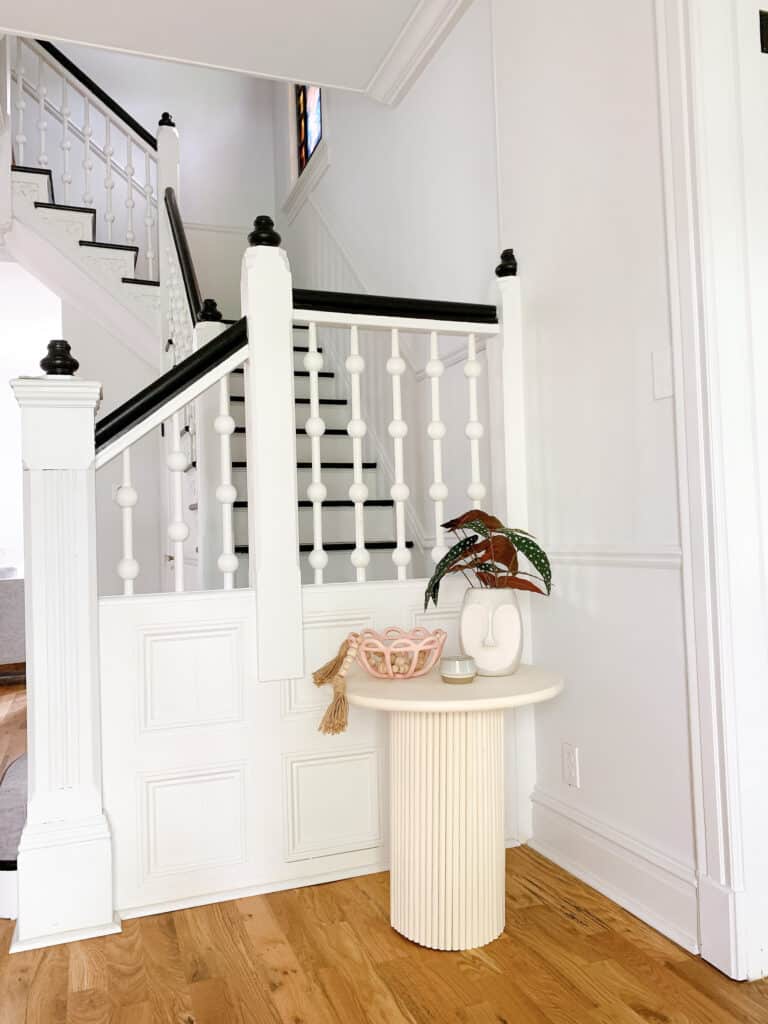
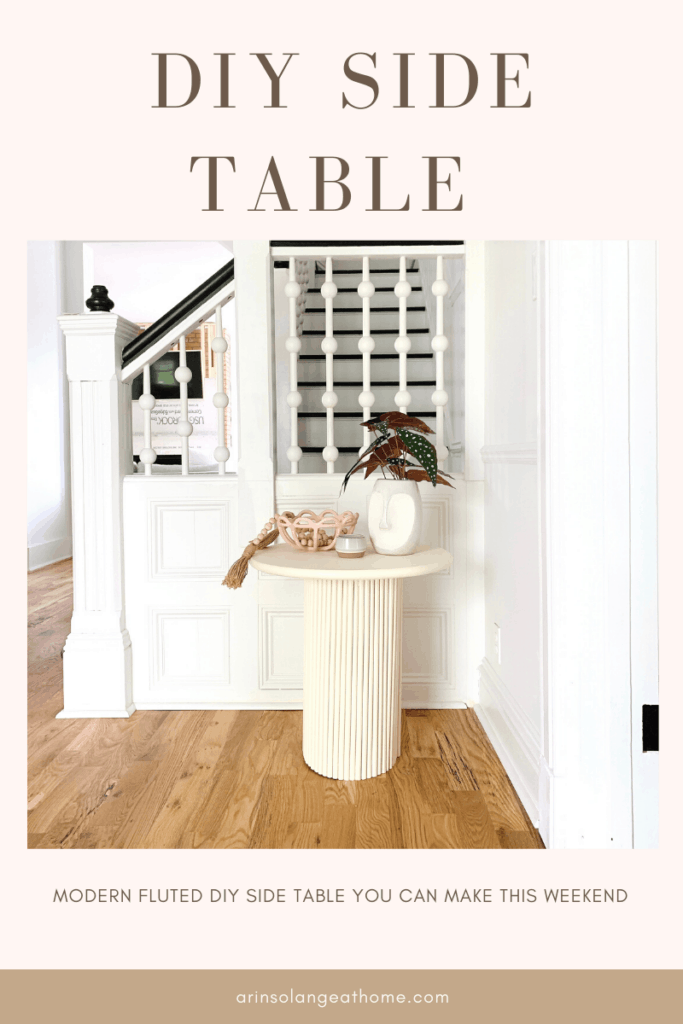
Another quick weekend warrior DIY for this easy DIY side table. You know I am all about making something your own if you can – and this little side table was a SUPER EASY way to make something your own. Sharing the DIY post below as well as some great other options.
This post may contain affiliate links
DIY Side Table
When we were creating our new family room space one thing that I knew I wanted was a round side table – but I wanted it to be of substantial enough size and height with our couches.
Clearly I could have just bought a side table but – A: what fun is that, and B: Finding something semi affordable for my exact needs was proving to be pretty difficult.
I have been leaning a bit more modern and Art Deco in some of my decor choices and this table was a clear easy choice (to go with a very last minute room).
Fluted Furniture
If you are on Instagram then you have been seeing fluted furniture. It is everywhere – and so much so that finding the supplies for it is getting tricky.
It is a fun style that works really well whether you’re modern, traditional or anything in between. I have seen it done on coffee tables, end tables, cabinet fronts – you name it.
I actually first started doing a DIY with fluted furniture when I was working on Ave’s dresser this past fall – I utilized dowels to create a sunburst look and it turned out so cute – and clearly didn’t scare me away too much.
Tips on Supplies for your DIY Side Table
One thing that I STRIVE to do when I am sharing DIY’s is to make them as affordable as I can. Sometimes that means the method I personally used isn’t ‘the best’. IE – in the learning process of it I learn that you can stick with my plan or go with something different.
If you are planning to Paint
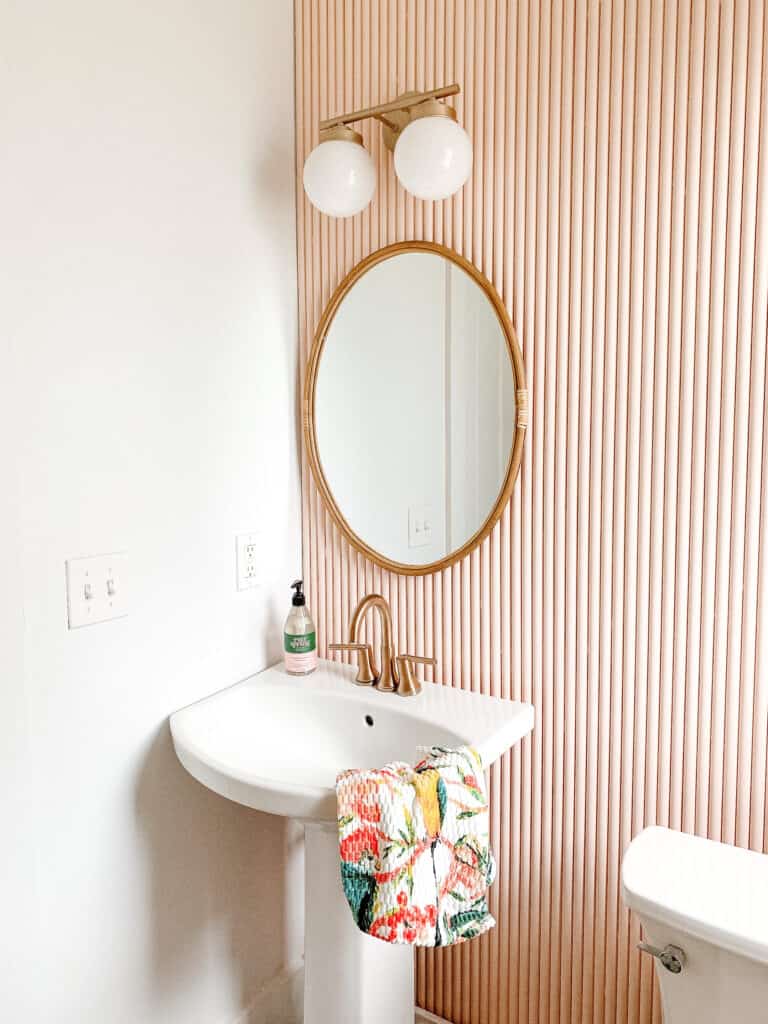
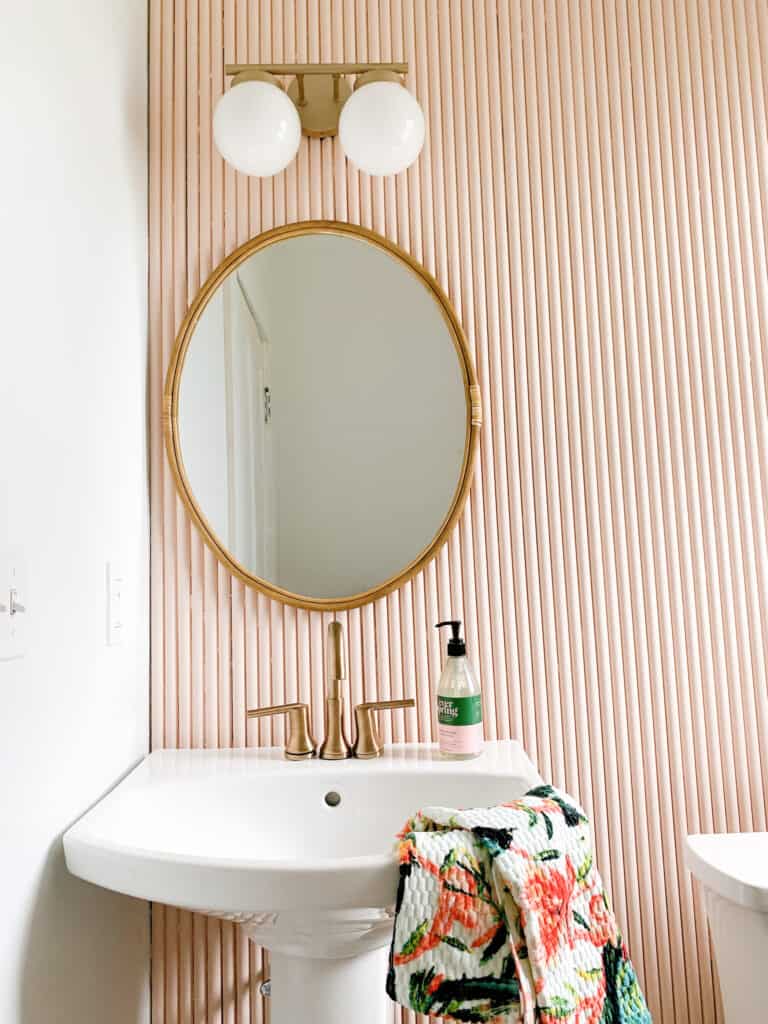
The dowels can be basically anything – similar to mine they didn’t mach in terms of color. BUT I am currently working on a wall in our powder room and realized that you could most definitely also use PVC pipe to make this so much more affordable.
This will clearly only work if you are going for a painted finish but will save you a ton of money – especially in this high cost of lumber world we are in.
If you are Planning to Stain
Clearly if planning to stain there is a bit more thought that needs to go into your supplies. You need to make sure that your dowels are in a similar color – you can see that some of mine were a bit green and I wouldn’t have picked those.
This method also clearly leaves off the option of PVC pipe. However you could do a stained top and painted base if you wanted!
Supplies for DIY Side Table
So this is one of those DIY Posts that can be tweaked and changed based on what you can find and what you want exactly. I will share options along the way in the supplies and directions to make this your own!
Materials
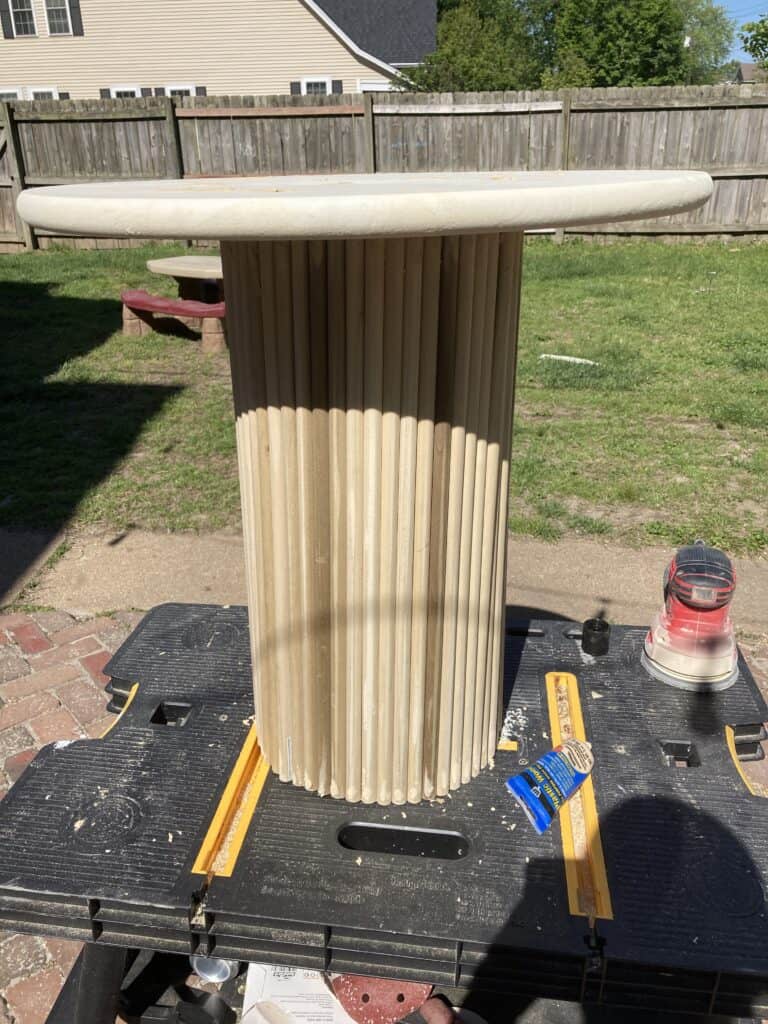
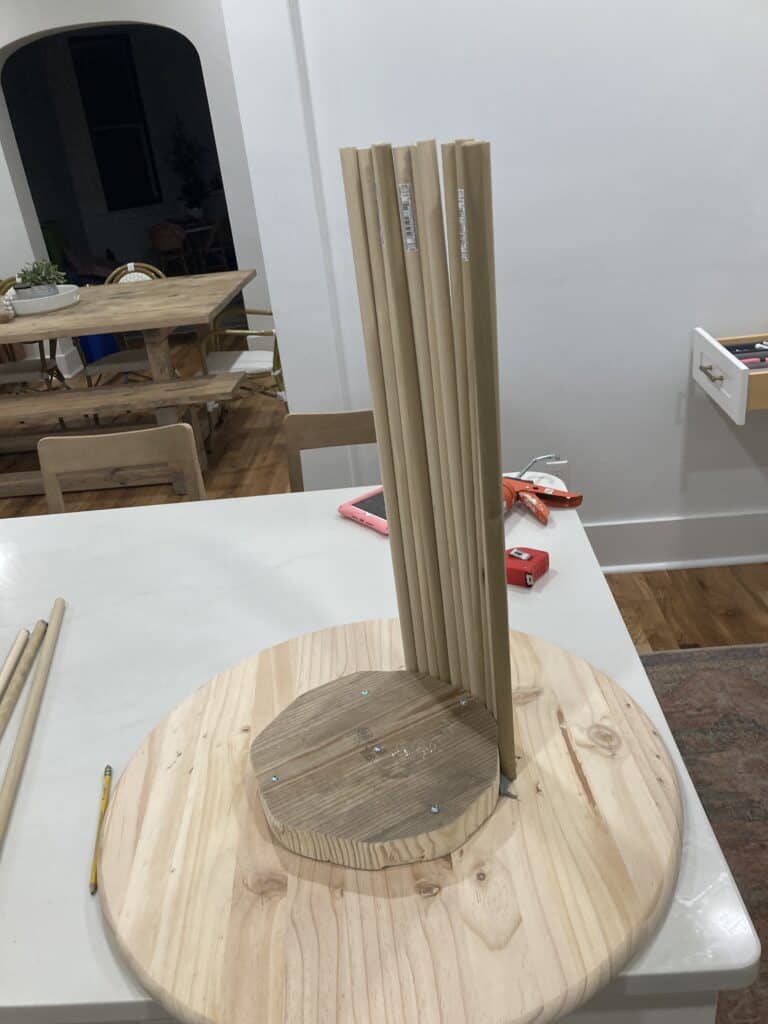
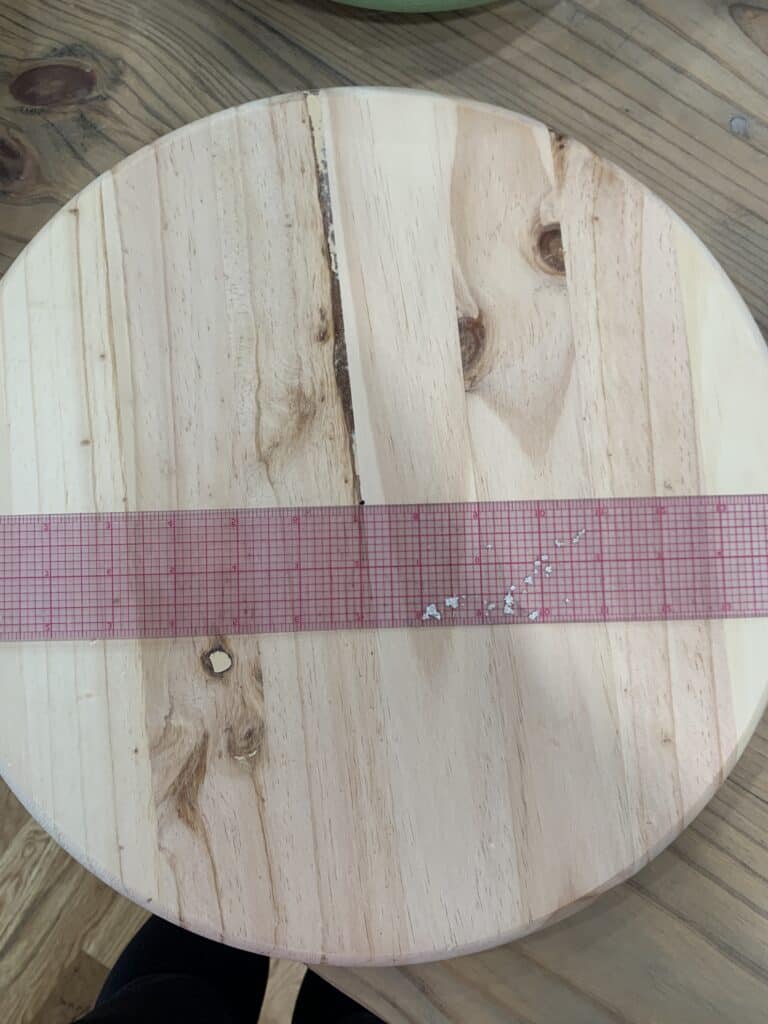
Table Top – I went with a 24 inch wood round
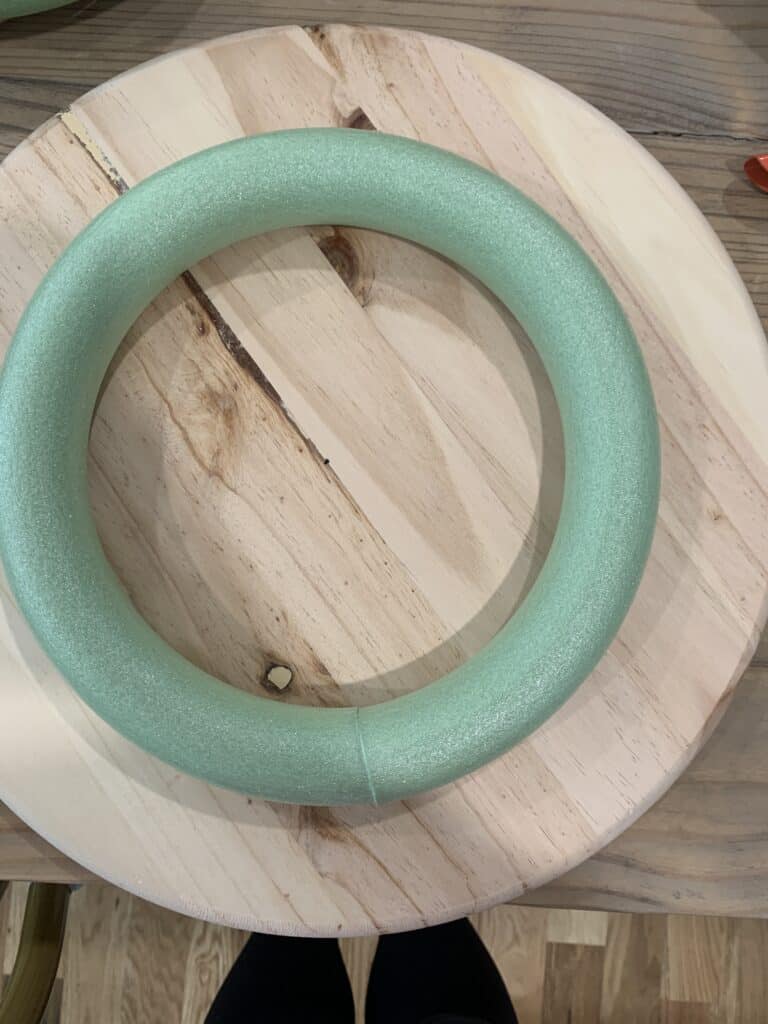
Stability/ forms for the base – You have some options here. We personally used scrap lunar and my husband cut me two rounds with his jigsaw. This saved money but that was because we had that ability. The more easy option is to buy 2 round wood pieces like these. anything from 9 inches – 12 inches would work great but I can’t seem to find them smaller than 12 inches.
Dowels – I just linked to the ones I used (however I found them for $2 ish a piece at Menards! For the 12 inch round at the height of my table you would likely need about 22 of them!
Cut all of your dowels or PVC Pipe to 23 inches tall (or your preffered height). For the exact dowels we used 22 dowels will be enough, however if you change the size of dowel at all you may need more or less.
Attach your 12 inch wood round to the bottom of the 24 inch wood round in the middle using screws.
Add wood glue around the edge of the 12 inch round and grab your dowels.
Now you will nail each dowel into the wood round. The wood glue in conjunction with the nails will keep it in place.
Once they are all in place set your second 12 inch wood round on the ground and nail into the bottom wood round. Once it is attached in a few spots you can flip it so you can work more easily.
Add Wood filler to all nail holes and any blemishes on the top of your table.
Sand the wood filler and make sure your base is even by sanding.
Paint or stain (notes in the blog post if you are using PVC)
How to Make your DIY Side Table
Their is a printable version of the supplies and such above if you find that to be more helpful!
Alright now all your supplies are gathered and it is time to create your DIY side table!
Step by Step How To:
Cut your dowels or pieces of PVC Pipe. I cut mine to 23 inches long.
Once your dowels are cut it is time to work on the base. As stated with the initial list of supplies – you will either have 2 small pre cut wood rounds or you need to cut them yourself. If you need to cut them this is the time.
Now take your 24 inch wood round and place a smaller round in the middle. Place in the center and attach with screws.
Now add a layer of liquid nails all the way around that smaller round IF YOU USED WOOD. If you used PVC you will want to work slower.
For wood rounds you will add them one by one nailing them into the wood round. For PVC I would add a few and hold them there with painters tape. Let those few dry and then slowly add more on in batches of 3 ish.
Once all your dowels are in place, take your second small wood round and set it on the floor. Place your table standing upright around the wood round and either nail into the base or add glue and glue onto the base if you are using PVC. (With the wood rounds you can flip it upside down after the first few nails to make it easier. And for the PVC wrap it tightly with painters tape while the glue dries.)
Add wood filler to any nail holes and crevices on the table top.
Sand – if you are using PVC legs you also need to sand all of the legs well.
And that is it. This sounds like a more complicated project than it is. It can definitely be done in a couple hours over 2 days (especially with wood). Shop around for your dowels and find them on sale if you can.
The table is short enough that craft store dowels will work as well, so you have a lot of options!
Other Posts You’ll Love
If you loved this DIY then check out these other posts for great posts you’ll love!
Hopefully you feel inspired to create your own DIY side table and this tutorial is helpful for you. Be sure to pin the photo below to find the tutorial later and Tag me in your posts on Instagram (@arinsolange) if you decide to make one.
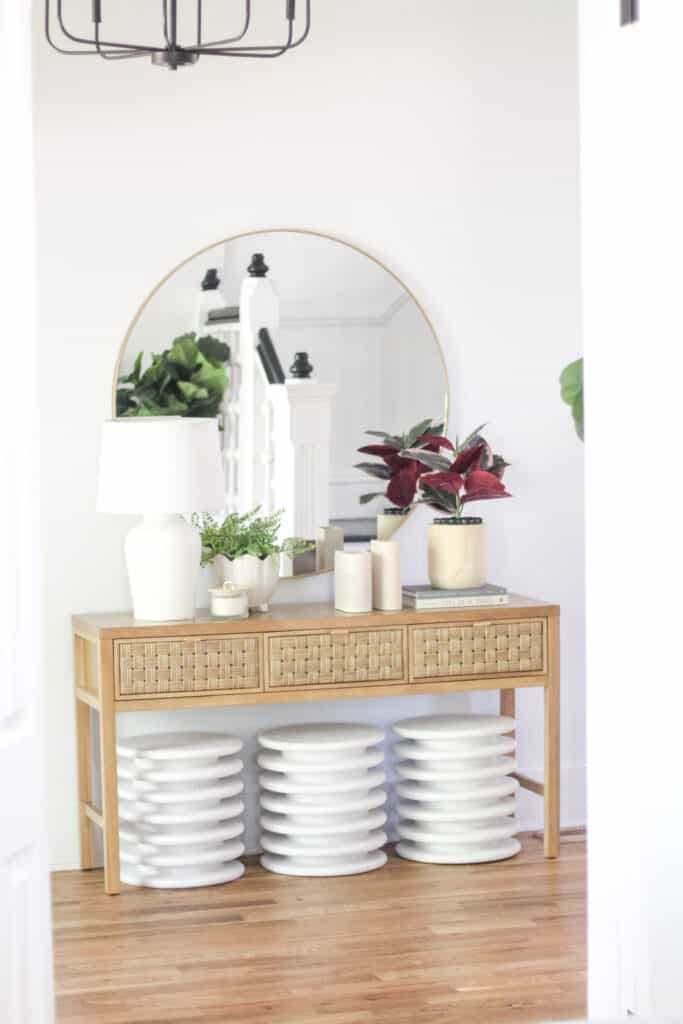
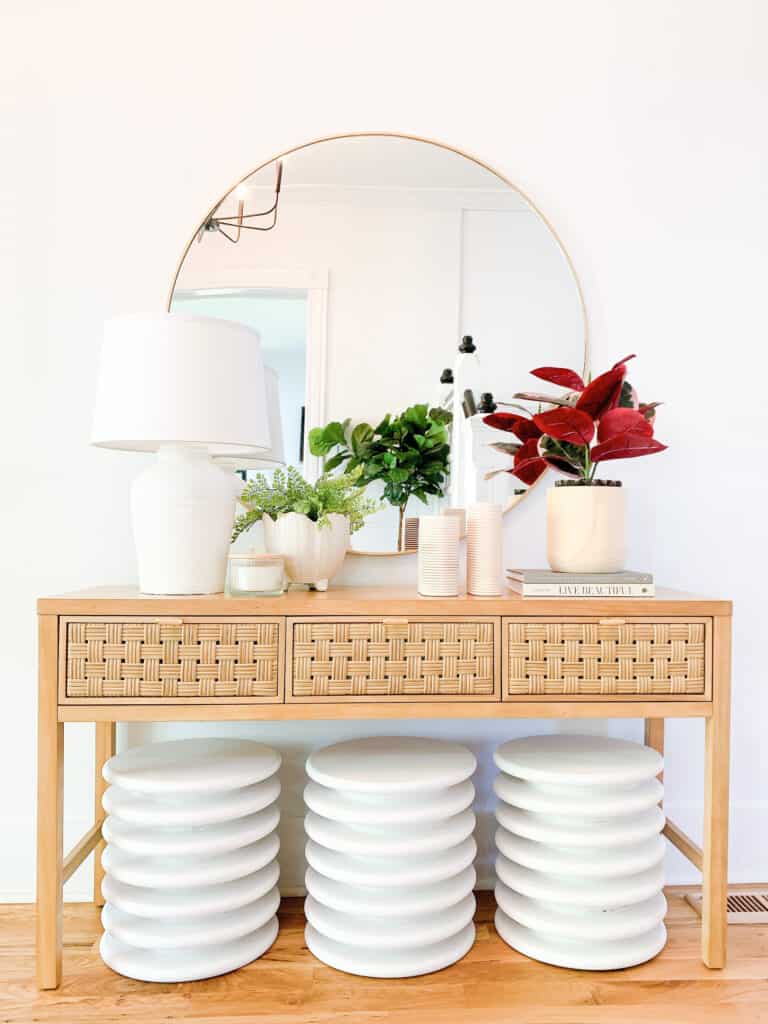
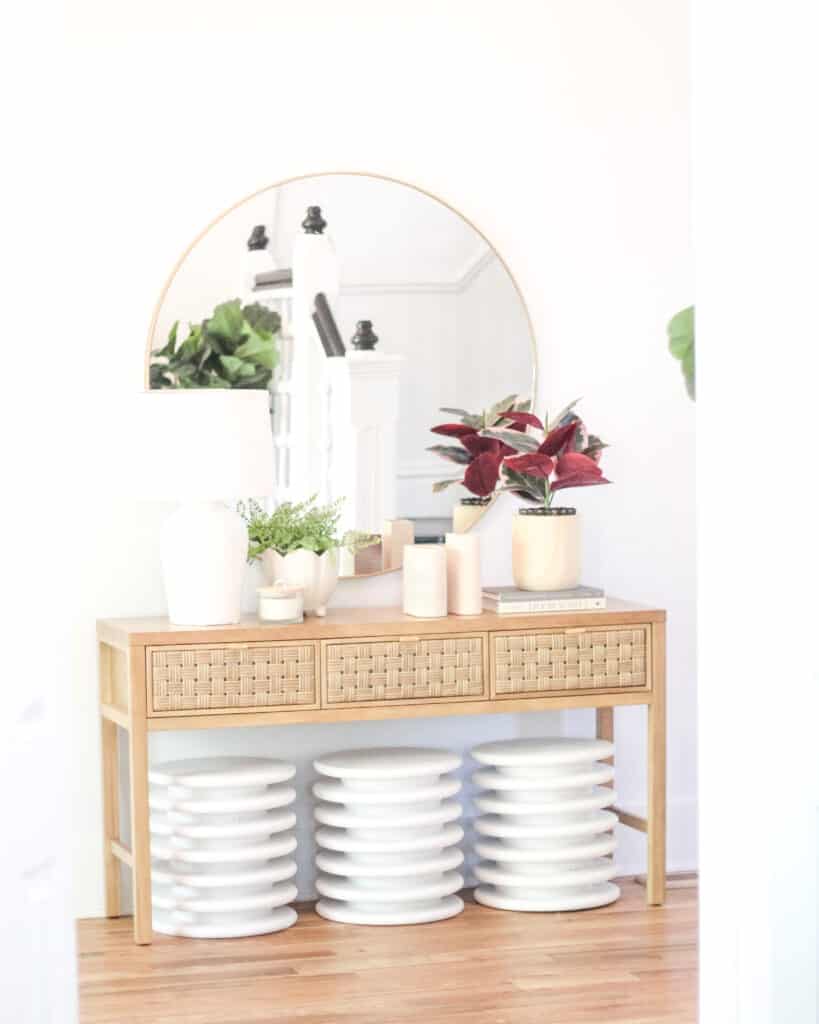
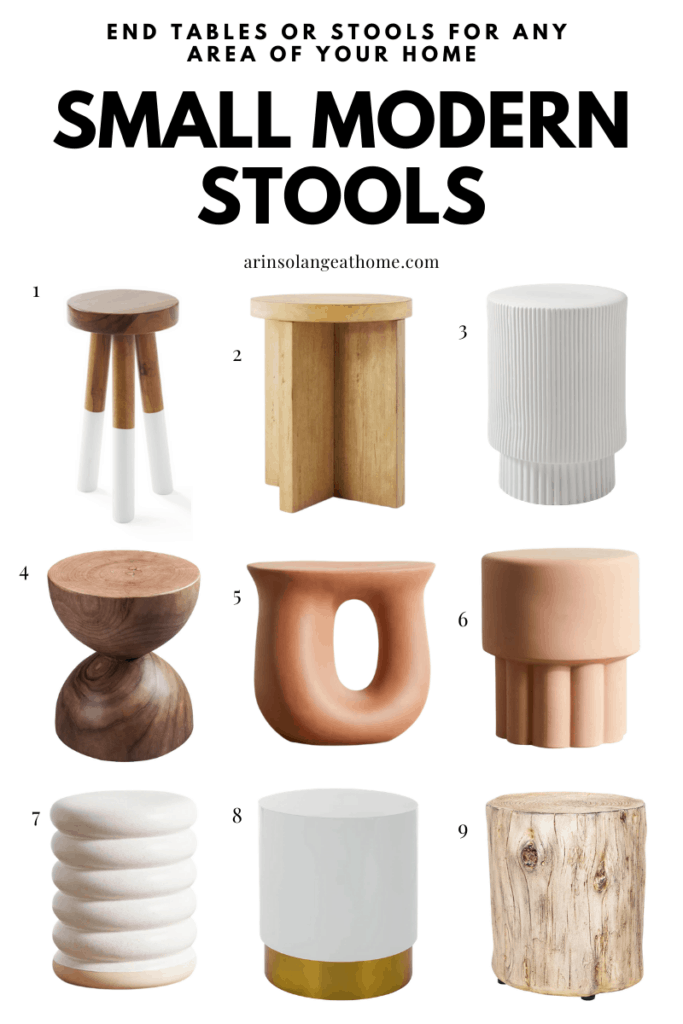
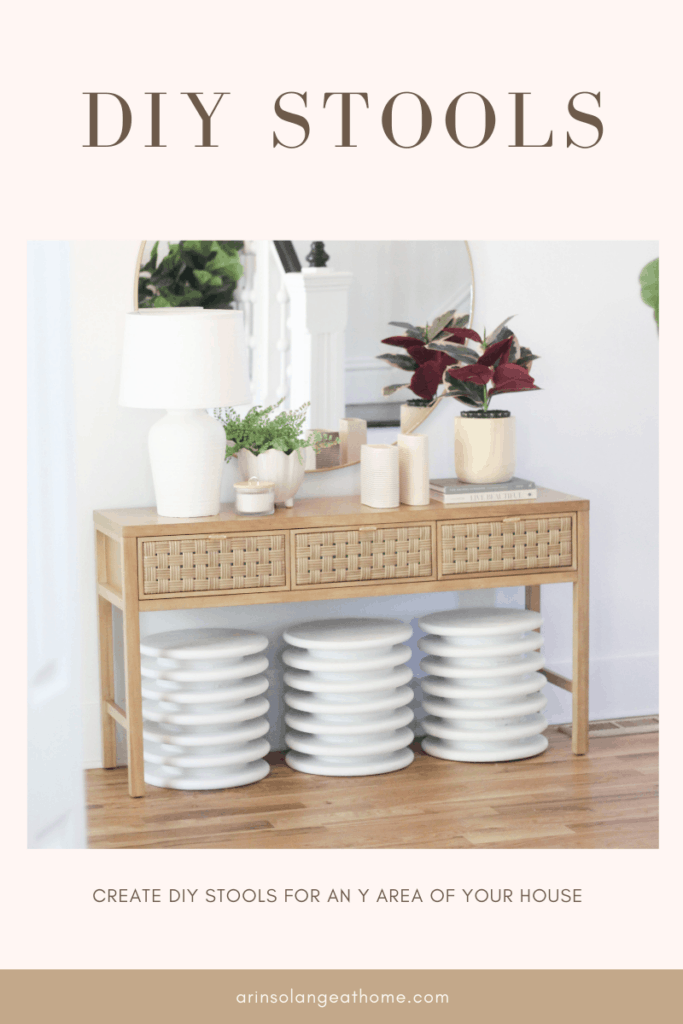
This week is about to be a week of all the furniture DIY’s! I have been going a mile a minute completing projects in our new house, and somehow that ended up looking like several furniture DIYs at the same time. To get started on the this week I am going to share some DIY stools that require NO TOOLS.
this post may contain affiliate links
Stools For an Entryway
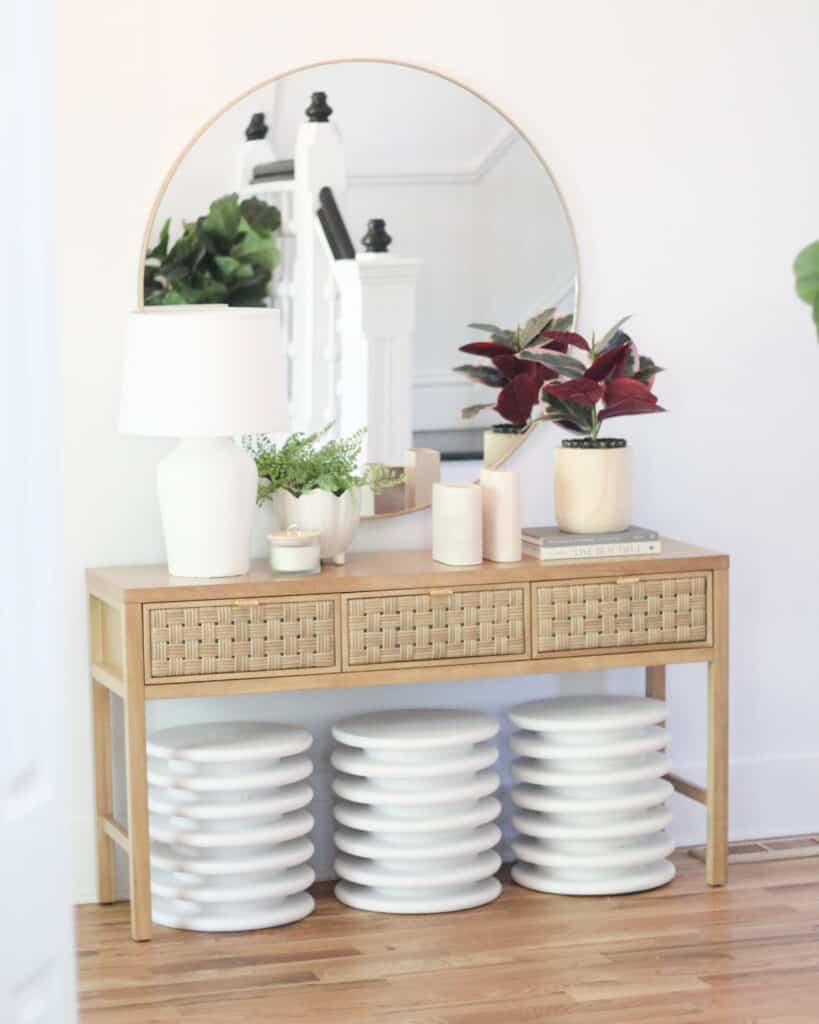
As always – I tend to be a DIYer that likes to solve a problem and make something useful with my projects – and this DIY did just that. I was eyeing several stools that I loved for under our entryway table but really needed 3 and didn’t want to spend $300 on something so small.
I also tend to have a picture in my head of what I want and sometimes DIY is the exact way to make that happen.
I have been loving the Anthropologie look for our house recently and felt these were a perfect somewhat modern yet simple DIY that I could see on that site.
Creating DIY Stools
When I set out to make thees stools I obviously was looking to make them on the smallest budget possible while still obtaining the look I was going for. I saw this DIY table on Instagram that is GORGEOUS and was so inspired to do something similar in a stool form.
As always there is trial and error on something like this. When you’re working with materials that aren’t just wood you sometimes have to get creative and try different adhesives to make things work well.
I ended up going with the second adhesive I tried. I knew I could end up with E6000 but that is pricey and not a quick use – but I will list it as a very great option in the tutorial – because you can definitely choose to use that as well.
I also wanted to go as inexpensive as I could so that meant using the least expensive spacers to create the fluted look. Again you can always choose to make them slightly taller and use different spacers for more money.
Supplies for DIY Stools
Supplies listed are for ONE stool
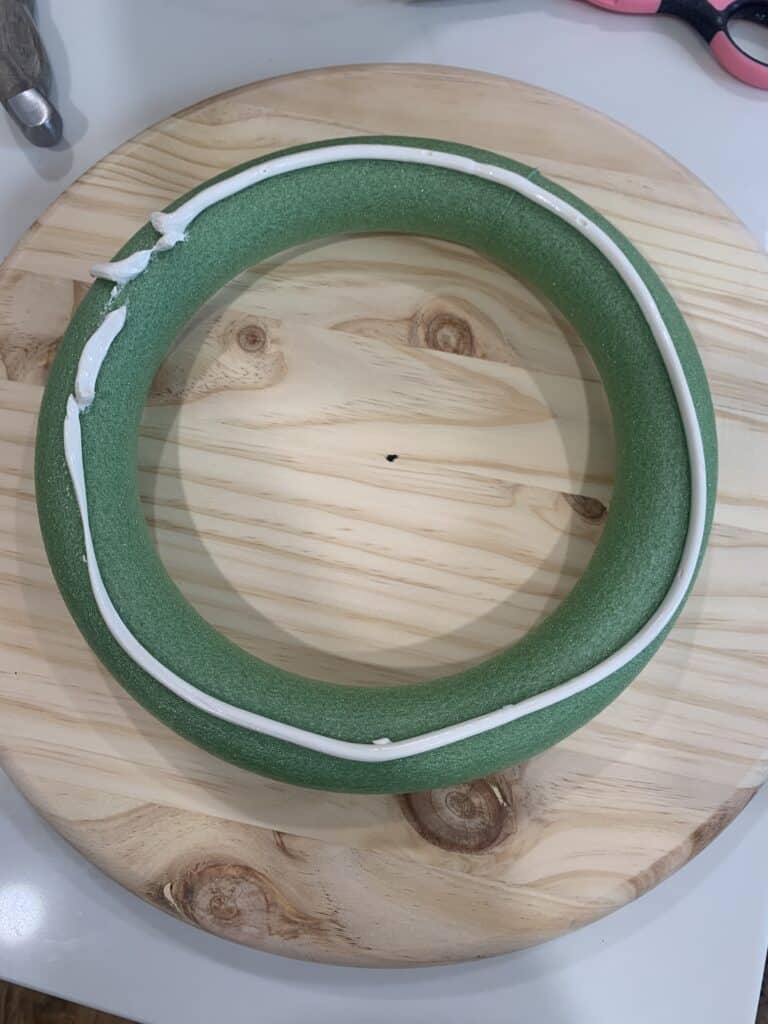
7 – 15 inch wood rounds – I personally got mine at Menards for $6 each. If you don’t have a Menards most craft stores or hardware stores have them – I would just look for a sale!
6 – Dollar Tree wreath forms. This will save you SO MUCH MONEY. I got all of the wreath forms for $18 for all of the stools.
Now that you have all the supplies – it is time to make the stools. This process is super easy I swear.
Take one of your wood rounds and find the center.
Now add adhesive to one side of one of the wreath forms
Lay the wreath form on the wood round so that it is centered with the adhesive side down.
Add adhesive to the top of that wreath form and lay another wood round down.
As you move up use a level on all sides to make sure you’re going straight up and down.
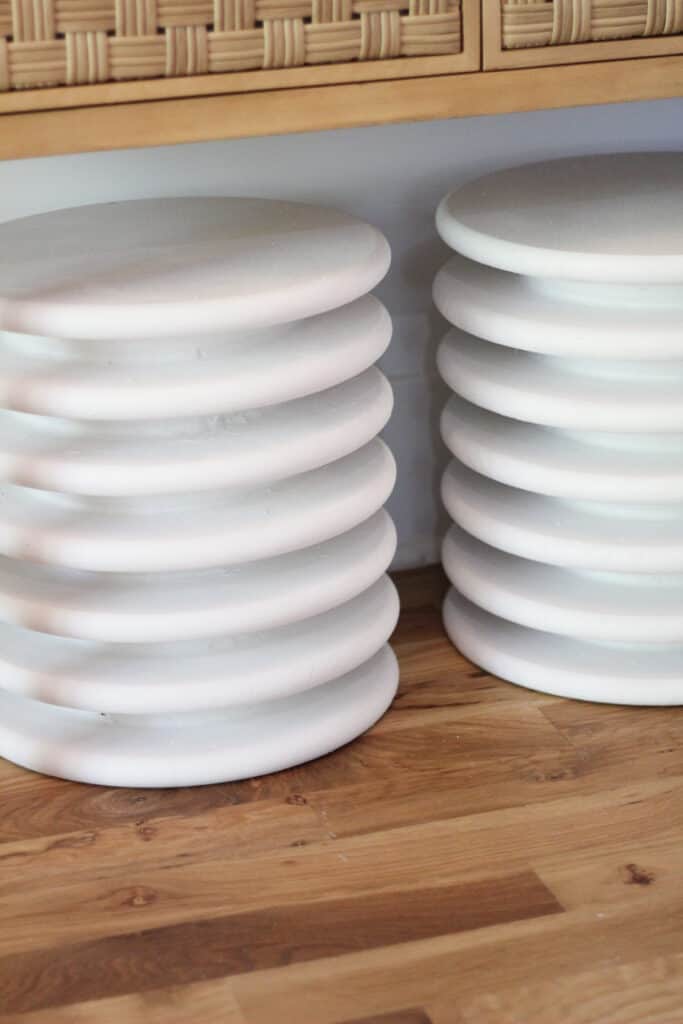
Once you have reached your desired height (for me that was with 7 wood rounds) let them sit and dry for 24 HOURS!!!!
Once dry you need to caulk all the seams between the wreath forms and the wood rounds.
Let that dry before painting.
First add the faux stone texture paint – a little goes a long way. Let that dry.
Now spray paint. You will want to let them fully dry then flip them to get the under-sides well.
And TADA – you have gorgeous stools to use anywhere in your house. I personally have mine in my front entryway, but they would also be gorgeous as a side table.
Remember – you can customize these as much as you want. Choose different sizes or colors to make them fit your home and needs!
Not looking to DIY? Here are a Few other Stools I Love!
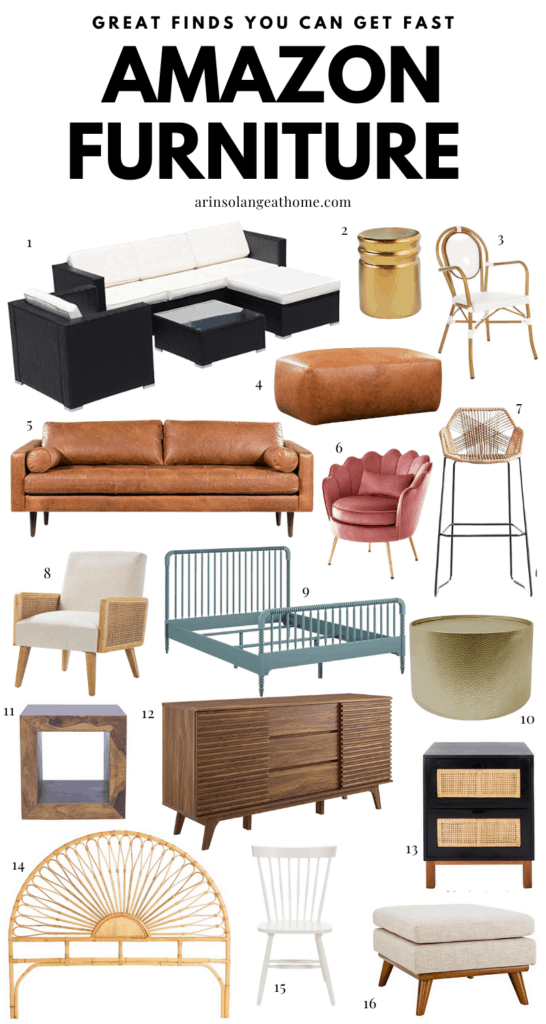
I am fairly sure Amazon Home finds have become my specialty for all of you, and today is all about furniture. I have been sharing my favorite Amazon finds each week on Instagram, and this week I wanted to round up some of my personal favorite Amazon furniture finds that I own or am eyeing.
This post contains affiliate links – read more about affiliate here
Furniture from Amazon
When we moved to this house and I started sharing furniture I was grabbing from Amazon some people were a bit shocked because of the lack of seeing items in person.
One thing that I always stress when it comes to Amazon is that you have the added benefit of reviews. When I picked our leather sofa I was between two and the reviews are what lead me to getting the one I ended up with, and I am so happy with that decision.
Due to current ship times, getting items large and small delivered to your home in a quick turn around time from a trusted retailer is so nice, and has lead me down the Amazon path so many times.
Tips for Furniture Shopping on Amazon
Aside from these items – I have a few great tips for ways to furniture shop while you’re looking on Amazon as well.
If you like one of these items or an item you find while browsing yourself, Amazon will recommend other finds and many times that is how I find just what I was looking for.
Search within brands. Amazon carries so many brands that I love so a lot of times I will start with those.
Use their Amazon Home hub to search and find some of their favorite items.
Like I said at the start of this post – Amazon finds are one of my favorite kinds of posts. Below I am linking to many of my other Amazon home posts, whether you’re looking for decor, clothes for your kids, holiday decor, or anything else – there is a post for you!
And that is it! I own 4 of the items in that round up, as well as using the 5th in a room this spring – so hopefully you find it helpful seeing those in the photos in this post.
Hopefully you found the perfect piece of furniture from Amazon in this post and feel more confident in making those larger purchases. Be sure to follow me on Instagram (@arinsolange) so you don’t miss any future Amazon Finds, and pin the photo below to find this post later.
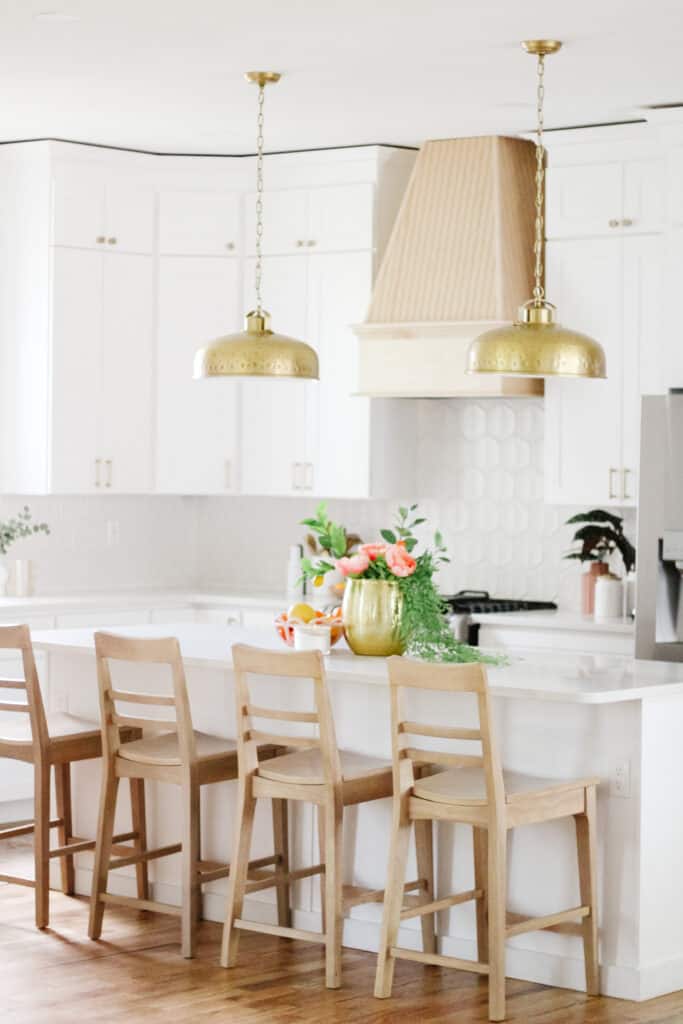
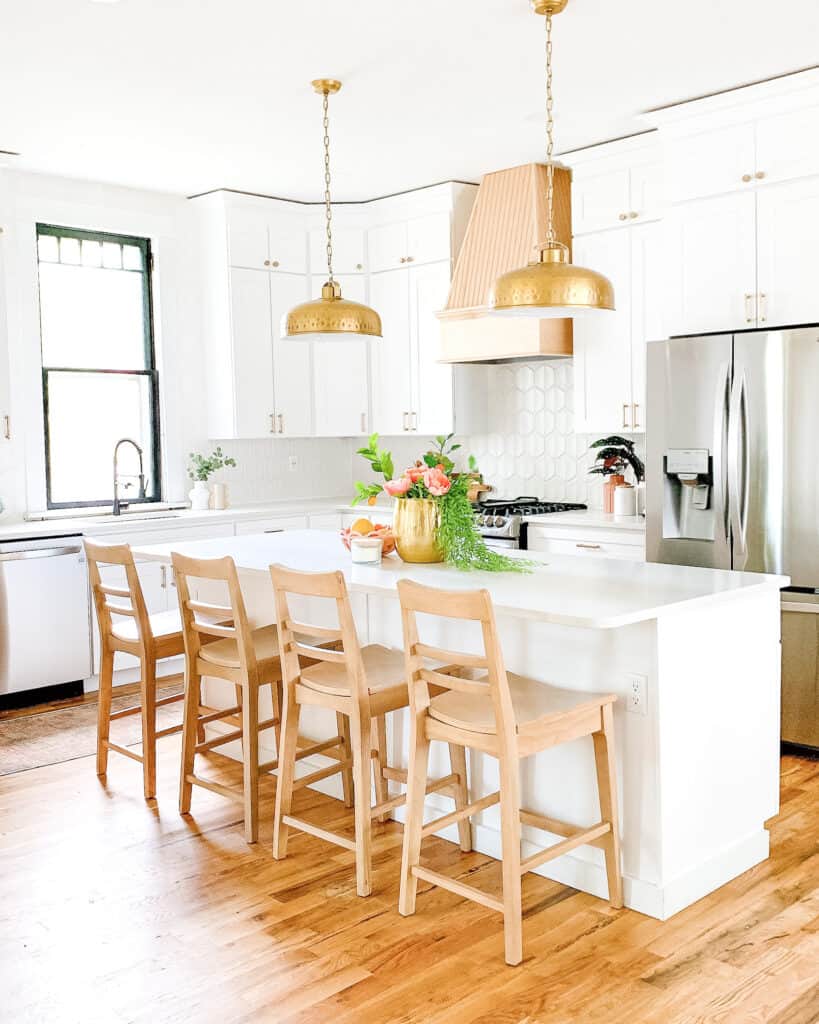
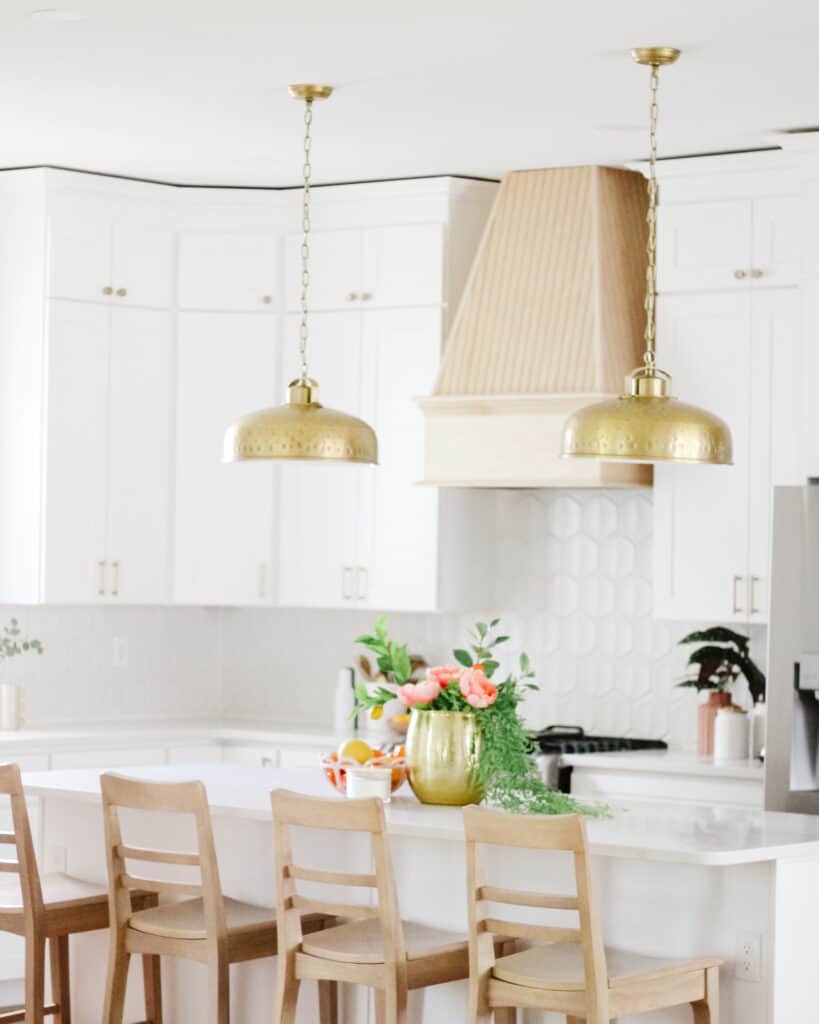
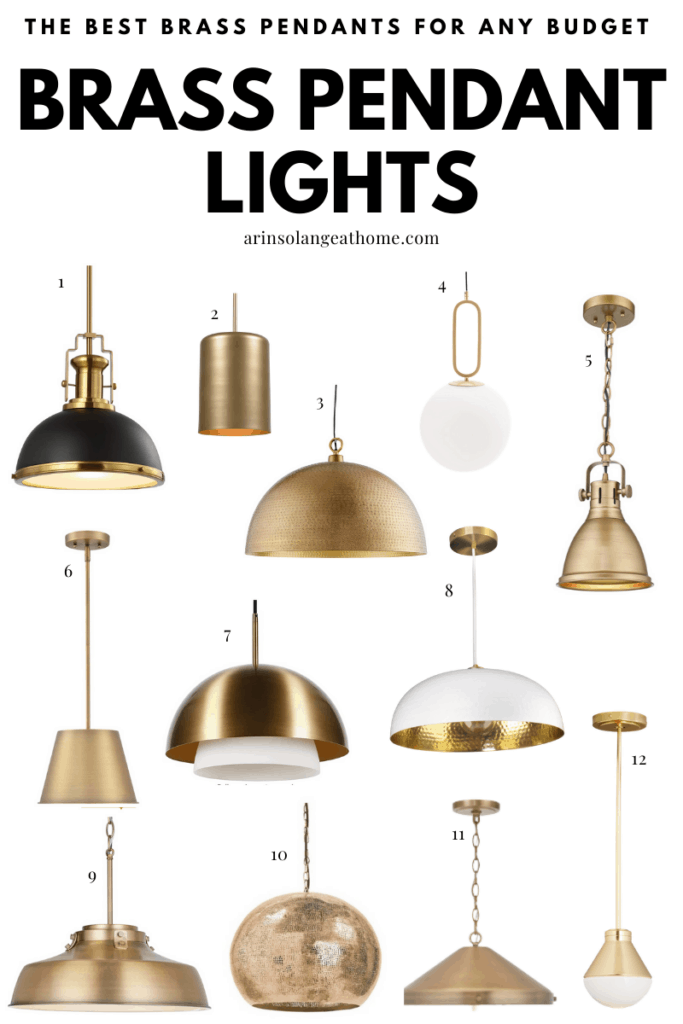
FINALLY I was able to share our kitchen in our new home, and that includes the gorgeous brass pendant light we went with. Because this was the second house where we used brass pendant lights I thought I would round up the best options for your kitchen and some tips for incorporating gold or brass into your home.
This post contains affiliate links
Outfitting our Kitchen with Brass Pendant Lights
This past summer my husband and I purchased an 1860’s home in the heart of a quaint downtown area of St. Louis. We have been renovating the house and enjoying it since, and I am excited to start sharing more decor and projects from this home.
these are seen in the round up as number 5
Today we are going to talk about Kitchen lighting choices, but next week I will also do a full kitchen tour blog post, so be sure to stay tuned for that incase you are looking for more sources on anything from decor, to finishes, all the way down to decor.
Be sure to follow me on Instagram and check out the hashtag #arinsolangehistorichome if you are looking for more photos and details from our home.
Picking a Brass Pendant Light
Adding brass or gold to your kitchen can be kind of scary, but it is definitely a very ‘in thing’ right now, so I wanted to share some tips on picking the best brass pendant light as well as the rest of your hardware and choices and how that works.
One reason I think adding brass via lights in your kitchen can be so great is it is easy to change. So if you are worried about gold or brass not being in long term, it is something you can easily change out without a major kitchen remodel.
Below are a few considerations to make when it comes to making your lighting selection.
Not all Golds/Brass Shades are the Same
Unlike black or chrome/nickel, things get a bit trickier when you start to incorporate shades of gold or brass into your home. You will want to see the items side by side before install, and you may want to pick some mix and match.
You don’t have to match every gold or brass exactly, but you will want to be in the same color family especially if things are very close to each other. One way to cut down on some of that is to order from the same company.
When we did our kitchen in this house the first set of knobs for the upper cabinets were not the same shade and we had to switch to a new knob to get a good match.
Mix and Match
Because of the hard matching issue – and because its 2021 and you can just do what you want, one great option is to mix and match.
In our last home I chose to do black hardware on the cabinets and the faucet but brass for the light fixtures. It was a great affordable way to do things (all of it is linked in this post), and I LOVE the end outcome.
Now that said – in this house I wanted a less ‘farmhouse’ look so chose to add more brass while still mixing and matching with the black faucet.
Another thing that can be so scary with gold and brass is the appliances, but again you don’t have to worry about that. Gold and Silver can be mix and matched, so even if that means brass light fixtures and a chrome/nickel faucet and chrome/nickel hardware on the cabinets that is fine too.
I would say your only ‘rule’ is to keep it to 2 finishes between your faucet, hardware and lighting. I wouldn’t tie all 3 together (appliances don’t count).
So now that you know some general things to keep in mind – let’s see my favorite brass pendent light choices!
Hopefully these options were exactly what you were looking for! I always try to hit a good variety of relailers as well as price points pending what you are looking for.
In our last house we knew it wasn’t a long term change, so we did the more affordable option, and in this house we knew it was worth more of a splurge.
Other Posts You’ll Love
If kitchens are on the brain, I have some other great blog posts that you will love below!
Hopefully you found the perfect brass pendant light for your home after reading this post, and I can’t wait to see how you style them. Be sure to tag me in any photos on Instagram (@arinsolange) to show me your lights, and pin the photo below to find these lights later.
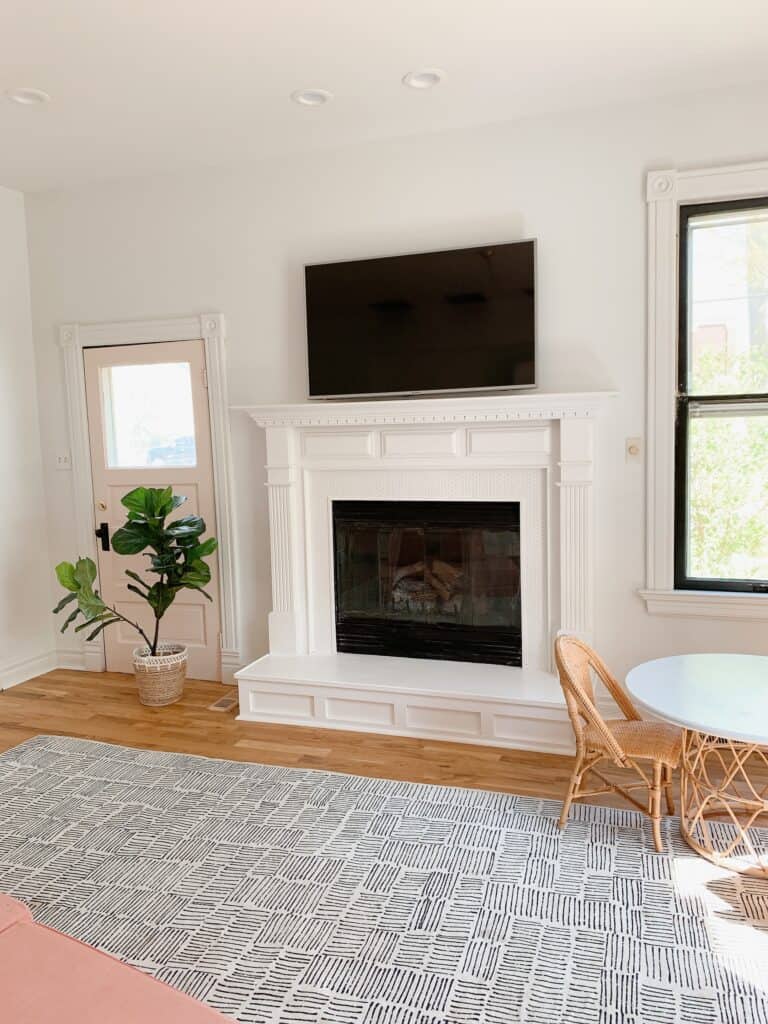
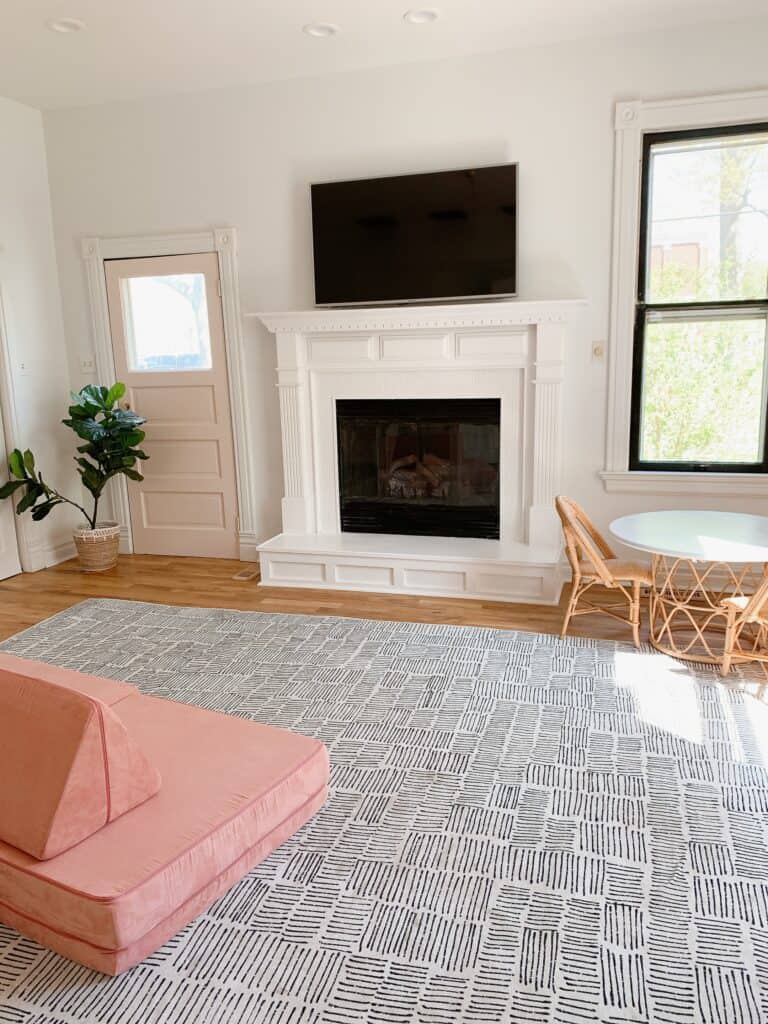
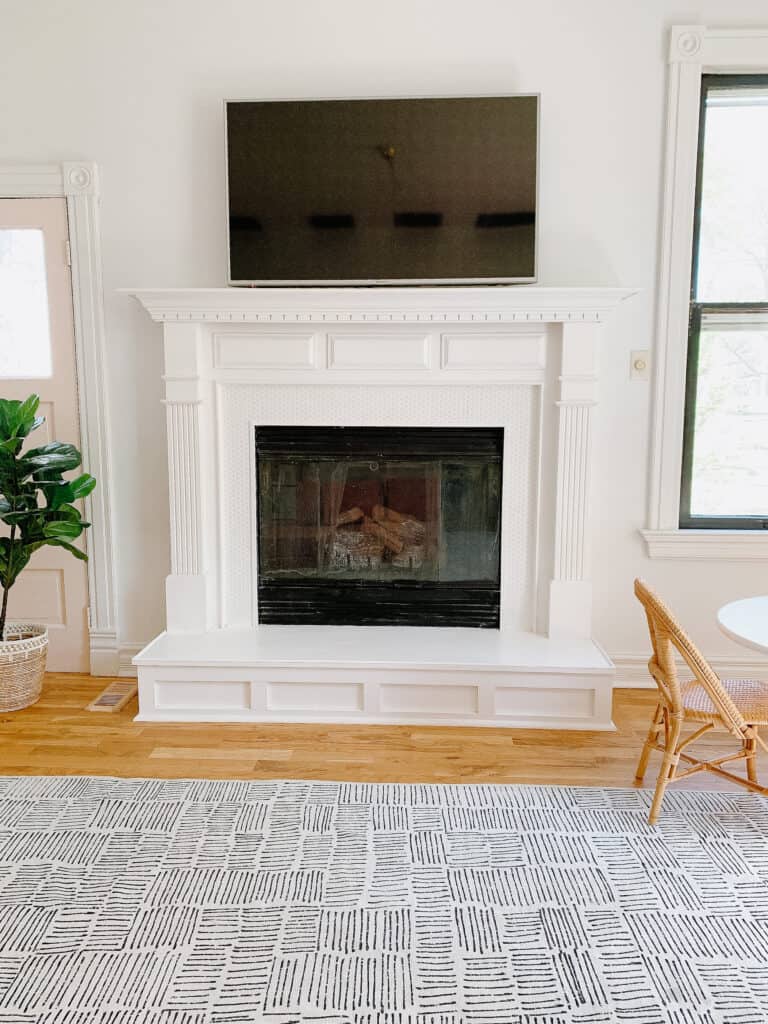
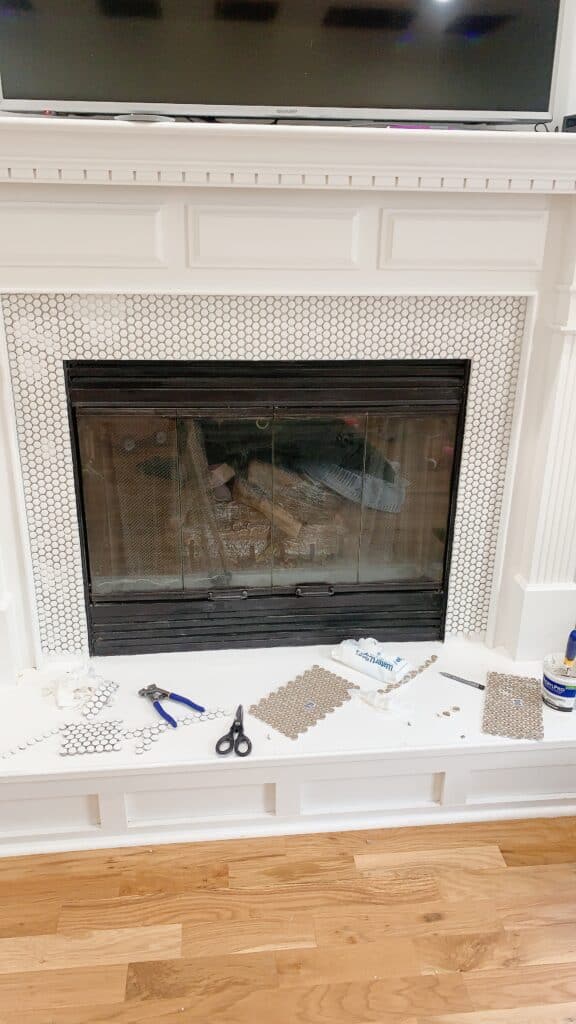
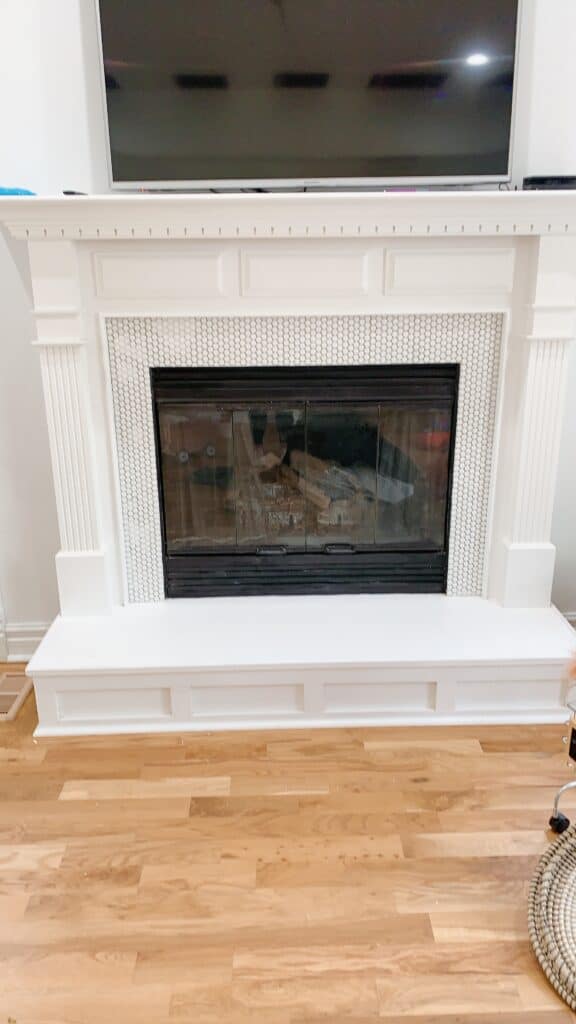
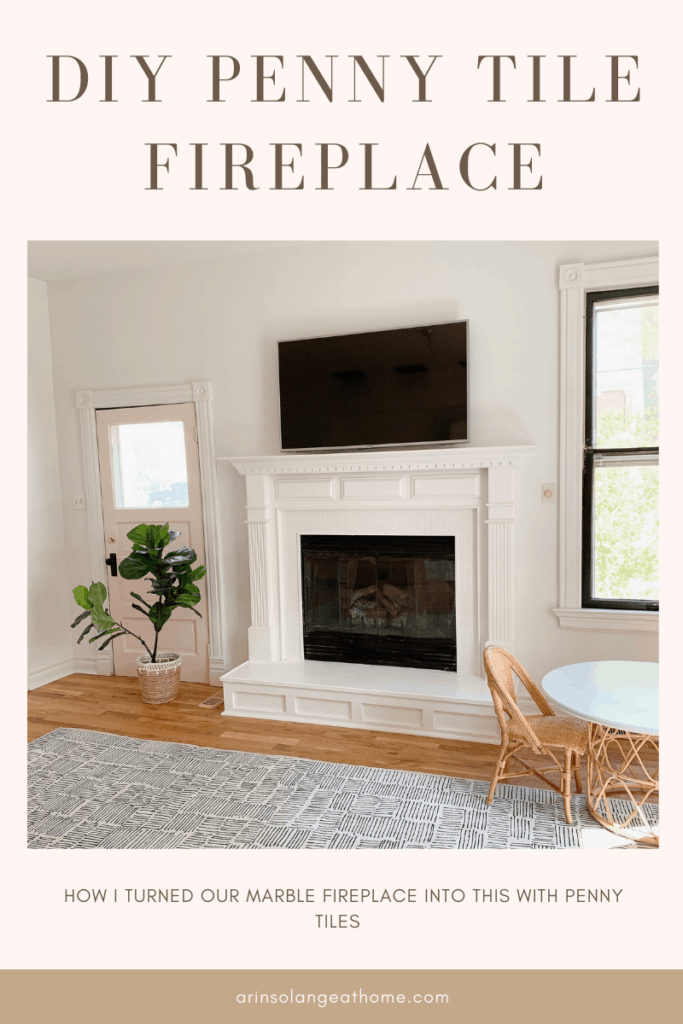
Finally the penny tile fireplace is DONE and I can share the how to on making this happen! I knew I needed to update our fireplace, after our first update wasn’t heat resistant (I’ll explain that more in the post) so decided to try to tackle penny tiles. It turns out they were a really easy DIY for even a beginner!
This post may contain affiliate links
Penny Tile
Before I get to this old fireplace and how to update it, lets talk Penny Tile. What is it? Why did I pick it? And a little more!
About Penny Tile
Penny tile is from the early 1900’s and has made a resurgence in the more recent years making it a great option of tying modern design in with older elements. When Penny tile was first used you only saw black and white patterns, but now you see them used in more subtle ways.
The tile can be used on floors, walls, backsplash and more. One thing to consider is the amount of grout when it comes to places like shower floors (more grout tends to mean more tedious cleaning), but overall is still a safe, and functional option for any space.
What is Penny Tile?
Penny tile can also be referred to as penny round is a small tile that is round or hexagon in shape. It comes in a variety of colors and styles and can be used to update a bathroom or space with a big visual impact.
How Expensive is Penny Tile?
Penny tile as with most tiles can vary in expense pending the color and style you go with. For my project I was able to find the tile as low as $3.50 per square foot.
How Hard is Penny Tile Installation?
Penny tile as with any other tile install takes some skill, but unlike other tiles you need fewer tools, and less ‘math’ due to the smaller size. When it comes to cutting and installing I would consider this on the easy end of projects, however there is a lot of grouting that goes into the project, so that leaned more towards intermediate.
Why Did I Pick Penny Tile?
Okay so now…why did I pick penny tile for our project? I will be honest – we have only tiled 2 other times and it was YEARS ago, and there were lessons learned haha. I knew with the fireplace I wantedsometing affordable and easy to work with, and I didn’t want to invest in tons of tools.
For penny tiles you can literally cut them with these little tile nippers which was a huge allure to me. I also knew they were light weight and I was working on a vertical surface so wanted something light.
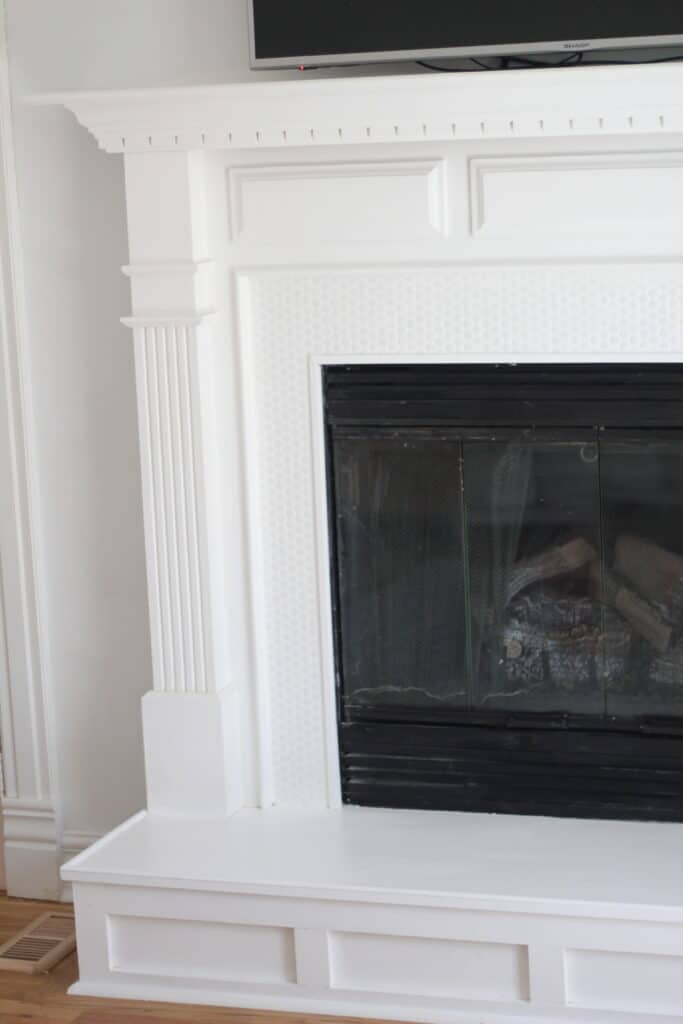
How to Penny Tile a Marble Fireplace
So who has been around since last fall and saw my tutorial for using sticky tiles to update our fireplace? When we bought our home I wanted an easy, inexpensive update for our fireplace in the kids playroom so I went with sticky tiles.
I don’t regret the project – but I will tell you that the penny tiles were just as easy if not more easy, and cost us less – so if you aren’t afraid of trying the project I say go for it!
I really wasn’t sure if you could tile over marble and after a good amount of research it was pretty clear that I was good to go as long as the marble was in good condition. Flat/not cracking and shifting and so on, so if you are also updating a fireplace you will be good to go!
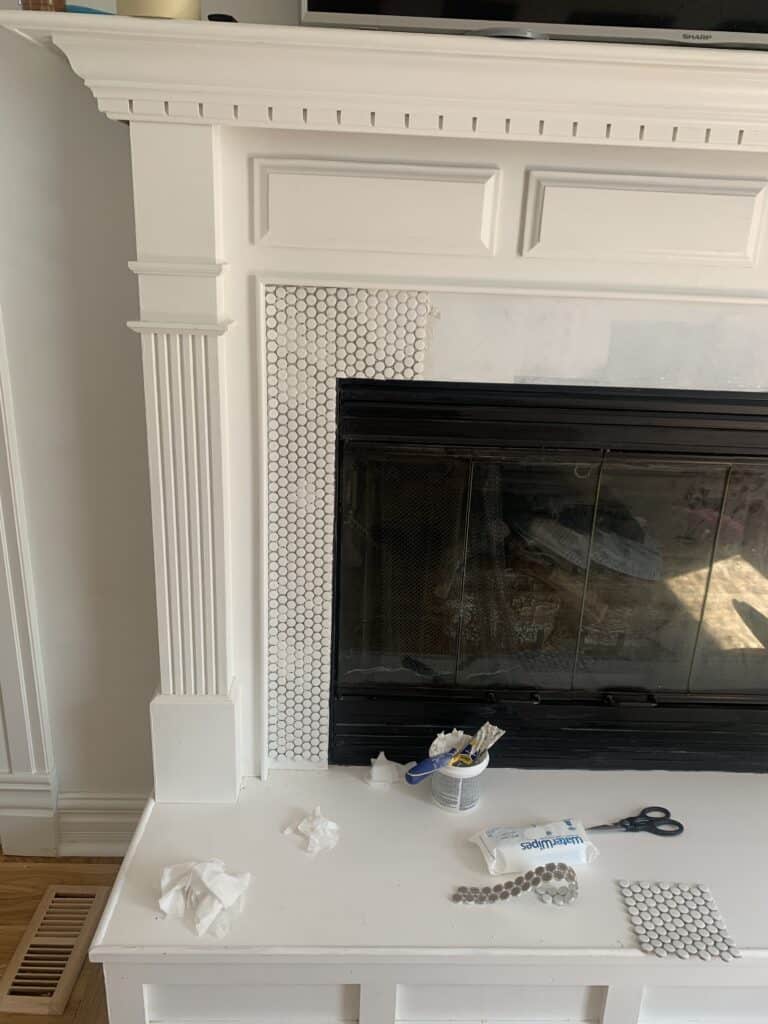
Supply List
Penny Tiles – I linked the exact ones we used. If you are doing a similar size project to us we needed 6 sheets of tile if that helps you gauge expense going into it.
Before you Start Be Sure to watch the Video in this post
Penny Tiling a Fireplace
As always sometimes this is a do as I say not as I do situation. I always learn so much when I take on these projects and try to share a really hands on and helpful tutorial that is done by normal people just like you. So sometimes that means I learned things in the process that I wish I would have done differently!
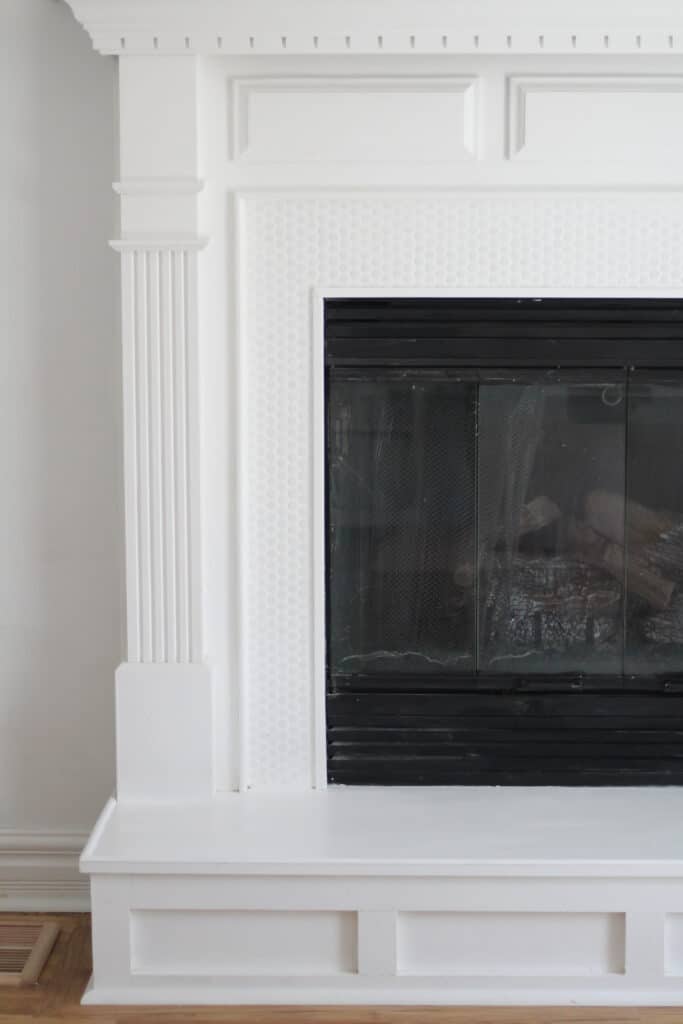
Step 1 – Add Edging of some sort
This was the step we sort of skipped and had to do last. Basically if your fireplace doesn’t have a lip you are working up to the edges will look bad and unfinished if you don’t give it a lip.
So you have two options – you can use this edge tile which is what I would recommend. OR you an use a piece of wood and adhere that with e600. We ended up doing the later due to having to do it secondary, but had I done things over I would have done the edge tile.
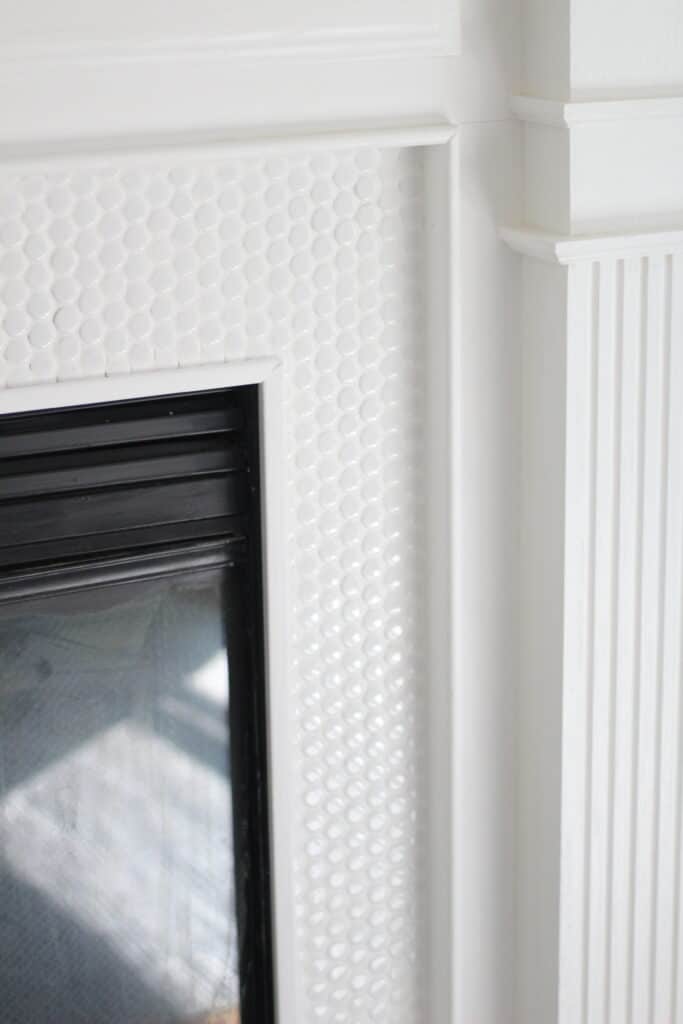
Step 2 – Installing the Penny Tile
Now you are ready to add your penny tiles. Starting in the top corner of your choice sort of hold your tile sheet up to figure out sizing. I personally chose to have the straight edge of tiles on the sides going down vertically and the jagged edges at the top and bottom.
That means that for your first piece in the top corner you need to take your tile nippers to the tile and snip every other tile in half so you have a straight line.
Your first piece is a bit trickier because I chose to keep it as whole as I could which meant cutting out a big square from the bottom right hand corner to go around the corner, but if that is too hard for you, cut piece so you are only working with one direction.
In my case going down the verticals of the fireplace didn’t need any tile cutting (they fit perfect and I could have cried happy tears). If they hadn’t you would have needed to snip the edge closer to the fireplace going down.
I did have to nip the bottom line above the fireplace, so there was plenty of cutting. Keep the extra halves because if you mess one up, or crack it you can just use a stray.
When you go to lay the tile you are going to use a trowel and apply a thin layer of the adhesive. Carefully lay your tile sheet down and make sure it is well into the corner. Then push it down fully on all tiles.
Do the same thing with all the tile sheets. I personally went down the vertical first, then across the top, then down the other vertical.
One thing to note – because I knew that the tiles fit perfectly on the verticals I personally decided to add a tiny hair of extra space between the sheets across the top so I wouldn’t have to snip them on only one side. You couldn’t tell if you tried, and it made things look better in my opinion. So that is an option.
The adhesive doesn’t dry super fast so you have time to play with it a bit.
Now let that dry for a day!
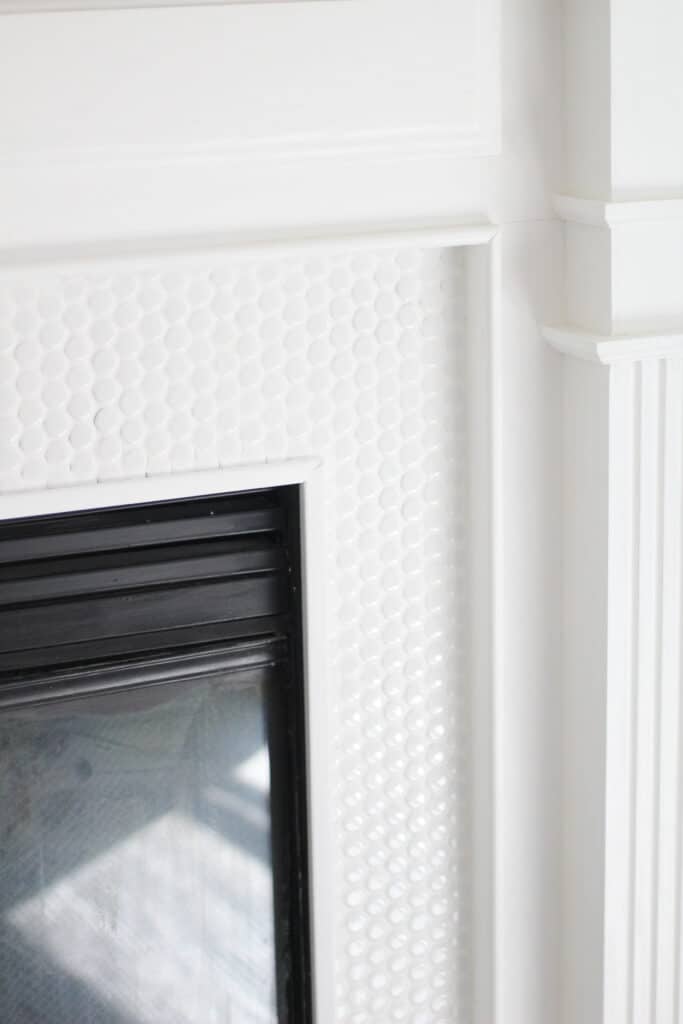
Step 3 – Grout
Next up is grouting. After your penny tiles have dried for 24 hours you can clean off any excess adhesive and start to grout.
Follow the instructions for grout on your container or bag, and apply using a trowel. I will be honest – I didn’t find this to be super easy because there are so many grout lines, so take your time!
After about 20 min you will wipe down the excess grout with a wet sponge and allow it to dry over night.
The next day you can take a microfiber cloth or cheesecloth and wipe down the tiles again to keep them looking shiny and get the last of the grout off!
Over all this project cost me less than $50 and can be done in a couple of hours over the course of 2 days. None of it fast drying so there is room to learn while you work, which makes for a great beginner project, and clearly I liked it enough to penny tile my whole bathroom wall the next day (reveal coming this week!).
Other Posts You Will Love
If you enjoyed this post be sure to check out these other posts that you will love as well!
Hopefully you found this post on installing penny tile to be helpful and are ready to start your own project. If you have any questions leave them in the comments below and be sure to follow me on Instagram (@arinsolange) for more fun and inspiration.
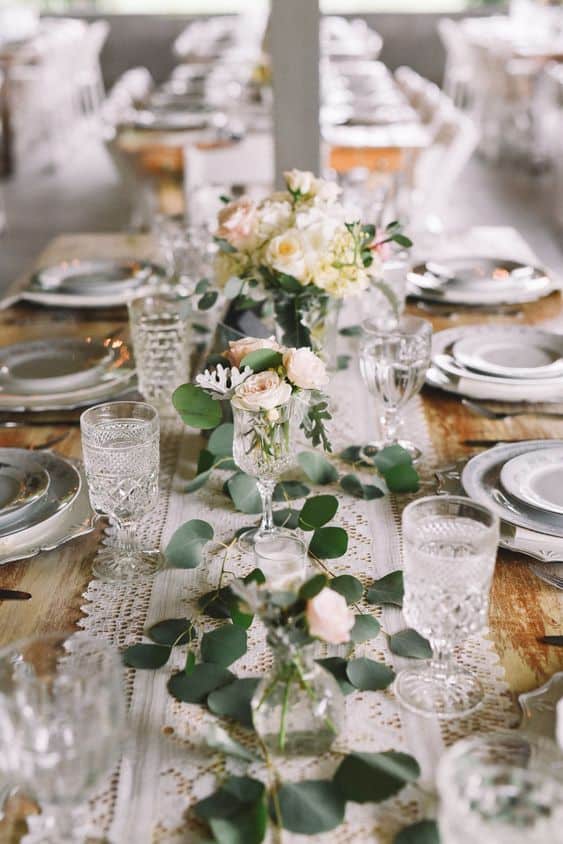
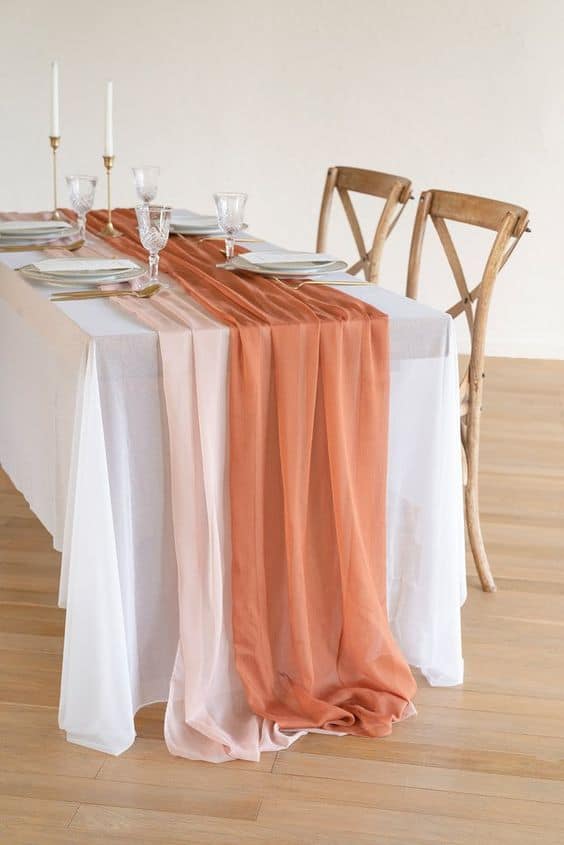
Decorating your table whether for a dinner, day to day use, or for an event or party can make a huge impact. Round table runner ideas however can be a little trickier. I think many times we think of a table runner for just a rectangular table, so I wanted to share some great round table runner ideas in this blog post that will help you create the perfect table and ambiance for your next event.
This post may contain affiliate links
What is a Table runner?
First off, you might be wondering what a table runner actually is. A table runner is a piece of fabric that runs the length of the table down the center section of the table only, unlike a table cloth that covers the table in its entirety.
A table runner “runs” the length or width of the table and can be used on it’s own or layered on top of a tablecloth.
Table Runner General Rules and Info
Before we get started – let’s talk some table runner general rules and info. I will say – take all of this with a grain of salt because I do think that decor is all about what makes you happy, but none the less there are some technical ‘rules’ and specifications that can be helpful to know when you are shopping or putting a table together.
General Size Specifications
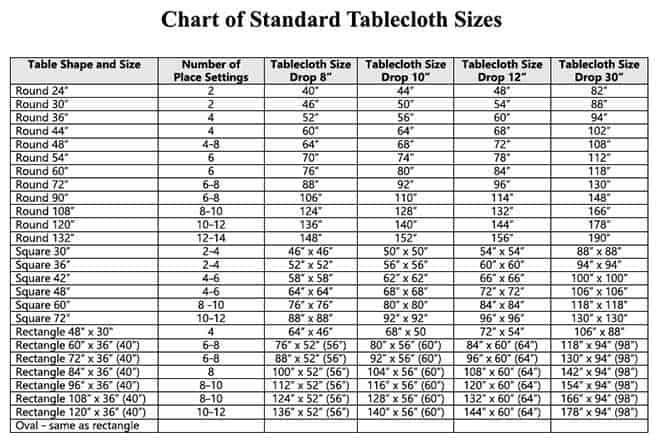
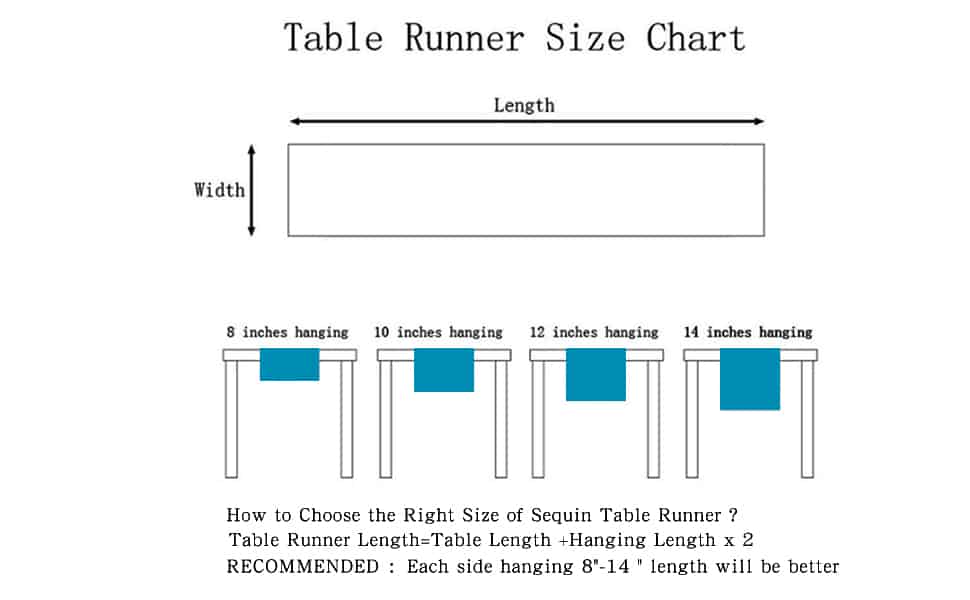
The number one thing people wonder when it comes to table runners is the ‘rules’ and specifications on size. When you are getting ready to decide which table runner is right for you, the first thing you need to do is get out your handy dandy tape measure and make sure you know the size of your table.
Once you know your table size, you can choose the correct length for your table runner. I have added two charts here, one that has standard tablecloth sizing and one that shows you how to measure for your table runner. On these charts you will see the term “drop” which is referring to how far the fabric will hang over the side of the table.
There are not fast rules for how far a table runner should hang over – this is purely up to personal preference, but as a general rule of thumb it should have some drop.
The Best Round Table Runner Ideas
Now that you know all the rules and background info lets get into some great ideas for table runners on your round table. I will also round up several of my favorite table runners in this post, so be sure to check those out before you go.
This post will walk through different ways to include table runners into your tablescape, whether you are working on wedding tables, holiday tablescapes at home, or anything in between. I will also be sharing my favorite table runners for round tables, so make sure you scroll to the bottom of that.
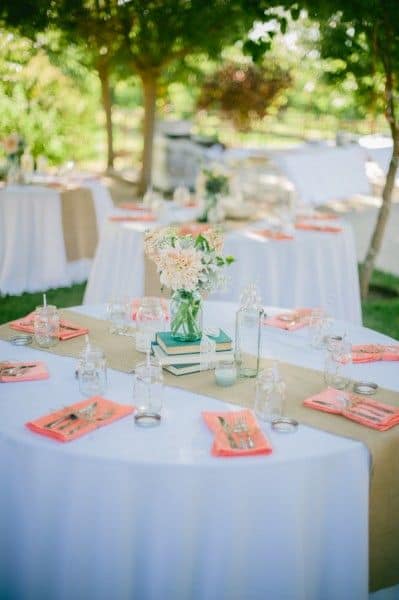
RoundTable Runner Ideas with No Table Cloth
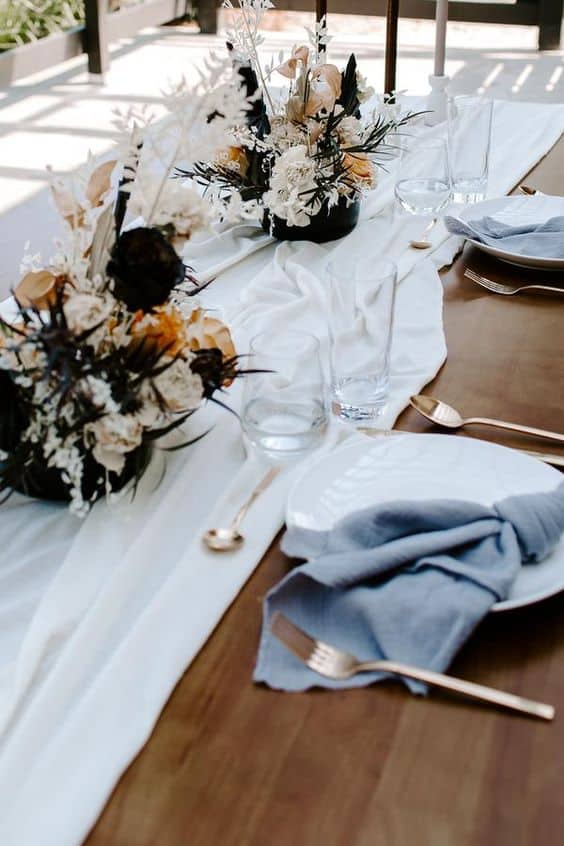
When it comes to a table runner you can go two ways – table runner over a table cloth, or a table runner where the sides of the table is left exposed.
In my opinion this is a more casual feel to the table, and can be better for less formal occasions. I personally don’t have a round dinner table, but typically when I use a table runner I do it in this manner.
The table runner is a great addition to the center of the table, and allows me to add lots of decor, but the table being left exposed keeps things more casual.
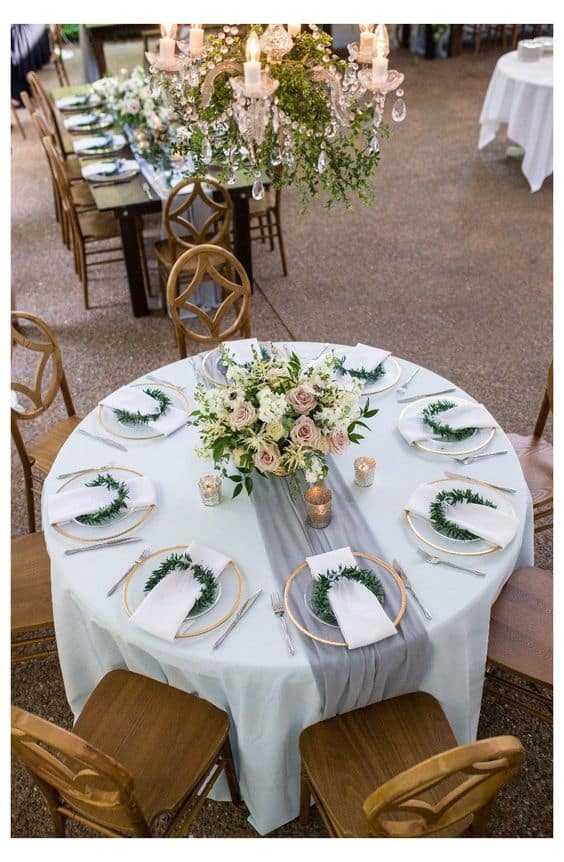
A great example of this being done is the table shown below. This is a very casual use of a table runner on a round table. The use of the round placemats added texture and more true table setting places for each person, while not feeling formal at all.
Using a table funner with no table cloth is also a great way to decorate your table for day to day use where you can still eat at and enjoy your table. If you have a large enough family where you are sitting all the way around the table for obvious reasons, someone will be sitting at the table runner on each end, so do keep that in mind.
My friend Julie has an oval table that she also uses a table runner with the rest of the table exposed, and it creates a gorgeous space to decorate the middle of the table while giving them enough space on the sides to eat and live life.
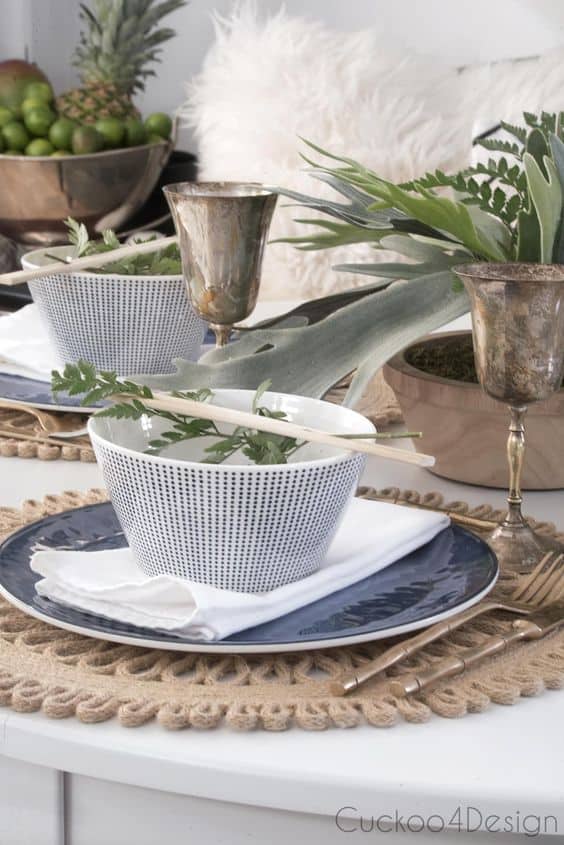
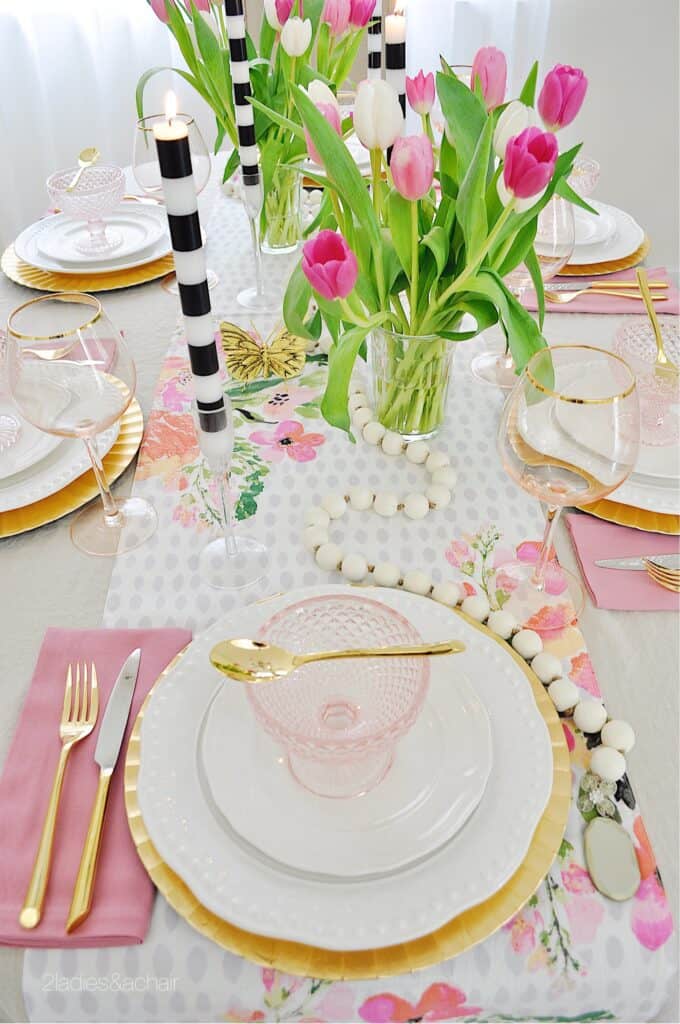
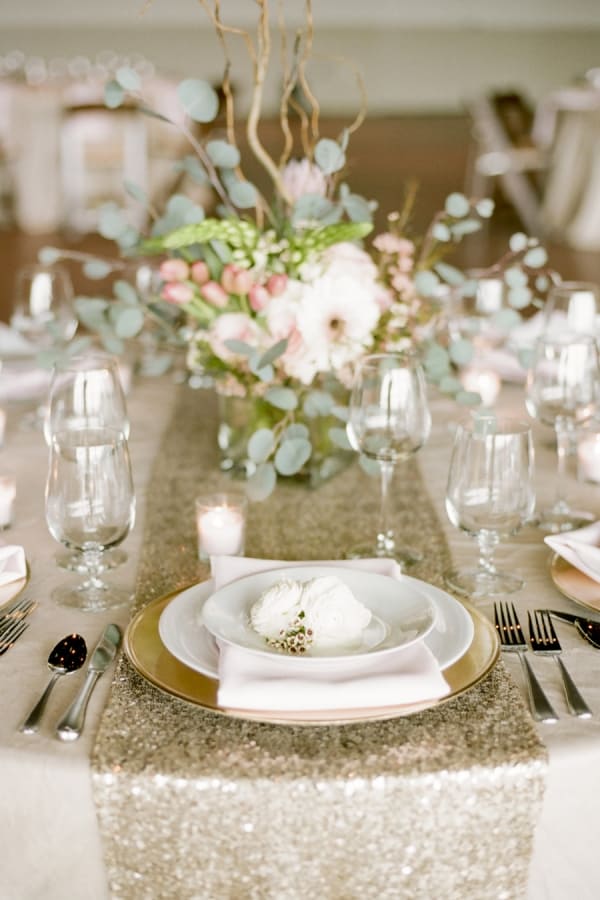
Round Table Runner Ideas
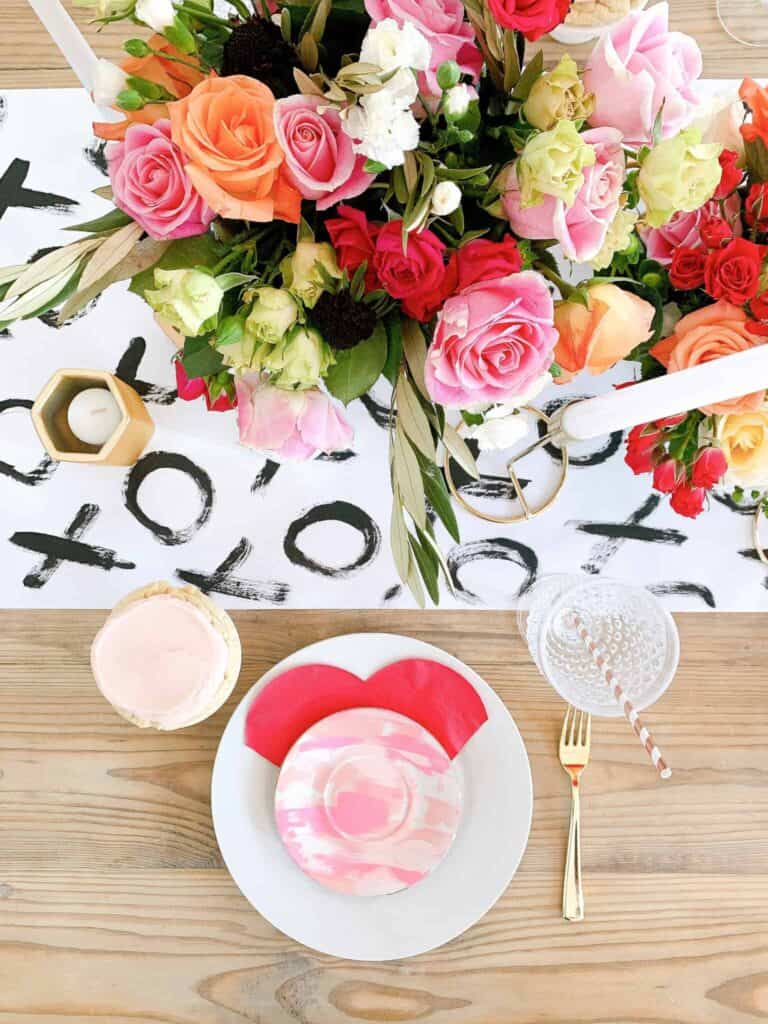
Over Tablecloth
If you are going more formal with your table try layering your table runner over a table cloth. As oposed to the bare table, this gives a more formal finished look sure what size tablecloth you need, be sure to refer back to the chart above!
I love a fun table runner over a white or neutral tablecloth. Plus it is super cost effective to only have one or two tablecloths and then you can just change out the table runner as needed! This is a perfect example, I love the floral and the contrasting candles.
You can see in the photo below that even tho they used a burlap table runner, the white tablecloth below created a more formal look to the table. This is great for special events, and is. great way to dress up any overall look you’re going for.
Unique Ways to use Table Runners on Round Tables
My round up towards the bottom will include some fun options for more day to day, as well as special occasions, but I wanted to share some great inspiration on unique ways to use table runners on round tables so you can use them as inspiration!
Sequin Table runners
Sequin table runners are a GORGEOUS WAY to add a lot of dimension to a table while also keeping things in a pretty neutral color palette.
I have seen them done both flat like a traditional table runner, as well as somewhat ‘messy’ and both are just stunning in a big way. Sequin table runners are a great example of DIY table runners – many times when you see the more ‘messy’ look it is simply sequin fabric that has been used on the table instead of what would technically be a table runner.
Lace table Runners
Lace is another great way to add texture to your table. Lace can be dressed up or down pending the table cloth or lack there of. In my opinion – a lace table cloth on a beautiful wooden table can have the perfect amount of farmhouse, and would be gorgeous for a wedding or bridal shower if that is your overall style.
You can also add a lace table runner layered over a white table cloth for a beautiful soft and vintage look.
Working with Texture
As opposed to lace – macrame is a similar feel that will give a totally different look when it comes to table runners. It is a wonderful way to add texture in a natural way.
I also included several jute options at the end of this post that I LOVE – these will also add texture in a beautifully casual way.
Another way to use your table runners is to layer them. You can easily mix and match your table runners to create the exact style you are going for. You will just need table runners in a variety of widths so create the look, and can easily create the overall look you were going for.
Best Round Table Runner ideas – Tips and Tricks
I know that if you are looking at this post you may also be wondering how to incorporate the table runner into your decor, which is somewhat up to your own discretion, but below are a few little tips and tricks I have found along the way:
Layer heat proof fabric under the table runner if you want to be able to add hot dishes without using hot pads or trivets. It will protect your table, but you will never know the layer of protection is there.
If you don’t want the extra leftover fabric to hang down (say this will be a daily use table) You can use painters tape to tape up the runner.
Use the table runner as a general area to place your decorative elements – don’t be hard and fast with this – I think allowing some of the decor to spill over the edges is beautiful, but using it as your general guide is really helpful, and will leave space for eating.
Take into account how you will be using the table to decide how much decor you add to the table runner, as well as how wide the table runner is. If you are going to be serving a family style meal a great run of thumb is to lay washcloths or trivets in the spots where you plan to add food so you know you will have room to use the table!
Using Placemats in a more casual situation will help create clear table settings at a round table.
Invest in neutral colors for table runners and add your color with decor.
Use extra table runners on coffee tables or dressers to add texture and dimension and change things up.
Roll your table runners for storage for optimal space.
Shop my Favorite Table Runners for Round Tables Below
If tablescapes are your thing be sure to check out these other posts below that you will love. I am also working on a blog post for later this week that will walk you through some great items to keep on hand to help you create quick, inexpensive tablescapes in your home year round, so if you aren’t following me on Instagram, be sure to follow me there so you don’t miss that post!
Hopefully this post helped you if you were trying to find the best round table runner ideas, and you feel ready to decorate your table for home or an event. Be sure to be following me on Instagram (@arinsolange) for more great ideas and content, and pin the photo below before you leave to find these great tips and table runners later.
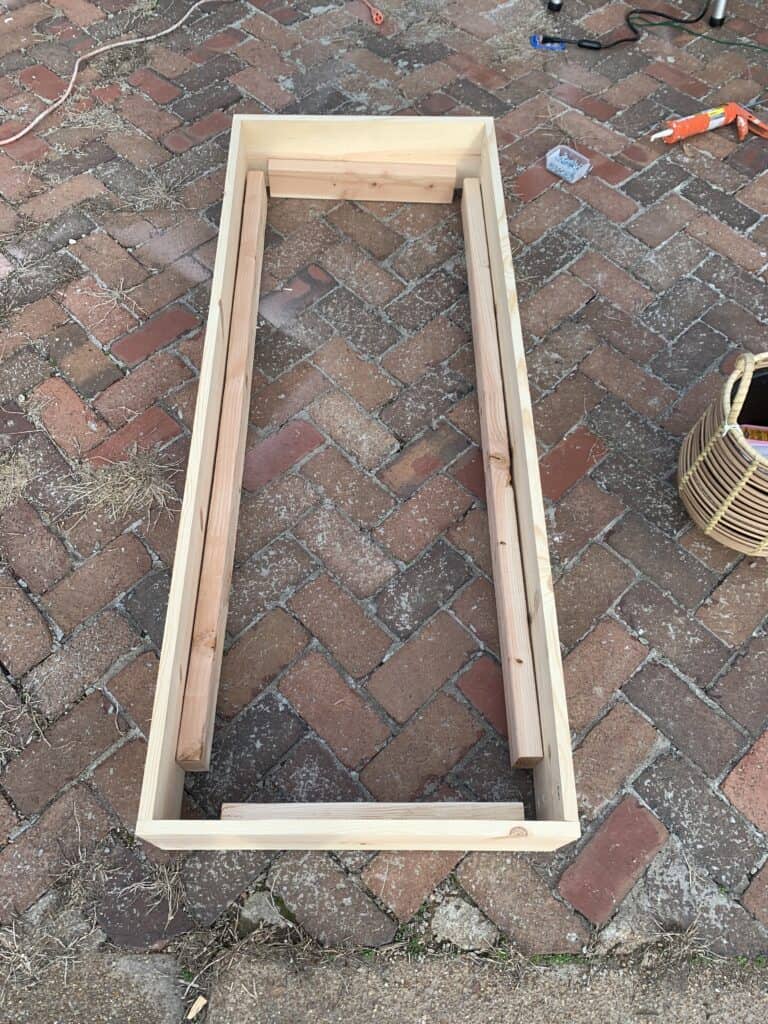
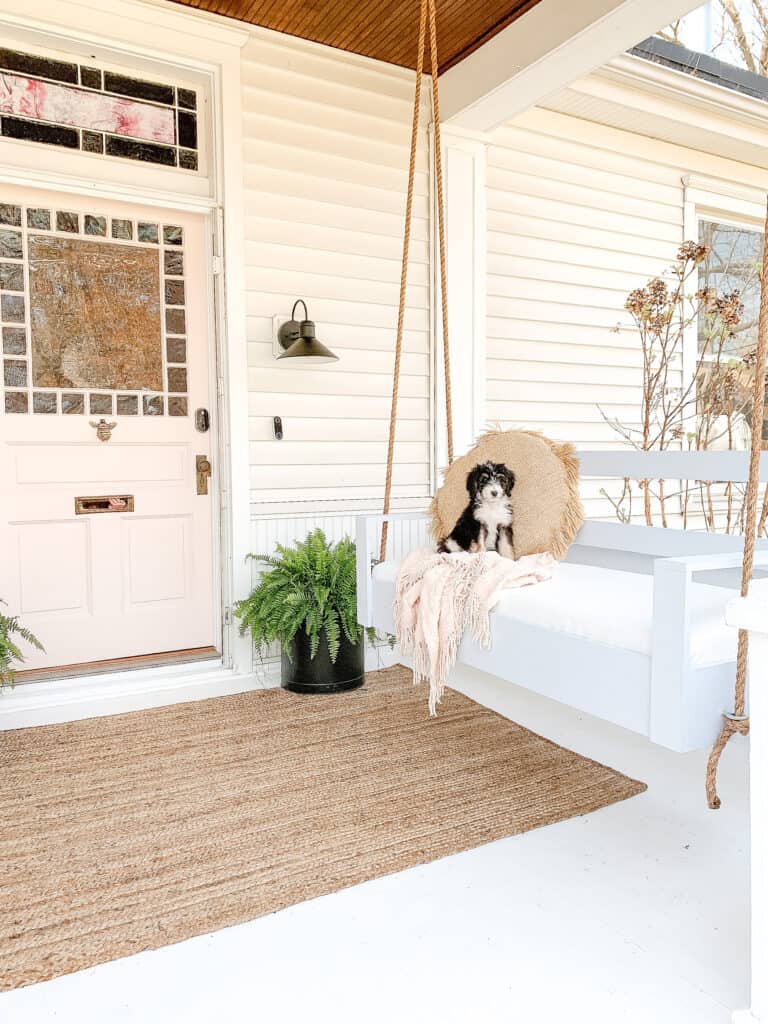
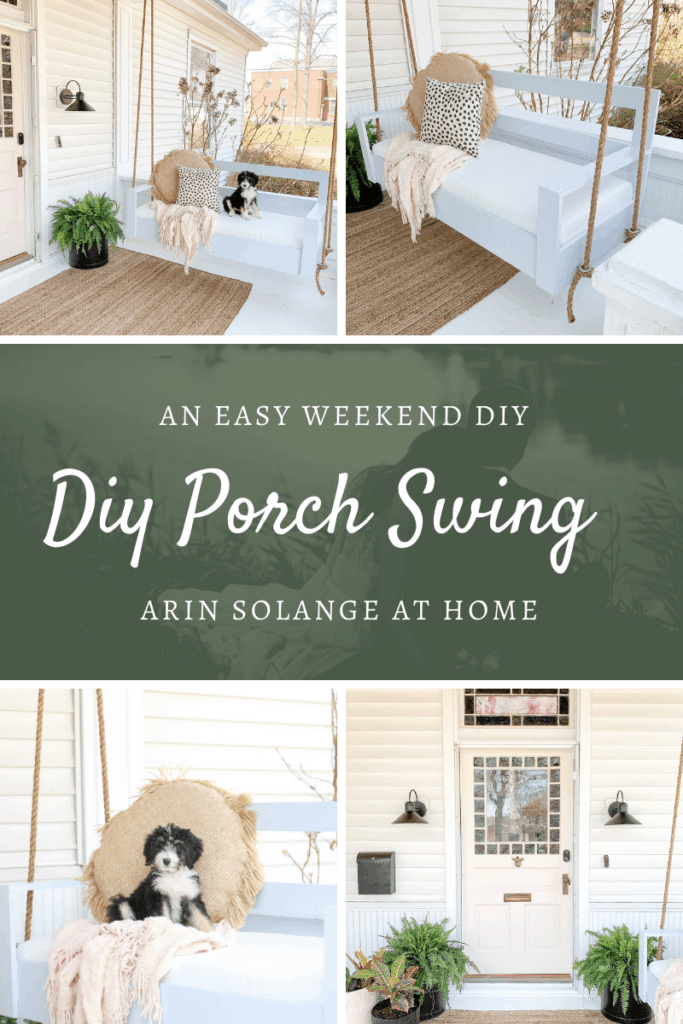
It is spring which means we are all working on getting the outsides of our homes in tip top shape so we can enjoy a pretty space outside while we enjoy the sunshine. Today I am going to share a super easy DIY porch swing tutorial that I hope you all will LOVE.
This post may contain affiliate links – as always with tutorials such as these, keep in mind that we are just DIYers – you are always using our tutorials at your own risk.
Getting our Porch Ready for the DIY Porch Swing
If you follow me on Instagram you know that getting my porch ready for this porch swing was a multi step process. Our home was built in the 1800’s and every aspect of it has needed serious love.
Before adding the porch swing we knew we wanted to really give the front of the house a good face lift as well as making it a more enjoyable place to spend time on the swing.
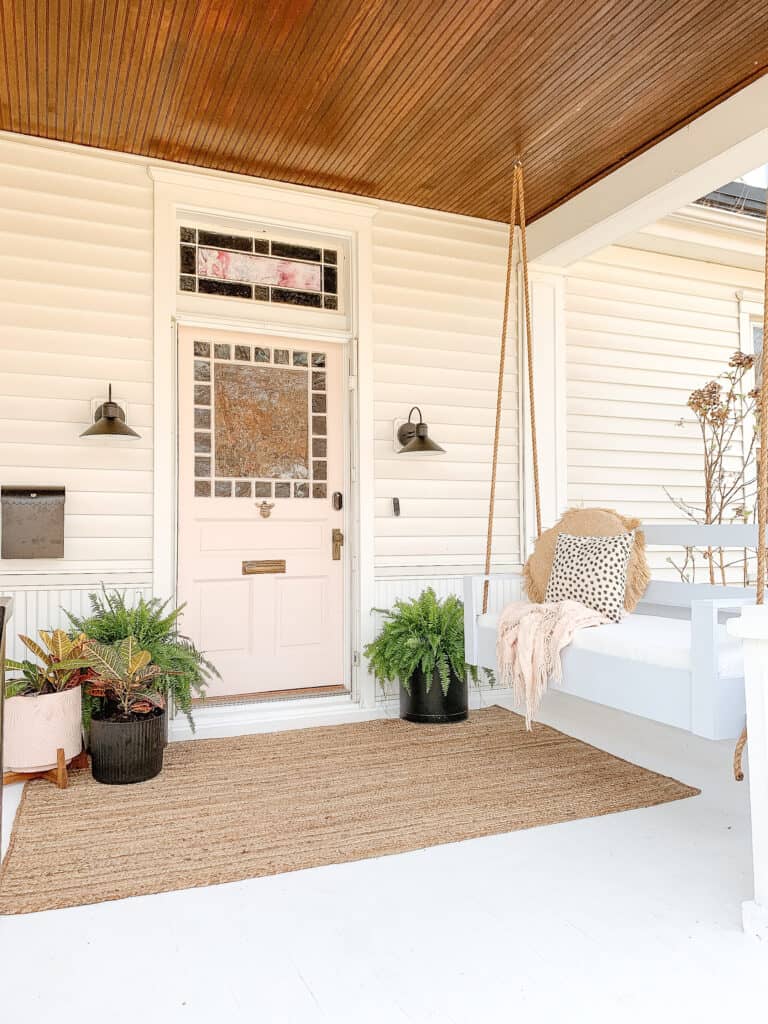
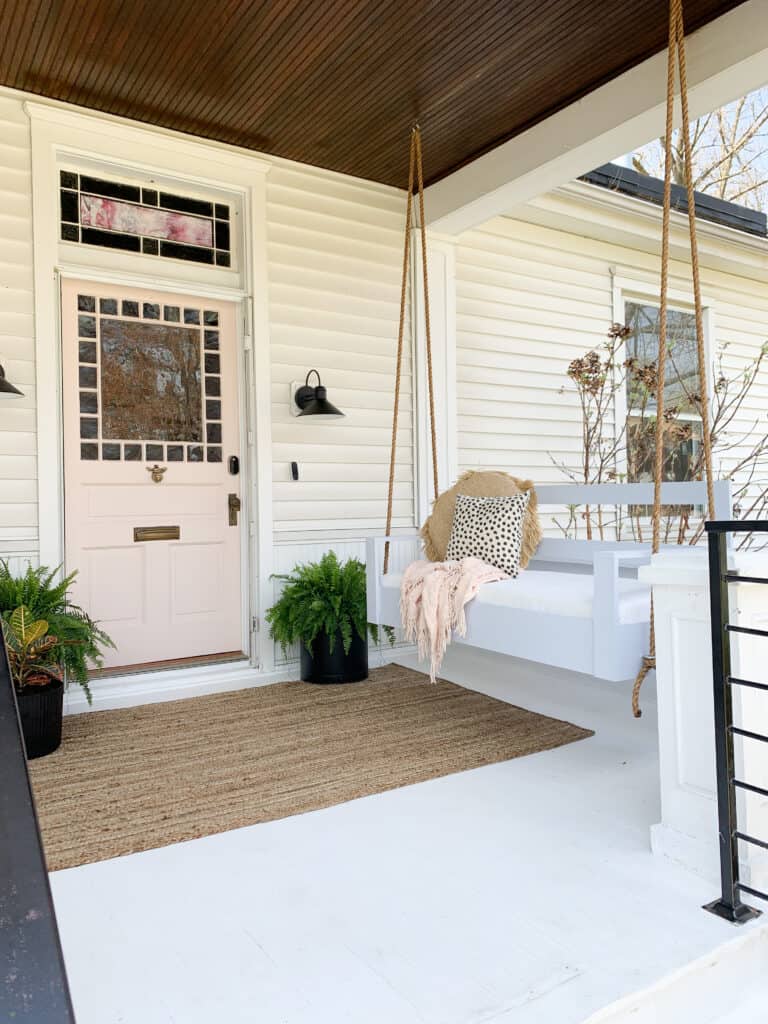
Painting the Door and Floor
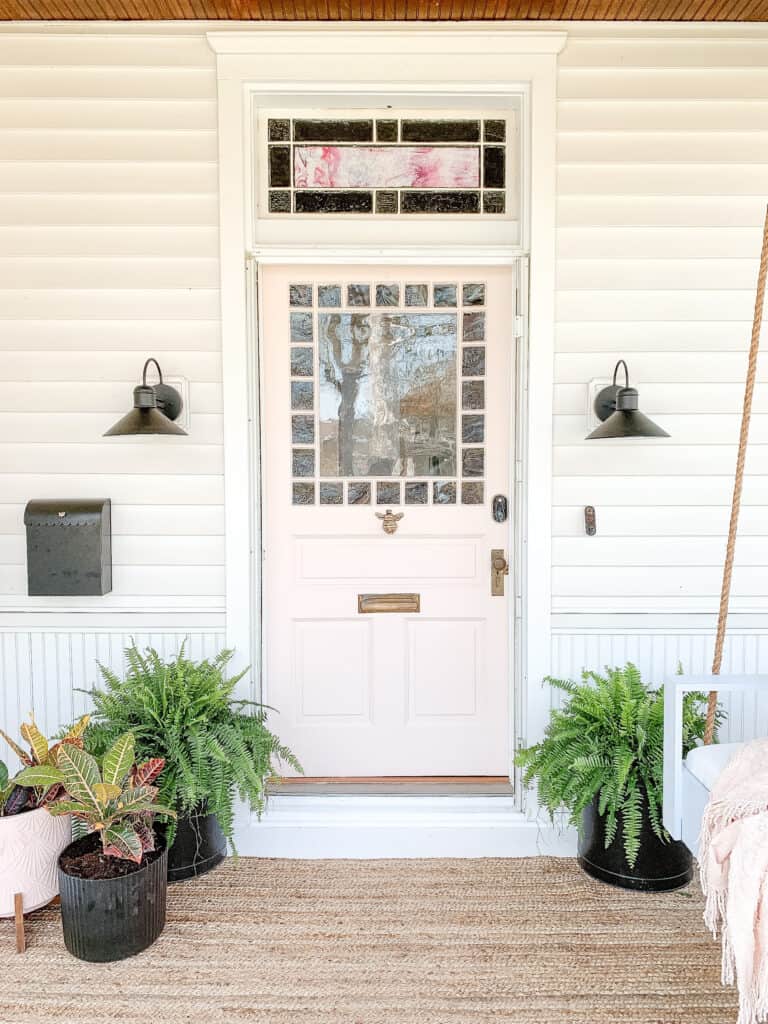
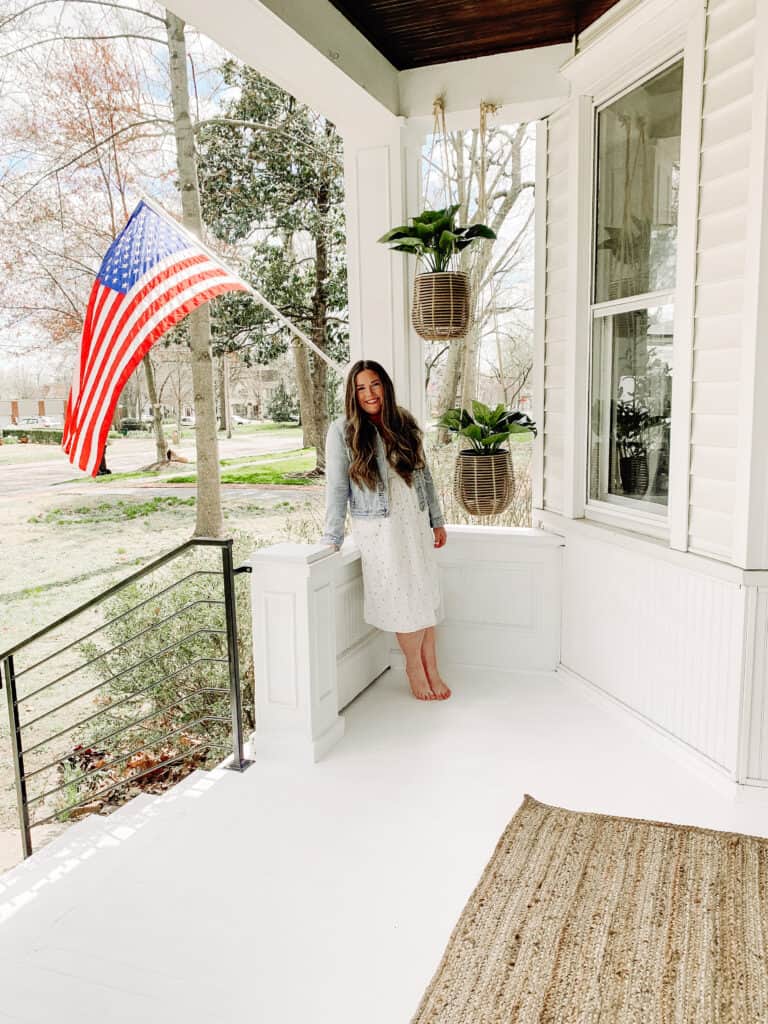
The first thing we did to the porch was paint both the floor and the front door. For the floor we went with white – which we knew was sort of bold, but I love a bright white place, and so far love how it turned out.
We also opted to paint the steps while we were at it. Most of our neighbors have wood steps to their porches, but ours are concrete. Painting them white was a great way to elevate the look of the porch for the time being.
We also decided to paint the front door Behr Seaside Villa. I have used that same color in our house in a couple of spaces, so knew I wanted to tie it in out front. There is some original stained glass above the door in pink shades, so bringing it together with the door was perfect.
We used Behr Porch and Patio Floor Paint in Bit of Sugar
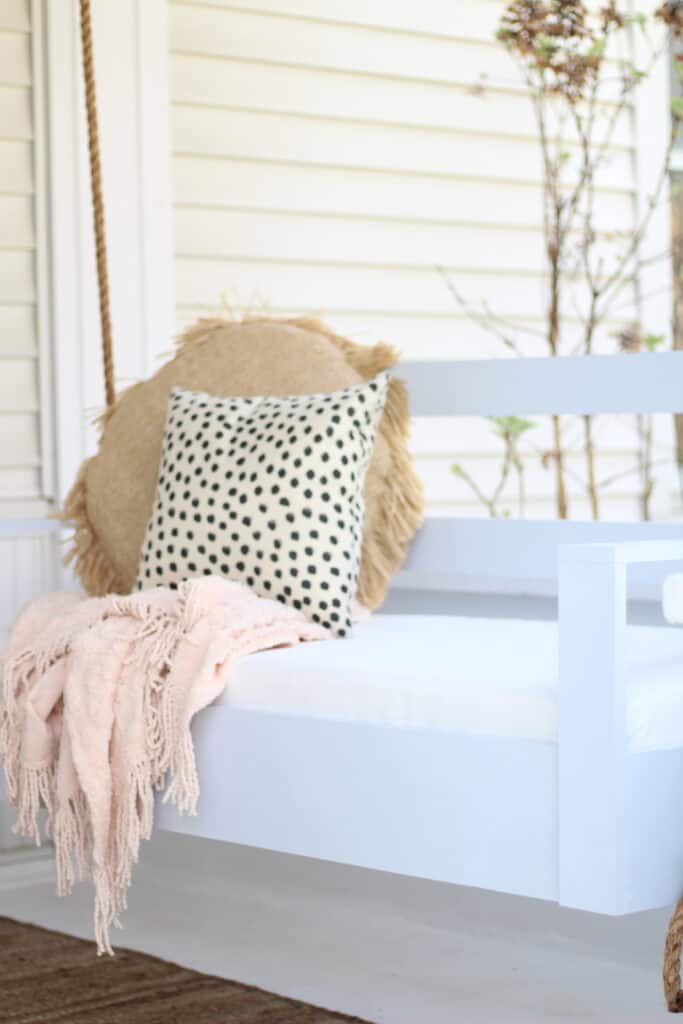
Accessorizing the Porch
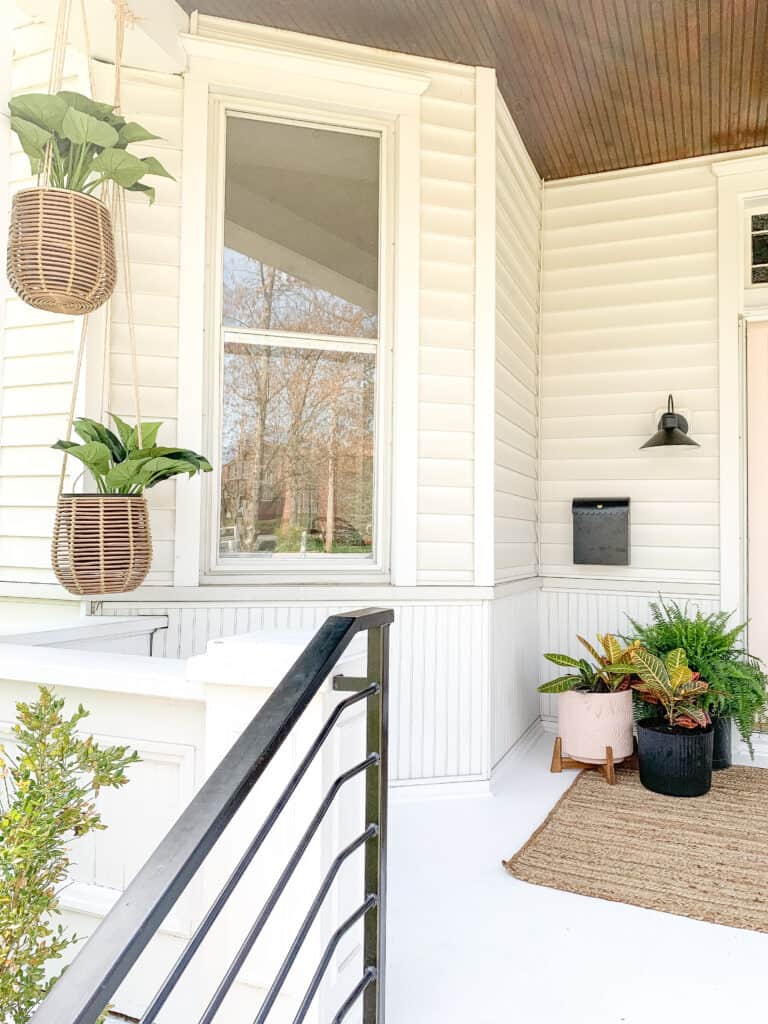
Once the paint was done I wanted to get some accessorizing done. One thing we have been DYING TO CHANGE was our mailbox. I opted for a wall mount mailbox after finding the perfect open for our house.
The one we chose has scallops and a little bee, and our siding has scallops so that tied in perfectly to that. The bee was so cute and matches our bee door knocker perfectly. (The bee door knocker has been on my want list for so long, and I found this much less expensive version and instantly bought it. It is SO CUTE in person!)
I also hung some planters on the other side of our porch to balance the swing and add something to that side and love how that turned out. They are so simple and were really easy. To see how I did it check out my Instagram highlight called ‘porch’
Last but not least was a rug and planters. I loved tying in the black and pink with these items. I decided to round up all of the accessories we used below as well as some other great options, so feel free to shop those!
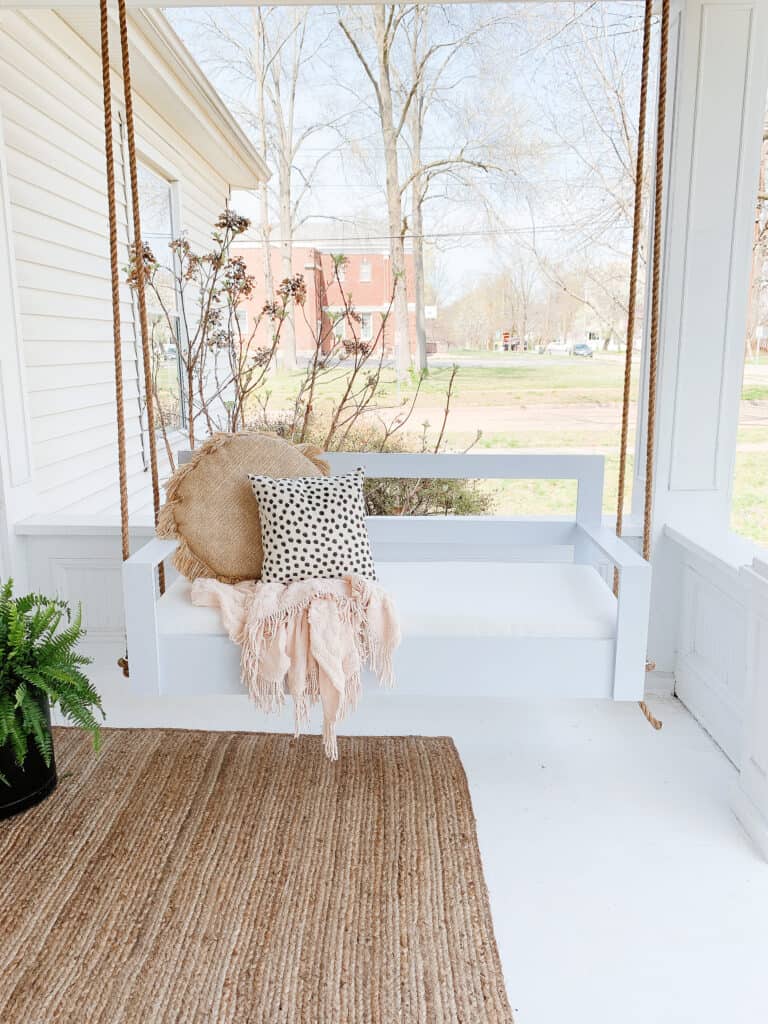
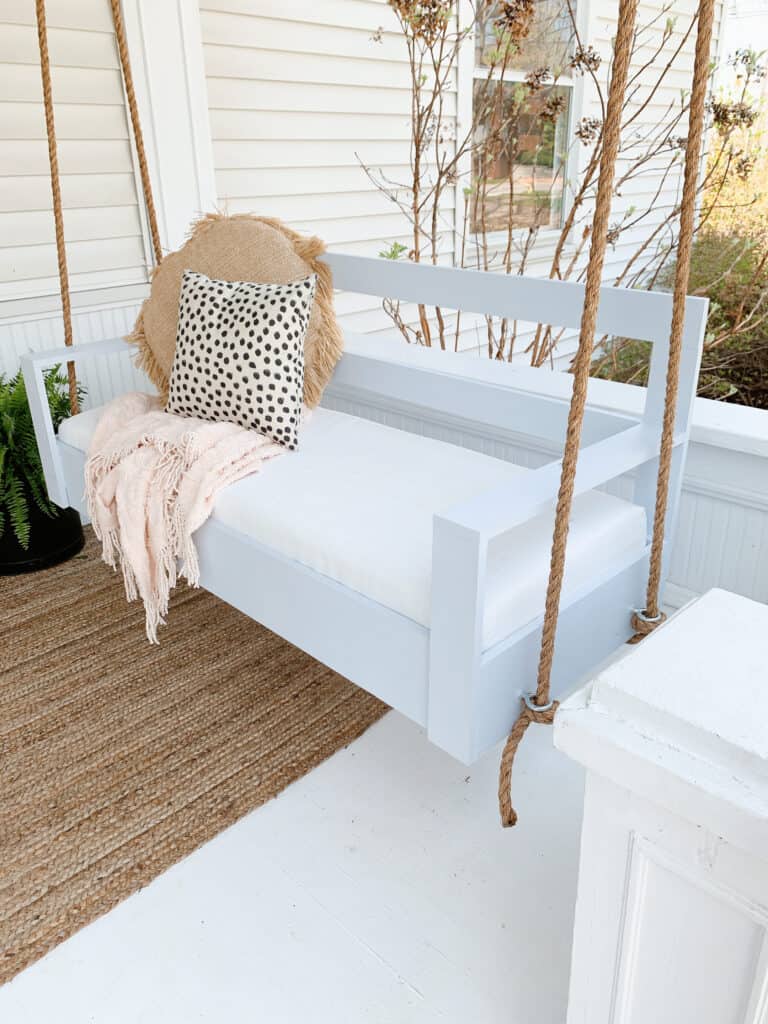
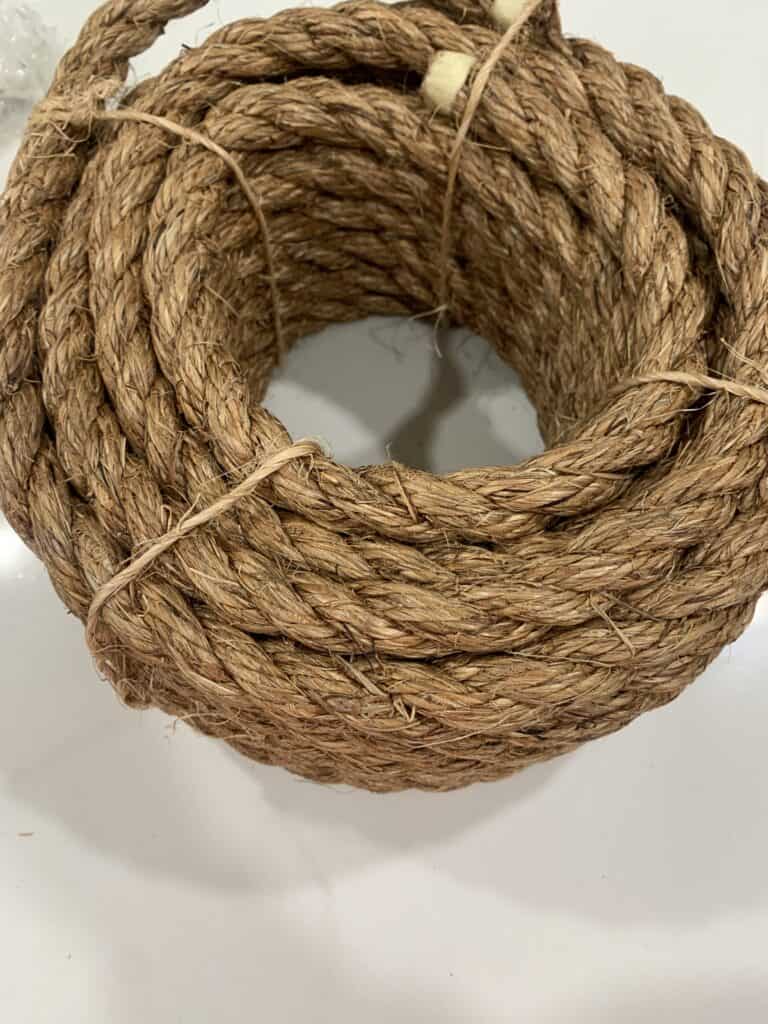
When we bought our home last summer I knew I wanted a porch swing. We are in the most quaint downtown area and I love the idea of pouring a glass of wine and enjoying the people watching this spring and summer.
The porch swings that always catch my eye are the ‘bed porch swing’ styles – but that is a bit tricky with the space we have. I knew our swing needed to be smaller, but I still wanted to somehow accomplish the bed look.
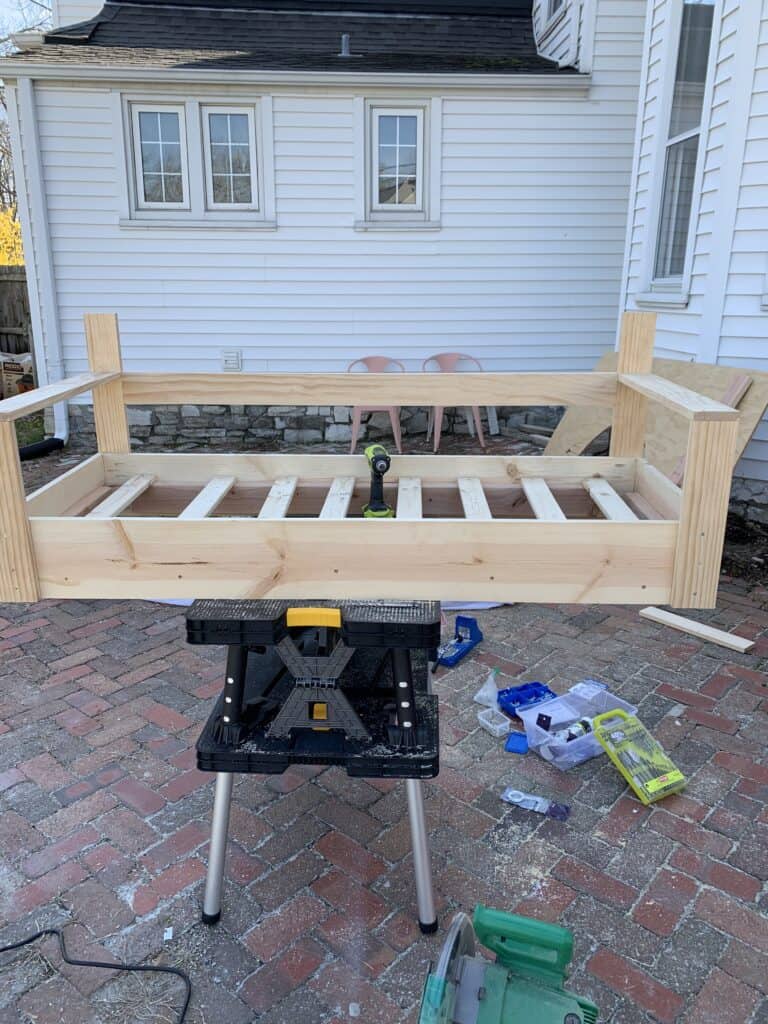
What I came up with was a DIY Porch swing tutorial that is 2 feet by 5 feet, and was honestly REALLY easy to do. The tutorial I will share in this post will not only share exactly how I made our swing and the lengths we cut our lumber, but will also be easy enough to modify for your space.
My goal was to make our swing as large as possible while looking great on the porch which I highly recommend for all of you too.
Watch this Video before you get started
I am admittedly not a videographer, but to see some behind the scenes and get a better grasp of the project watch this short 5 min video to see how we made the swing. It is especially helpful with the cushion!
Supplies and Lumber
** As stated above – the supplies listed below are for a 2 foot by 5 foot swing. You can easily adjust your size to fit your space, but take that into account on lumber.
2 – 1x8x8 foot pine boards (this is the visible frame to the bed)
4 – 1x3x8 foot furring strips (these will be your slats and for the frame to your cushion)
3 – 1x4x8 foot pine boards (arms and back)
2 – 2x4x8 foot boards (support for slats inside)
Let’s Build It! – DIY Porch Swing Tutorial
Alright now it is time to build your porch swing. Below are the steps I took in making ours. Again like I stated earlier – I will share our measurements but also feel free to adjust them.
Another thing to note – I am sharing our measurements, but I HIGHLY recommend you checking each measurement for EACH board for exact lengths. Ours were slightly different in each place because boards can be warped and such. Measuring before each cut for your swing, even if making the same size will help you!
Step 1 – Build your Frame
Using your 1×8 boards you will build your base. Cut 2 pieces at 24 inches long, and 2 boards at 60 inches long.
Decide if you want to make your swing 2ish inches wider or longer. For us we went with 2 inches longer, so we took 1 of our long boards and using screws attached a short board to one side, then did that again to make a box.
Essentially drill through your 24 inch long boards into the ends of the 60 inch long boards. Be sure to countersink your screws so you can hide them with wood filler!
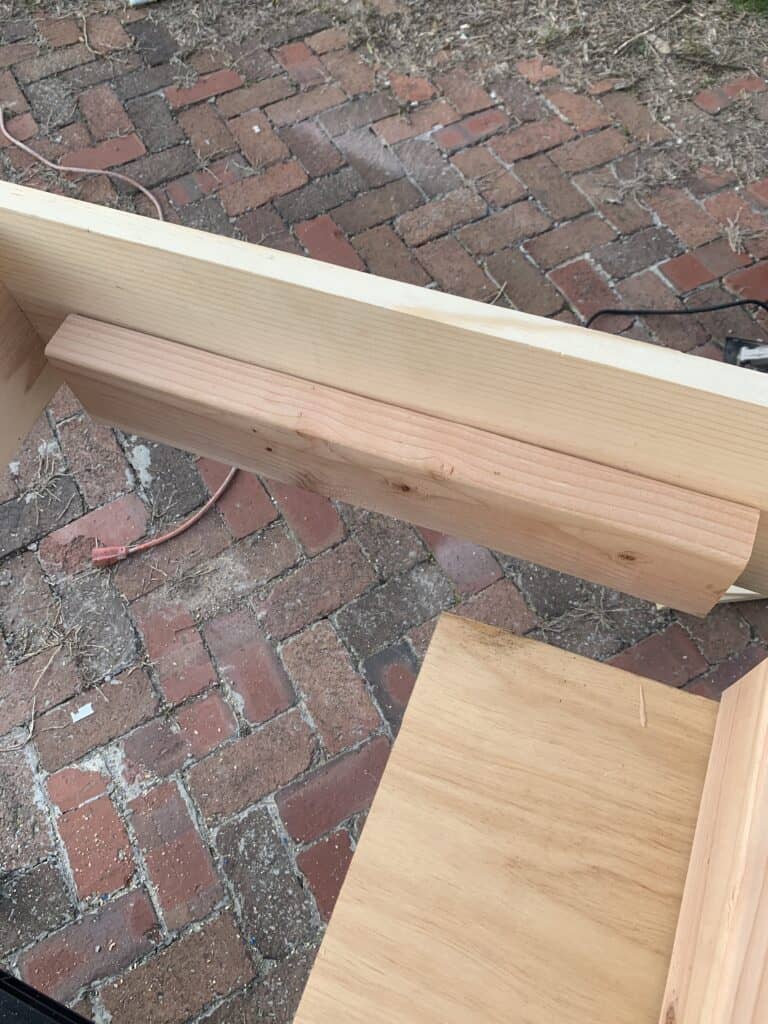
Adding Support and Slats
Now you should have an empty box. To add your supports you are going to cut your 2×4’s inside. We cut each 2×4 6 inches shorter than the outside frame. (this meant 2 pieces at 18 inches long, and 2 at 54 inches). When you go to attach these just center them inside the frame – it doesn’t have to be perfectly placed in terms of left to right.
Once those are cut apply wood glue to them and get ready to attach them. One thing that is really important in this step is that they are evenly attached inside without hanging out the bottom.
Our solution for this was to place a 1 inch board UNDER the 2×4 only. Screw the 2×4’s in coming from the outside of the swing in several places, then remove the 1 inch little spacer board and move it under your next piece.
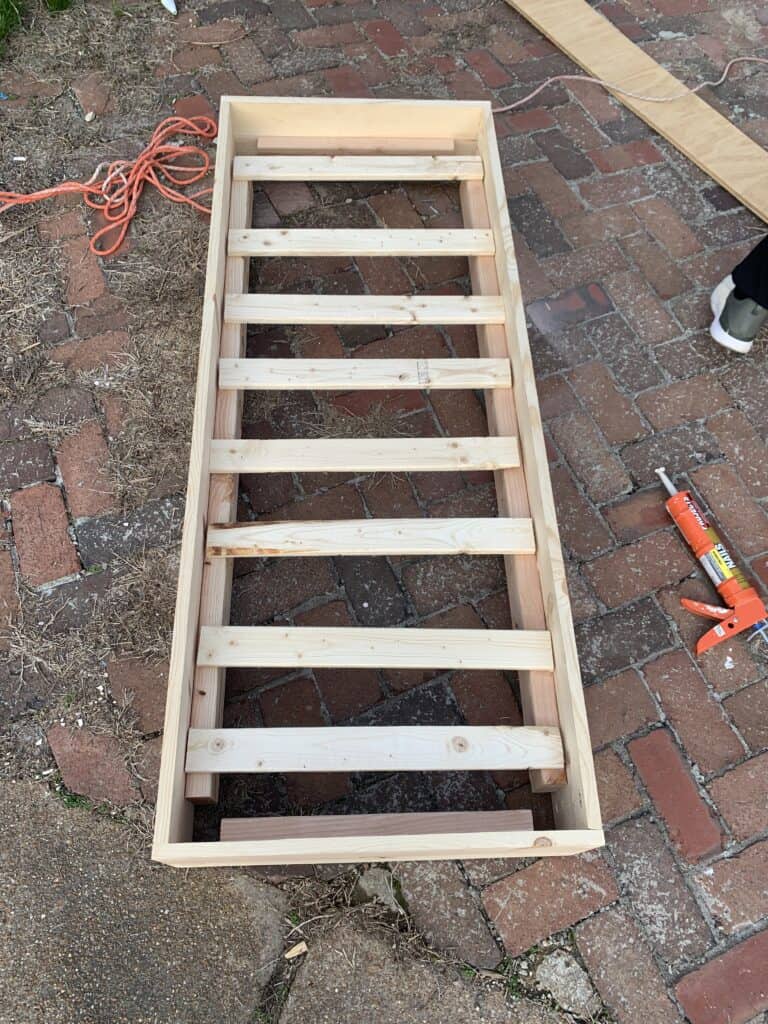
Once all 4 pieces of 2×4 are in place you will have a your frame fully assembled and ready for the slats.
Measure how long your slats need to lay on the 2x4s and cut 2 full 1×3 furring strips to make slats. Leave the others alone for later in the project.
line them up inside the swing and drill them in to keep them in place.
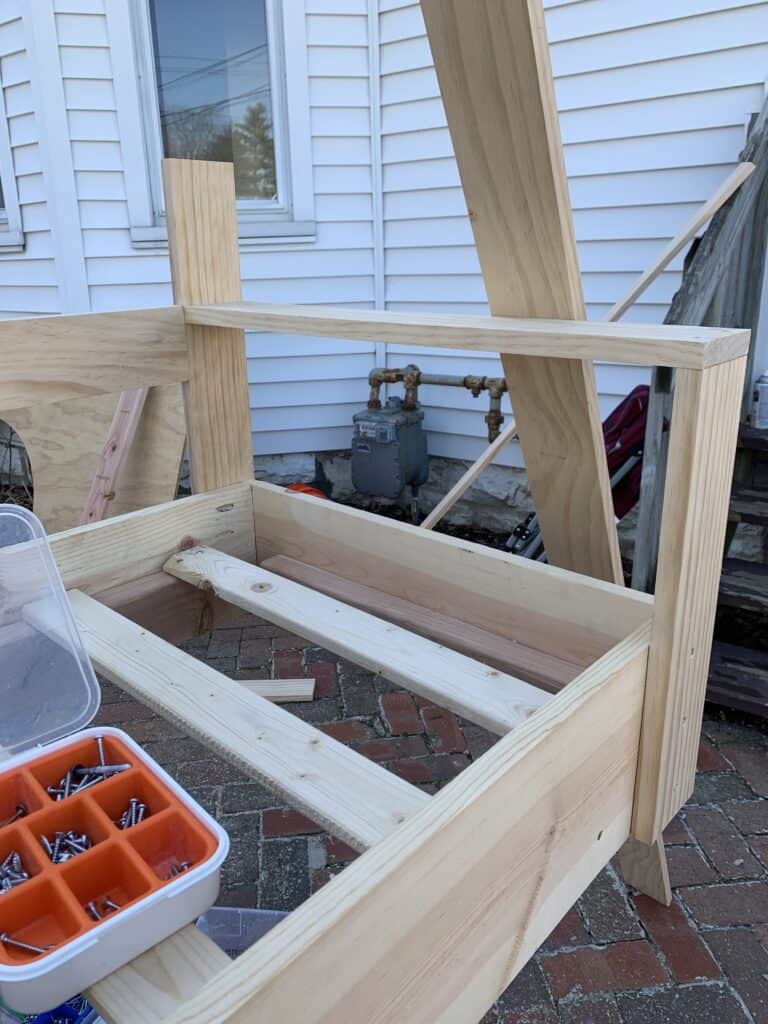
Arms and Back
Next you will assemble the arms and back. One thing I want to stress again here – do this IN THIS ORDER, and measure every cut to fit your swing perfectly.
All of this will be done with your 1×4 boards.
First cut – the front of the arms. We cut ours 16.5 inches. (this should be standard and you can go ahead and cut both). ** this length will be the same even if you adjust your swing to be larger or smaller.
Attach those two pieces by countersinking screws through the front of the boards. We lined the arms up with the bottom of the swing and the outside of the swing.
Second cut – The back of the arm/ Vertical back pieces. Again this should be standard and you can cut both. 2 pieces cut to 23 inches. Attach these in the same manner. ** This length will also stay standard
Third cut – Measure this one for each cut. You are going to add your top of your arm. Ours were 24.5 inches long, but I remember we had to just BARELY adjust the measurements on each. They need to perfectly fit in that gap.
Once cut, attach them by drilling down through the front and in through the back.
4th cut – Top of the back. Again measure this perfectly, but ours was 61.5 inches long. To attach this piece we added pocket holes to the bottom edge on both ends to pocket screw them into the back vertical pieces.
5th cut – Your last cut for the swing itself. Measure this guy perfectly as well but ours was 54.5 inches long. We added pocket holes on the ends of this board and used pocket screws to screw them horizontally into the side pieces.
Make sure you measure where you want it to go on both sides so this piece is straight.
That is it for the swing! Now while you work on the cushion wood fill ALL of the holes!
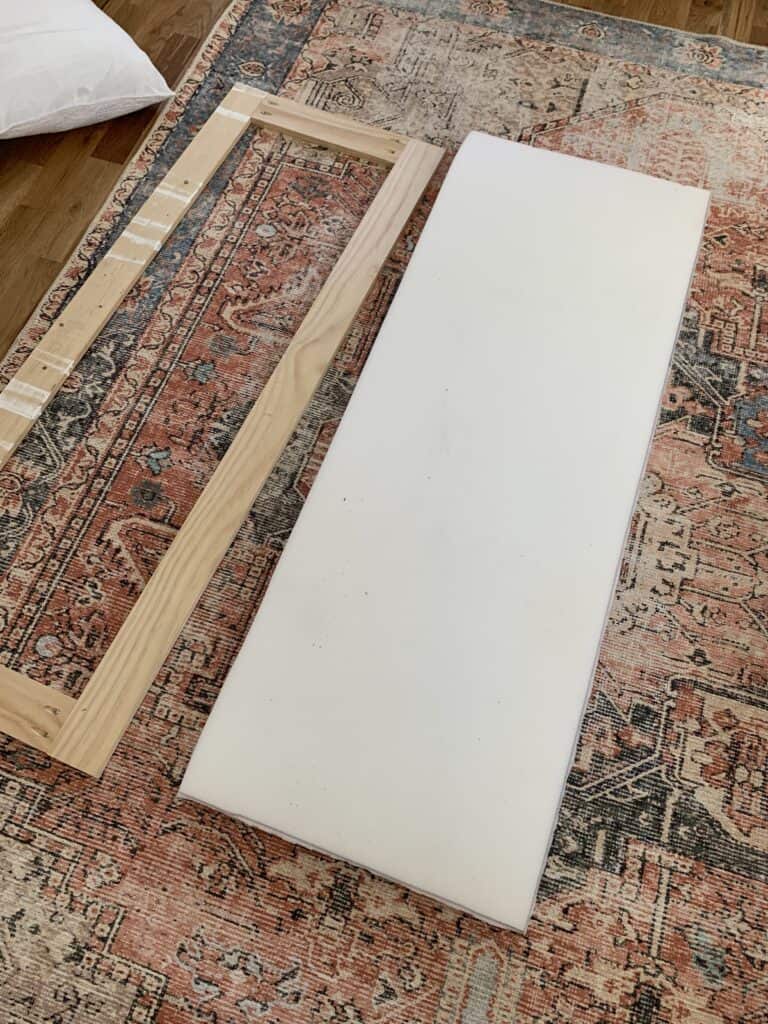
Making the Cushion
For the cushion since this was custom size – it needed to be custom as well. We measured the inside of the swing where the cushion would go and subtracted 1 inch from both the length and width and sam assembled an open rectangle. Use your extra furring strips for this, and pocket screws to attach.
Once you have that open frame take it to your foam and trace it on your foam. I used 2 inch thick foam so used two layers.
I then laid down my waterproof outdoor fabric, then a layer of batting, then both layers of foam, then last the frame. I cut a square of fabric out of every corner to give me less fabric to work with, then you will carefully starting in the middle of the long side start pulling the fabric tight up over the wood frame and stapling.
For the for corners I had a method you can watch in my video in this post which will hopefully help! Make sure you are pulling tight the whole way around, and when done snip any extra fabric off.
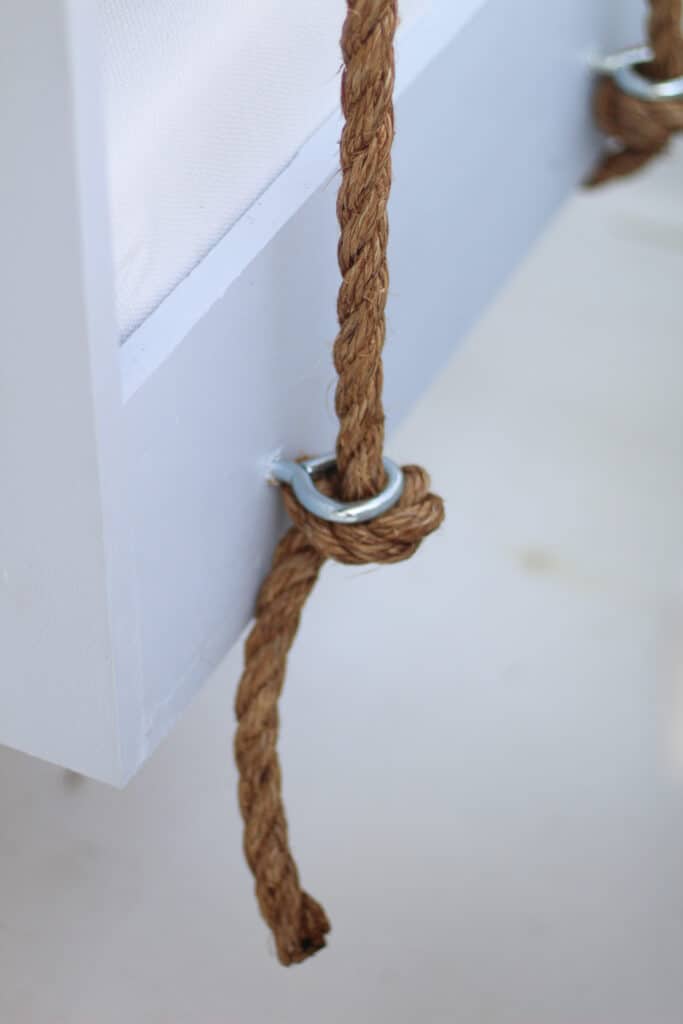
Finishing and Hanging the Swing
All that is left with the swing is to sand then paint or stain. We decided to paint ours and went with the colorValspar Tinsel Beam
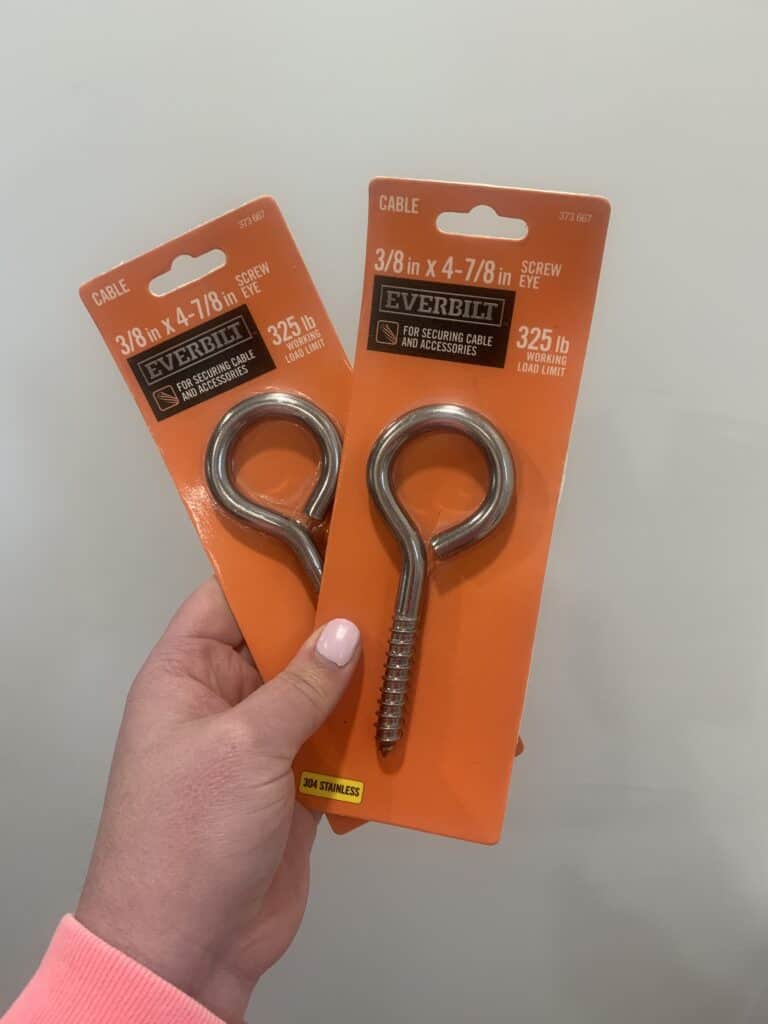
Once it is fully dry and done you will add your eye bolts. As far as positioning this is sort of up to you, but decide on a distance from the corner and place all 4 in the same place. You do need to make sure you are far enough in on the corners that you are going into the 2×4 supports inside.
Now for hanging it – this is somewhat up to you. You can use 1 or 2 eye bolts on each side in your ceiling. 2 will make it swing less. we chose to do only 1 due to the positioning of our beams. You do need to use your stud finder and be in a beam!
We chose to use 1 long piece of rope per side, so cut our rope in half then added a large knot on one side. We then placed the swing on some planters to find our height, ran the rope up through the ceiling eye bolt and down to the other side where we tied another knot.
And that is IT! This is honestly a weekend project that can be done start to finish with about $200.
Other Posts You’ll Love
If you loved this post you will love these other blog posts below!
I hope you found this tutorial for our DIY porch swing helpful, and feel ready to tackle your own. Tag me in your photos on Instagram (@arinsolange) when you finish your swing, and be sure to pin the photo below for later!
Summer is around the corner, and with the weather warming up our kids toys are starting to take over the yard! As a mom of 4 I have used different outdoor toy storage ideas over the years. Certain methods have worked better in certain homes – because let’s face it – organization is not ever a one size fits all situation. This blog post will walk you through some Outdoor toy storage ideas to store toys that all moms will thank me for this summer.
This post may contain affiliate links
Outdoor Toy Storage
There is NOTHING better than the warm spring and summer days that come after a long winter in the midwest for us moms. The peace and quiet our house feels with kids running around outside, and the easy bedtime routines that the kids give us after – it is a win win!
I have 4 kids – ages 1 to 8. I have 2 boys and 2 girls – so that means we have a lot of outdoor toys. We also have 2 boys and 2 girls, and in our house that means that we somehow have to have every toy in both pink, and blue, and green. And Barbies, and action figures BOTH have to live outside. (you get the picture – SO MUCH JUNK). Why does it seem like kid’s toys multiply?
In the time we have had kids we have lived in 3 homes – all with very different needs in terms of outdoor toy storage. I have come up with ways to make storing and cleaning up outside easier at each house, so I am hoping by mixing some of the products I share, while mixing some tips I have you will have a summer that brings you a cleaner outdoor space.
Embracing Kids Items to Enjoy your home
One thing I talk about ALL THE TIME on my Instagram, as well as here on my blog is that as moms, if we learn to embrace the ‘mess’ that kids come with our lives get so much easier.
Now when you’re reading that – if you are anything like me – you might be cringing. I am very type A and organized. I like things to have a place and be put away at all times. That isnt always 100 percent possible with kids – but by learning to embrace the chaos it is much more possible than fighting it.
You know while you have young kids at home you are going to have toys, and clutter right? Finding ways to incorporate their items and needs into your decor can make your home feel more seamless instead of stressful.
I have a whole blog post here on how I do that inside my home, but the same goes for outside. (Now personally I let me kids trash the outside a bit more because it saves inside, but you get the picture).
Find Methods that Work well for the Age of your Kids
Another way to save your sanity is to pick methods and storage items from this post that mesh well with your kids. For example – something NOT to do: When we moved into our last house we had a 3.5 and 1.5 year old. We had a rear entry garage so I wanted a way to store their toys in the garage and easily bring them out for them to play with.
My solution was this rolling cart. In theory it was great, but for ALL toys it was horrible. The kids weren’t big enough to reach anything that didnt stick out the top, so I constantly got called to help – and that is not what I am about haha!
As the kids got older that same rolling cart was much more helpful for the gear they had because they were old enough to understand what went where, and reach in a bit to find what they were looking for. So think through how you will use something and if it will work for your current circumstances.
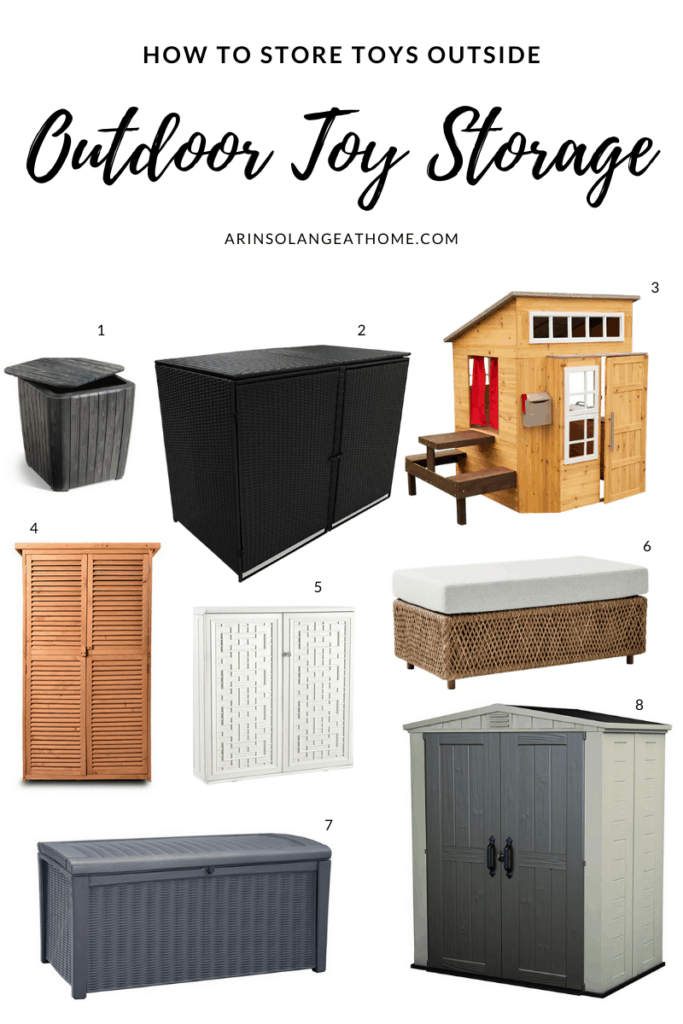
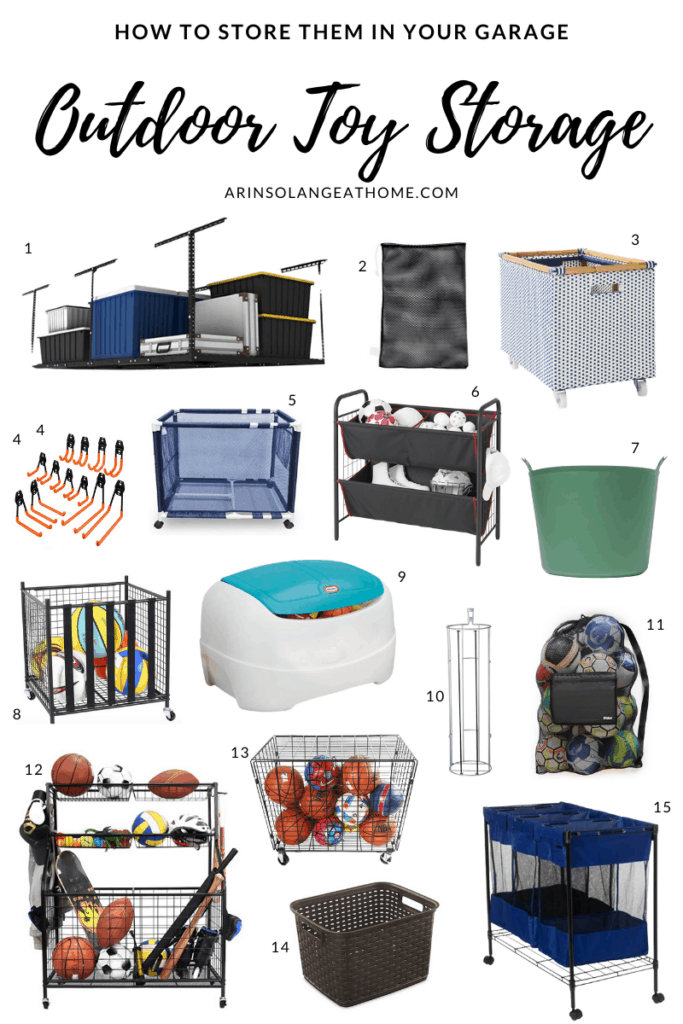
The Best Outdoor Toy Storage Ideas
Now that we have talked about keeping those spaces tidy and how to know if something is right for you, lets dive into some different storage options. I will talk about ways to store your toys both outside and in your garage in this post, so if you have a preference on one over the other feel free to skip to that section.
Outdoor Toy Storage ideas – Outside Options
In our current house we don’t have a garage, but rather a barn that needs some serious love. We don’t want the kids going in the barn constantly to find what they are looking for, so are coming up with ways to store outdoor toys outside.
There are several different Ideas I will talk about in this section, as well as linking to some great products that will help you get those toys organized.
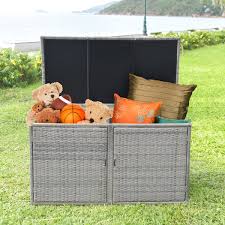
Option 1 – Outdoor Storage Box or Storage Cabinet:
This is what we are doing in our backyard currently. We bought a large storage bin (think maybe what you would store cushions in) and have the kids put all their day to day toys in it. With 4 kids we are able to store everything aside from large ride ons in this bin. (even scooters).
The Pros:
It is super easy clean up – the kids just walk around the yard and grab everything they need and throw them in.
It is one simple item that doesn’t take up much space and isnt bad looking.
They are easy to find in store or online
The cons:
If the kids don’t fully close it it does get water inside
It is a catch all so some toys go there to die in the bottom (we will need to clean it out 2 or 3 times a year).
The toys at the bottom are hard for my younger 2 kids to reach.
I have also seen recently bins like this that are a big more of a cabinet for outside. The exact one I linked is gorgeous and on the right patio would be gorgeous and would allow for smaller toys to be organised in a more reachable way using baskets like these.
I think for me I would prefer something along those lines so things like chalk and could stay more available to the kids, but I will also say that getting the kids to put things where they belong can be a big battle inside so outside might be even worse.
Check out the other options I linked below for some great similar ideas for your small toys outside.
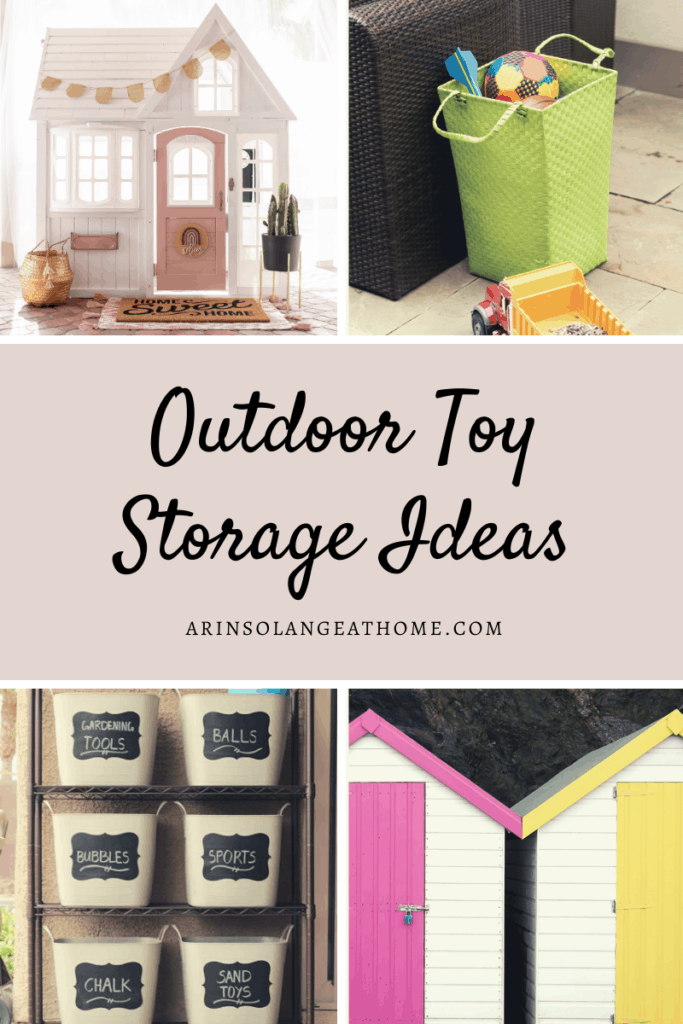
Option 2 – Playhouse or Toy Storage Shed
Another great outdoor storage option is a shed or a playhouse. Depending on what you need to store you could definitely store smaller items in a playhouse without the expense of a shed, or you could do a small shed and have it be dual purpose.
If you decide to go the method of using a shed be careful on what else you store in there if you will be allowing your kids to play in their on their own.
A big pro of this toy storage solution is its large capacity. That said – you need the yard space to make this happen.
Another great option is a ‘trash can shed’ – which is not really a shed, but more of a hidden parking spot for trash cans that would also work wonderfully for bikes toy cars, and other ride on toys, and will give them a covered area to stay.
If you want those stored outside without the expense of a shed that might be a great way for you to conceal them and keep them a bit more weatherproofed than being directly outside at all times.
One downside to these is that they don’t seem to be fully weather resistant so you would want to take that into consideration.
Option 4 – Storage Coffee Table or Storage Ottoman
Just like inside your home, outside your home a storage ottman or table can be a great way to store outdoor toys. I showed a couple in the graphic below that you could tie into your patio seating while keeping your kids toys fully concealed.
The double duty this serves as patio furniture while also being the perfect place to store toys of your kids is a mom win if you ask me.
Sounds like an oxymoron right? What I really mean by this is ways you can store your toys in your garage while they aren’t in use!
There are several different things I will talk about on this from ways to store them during the warm months while they are in use, as well as ways to store them and get them out of the way during the winter.
Option one – Rolling Storage Cart
Like I mentioned above we did one of these at the last house and at different times I loved it more than others. We personally had a 3 bin version where we [at the time] stored all of our outdoor toys. In theory my idea was it was a single item to roll outside when the kids wanted to play.
The idea behind it was actually great. I loved having something to roll to the driveway with the kids toys, but as mentioned earlier in this post, my kids were too young to reach much in it.
So my overall advice would be – this is still a GREAT storage option for your garage, but might be better for only taller things (bats, golf clubs, etc) or better if your kids are older and can reach inside. By the time we moved my older kids were 5 and 7 and able to handle it a bit better.
This is another version of the rolling cart that is just gorgeous. If you are looking for something you can roll out on your patio while keeping it looking gorgeous this would be a great splurge piece. The low profile means little hands could grab what they need.
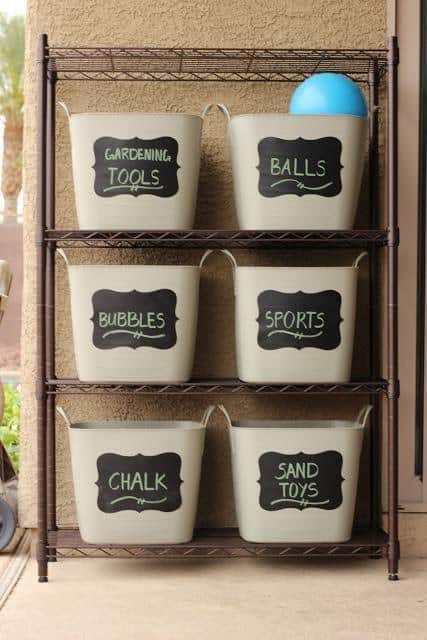
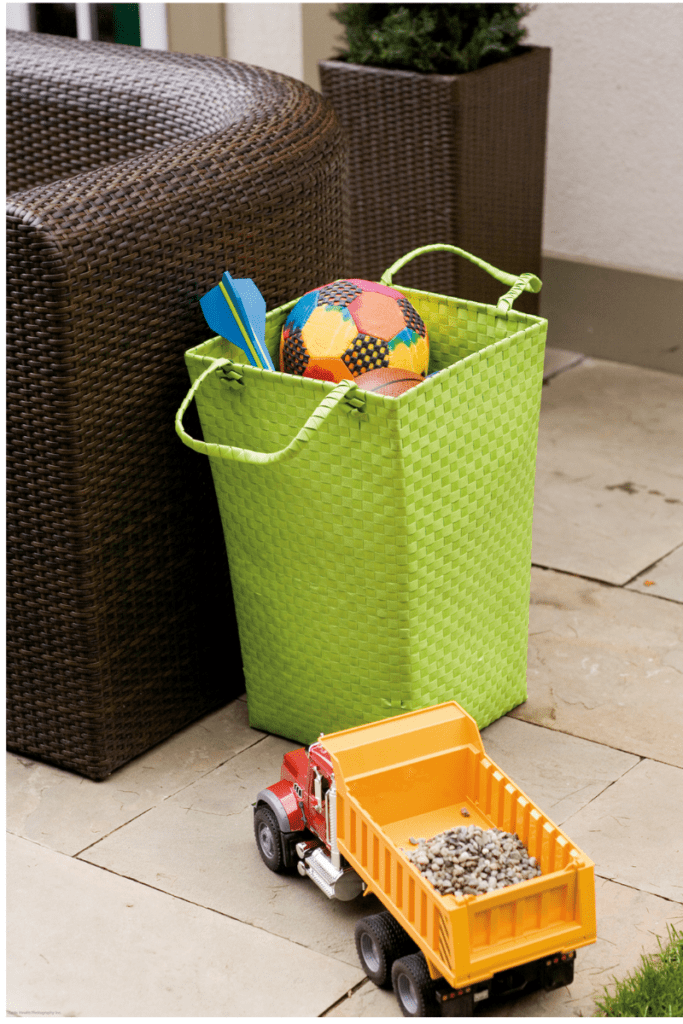
Option 2 – Ordinary Baskets and Bins
If you can make a space for your kids toys on a shelving unit in your garage, these bins are perfect for storing toys. We use them all over the house and I love that they can just be sprayed out for easier cleaning.
We started storing many of the kids toys this way last year and it was such a good way for the kids to be able to get what they needed while cleaning up in little time.
Add onto them these little basket labels, or chalkboard labels so they can put thing where they belong. (No kids won’t be perfect at this, but it is helpful to set the expectation if that is something of importance to you as the parent. – if not skip that step, and let them be catch all baskets which is great too!).
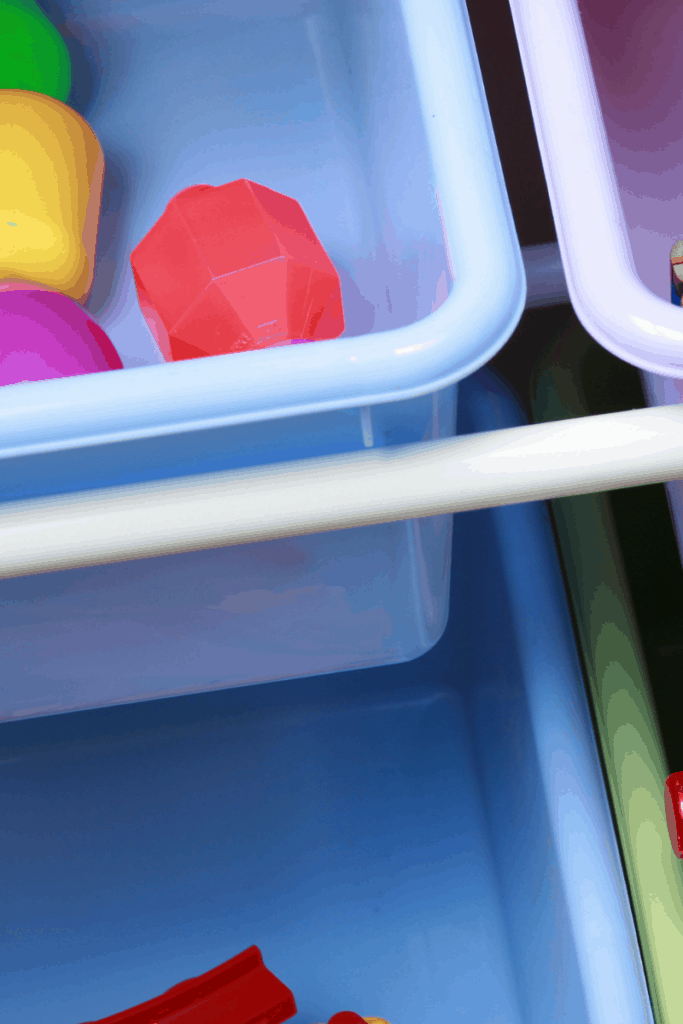
Another thing you can utilize within those baskets and bins (or really any of these storage methods is mesh bags. These are traditionally used more for the beach or for laundry, but are a great way to keep smaller items together.
We use them to store balls, sand toys, and on so if my son wants to play baseball he isn’t digging around trying to find all the balls. They would also be great for smaller trinket toys if you have younger kids. I know my kids love bringing inside toys outside and generally my rule is once they go out they stay out!
Option 3 – A Toy Box
This is pretty straight forward. A simple toy box in your garage can serve as a perfect way for your kids to store your toys. Growing up that’s exactly what we had and it was wonderful!
Option 4 – Wall Hooks
In my opinion this is one of the best ideas on storing so many items to keep them in reach, while also freeing up garage space. They will give your garage an organized look while helping you stay sane.
We use ours for everything from strollers to sleds, to bags for sports gear and so on. It is also a great place to hang these bags for ball storage if you have kids that play sports.
This is a great method to use with some of the others in this post – nothing is one size fits all, and in my opinion mosts families will need to use a few of these methods together to find the best solution for them and their family.
Winter Storage:
Something that is also helpful is storing toys away when they won’t be in use. The winter months are long and cold here in St. Louis, so adding something like a hanging garage shelf can allow you to put bikes, and scooters up in the winter, while bringing things like sleds down to be more accessible. Adding floor space is helpful for basically everyone in the family.
It is also a great place for extra storage for those less often used items like kids pools, pool noodles and floats, hula hoops and so on. Many times garages are simply limited on space, so finding a great way to utilize the space going UP can be a great way to add square footage.
If you add some hooks and utilize bungee cords you will more easily keep items in place going up and down, so take that into account if you are doing this DIY.
Hopefully you found this post to be helpful, and you can implement some of these outdoor toy storage ideas into your home and lives to make it less stressful. If you have other ideas be sure to leave them in the comments below to help another mom out. And if you aren’t following me on Instagram yet (@arinsolange), be sure to follow to see what I do with our new outdoor space.
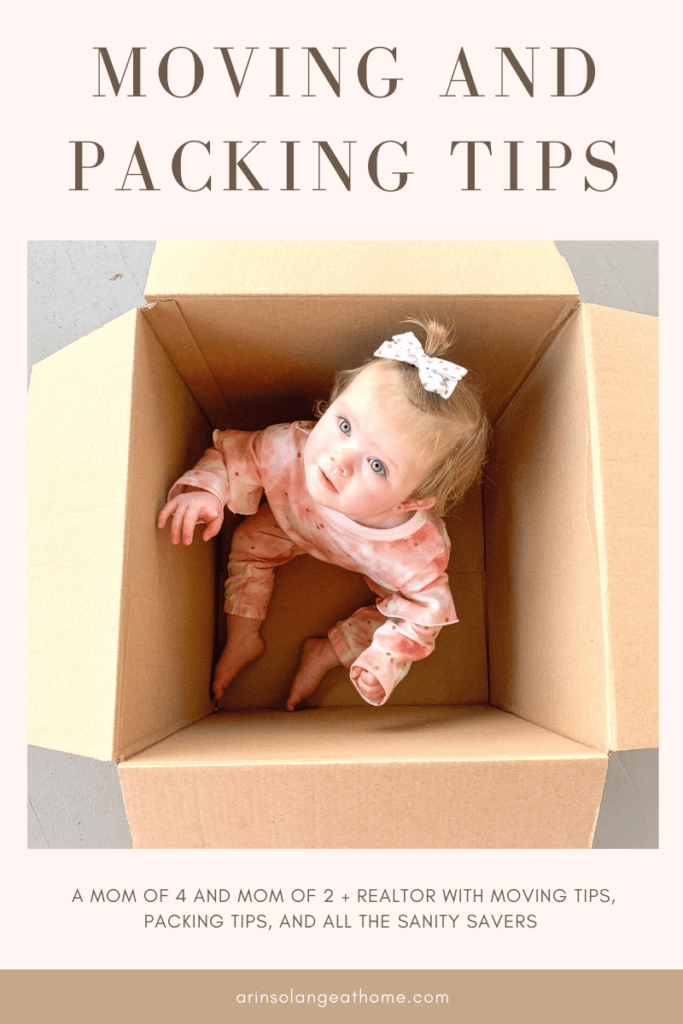
Moving tips and packing tips – basically the thing any of us that are moving are looking for, right? I am a mom of 4 who recently moved and I am finally ready to share all the tips and tricks on moving, as well as some great advice from my realtor that will help you get ready for your next big move.
this post may contain affiliate links
Moving Tips & Packing Tips
If you are reading this you are probably packing for a move. Congratulations! We recently packed up our family of 6 to move – with a little side hold of a rental during a renovation, so I feel like I can share great tips no matter what your move looks like.
In this blog post I will walk you through my tips and process when it comes to packing – it is a lengthy bit, but I swear it will help.
But before we get to that I am also going to share some great advice on moving from our realtor here in St. Louis.
This is personally my third move. Last time we moved we had 2 little ones who didn’t have much for opinions on what was coming with us, so this time has been slightly different in that regard. Most of the tips I share will be universal – but there will be some tips that will help you with kids at home specifically.
Tips on Moving from A Realtor
Last summer when we found the house we are currently in we called Amanda Brandt to help us with our move. I had met Amanda once before, and she was so sweet and PATIENT with us. We really weren’t sure if we wanted to move or not, so I loved that she was just happy to take us to see a house if it felt right.
We talked WAY back then about writing a blog post to help my readers and followers who would also be going down that path, but with 6 kids (and one on the way – FOR HER NOT ME) it took us a minute to get things going.
Be sure to reach out to Amanda if you are moving soon, or just have any questions – she is always happy to help! But enough about Amanda and more about her great advice for you all. We asked my followers some questions and did a Live to cover some of this, but incase you missed it here are some great Q&A’s with Amanda.
What is the Best Time of Year to Move
Peak moving season is typically the spring and summer months. Traditionally, the weather is nicer and kids are out of school, making it an ideal time to move for families.
I would say the best time of year to move is based on the needs of you and your family. Each family has their own individual needs and motives when it comes to deciding to make a move.
The current trend I’ve seen seems to be that most families are spending more time at home and realizing they need more space. Home offices have become crucial as more people are working and schooling from home. The best time to move is when it works best for your family.
It also depends on what is happening in the market. For example, in this current market, if the home is priced right and photos are professional, it will sell quickly. If you need to sell your house, now is the time. Inventory is at an all-time low, which creates a higher demand for houses, hiking the prices up.
On the other hand, when you are a buyer in a low inventory market, you will want to have a backup plan. Ideally, you would buy a house and then sell your own, then you only need to move once. This option doesn’t work for most people, so other back up plans can include: selling and then renting short term until you buy your next house, selling and then living with a family member or friend, or trying to sell and buy simultaneously.
Should You Fix Everything Before you Hit The Market?
You should fix what will provide the biggest return before you hit the market! This gives you the best chance of your home selling quickly and for more money. Buyers want a move in ready home.
They don’t want to come into a house that needs a lot of maintenance work and repairs to be done. If you do not make the fixes before you go on the market, when a buyer looks at your house, they are going to see all the work that needs to be done.
This will give them the idea that the home has not been taken care of and well maintained, which will lead them to be more hesitant in making an offer. Your goal as the seller is to eliminate as many possible objections a buyer may have to making an offer on your property.
Your biggest competition as a seller will be new construction. Keep in mind that taking care of all deferred maintenance and doing a thorough cleaning will help your home show at its highest level and sell for the most money. The goal when putting your house on the market is to attract as many buyers as possible, so get your home in tip top shape! You only get one first impression, and it will pay off.
Tips to Do Before You Reach Out to a Realtor – At What Point Do You Reach Out to a Realtor
Your very first step is to reach out to your Realtor®! Most sellers start thinking about selling six months to a year out. As soon as you start to think about selling or buying, CALL YOUR REALTOR®! I will provide you with the information and data you need to help you make the best decision and put a plan into place, even if you’re not sure you are ready to sell.
Unfortunately, it seems that realtors have a bad rap of only listing a house and doing the bare minimum, but a good Realtor® will do so much more than that!
Think of your realtor as a home selling and buying consultant. They know the process inside and out and will walk you through every step of the way. It is my job to take out all of the guess work, so you are confident in what you need to do to achieve your goals.
We will discuss your goals and help you figure out the best plan of action and timeline. I will then provide you with a starter pack containing everything you need to get started.
After that, we meet to view your home and wrap up the final steps to get it ready to list. This includes putting together a staging plan, scheduling a professional photographer and creating all marketing materials.
What Major Costs Should I know About?
Every Realtor® is different when it comes to fees and commission. My commission covers the cost of staging, photography and all marketing costs. I believe that these areas are KEY to selling a home when the majority of buyers are looking at pictures online, so I take these costs on as part of my job to market your home.
Currently the way the real estate system works, as a seller, you are paying the commission for your agent and the buyer’s agent. This comes back around to you, when you go to purchase a home, because you will not be paying your buyer’s agent, that seller will be.
Here are costs to be prepared for when selling your home:
Title company fees/closing costs
County inspections
Repairs
Realtor® commission
If you are purchasing a home, here are costs to be aware of:
Inspections
Earnest money
Down payment
Appraisal
Homeowner’s Insurance
Please be aware that this is not comprehensive. This is a very high level of how to get started. That is why it is so important to call your Realtor® first. Every state, county and city has differing laws when it comes to real estate, and your Realtor® will know what steps need to take place in your specific location to get your home ready to sell.
If you would like more information on how to get started with selling or buying a home, please email me [email protected] or call or text 636-248-5646 or find me on Instagram @amandabrandtrealtor. If you are located outside of Missouri, give me a call and I can set you up with a trusted Realtor® local to you!
Packing your House to Move!
Alright before we get to some of my moving and packing tips – here are my major rules:
Big Rules To Follow with Packing
Do not move items you don’t LOVE
Do not pack bins without going through them – this is a pain. It might be kids clothes you are saving for another kid, holiday decorations, keepsakes – you name it. Moving is the best time to purge what you don’t need. I went through all those bins and if I wasn’t 100% sure it would have a place in our lives in the next house it got sold or donated. This will take extra time – but it’s also a great step you can take earlier on – maybe before you even list your home.
Do not move anything dirty – Moving is a great time to get bedding and curtains dry cleaned, hose off any outdoor toys, strollers, and such. Clean it all. Do the work on this end so while you are settling in on the other end it can be more enjoyable.
Don’t Move Loose Items – Obviously some things don’t belong in bins and boxes (huge fake plants, picture frames) – but if it is small it needs to go in a box or bin.
Moving Tip #1 – Purge to donate or sell
When it comes to purging most of the time I try to sell about 50% of the items I am getting rid of first. I can normally make $5k ish just by getting rid of things we don’t need or that will be replaced on the other end.
Here is a rule on that – if it goes to the sell bin and doesn’t sell – donate it. You didn’t love it enough to keep it so don’t move it.
I do this in every area of my house. If it is something that you will need to replace on the other end keep a list so you remember you won’t have – say cutting boards – on the other end of your move! I tend to replace some things like that or inexpensive Tupperware when I move because it is a good time to start fresh on that.
Get your kids involved! When it comes to kids toys – we have our kids help. This is a good time to talk to them about how fortunate they are and how they can bless another family. I will say – tread lightly and don’t push too hard. Moving is A BIG CHANGE for kids, so you don’t want them to feel like they are losing their home and their belongings.
How we do this with our kids is we sit down with them and have them help – we talk to them about how we want to get them a few new toys at the new house, so we need to make room. We talk to them about passing along toys they no longer love or need to help other families. After they have helped – kick them out and you do the last purge of those items.
Your kids will hold onto things that you KNOW they won’t miss. They won’t even notice it is gone. So once they are off doing their own thing do more. Also get rid of anything that is not in good shape. For us we got rid of 10 bags of toys and stuffed animals from our playroom – That is A LOT of stuff that now won’t be in our new house!
Follow this rule of thumb for EVERYTHING YOU OWN. Purging is a huge part of moving.
Organize on the Front End
On the note of thinking ahead and purging – if you know where you are moving already and have some idea of how you might want to store certain items, organize things on this end. What do I mean by that?
If you know you will be storing bows in a bathroom instead of closets – maybe find the organization solution on this end.
Or if you know you will be storing your kids craft supplies in a closet pack them in a way that you can unpack them and put them right on the shelf. Sometimes this isn’t the most space saving way to move – but I can tell you it is really helpful when you are exhausted on the other end!
Boxes and Bins
If it won’t get unpacked (holiday decor and such) choose bins. Pack them up – label them well and when you get to the new house you can just leave them closed.
I also tend to opt for a plastic bin for my items that I really don’t want broken. (That said this move I didn’t have anything break in a box or a bin!)
When you are filling boxes try hard not to have to combine rooms – you will thank me on the other end. If there is empty room at the top throw in blankets or towels/ throw pillows. Things that will pad the box, keep it light, and won’t be a pain to haul to it’s actual room in the new house.
With my kids rooms – I have 4 kids. I started boxes for decor and bedding from each room. They all filled a box – some filled 2 boxes. Then when I needed to combine I combined the girls. Then if there was some left I did one last box that was labeled ” kids rooms”.
So 90% of the items I know pretty specifically belong in one room or one space – the rest of the items all go to a very similar area. (I wouldn’t necessarily use this exact model if your kids rooms won’t be in a similar area. So if you have kids on different floors of your home you may want to do this slightly differently!).
The main goal is to safely get items to the room or as close to the room they will end up in so you aren’t carrying half empty boxes all over the place.
Label
Everyone has a different opinion on how to label. I think 1000% if you have movers coming to help you move you should use a color code system. Have a color for each room and put a large label or piece of tape on the box AS WELL AS A WRITTEN DIRECTIVE.
When you get to the house for move in have a couple cheat sheets for them to know where things go, but also go to the room indicated and place that color on the door frame so the movers can easily find it.
** Basically this is helping movers because they have no idea what ‘jacks room’ means. They don’t know ‘Jack’. Kitchen, basement – things like that don’t need as much help from them.
If you are moving on your own with no help from others you probably don’t have to do this system, BUT make sure that every box is still WELL labeled.
Tips on a 2 Step Move
The last thing I want to touch on is a 2 step move. This past move for us was the first time we did this. We moved out of our house, and into a condo with our stuff in storage for a few months, and boy did I learn A LOT.
Place furniture and decor at the back of your storage unit. Think things you KNOW you won’t need even if the move takes longer than you anticipated.
Only take with you what you need for the middle stop, but also make sure you bring enough to keep yourself comfortable. It is a weird transition not being in your home so take care of your mental health.
Be mindful of season changes. We moved out of our house and to the condo in August, and were supposed to move into our new house in October. That turned into November, and we had an early cold this year. That meant I didn’t have coats unpacked and so on. If I were to do it again I would have kept all things kid related at the front of our storage units because there were several times where I realized I forgot things.
Be patient with yourself and give yourself grace. I was so angry with myself for needing to buy new on a few items that I knew we had but I couldn’t find. That is just a reality in that stage of life.
Keep in mind that being displaced may mean more take out and delivery, and less structure in your lives. Prep yourself mentally before this kind of move, because it is a lot to handle, but the end outcome was very worth it!
Other Posts You’ll Love
If you loved this post – here are some other posts you may love!
Hopefully you found this post helpful and feel ready to tackle your next move, with some great moving tips and packing tips! Be sure to pin the Photo below for later, and follow me on Instagram (@arinsolange) for more fun and inspiration.