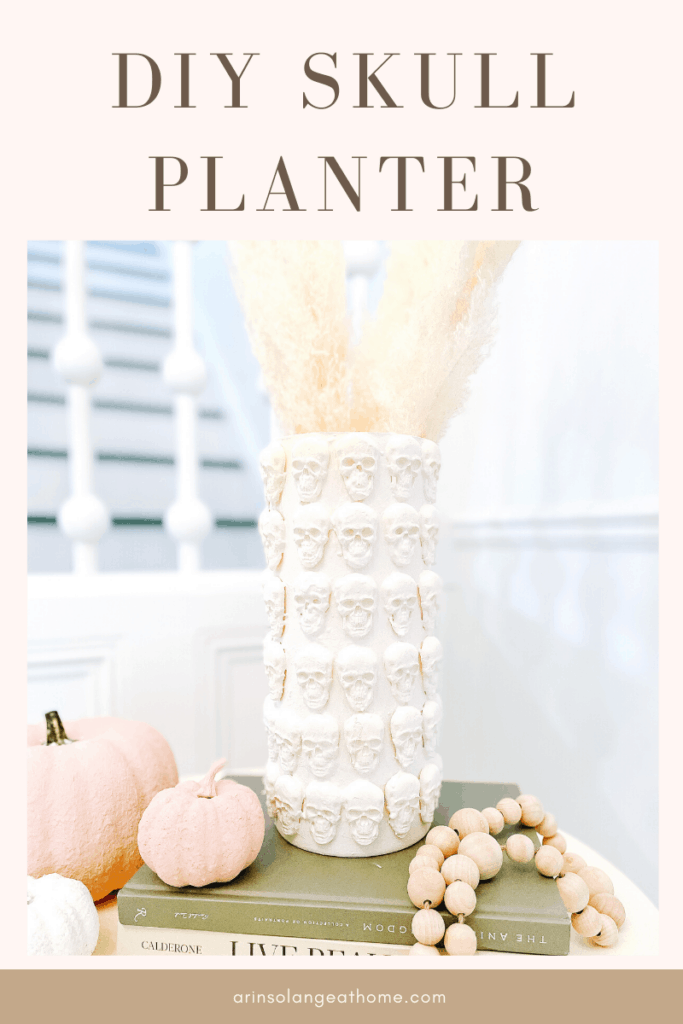
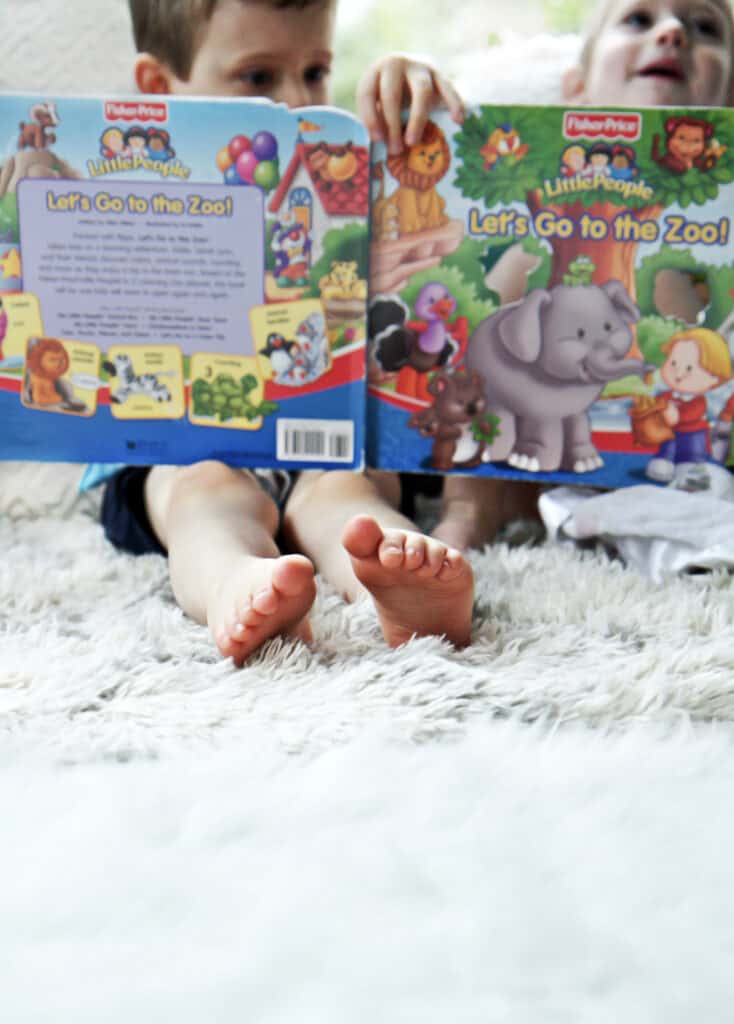
Last week I was scrolling the internet and found a skull planter that I was obsessed with. It was sooooo cute, but also so expensive…so I knew I had to try my hand at a DIY. I am going to share how I did my DIY Skull planter for anyone who wants to do one this fall….or honestly for year round!
This post may contain affiliate links – post written in 2021 and updated with additional option in 2022
DIY Skull Planter
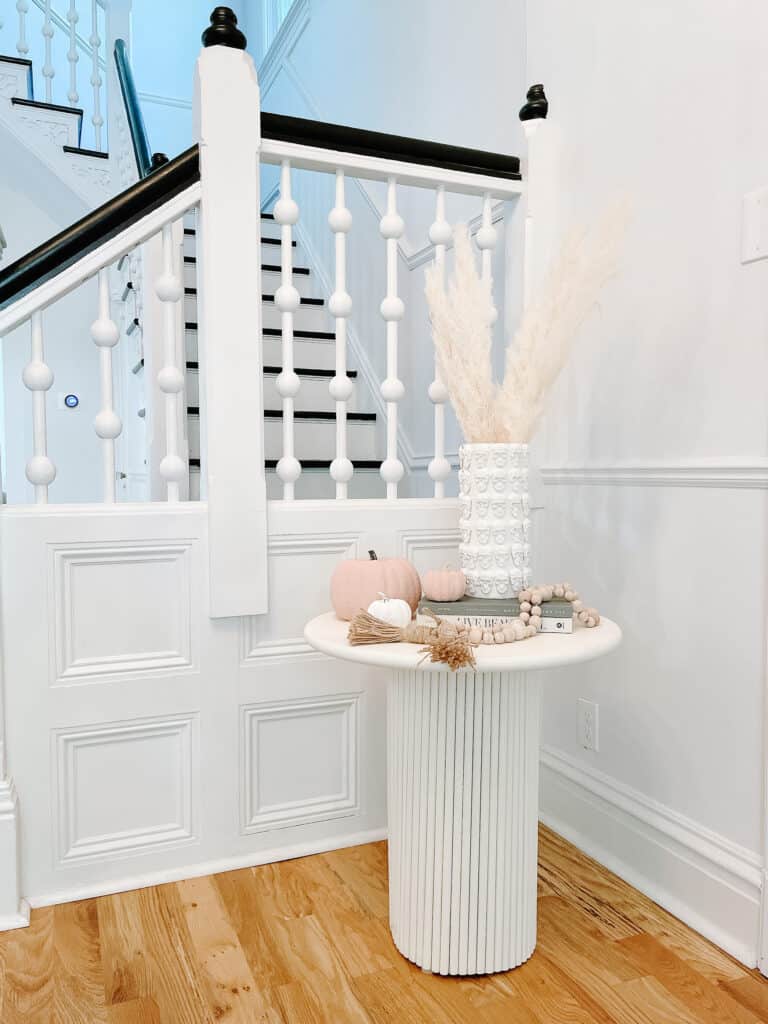
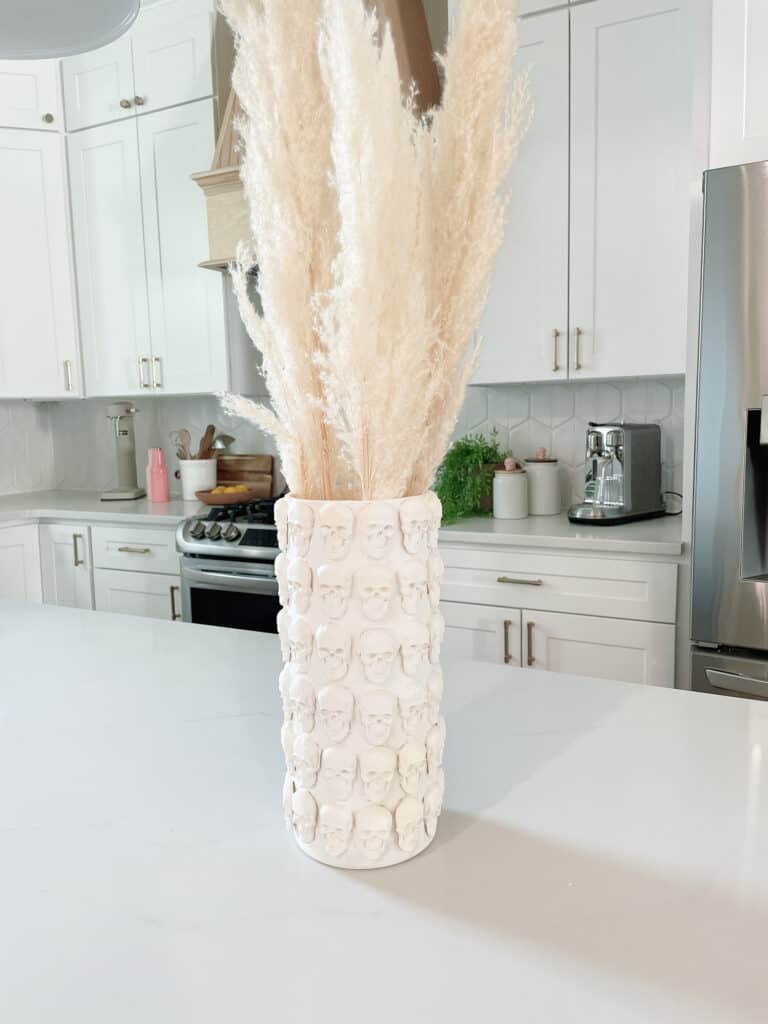
I LOVE fall and holiday decor, but don’t like my house to feel cluttered, so when I can I like to make the decor feel very cohesive with my house. When I saw a skull planter online I was in love with the subtle Halloween vibe it was giving, while also being really pretty for your home.
The smallest size of that planter is $220….so it was not going to happen, but I instantly thought…I think I can make that myself.
This was a REALLY easy DIY, but also a bit time consuming, but the end outcome was SO worth it.
It is a project you could 100% do on other things. I originally thought about doing it to canisters in my kitchen or my utensil holder, so think outside the box on where to try the diy skull planter method.
** A year after doing this first one I did a second, larger version – so be sure you check out the tutorial for that one to see which you like better.
Working with Resin
This DIY requires you to use resin, which I know can be really intimidating, so I wanted to share a few tips and things that will help you.
I actually did my first resin project a year ago on these letters, and since then I have done 3 or 4 other projects. I have learned a ton along the way, and want to share what I have learned, and also lead you to the right project.
10 Min Resin vs Normal Resin
Last year when I did my letters I used your traditional resin. This is something that takes 24 hours to cure, and takes a bit more finesse because it is meant to be left ‘clear’. It is such a fun medium to work with, but you do need to leave it sitting for 24 hours.
For this project, as well as my daughters dresser, and my mirror I used a 10 minute resin. This is essentially a resin that sets in 10 minutes but it dries white. I always use this more for something that you will paint. Think of this as a way to add a mold to something that you will cover.
Prepping your space with Resin
One thing that you need to know with resin is that it will ruin a work surface. I personally like to use a large trash bag and tin foil or one of these disposable tin things to work in.
I just want you to know that going into it. Take care while you are working!
Making your DIY Skull Planter
Okay now onto this DIY! One thing to note – if you are okay with making the molds over the course of a day or two you will only need 1 mold, but if you want it to go a bit faster I would buy 2 or 3 molds for the skulls!
Supplies for Skull Planter
Skull Mold (remember my disclaimer above when it comes to how many you buy)
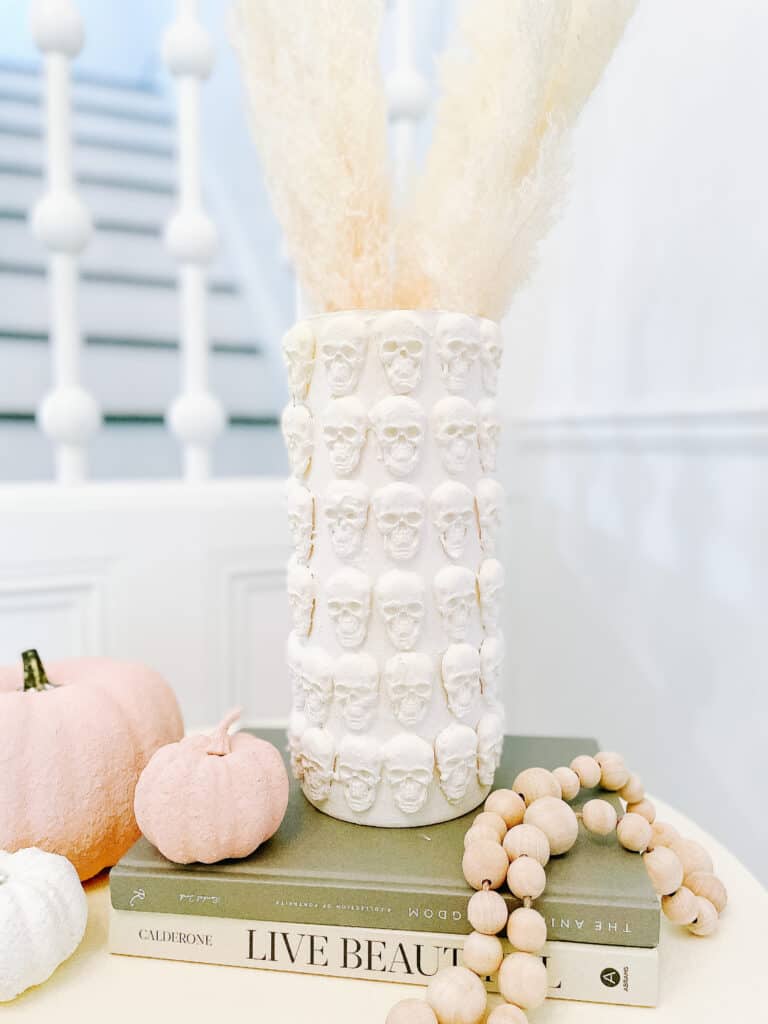
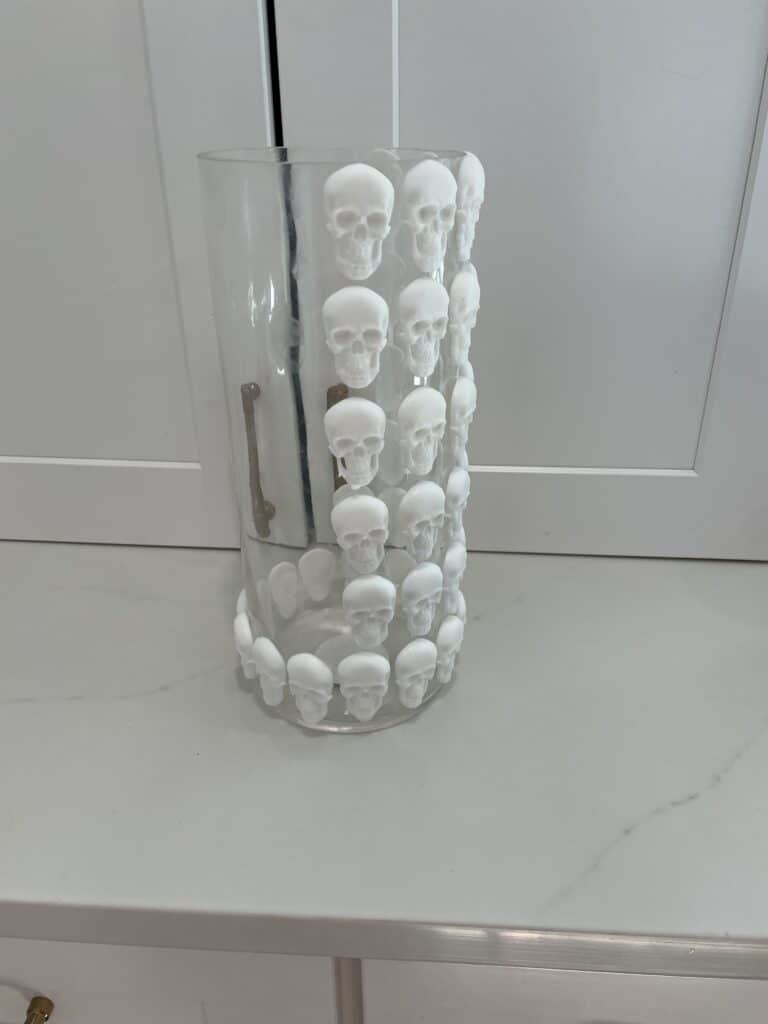
First things first – you need to make LOTS of your skulls. Follow the instructions on the resin, but essentially you will mix equal parts of each together then pour in the mold. In 10 minutes you can pop them out and make another set.
Once you have made all the skulls start to hot glue them on your vase. I started at the bottom and went around a few then up. I sort of worked in batches. Don’t worry about perfection because the paint method makes it messy.
Once your Vase is fully covered in Skulls it is time to paint. To give the paint that cement planter look Mix 1 part paint with 1 part baking soda. Then add a couple teaspoons of water. This will make the paint dry very matte. I went sort of messy with the paint and even let there be some lumps!
That is IT! It is honestly really that easy. In total this project cost me about $25. I had coupons for the Resin and the vase, but this would also be something great to do with those plain vases you get from the florist.
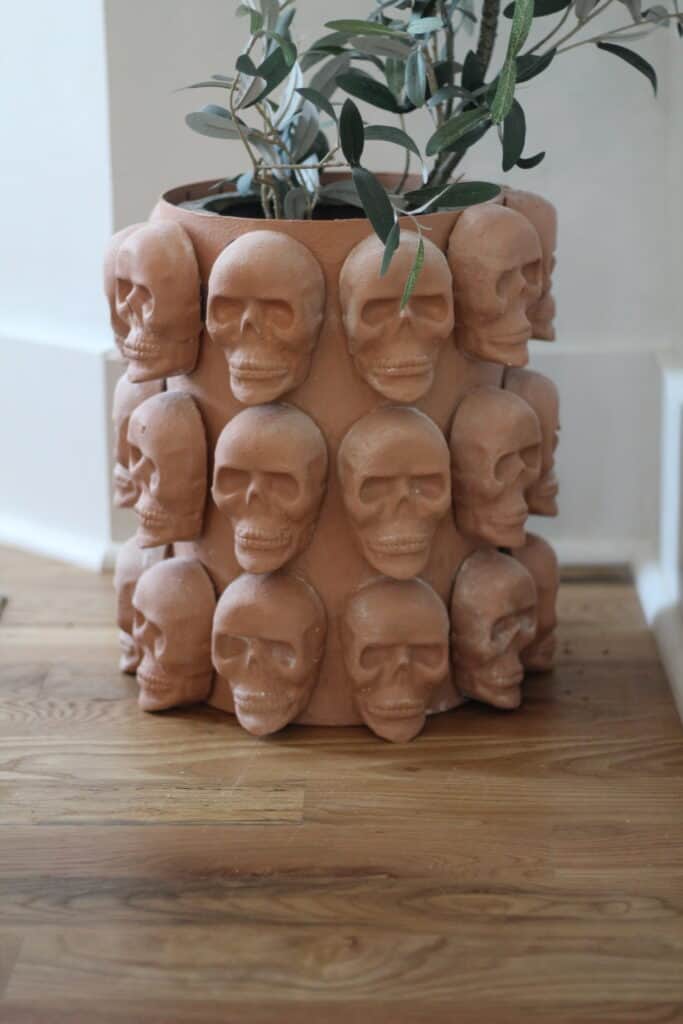
Updated Skull Planter using Plaster
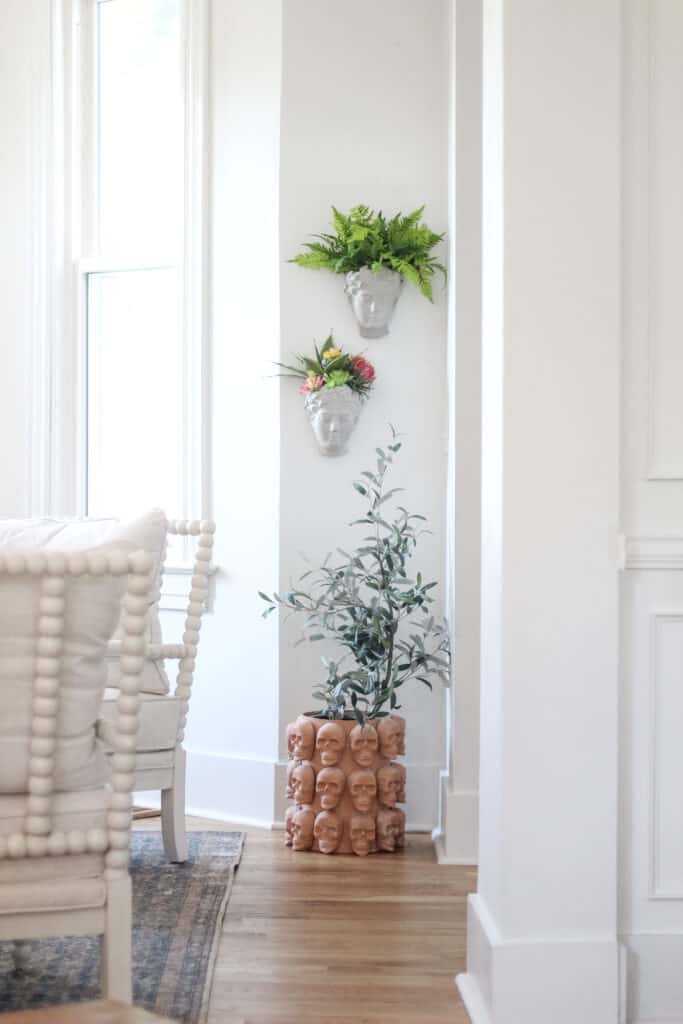
1 year after creating the above skull planter I really wanted larger ones for our front porch with huge skulls. I knew that would be expensive with resin so really wanted to find an alternative. I ended up trying plaster and it was such a win – I LOVED the end outcome.
Supplies for Larger Skull Planter
Trash can, vase, or planter of some sort for the base – the sturdier the better!
A bag of plaster of Paris mix from the hardware store
container for mixing
Skull mold – I used one from Michaels, but here is another
E600
Paint + Baking soda
Tutorial for Large Planter
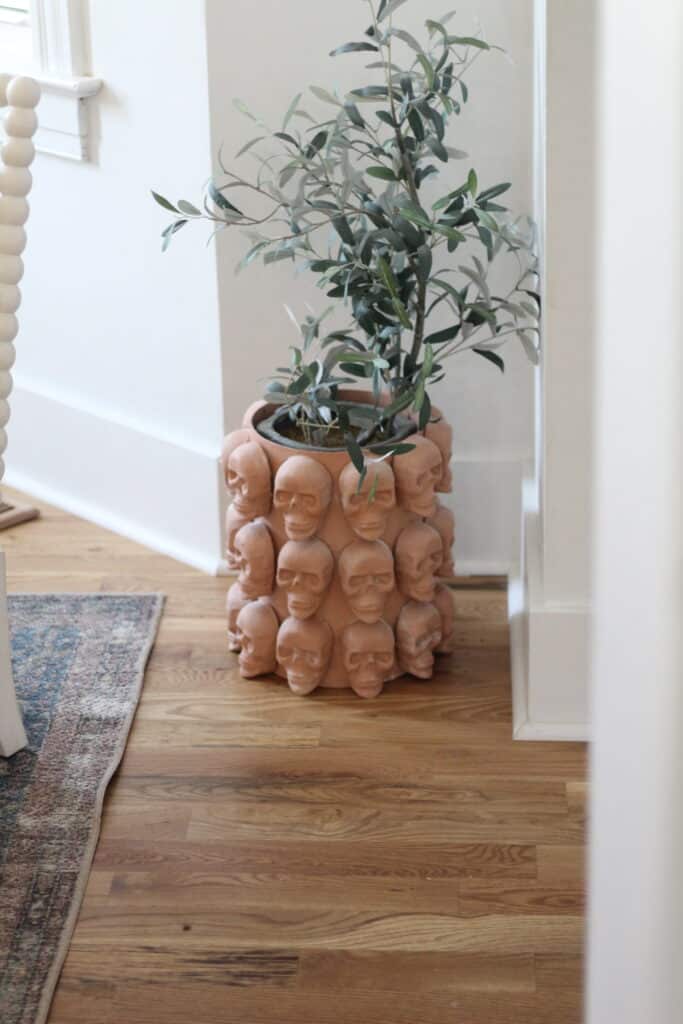
Make your skulls with the Plaster mix – the bag should have instructions on mixing and making them. Make quite a few and set them aside to FULLY dry.
Once you have your molds it is time to glue them on the planter. Using e600 glue each skull on the planter. You will likely have to take your time on this letting them dry in rows.
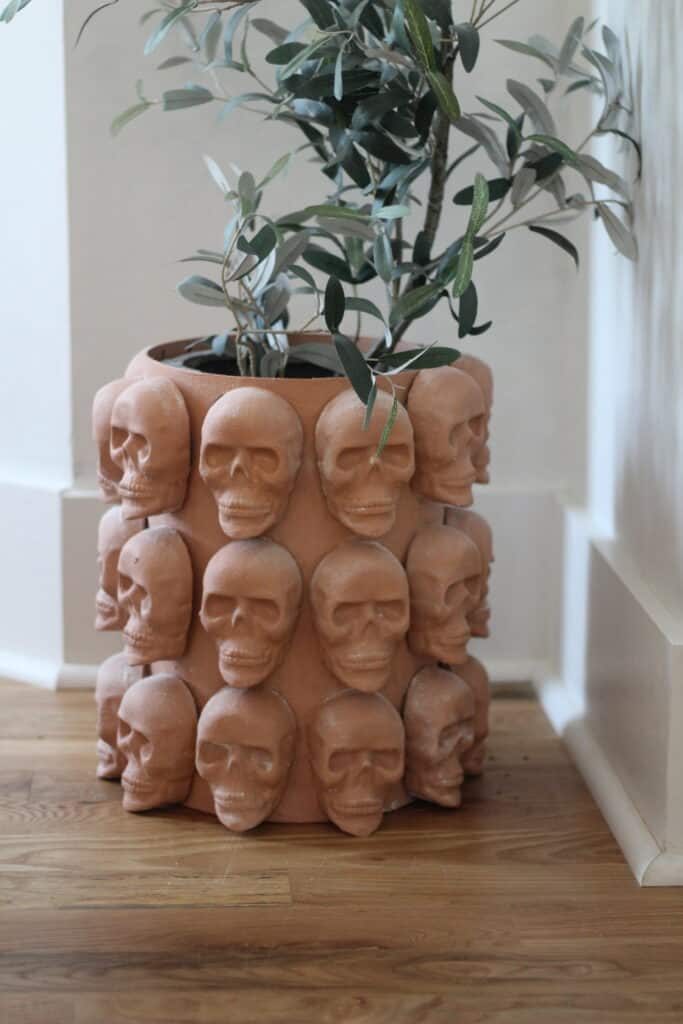
Once the skulls are all on – paint the planter. I used a combination of orange, brown and white craft paint for a terracotta look.
Last – When the planter is 90% dry dust it with baking soda!
This is heavy, but turned out so pretty and was WAY more affordable than working with Resin.
Considerations on Resin vs Plaster
Cost: Plaster can make a lot for a small budget. Resin is expensive!
Safety: Resin is kind of toxic so you need to be careful
Ease: Working with resin once the molds are made is easier. They are lighter weight so glue down easily, and less porous so were easier to glue.
Other: Resin is not breakable so the Resin planter if done on a plastic inner container could able to withstand more in that manner.
Hopefully you feel ready to tackle your DIY Skull planter after this easy tutorial! I would love to see your end results, so be sure to tag me on Instagram (@arinsolange). If you have any questions leave them in the comments below, and be sure to pin the photo below to find this tutorial later.
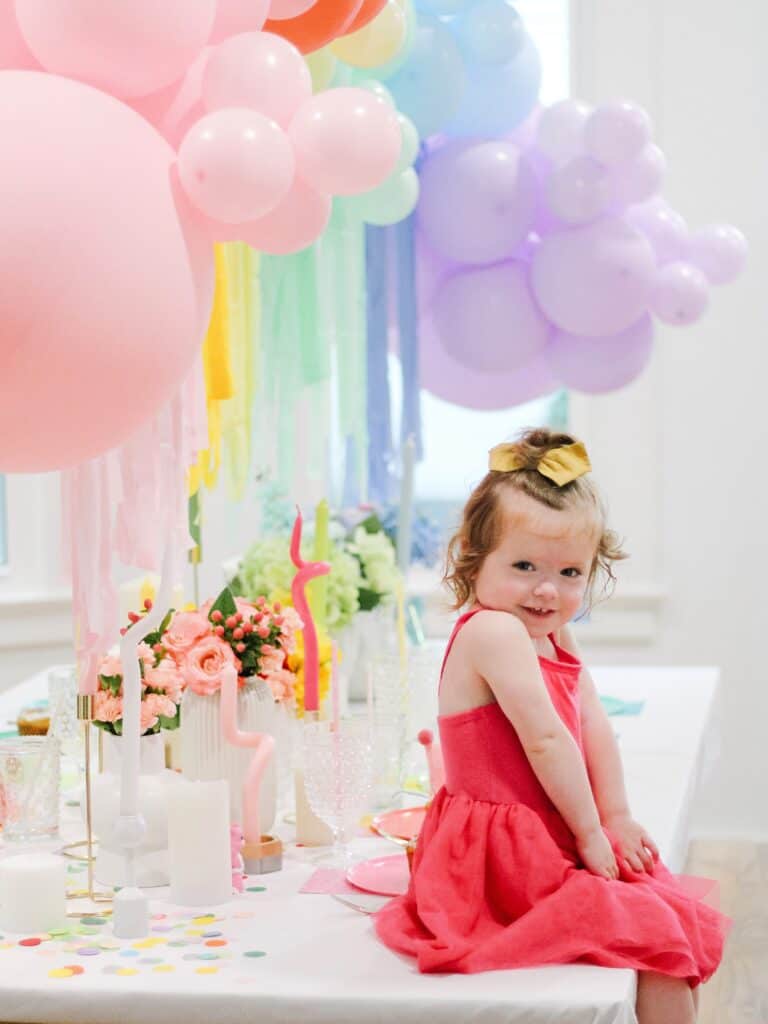
My sweet Goldie Mae went and broke my heart by turning two! Goldie is Care Bear obsessed so I wanted to throw her a small little Care Bear birthday party for just our family. It did not disappoint, and I can’t wait to share the simple details with all of you.
This post my contain affiliate links
Care Bear Birthday Party
All the 80’s and mamas are rejoicing in the comeback Care Bears, am I right? My 6 year old and 2 year old both love watching them, and have all the stuffed Care Bears to join them.
Goldie – the birthday girl, became SO attached to her bears that I really wanted to make her 2nd birthday Care Bears themed, but honestly…wasn’t sure how to do it in a sort of small way and keeping it looking classy.
I know that some people can make character parties cute so easily, but I have found it difficult every single time we have done a character party so I was a bit nervous about how this was going to go down. I ended up loving the end results and can’t wait to share all the details to the party in this post!
Other Party Ideas
I am assuming if you are here you might be already set on Care Bears for your party of choice but if you aren’t I figured I would share a couple other great options for you!
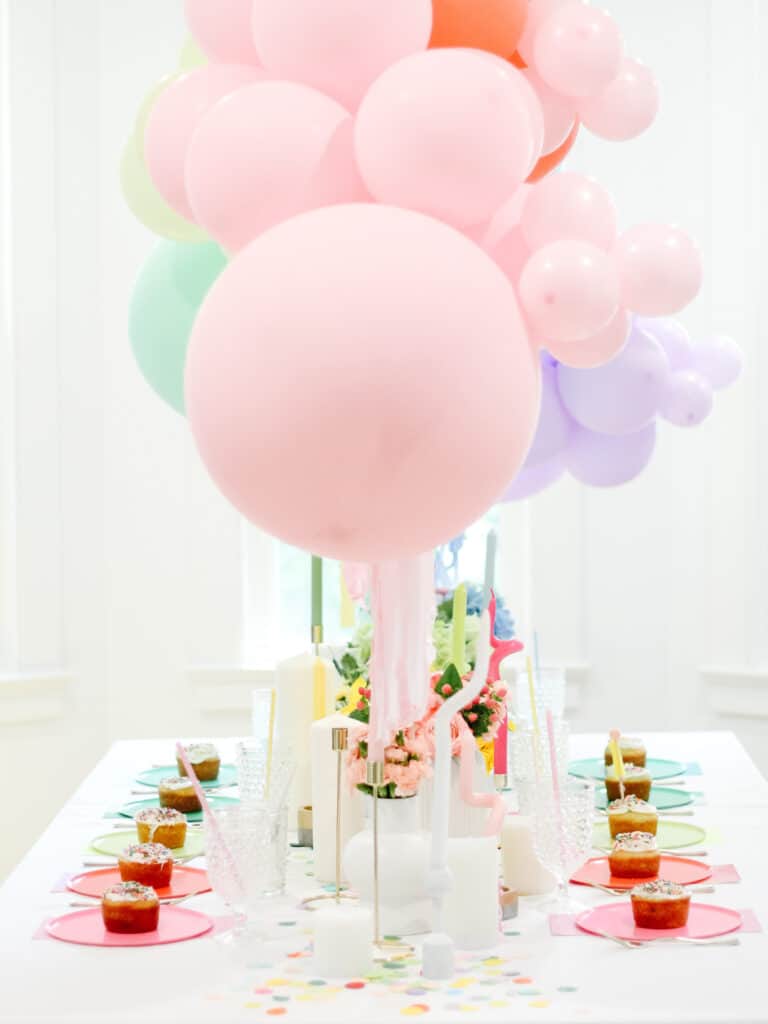
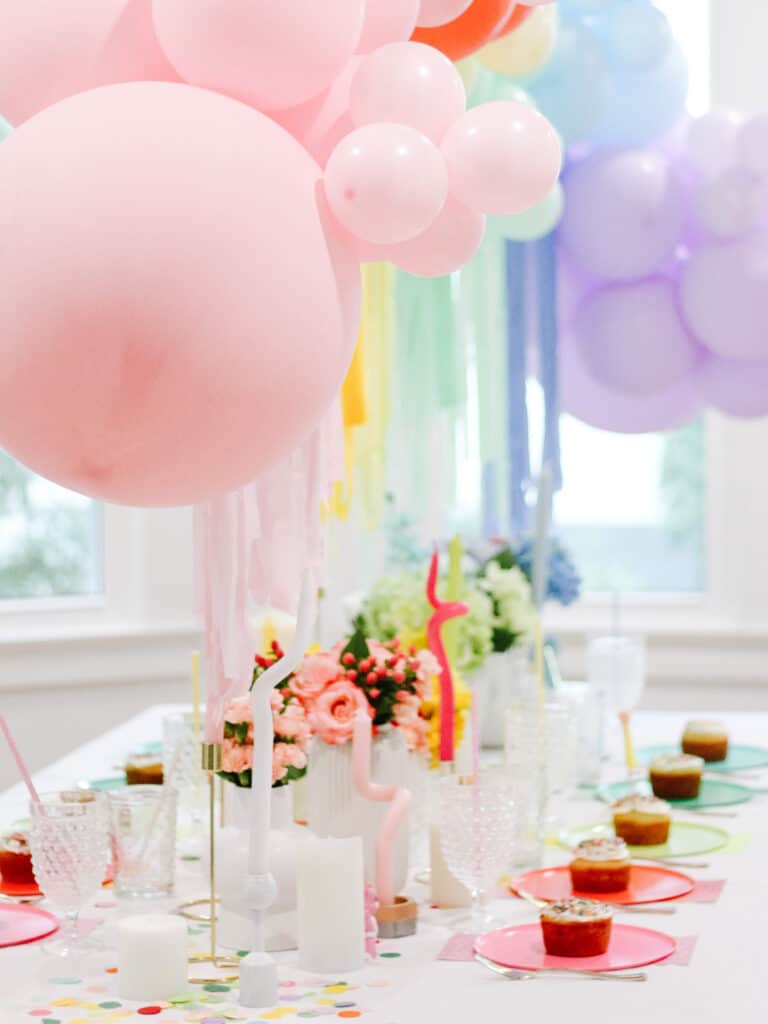
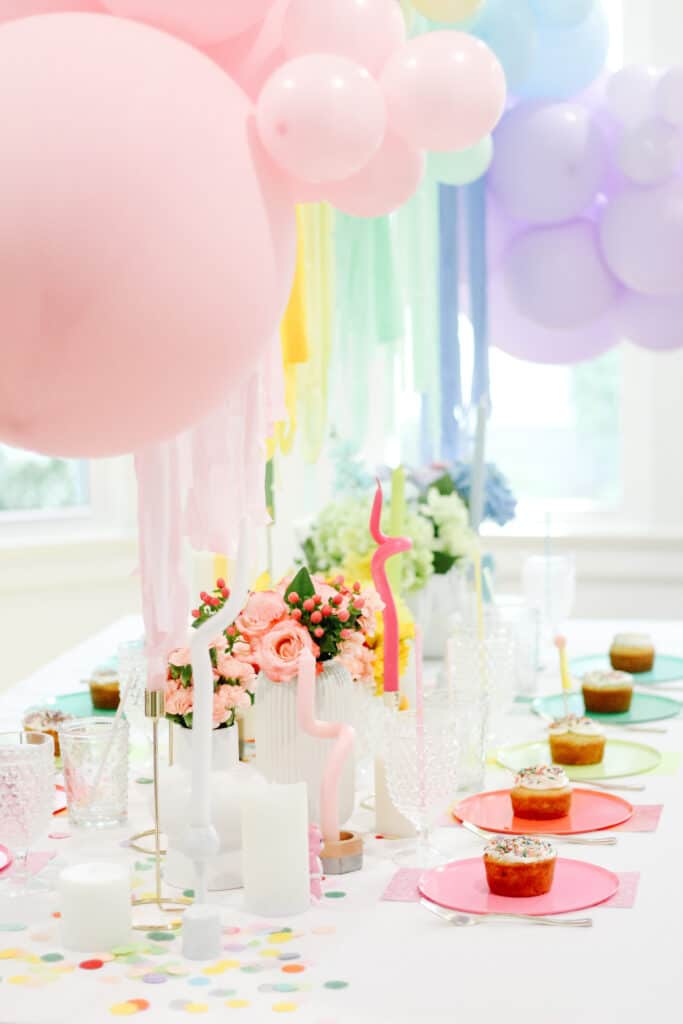
For sweet Goldie’s 2nd birthday we just did a big happy family party – but don’t let it fool you – we still went with a magical set up for her. I love doing a big table set up for the kids because It is something we can enjoy for a few days, it is simple, and it is just plain fun!
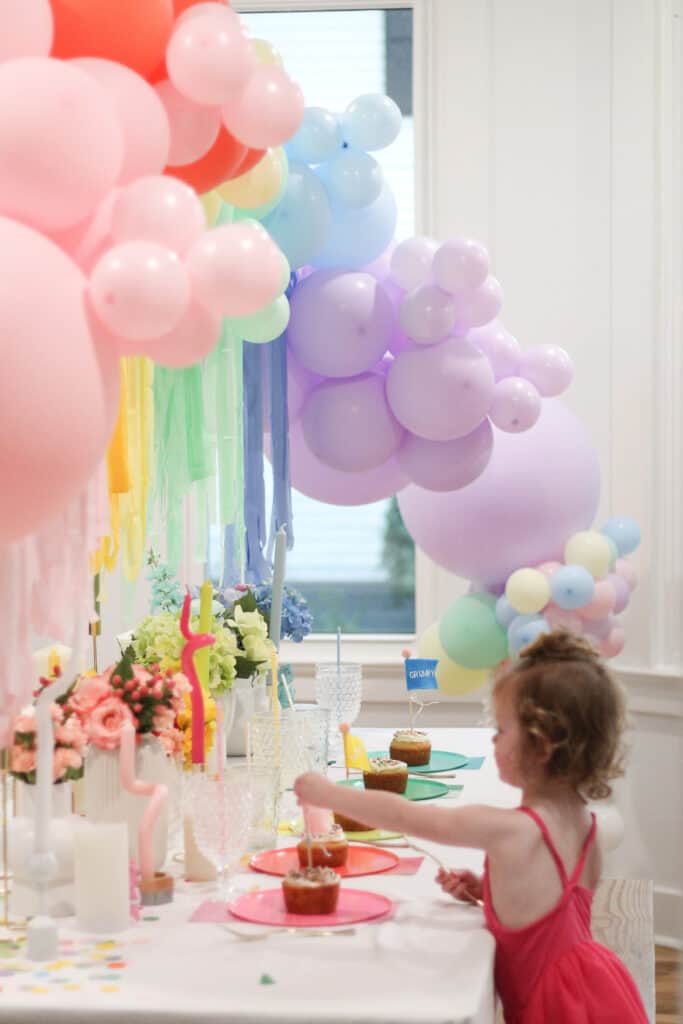
I went with a sort of rainbow pattern – so I wanted the colors to be color blocked together. Sometimes I like them more mixed up, but in this case I loved the color block look. Once we got it up we LOVED it, but agreed that something more would be….well more.
We added this set of streamers to the bottom of the balloons (I used these little sticky things and it worked great!) and it was such a fun pop. I will say that if you plan to sit all the way around the table for dinner this look will not allow for much dinnertime conversation.
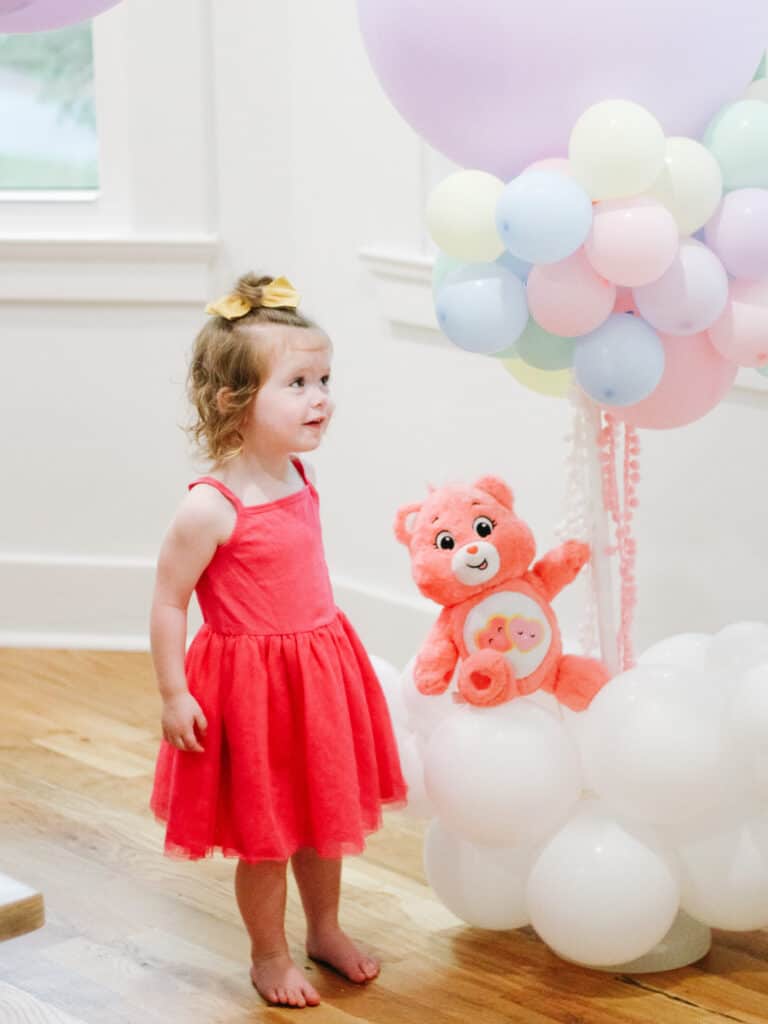
Party Hop shop also made this fun little balloon thing with one of Goldie’s stuffed Care Bears that was SO CUTE.
Care Bear Birthday Party Table Top Details
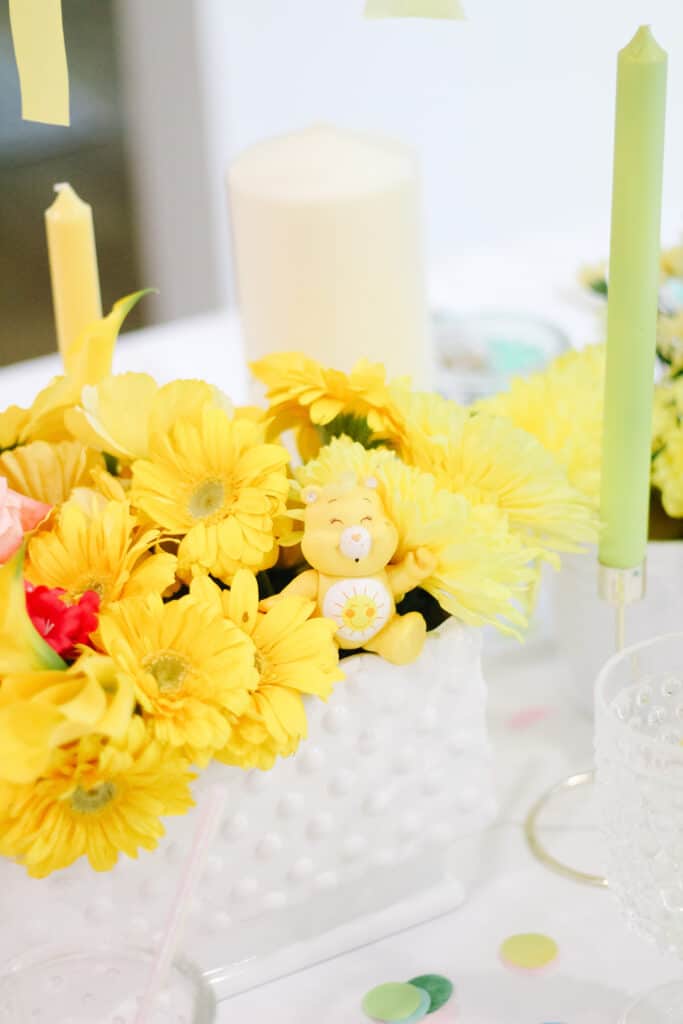
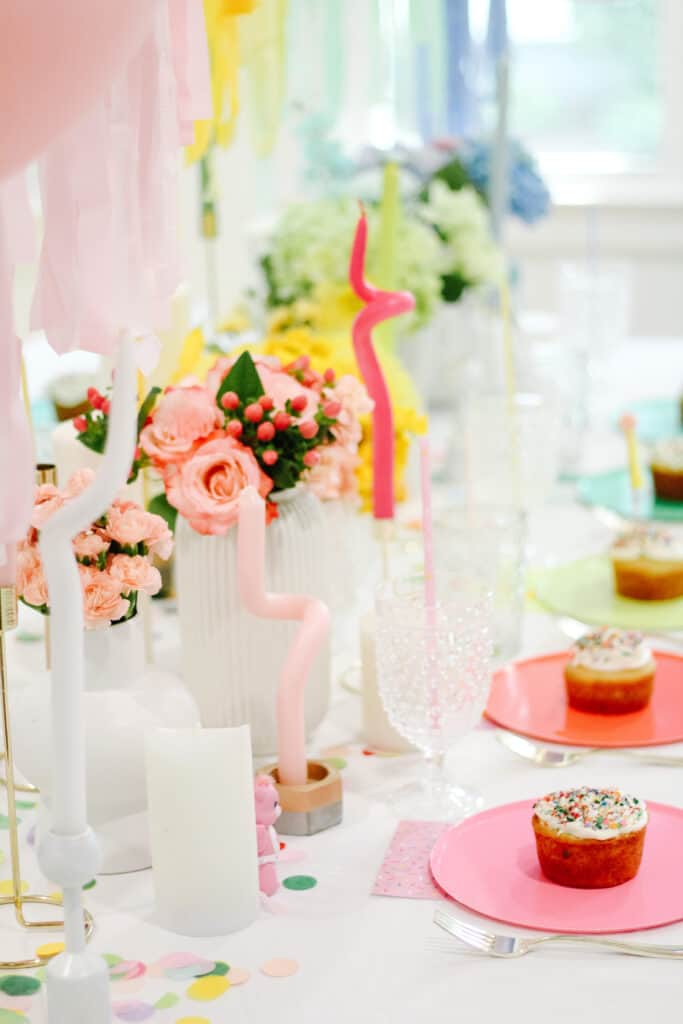
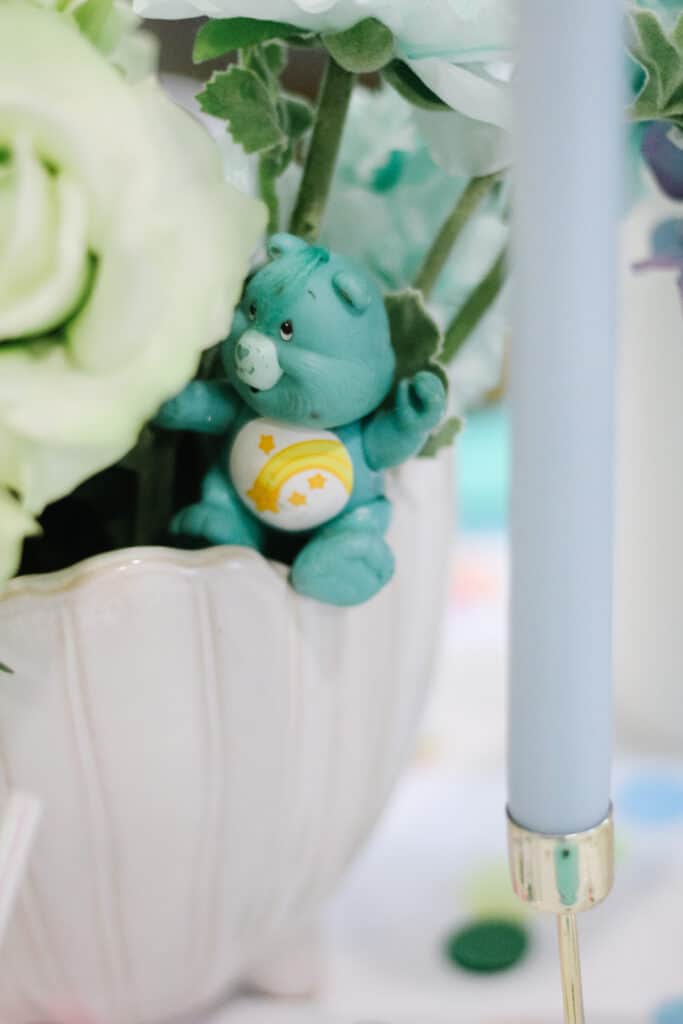
Like I said before – I was going for a bit of a rainbow theme with the Care Bears, and the table was no different. For the center of the table I used white vases and did sort of a rainbow effect with flowers.
I always try to vary my heights and shapes when I do this, and it worked wonderfully in this case. In the flowers I propped up some little vintage Care Bear figurines that we had. They were so cute and added the little Care Bear aspect we needed!
For each place setting I kept things sort of color blocked. So basically, napkins, paper straws, and such. With either scrapbook paper or napkins add some pattern in some of the spots to add dimension.
DIY Flags
One thing I did was use my Cricut to make little flags for the cakes with the Care Bear names on them for the cakes. It was a subtle way to tie in the Care Bear theme.
The Perfect Gifts to go With your Care Bear Birthday Party
If you are looking for the perfect gifts for you Care Bear loving child, I have gift guides by age below! Check them out for some unique and great finds.
Hopefully you feel inspired to make your own Care Bear Birthday Party with these simple details! If you have any questions on my party be sure to leave them in the comments below, and don’t forget to follow me on Instagram (@arinsolange) for more inspiration and fun.
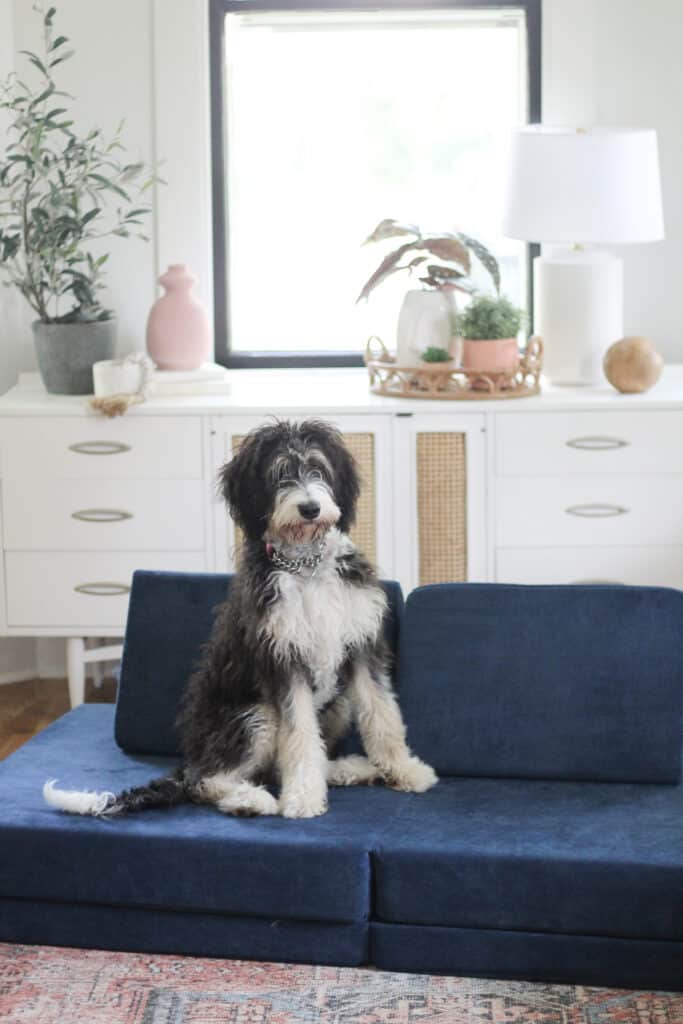
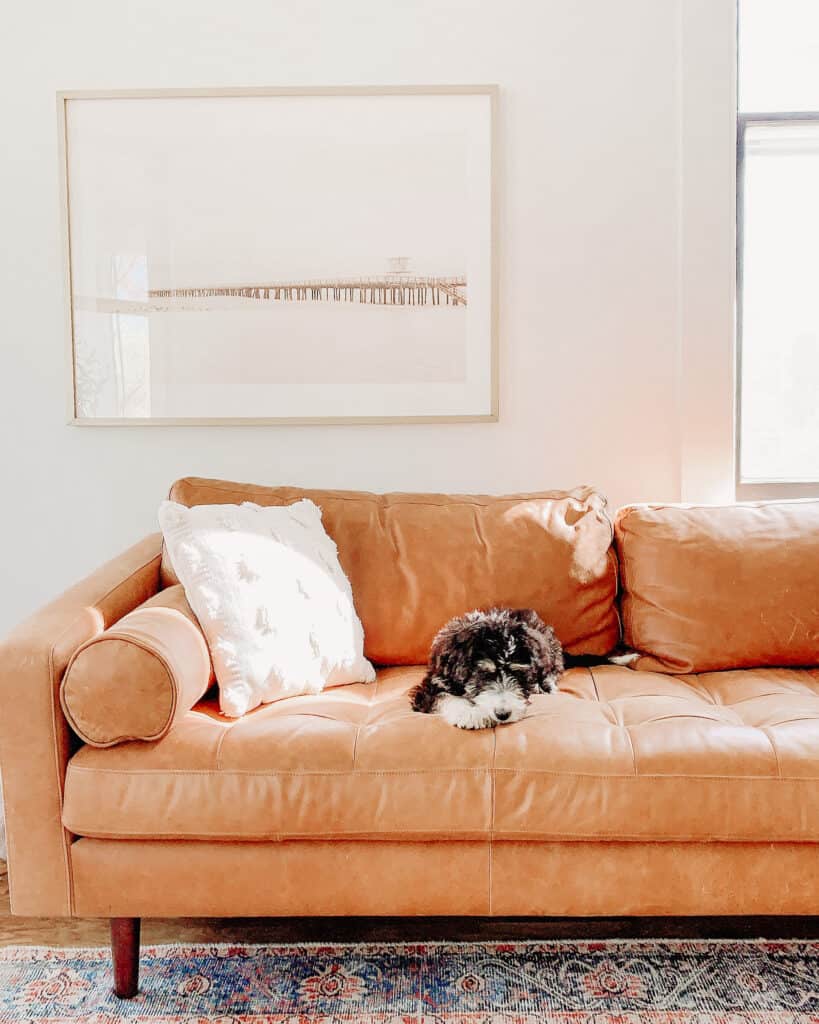
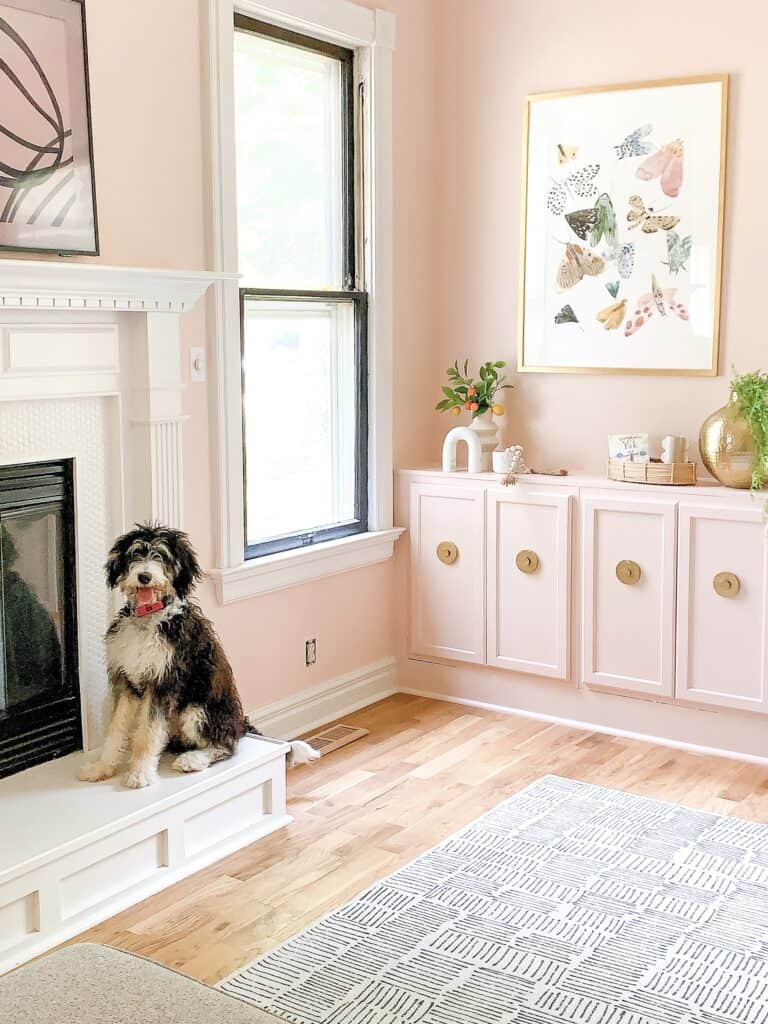
I never thought I could love a dog so much until I met our sweet pup Penny. She is a Berniedoodle pup that is full of sunshine, sass, and sweetness and is a beloved member of the family…. but can we also talk about the fact that adding a dog to the house also had me researching the best way to get rid of dog smell from my house!
This post may contain affiliate links
The Best Way to get Rid of Dog Smell from Your House
Getting a dog has always been on our radar… but over the years I have also gotten more and more particular about my home so I knew I needed to go into it with some research in place. We already have 4 kids so I was super hesitant to add a canine companion to our household.
We are already in a constant state of DIY, renovations, and crazy life haha. But, to be honest, the main reason I was hesitant is because I like to have my home nicely arranged and in tip top shape.
I’ve created a sanctuary that I call home and walking into that sanctuary I was afraid that I’d be hit by a lingering smell of dog odours. Not exactly the warmest welcome when entering the front door or the first impression I’d like to give people.
Help! My Dog Stinks!
If you are like me and have been afraid that your house smells of unpleasant pet odors I’m here to help you love your furry friends again and put those worries to ease! With the right tools, regular basis cleaning, and some general good habits, I’ll have your house guests walking into your home without even realizing a dog lives under the same roof.
Dogs can still be your best friend but have that lovely je ne sais quoi scent about them. That scent that makes you want to automatically throw them in the bath or eat a bag of Fritos because if you can’t beat them, join them! A smelly dog is in some ways just part of nature.
All dogs have natural oils that are not only unique to them, but also help protect your dog’s fur and your dog’s skin. Dogs also have sebaceous glands and sweat through their fur and paws. That sweat that comes through your dog’s coat may be what you perceive as a wet dog smell that transfers to your soft furnishings, carpets, dog’s bed, and what may seem like the whole house.
Other reasons for dog odors include diet, hygiene, or a medical cause such as bacterial or fungal infections. Dogs may have bad breath due to their diet or hygiene. Giving your dog bones and brushing their teeth are two of the easiest ways to help combat bad breath.
That lovely Frito paw smell is actually caused by bacteria and this bacteria is generally harmless. Yeast, mites, and fungal infections can also affect your dog’s ears and fur which may lead to a doggy smell.
When dealing with bacterial or fungal infections, please consult your pet’s Veterinarian as they may need medication. Regular grooming which includes bathing, haircuts, anal gland expression, and nail trims are key for keeping these avoidable pet smells at bay.
Perhaps you’ve brought a new puppy home or maybe your older dog is starting to have a harder time making it outside, either way, dog urine is one home smell that you do not want! For older dogs or dogs that have previously been potty-trained but begin to have accidents, I urge you to see your Veterinarian as this could be a sign of a medical condition.
However, for those of us going through the puppy phase of potty training, I am with you! This was my biggest fear when we first brought Penny home. Seeing that dreadful wet spot on my bare floors or even worse, cushion covers!
I definitely cringe just thinking about our potty training time with Penny. Fortunately, we are in the clear now and I’ve learned a few tricks along the way to help you erase those pet odors.
The Best Way to get Rid of Dog Smell from your House – How to Eliminate Dog Oders
The majority of dog smells are avoidable and with a little effort you can keep those pesky smells away. For those smells caused by a medical issue, it may be as simple as taking the proper medication. For other beloved pets, the smell may take some elbow grease and good old fashioned home remedies. Check out my useful tips below to help your house be free from pet smells!
Schedule Regular Grooming and Veterinary Appointments
The best way to prevent avoidable pet odors is to be responsible pet owners and regularly schedule your dog’s veterinary appointments to keep up to date on all things health related. Dental decay, bacterial infections, and fungal infections can all lead to new smells (and not the good kind).
A great way to keep pet smells away is to regularly clean your home. Open all your windows, let in the fresh air, and turn your ceiling fans on to circulate the fresh air. With the windows open, turn on some music and bust out your vacuum.
You’ll need to vacuum up that pet hair and dirt which may be the cause of your odors. Even dogs that claim to be non-shedding can leave a trail of dirt leading to a smelly area. You’ll not only vacuum your floors, but also stairs, couch cushions, dog bed, and really any favorite spots of your pup.
Once you’ve cleaned up all that dog hair and dirt, a good idea is to use a steam cleaner or mop. Steam cleaners are great because they kill bacteria and viruses! But make sure they are safe for your type of flooring. For those with hardwood floors, you may need a specialized wood floor cleaner. Thanks to GoCleanCo I find that hot water and Tide powdered laundry detergent works best on cleaning my floors with a spin mop.
You’ll also want to make sure you throw your dog’s pet bed into the washing machine on a regular basis. If your dog prefers to snooze on your couch cushions, you can try some upholstery cleaner and a clean cloth to help freshen up the fabric.
We specifically chose a dog bed that can be fully washed – the inner liner keeps the foam from getting dirty and we wash the outside and liner all the time to keep things clean and smelling nice!
Clean Up Pet Stains & Accidents the Best way to get Rid of Dog Smell
I can not stress the importance of this enough, clean urine odors and stains immediately. Do not let them set. Do not wait until morning. You will forget. It will smell. It will seep into your carpet and then you’ll spend 20 minutes on your hands and knees smelling the carpet to find said spot. Just clean it up at 3:00 am and make yourself some extra coffee.
I love having a portable pet carpet cleaner for potty training days. Ours has saved us on more than one occasion. It will not only help clean up puppy accidents but when the day comes when your dog eats an entire bag of potato chips, you’ll be glad you have the carpet cleaner. Trust me on this one!
** It is worth noting that I think that carpet cleaner is just great for ANYONE TO HAVE. I have used it with my kids so many times, but also use it to clean my couches all the time! If you have sofas that sort of get that water spot look if you clean them – this will solve your worries!
You don’t necessarily need heavy-duty cleaners to properly clean up pet stains. To clean up dog urine you do need an enzymatic cleaner that properly targets the pet’s stain.
The enzyme cleaner eliminates not only the odor, but also helps break down the urine molecules which will prevent your dog from going back to that same spot and soiling again. My current favorite cleaner is Folex – you have to just trust me on this because it is truly that good!
I find that after I clean up an accident I need to neutralize the air. Opening windows is great but not always feasible. While I love my Pura air fresheners in my home, I also like to use a natural odor eliminator elixir. I fill a spray bottle with cold water, 1 cup of apple cider vinegar (or white vinegar), and some essential oils (usually lavender or tea tree oil).
This can not only be used as a quick room refresh spray, but also a natural floor cleaner. For carpets, try adding baking soda directly to the stain and vacuum it up after allowing it to set for several minutes. You can also try lighting specialized candles that help eliminate odors.
Best Air Purifiers to get rid of Dog Smell
Air purifiers with HEPA filters are a great tool to have in your arsenal with your fight against pet odors. Air purifiers can remove up to 99.9% of pet dander particles which not only help with pet odors, but also help those people who suffer from allergies and asthma due to pets. We love ours so much we’ve put them in every bedroom in our home.
Not only do they neutralize odors and help those who suffer from allergies and asthma, but they can also lessen the chance of catching airborne illnesses like the common cold and flu. Lucky for you, I’ve linked the air purifier we use. If you already own an air purifier make sure you are changing the air filter per your brand’s instruction.
Our sweet Penny pup is an important part of our family and we can’t imagine life without her. Pet stains and odors however, don’t need to be a part of your home. With regular grooming, care, and cleaning, you can keep your pet’s odors to a minimum and spend more time snuggling them without having the sudden urge to eat Fritos. I hope you found some helpful tips to help you rid your home of any unpleasant pet odors.
Other Posts You’ll Love
If you liked this post – here are some other great blog posts you should check out before you go!
Hopefully you feel confident in the best way to get rid of dog smell from your house after reading this post, and you know you can happily be a dog owner and have a wonderful and clean home! If you have any questions on anything in this post leave them in the comments below, and don’t forget to follow me on Instagram (@arinsolange) so you don’t miss anything else I post!
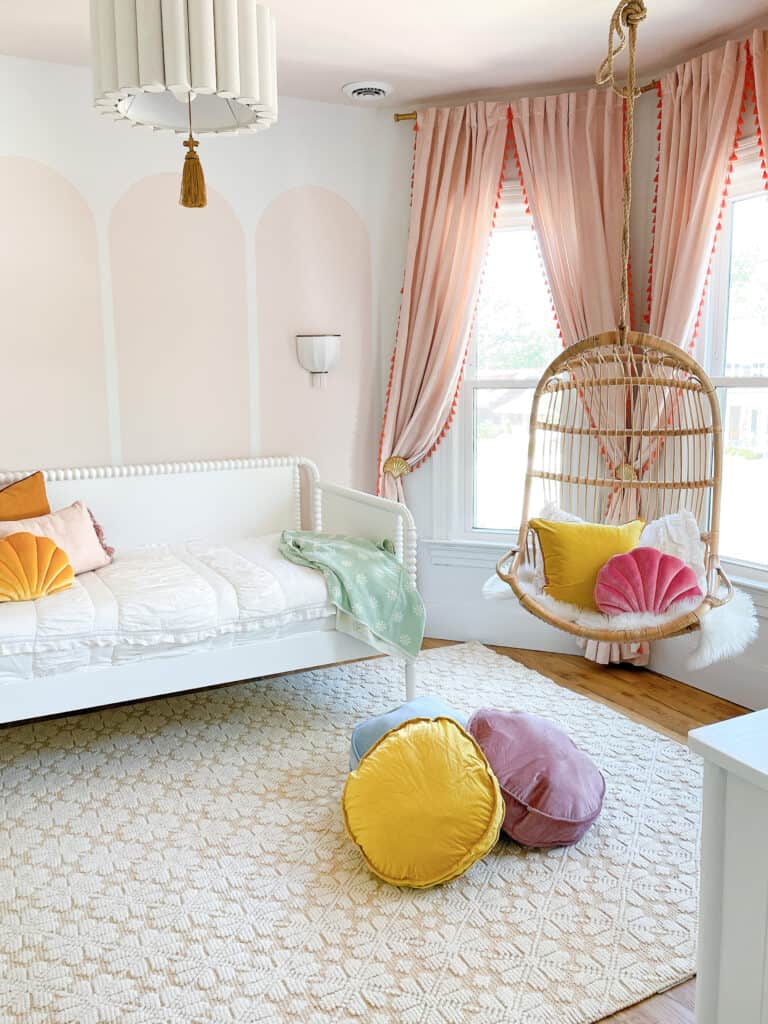
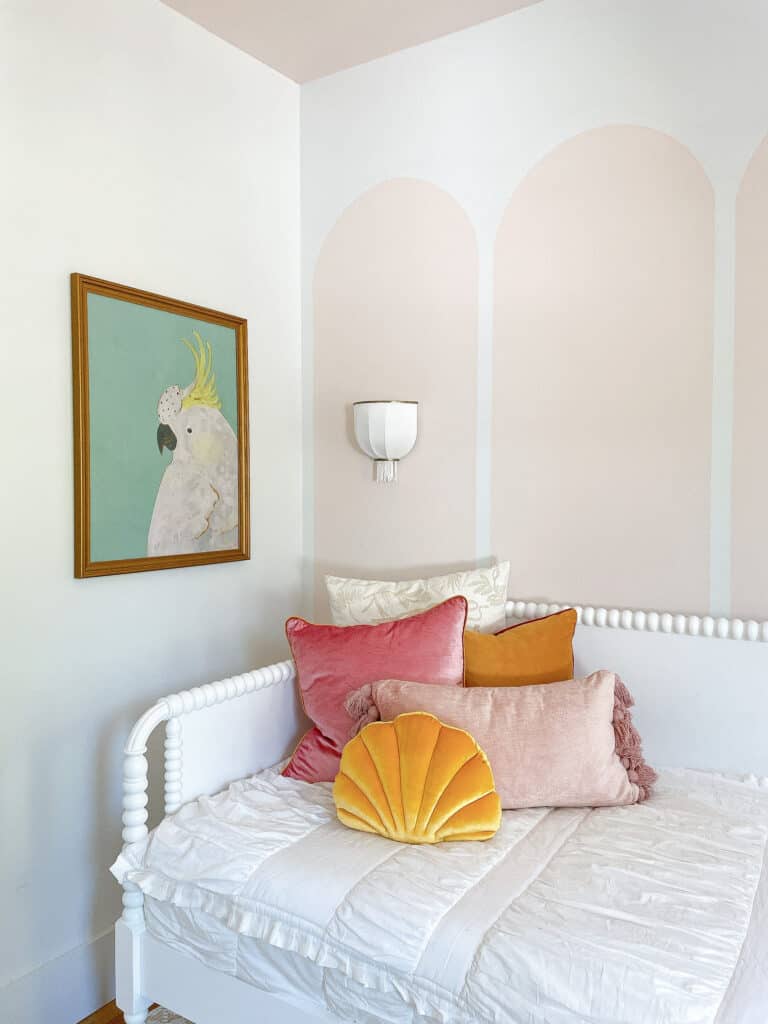
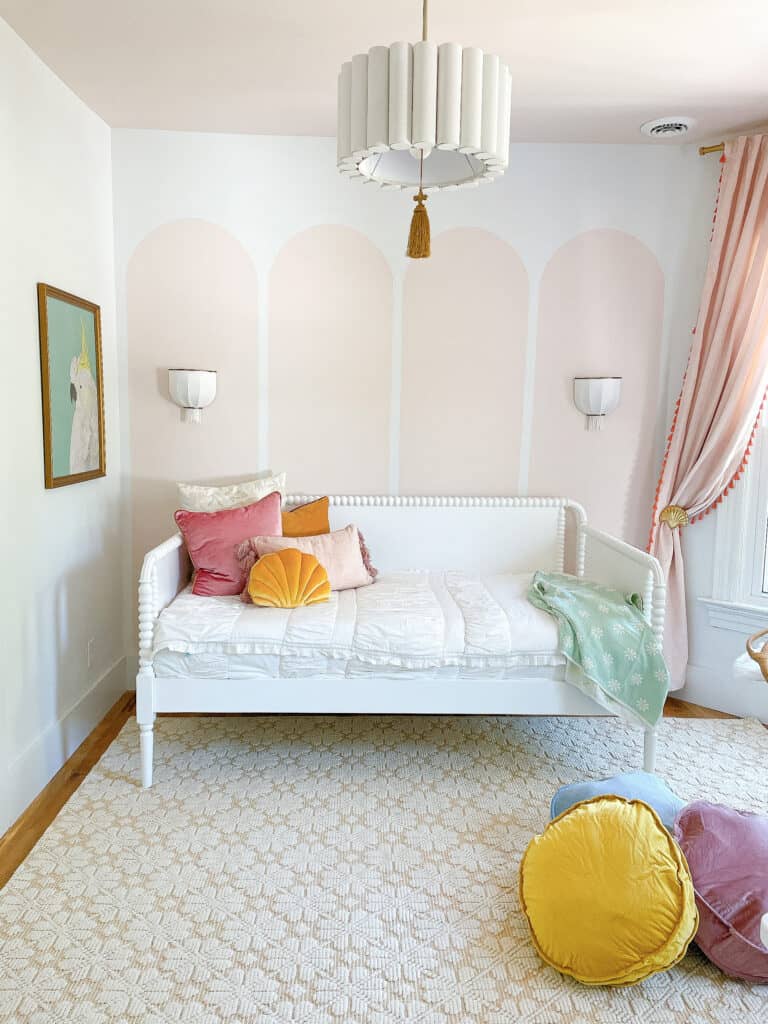
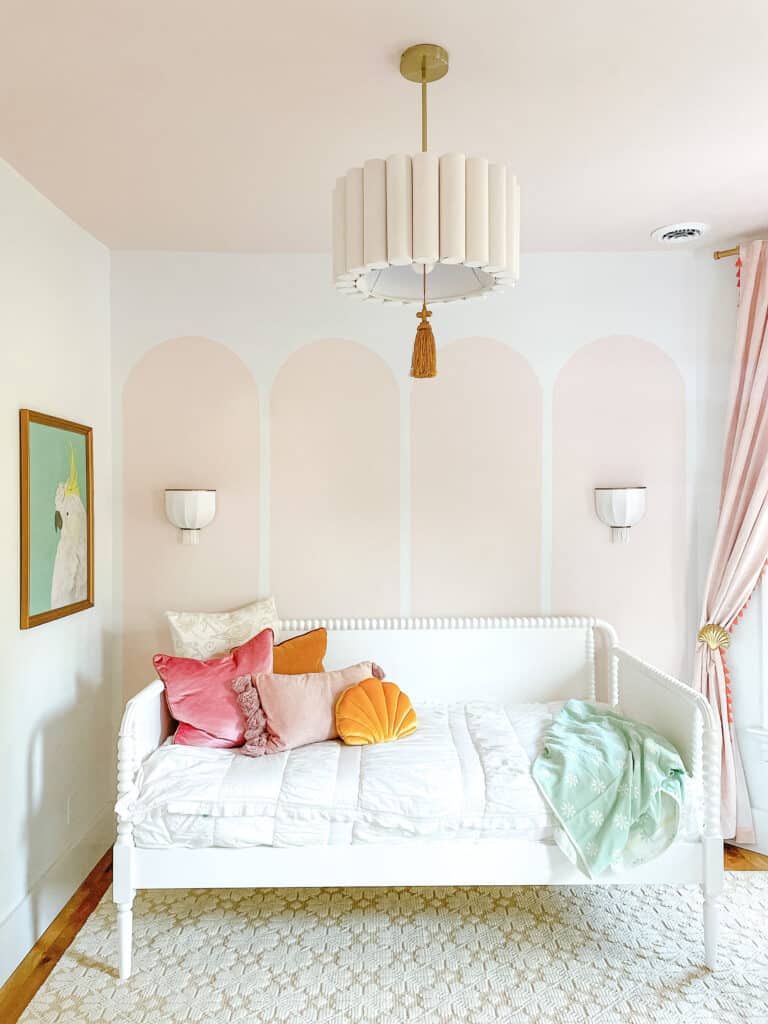
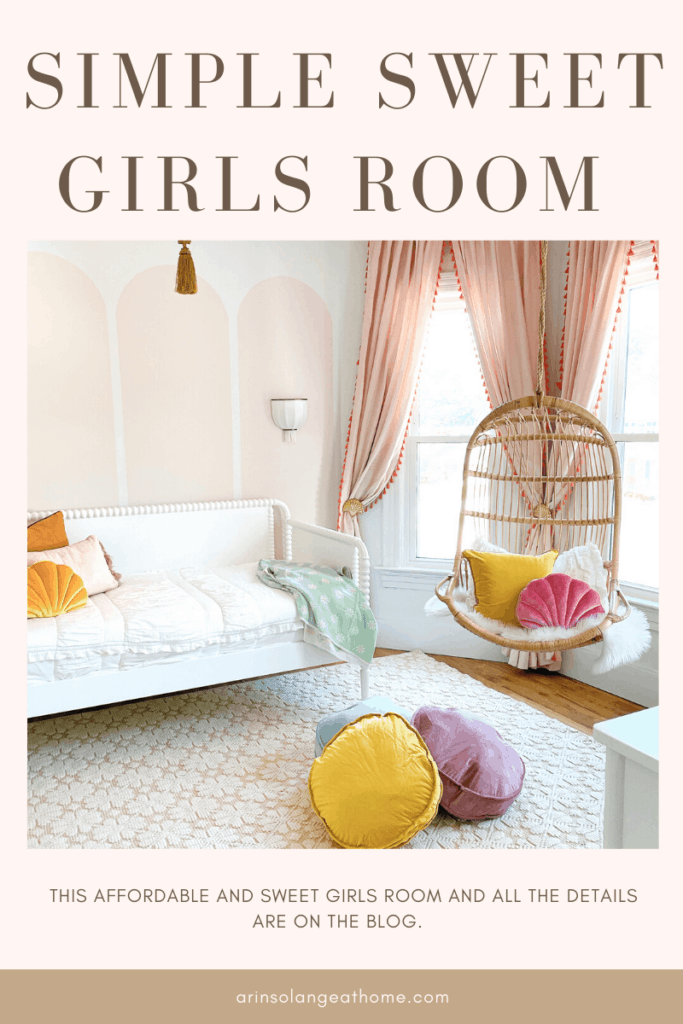
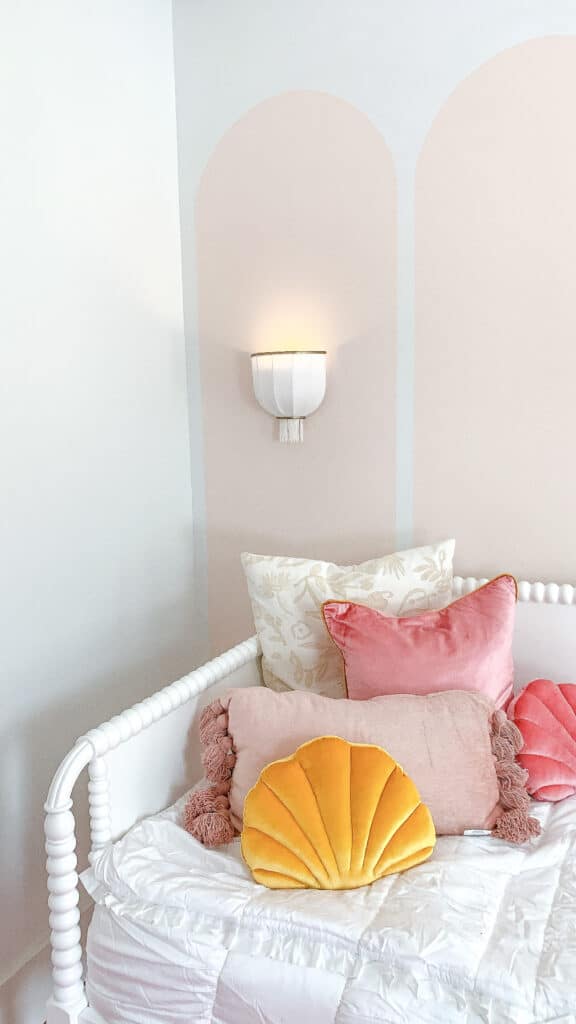
Avé’s room is finally done in our new house, and I am SO EXCITED. I not only love the end outcome, but honestly am really excited to have a finished room. We based her whole room off the paint color Valspar Desert Bone that she picked out, and the end results were perfectly sweet and whimsical, so hopefully you find some great inspiration for your home too.
Valspar Desert Bone
When we were looking at doing Avé’s room there were a couple of non negotiables:
1. It was going to be affordable ISH – I didn’t want to splurge on Wallpaper because I knew that our long term plan was to move her to the attic space and we don’t know if that is a 2022 plan or 5 years down the road plan. I didn’t want to over invest in this room for her if she would move out in a year.
2. It was going to be pink. If you know Avé then you aren’t shocked. And if you have followed me for long you know I was not disappointed either haha.
Avé is almost 7 and has some serious opinions when it comes to decor…thats what I get for having a daughter that is already in love with design shows ha. Because of that I wanted her to have some say in her room design, while still letting me do my thing.
I talked with her about paint colors and got some swatches – I opted to bring home 4 options that I liked and let her pick from those instead of letting her go crazy at the store. I talked to her about the perks and down sides to lighter and darker paint choices and ultimately she landed on Valspar Desert Bone.
It was still very ‘pink’ but light enough to keep the room feeling tall and open. We knew we were painting the ceiling fore sure initially and had originally talked about possibly doing all the walls the same color as well…so I explained that we didn’t want to make the paint too dark and make her room feel like a cave.
Creating the Arches with Valspar Desert Bone
For the back wall in Avé’s room we added these fun painted arches for a super affordable way to update her back wall. I knew I wanted that wall to be bold with artwork or something, and this ended up being perfect.
To create the arches you can watch this Reels on my Instagram, but we measured things out and used painters tape to mark it off. I highly suggest using frog tape for a more crisp outcome. The arches are in the same Valspar Desert Bone as the ceiling.
Valspar Desert Bone Room Details
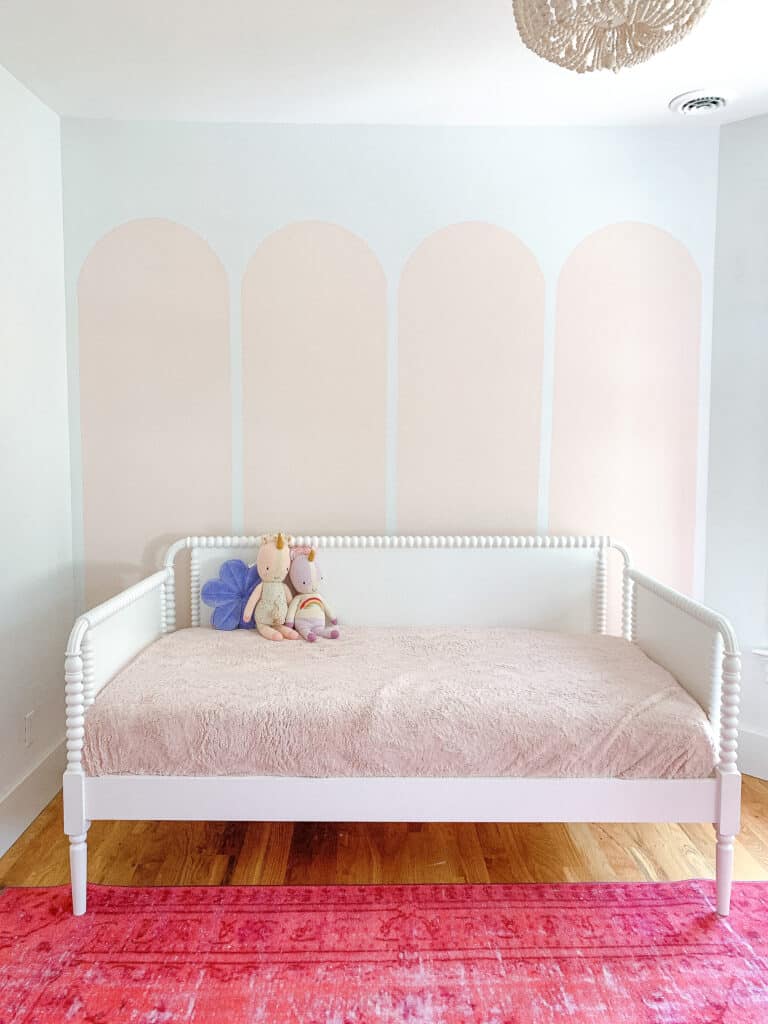
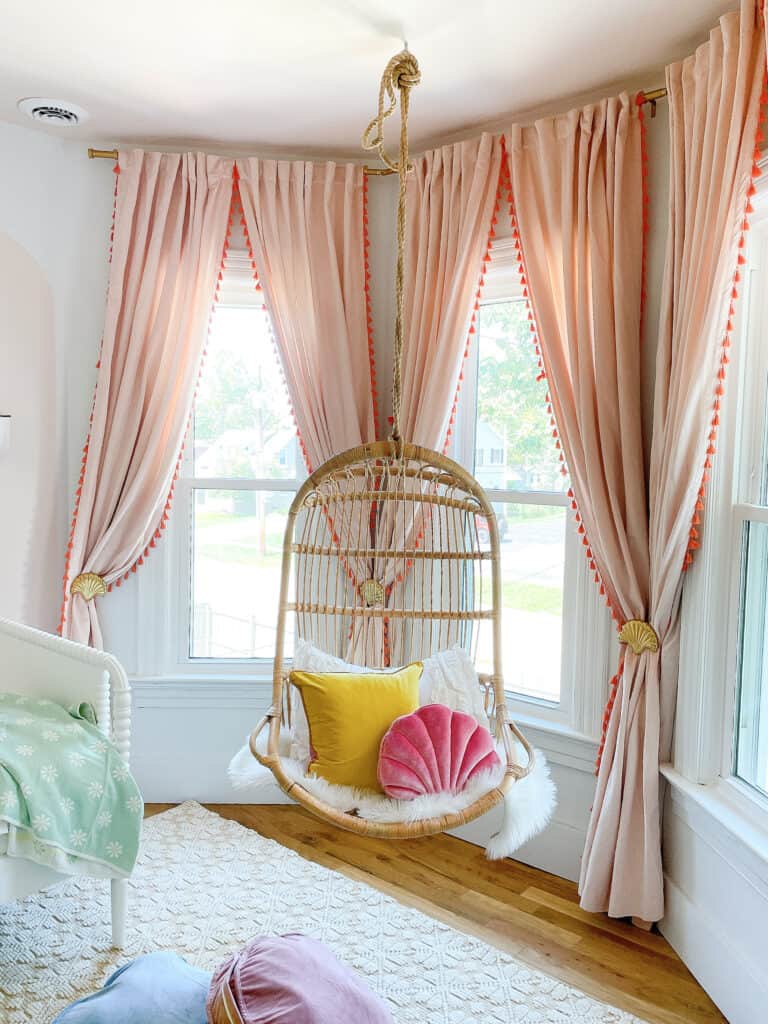
Now that we talked paint colors – lets get to the fun stuff in her room. Our house is 150 years old…which means the rooms aren’t all as ‘normal’ in shape as some. Avé actually has gorgeous bay windows in her room that I fell in love with, so although it is a room that has less room than some in terms of decor, it also is just so fun and dreamy.
I tend to decorate on the more minimal side – I don’t love clutter, so a lot of my decor choices are clean and simple and this room is no exception. I kept things very simple and love how it turned out.
The Furniture
When we moved from our last house we decided to swap out Avé’s gorgeous full sized bed for a day bed because of space. We knew that giving her more room to play in her room was more important, and we are so happy with the decision.
We also decided to keep a hanging chair in her room. In our last house Avé had the hanging white rattan chair and Goldie had the natural color. When we got Avé the white bed I decided to swap the chairs for the girls. If you have ever considered a hanging Rattan chair I have a whole review on them in this post that you might find helpful.
I ended up doing this IKEA hack with Resin and it turned out so pretty. It was VERY easy so I cant recommend the DIY enough.
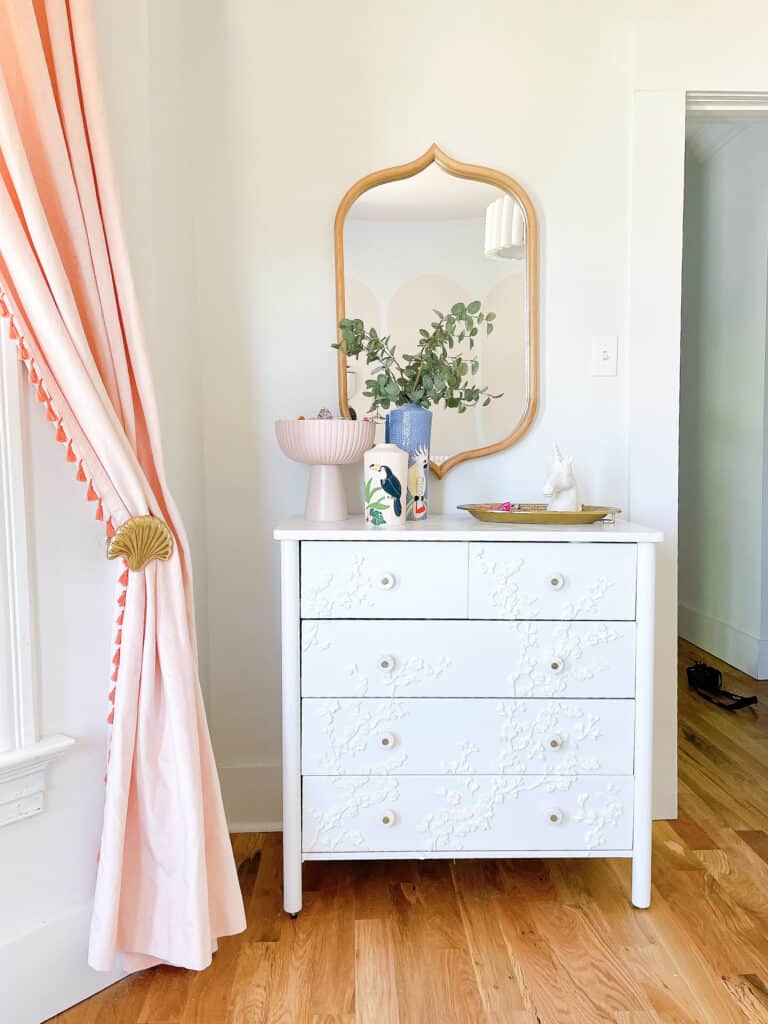
We actually have that same dresser in Jack’s room in its original state and I just love the size and storage it offers. Avé’s room couldn’t do anything much wider, but I wanted to keep her dresser low enough that she could use the top of it while she is so young.
Bedding
If you have followed me here on my blog that you already knew that Beddys bedding was going to come into play in this room. I LOVE Beddys in a big way. Like it is the bedding of my dreams.
I knew for a fact it would be in this room, and I opted for simple white so I could add to the bedding with throw pillows. If you have ever wanted to hear more about Beddy’s Bedding you can read my full review here, but I also have a discount code below you can use.
As for the rest of the decor….I have had this room at about 75% for MONTHS. I mean months. I needed to find a rug and curtains, and honestly…I just wasn’t in love with anything I was seeing.
I don’t love to go too expensive with those items in kids rooms because I tend to change the spaces a lot…and with Avé’s room I needed 6 curtains, so changing out really expensive ones in a year might have led to divorce. (we also have really tall ceiling so I end up having to get the highest priced options…of freaking course.)
I finally found a rug and curtains and the rest of the details fell into place!
The Rug
I fell in love with this rug as soon as I saw it. I spent a few minutes with some consideration on the blue but opted for the natural/yellowish one and LOVE it. It is so soft and seriously so pretty and unique.
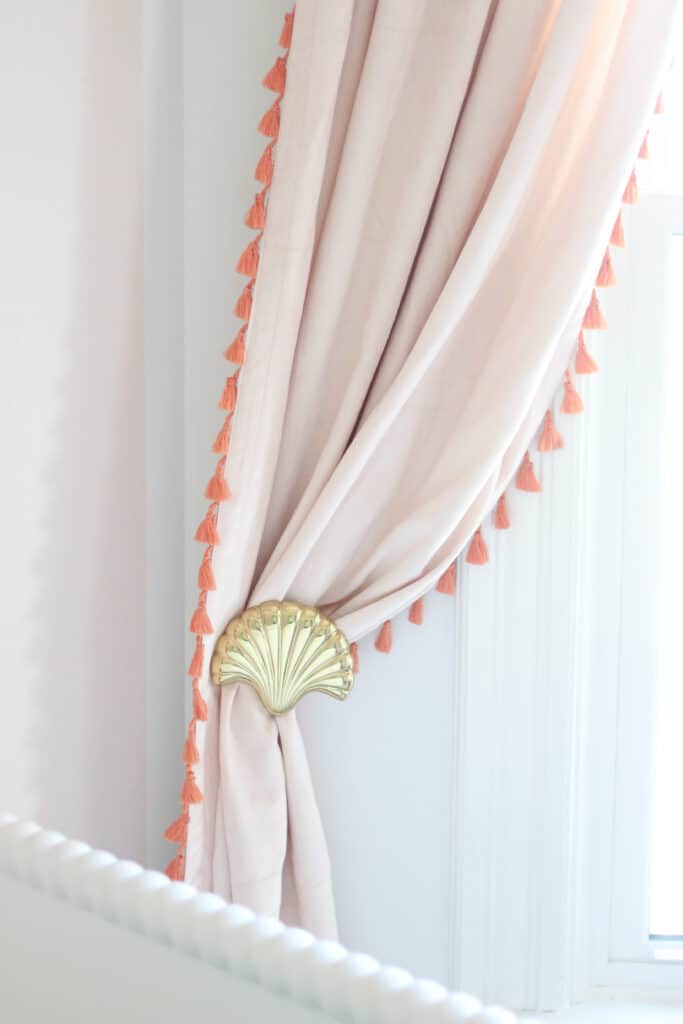
The Curtains
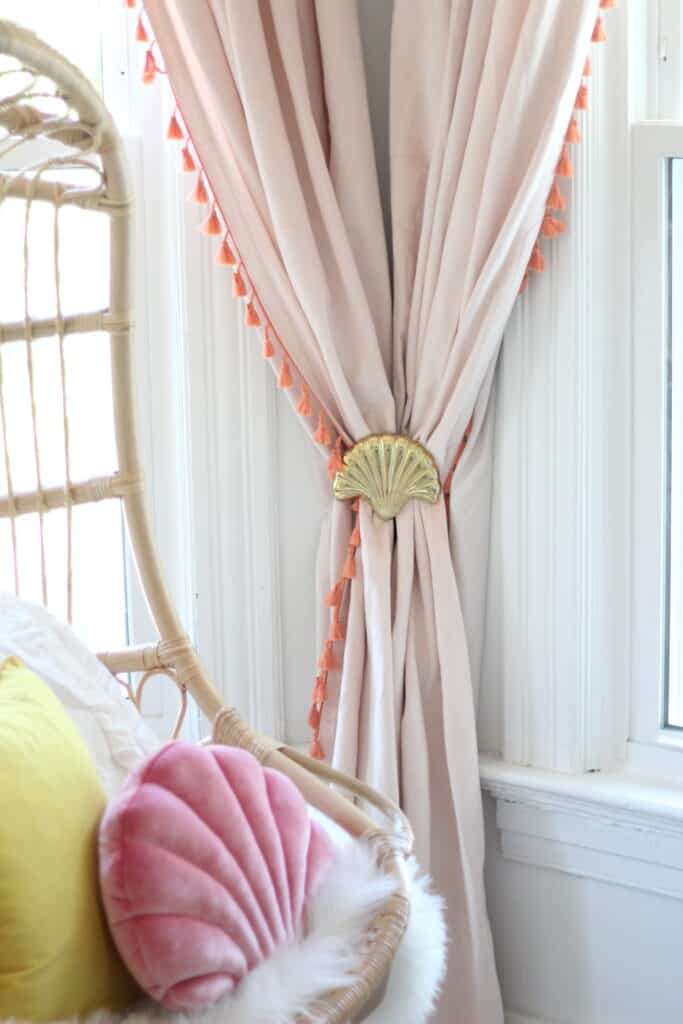
I finally ended up going with sort of simple curtains for the room. I loved that the pink in these mashed the Valspar Desert Bone really closely so they didn’t clash, but the added tassel edge broke up the color a bit.
Once we added the curtains we decided to give her tie backs because they are so high that its hard for her to open and closet them on the rod. I found the tie backs at an antique store and fell in love!
As far as the other decor – I kept things really simple. I had a lot of items already, and wanted to keep things affordable yet pretty. One thing that is worth noting is that the poufs on the floor double as stuffed animal storage.
When we did Jack’s room I got him a storage pouf and it was one of the better choices I have made in kids room decor in so long. The pouf stored way more than a basket and keeps his room looking so clean and put together every day. I knew I wanted that in Avé’s room too, but really struggled with what one to buy.
I ended up getting her these three – they came with the pillow inserts so I figured if she didn’t need them all for her stuffed animals I would throw the pillows in them. It worked so well, and I am beyond impressed with how well it worked.
For the pillows I used some from Home goods as well as all the ones linked below.
As far as wall art and decor – the mirror and bird picture are new, and I LOVE THEM, and the other smaller decor items are all older items I have been holding onto.
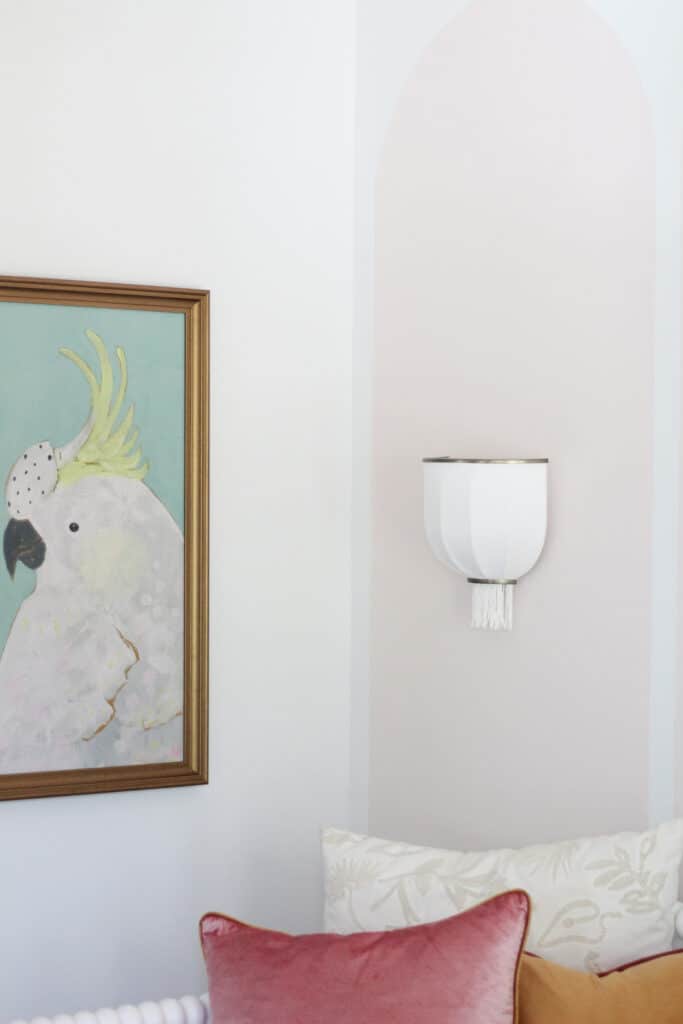
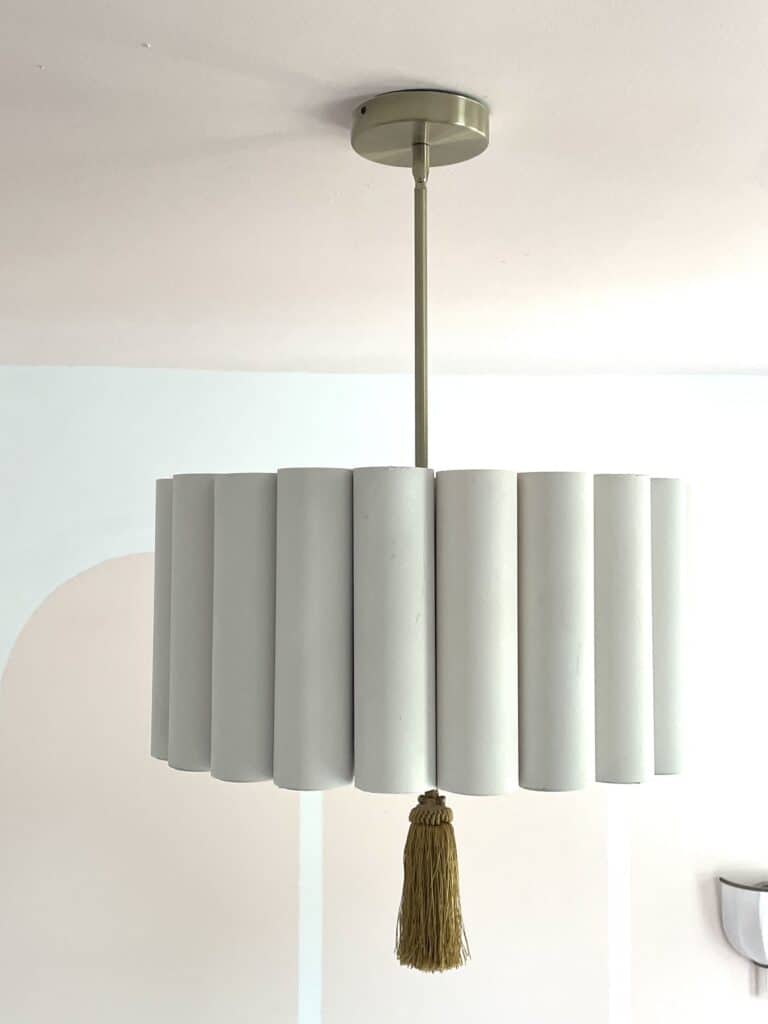
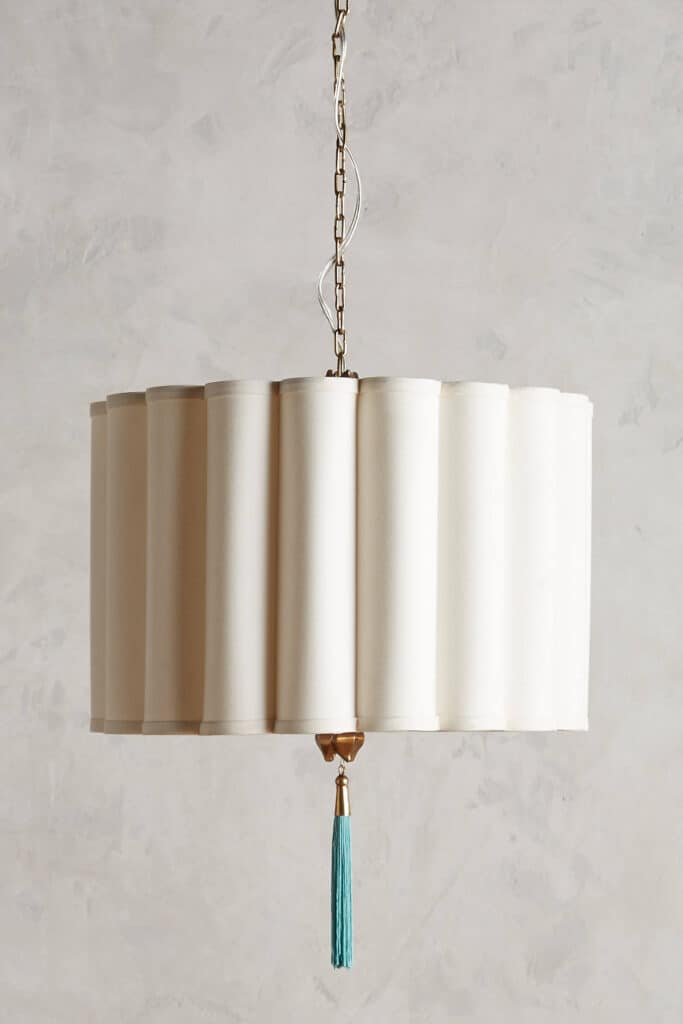
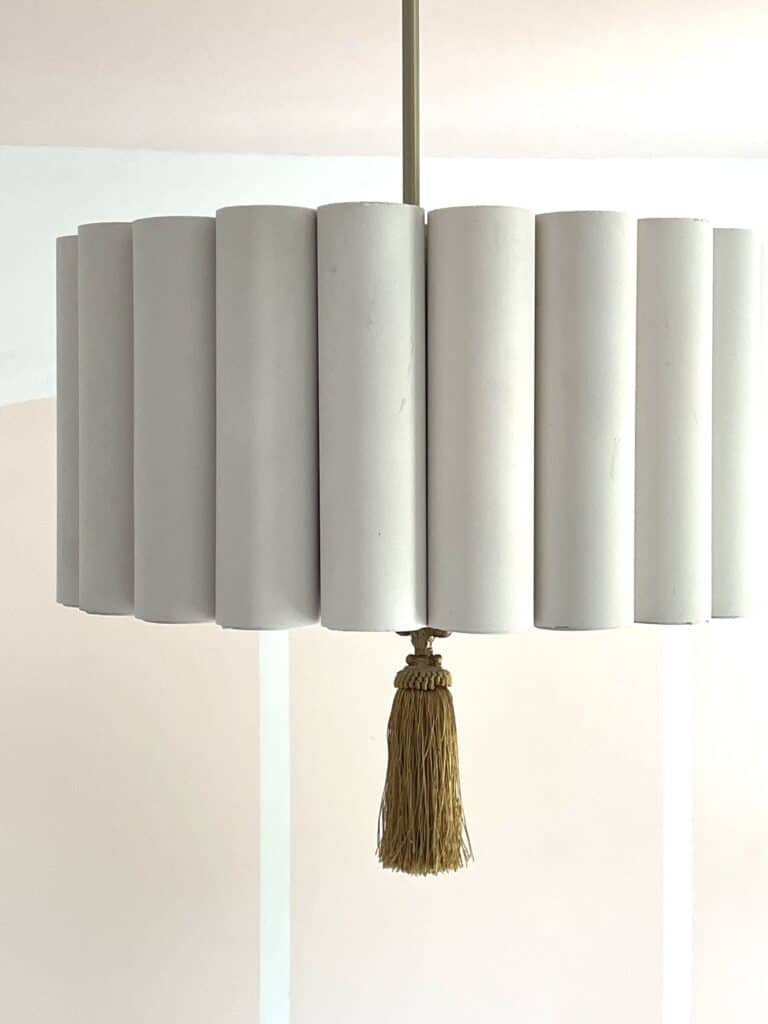
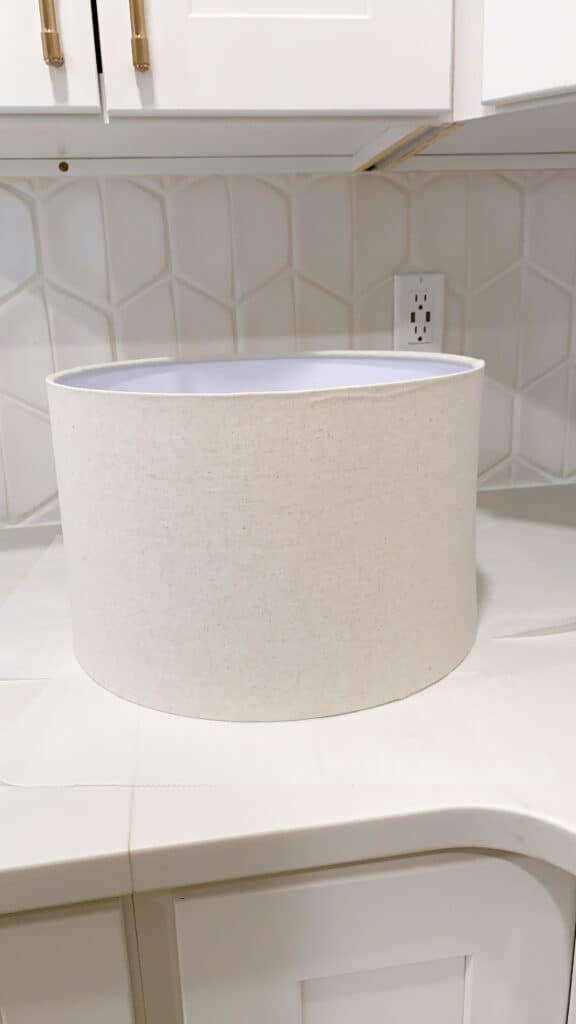
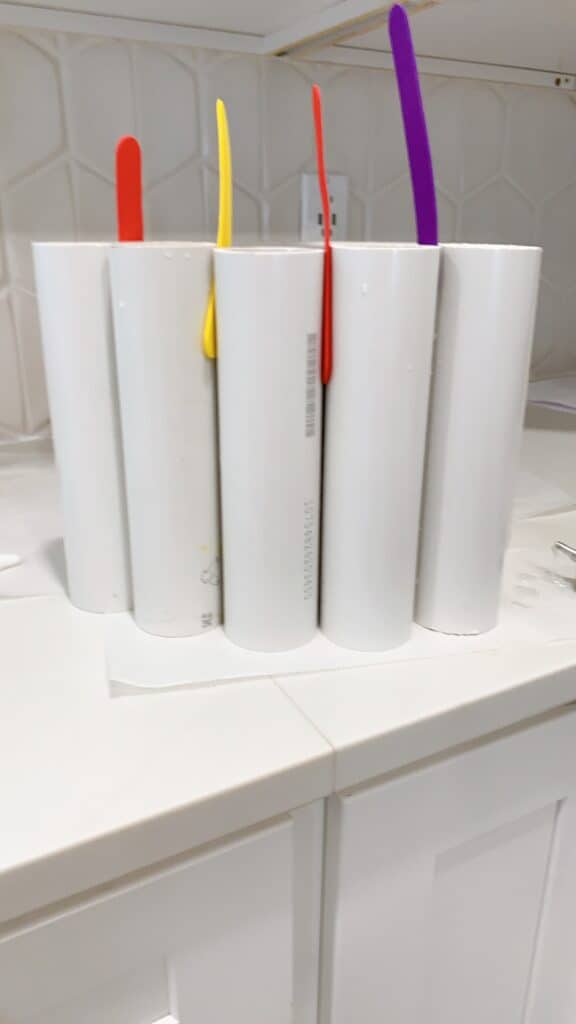
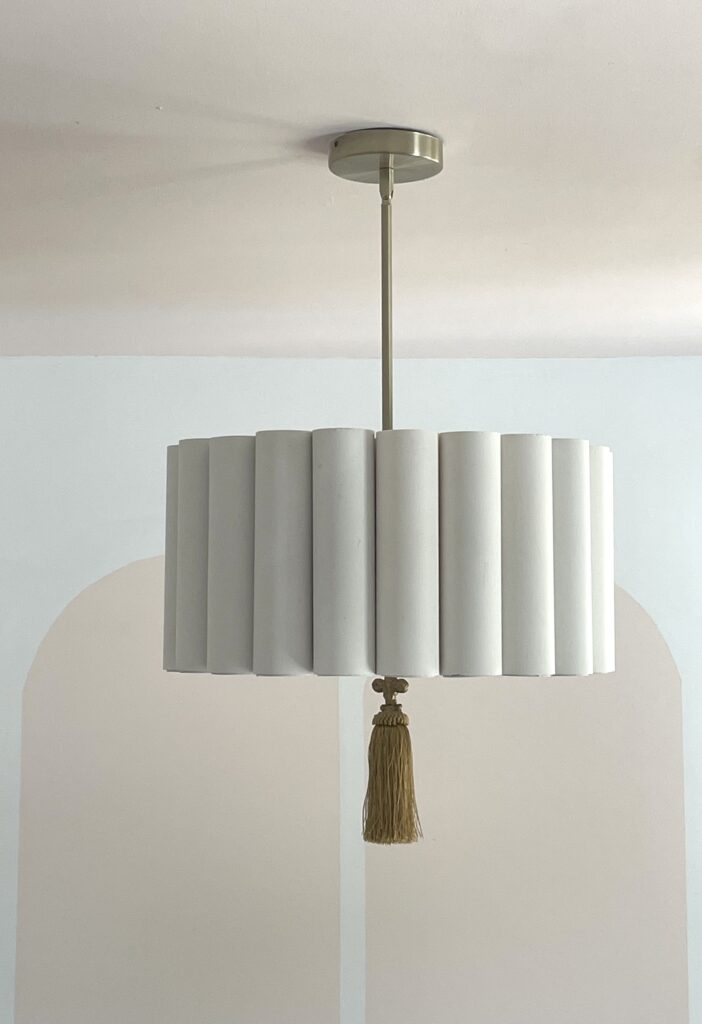
The lighting in Avé’s room is one of my favorite things. Both the wall sconces, and her ceiling light fixture. The ceiling fixture was actually a DIY done with PVC pipe – you can see more about that and how to create it in this blog post.
And for the wall sconces? We wanted to give Avé this very ‘Beauty and The Beast’ feel to her wall with sconces, but didn’t have any desire to bring in an electrician. We cut the hardware cords for her sconces, and mounted them to the wall, then set a puck light in them instead.
It gives the same really awesome look and function with no electrician needed!
Hopefully you found this blog post helpful and have inspiration on how to use the paint color Valspar Desert Bone in your own space. I would love to see where you use it if you try! Be sure to leave comments below with any questions and follow me on Instagram (@arinsolange) for more fun and inspiration.
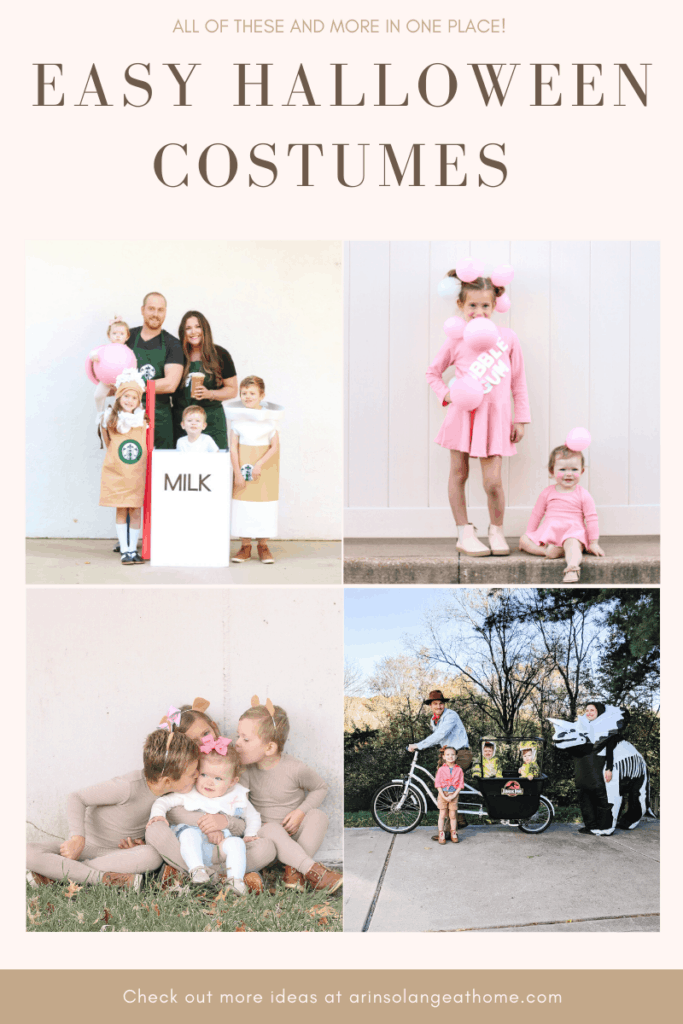
Halloween is just around the corner – which by the way – I CAN BARELY BELIEVE. But since we can’t slow down time, we might as well get ourselves prepped and ready to fully enjoy all things fall. Over the past few years I have rounded up several easy Halloween Costumes that my family and I have done – some just one or two kids, and some all of us, so I wanted to share them all in one place today.
This post may contain affiliate links check out my privacy policy here
Easy Halloween Costumes
October is NUTS for our family. We have 3 birthdays leading up to the holiday, so I always feel a bit like I am hanging on by a thread trying to get everything done. I am a bit of an over achiever. I love my kids to have the ‘DIY’ ish Halloween costume, but I don’t have it in me to go above and beyond, so easy costumes are my NEED!
I think that people think that going to the costume store is the only way to get easy Halloween costumes, and that is simply not the case. Sometimes DIY is just as easy in creating a fun costume – and I am going to show you how.
The makings of Easy Halloween Costumes
To me – easy Halloween costumes typically mean you are using mostly street clothes, and they don’t require sewing and major amounts of work. That is not to say there isn’t some creativity, but most of the costumes you will see in this post are going to be SO EASY and cost you nearly nothing.
I have some other posts with last-minute halloween costumes which is honestly where 99% of these were born (you get bonus points in any costume contest if you finished it that day…right?) so I will link to that post as well.
The best part of all of these diy Halloween costumes is that they all are VERY low cost, and can give some items in your closet a new life. I am never serious and for me the best Halloween costumes are normally the easiest halloween costumes and the funniest halloween costumes.
Easy Halloween Costumes for Groups/Families
I will be honest – we have only done a whole family halloween costume 2 times. They tend to be a lot to coordinate, HOWEVER, both times they were done last minute with minimal effort, and made me realize that family halloween costumes will be a thing for us.
Let it be known – we let the kids pick what they wear for trick or treating so these costumes are truly just for my work. – I don’t need anyone reminding me that my kids don’t want to wear this haha!
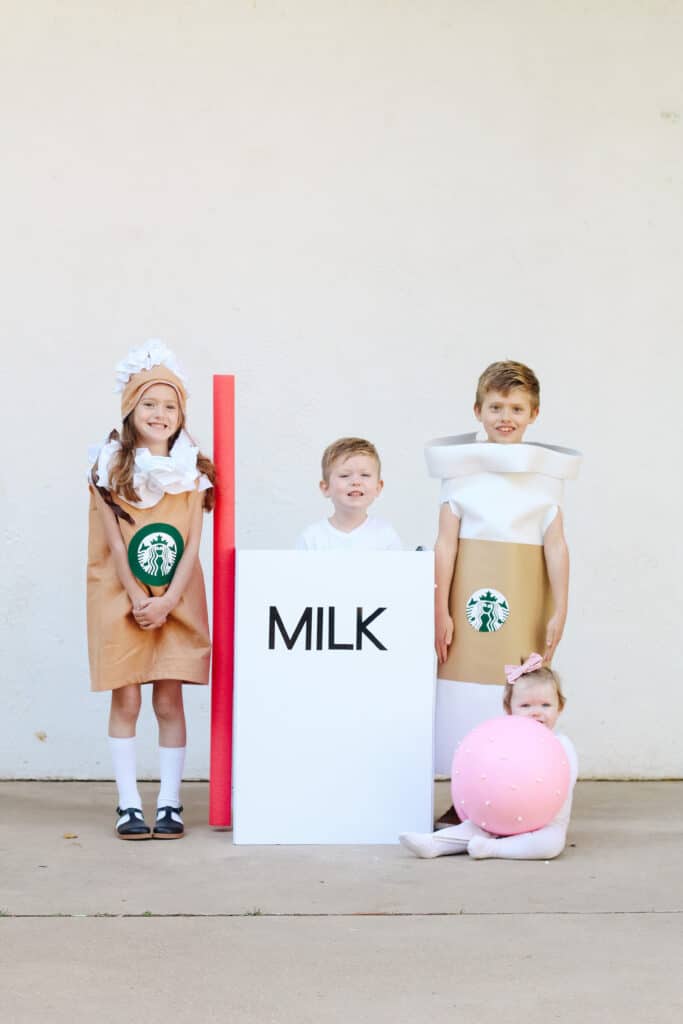
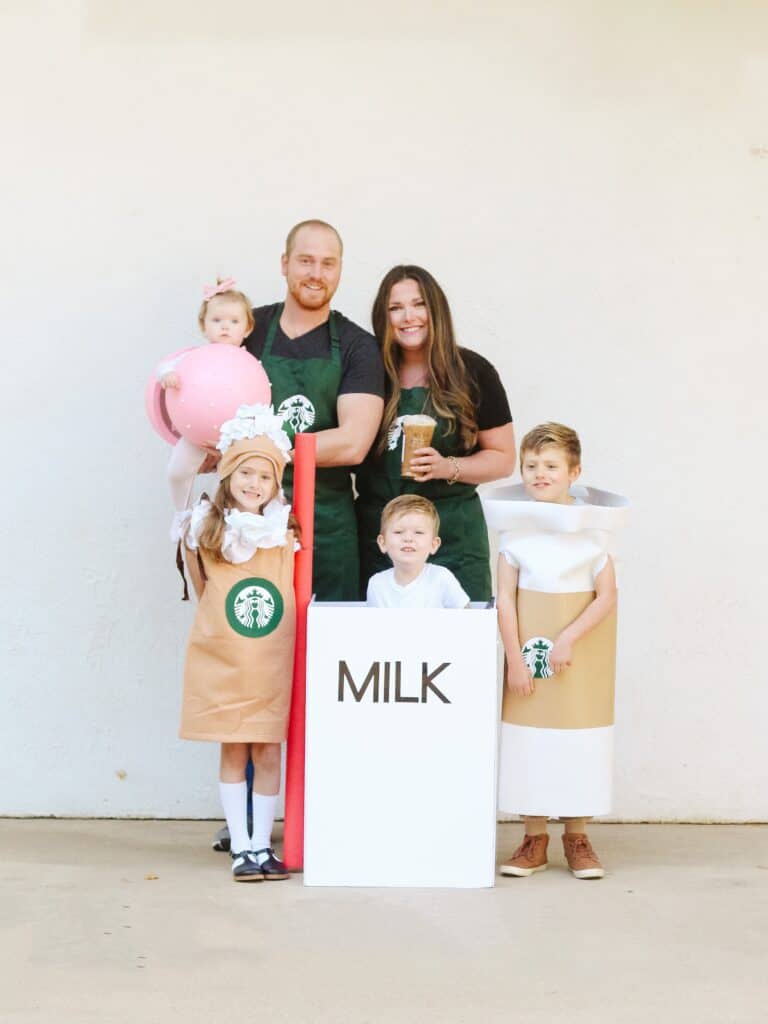
Family Costume Number 1 – Starbucks for All
Last year I had the idea to dress our family of 6 up as ‘Starbucks’ for Halloween. If you know me I am a Starbucks addict….and I figured after the amount of it I had been drinking during a move and renovation I would just FULLY embrace the coffee lifestyle. The Starbucks costume ended up being such an easy and fun costume that I knew I needed to share how we made it happen!
Cake Pop Costume
The baby was a cake pop, and let me tell you….I wanted to actually eat her with how cute she looked!
For her costume I took 2 of these foam half circles and painted them light pink. I then glued sprinkles like this on them (I opted for something actually edible incase she ate any!).
I used rope like this and connected the 2 half balls together in 3 spots. One short string in the middle of the bottom – this was to go between her legs (think a life jacket strap). Then two other strings (actually 4 were for the shoulder straps. For those I used hot glue and glued a piece on the top of each side on both sides to tie on her shoulders. (the Glueing was done inside the balls)
I paired with a white onesie and white tights and called it a day. It was soooo cute, and I think the pink cake pop is so iconic for Starbucks now that it definitely ‘read’ as right.
I then took a second piece of the same material and made a strip about 5 inches tall. I hot glued that piece in spots along the top to make it sort of ‘stick out’ so it looked like the lid. Be sure to leave the sides open because that also works great for arm holes!
I used tan felt and wrapped it around the piece for a hot sleeve, and added a round green circle of felt. (all of this done with hot glue or sticky felt – you choose). I then used my Cricut to cut an SVG file for the Starbucks logo and stuck the vinyl to the green felt circle. I went with normal felt – not iron on, because I knew it didn’t need to be long term.
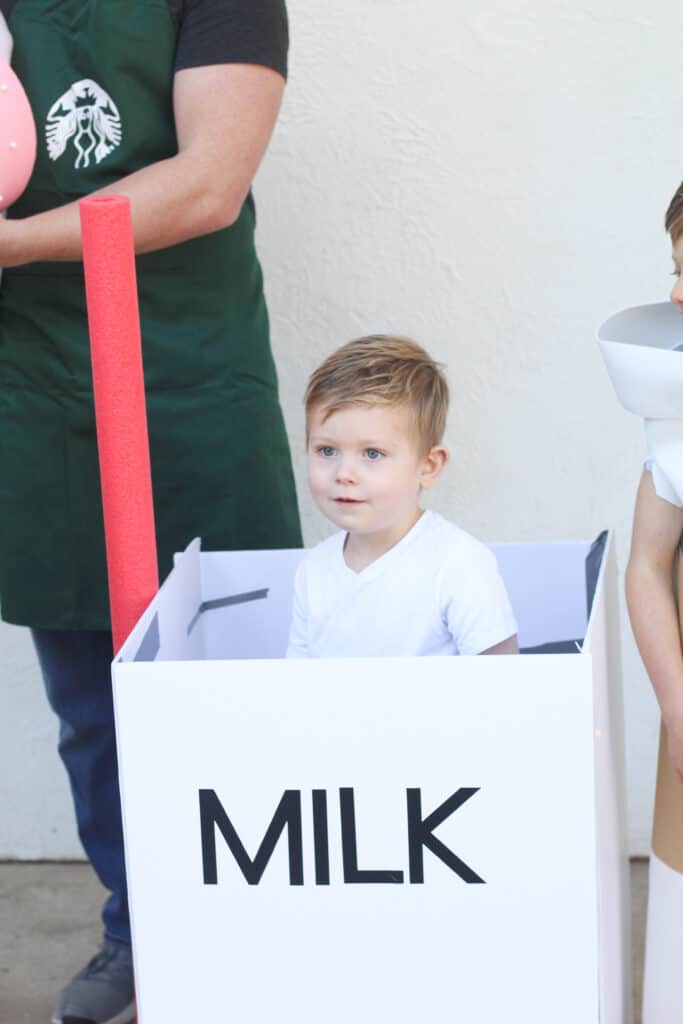
Box of Milk
For my 3 year old son I made him Milk. – I originally wanted to make him chocolate milk, but easy won, and it was so with it. I literally just used 2 poster boards and duct taped them into a box on the inside. I then added the words ‘MILK’ to the outside and glued strings to hang over his shoulders when walking. It was honest to goodness a 10 minute costume.
This is also a great one you could do with a cardboard box – so if you have the perfect sized box laying around keep it for Halloween!
Frappucino
My 6 year old was as cute as can be…and was our only store bought addition to this group. Let me tell you – Amazon prime cut down on my work so much that it was SO worth it tying in the store bought.
I have seen some cute DIY Frappucino costumes, and they are some of the best costumes, but quite frankly…. I didn’t have time and loved the ease.
I did use the same SVG of Vinyl from my Cricut on some green adhesive felt to cover the store bought emblem with the Starbucks Logo.
Well Caffeinated Baristas
Well now that we finished the 4 kids….we needed to tackle how to tie in Sam and I to make this a family Halloween costume. I went with Simple for us because – wellllll again I am so last minute. I had both sam and I wear black or white shirts because when I worked at Starbucks those were the rules. I then ordered these aprons, added the SVG files in white vinyl and DONE.
It was SO EASY to add us to the mix….we also went and grabbed some coffees on the way to shoot the photo but for a Halloween party I would fill those so fast with my favorite cocktail.
Easy Halloween Costume for the Family 2 – Jurassic Park
This was a fun one for our family because our last name is JURA, so we went as JURAssic park. At the time we were a family of 5, and my kids still talk about the costume. We used our Madsen cycle as the vehicle and it was such a fun touch, but you could do the same thing with a wagon as well.
The Humans
This was super easy, and we literally used clothes we had – I bet you can do the same…you just might have to dig in the back of your closet. For my daughter we actually used shorts from her brother (because she didn’t own khaki shorts) and a shirt from one of them to tie up. These would also both be REALLY easy thrift store finds if you don’t have them.
My husband wore khaki pants, a blue snap button shirt and a bandana. He also had a hat on that I believe we did have to buy for the occasion.
Dinosaurs
It isn’t Jurassic park without dinosaurs roaming free right? We opted for more ‘funny’ with this costume than anything…as shown by what I wore. For the boys we bought them Dinosaur costumes.
This was a super easy store bought costume option that I don’t think we could have made in a DIY fashion for less money. I also think sometimes think that when you are talking easy Halloween costumes and Family costumes that normally reads better with a 1 or more store bought option in the group.
I also went as a dinosaur which THRILLED MY KIDS. I actually went with a blow up dinosaur costume like this and it was equal parts hilarious and amazing.
Single Person Easy Halloween Costumes
Okay so that is all I have for family Halloween costumes…until this year, which I can’t wait for. Be sure to follow me on Instagram so you don’t miss that big reveal. But in the mean time let’s talk about some easy Halloween costumes for one (because who wants to be tied to a group the whole time?)
I have lots more costumes linked in both this post and this post, but wanted to get all of my favorites and how to do them in one place for you, as well as how to execute them! The following costumes are great for you if you are looking for a simple costume that will use things you have in an easy way.
Arthur Costume
Who remembers Arthur? Please don’t tell me if you don’t because I need no reminders that I am getting old. But honestly this costume is DARLING for both kids and adults.
For this costume I put Ave in a yellow shirt layered over a white shirt with a collar. I paired it with a denim shirt and knee high socks, but the bottom is sort of up to you. Arthur wore denim, but to me sort of dressed ‘nerdy’ so I almost went school girl ish with my daughter as a play on that.
For the ears I just took some felt and glued it to a headband! – This is truly a costume I spent NO money on, because I already had the glasses from Where’s Waldo….so maybe we should go to that next!
This is honestly one of the coolest costumes I have done and is a great option for you to throw together on Halloween night because it was easy!!!!
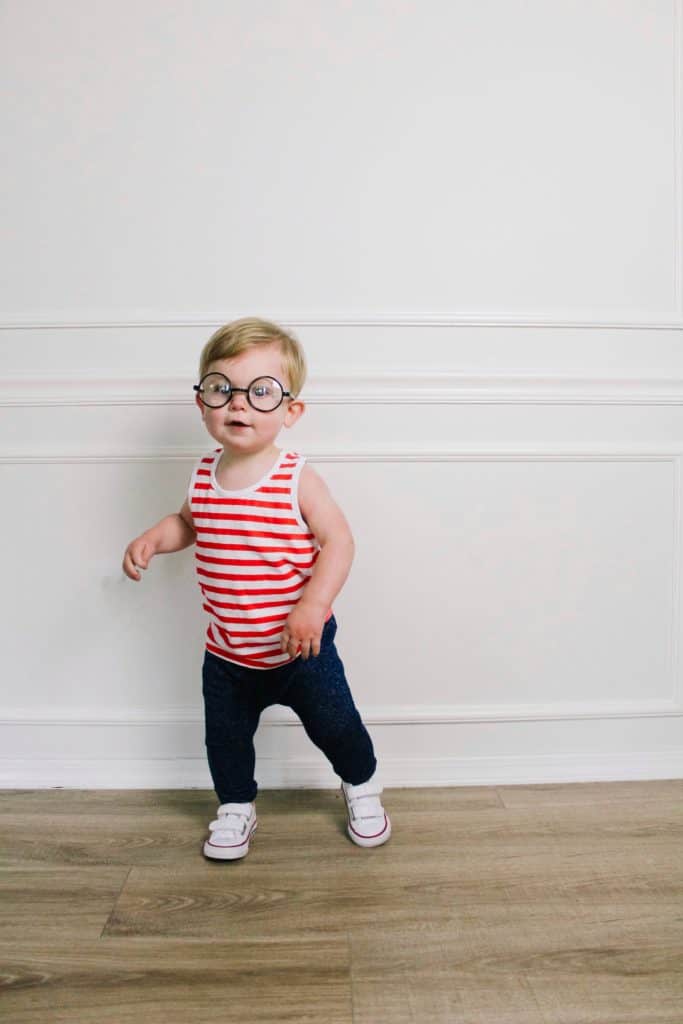
Easy Where’s Waldo Costume
This one was SO CUTE. I have seen where’s waldo done so many times for adults but not as much for kids…and boy did these kids look cute.
I actually had red stripes on hand from June and January (they normally do have some great stripes!) because of Disney world, so I paired those with some simple glasses and we had a costume. You could add a hat too, but it isn’t fully necessary.
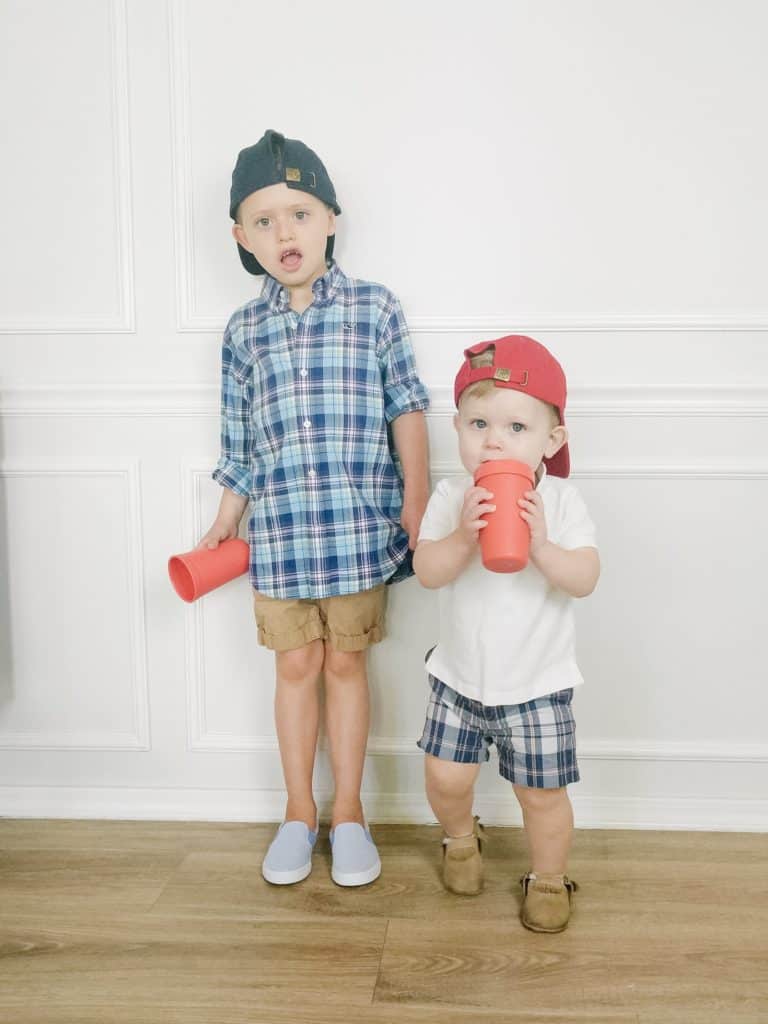
Frat Boys Costume
Alright this is a fun best friend Halloween costume for those college girls too….I mean might as well dress as those you’re trying to impress right?
This was honest to goodness the most easy idea I have ever had. I bought NOTHING. I dressed both of my boys in polo shirts, preppy shorts, and backwards hats. I then gave each of them a red replay recycled cup that I already owned as their ‘red solo cup’ and we were done!
Pocahontas and Meeko Costume
I keep thinking the last one I posted was my favorite east Halloween costume until I get to a new one, but my daughter as Pocahontas was soooo cute. I LOVED Pocahontas growing up and it was so sweet seeing her dressed up and loving it too. As an added bonus we added Meeko (the raccoon) and she had a 2 year old brother who was the perfect choice for the role.
For my daughters costume I used a Plum Tutu which is my go to. I will say you could use a white dress or ivory dress and tie in the details. Always remember that a costume doesn’t have to be perfect. Aside from the tutu or dress everything was felt. I bought felt sheets to make her arm band, necklace and a sash over her tutu.
And for Meeko – he was in this and was about as cute as they come!
Easy Bubblegum Costume
2 girls has called for even more pink in my life. So bubblegum was a great DIY costume to tie that in….right? For this costume I literally used these pink dresses for both girls, and added letters. You could do iron on, vinyl, or even these letters with double sided tape like me. I then used double sided tape and some balloons. Add some more balloons to hair clips using hot glue, and you are done!
Base your method of adhering the letters and balloons on how long they will wear them, but honestly it was sooo easy and cute!
Goldielocks and the 3 Bears Costume
Cue the costume I will make my kids wear every year. It is not my fault that I had 3 kids then a baby ‘Goldie’. Again we are talking about a super easy costume with a great excuse to buy more of my favorite pajamas. I put all three of my older kids in these (girls) and these (boys). I then made them all felt ears glued to a headband and clipped a bow on to my daughters. Now you have Daddy bear, Mommy bear, and Baby Bear!
Those pajamas come in various colors and are my favorite so be sure to get creative with them.
Now I needed Goldie Locks – for Goldie I got her this onsie from Amazon, added some knee high socks, and these Peter Pan collar bibs, which ended upping a favorite and she was read to go.
This is one of those last-minute costume ideas that you might need to buy more of from Amazon, but every single piece will be used often after, so it doesn’t feel like such an investment.
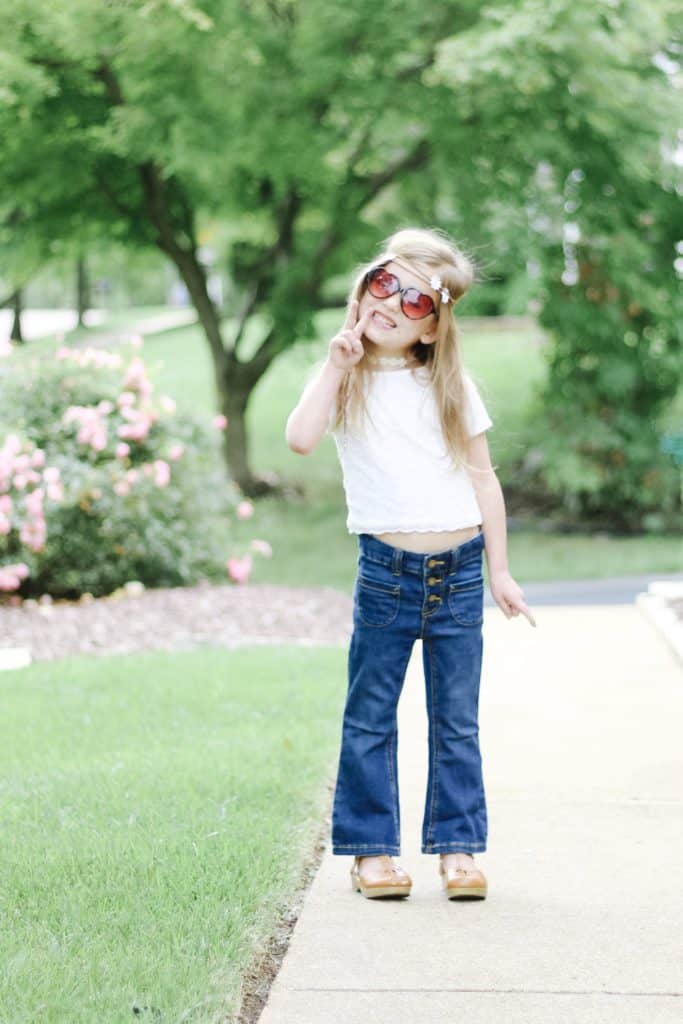
Hippie Halloween Costume
Talk about another great last minute costume idea no matter your age. I pulled this whole costume together from stuff in my daughters closet. Bell bottom jeans, a fun eyelet shirt, a choker and some fun sunnies and Ave was ready to take on Halloween. I mean this my be your perfect excuse to buy the ever more trendy bell bottom jeans.
Other Great Easy Halloween Costume Ideas
Mary Poppins | High School Musical | Snow White | Miss Universe | Scooby DOO |
Other Posts You’ll Love
If you’re still looking for the perfect costume, or more halloween fun look at these posts below!
For more Halloween fun be sure to be following me on Instagram (@arinsolange) – because I have plenty more easy Halloween Costumes to come this year! If you have any questions from this post be sure to comment below, and be sure to save the photo below to find these pictures every year!
My kids are officially back in school, which means I finally have time to think about anything other than snacks, lunch, snacks, dinner, dishes….well you get the picture. One thing I want to chat with you guys about is what you can be doing this fall to get your home ready for the fall temps!
This post is graciously sponsored by Hoffmann Brothers – thank you for supporting the brands that support my blog!
Increasing indoor Air Quality
Fall is naturally the time we start to think about spending more time indoors. In St. Louis we all know that the temps can drop at the drop of a dime, and you will be closing doors and stuck inside.
On top of that – in today’s current climate there is always the chance for some quarantines from school (I know, I know – knock on wood!). Hoffmann brothers has several things they offer to get your home up to snuff this fall!
Indoor Air Scrubbers
This is something none of us had probably really heard of 2 years ago, and now we hear of them all the time. Hoffmann Brothers can come install an indoor air scrubber to keep your air quality higher and keep you healthier. Air Scrubbers work to reduce pollutants, allergens, chemicals, viruses, and bacteria.
Whole House Humidifiers (or dehumidifiers…but that isn’t normally on the brain in the fall)
Another way to keep everyone feeling their best and your air quality at it’s best is to add a full house humidifier. Trust me – from one mom to another – you will thank yourself when you aren’t having to fill water in 14 tanks at bedtime every night.
You will feel so much better without your home being so dry in the cold winter, and its a great overall investment.
Duct Cleaning
Another great way to improve the air quality in your home is to get your ducts cleaned – this is actually on our list for fall. Getting your ducts cleaned gets rid of mold, debris and dust that you are otherwise breathing in.
Honestly – we did this at our last house and it was one of the best decisions we made.
Setting yourself up for a warm home
And while your air quality is of high importance, don’t forget to be thinking about the winter temps ahead of time. Get your Home Protection Plan maintenance scheduled to make sure your furnace will be up to snuff this year, and if you have a smart thermostat have them check that too.
We recently realized our Nest thermostat was acting a little off and never could get to the bottom of it, until we found out it was installed wrong in our renovation. We were so thankful that Hoffmann brothers is knowledgeable in smart thermostats so we know they can get it running correctly!
As always – the behind the scenes stuff for houses is never as much fun as painting a room, but I swear you will enjoy it so much more than anything pretty you can do. This winter I think we all want nothing more than a healthy family, and that starts at home, so hopefully some of these great services from Hoffmann Brothers will get you home fall ready in all the important ways.
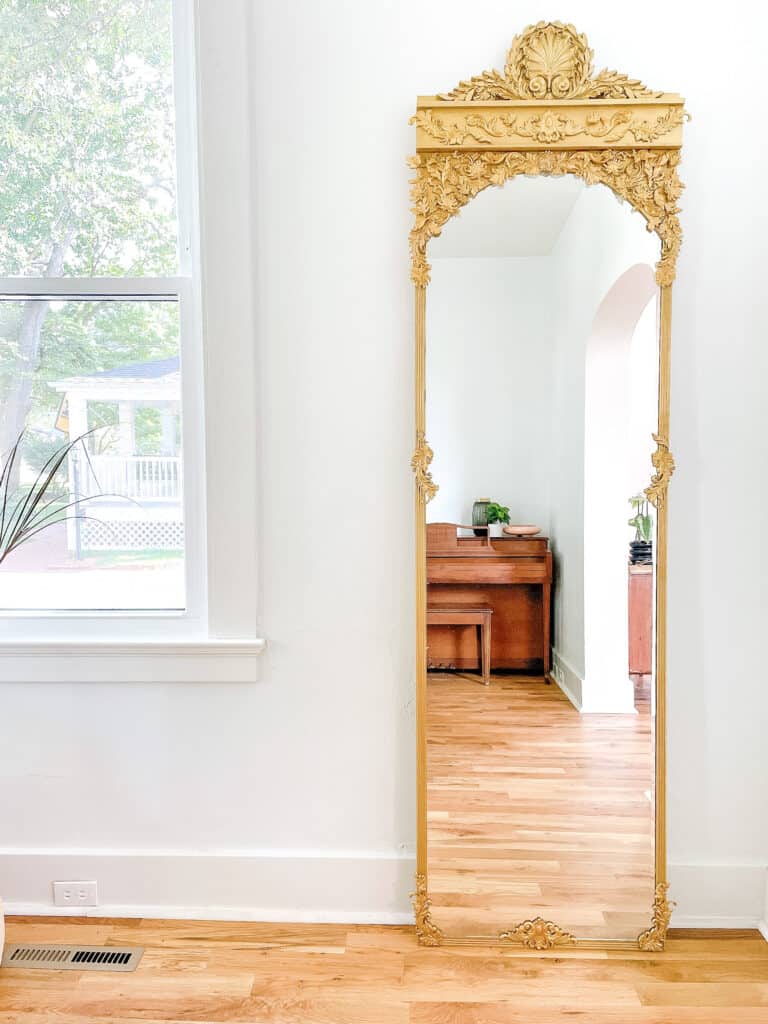
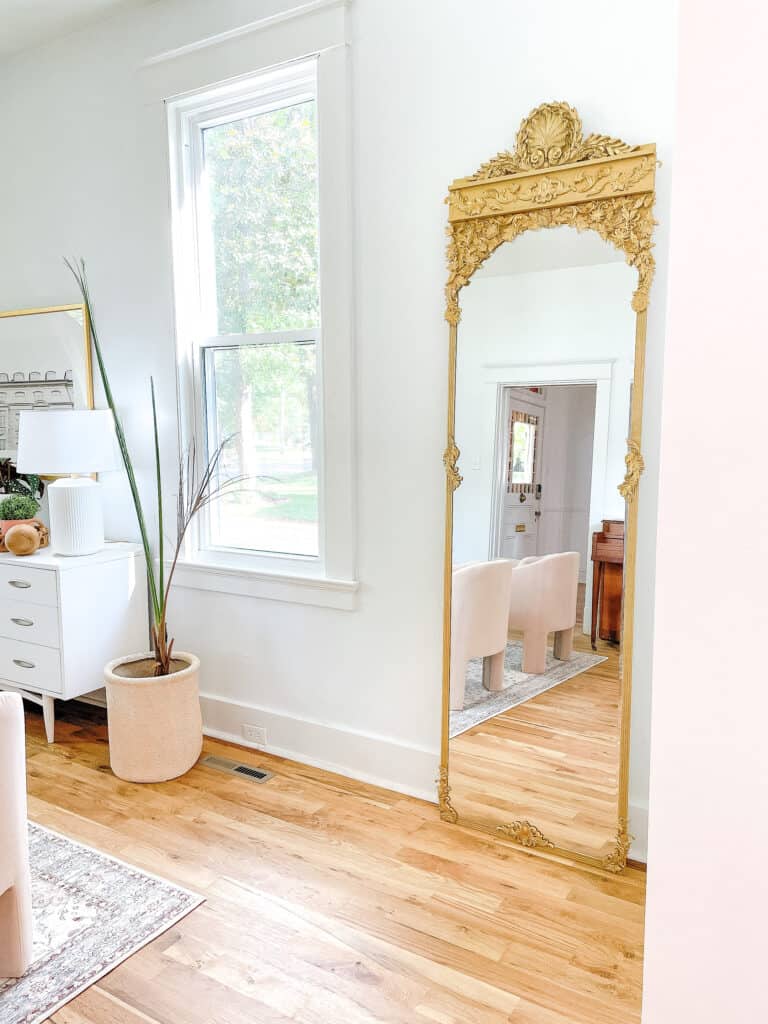
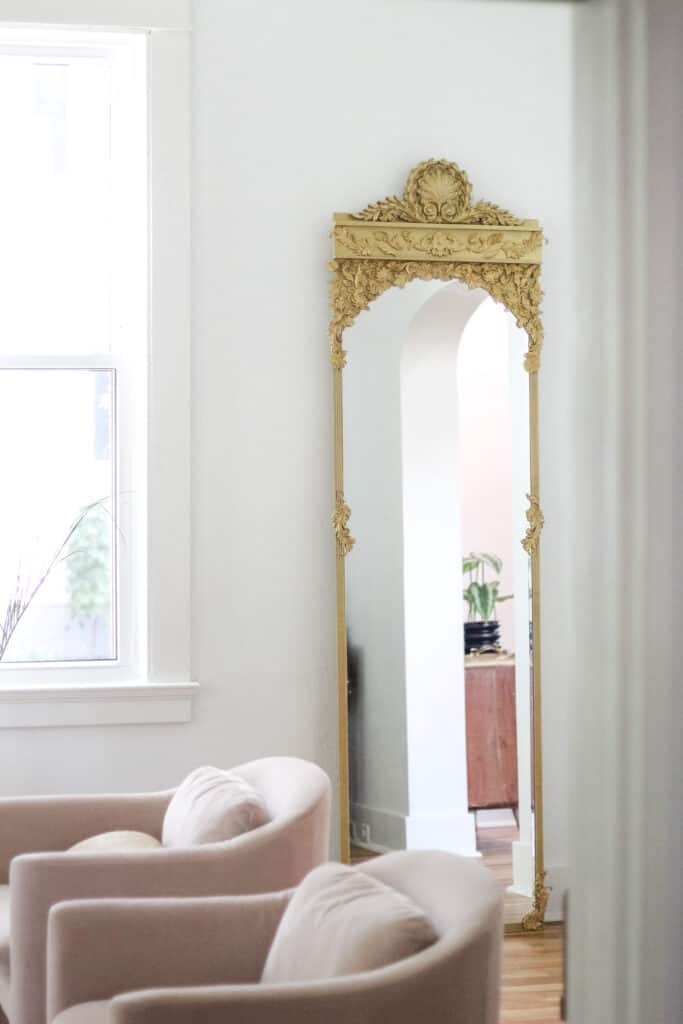
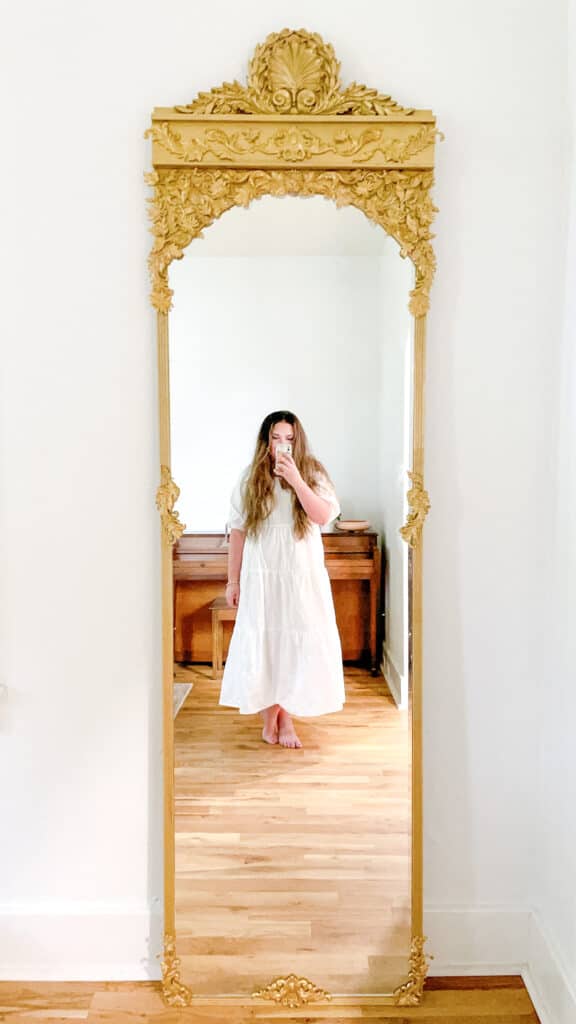
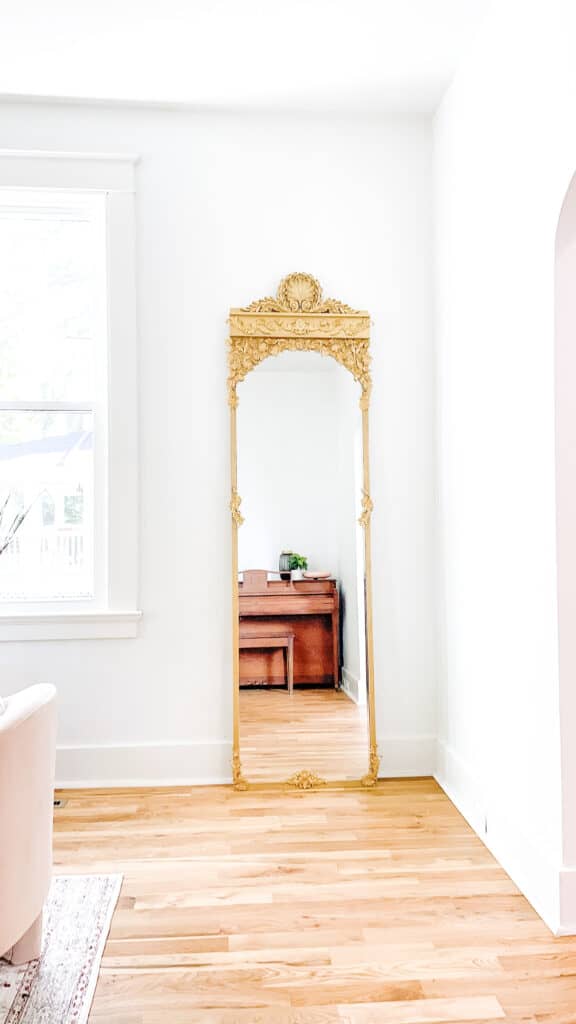
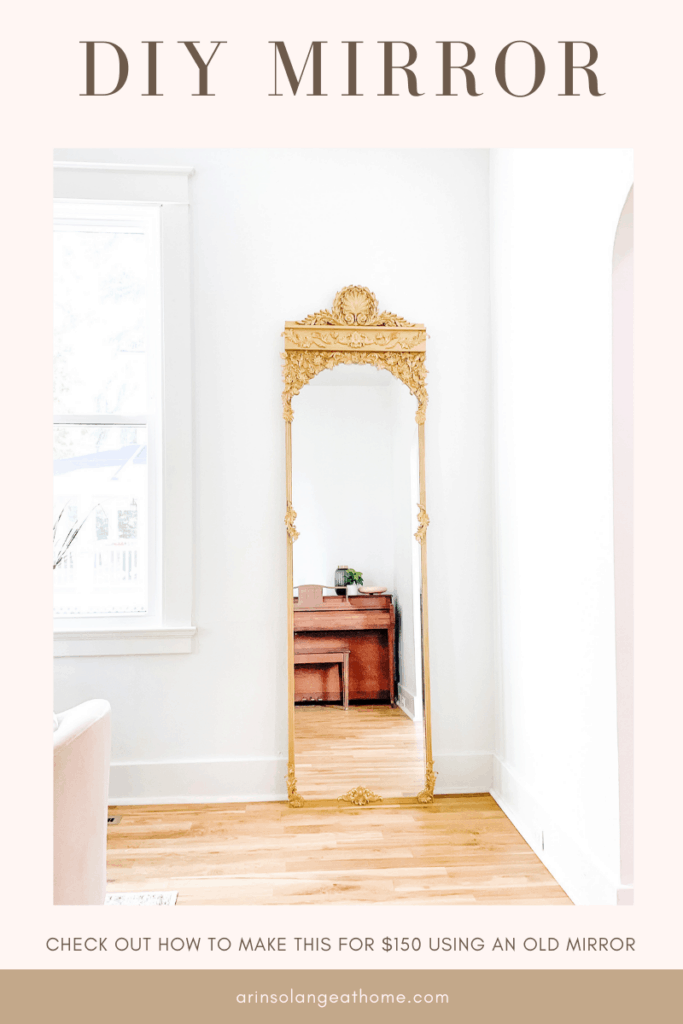
I have been wanting to do my own take on a DIY Mirror frame for YEARS, but honestly haven’t ever had the right Inso on what to create…until now. I am going to share with you all today how I created a DIY mirror frame for a marketplace find to look vintage and expensive!
This post may contain affiliate links
DIY Mirror Frame
Although I am going to walk you through my exact DIY and give you the details for how I made my mirror – I know some of you may want to do your own take on it, so before we get to the part where we make this ‘fancy’ lets talk about just plain old framing the mirror. Sometimes getting an inexpensive mirror and updating it t be exactly what you want is easier than spending hours on the internet searching for the perfect mirror.
You may also be looking for a way to give your bathroom mirror an updated look. This is a pretty simple DIY that won’t take much time, so hopefully this blog post has you updating your space in just a couple of hours.
Framing a Mirror:
There is more than one right way to do this, but for ours we chose to take thin plywood and mount the mirror on that first using liquid nails. We left a slight overhang on each side of the mirror so that we could glue the mirror to the wood instead of to the mirror, but you don’t have to do it that way.
You can also just use the liquid glue and go straight to the mirror with or without a wood back piece. If you are adding a frame to an existing hanging mirror in say a bathroom – just go ahead and glue your frame to the front of your mirror, or to the wall right to the outside of the mirror pending what looks better.
Building the DIY mirror Frame:
For the side pieces grab what ever kind of wood or trim you want to use for creating the frame. I used thin trim, but you might want something thicker. You will need enough for all 4 sides.
Your next step is to measure then cut your corners. You will cut the corners at a 45 degree angle which is most easily done with a miter saw like this one, but you can also use a simple miter box like this and saw.
Once all 4 pieces are cut, using your liquid nails glue them down.
You may have to wood filler your corners, that is IT! You can now use paint or wood stain the actual frame of the mirror.
Painting the Mirror:
Once the glue is dry if painting or staining is your plan, your best method is to put down tin foil to cover as much of the mirror as you can then painter’s tape around the foil. If you get any paint on the mirror use a plastic scraper to get it off.
How to create my DIY Mirror Frame that looks Vintage
Now that you have a good general way to create a DIY framed mirror lets get to my actual DIY! I will telly you that one aspect of this DIY was an antique, but in my hunt I found several similar options that were so fun. In a few simple steps you will have exactly the mirror you wanted!
Supplies
Plain Mirror – I got mine on Facebook Marketplace but you could get any builder-grade mirror
Trim for frame – we went really thin with ours, but you can go thicker
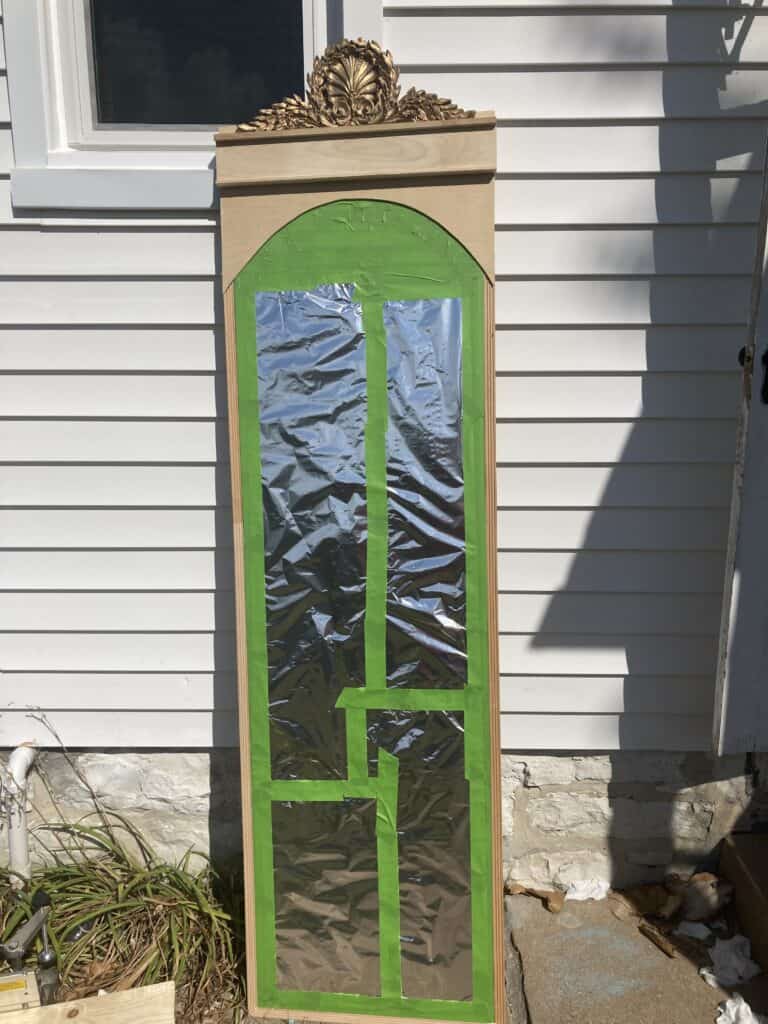
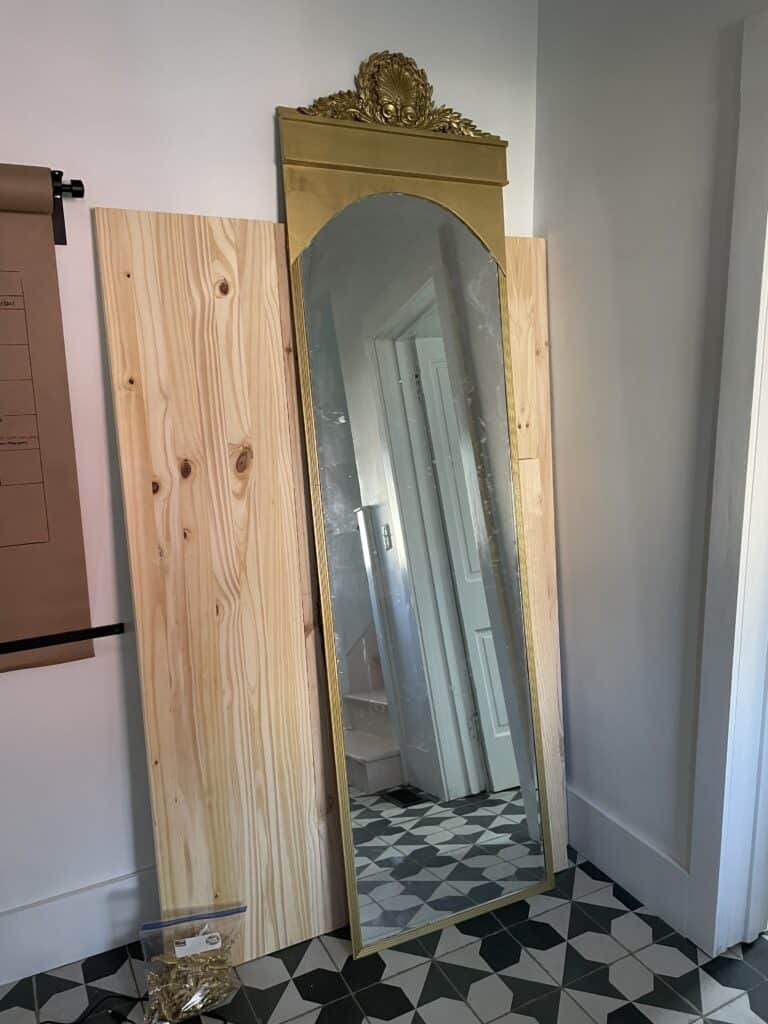
Plywood for the back – you need just taller and wider than your mirror – you can have this cut at the hardware store for you. You need it just bigger than the width of the mirror and the height of the mirror.
First we wanted to make sure we had a way to hang or baby proof our mirror. We added a scrap piece of 1×3 wood to our plywood back. We this gave us a thick enough piece of wood to add baby proofing straps or this mounting bracket. (in the end we went with the baby proofing strap and left it on the ground due to how big and heavy ours was.)
We did all of this before gluing the mirror to the plywood so we wouldn’t have any mishaps with the drill and the mirror. If you plan to just lean your mirror you could skip that step.
Now you can mount the mirror on the plywood. We used liquid nails and positioned the mirror to just barely have hangover on all 4 sides. Let that dry for a full 24 hours before you start moving it around to do more.
Framing and Adding the Large embellishments:
First you are going to frame your mirror. As stated above we used our miter saw and cut the trim pieces of wood at 45 degree angles for the corners. We glued those onto the small lip of plywood that was hanging out from the back of the mirror.
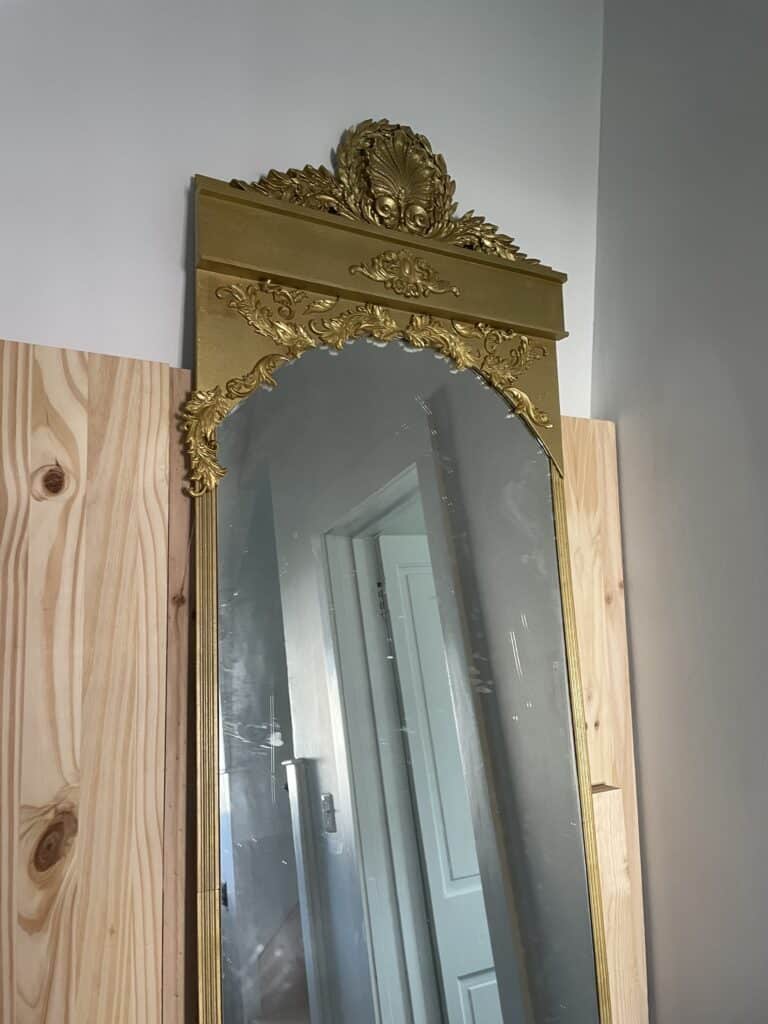
Once it is fully framed it is time to add your arch. This is fully optional, but I felt like it really updated the whole look of the mirror. I used a small piece of leftover plywood and drew an arch.
We then cut the arch with our jigsaw and glued it on the top of the mirror . I let it hang over the top, and didn’t worry about how the spot looked where it overlapped the frame because I knew that would be covered eventually.
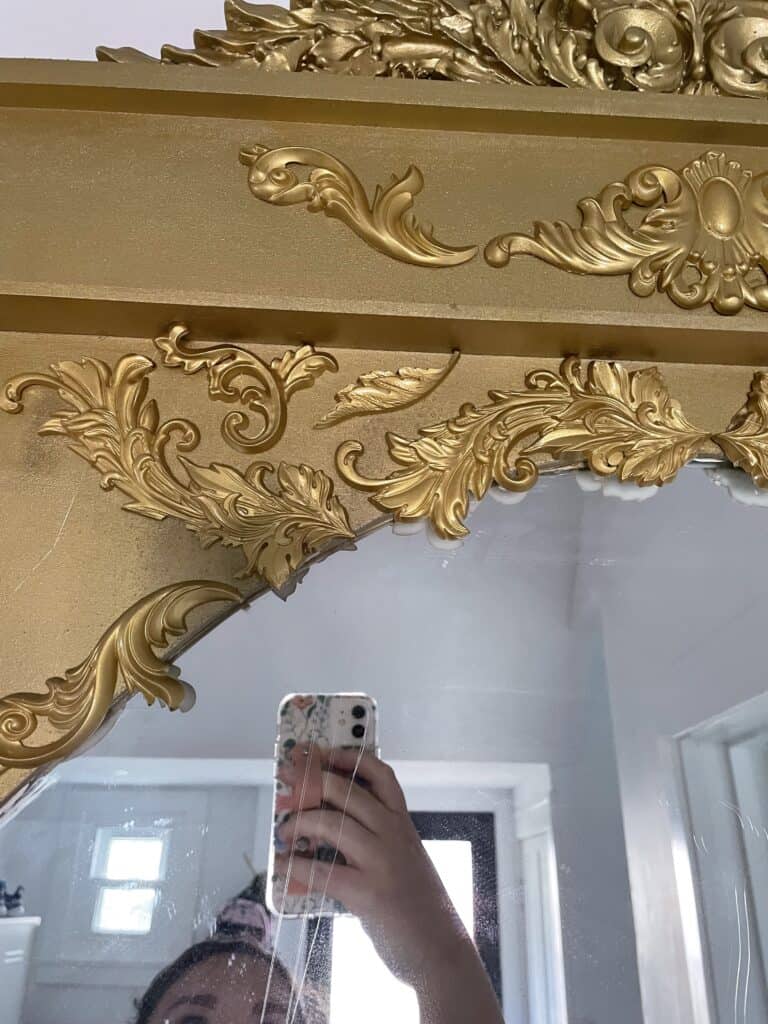
Next we added a door frame piece (this one) and an embellishment from the antique store. Like I said earlier in the post – the embellishment from the antique store. When I was looking there were several great options, and you could just use the resin molds up there, but to me it really added to the mirror!
Once that is all done – paint your mirror!
Adding Resin Embellishments to DIY Mirror Frame
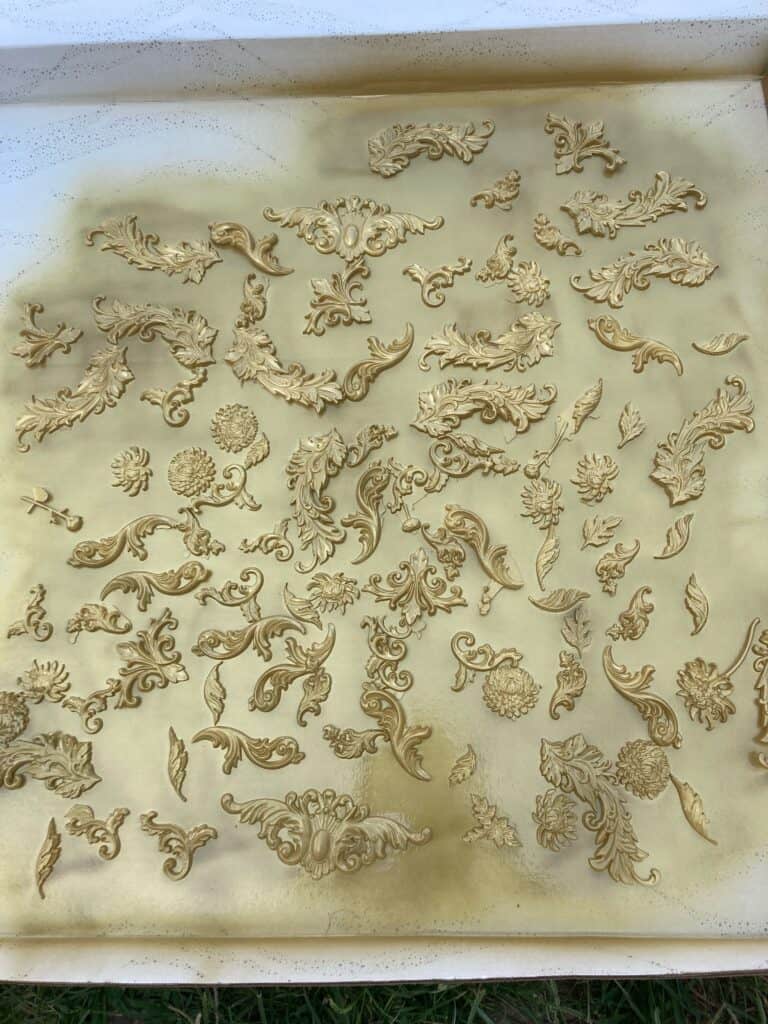
Now for the fun. You should have a fully painted mirror waiting for you to add your resin embellishments.
First – make LOTS of resin embellishments. I used a combination of the 3 molds I linked in supplies, and needed 2 boxes of the resin. This resin dries white and in 10 minutes. Be very careful where you make these because the resin will ruin things.
Once they are all done you will paint them as well. I would paint both sides for good measure. If they hang onto the mirror you will want them to be gold too.
Once you have painted them all it is time to glue them on. I used hot glue and started with sort of a symmetrical design. Once the symmetrical design had been created I went through and filled in the gaps and overlapped a bunch. I didn’t keep this EXACTLY symmetrical.
The last step was to add rub and buff to the mirror. This is a sort of strange paint that you can add lightly to the areas that are raised on the mirror. It added a bit of dimension and that antique look I was going for.
And that is it! My husband used a baby proofing kit to hold it to the wall (in the 1×3) and that was incredibly helpful because it is heavy!
Other Posts You’ll Love
If you liked this DIY check out these other posts below that you might love too.
Hopefully you feel ready to tackle a diy mirror frame, and if you try your hand at my DIY mirror I would love to see your end result! Tag me on Instagram (@arinsolange). If you have any questions be sure to leave them in the comments below.
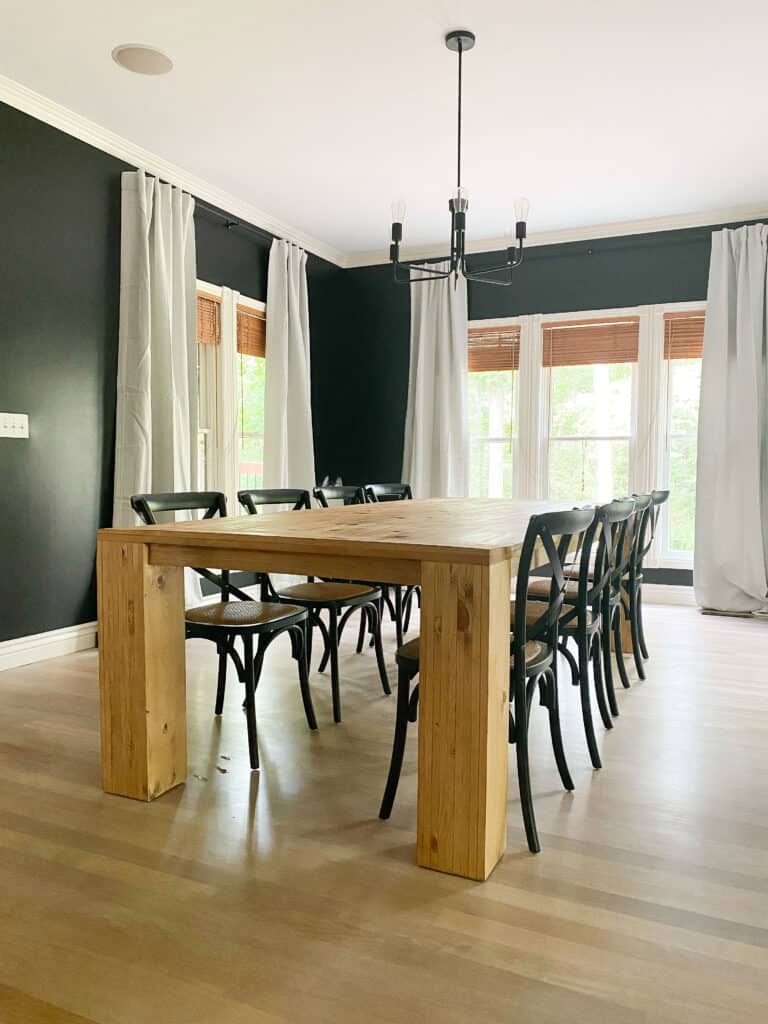
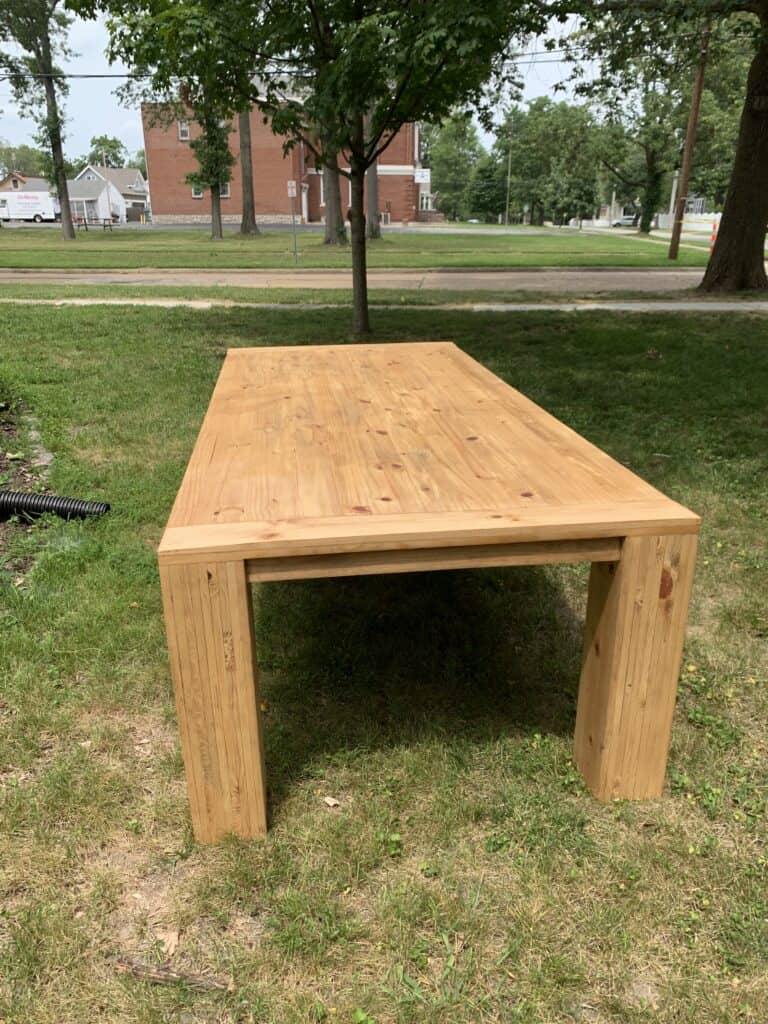
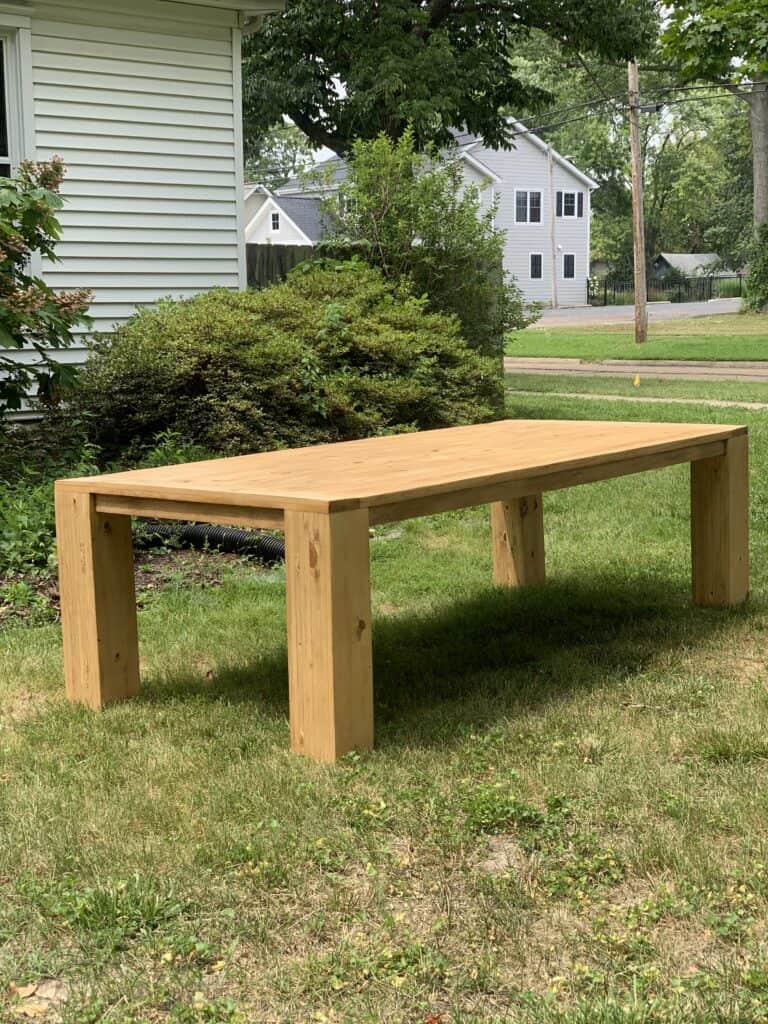
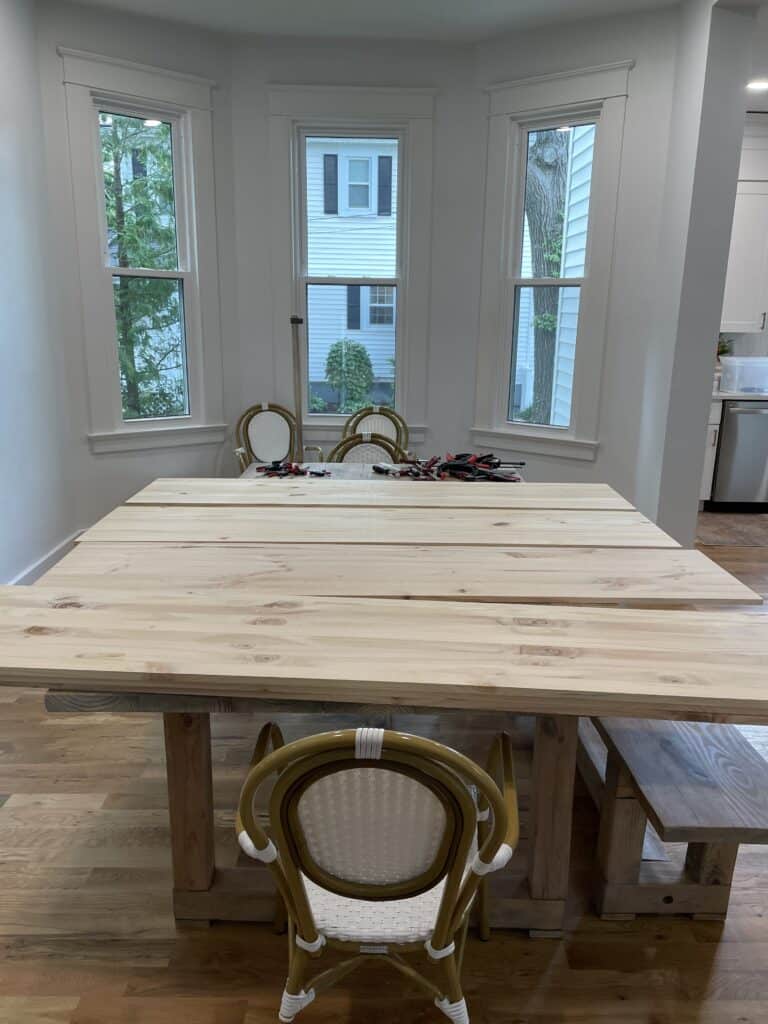
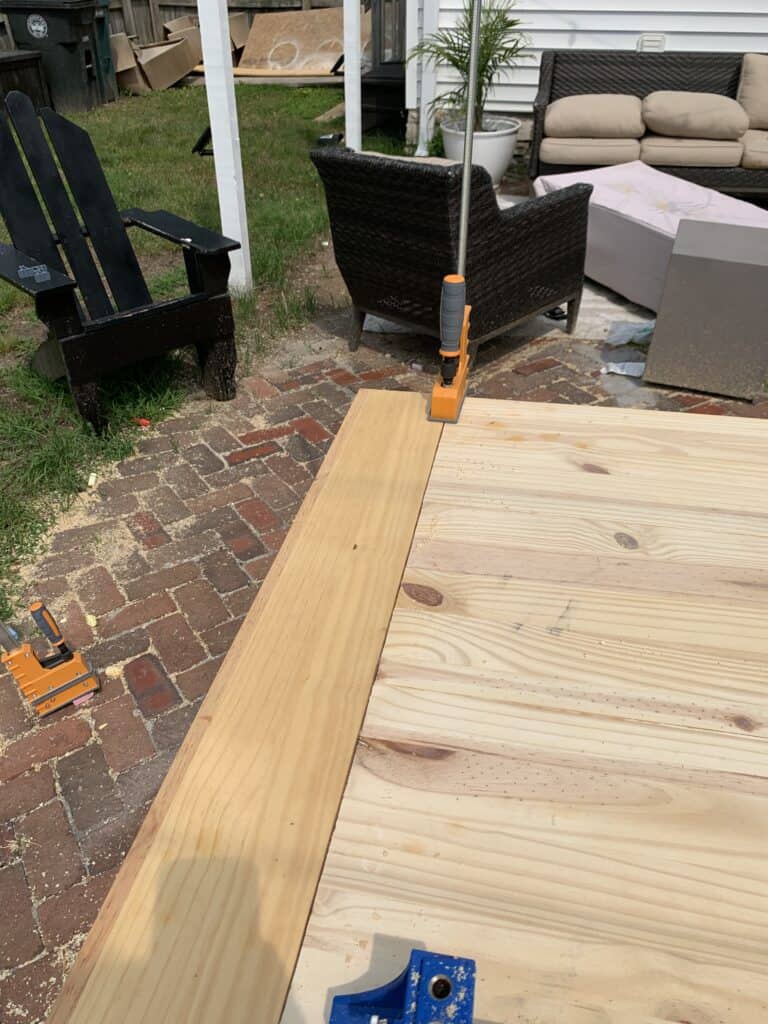
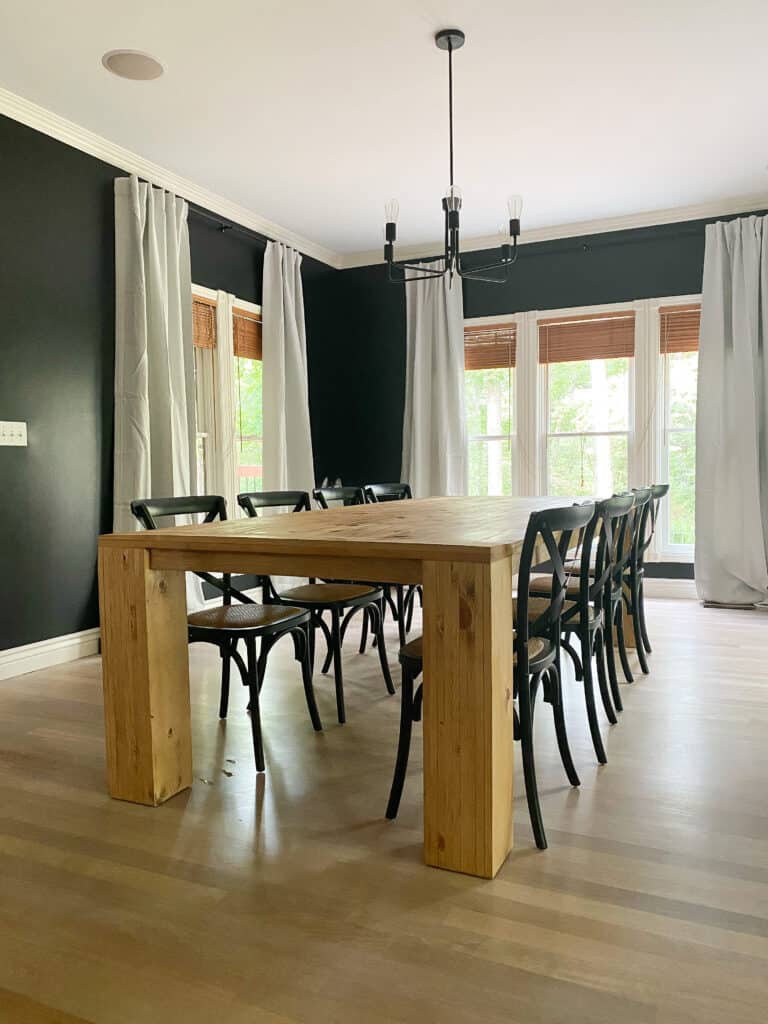
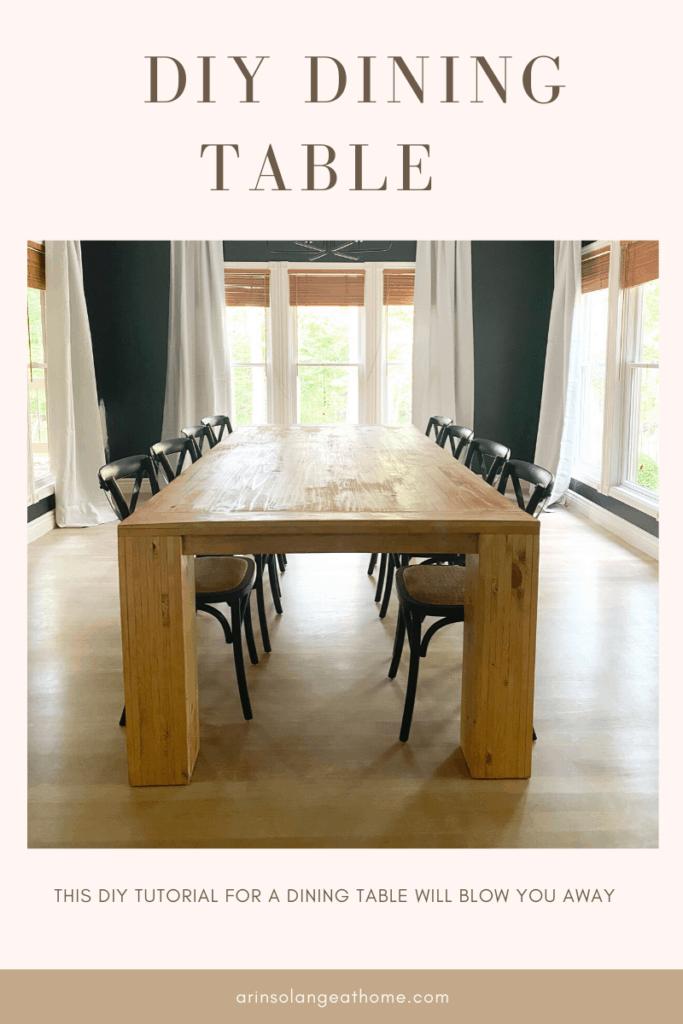
Who is ready for one of the most gorgeous DIYs to hit my blog thus far? I am sharing a DIY dining table tutorial today, and it will be the first of 2…because this gorgeous beast was not for me. If you are looking for a great way to get a custom size dining table, at a much more affordable price, then this tutorial is for you! Hopefully you can build the perfect table
This post contains affiliate links. There are power tools needed in this post. I am not responsible for injury. Be sure to always work with the utmost safety so you can keep DIYing!
DIY Dining Table
As I said in the first paragraph – this DIY project wasnt for me. My friend Val got a new home recently as a vacation and rental property – read more about that here.
She needed a large dining table for the house – partially due to a huge dining room, but also because they will be entertaining their often. Because of that they were looking at some pretty monster tables.
If you haven’t been furniture shopping recently – getting anything takes so long. Trust me – we have been renovating and furnishing and it has been downright painful. Add that to the fact that the tables she was eying were thousands of dollars, with few options to pick from, she came to me with the proposition of building her a table as a blog project.
My first thought? That is terrifying – we normally only build things for our own use. But, there is nothing better than getting a great tutorial in for all of you and not having to spend a bunch of money. We got to planning, and between Val and myself came up with a pretty good plan.
Designing the DIY Dining Table
Val sent me a few different options of tables she was looking at. I LOVED this one, and this one. Both were simple in design but had a bit more character and modern edge than just a basic table design.
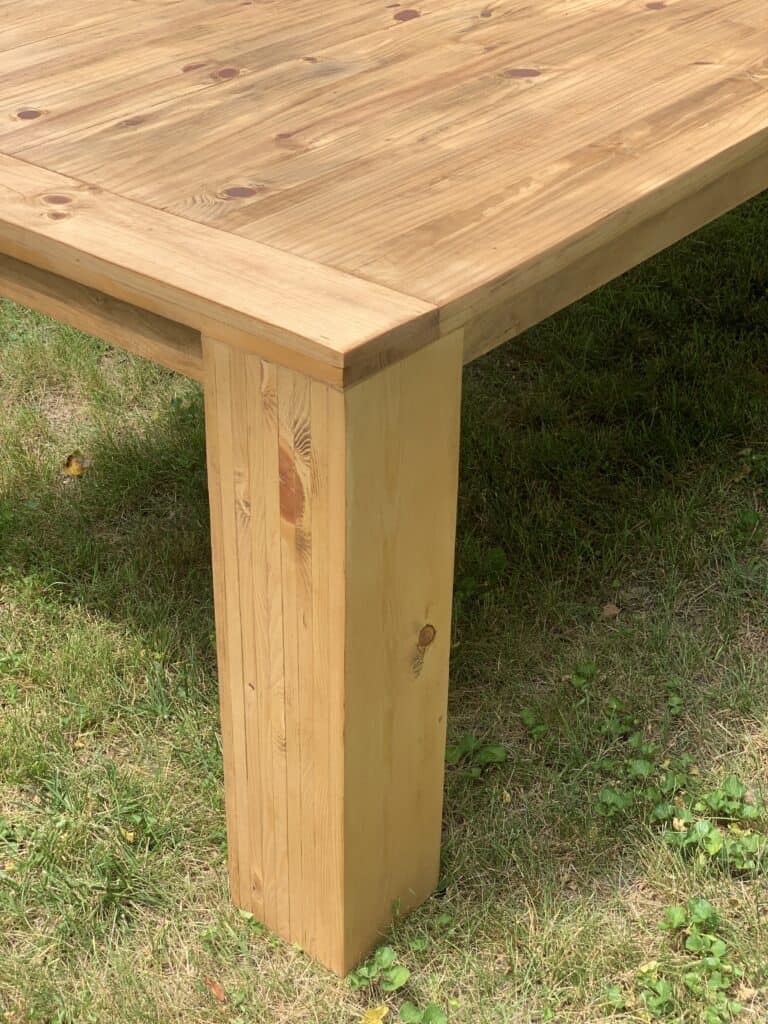
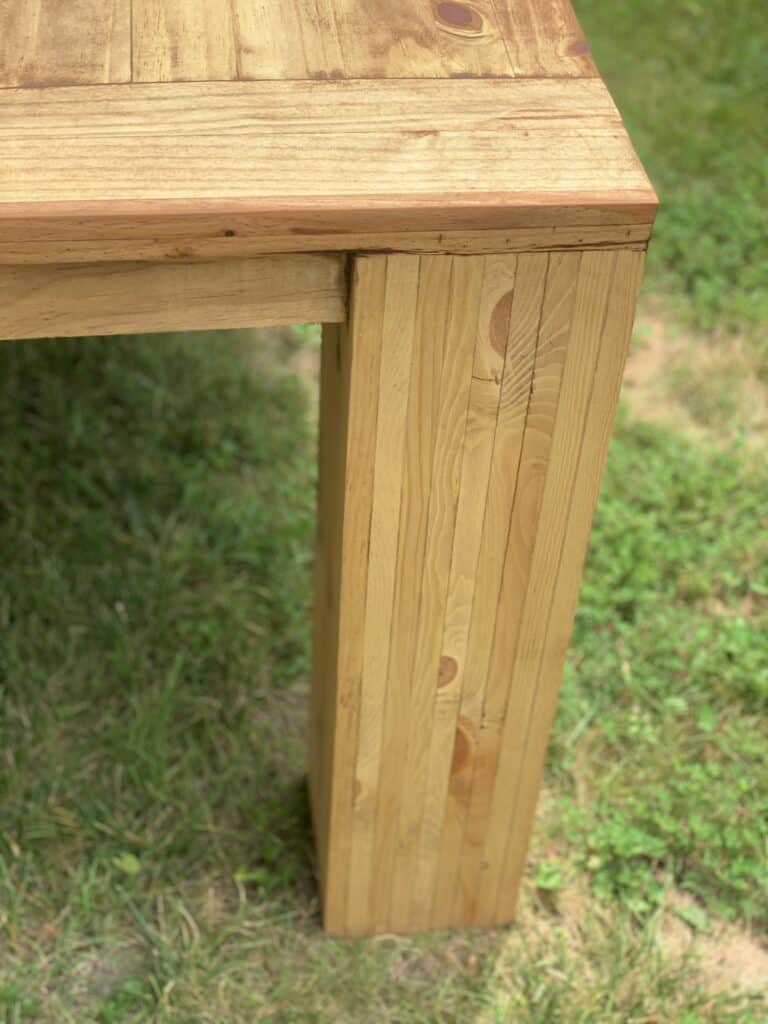
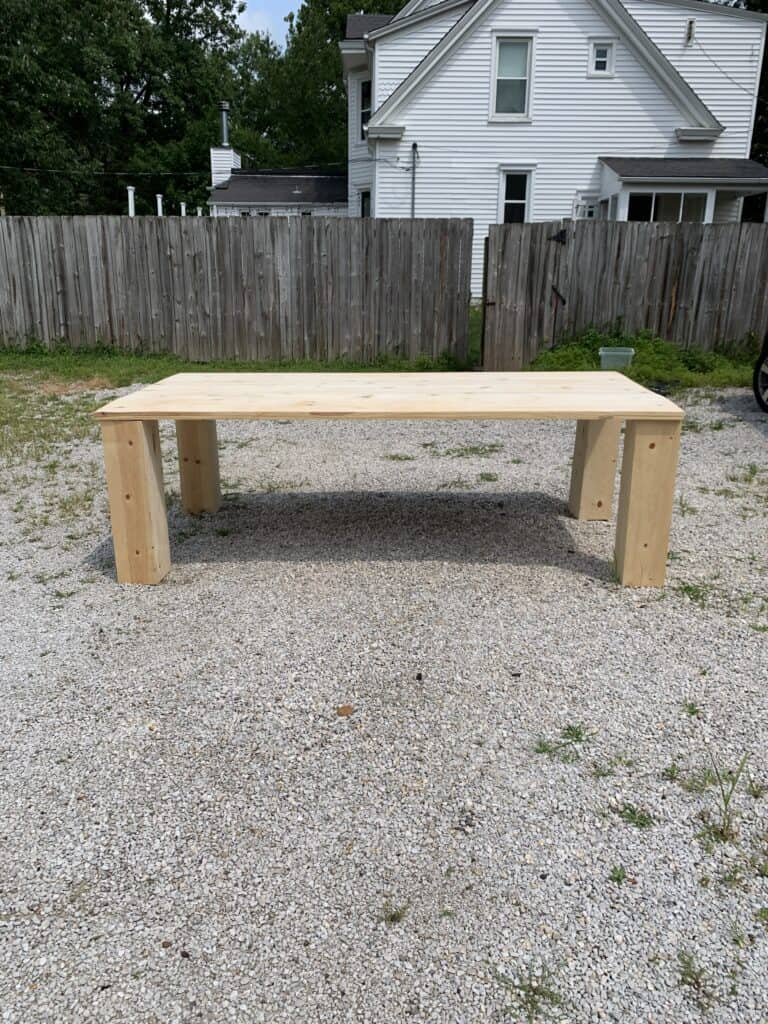
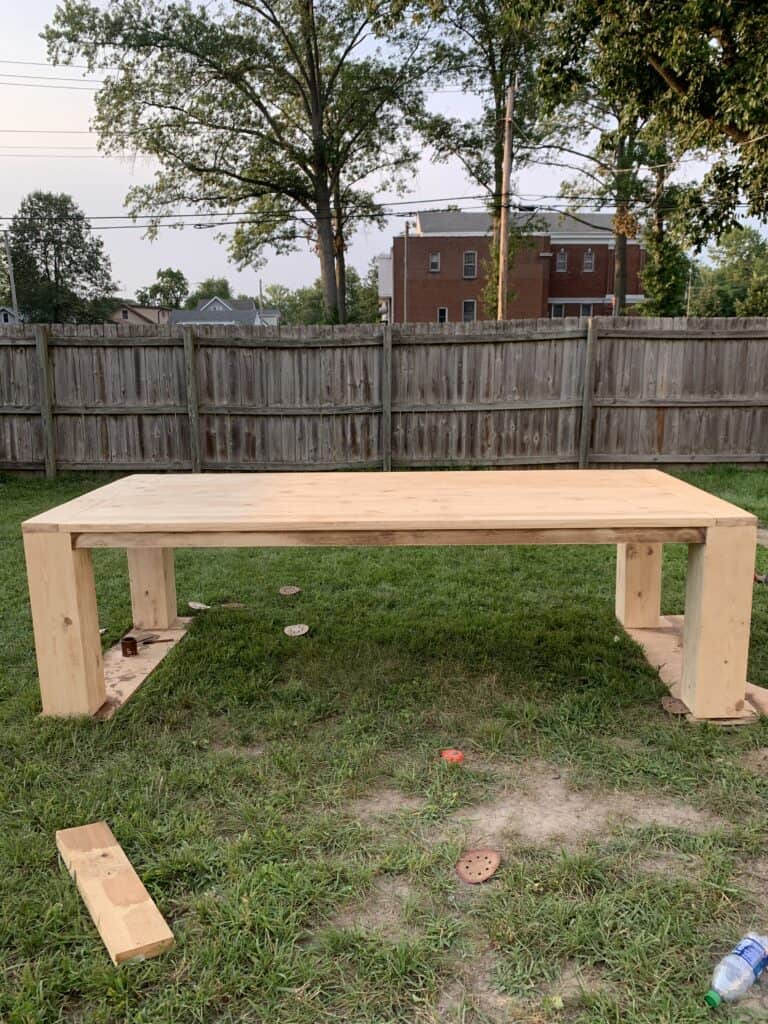
Due to the size of the table we opted for VERY big legs to support the beast. You guys this bad boy is 106×48 inches. (not to worry I will share how to pick lumber that is best for your perfect size table – as most of you likely don’t need this size.)
When it comes to DIY you want to make these unique and fun, but I also think there is nothing better than finding a high end table that you can make your own. We landed on a really simple design that had some edge. Overall I think we came up with a stylish look that would look good in so many homes, no matter your decor style.
Why DIY?
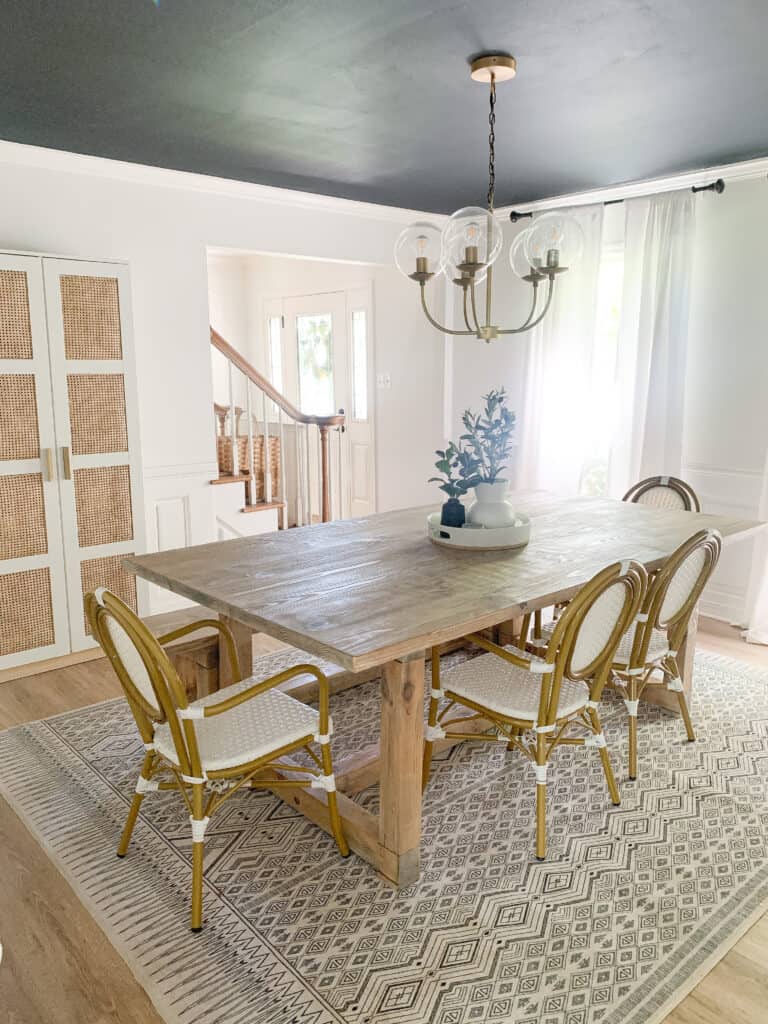
DIY can be the best thing in my opinion. Aside from time and cost, DIY has a few other great benefits when it comes to furniture. We actually have a custom dining table that we have had for years (well before we started doing any woodworking) and I have enjoyed the benefits of a custom table myself – so I feel like I can really weigh in on this.
Here is the before of our custom dining table. This was the color it was when we got it.
First of all – When you get a solid wood custom table you know there are no heavy varnishes and such on them. If you change your mind on stain, or an accident happens, some sanding and staining will have your table good as new.
That might not be of importance with smaller pieces but with a large and expensive piece like a table that piece of mind has been AMAZING for us.
Here is our dining table after we sanded and re stained
With our current table about 3 years after buying it I decided I didnt love the stain, and we sanded the whole thing down and stained it much lighter. It was the best decision because it made me fall back in love with the table in our home for less than $20 in supplies.
Custom is also amazing for size. Let alone length, width on tables has lessened a lot over the years. When we were looking to buy a dining table years ago I was so frustrated that the width of current tables was so small. The table we had been using was an antique and was about 48 inches wide.
I LOVE having a wider table so that I can have decor or food on the table while still sitting comfortably, so going custom allowed me to retain that width of table in our space.
Although lumber costs are high right now – you can still save a lot of money buy DIYing a table, and you will get something high quality and solid wood.
Okay so – now I have given you all the ins and outs to how we came up with this DIY dining table design, and why we did it, so now lets get to actually building the table! This post will have a step by step guide both in the blog post and in a printable version.
A couple of major things to note before you start shopping:
When you are shopping for lumber for something like this you don’t want to skimp. That said – lumber prices are pretty high right now, so you dont have to get the best of the best.
When you are picking lumber you want to check to see if each piece is high quality. Turn the pieces on their edges and check for any warping and be picky!
When you are building – be aware of humidity and temps. We live in Missouri and it is humid as all get out in the summer, and we dealt with warping in the hot summer and lost some lumber. You will also want a flat surface to do your building on if possible.
Last – when it comes to stains you will want to test them. But we also learned that some stains oxidize when they have been opened. So if you settle on a stain, before you start on the table test that can one more time!
Those three tips will save you a whole lot of trouble when you are creating this bad boy!
DIY Dining Table Supply List
(depending how you work best, I also have a printable shopping list and instructions towards the end of this, so if that works best for you, you can go that route!)
Supplies for Staining
Wood Stain – For our table we did a 50/50 mix of special walnut and golden pecan both from Minwax.
Planer – we got this inexpensive one – but it is very optional.
Miter Saw – We have personally owned both this inexpensive one and this nicer one. Clearly we love the nicer one, but if you won’t be doing many projects, the first one was amazing for us!
I will list exactly what we used – but modify the table top and aprons based on the size you need. The legs should remain the same for any size table top. We personally have the best luck getting lumber at Menards, but I know not everyone has a Menards near them.
Table Top:
8 – 1×12 x 8 foot pine boards
2 – 1×6 x 10 foot pine boards ( you will want these end pieces no matter what, so if you don’t need a super long board you might be able to drop the 1×16’s to shorter sizes
2 – 1×3 x 10 foot pine boards (apron)
1 – 1×3 x 8 foot pine board (apron)
2 – 1×3 x 8 foot furring strips
Legs:
8 – 1×8 x 10 foot pint boards
Step by Step Plans to Building your DIY Dining Table
Take the order of the table top and the legs with a grain of salt. They both need to be done and in whatever order works best for you. I am going to start with the legs but feel free to build your table top first. There are also some pretty good step by step photos integrated into the post that are hopefully helpful.
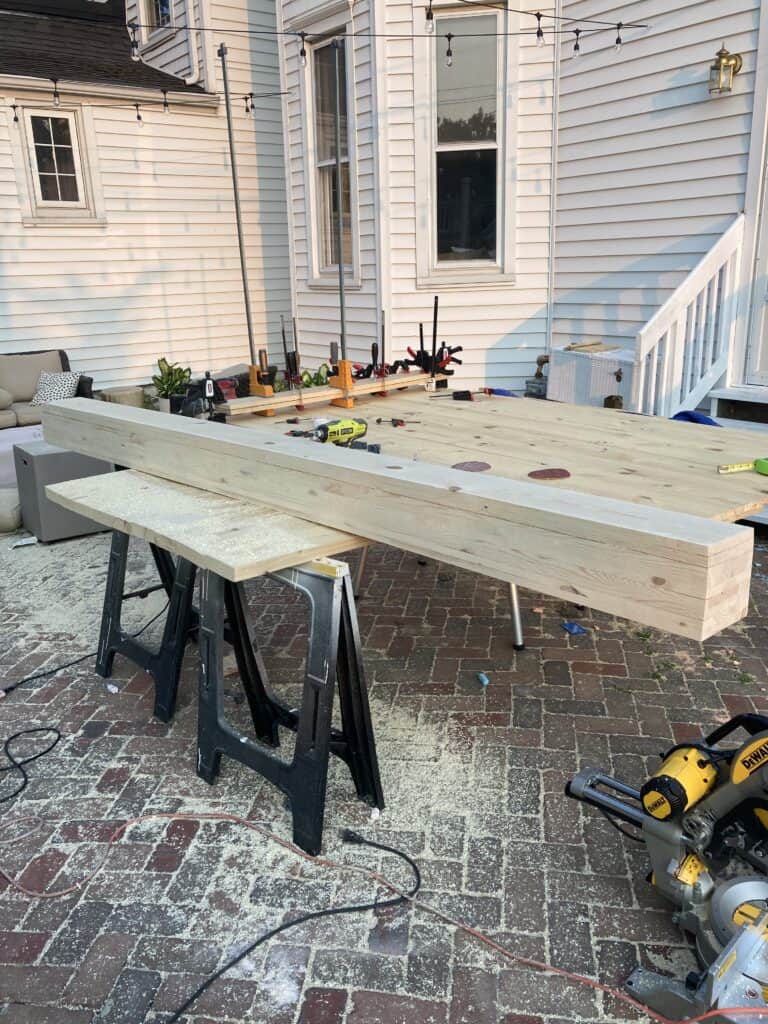
Building the Table Legs:
This is just a case of wood gluing and clamping all the boards together. Lay your first board down and put down wood glue. Lay your next board on top, and repeat until they are all stacked.
Now you need to clamp them. We used our two big clamps and 4 other smaller clamps. Use as many clamps as you can, and add weight in between. Then walk away from these for 24+ hours.
Once the glue is dry, remove the clamps.
Now you need to sand all 4 sides of the piece.
Cut the Long piece into 4 equal parts.
Sand down the ends to be smooth, and set the legs aside.
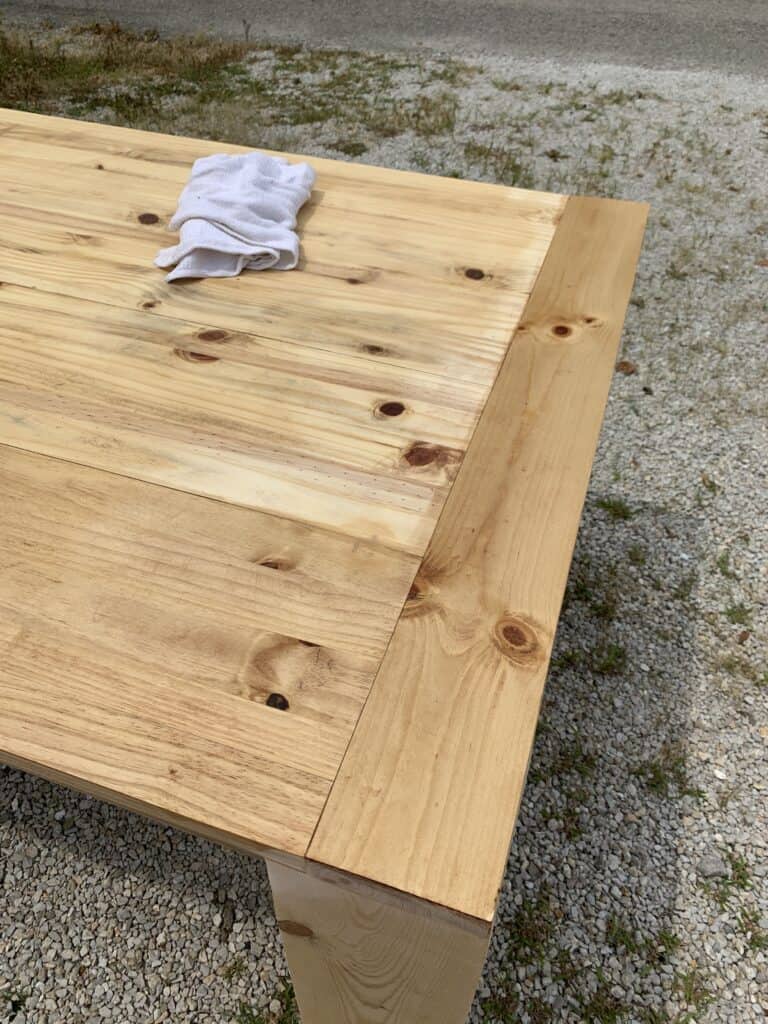
Building the Table Top:
1. Sandwich each of your 1×16’s and 1×6’s into sandwiches. You want each of them to end up looking like a 2×16/2×6. Use the same method as before- Wood glue, clamp and weight, then let sit for 24 hours. Depending your number of clamps you may need to do this in phases.
2. Once the clamps are removed we are going to focus on the 1×16 boards. Add just a few pocket holes (just the holes right now0 to the under side of your boards so you can join the 3 together. (Keep in mind if you are going to end up cutting this section shorter don’t put the pocket screws in an area you will end up cutting off).
3. Use wood glue between all three sections and clamp your table top together. Pay close attention to low level this is! We used these large clamps for the tabletop.
4. While it is clamped and the glue is still wet add your pocket screws. Again in this whole process this is the most important step to make sure its fully level, so take your time!
5. Once that is dried and you remove your clamps you will want to plane or sand the ends to be really smooth.
6. Now it is time to add your 6 inch end pieces. One thing that is really important is to measure your end of your table so you can cut the now 2×6 board to the width of each side. Measure each side. (that is why I told you to get a 10 foot board instead of an 8 foot board – with the 8 foot you have no room for extra and you will likely need just a tiny bit more than 48 inches).
7. Add pocket holes to the under side of the 6 inch piece.
8. Add wood glue, clamp, then pocket screw your end pieces on. Again let this sit for 24 hours.
9. Remove the clamps and the starting stages of the table top are complete!
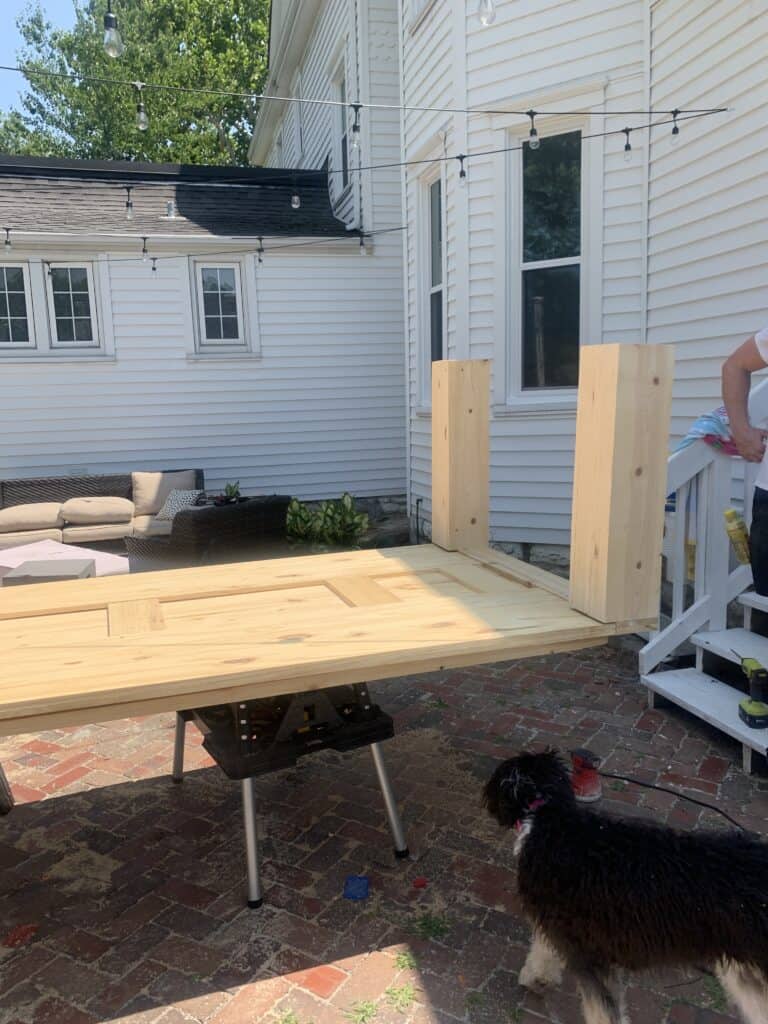
Attaching your Legs to the Table top
Your next step is going to be attaching those big legs to your table top. You should have 4 equally cut legs that have been sanded down.
You will add pocket holes on two sides of the legs.
Add wood glue to the top of the leg, and pocket screw and wood glue each leg on to the corners.
Let this dry for 24 hours.
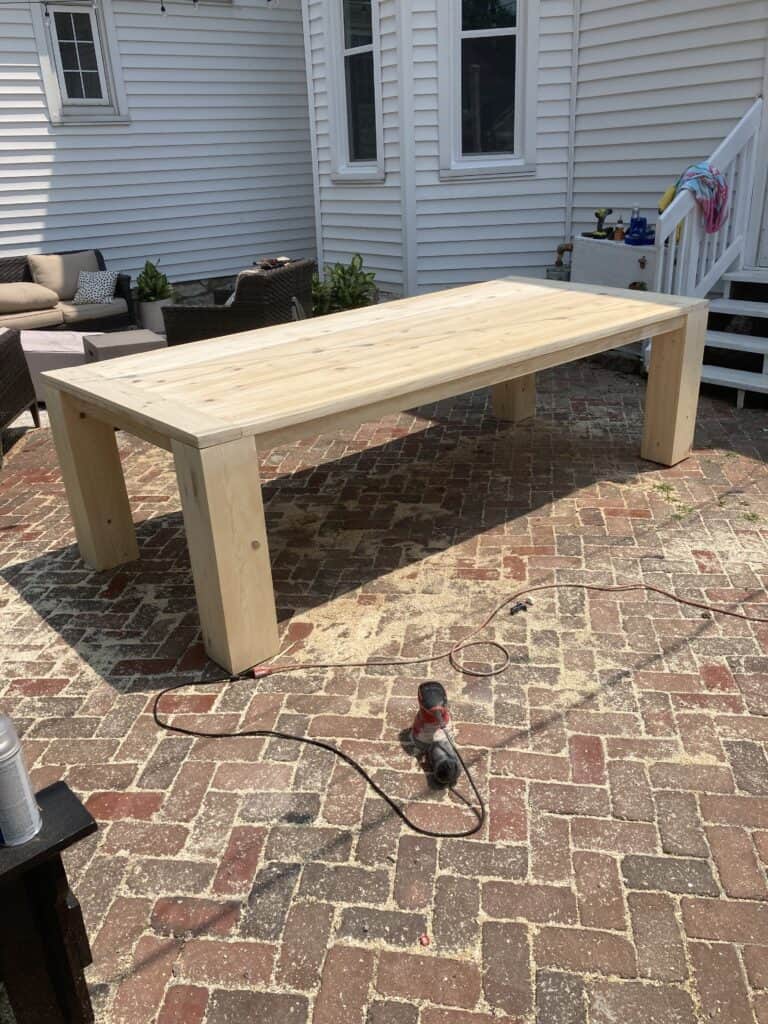
Adding an Apron and extra support slats
The apron of a table is basically support pieces that in my opinion elevate the overall look of the table.
Here you see the table fully built before the apron
You are going to cut your 1×3 pieces of pine to fit between the legs on all 4 sides of the table.
Add pocket screws and wood glue to the ends.
Pocket screw into the legs of the legs of the table.
We then also added support pieces using the 3 inch furring strips to the bottom of our table because of the overall size. Those were simply screwed in with 1.25 inch screws. That step is not necessary if your table is not huge like the one we built.
Finishing your DIY Table
Now you should structurally be able to look at your table and see a fully built and gorgeous table. But there is still quite a bit of work to do!.
Wood filler – you need to add wood filler to all the cracks and crevices. You’ll use a good amount of wood filler, especially on those legs.
Let it dry then sand – and SAND IT WELL. This is also your chance to sand every edge and just get everything looking perfect!
Once your table is fully sanded it is time to wood condition your table. This is an important step! Essentially adding wood conditioner will make your table take the stain in a less blotchy way.
Let the wood conditioner dry and now you can stain. Like I said above – we tested our stain on a sanded piece of pine. The colors we went with are in my supply section.
Once the stain is fully dry you can add your polyurethane as the final step. This seals the table to keep it nice. Use a foam roller to apply the poly and allow that to dry for a few days before you use the finished product. You may want to add more than one coat – you be the judge!
AND NOW your wood dining table is done. Don’t forget I offer Printable plans below incase that is easier for you as you are building.
Free Printable Plans for DIY Dining Table
Below you should be able to print the step by step plans for this DIY to keep with you while you are building.
Yield: 1 Table
DIY Dining Table Tutorial
Use this tutorial to create a DIY dining table that is custom for your space.
Materials
8 1x12 by 6 foot or 8 foot pine boards pending length of table desired
2 1x6x 10 foot pine boards
2 - 1x3x 10 foot pine boards
1 - 1x3x 8 foot pint board
2 8 foot furring strips
1 inch pocket screws
1.25 inch screws
Wood Glue
Wood filler
Polyurethane
Stain
Wood Conditioner
8 - 1x8 x 8 foot pine boards
Tools
Miter Saw
Sander
Drill
Kreg Jig
Planer (Optional)
Circular saw (possible pending desired length of table)
Clamps
Instructions
Step by Step Plans to Building your DIY Dining Table
Take the order of the table top and the legs with a grain of salt. They both need to be done and in whatever order works best for you.
I am going to start with the legs but feel free to build your table top first. There are also some pretty good step by step photos integrated into the post that are hopefully helpful.
Building the Table Legs:
This is just a case of wood gluing and clamping all the boards together. Lay your first board down and put down wood glue. Lay your next board on top, and repeat until they are all stacked. Now you need to clamp them.
We used our two big clamps and 4 other smaller clamps. Use as many clamps as you can, and add weight in between. Then walk away from these for 24+ hours.
Once the glue is dry, remove the clamps. Now you need to sand all 4 sides of the piece. Cut the Long piece into 4 equal parts. Sand down the ends to be smooth, and set the legs aside.
Building the Table Top:
1. Sandwich each of your 1x16's and 1x6's into sandwiches. You want each of them to end up looking like a 2x16/2x6. Use the same method as before- Wood glue, clamp and weight, then let sit for 24 hours. Depending your number of clamps you may need to do this in phases.
2. Once the clamps are removed we are going to focus on the 1x16 boards. Add just a few pocket holes (just the holes right now0 to the under side of your boards so you can join the 3 together. (Keep in mind if you are going to end up cutting this section shorter don't put the pocket screws in an area you will end up cutting off).
3. Use wood glue between all three sections and clamp your table top together. Pay close attention to low level this is! We used these large clamps for the tabletop.
4. While it is clamped and the glue is still wet add your pocket screws. Again in this whole process this is the most important step to make sure its fully level, so take your time!
5. Once that is dried and you remove your clamps you will want to plane or sand the ends to be really smooth.
6. Now it is time to add your 6 inch end pieces. One thing that is really important is to measure your end of your table so you can cut the now 2x6 board to the width of each side. Measure each side. (that is why I told you to get a 10 foot board instead of an 8 foot board - with the 8 foot you have no room for extra and you will likely need just a tiny bit more than 48 inches).
7. Add pocket holes to the under side of the 6 inch piece. Add wood glue, clamp, then pocket screw your end pieces on. Again let this sit for 24 hours.
8. Remove the clamps and the starting stages of the table top are complete!
Attaching your Legs to the Table top
1. Your next step is going to be attaching those big legs to your table top. You should have 4 equally cut legs that have been sanded down.
2. You will add pocket holes on two sides of the legs. Add wood glue to the top of the leg, and pocket screw and wood glue each leg on to the corners. Let this dry for 24 hours.
Adding an Apron and extra support slats
The apron of a table is basically support pieces that in my opinion elevate the overall look of the table.
1. You are going to cut your 1x3 pieces of pine to fit between the legs on all 4 sides of the table.
2. Add pocket screws and wood glue to the ends.
3. Pocket screw into the legs of the legs of the table.
4. We then also added support pieces using the 3 inch furring strips to the bottom of our table because of the overall size. Those were simply screwed in with 1.25 inch screws. That step is not necessary if your table is not huge like the one we built.
Finishing your DIY Table
Now you should structurally be able to look at your table and see a fully built and gorgeous table. But there is still quite a bit of work to do!.
1. Wood filler - you need to add wood filler to all the cracks and crevices. You'll use a good amount of wood filler, especially on those legs.
2. Let it dry then sand - and SAND IT WELL. This is also your chance to sand every edge and just get everything looking perfect!
3. Once your table is fully sanded it is time to wood condition your table. This is an important step! Essentially adding wood conditioner will make your table take the stain in a less blotchy way.
4. Let the wood conditioner dry and now you can stain. Like I said above - we tested our stain on a sanded piece of pine. The colors we went with are in my supply section.
5. Once the stain is fully dry you can add your polyurethane as the final step. This seals the table to keep it nice. Use a foam roller to apply the poly and allow that to dry for a few days before you use the finished product. You may want to add more than one coat - you be the judge!
Other Posts You’ll Love
Once you finish your own diy dining table make sure to check out these posts below for some other great projects!
Hopefully you are ready to build your own table and found the tutorial for my DIY dining table helpful. We will be building ourselves a new dining table in the next couple of weeks, so if you are looking for an alternative base option be sure to follow me on Instagram (@arinsolange) so you don’t miss the tutorial. If you have any questions leave them in the comments below, and happy building!
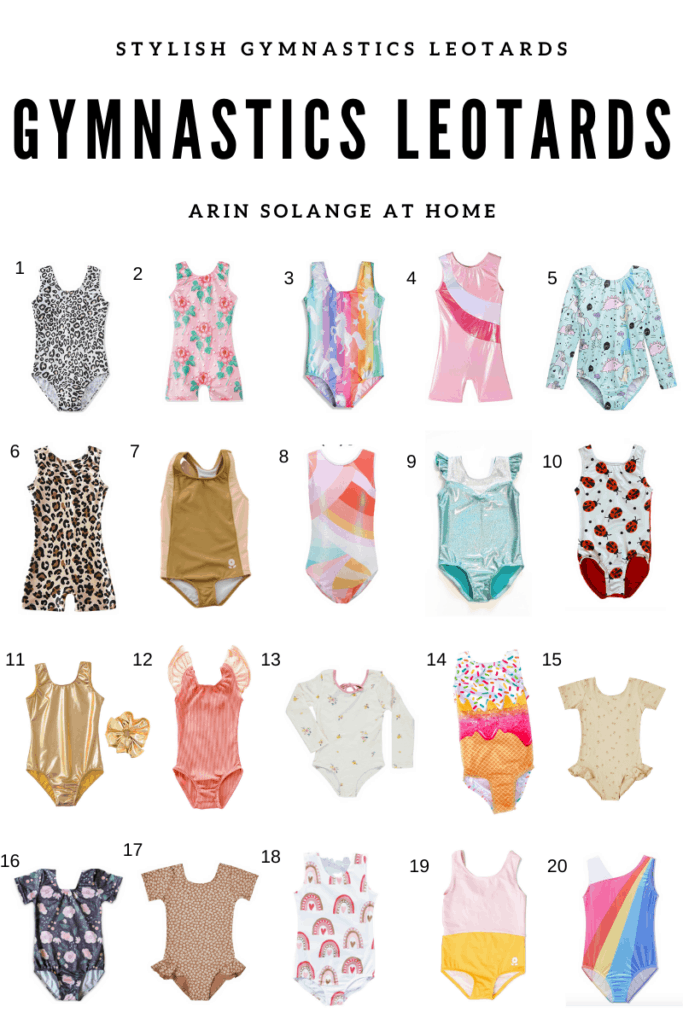
Avé just started gymnastics and the cute toddler gymnastics leotards world was thrown at me. She is insistent that she needs GYMNASTICS leotards, but I have had a hard time finding cute ones, so I made it my mission to find them for both her and you!
This post contains affiliate Links – post was originally written in 2019 and was updated in 2021
Toddler Gymnastics Leotards
I have searched the internet hight and low and found some of the best toddler gymnastics leotard options available and rounded them up for you.
I am the mom of a 6 year old, but at the time I originally wrote this post she was more toddler, less big girl. Because of that I will be rounding up toddler gymnastics leotards and kids gymnastics leotards all in one. I will check that the sizes work for both!
Gymnastics leotards have changed SO MUCH over the years. When I was in gymnastics I am pretty sure I wore tie dye biker shorts and shirts (which ironically is back in these days ha!)
What to Look for in Toddler Gymnastics Leotards
So on my mission for the best leotards, I thought I would share a few thins I look for in leotards for my girls. Although gymnastics isn’t something I have done much of, my girls both have danced since before they were very little, so leotards in general are something I am pretty well versed in.
I try really hard to look for fun prints and colors that my girls will like, without them being super gaudy and wild.
I also prefer more butt coverage on the leotards, and some even offer crotch snaps which can be extra helpful for really young toddlers.
Things to Consider
A few common questions and things to consider when you are shopping for toddler gymnastics leotards.
Will they wear underwear under their leotards? Technically no, but I would say take that with a grain of salt. My little girl preferred to wear them her first year, and she isn’t competitive, so it was no big deal.
Are leotards required? No! For the most part your little one can wear whatever makes them happy. Some kids wear typical athletic clothes.
Pink and yellow – we actually own this one and it is beyond adorable and super well made. If you are looking for unique but traditional materials and style this is a great brand.
Rainbow – I actually fell in love with this when I saw a little girl in my daughters gymnastics wearing it. Super affordable and so cute.
Hopefully this helps you find some fun, unique, and cute toddler gymnastics leotards that both you and your daughter will love, and like I mentioned in the first paragraph – if you are a dance mom too, be sure to check out the posts below!
Other Posts You’ll Love
If you liked this post then you will love these other posts as well.
Hopefully you found some cute toddler gymnastics leotards that you love, and you feel ready to take on a new (or old) activity in style. Be sure to follow me on Instagram (@arinsolange) so you don’t miss any of my new posts, and leave any questions you have in he comments below.
How many of us are desperate for some great activities for our kids for fall and winter temps that are coming? Today I am talking all about the best activities for 14 month old, but honestly this is hopefully a round up of activities for all the toddler mamas who need some help staying sane this year!
This post may contain affiliate links.
Activities for 14 Month Old
I can not believe that school is starting back up in just a few short weeks! It seems like summer flew by this year and before we know it those cooler temps will be creeping in (which would be fantastic right now as we are under a heat advisory!).
As my big kids go off to school, I’m starting to think of some fun activities for Goldie to keep her busy and spend some quality time together. I thought this would be a great opportunity to share with you fellow toddler Mamas some great ideas.
While Goldie is turning 2 years old, I plan on focusing this post on fun activities for our young toddlers (14 months+). Although, these are great ideas for any aged toddler!
Developmental Milestones
Congratulations! You made it to your baby’s first birthday and things are just about to get REAL fun! You’ve mastered the sleepless nights, reflux, colic, and diaper blowouts. But now, just when you thought you’ve got it all figured out, your little guy has started moving and before you know it swimming in your dog’s water bowl.
While I know water play is a fun way to cool off, I don’t think you quite had that in mind when you found them playing in the dog’s water.
Our little ones are changing so quickly and each day they develop new skills. I’ll go over some of the fun developmental milestones that are happening during the 13-15 month range and how you can pair different activities for their needs.
Please keep in mind that I am not a developmental psychologist or expert in the field. These are just a general overview of expected developmental milestones for the age range. They may happen sooner or later. Every little one develops at a different pace and there is no one size fits all. Please don’t compare your child’s progress to another.
I know it can be so hard but, if you have a concern about your child’s development, please reach out to your healthcare provider or local “Parents as Teachers” (this is a great resource available for local STL friends through your school district).
Gross Motor Skills
Babies learn to walk anywhere from 9 months to 18 months. Your little one may not be walking yet and that is okay! On the flipside, you may have a toddler who is running around the living room, climbing stairs, and keeping up with other young children in the household.
Most toddlers at this stage can pull themselves to standing and cruise. Whatever their activity level is, it is imperative to ensure they are in a safe place for their activity. There will be lots of bumps and bruises as they learn how to move about.
Fine Motor Skills
Toddlers at this age are extremely curious. They are constantly examining items and looking at everything around them. You may notice that your little one can wave hello or goodbye, or point to the cat or dog.
They should have mastered the pincer grasp to pick up food and may be able to bring utensils to their mouth but not necessarily able to pick up food with the utensil without assistance. Your 13 month old may also love books and love turning the pages of the books.
Of course you still may be reading the page as it is being turned, but it is the thought that counts! They also may love handing you different toys and books or placing smaller toys into baskets and dumping the toys back out.
When Walker was around 14 months old he loved to help unload the washing machine. With assistance, your toddler can help with some basic chores around the house to further develop these fine motor skills.
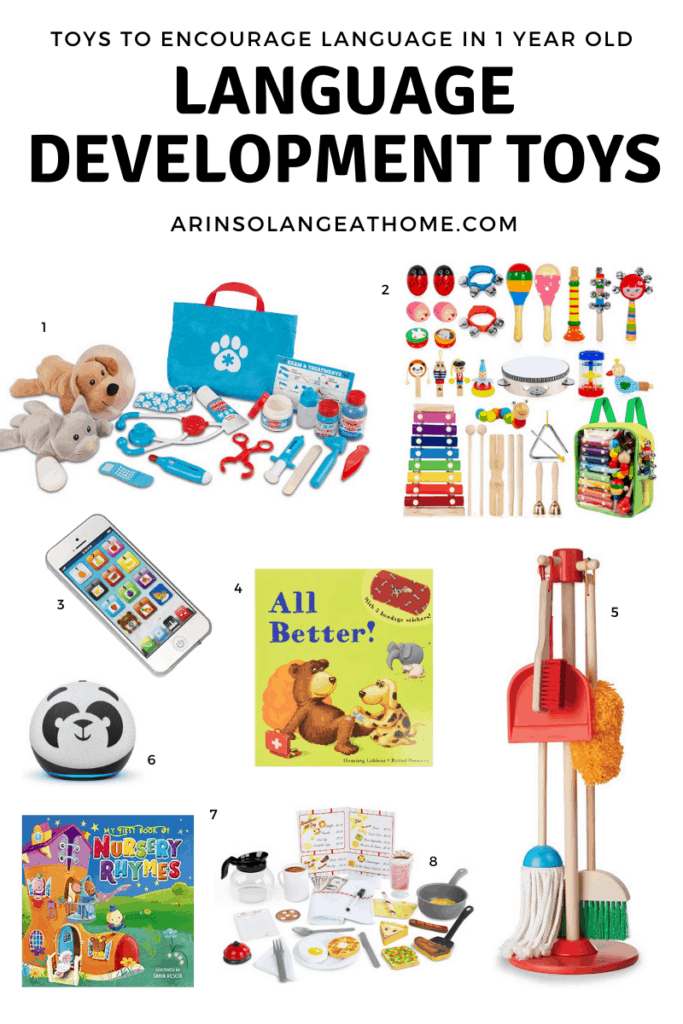
Language Skills
You may have already heard those magical first words “Mama”. Okay, who are we kidding, usually the first word goes to “Dada.” My husband would spend so much time with our kids trying to get them to say “Dada” first.
It was always a game to see what their first word would be and since “Mama” is harder to say, it was almost never that! Most younger toddlers are babbling and can say simple words like “dada, baba, mama.”
They may also imitate other sounds that they hear. So if you sing “old Macdonald had a farm, eieio”, don’t be surprised if you hear your 14 month old baby imitate “eieio.” They’ll be saying new words before you know it!
By 15 months old your little one should be able to understand about 120 words! They won’t have the vocabulary to say it quite yet, but they can understand it. So when you say “No” and they smile and do the thing you said not to do anyway, it isn’t from lack of understanding. You can blame that stubbornness on Dad!
Cognitive Skills
Speaking of stubbornness, you may catch a glimpse of those tantrums you hear so much about in the terrible twos. During this young toddlerhood stage, your little one is their own person and has their own opinions on what they want and need.
They want to do everything on their own but may be limited by communication to get their point across which leads to a meltdown out of frustration. Eventually, they will develop those skills to help communicate better and you’ll get a hand for what they’re trying to tell you.
You may also notice that your 14 month old babies have stranger danger and separation anxiety. This is all completely normal behavior. They long to be close to you, within eyesight or able to still hear you. While I love the extra snuggles, sloppy kisses, and hugs, I know that this stage can be so difficult!
My heart breaks anytime I need to step away when one of my kids needs me. So if daycare drop off doesn’t go well, I feel you! This is why routines and explaining the routine is so important at this age. Before you leave, be sure to tell them what is happening. “I’m going to be dropping you off to play with Grandma, but I’ll be right back.”
Activities for 14 Month Old
Now that we’ve had a breakdown of some of the developmental milestones happening at this stage, let’s talk about toddler activities! If you have ever gotten together with another friend who has a similar aged child as you, you’ll notice that at a year old and until they reach about 3 years old, the play is mainly solitary or parallel play, that is there is no interaction between the toddlers.
Despite the lack of interaction, your little one is still learning important social cues through play in real life. In fact, learning through play is key in developing those gross motor, fine motor, speech, and cognitive skills.
You don’t need a lot of toys or new things to entertain your little one. Oftentimes, the box the toy came in is the most played with item. A great way to get your little one involved and entertained is by focusing on simple and everyday tasks and materials. Of course, there are always items that are a good splurge (hello Nugget couch).
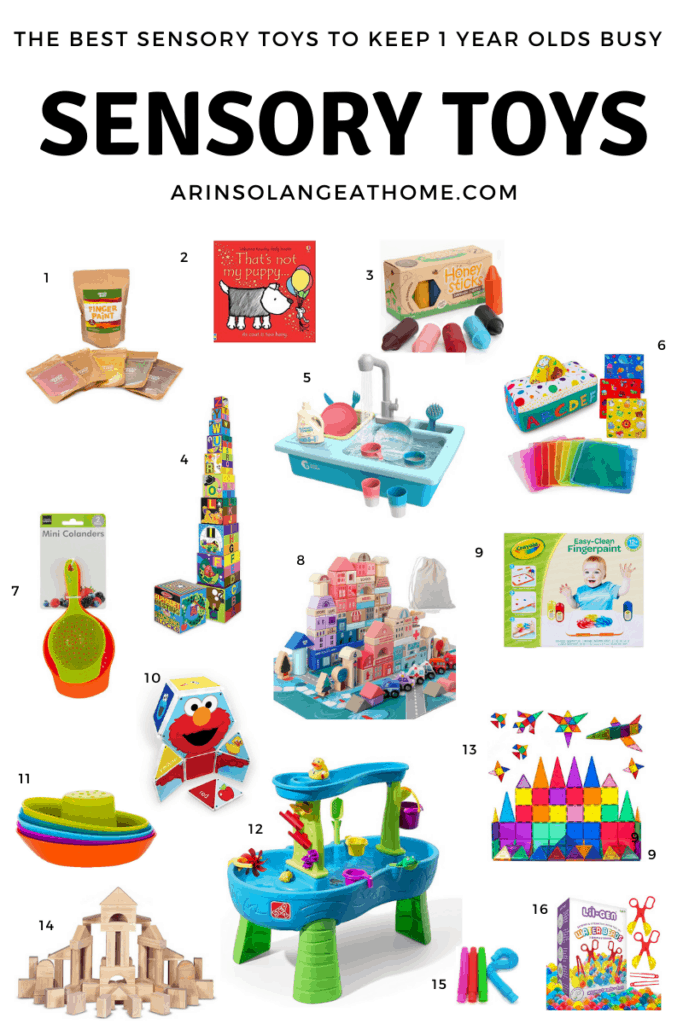
Activities to Encourage Cruising
Encourage those gross motor skills by allowing your little one to cruise around the house.
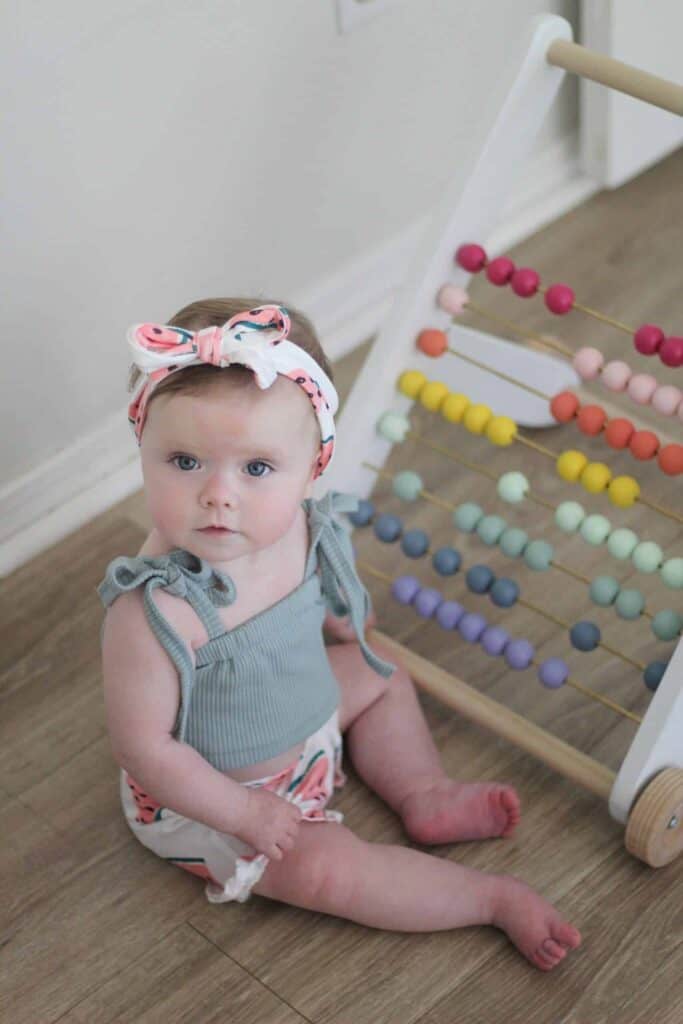
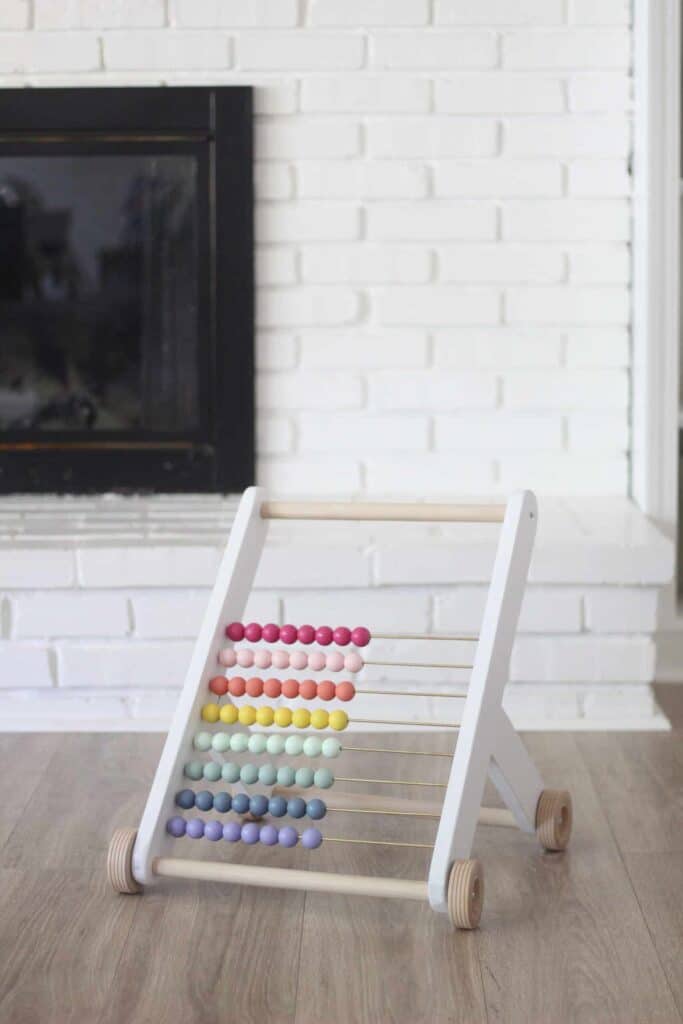
For babies who are walking, a great way to do this is to provide them with a push toy. There are tons of different styles and varieties. However, no matter how fancy the push toy, Goldie always seems to love to go for the kitchen chairs.
A simple way to transform your kitchen chairs into a push toy is to just add sliders to the bottom of the chairs and boom, automatic push toy! For those of you who have a Nugget, the triangle pillows can also be used as a great push toy.
If your little one isn’t quite cruising yet they may have a hard time moving the chair. If they are standing on their own and pulling to stand, a great solution to this is to try rearranging pieces of furniture close together to encourage them to cruise. This is a simple activity that can be easily accommodated for various activity levels and does not take a lot of time or resources to set up.
Now you may be saying, “But Arin, my little one isn’t standing yet, let alone walking.” Good news, I’ve got you and your little covered to encourage them to cruise. You will need a few materials for this though.
Step 1, gather some painters tape.
Step 2, gather 4 separate gallon size plastic Ziploc bags.
Step 3, find various sensory materials to fill the plastic bags.
Some ideas that I have used include, easter grass, water beads, cheerios, oil/water/food coloring, finger paint. Each bag will contain different sensory experiences and different textures. Once you’ve filled the sensory bags, tape them to the floor in a circle or semicircle.
Your little one will be able to scoot or cruise from one sensory experience to the next. Not only is this a great sensory activity, but the best part is that it is also a mess-free sensory activity! If that doesn’t entice your little one, a ball pit or tunnel is also a good idea to encourage cruising.
There are lots of activities that can be explored with sensory play. Sensory exploration is key for developing cognitive skills which combine the senses of taste, touch, smell, vision, and hearing. These observations and skills gained will help with problem-solving skills later in life.
Block play may sound basic, but these small toys pack a big punch and help with hand-eye coordination, language, and fine motor skills. You can find basic wooden blocks, cardboard blocks, or my personal favorite magnetic tiles. Try talking about what you are building, seeing, and feeling with the various colors, shapes, and sizes. Little hands will love knocking over your towers you create together.
Some great activities for 14 month old for those hot summer days is some water play. For inside water play, make sure you place a shower curtain liner under the tub anytime you anticipate a mess!
You can try filling a storage tub up with soap and water and encourage your little one to wash his or her baby dolls or plastic animals. Really anything from your child’s toy bin that can get wet can be “washed.” Heck, I used to encourage my kids to do the dishes. Now it takes more coaxing.
Another great sensory idea is taking an empty toilet paper roll or paper towel roll and taping multiple rolls to the wall. From there you can have your little one drop pom poms through the roll into a basket on the floor. This is a great game for independent play.
Alternatively, if your little one isn’t quite mobile yet, you can sit them in their high chair and provide them with an oatmeal container. Cut holes in the top of the oatmeal container and encourage them to push the pom poms through the openings. As they get older you can color code the openings or add different shapes as shape sorters.
Your little artists may also get a kick out of creating finger and foot painting with edible paints (think whipped cream and food coloring). Or, you can provide them with tissue paper painting.
Grab those tissue papers you have lying around from old present bags and tear them into smaller pieces. Provide your little one with a bowl of water and a paintbrush and show them how they can paint the tissue paper on a glass window or door. This is a great rainy day activity that is no fuss and is easily cleaned up.
Now nothing beats a good old fashioned sensory bin. It’s the little things in life that make such an impact. You can grab whatever you have on hand: beans, oatmeal, jello, pasta, rice, shaving cream and allow your little one to explore the different ways the various materials feel, smell, or taste. My kids always have the best time with these easy bins.
Throw in a wooden spoon, some scoopers, and bowls for a pouring station. Or throw in some toy animals, dinosaurs, and edible sand (crushed up graham crackers) for a different experience. If you prefer, you can always make your own sensory bottles with oil, water, and food coloring.
There are so many different ideas that don’t take a long time to set up and provide endless hours of entertainment.
Activities for 14 month old to Encourage Language Development
We love music in our house. One of the best ways to encourage speech is to sing and play music. You can teach your little one different nursery rhymes or go with something more contemporary.
One of the best things about this is you can also break out into a full on dance party. Watch your little one light up when the music comes on and shake his or her booty! So you may not be much of a dancer but the main thing is that you are having fun!
Utilizing your local library is also a huge win! Explore different books and spend time together reading and going over different words and phrases. When communicating with your little one, make sure you respond to their babbles and use full sentences. This will encourage language development and your little one’s hard work will pay off before you know it.
Imaginative play is also a great tool for helping with language and communication. Give your child a telephone and pretend to call Grandma or Grandpa. Set up a restaurant and pretend to order off a menu. Sometimes the best game you can play is one that mimics your everyday life.
I hope this provides you some great ideas to get you started with your little girl or guy. What I love about all of these activities is that they can be easily adapted to older kids to include siblings and don’t require any special toys as you can always use what you have on hand.
Other Posts You’ll Love
If you liked these activities for 14 month old check out these posts that you will love as well!
Hopefully this helped you find the best activities for 14 month old that you will love! If you are looking for more fun things to do with your kids find me on Instagram (@arinsolange) and if you have any questions leave them in the comments below!
I am SO excited for this DIY tutorial you guys!! I honestly don’t remember the last time I loved a DIY So much. If you are looking for a DIY Light Fixture tutorial this blog post is perfect for you! Hopefully you create your own version for a whole new look to a space in your home.
This post may contain affiliate links
Creating Ave’s Room
We have been working on updating my oldest daughters room in our 1860s home. If you are new to my blog – we have been renovating an 1860s home in St. Louis, MO, and taking you all along for the ride.
I have 4 kids, and right now my big focus is on my 6 year old daughters room. I am working on creating a grown up, yet little girl room for her one diy project at a time.
That always means DIY’s along the way. I am going for a sort of boho, fun, whimsical design that incorporates some Art Deco aspects. I have been searching every thrift store I can find for inspiration and fun things to add to the space (and honestly thats a great place to find fun light fixtures for DIY’s as well).
I don’t have the room fully done for a reveal, but while I finish it up, one thing I thought I would talk about is the fun in adding sconces as well. I bought Avé these fun little sconces that were the perfect light fixture for her walls.
In order to cut out an extra electrical cost in the room we opted to mount them and add puck lights that are battery operated to the lights. (The puck lights also can turn different colors which was an added bonus for the 6 year old!)
So if you are looking for a fun project that is super quick and simple that might be something worth considering.
PVC DIYs
Once you get down to the supplies on this DIY you are going to notice that this DIY light fixture is made from PVC pipe… which just seems weird, but it isn’t my first rodeo doing a PVC pipe DIY, and the last one is one of my favorites to date, so I knew it was worth a shot.
We did a full fluted PVC pipe wall in our bathroom a few months ago and it is GORGEOUS, so I knew that PVC could be transformed if given the right chance. Well and if I could convince my husband that it would yet again work.
If you finish this DIY tutorial and decide you’re ready for another, be sure to check that post out because it is honestly such a cool outcome to a bathroom.
DIY Light Fixture
One thing that I knew Ave’s room needed was a new light fixture. I have a HUGE passion for making a more affordable version of very high end items that I can’t justify in our house full of a million kids, and this DIY was exactly that. I combined a lamp shade, spray paint, and some PVC pipe to create something that I LOVE.
I love modern – sort of granny modern actually, so when I was looking at modern light fixtures I kept falling in love with the very fluted and funky look that I landed on, and it ended up being pretty darn easy to create.
This isn’t my first time doing a DIY light fixture to some extent. Last month when we finished our powder room I had an existing light fixture that I loved that I gave a coat of spray paint to be the right shade of gold. I have also painted an old chandelier ivory in our last house. It gave an old brass fixture a farmhouse feel for basically nothing.
Just remember that light fixtures can be updated with a little bit of paint or new shades just like you would update old furniture with new hardware or paint.
Things to Note on This DIY:
It will be HEAVY to hang – I recommend a professional, however if you feel comfortable tackling it on your own, know that going into things.
This is a single pendant lamp light fixture and thus will not put out tons of light, however we have been very happy with the light output for a bedroom.
Supplies for your DIY Light Fixture
Okay so enough on doing DIY’s and more on doing this DIY pendant light. Gather all of your supplies listed below to get started.
Pendant Light Kit – Pick whichever you want. I opted for gold for the look I wanted but honestly just find something affordable that you like the look of.
Lamp Shade – you can pick about any lamp shade but it needs to be perfectly vertical on the sides. I went on the larger size, but you could also look at thrift stores for that.
Spray Paint – I personally love this spray paint and felt that it did a great job giving it the look I was going for. This wold be a light fixture that would be GORGEOUS in a bight color as well, so play with color if you are looking for fun!
Optional – Tassel(the inspiration light I loved had a blue tassel hanging from it)
Miter Saw – We have owned both of these and love them. Pending your needs depends on which I would recommend price wise. We upgraded as we started doing more and more DIYs. (less expensive / More expensive)
Step by Step Instructions on Making your New Fixture
These 4 simple steps will help you make a DIY light fixture in one afternoon. This is a super easy diy, but you will need to use a Miter Saw or have someone else cut the PVC.
One thing to take into account before you start is which way you want the lamp shade to go. You don’t want the light bulb to hang out the bottom, so pay attention to that before starting.
First things first you are going to cut your PVC – Make them just a little longer than the height of your lamp shade. If you haven’t cut PVC before know that it does make a pretty good mess. We got our PVC pipe at Home Depot.
2. Using hot Glue you will start to glue your PVC pipe on the outside of your lamp shade. Space them accordingly because you may need to leave a tiny gap between each pending how the spacing turns out.
We opted to glue them on with the bottom on the counter just like it will hang so that the side you will see stayed perfectly level.
3. Once it is done and dry, flip your lamp shade over so the bottom side is up and using hot glue CAREFULLY glue your small wood circles onto the bottoms of the openings. They barely hang over so this was a bit tricky, but was the most affordable option I found.
4. Spray paint – I used a matte spray paint to make it look more like fabric and loved the end outcome.
Hanging Light Fixture
Once the light fixture is done, it is time to hang the DIY light fixture, but you are going to notice – IT IS HEAVY. In my opinion I would only hang it with the existing electrical box if you have a ceiling fan box in place to handle the weight. We chose to have an electrician come in and professionally hang the light fixture and move the existing location of our last fixture.
Because the light ended up being such a focal point to the room I needed it centered so that took the leg work out.
Overall – this was a DIY that was simple, and inexpensive, but it totally changed the feel of the room. Sometimes I think people overlook what a big impact light fixtures have in a space, and forget what a great thing it is having something that suits your style that takes little to no upkeep.
Other Posts You’ll Love
If you loved this tutorial check out the posts below for more blog posts from me that you will love.
Hopefully you found this tutorial for my DIY Light fixture was easy and fun, and you were able to create something custom for your child’s room. Be sure to follow me on Instagram (@arinsolange) for more DIY’s and home decor, and be sure to leave any questions you have in the comments below.
White cabinets are all the rage right now and quite honestly they are a trend I don’t see changing any time soon. There is something simple and clean about white in the kitchen that has kept it as a trend for quite some time. Today I want to share with you some white kitchen cabinet backsplash ideas, as well as some things to think about when picking a backsplash.
This post may contain affiliate links – update 2025.
White Kitchen Cabinet Backsplash Ideas in My Own Homes
White cabinets in a kitchen create a neutral look that stands the test of time. Whether you are undergoing an entire kitchen renovation or updating your space with some DIY projects, implementing white kitchen cabinets is an easy way to make a dramatic impact.
With the addition of kitchen backsplashes you can create visual interest that will impress your family and friends.
DIY White Cabinets – House 1
In our last house, we knew we wanted to change things up in the kitchen. The dark cabinets weren’t our style and it made the space seem even smaller. We opted for a white color scheme in our kitchen to create a clean look.
During the stay-at-home order, my husband (Sam) and I got to work and painted our dark cabinets white. See our DIY post on painting kitchen cabinets here.
The impact it made in our kitchen was incredible to say the least. The white cabinets paired with our already white kitchen backsplash complemented each other well for a cohesive look.
This DIY ended up being the best choice to pass our stay-at-home time. Of course, renovations with 6 people in the same house was not easy! That being said, it was a great example of how one small change can make such a big statement in a space.
Full Reno – House 2
Fast forward to when my husband and I bought our 1860’s historic home this past summer (wow, has it been a year already?) we knew we would be undertaking some major renovations. Like most (okay, all) rooms in the home, the kitchen was no exception to needing said renovations.
While some people may be put off with renovations, the best thing about renovating your space is it gives you the perfect chance to put your personal style into your home.
For our newly renovated kitchen space I chose to keep it simple, clean, and timeless. I opted for white cabinets, a white backsplash, and brass accents for a classic kitchen.
View more pictures of our newly updated kitchen here.
Whether you plan to DIY or fully renovate, decide what personal style you want to put into your space. I think that white kitchen cabinets are a timeless option that almost anyone can love – but picking your backsplash can be tricky to make it fit your needs.
Design Concepts – Where to Start on White Kitchen Cabinet Backsplash Ideas
If you plan on tackling a kitchen update, whether that being DIY or renovations, I’d recommend browsing kitchen pictures for inspiration. Before you begin your project, you’ll want to decide on a design concept.
There are so many styles and designs that you can choose from and depending on that design concept you’ll want to pick your hardware, backsplash, cooking space, paint colors, etc. to enhance your design for the perfect place.
Since we are talking white kitchen cabinets and backsplashes, I’ll cover some of my favorite design concepts within those parameters to give you some great ideas.
Farmhouse Kitchen
The farmhouse look, made popular by Joanna Gaines, has been in for quite some time now. With reclaimed wood, white clean lines accentuated by dark wood features, shiplap, and “X” ended accents, it is easy to love this look.
Industrial kitchens are masculine, dramatic, and highlight the materials used in the building process. Think exposed brick, pipes, and the use of steel in this kitchen. I always imagine these kitchens in lofty apartments.
Check out this concrete ceiling in this industrial kitchen as seen here designed by Studio VARA.
Coastal Kitchen
Coastal kitchens take their design inspiration from the water- whether that be ocean, lake, bay, etc. Think rattan chairs, driftwood, and bright open spaces for these kitchens.
Modern kitchen designs incorporate clean lines with a pop of color. These kitchens are sleek yet bold and often have an element of surprise.
This modern kitchen can be found here at AlysDesign.
Transitional Kitchen
I love a good transitional kitchen. To me, it gives the best of both worlds. You have both classic and traditional elements mixed with a modern feel. Clean lines, an open concept, contrasting hues, and mixed finishes encompass transitional kitchens.
Now that you’ve perused kitchens all over Google and have narrowed down your scope, you can begin to make decisions about details in your kitchen. One of those decisions you’ll need to make is the general color scheme of your kitchen and its accents.
For this post’s purposes, we will assume white kitchen cabinets. However, consider different colors for some of the cabinets to give you pops of color. A navy kitchen island or reclaimed wooden shelves instead of upper cabinets are great ways to incorporate this concept.
If you have maple cabinet doors and prefer a DIY, you can easily paint or stain these cabinets white or your preferred color. A popular cabinet color that pairs well with a white kitchen is light blue.
This gorgeous kitchen designed by Christine Sheldon Design and photographed by Kathryn MacDonald Photography and Web Marketing shows white shaker cabinets offset by a dreamy light blue kitchen island. For more pictures of this kitchen click here.
You’ll also need to consider the color scheme of your countertop and its materials. The countertop space and backsplash ultimately come together. You don’t want the two to be competing forces so you’ll need to consider the design of both the countertop and backsplash.
As a rule of thumb, if you have marble or granite countertops with several colors or patterns, choosing a backsplash that is more neutral would be a better option. Whereas if you opt for a more neutral countertop space, a bolder color or pattern for a backsplash can be achieved.
Consider the wall color in the kitchen as well. Typically, cabinets cover the bulk of wallspace in the kitchen. You’ll still need to pair a wall color with your white cabinets and preferred backsplash. Choosing neutral or white walls will further create a seamless look.
Be careful on choosing the correct white for a paint color. You’ll need to view the color against the white cabinets at various times of the day for a perfect match. I have a blog post here with all of my favorite neutral paints if you want to check that out.
However, there is no rule that says you can’t paint your kitchen a bright color to offset all the white if that is your preferred design. You can still achieve that bright white look with a pop of color.
This pink and white kitchen is a dream! Created by Gina Racehlle Design check out the details of this kitchen here.
White Kitchen Cabinet Backsplash Ideas – Colors & Designs
And now finally, for the main event- kitchen backsplashes. We’ve talked kitchen design and kitchen colors, but we have yet to get into kitchen backsplashes. It’s important that you consider your design and color scheme prior to picking a backsplash because the backsplash design can truly transform your space and make a big impact.
Afterall, your backsplash is ultimately the focal point in your kitchen. It can highlight your accent features, such as hardware and showcase countertop materials while still being a work of art in of itself.
Color – White Kitchen Backsplash Ideas
Backsplashes can come in a variety of colors when paired with your white cabinets. Of course, you can opt for a white kitchen backsplash to complement your fully white kitchen. The design is classic, timeless, cohesive, and seamless. Opt for brass, gold, or contrasting black hardware to offset and complement the white design.
Light gray is another popular choice to be paired with white cabinets. You can opt for light gray tiles or incorporate gray by introducing a white marble backsplash that has gray veining. Either option would create two completely different looks. That is part of the fun with white kitchen cabinet backsplash ideas – there are so many options.
Another popular choice for a backsplash is a warm neutral color. Taupe is a great alternative to gray and can create a focal point among the white. A natural stone would also be an option that would add an earthy element to the space by creating more depth and texture (more on that later).
Intimate Living Interiors designed this natural stone backsplash in this transitional kitchen.
Colorful backsplashes are a great option to incorporate your design style into your space. Popular color options include light greens and blues which can further enhance a coastal kitchen. Whereas bold colors like black, pink, and bright emerald green are known to be used for more modern spaces.
Beautiful kitchen design by Nicole Davis Interiors showcases the use of blue and white colors to create a unique backsplash.
Patterned backsplashes may use several colors and can further enhance a kitchen’s design. Patterns can range from one color scheme to a combination of colors. Not only do patterns add a focal point in the kitchen, but they also add depth and texture. Texture is so important in white kitchens as it helps break up all that white (not that there’s anything wrong with an all white kitchen- swoon!).
If you think about it, you have a smooth cooking space and shiny appliances and floors. This is of course assuming you don’t have tiny humans who like to leave dirty fingerprints over said shiny surfaces. If you add another shiny backsplash to the space, your design may not pop and will blend in, leaving you without a focal point.
Why spend all that money on a backsplash and beautiful kitchen accents if they aren’t going to pop. By incorporating different patterns and other techniques to add texture you are ensuring your backsplash will stand out. Granted, smudged handprints from your kids can also add a nice natural textured feel too!
There are a variety of different pattern backsplashes to choose from. Each backsplash pattern and shape are unique and can emphasize your kitchen’s design concept. Horizontal and vertical pattern backsplashes are classic and seamless. Often, you’ll see this style of pattern in a subway tile.
While the tile itself is not patterned, the position of the tile (vertical versus horizontal placement) creates a visual pattern. This pattern can add depth to the space (when placed horizontally) or it can add height to the space (when placed vertically).
We typically see placement in a horizontal fashion, but a vertical placement can draw the eye up towards the ceiling and make the space feel taller. Vertical shiplap backsplashes are a good example of the use of this vertical layout with an unconventional material for a farmhouse feel.
The Grit and Polish reveal their farmhouse kitchen makeover complete with a vertical shiplap backsplash.
Herringbone and chevron patterns are another example of a pattern created by a layout. While the two patterns may seem similar, they are quite different. The chevron pattern is more contemporary and resembles an inverted V. Herringbone, on the other hand, is more transitional, creating a zig-zag effect with rectangular pieces.
These patterns provide an illusion of added height and depth to the space. Both patterns have the ability to stand alone for a more subdued look, or could be blended with other patterns to create a bold statement.
Studio McGee’s stand alone herringbone backsplash adds added dimension and texture to this all white kitchen.
The scalloped, fish scale, mermaid, or morrocan fish scale pattern (yes all of those are the same thing), is a popular pattern that can add texture to your space. The unique shape provides a coastal or Mediterranean feel and often is seen in bold colors that pop among white cabinets.
For a more cohesive and understated look, you can use this pattern in a neutral or white color. The waved design of this pattern reflects light easily and when used in a white or neutral color, the kitchen can appear larger as a result. This would be a great option for a small kitchen as the unique shape creates an optic illusion.
Hexagon, polygon, penny, and mosaic are examples of contemporary design patterns that add personality to any kitchen backsplash. These are great options if you have a more neutral and simple counter space.
When paired with white cabinets, walls, and counter space, a colorful bold backsplash using one of these patterns can not only break up the neutral white space, but will also make a statement in your kitchen.
Overall, pattern backsplashes are a great way to incorporate color and texture into your kitchen. For those that like a monochromatic look or prefer a more classic design there are other ways to add texture and depth to your backsplash without utilizing patterns.
Subway tiles are a great example of a classic design that can be enhanced to add additional depth and texture to the space. A beveled edge subway tile makes the backsplash pop off the wall with added texture and depth. The use of a beveled edge results in the subway tile having a 3D appearance. This can be used in designs where you want a monochromatic look with a focal point.
Studio McGee does it again with her Evergreen kitchen remodel.
A backsplash’s finish can also add texture and depth to the kitchen. Consider the material of your backsplash and whether the finish it gives off is more matte or glossy. For natural stone and brick backsplashes, a matte finish is more likely.
However, tile can come in both glossy and matte finishes. Glossy finishes tend to be more contemporary and reflect light leading to a brighter space that can appear larger. Matte finishes are more traditional and while they can appear flat, they do add a nice contrast to a kitchen with other high shine finishes. As an added bonus, matte finishes hide stains!
Desiree Burns Interiors designed this all white kitchen complete with glossy white subway tile.
Iridescent tile is another popular choice that can add depth to a backsplash with its reflective finish. The light that is reflected in the iridescent tile creates a brightening and open and inviting space to any kitchen.
Grout color is another design decision that can affect the appearance of the backsplash. Depending on your design, you’ll want to pick a grout color that complements your vision for your kitchen. If you want to have a kitchen with a cohesive look, you’ll want to choose a grout color that is similar to your tile color.
For example, a white tile with white grout will blend seamlessly. This is a classic look with clean lines and blends effortlessly. This combination can also be beneficial if you have a focal point somewhere else in your kitchen. Keep in mind that white grout will need to be cleaned often as it shows stains easily. This may be a deal breaker for some.
On the flip side, contrasting tile and grout colors highlight the pattern and tile in the backsplash. White tile and black grout is a common pairing and gives a more modern feel. Adding a neutral color like gray or taupe is a good way to highlight the pattern and tile without the bold statement of a black grout.
As an added bonus, it does not have the stark white contrast that can stain easily. Gold grout is another bold and modern option that can add additional light and personality to your kitchen. Grout color may not seem that important but the color you choose when paired with your tile can change the entire aesthetic of your kitchen.
Another design concept that impacts your kitchen’s aesthetic is the height of your backsplash. Backsplashes come in all different heights depending on the look you want to achieve, as well as your budget. Originally, kitchen backsplashes were 4 inches from your countertops.
While this standard height will add some protection to your walls from kitchen messes, it does not allow the backsplash to fully embrace its purpose: to help protect your walls from said messes while serving as an aesthetically pleasing design. The look can feel outdated and frankly, cheap. While it is budget friendly, there are other ways to give your space a more luxurious feel while still being conscientious of cost.
Rather than installing the 4 inch standard backsplash, you can opt to install a full backsplash behind your range. Not only does the full backsplash protect your wall from those kitchen splatters, it also serves as a focal point for your kitchen. The limited space of the backsplash is much more budget friendly than installing a full backsplash throughout the entire kitchen.
A more common trend seen in backsplash heights is the installation of the backsplash to the kitchen cabinetry. While this is more costly due to labor and materials, the full backsplash makes a big impact on the kitchen. It offers plenty of protection and is a key feature in your kitchen’s design.
One trend that is becoming more popular is taking the kitchen backsplash all the way to the ceiling. This is labor intensive and can be very costly due to the amount of materials used. This look can be achieved by focusing on one wall for the ceiling height backsplash.
Often, the backsplash is taken to the ceiling on the wall with the range and is applied to the range’s hood extending to the ceiling. This is a great option for a simple backsplash to create a dramatic effect. Your eye is drawn upward to the ceiling creating a more open and brighter space.
For those of you that have been following my blog for a while you know that I love my home to have both fashion and function. Your kitchen backsplash is no different. The main purpose of your kitchen backsplash is not only to be visually pleasing and set the tone for your kitchen, but also it is there to protect your walls.
How many times have you been cooking and your walls got sprayed with spaghetti sauce or bacon grease? You’ll need to keep in mind the pros and cons of backsplash materials when picking out your backsplash. Now, if you don’t cook, you pretty much have your choice of any material! I’ll be listing some common kitchen backsplash materials and their pros and cons.
White Kitchen Cabinet Backsplash Ideas – Tile Backsplashes
Perhaps the most widely used and most popular pick in a backsplash is a wall tile for your kitchen backsplash. Tile materials can range from ceramic/porcelain tile, glass tile, and stone tile.
Ceramic or porcelain tile is the most popular choice for kitchen backsplashes. It is easy to maintain, easy to clean, and is favorable to budgets. Porcelain and glazed ceramic does well with water for easy cleaning and are heat resistant for those backsplashes near stoves and ovens. You can find these tiles in multiple tile designs, sizes, colors, and patterns. Ceramic subway tile is a popular choice in both classic and contemporary kitchens and is used for its timeless aesthetic.
Glass tile (think standard subway tile) is another popular option and would be a great addition to a smaller kitchen. Because of the glass tile’s reflective properties, it brightens kitchens and can make them appear larger.
A glass backsplash would be a great addition for smaller kitchens or kitchens with poor lighting. Additionally, glass tile never needs to be sealed and again is easily cleaned like its ceramic and porcelain counterparts.
Both ceramic and glass tile need to be grouted and require a skilled hand for placement. It is possible to DIY and lay your own ceramic or glass tile, however, the more elaborate the tile design and layout, the more skill will be required for placement. Cost wise, ceramic and glass tiles can be found from high end high dollar tiles to more budget friendly options.
Stone tile (think marble, slate, and travertine) are natural and porous elements. Due to their makeup, stone tiles must be sealed to avoid staining. This would not be the best option if you are not a fan of upkeep and maintenance as they require periodic sealing to ensure stains are kept out.
Should a tile be stained, cleaning can be difficult and may require the tile to be replaced. Additionally, you’ll pay a premium for stone tiles. With considerable upkeep and a higher price tag, it is easy to see why people turn to ceramic and glass tiles.
White Kitchen Cabinet Backsplash Ideas – Natural Stone Slabs
We’ve discussed natural stone tile, but a new trend has hit kitchen backsplashes and it includes natural stone slabs. Instead of individual tiles grouted together to form different patterns and layouts, a slab of continuous natural stone is placed as the backsplash.
Marble, quartzite, limestone, slate, granite are all options. And yes, if you are thinking what I’m thinking which is, “that sounds expensive” then you would be right! These are very costly but very impressive looking and will give your kitchen space that luxurious feel. Who doesn’t want to feel like they are cooking (or eating) in a Michelin star kitchen?
You’ll also have to keep in mind maintenance since these are natural stones. You’ll want to ensure that you don’t stain or splatter your beautiful white marble backsplash with proper cleaning, sealing, and polishing.
White Kitchen Cabinet Backsplash Ideas – Brick
Brick is another great option when it comes to white kitchen cabinet backslash ideas. The design is versatile and can be seen in rustic farmhouse, transitional, contemporary, and classic kitchens. You can have several different shades of brick or paint/wash the brick for a stained appearance. Brick is durable and will hold up to the heat in a kitchen.
However, it is costly and can be difficult to install. Brick veneer is a budget friendly option and is easier to install than traditional brick. Keep in mind, both brick and brick veneer will need to be sealed to ensure durability.
A downside of brick is that it is difficult to clean and can show stains that are left untreated. Maintenance aside it is a great option and provides not only depth and texture to your kitchen space but also warmth.
White Kitchen Cabinet Backsplash Ideas – Unconventional Options
While we’ve covered the more popular choices for white kitchen cabinet backsplash ideas, there are several unconventional options that I’d like to mention. A stainless steel sheet backsplash is a modern no fuss option. With reflective properties, stainless steel brightens kitchens and is an affordable option.
A chalkboard paint backsplash is another option for a contemporary kitchen. This easy DIY is easy to maintain, easy to clean, and low cost. You can add your own artwork and change it out seasonally.
Beadboard and wood (think shiplap) are also options for backsplashes. Both are great DIY projects and can enhance your farmhouse kitchen decor. As an added bonus, it is easily cleaned and doesn’t take any maintenance like it’s stone and tile counterparts.
Peel and stick options are available for people who are looking for easy DIY projects. You can find these options in various materials at your local hardware store. Peel-and-stick wallpaper may not be what you think of when a kitchen backsplash comes to mind.
However, this may be a great option for renters who want to personalize their space but not fully commit to the financial and emotionally draining kitchen renovation. Before you laugh it off, you can find some beautiful options that give the appearance of expensive tiles and stone for a fraction of the price. And if you get bored or decide you don’t like it, simply peel it off and pick something new!
Whew! We have covered a lot of material! Kitchen designing can be an overwhelming process. I hope you found this post helpful in navigating the world of kitchen backsplashes. There are so many options to choose from in all different price points that you can find something you’ll love and live with for years to come.
Start with gathering inspiration so you know what your kitchen’s aesthetic will be and go from there. Take each decision one step at a time and try your best to not make any rash decisions. Set out your options in the space and spend some timing living with your choices to get a feel for your new look. Before you know it you’ll be living with your brand new backsplash!
Where to Shop for White Kitchen Cabinet Backsplash Ideas you Saw in This post!
Amazon – I find so many of my favorite tiles on Amazon. They are affordable and easy
Home Depot – This is a super affordable place to get your very simple and timeless tiles.
Pin the Photo for White Kitchen Cabinet Backsplash Ideas Later
Hopefully you found this post sharing all about white kitchen cabinet backsplash was helpful for you and you feel ready to tackle your own kitchen. If you have any questions leave them in the comments below, and be sure to follow me on Instagram (@arinsolange) for more fun and inspiration.