Adding a four-legged friend to your family is an exciting commitment! You have done your research, and are ready to take the leap. It is no surprise that many people are adding Bernedoodles to their families. This large breed puppy has a friendly temperament and a fierce loyalty. We personally got a Bernedoodle last year, and she just turned one. I remember the day we brought her home trying to figure out how much to feed a Bernedoodle puppy.
As a new puppy parent, the last thing you want to do is over or under feed your new pet, so hopefully this post serves as helpful for you with your new Bernedoodle puppy.
This post may contain affiliate links
All about Bernedoodles
Bernedoodles are adaptable, making them a wonderful choice for novice or veteran owners. They are smart and protective dogs. This makes them great for young ages.
If you are just doing your beginning research, the Bernedoodle breed is a combination of a Bernese Mountain Dog and a Poodle. They inherit their intelligence from the Poodle parent. It is obvious that the goofy traits are those of the Bernese Mountain Dog parent.
These parent breeds create a perfect family dog. Their size is determined by the Poodle parent. They are broken down into size categories. Bernedoodles can be toy, mini or standard. One thing that is pretty surprising is that the different sizes do not typically affect their food choices during puppyhood.
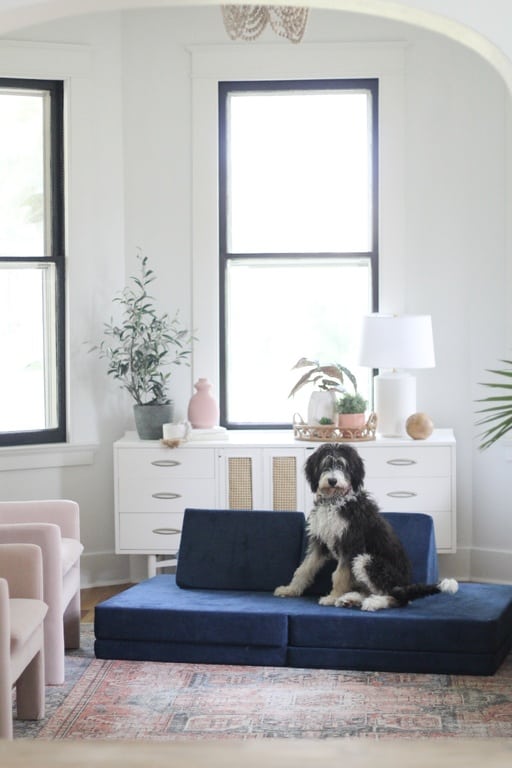
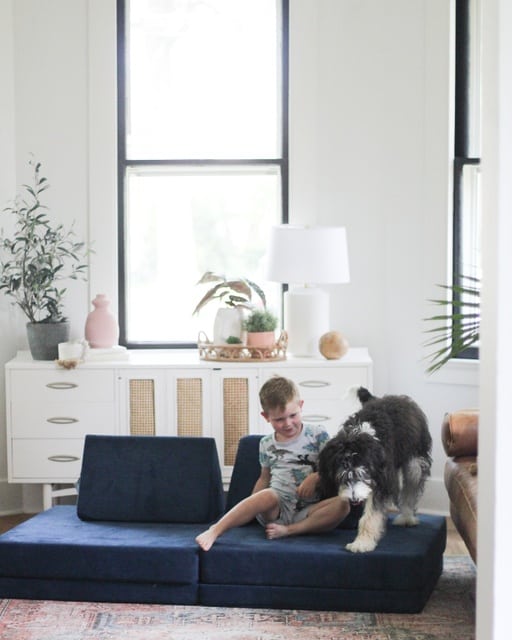
Bernedoodle puppies are known to love younger children. They are playful and gentle as a lifelong companion. Bernedoodles are smart but are also silly. This trait makes them a good choice for all ages. As a mom of four kids, this was very important to me.
If you want to learn more about owning Bernedoodle – I have a whole blog post here with all the details on what is like to truly own a Bernedoodle puppy.
How much to Feed a Bernedoodle Puppy
As you prepare to become a bernedoodle parent, their growth and development are important to you. You are undoubtedly concerned about health issues or health problems that may arise. Did you know that there is a big difference between puppy food and adult dog food?
These different kinds of food can affect your dog’s digestive system. It may be hard to know where to start, but I will break it down for you! In their full size, they are big dogs. At their full height, they are also very tall.
Their looks can be deceiving. Even though they are larger dogs, they may not need more food than a typical dog. You want to be prepared with this knowledge before you decide if this dog is right for you. How do you ensure a healthy lifestyle for your pup? It is important to learn how much food is necessary in their different life stages.
The Reasoning Behind the Puppy Food
New dog owners have several choices to make when it comes to food. It can be overwhelming, but there are a few simple things to keep in mind for a balanced diet. Your main goal is a healthy, happy dog!
Adult dogs and puppies have different nutritional needs. Puppy food is specifically designed for growing pups. As they grow, they are burning more calories. This means that they need more calories per pound of body weight to sustain their developing bodies.
Bernedoodle puppies need more fatty acids and high protein diets. These puppies complete a majority of their growth within two or three years. In these first few years, they will need higher amounts of protein calories. Puppy food and it’s proper nutrition is essentially created for growth and reproduction.
Veterinarians will say that it is, however, not toxic for your puppy to eat adult dog food. It also isn’t harmful for an adult dog to eat puppy food. They may suggest that you do your best to stick to these separate kinds of dog food for optimal health.
After the first few years of a dog’s life, they will switch to adult food for dogs. This type of food is typically referred to as adult maintenance for day-to-day living. It should be clearly labeled on the packages. Once they have reached their adult weight, they can maintain the health benefits from their simpler diet.
The transition from puppy food to adult dog food should be seamless. Bernedoodle dogs are laid back and not picky! Most of the time, they will eat what is put in front of them. Now that we have covered the difference between the types of dog food, we will get right to specific amounts for Bernedoodle puppies.
Our Penny had a very sensitive stomach as a puppy, and we have stuck with this puppy food and been very happy with the choice. She seems to be happy and thriving on it.
Specific amounts of Food for Bernedoodle Puppies
Young puppies that are two to six months of age typically eat three different times a day. The daily amount of puppy food depends on weeks of age and how much they weigh. It will also depend on how much exercise they receive.
I will break that down specifically. But, it is important to keep in mind that their food intake will increase as they grow. At around six months of age, Bernedoodle puppies can eat twice a day. This schedule may continue for adult Bernedoodles.
The first six months of your puppy’s life is most important nutritionally. They are growing very quickly. Setting your puppy up with proper nutrients will benefit growth, brain health and a long lifespan.
-Three to twelve pounds: one half – one cup daily
-Twenty-six to fifty pounds: two to three cups daily
-Seventy-six to one hundred pounds: three to four and a half cups daily
This is a general idea of how much your Bernedoodle puppy will eat as they grow. It is helpful to stick to designated eating times for your puppy. This gives their digestive system consistency and can benefit a family’s lifestyle and busy schedule as well.
Do not forget that It is a good choice to check the directions of the healthy dog food you purchase. On the back of each package, there should be a suggested serving size. As always, contact your veterinarian if you are concerned about how your Bernedoodle is developing. Interestingly enough, adult Bernedoodle dogs tend to only eat one serving a day.
They can finish their larger amount of food in one sitting. When they reach an even older age it may be difficult for them to finish this serving in one feeding. It is helpful to spread these servings out for older dogs while it gets harder to finish a meal. At this point you will be in tune to what your Bernedoodle dog needs.
More Than a Diet – Weight and Bernedoodle Puppies
There is good reason to be concerned about weight gain. Bernedoodles are known for their love of food! It is easy to over-feed your puppy. A general rule is to check their ribs. You should be able to feel the ribs easily but not be able to see them at a glance.
This is a great way to check on your Bernedoodle dogs and their weight gain. It can be tempting to feed your pup food from the table. This seems innocent but can create poor eating habits down the road. It can also disrupt their digestive systems. You have worked hard to create a healthy diet and want to keep it that way.
If a Bernedoodle puppy is hungry, they will eat from their designated spot and will not need anything extra. Your puppy’s health is a priority and these tips will ensure a happy pup! Do not forget that although the feeding schedule is important, we cannot forget about giving our dogs plenty of exercise! Long walks will encourage a healthy life for your Bernedoodle and for you.
Overall health includes diet and exercise. Your puppy’s health in the first month of their life will set them up for a healthy life. This is another reason why Bernedoodle puppies are a wonderful family dog. They have plenty of energy to keep up with toddlers. It is also a helpful way to encourage your teens to get outside and away from their technology.
Bernedoodle Puppy Food – Dog Food Options
With a growing amount of dog food brands, it can be hard to pick the best food. As you browse the isles, it is obvious to note that wet food is more expensive than dry food. However, they are both great options! The standard Bernedoodle loves to eat and they are such large breeds that they can eat a lot. Fortunately for dog owners, many dogs love dry food.
Wet or raw dog food has less carbohydrates than dry food and can be more hydrating. Many veterinarians suggest that either kind is a great choice! I would find a brand and type that fits into your grocery budget. A raw diet may seem like the best choice, but we know that Bernedoodles aren’t picky.
Bernedoodles tend to eat what they are given. This is a mom’s dream come true! If only this trait would rub off on the human puppies we have. There is nothing wrong with the dry kibble choice! Each type of dog food has the nutrients it needs to help your dog grow. The biggest difference between dry and wet dog food may be the way it is digested.
Keep in mind – that as with kids and yourself there may be adjusting to find what is best for your puppy. Start with a small bag the first time you purchase puppy food, and if you are changing them from what they were on at a breeder or in a shelter mix the new food with the previous food for a slower change on their gut.
Now that you have been prepared with nutrition knowledge, you are ready to welcome that pup in to the family. Giving them proper puppy and adult dog food will help create a healthy dog. More than food, your Bernedoodle needs love and affection.
This will not be difficult at all. Bernedoodles are easy to create a bond with. I know that you will love your Bernedoodle puppy as much as my family does! Let me know in the comments if you have a puppy and what kind of food is your family’s favorite.
Hopefully you feel confident in how much to feed a Bernedoodle puppy after reading this post, and be sure to follow me on Instagram (@arinsolange) to see what our Penny is up to! If you have any questions feel free to leave them in the comments below, and be sure to pin the photo below to find this post later.
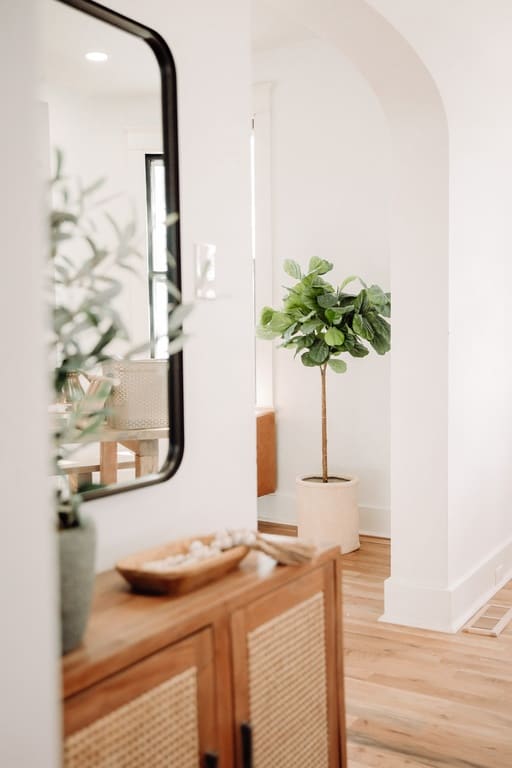
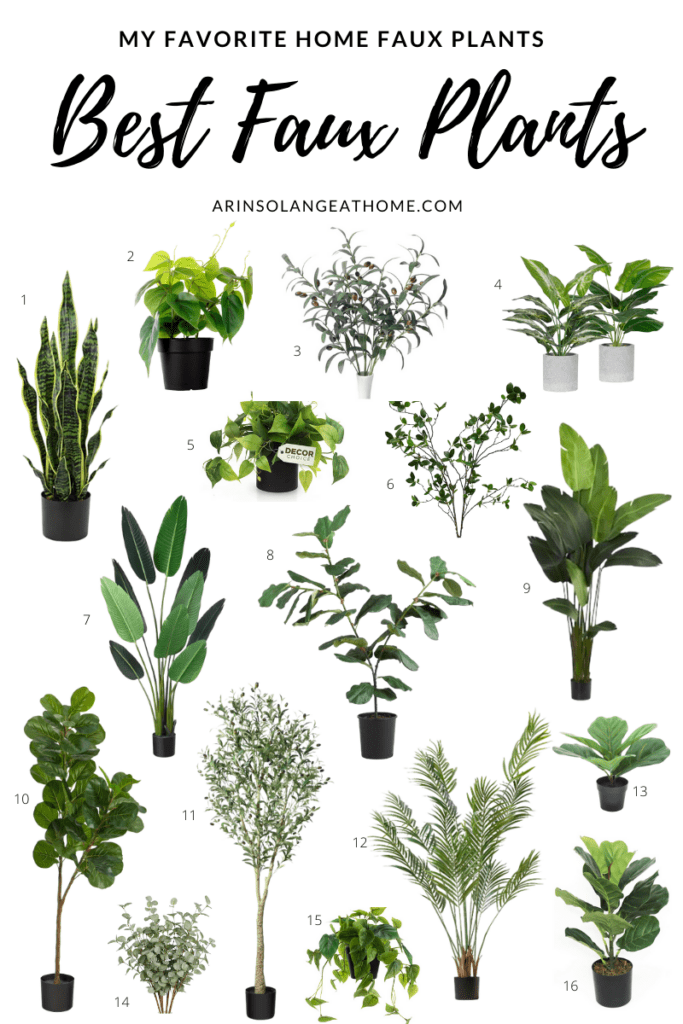
It is no secret that I have a black thumb. I try and try to keep plants alive, but I am often preoccupied keeping the 4 kids alive, and the plants always end up in the trash can. I have recently come to terms with the fact that I will have faux plants in my home for years to come….so I might as well share the best I have found with you all, right?
This post contains affiliate links.
The Best Faux Plants
Thanks to my black thumb, I have scoured the internet for the best fake plants. This is definitely an area where you want to do your research. I can’t tell you how many times I have purchased a fake plant that looked lush and beautiful in the image only to receive a sad, scrunched up, bunch of greens.
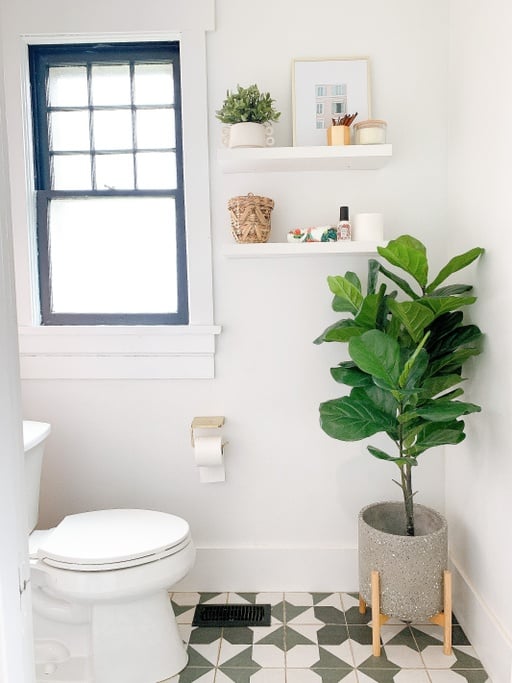
It is also worth noting – in most cases – price isn’t your indicator on quality. I think that larger leaves tend to be harder to pass off as real when fake, but none the less – don’t let a big name brand fool you into thinking it will be amazing.
I also tend to think when going with larger fake plants, you want small leaves, or plants that natural leave can sort of look rubbery. Because that will naturally have a more real life look when fake.
Fake Plants as Decor
So if you are not team real plants (or maybe you just have a room where a faux would best) I am going to round up the best options today. Faux plants are a great option for those of us with black thumbs (hi!), but they are also great options for other reasons.
If you live in an apartment that is short on natural light or maybe you live in Alaska where it is dark for long periods of times (can we be friends?), fake plants as decor are a great alternative to live vegetation. You won’t have to worry about moving your fake plants to the sunniest part of your home so they can bask in natural light.
Fake trees are also not going to have the potential to attract bugs and critters that live plants will. That’s enough of a plus side for me! Fake plants can also be a wiser option with young kids or pets at home. If you decide to go with the real deal make sure you look up the kind of plant first to make sure it is safe for everyone in your home – even the more curious ones.
If fake options sound like the best option for you, keep reading for the best fake trees that you can put in the shadiest room in your home without the fear of an infestation of bugs!
Other Home Decor Finds
I have been rounding up Amazon home finds for years now. I have round ups no matter your decor style or what you’re looking for. Check out the the link below to check out more finds.
Hopefully you found some Amazon home decor that you are so excited to incorporate into your home. If you have any questions on these items or this post, be sure to leave them in the comments below. And don’t forget to follow me on Instagram (@arinsolange) where I share daily Amazon Finds.
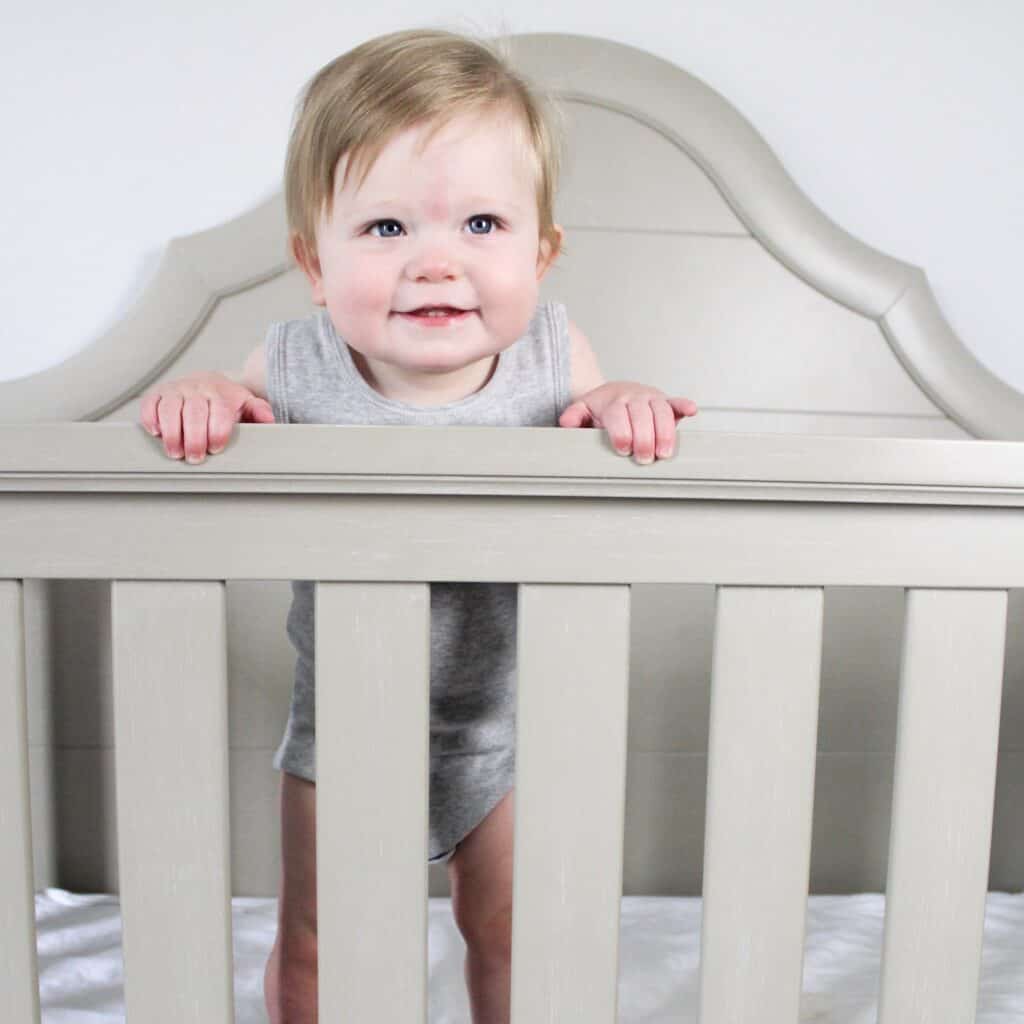
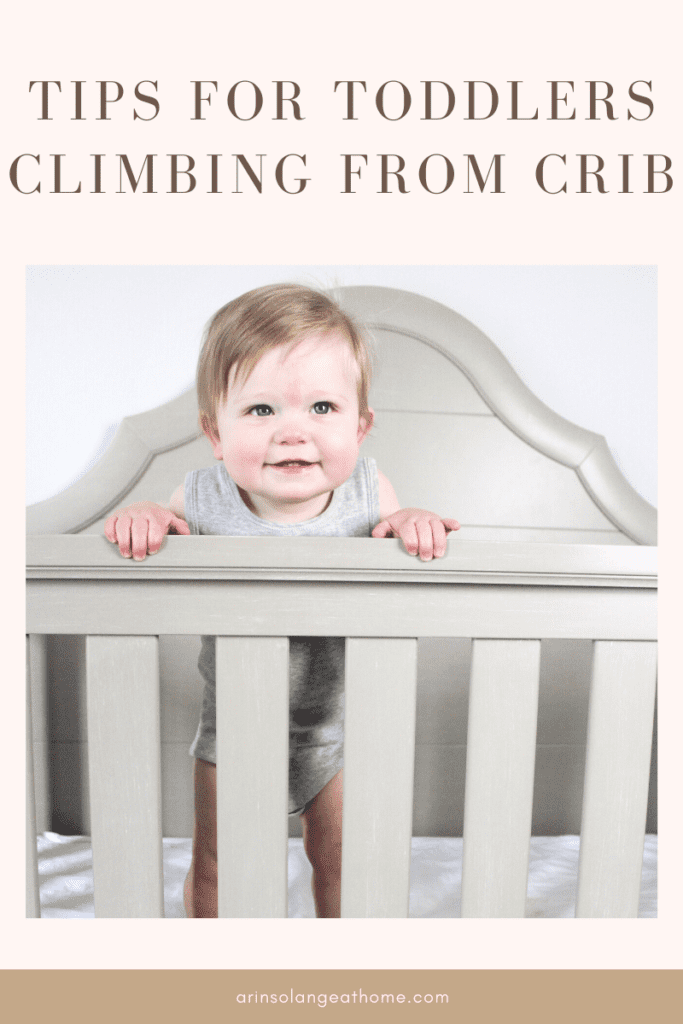
Tips To Prevent Your Toddler From Climbing Out Of Their Crib
Is there anything better than a full night sleep? As a mom you finally get used sleeping through the night but then babies hit that toddler stage, and stuff gets ROUGH. So let’s talk about the best tips to prevent your toddler from climbing out of their crib today.
This post may contain affiliate links.
Tips to Prevent Your Toddler from Climbing out of their crib
How I love how my head hits the pillow, my eyelids get heavy, and I float off to dreamland. Oh, but wait. In the middle of the night my eyes flash open and there I am staring face to face with my toddler.
That’s right, my toddler who is supposed to be sound asleep in their crib. Then it hits me. I am in the dreaded crib climbing territory. If you are like me and this scenario sounds very familiar and you are desperate for some tips on how to prevent your little climber from achieving a crib escape then you are in luck. I’ll be covering how to handle those crib climbers and what to do when this happens to you.
Why Do toddlers climb out of their crib?
Why? More importantly, why is this happening to me? If you are feeling sleep deprived and defeated, I have been there before. As a mom to four young children I have had my share of experiences.
Not all kids experience the same behaviors. Just when you have one phase figured out a new one will pop up. So why did your sweet happy baby go into full on crazed escape artist mode? There are actual ‘reasons’ toddlers hit this phase – and sometimes understanding those reasons helps us to better parent them through it.
Developmental Milestones
Crib climbing can occur anywhere between 12-24 months. It is most common around 18 months and happens as a result of their developmental milestones. Hooray, your little guy took their first step. What a great milestone. Unfortunately, we don’t say the same about crib climbing.
Between 18-24 months, young toddlers will start to climb up and down furniture, walk up and down stairs, run, and become fiercely independent. The combination of your toddler’s newfound motor skills and independence leads to their desire to climb right out of their crib and into your nightmares.
At 18 months, you may notice your toddler begin to have tantrums. Their opinion will be well known and they will want to do everything themselves. At this age, doing everything themself is practically impossible, and that will lead to many meltdowns.
Their impulse control is poor to say the least, and they will think it is perfectly acceptable to swan dive off your kitchen table. I may speak from experience here. Common sense is not their friend.
Let me paint you a picture. Your little Houdini has just learned that they can reach their leg up and over their crib. They hoist their little body up and before you know it they have flown themselves straight out of the crib and onto the floor.
Whew, that was either thrilling or terrifying to them. Here is the key part of the picture. They did it on their own and now they have a brand new skill! If it was thrilling to them then you are in luck because now you’ve got a climber on your hands.
Tips to Prevent your Toddler from Climbing out of Your Crib – What to do when it starts?
Joking aside, having a child who climbs out of their crib can lead to a number of issues, safety issues and sleep being the major two that come to mind. I’ve seen it plenty of times and fortunately, (knock on wood) we’ve never had a serious injury. However, that is sheer luck. It is a long fall from their crib to the floor and an injury can occur at any time.
Safety First
Keep in mind that head injuries can be very serious. If your child hits their head, stay calm. You need to remain calm so that they stay calm. Chances are you’ll need to calm them down as well. Make sure you soothe them instead of using it as a learning experience.
“See, this is why we don’t climb out of bed.” That isn’t going to help anyone here. Grab some ice and put ice on their head where they may have a bump or mark. Now, I’m not a medical professional, so at this point you’ll want to call your pediatrician or after-hours line to go through what happened.
Any loss of consciousness, vomiting, excessive crying, complaints of headache, or your child not acting themselves warrants a call right away.
(Please note that I am not a doctor, these are just my observations as a mom.)
Toddler Proof Your Home
You’ll also want to ensure you baby proof your child’s room. If they are able to get out of the crib, then they are able to be unsupervised in their own room, well the whole house actually. Cover any electrical outlets up with protectors, anchor your furniture, and secure blinds or long cords that may be a strangulation hazard. You’ll want to have baby gates up accordingly. A baby gate at the top of the stairs will help prevent your drowsy toddler from falling down them in the dark. Make sure you put up and lock any medicines or potential poisonous materials. Ideally, you’ll have a video monitor or baby monitor that will alert you to when they are climbing out of their room.
If you are a heavy sleeper, it may be a good idea to get a door alarm for the bedroom doors that will alert your phone that your child has left their room. This will help prevent your toddler from having free reign of the house for too long and making a mess in your living room.
Sleep
If your child climbs out of their crib all night long chances are they aren’t getting much sleep time and neither are you. Sleep is crucial for brain development so they can continue to hit those milestones.
At 18-24 months, your toddler should be getting around 11 hours of sleep with naps that last from 2-3 hours. Without adequate sleep, they are more likely to have those delightful tantrums. Additionally, sleep helps your child release growth hormones for development, lowers their risk of obesity, increases their ability to learn, and lowers behavioral issues.
Don’t be surprised if at around 24 months old, they undergo a sleep regression. Remember when you brought your new baby home from the hospital and just when you had the sleep situation all figured out, they started to not sleep again? It was then that you learned about sleep regressions.
Well guess what, toddlers get them too and yes, they are a major bummer. The 2 year sleep regression can happen anywhere from 2 to 3 years old. You may notice early wakings, waking at night, refusing nap time, protesting bedtime, not staying in their bed if they have transitioned to a big kid bed, and crib climbing. Isn’t the toddler stage fun?
The good news is that this is all temporary and will pass. That should give you some peace of mind, but I’m not going to lie to you, it may be an unpleasant couple of weeks. I wish there was an easy solution to help solve all your sleep problems.
I will say, the best option is to continue with a consistent sleep routine and stick to your boundaries. Whether your child is crib climbing due to a sleep regression or not, your toddler’s sleep will be affected. It is necessary to solve your crib climbing problem so that you both can get back to a restful night.
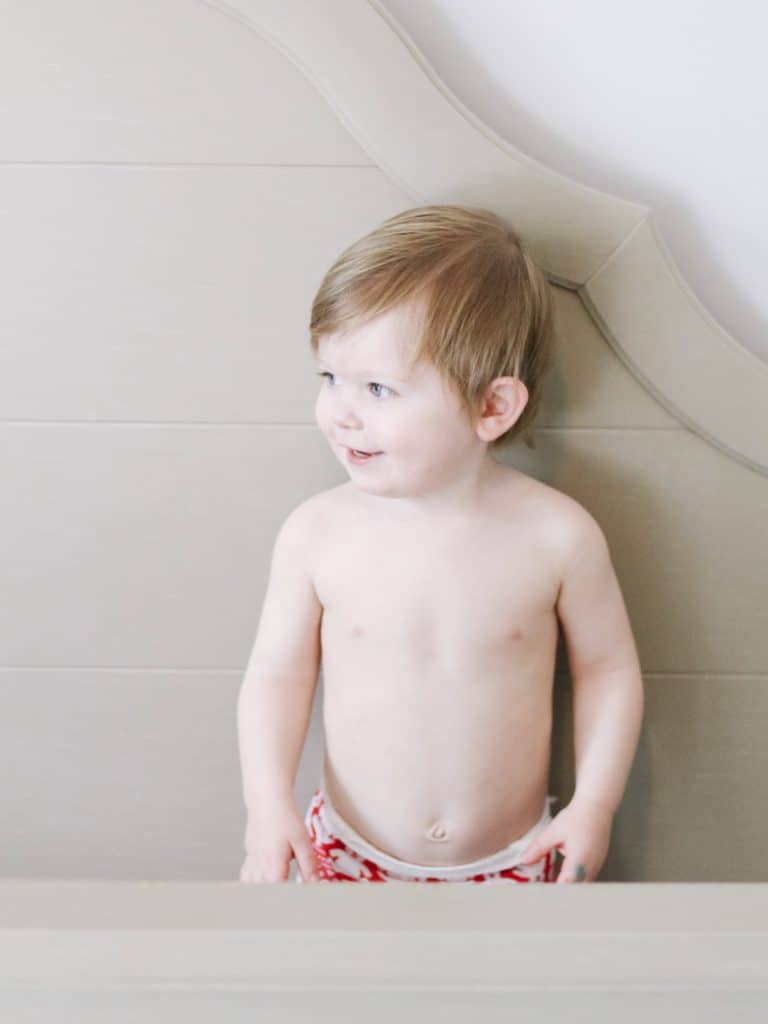
My sweet Walker back when he was still in a crib. Check out this post on toddler sleep schedules.
What Can I Do – Tips to Prevent Your Toddler from Climbing Out of Their Crib
So what can you do? You’re exhausted, your toddler is exhausted and you are desperate for some solutions.
Set Expectations with your toddler
The first thing you want to do is set up expectations and boundaries with your toddler. Make it very clear to them that their crib is for sleeping.
Avoid A Big Reaction
So you caught your toddler in the act of climbing out of their crib for the first time. Don’t draw attention to it. Don’t exclaim “Oh look at you! NO! Don’t climb out!” They will just think this is funny and proceed to do it again and again.
Be cool, calm, and collected. Once they climb out, simply put them back in and provide positive reinforcement to them for being and staying in their crib.
Set A Bedtime Routine
This may seem like a simple solution but make sure you have a sleep routine established with your child. This will help signal their brain that it is time for sleep and not time for play. Every night you begin your bedtime routine your child will recognize the steps and begin to prepare for sleep. You can make the routine as long or short as you like. A good idea is to stick to the routine and try not to deviate from it.
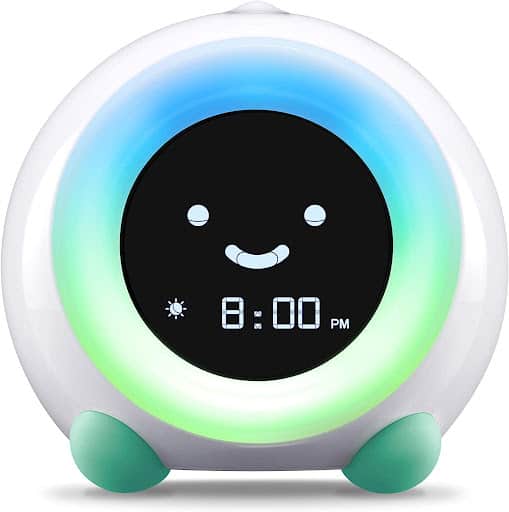
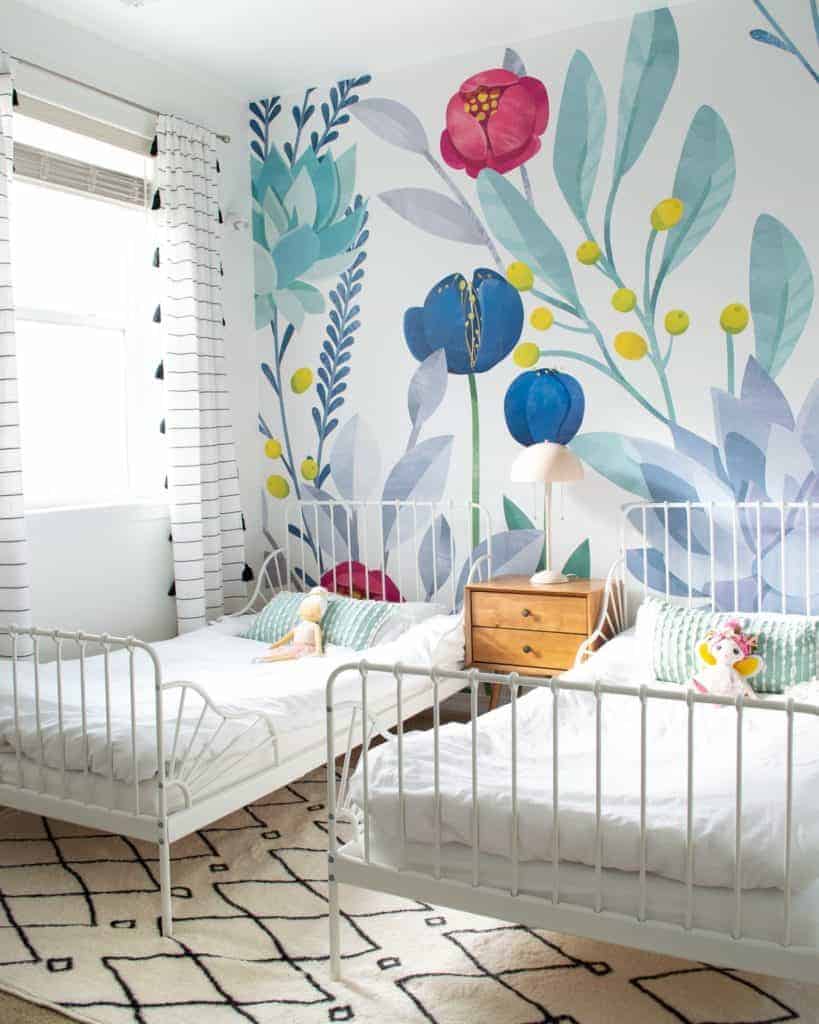
Consider reading and setting a clock as part of the bedtime routine like in this shared toddler room.
You’ll also want to ensure you are promoting an environment that is conducive for sleep. The best way to achieve this is to ensure you have the room dark enough for sleep. Blackout curtains are the best way to get it dark enough for your toddler and baby to drift off to sleep.
Another good idea is to have white noise playing. You’ll want to find a white noise machine that does not time off. When the white noise time goes off it can actually wake your child up and out from their sleep.
Make sure the temperature in your toddler’s room is not too hot or too cold. Experts recommend a temperature between 65 to 70 degrees Fahrenheit for optimal sleeping. If it is on the cooler side, you’ll want to dress them accordingly and plan for layers. If it is on the warmer side, make sure you dress them in light clothes that won’t cause them to become overheated.
Tips To Prevent Your Toddler From Climbing Out Of Their Crib – Sleep Sacks Save The Day
Invest in a quality sleep sack. This is a great option to help buy you time and curb that crib climbing. When your child is wearing a sleep sack they are unable to get that leg up to boost themselves over the crib. A toddler sleep sack is not something you can generally find easily in your local Target.
You may have to do some online shopping instead to get the best options. It should be a long wearable blanket that leaves enough wiggle room for them to stretch their legs out. You’ll also need to make sure that the sleep sack is not easily removed. The last thing you want to do is have your toddler learn how to remove their sleep sack all together.
Pack N Play Option
For younger toddlers, switching them to a pack n play may be an option. This would only work for young toddlers who aren’t tall enough to climb out and could buy you some time until they are ready to transition to a big bed. The mesh siding in a pack n play is harder to grip to climb out.
Okay To Wake Clock
For an older toddler, you can try an okay to wake clock. Toddler clocks are a great way to help your child visually see when it is okay for them to leave their bed. Every time you go in to get your child from their sleep the light comes on and alerts them that it is time to wake up.
After using it several times your child will make the connection that the green light means time to get up and play. This provides boundaries for your child and a little bit of trust on their part. At the same time, it also provides them with a sense of security that they know what to expect and can encourage them to stay in their crib until the light turns the correct color.
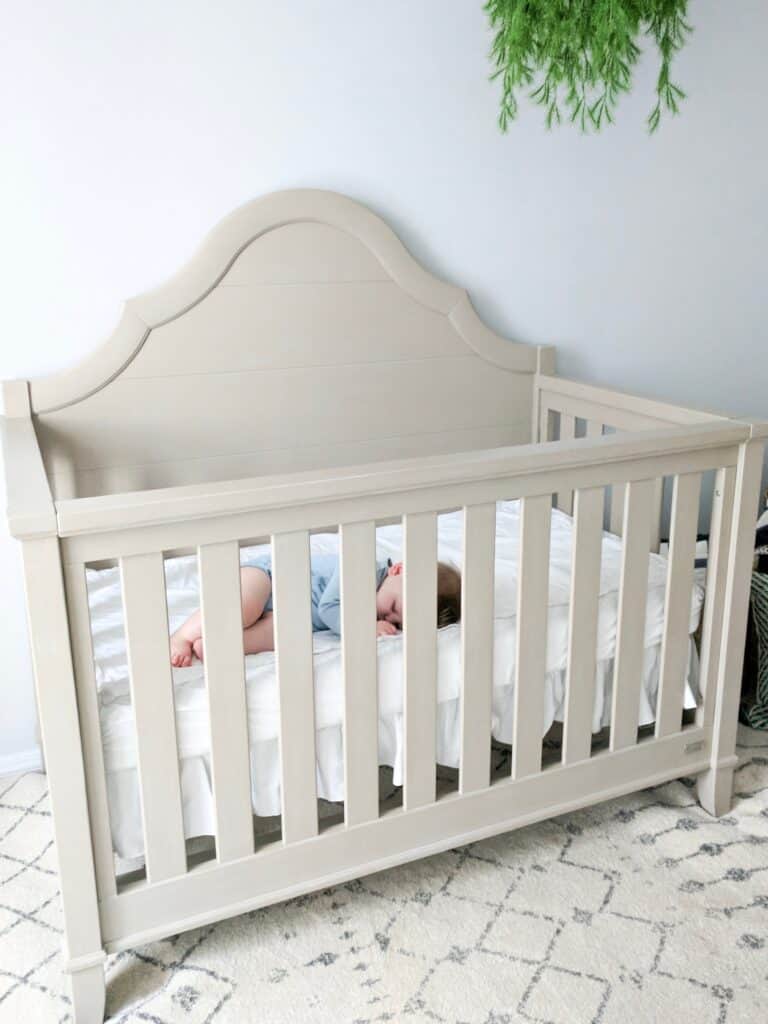
Lower The Mattress – this is the number one first tip To Prevent Your Toddler From Climbing Out Of Their Crib
This may sound like another no brainer but make sure you have lowered your toddler’s crib to the lowest setting. If it is already in the lowest position you can lower the crib mattress even further.
The bottom of the crib generally has a bottom with springs that holds the mattress in place. Remove that bottom and put the mattress on the actual floor. This will give you a few inches that may make it impossible for your toddler to reach the top of the crib.
Turn The Crib Around
If your child’s crib has a higher side and if all else fails, turn the crib around so that the lower side is to the wall and the higher side of the crib is facing outward. This will give you a few more inches and make it pretty difficult for your little one to reach the top of the railing to climb out.
Remove Items In Their Crib
Does your toddler sleep with their favorite book or stuffed animal? Remove the 12 stuffed animals and all of their treasures which may be helping them reach the crib sides to climb out. Go back to the basics of nothing in their crib but them. They may have a difficult time not sleeping with their favorite monkey, but the good thing is they won’t be climbing out of their crib anymore.
Tips To Prevent Your Toddler From Climbing Out Of Their Crib – Remove Temptation
Is your toddler climbing out of their bed to play with their toys in their room? Or are they trying to reach their favorite books that are in plain sight? Remove the temptation and any items that may be the cause of their wanting to climb out of their crib.
Toys can go into baskets and books can be stored on a bookshelf away from the crib. You’ll also want to make sure that their crib is not near any pieces of furniture that may assist in their escape. If the rocking chair is near the crib railing they may be able to use it as leverage to help them climb out. Keep your furniture far enough away that it won’t help with escape plans.
Crib Tents – A great short term crib climbing solution
You may see some products advertised where a tent or canopy is placed over the crib to help keep your child in their crib. For safety reasons, I do not recommend using these products. Anything placed over the crib could cause strangulation or could cause your child further injury by getting caught in them should they try to climb out of their crib.
Bed Readiness Tips To Prevent Your Toddler From Climbing Out Of Their Crib
So you’ve tried all the crib solutions, all the tricks, and nothing is working. Your toddler is still climbing out of their crib and you are ready for your sleep and sanity to return. You may have to consider if your child is ready to make the move to a new bed.
Signs of Toddler Readiness to Switch to a Big Bed
The average time a child switches from their crib to a regular bed is between 3-4 years old. That being said, I generally switch my kids to their big-kid beds between 18 months to 2.5 years old. I will say that you have to assess each child’s readiness individually and make your decision based on your child.
It may be harder to transition a younger toddler (less than 2 years old) due to impulse control issues. The longer you’re able to wait, the more you’re able to reason with them which will help keep them in their bed.
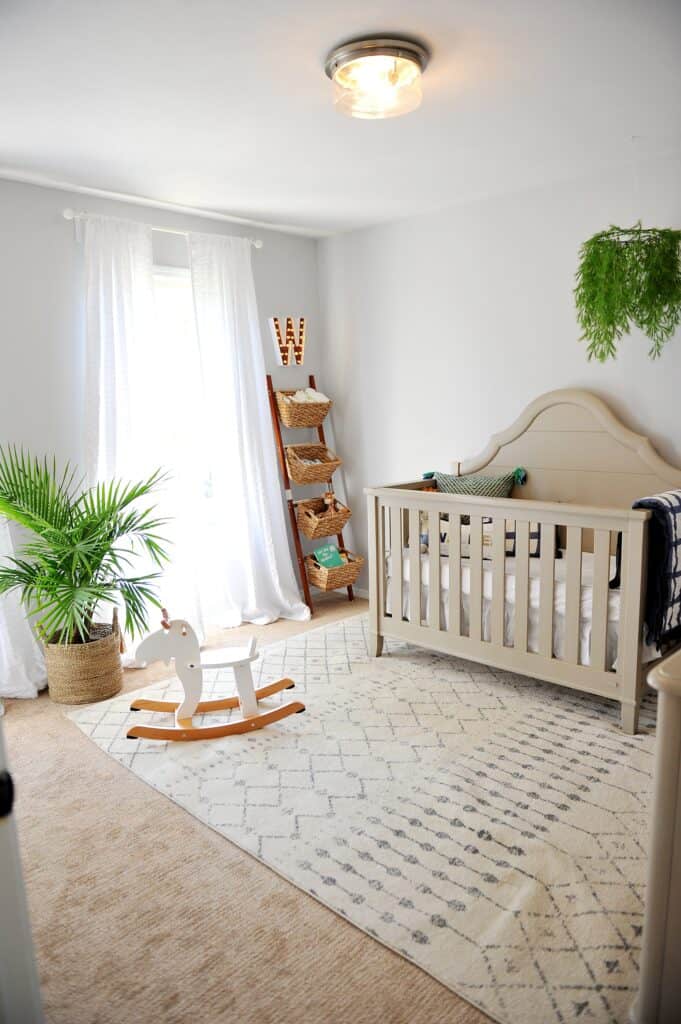
This adorable room is complete with an Ikea toddler bed.
When Not To Make The Transition
Keep in mind that you don’t want to make the transition to a big kid bed during periods of transitions. That means if your child is in the middle of potty training, just starting school, or becoming a big brother or sister in the next few weeks, then now is not the time to make the move.
You need to wait until they have a full sense of security and control in their life. This will lead to less pushback and a more successful transition.
Bed Security
You also have to keep in mind that a crib is designed to keep your child safe and to help them feel secure. Their entire life all they have known is that crib. Once the walls come down, that sense of security they feel may come down with it.
Instead of having a confined space, now they have their entire room and a huge bed. That may be scary and a bit overwhelming for a young child.
It may be useful to transition them first to a toddler bed. A toddler bed has a rail on the front part of the bed to help keep that security. The bed itself is similarly sized to their crib and is lower to the ground for safety.
This is a great feature that allows them to get in and out of the bed easily but while sleeping still provides that sense of security with the guard rails. Once they have mastered a toddler bed you’ll have a smooth transition to a twin bed or full.
Easing into The Transition
Involve your toddler in the big decision to transition to a big kid bed. Have them pick out their bedding, accessories, and any stuffed animals that they want to sleep with.
Make it a big deal that they get to have this amazing new bed. Set them up for success by talking about their new bed before making the transition. You want to get them excited and onboard for this switch.
Make sure you keep the same bedtime routine and establish those boundaries. They need to know that it is bedtime and that means it is time for sleep, not playtime.
What a fun toddler bed to help ease the transition.
An okay to wake clock is a great option here too. They can visually see when it is time to wake up to play. If they continue to get out of bed, you need to continue to put them back to bed. They may test those boundaries, but consistency is key.
If all else fails, I highly recommend reaching out to sleep consultants. They are trained to look at each child as an individual and apply solutions tailored to your child. Better sleep is worth every penny in my book!
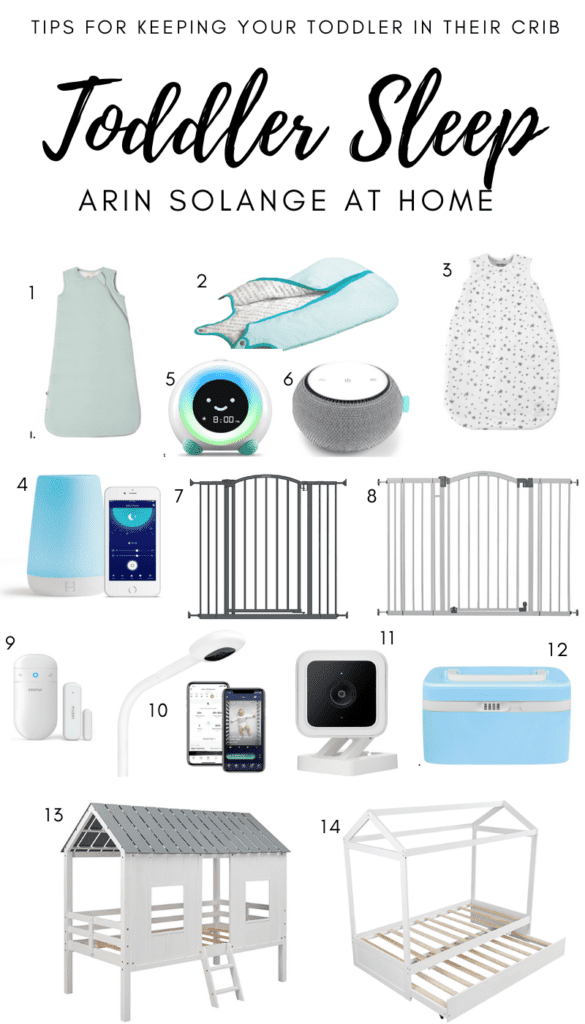
My Favorite Products To Prevent your Toddler from Climbing out of Their Crib
Nanit Pro Smart Baby Monitor actually gives you a record of your child’s sleep! As a bonus you have access to sleep experts for a full year after purchase.
Wyze is a great video monitor option for a fraction of the cost of a Nanit Pro.
SoftSea Twin House Loft Bed is a great option for those climbers who transition to a big kid bed. This is similar to a toddler and will help keep your little one feeling secure.
I hope this post gave you some great ideas on tips to prevent your toddler from climbing out of their crib. I know it can be difficult with little sleep and patience to put the steps into place. Just remember that this is a phase and will soon pass. You’ve got this! If you have any questions, feel free to leave them in the comments section, and follow me on Instagram @arinsolange for more home, decor, and DIY. Good Luck!
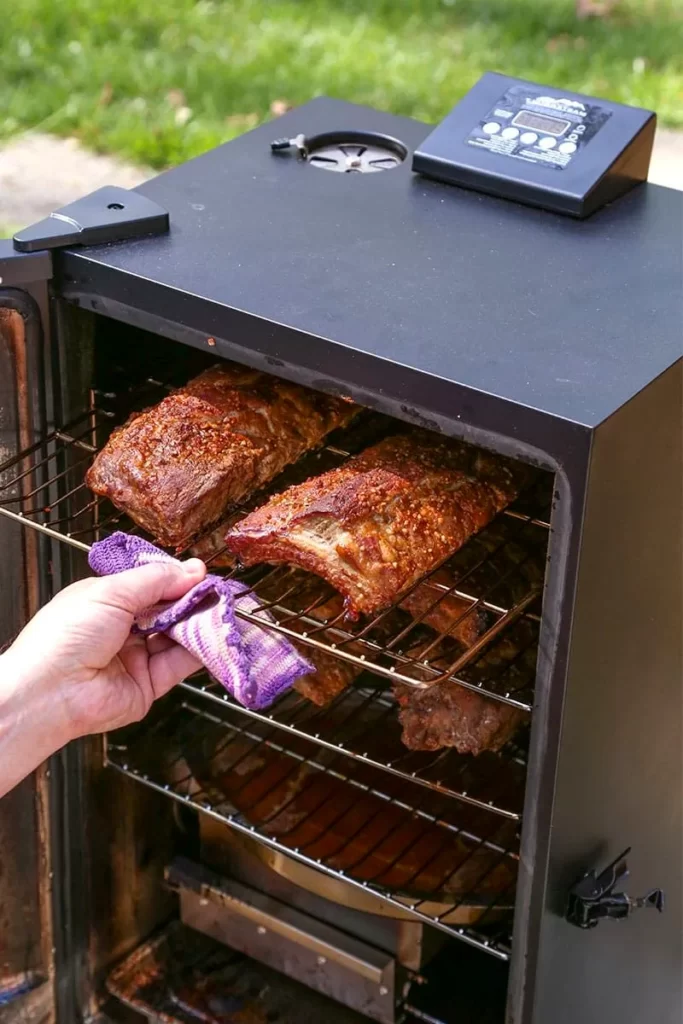
If there is one mode of cooking that I am constantly dying to try after about 10 minutes on social media, it is smoking. Whether it be meat, or cheese, or basically anything you can think of people are smoking it these days – and we had to jump on that bandwagon. When we were picking our smoker we did a lot of research on electric smoker vs pellet smoker and I wanted to share that insight with you in case you are selecting a smoker for your family.
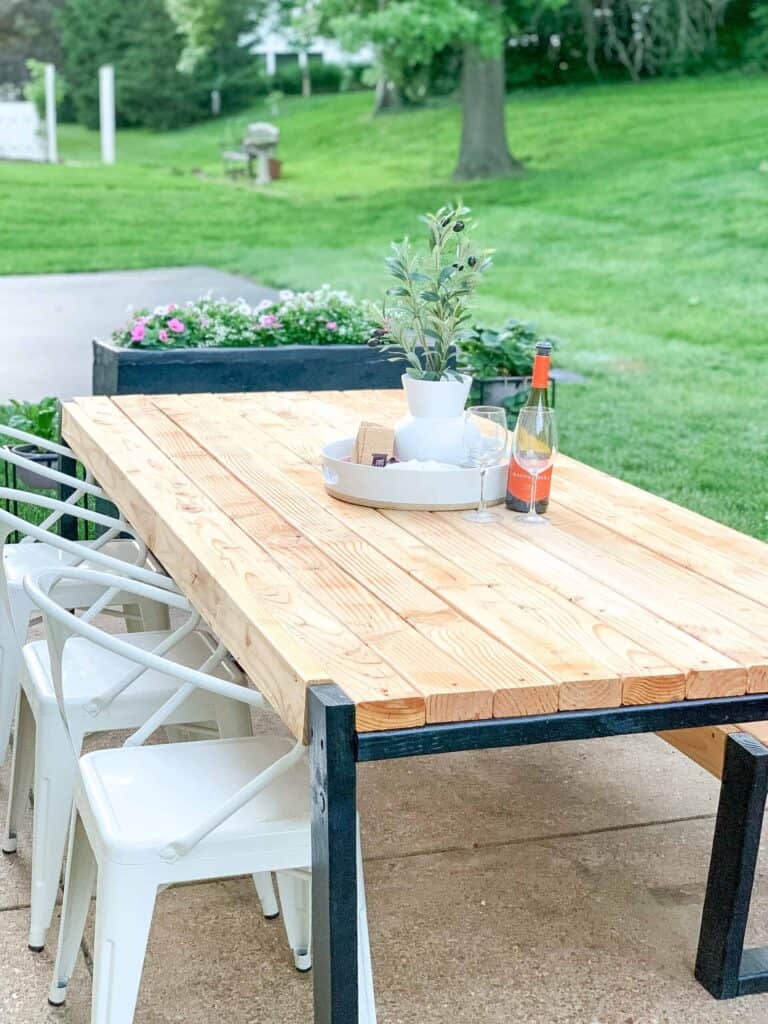
Check out my post on patio hacks for a more enjoyable summer.
This post may contain affiliate links and was updated in March of 2024.
We just had our first big snow in St. Louis and the cold weather has me dreaming of summer already. One of my favorite warm weather activities is being able to sit outside and enjoy family time. We love walks around our quaint neighborhood and eating out on patios with friends.
Two summers ago, we purchased a smoker and it has been such a great addition to throw the best summer BBQs. If you have ever wondered what the key differences are between the different types of smokers then the good news is this post is for you. I’ll go over the best electric smokers and the best pellet smokers for you to elevate your summer BBQs.
What Is a Smoker?
Before we get to Electric Smokers vs Pellet Smokers I have to admit, Sam is the one in our family who is the barbecue master. I tend to stay clear from outdoor cooking. If you are a long time reader, you’ll know that cooking is not my forte. I prefer home decor and DIY to cooking and creating recipes. Nonetheless, I looove a good BBQ.
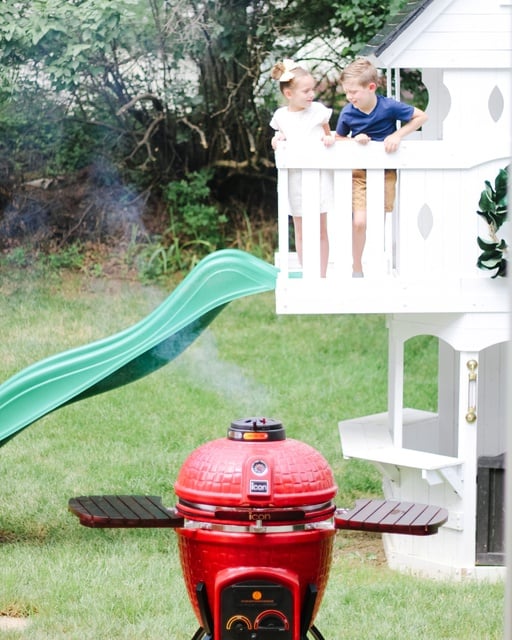
A couple of years ago when on the smoker hunt, we landed on an ICON Kamado Grill. When we first got the smoker, I was a total novice and didn’t know much about what made the perfect smoker. Honestly, I didn’t really know the major difference between the various types of smokers.
In my research, I’ve learned that the type of smoker you have makes a big difference in the overall unique flavor.
First things first, what exactly is a smoker? If you’ve ever had great barbeque, you’ll know that one of the things that makes it so good is the smoky flavor and tender meat. How exactly does that happen though?
A smoker is used outdoors and maintains low temperatures to cook your meat low and slow. The smoker creates smoke around the meat to be absorbed for that smoky meat flavor.
There are many different types of smokers that can create that smoky flavor utilizing a variety of heat sources. When you are looking at smokers, it is key to look at the heat and power source, versatility, flavor profile, budget, and size.
This is a great guide on using the Masterbuilt electric smoker.
Electric Smoker vs Pellet Smoker – Types of Smokers
Smokers vary by cooking process, as well as by shapes and sizes. The type of smoker you choose to buy can be dependent on your lifestyle (are you a novice or pro smoker?), type of fuel you prefer to cook with, type of flavor preferred, and versatility. Consider the amount of people you generally cook for and your outdoor space where your smoker will reside.
Some smokers can be bulky and extremely heavy, which may not be ideal. On the other hand, some smokers can be a large investment, which may not be feasible for all. The kind of smoker you ultimately decide on should be perfect for your budget, time, and type of barbeque you wish to smoke.
An offset smoker comes in both a horizontal and vertical design. An offset smoke is a two part smoker with a cooking chamber and firebox. The cooking chamber has long grates with a door and smokestack.
The firebox is attached to the cooking chamber and is where your heat source and smoke are created. That smoke then travels to the cooking chamber and out of the smokestack. One of the pros about offset smokers is that you can cook a large amount of meat.
These pit boss grills are commonly used by BBQ pitmasters. They can also be used as a dual smoker and grill option and allows for cold smoking for greater versatility. Fuel cost is typically low and these units can last for the long run. One of the cons is that these types of smokers are a big investment. Additionally, units can be bulky and difficult to move.
Like I said above – this is what we have. If you have ever seen the Green Egg, then you’ve seen a Kamado smoker. The Kamado grill is extremely versatile and serves as a smoker, grill, and wood oven. If you are wanting lots of versatility and a piece of cooking equipment that can do it all outside, then this is a great investment.
And an investment it certainly will be as these types of grills cost in the thousands range. One of the advantages of this grill is that between the ceramic material and egg design, a large temperature range can be achieved allowing for different cooking methods to be used as well as the ability to cook lower temperatures for long periods of time. The ability to cook low and slow is perfect for smoking and creating an incredible flavor.
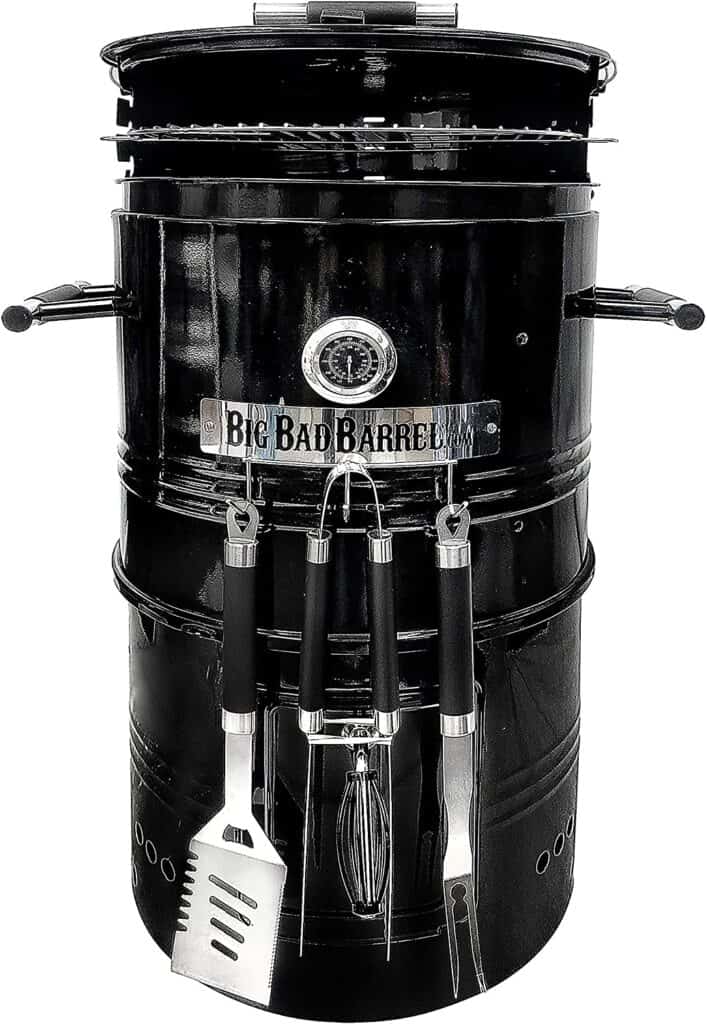
Drum smokers are exactly as you’d imagine. A giant drum where you have layers consisting of your heat source (charcoal or wood), grates for where your meat cooks, and vents to control the temperature.
These are simple and fairly cheap for those with a tight budget. You can still get a great barbecue as they can maintain lower temperatures overtime. The use of wood in the drum also creates a nice wood smoke flavor. On the downside, these aren’t that impressive to look at and can be difficult to maintain a consistent temperature.
Water smokers are extremely popular and known to be a perfect choice for those who want to have quality smoked meats without the hefty price tag. These are much more appealing to look at in comparison to a drum smoker, and are great for smaller patios as they are fairly compact.
The smoker has a bottom level for where your heating element is located. Some consist of charcoal or wood while other smokers use gas or an electric element. Above the small fire is a water pan that distributes heat and regulates the cooking temperature and smoke.
Above your water pan can consist of grates or hooks where you place your meat. This a great option if you are just starting out to smoke your barbecue and have a smaller budget. It also takes up less space and can be used in small spaces.
A propane smoker is extremely similar to an electric smoker. The biggest difference is that propane is used as the heat source. When it comes to making this choice – the biggest thing you may want to consider is your access to an electrical outlet. Sometimes having less cords can make propane a great choice.
What’s The Difference: Electric Smokers vs Pellet Smokers
While we’ve gone over several common types of smokers, electric smokers and pellet smokers are two of my personal favorites. Both are known for being able to cook at low temperatures consistently for long periods of time with accuracy.
Unlike the previously mentioned smokers, these smokers are known as hassle free smokers. While they are very alike, there are some key differences to note that may make one the better choice for you and your lifestyle.
Electrical smokers are most known for their convenience. You can set your electric smoker, walk away, attend a pool party, and come back and have a smoked meal.
Power & Heat Sources
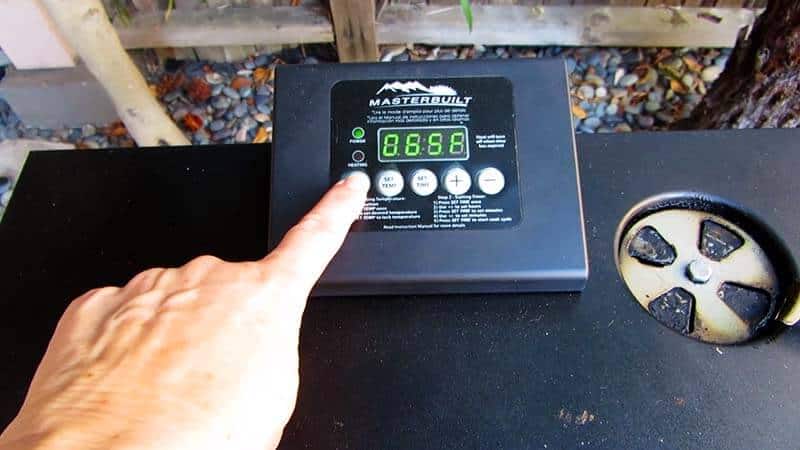
They work similarly to ovens by using electricity as the power source. You simply plug in your smoker. Rather than using hardwood pellets to smoke the heat, the heat source is electricity via a metal heating rod.
Since you aren’t using a real fire as a heat source, you won’t have the same amount of flavoring as you would in other wood smokers or charcoal smokers. These electric models do have a wood chip tray where you place wood chips to help achieve a woody flavor.
The benefit of electric smokers is the ease of use. Electric smokers have a precise temperature control which allows you the benefit of walking away. Wood and charcoal smokers require constant watch to ensure the right temperature is kept.
Digital controls control the internal temperature and are often available on your smartphone. With the use of a smart meat probe, you can be sure that the right temperature is being met.
These smokers also aren’t like traditional grills and only have the smoking option which lacks versatility. Higher temperatures are unable to be reached in electric smokers and can generally only reach up to 275 degrees Fahrenheit.
As a result, this can cause issues with certain meats, like chicken and turkey, that require a temperature of 300 degrees for crispy skin. On the other hand, electric smokers can reach lower temperatures at 100 degrees that can’t be reached by pellet smokers.
As a result, electric smokers are ideal for cold smoking. To be honest, I didn’t know cold smoking was a thing but apparently, you can use it to smoke things like cheese without causing it to melt.
Another guide to using your electric smoker can be found here.
Flavor & Food
Electric smokers aren’t the best choice for having a natural woody smoky flavor. They also produce less smoke overall. Since a fire is not used as the power source, this results in the less intense flavor and does not create a smoke ring.
A smoke ring is seen in the meat when a reaction takes place due to the low temperature and gasses from the oxygen flowing from the fire. Since electric smokers don’t use fire as a source of heat, this smoke ring can’t be achieved. If you aren’t a professional BBQ pit master this lack of smoke ring may not be a huge deal breaker for you.
Electric smokers are generally pretty compact but have plenty of cooking space for large quantities of meat. You do have to be mindful about quality products. You generally get what you pay for and if you opt to buy a less expensive option you may have a cheaply made unit. Overall, these are less expensive than pellet smokers.
Pellet Smokers
Pellet smokers are the best option if you want the convenience of being able to walk away from your smoker, but still having that fire source used in the smoking to create that authentic smoky flavor.
Power & Heat Source
Similarly to an electric smoker, pellet smokers also use electricity to maintain cooking temperatures with the use of a digital controller. Pellet smokers do, however, use pellets as a source of power and cook the meat over a natural wood fire.
In a pellet smoker, you have a storage container that you fill with your wood pellets. An auger motor takes those pellets to be burned in the cooking chamber where smoke is created. The motor also helps control the temperature by adjusting how much air is allowed in to control how fast or slow the pellets burn.
Back in science class, do you remember a combustion process? Sound familiar? Pellets that are burning at the bottom of the cooking chamber are ignited by air from intake fans which help this combustion process take place.
Smoke and heat are distributed over the meat cooking, resulting in that delicious flavor. Because you are cooking your meat over the fire from burned pellets, you have an incredible flavor.
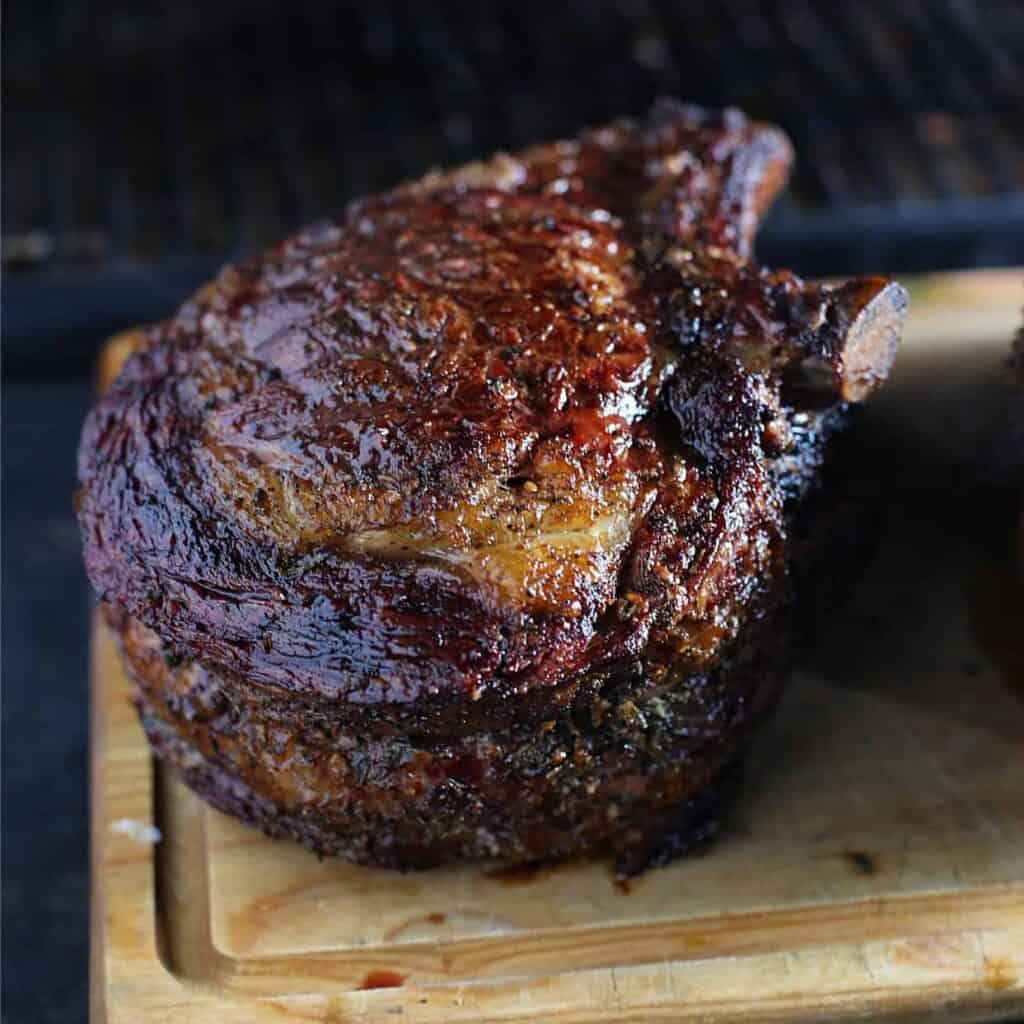
This smoked prime rib was made on a Traeger pellet smoker and the recipe is available here.
Versatility
Different models allow some pellet smokers to be used as pellet grills. Temperature ranges from 170 degrees up to 500 degrees Fahrenheit. If you want the option to have more versatility with using it as a grill, ensure you get a model that can handle those high temperatures.
Size & Budget
Pellet grills are much heavier and larger in comparison to electric smokers. You are not able to move these smokers around and once you have it anchored in your backyard, it would take quite some heavy weight lifting to move.
Pellet smokers are an investment. Keep in mind that you have the benefit of setting this smoker up and walking away while still having an authentic smoky flavor. You have the best of all the worlds in this option.
In my option, you get the best results with the use of the fire and benefit of using the digital controller to help set the temperature. You will certainly pay more for models that are more versatile and can handle more than just smoking.
In total, pellet smokers can cost anywhere from a couple hundred dollars upwards to thousands of dollars. You’ll also have the added cost of your bag of pellets. On average expect to use 2 pounds of pellets per hour with most meat smoking to take several hours. In the end, the best results take time and patience.
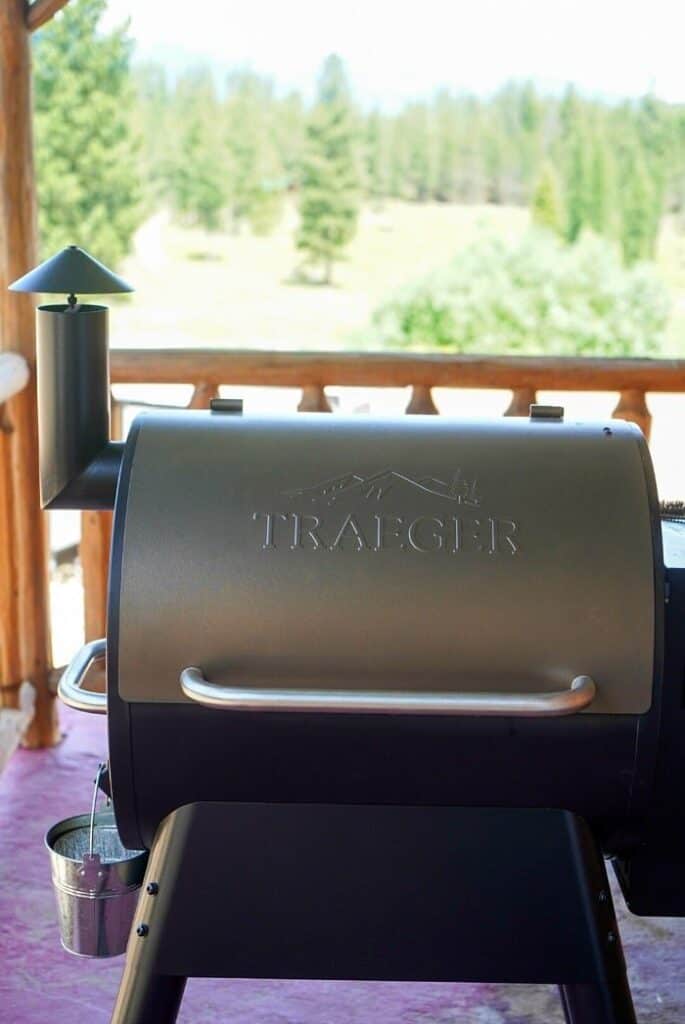
3. Traeger Pro 575 Series Pellet Grill & Smoker– WiFIRE technology, as Traeger calls it, connects your grill to your home WiFi and the Traeger app allows you to control the grill from anywhere!?
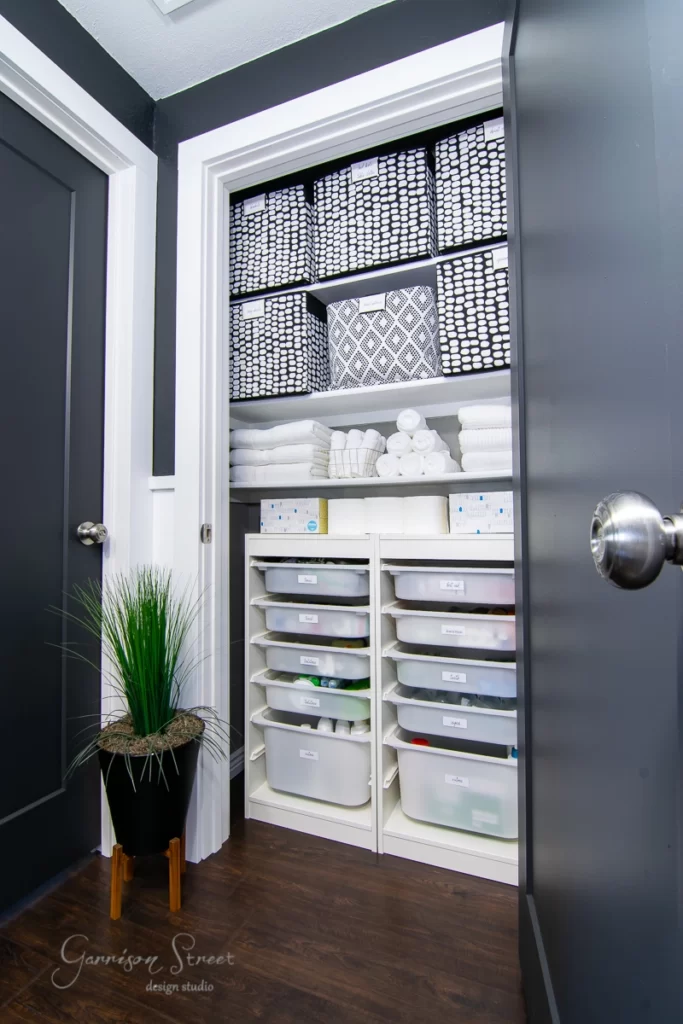
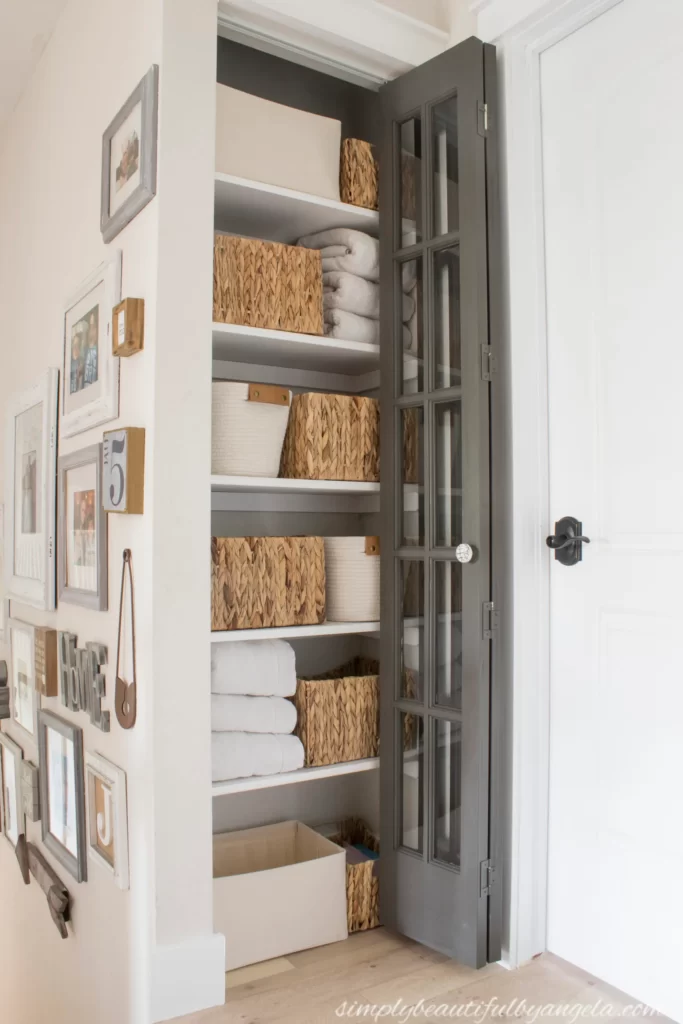
Who is ready for the best Linen Closet shelving ideas? I am on house number two of getting creative with linen closet shelves to make the minimal space we have more functional. Today I am sharing all the best linen closet ideas for making your own linen closet more functional and beautiful.
This post may contain affiliate links
Linen Closet shelving Ideas
Owning a historic home comes with certain challenges. The floors and ceilings are never perfectly straight, layouts can be impractical, and well we won’t even mention what happened last year to our pipes.
Closet space in an older home can be few and far between. We were lucky that most of our rooms had decent storage space. I have, however, neglected our hall linen closet since we’ve moved in.
I finally got around to a linen closet makeover and I could not be more excited about the results. I’ll go over my top tips for an organized linen closet and how to make a linen closet of your dreams.
Before we talk organization and shelves in your linen closet – you first need to begin by decluttering your space. For those of my readers who have followed along with my nursery closet organization tips and bedroom organization tips, this first step may seem repetitive.
I can’t stress it enough though. This is the best way to figure out where your needs are and where you need to trim down. If you are still saving sheets from your baby’s crib and your baby is now a 10 year old, it is time to toss those sheets!
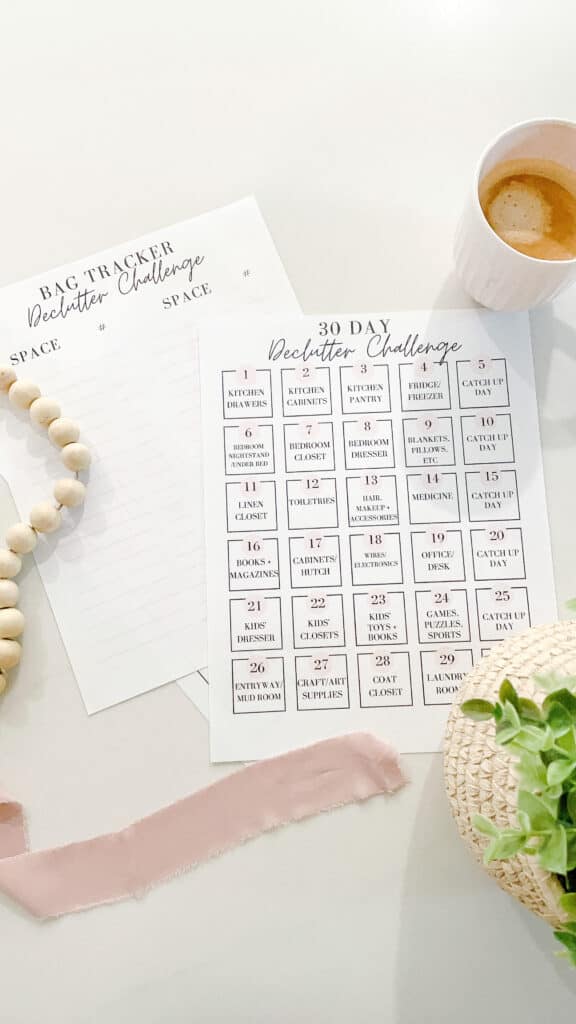
Check out these tips and tricks to start decluttering and a free free printable document that will help walk you through your whole house in 30 days.
Once you declutter those items, you can decide what makes sense for you and your family. Decide what needs to stay, what can go, and what can live elsewhere.
It may make sense to keep your sheet sets in your bedroom, or perhaps, you decide to move your beach towels to the laundry room.
Would it make more sense for extra blankets to be kept in wicker baskets in the bedroom? Determine what you’d like your linen closet’s purpose to be, and everything can go in their proper places.
You’ll also want to keep in mind that the items you do store in the linen closet should be safe and make sense for all household family members.
You want your items to be in a convenient place, but it may not be safe to keep the family’s medicines in an area where little hands can access. Consider the perfect place for your items and your family’s lifestyle.
Arranging Your Items
You’ll want to arrange your linen closet for easy access and convenience. Keep in mind there are many different ways to do this. If you happen to have multiple closets, like a bathroom closet or other utility closets, you’ll need to decide what makes sense to go in your linen closet.
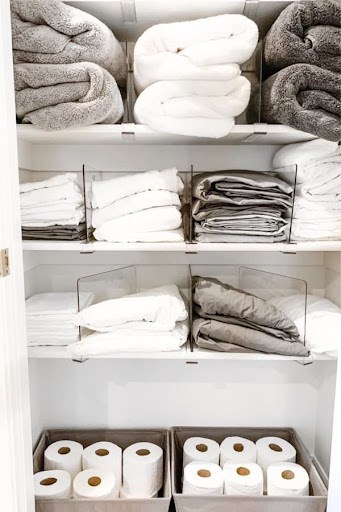
If your linen closet is strictly for linens, a great idea is to assign each shelf to a bedroom. Your children’s shelves will be closer to the bottom of the closet, while the top shelves are reserved for the adults. Each shelf will contain bed linens, bath towels, etc.
If the linen closet contains a mixed bag of items like toilet paper, extra pillows, paper towels, and different sets of sheets, consider organizing by convenience.
Bulky items can be placed on the bottom of the closet, while items that are commonly used can be placed at eye level. The top shelf can house unused items and lighter items. This is a good method to use when you are limited to a small space. The end goal is for an orderly linen closet that is functional and convenient.
I’ve said it before and I’ll say it again, your closet is not your junk drawer. Don’t just toss random cleaning supplies and spare towels on the open shelves and expect to find yourself fully maximizing the use of your closet.
Visual clutter can be easily tamed in an inexpensive way with a little bit of time.
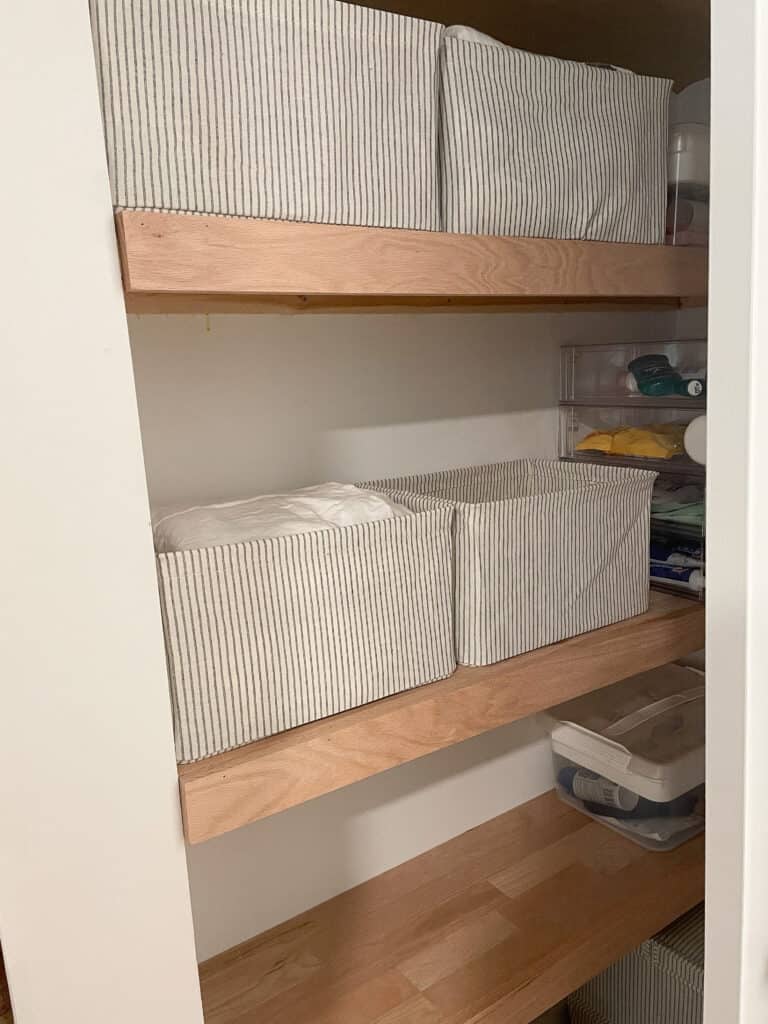
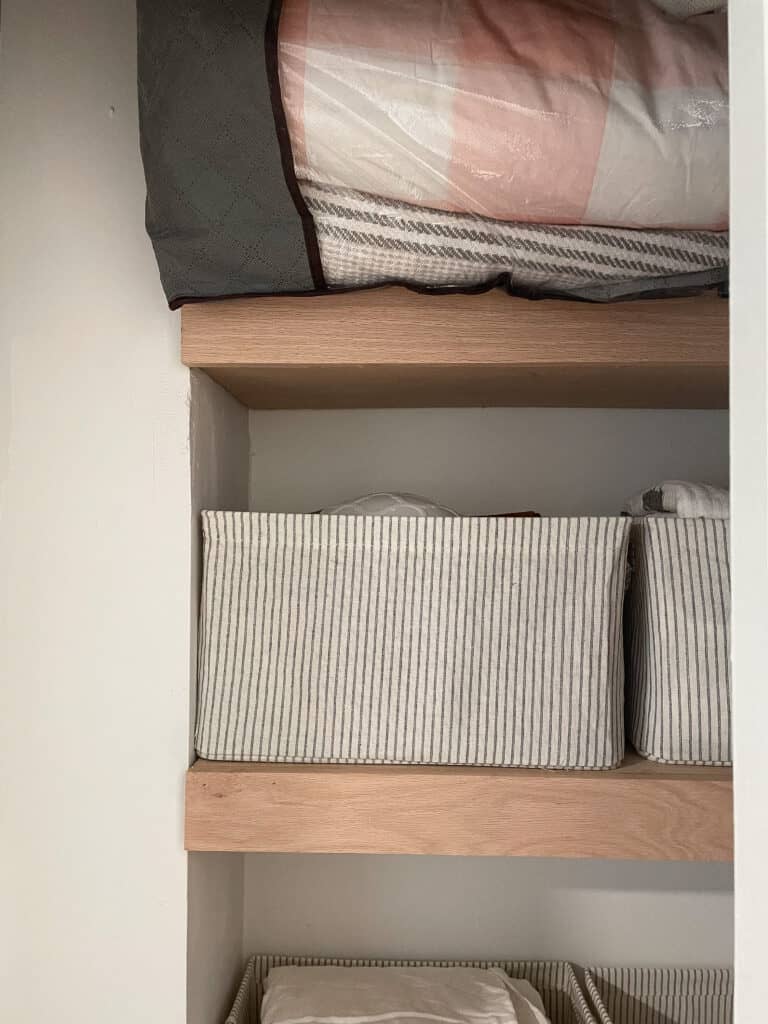
Opt For A Shelving System
If you have a blank canvas to work with, you can always invest in a shelving system. This doesn’t need to be overly expensive and can be as simple as installing a few wire shelves. If you want to get on the more fancier side, adjustable shelving is a great option as it allows you easier access.
Sam and I have created our own shelves in our last house and our current house. We love the outcome and look of our DIY wooden shelves. Linen closet shelves don’t need to be some elaborate system. With some hard work and elbow grease, you can install your own.
The easiest way to create extra space and contain chaos is by investing in storage bins. The baskets can be anywhere from fancier wicker baskets to mount wire baskets. The baskets are key to containing small items that clutter your shelves.
Clear bins are my personal favorite because they allow you to see what is inside. I don’t have to spend time searching for which basket I’ve placed the item in. Instead, I can just grab and go.
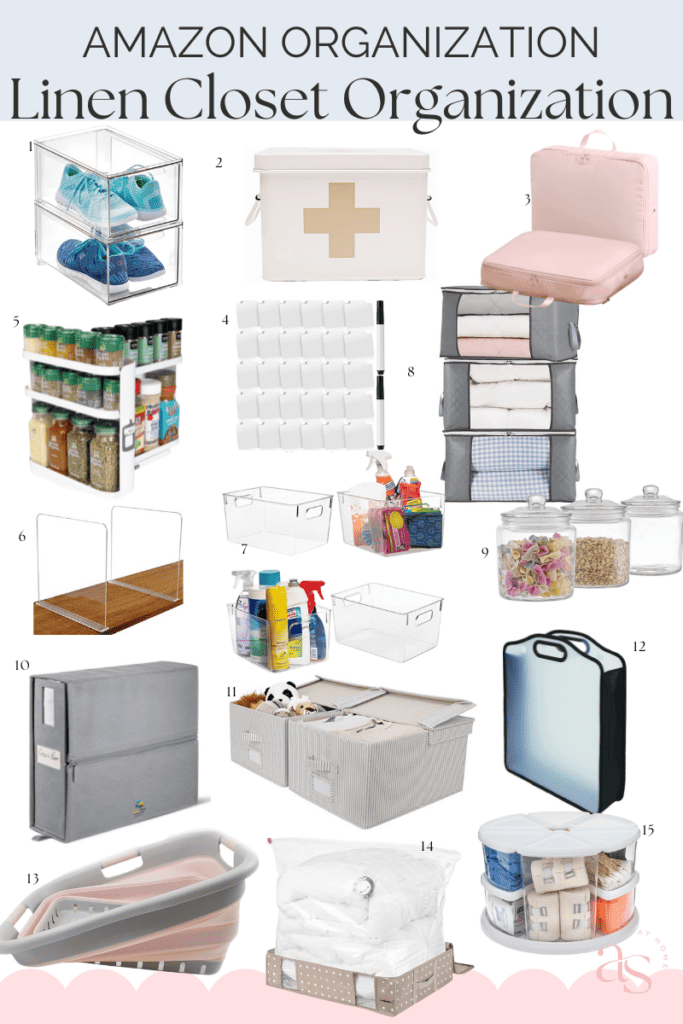
My Favorite Linen Closet Baskets
Label Your Items
If you don’t go with clear storage bins, consider using a label maker to label the baskets you use with what is inside. This will allow you to find those smaller items more quickly.
You may also consider labeling other items, not just baskets. If you decide to organize your shelves by room, label the shelves so you know which shelf goes with which room.
If you organize your shelves by more commonly used items, then label the sheets so you can easily see which sheets go to the correct bedroom.
Talk about organized! This linen closet can be found here.
Linen Closet Shelving Ideas – Consider Dividers
Dividers are a good idea to help you organize your shelves. With open shelving, you may need a more defined space to help create that defined space for different items.
If you have deep shelves, you may not only need dividers, but shelf risers to create extra space. There is no such thing as too much space.
My Favorite Shelf Dividers
What a great use of shelf dividers found in this linen closet here.
Utilize Your Closet Door
Use all of the space in your linen closet by looking at the inside of the door. A closed door has plenty of linen closet storage space.
You can hang a door organizer to contain small items that may otherwise be lost, think batteries, buttons, sewing kits, etc.
If you have a small closet and need additional space for storing shoes, a shoe organizer is an easy way to accomplish that.
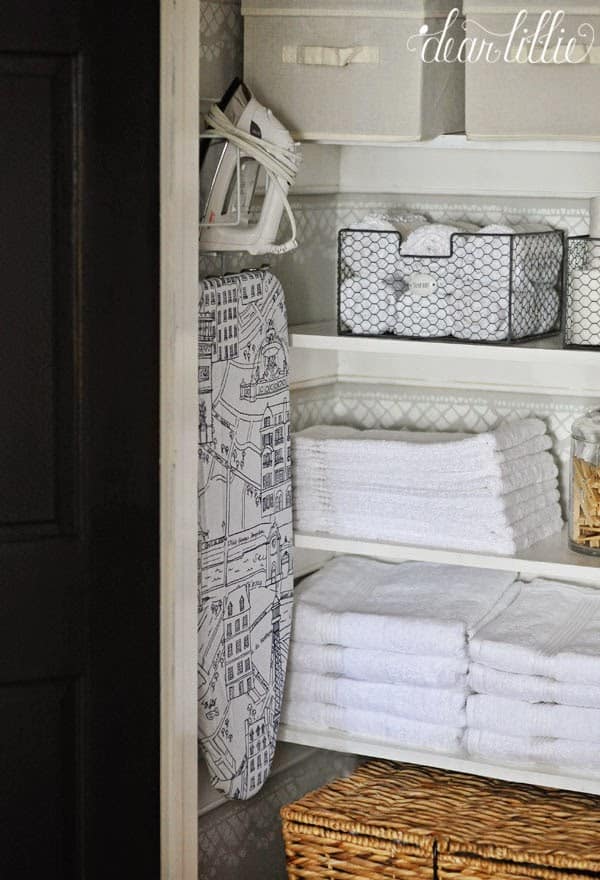
If you are struggling to find a place for your bulky ironing board, you can hang it up on the back of your linen closet door. You can use door racks or buy the ironing boards that are made for over the door storage. These are easy ways to contain the bulk and still have it be functional.
Not an inch of space is unused in this linen closet found here.
Learn How To Fold
Don’t underestimate the art of the fold. You can free up a lot of space and create a seamless look with the right fold. I won’t lie, I’m not the greatest at this, but it does make a world of difference.
Folding your sheets is another easy way to stay organized. I know some people swear by keeping their entire set of sheets inside their pillowcases .
That way, you have the correct pillowcase with the correct sheet set.
Other people prefer to keep all of their fitted sheets, pillow cases, and flat sheets separately. How you decide to organize it is totally your call. Just make sure you fold it orderly.
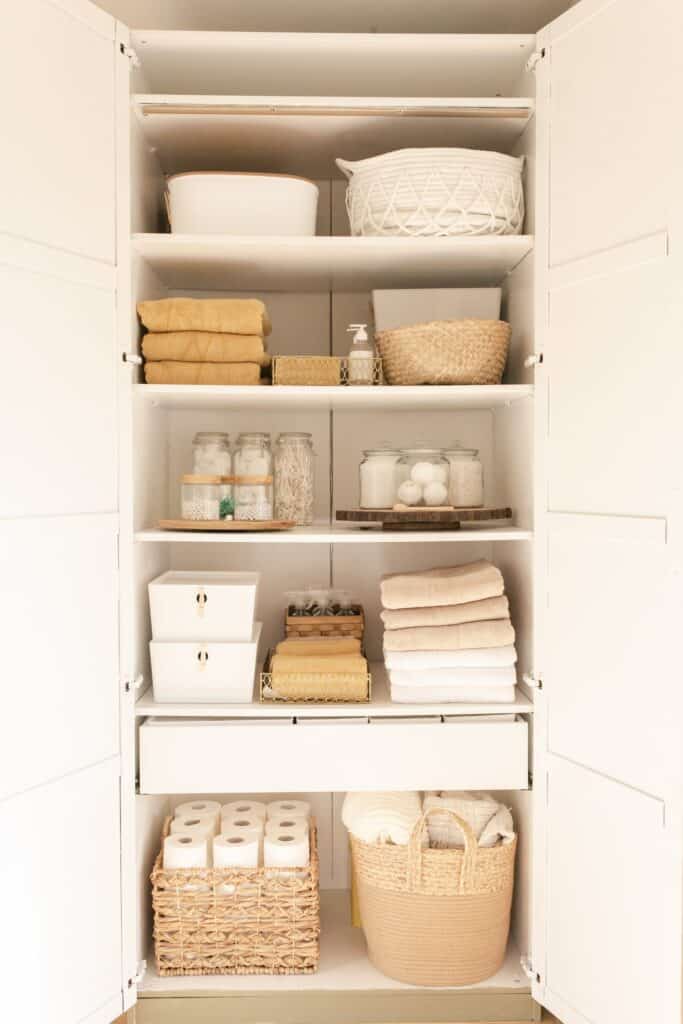
I love that this person created a linen closet out of an IKEA wardrobe. Great idea for small spaces.
Helpful products and More linen Closet Organization
Clearly I am passionate about linen closets – because I actually have another great post with all of my favorite Linen closet organization items.
I hope this post was full of some great linen closet ideas. You want to create a space that is convenient and functional. Grab some baskets, a label maker, and get yourself organized.
There are so many linen closet shelving ideas that can be easily incorporated today. Hopefully this post helped give you tips and inspiration to get yours functioning at its best for you. If you have any questions, feel free to leave them in the comments section, and follow me on Instagram @arinsolange for more home, decor, and DIY.
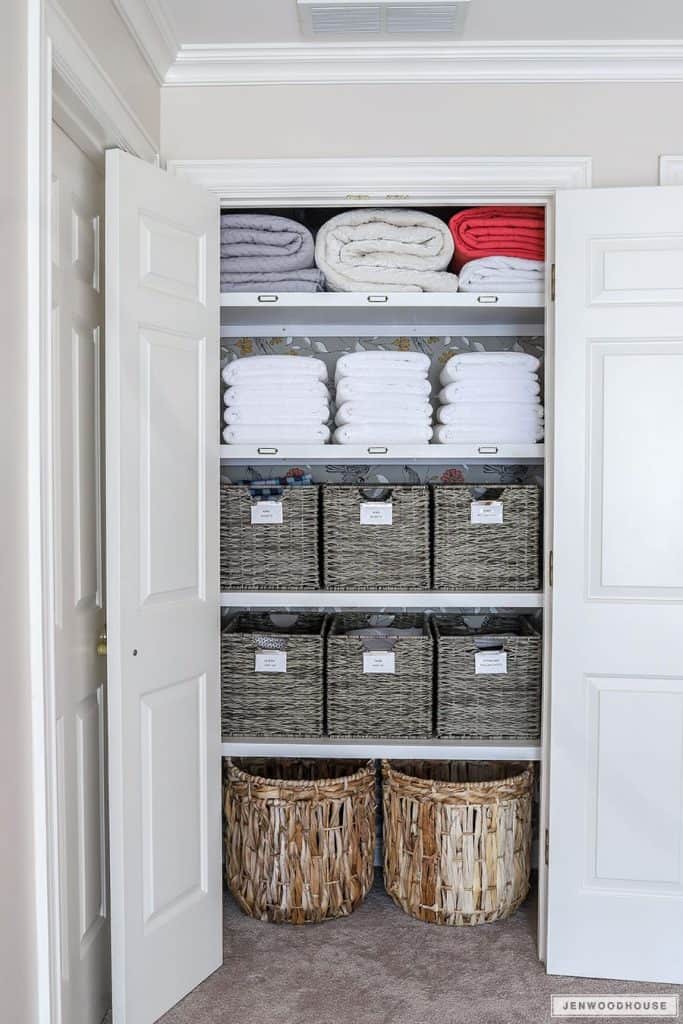
One of the most underrated spaces in a home is a linen closet. We are a family of 6 and with only one linen closet, I am always looking for how to organize a linen closet well, and keep it organized with daily use. If you have been looking for great tips for keeping your linen closet organized this post is just for you.
This post may contain affiliate links
How to Organize a Linen Closet
One year ago my family of 6 moved into a 150 year old home in St. Louis, and although we were able to add a linen closet during our renovation – we are still dealing with minimal storage with such an old home.
We have small bathrooms, so the single linen closet has large shoes to fill…or hold? It serves as daily excess storage, while also holding everything from beach towels, to extra decorative pillow cases, and the million tubes of toothpaste we seem to need.
In our past house we had a small linen closet for both ourselves and one for the kids, so I have learned over the years how to best organize these small closets to serve our family well, but also stay organized with constant use.
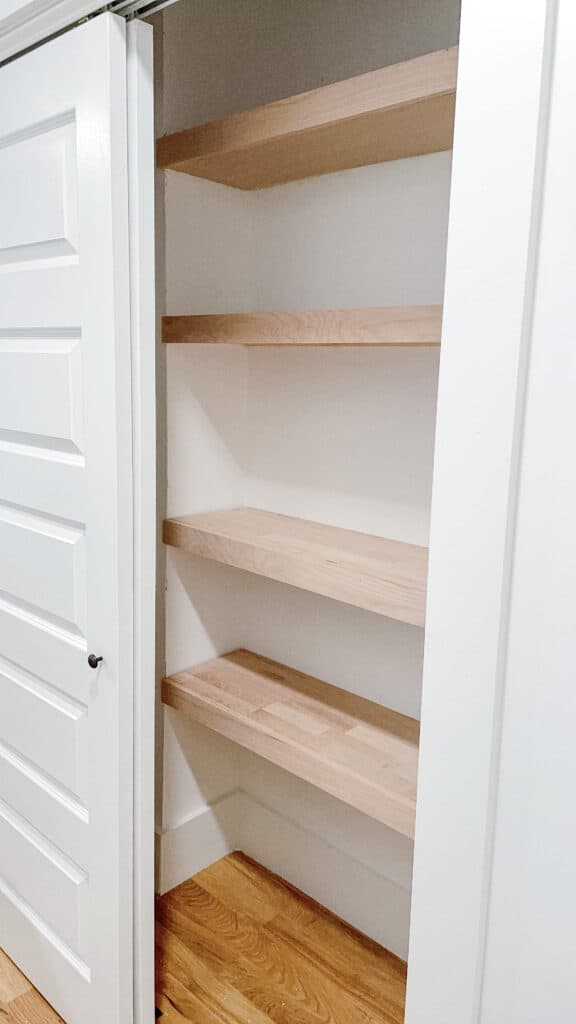
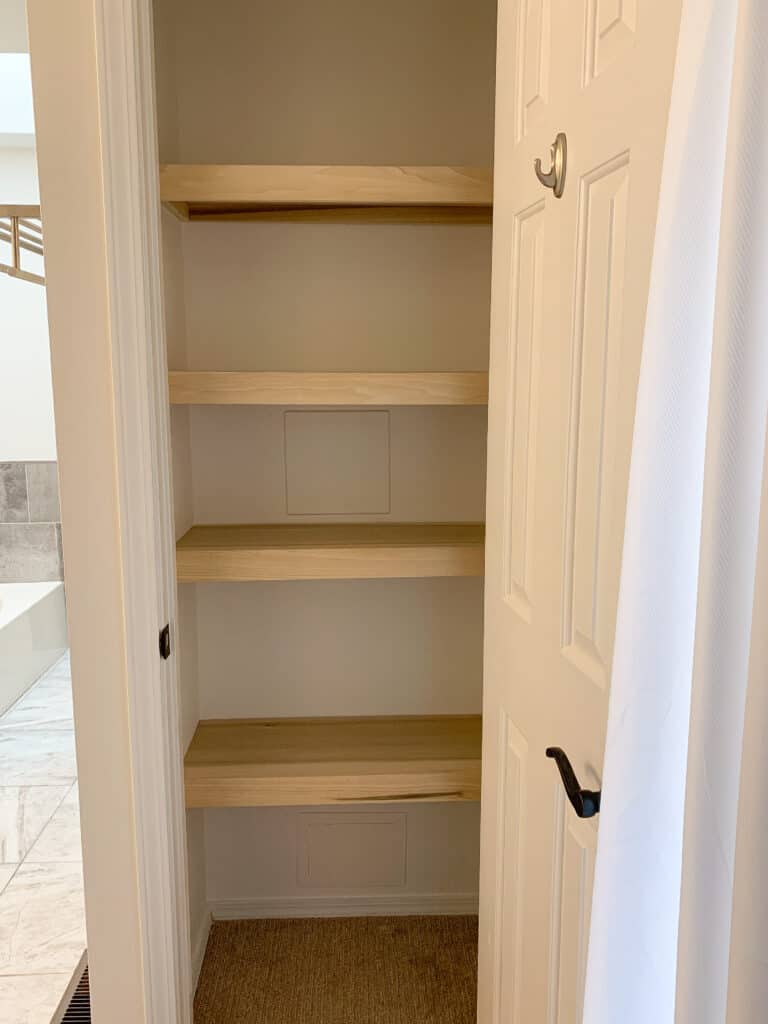
Getting your Linen Closet Ready
One thing that is important when it comes to organizing your linen closet is making sure you get the space ready. If you can add additional shelves sometimes that can be a huge help. I also find that solid shelves as opposed to wire shelves seem to do better in linen closets due to the small bottles that sit on them.
In our last house we did an easy DIY for shelves that were affordable and made the linen closet look so much more gorgeous.
It was such a simple update that truly made the space feel more high end and put together, which helped us keep it more organized, so we decided to go ahead and do the same thing here in this house.
A couple other things that will help get your linen closet for organizing are:
A fresh coat of paint on the walls. If your walls are not clean or really scuffed up – a fresh coat of paint can make a huge difference.
Make sure all shelves are placed at good heights for your storage needs.
Declutter Before You Start
The first step to organizing is to declutter. One thing to keep in mind when it comes to an organized linen closet is that you can not organize more stuff than the space fits. I tend to see myself as an aspiring minimalist and even I had way too much stuff in our linen closet.
Every year in January I do a 30 day declutter of my house. I push myself to get rid of 30 bags of clutter from my home, and the linen closet is always on that list.
If you are interested in doing the declutter challenge yourself, I offer the free documents to make it easier on this blog post about how to declutter your home.
Linen Closet Organization Ideas
Okay now that we have a prepped and ready linen closet, let’s talk the actual tips for organizing your linen closet. I also have lots of favorite products lower in the post, so make sure you check those out while you’re here.
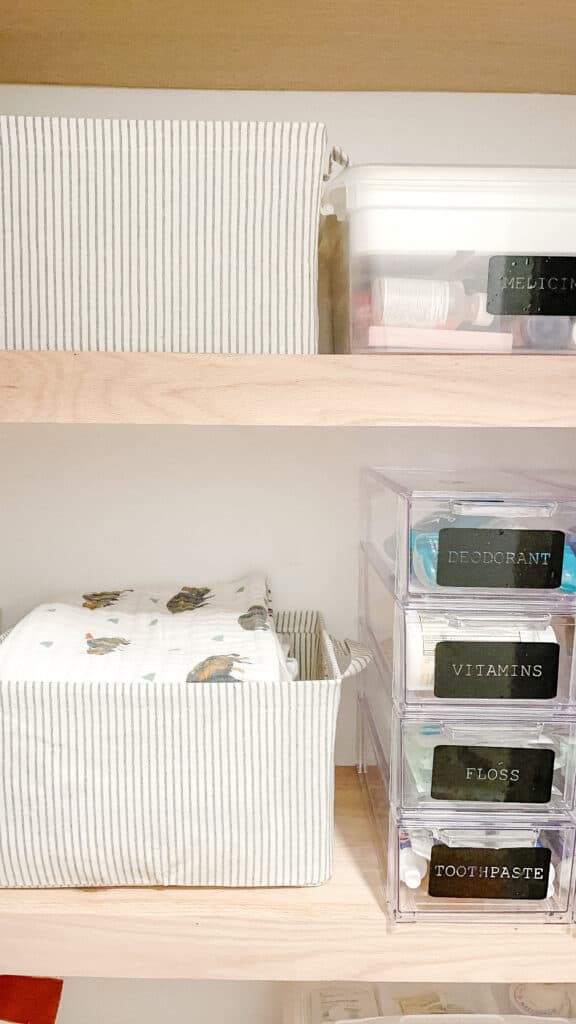
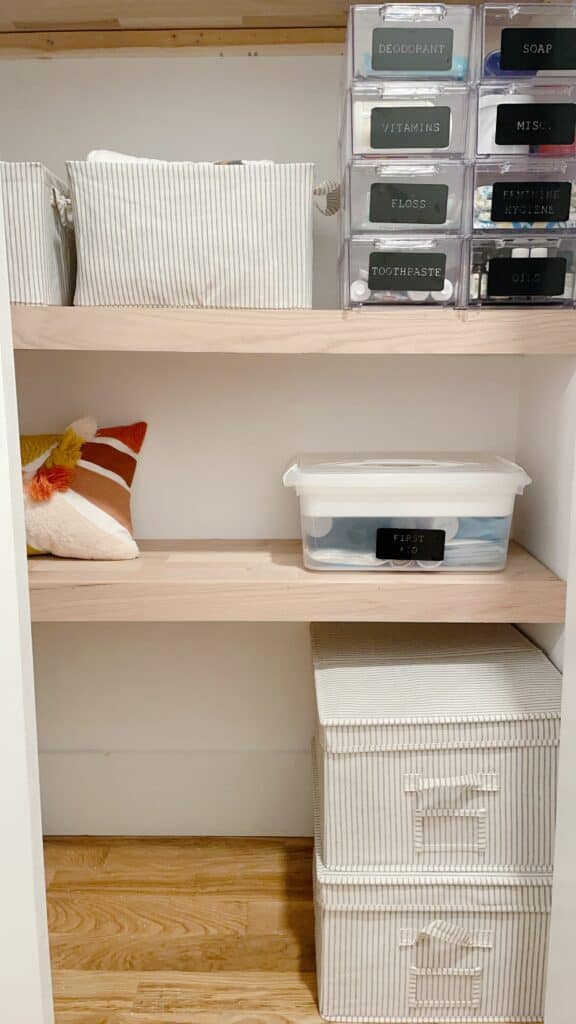
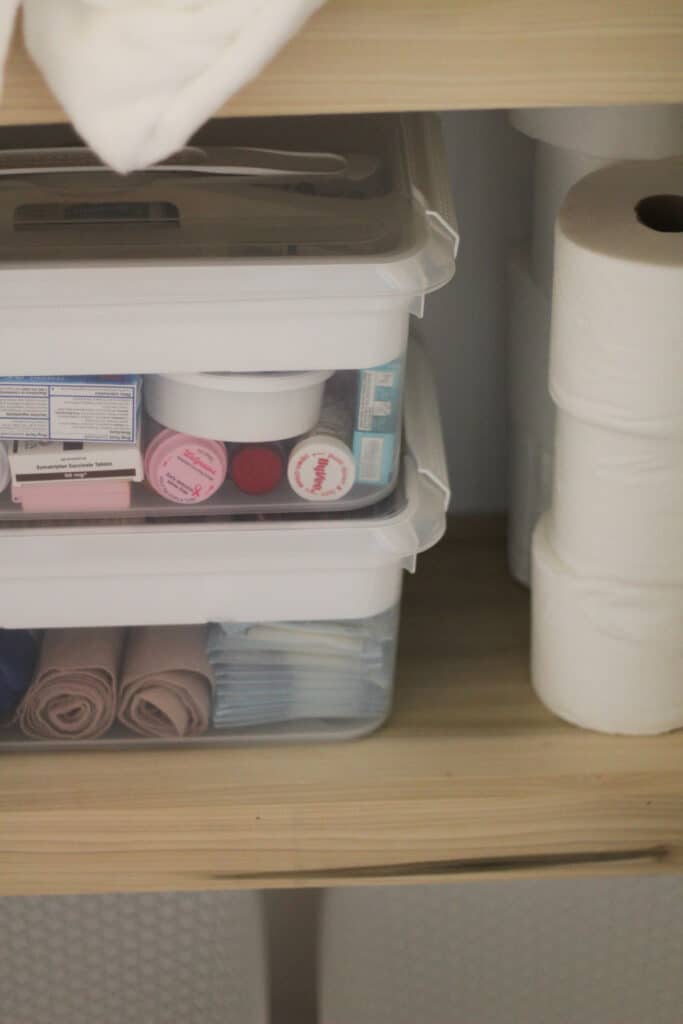
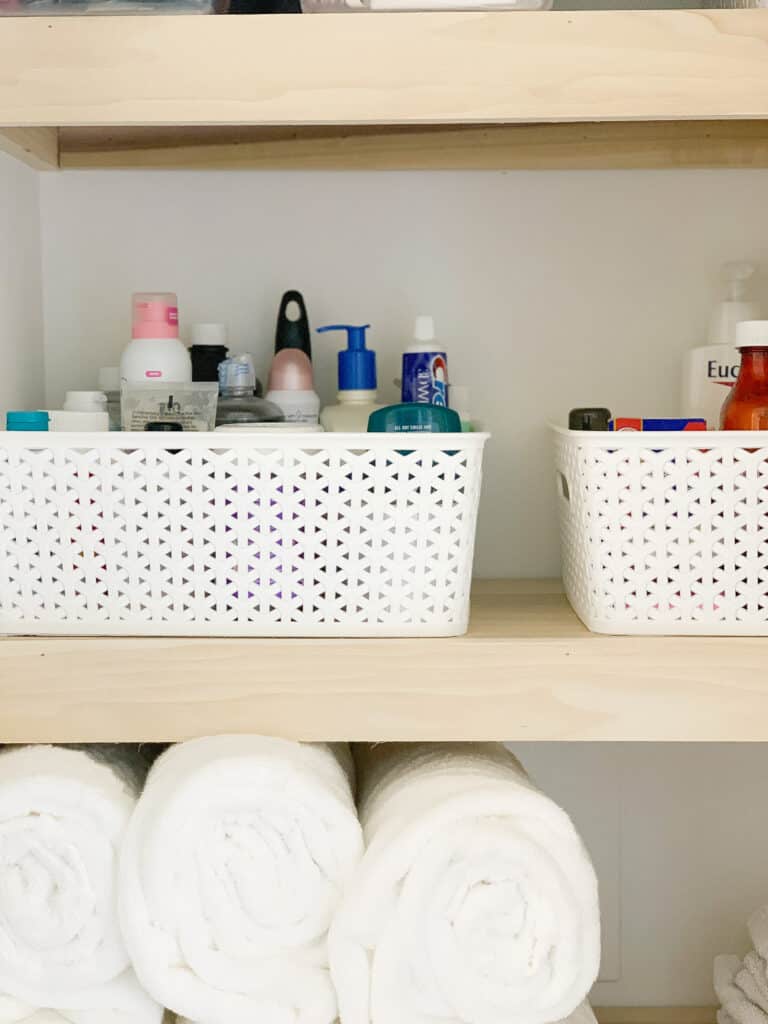
Storing Smaller Items
Linen closets are unique in the fact that they tend to house very bulky items as well as small items all together. My big suggestion with the small items is to keep them together and in baskets or bins. This will keep them from getting lost amongst the larger items and makes for a clean look.
I tend to gravitate towards baskets like this for quick reach items, and recently started using clear acrylic drawers for some of the other bulk items that don’t stand up well, like toothpaste. With the clear acrylic drawers, remember to stack the drawers so that you use the full height of that shelf for maximum storage space.
Storing Linens
Linens typically need to be stored in several different ways because in most homes you have linens that fill different needs, so I am going to walk you through what works best for me, and you can adapt and use what works best for you in your home.
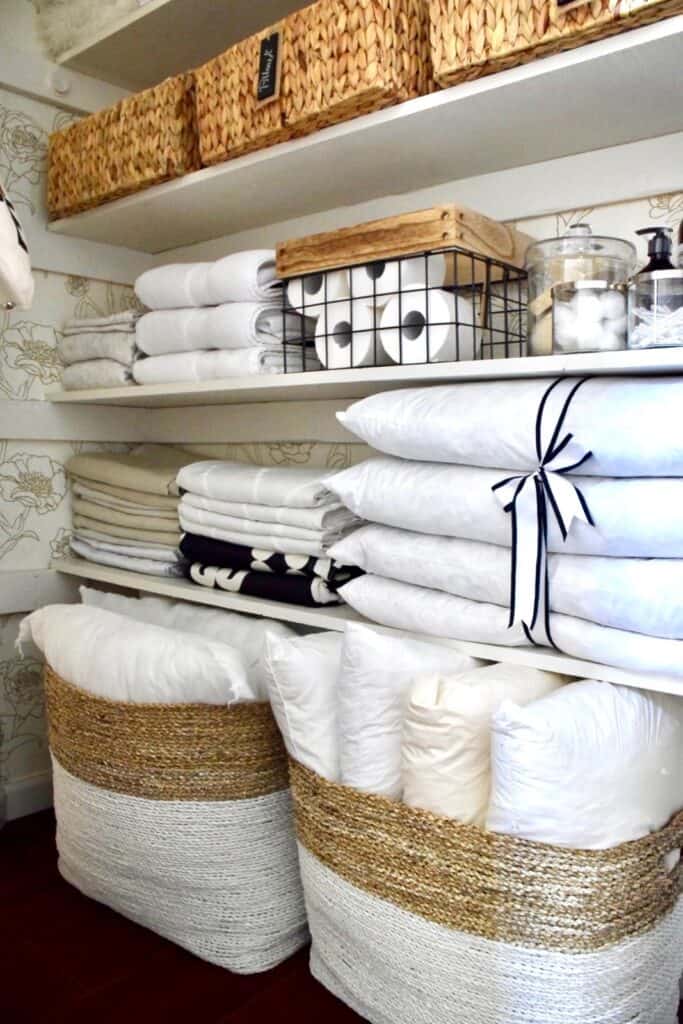
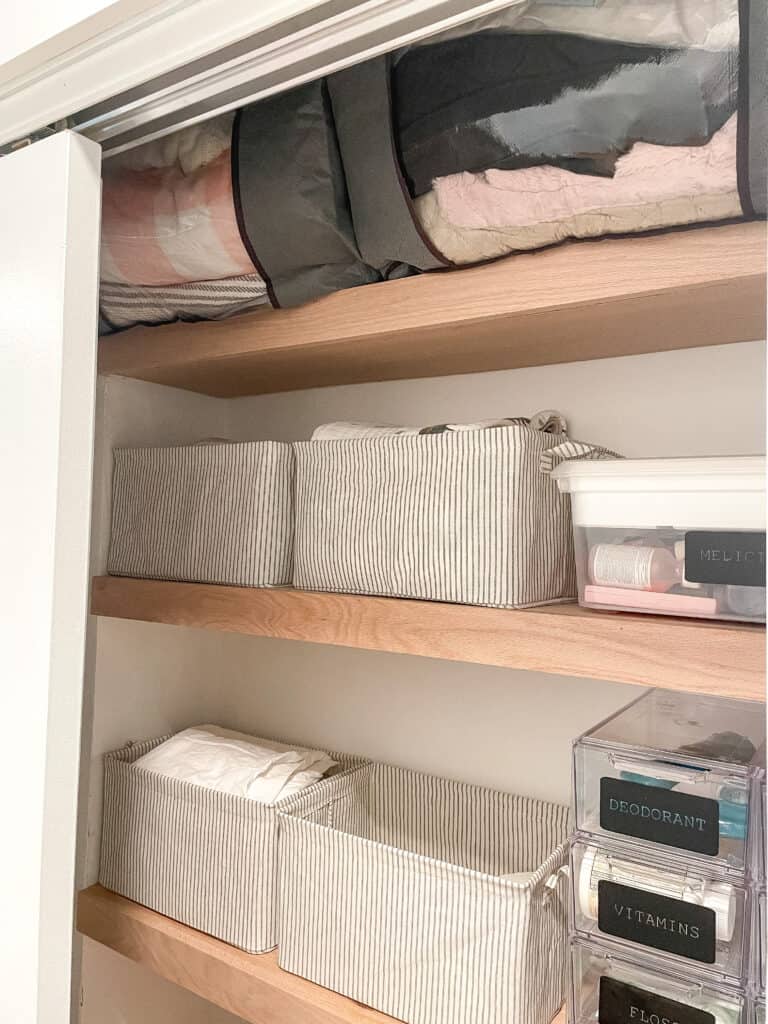
Top Shelf
On your top shelf I would add linens that you rarely use. Think things like seasonal quilts or pillow covers, extra duvet inserts, and things like that. Things that you are only getting down a couple of times a year. Because our guest bed is a pull out sofa, I also store all of our guest room sheets and bedding in one place on our top shelf.
To keep that space looking organized and functional I put everything in linen storage bags and it keeps them clean and fresh, while my linen closet looks organized.
Another great way to organize that top shelf is to use space saver or vacuum seal bags standing upright with those excess items that you don’t frequently use. The space saver bags free up a lot of valuable space and allow you to stand things up, which for homes like mine with high ceilings that is important.
Lower/ Easy to Reach Shelves
Because not all linens are kept stored for a long time, we need to talk about how to store the rest of the items you have. I will be really honest. I love having an extra set of sheets for everyone in my family, but I also hate folding them. As a 32 year old woman I still can’t figure out how my mom makes her fitted sheet look so nice in her linen closet (and yes I have tried all the tricks in the book).
My solution for keeping a tidy linen closet without the skills those fitted sheets need is to fold the sheet as best you can, then stack it with your top sheet and all but 1 pillow case. Once that is all stacked nicely slide the set of sheets inside the leftover pillow case, and add all extra sheets to a basket or bin.
For extra blankets – If they are blankets you use frequently you can fold them on a reachable shelf, but if they are rarely used I would again add them to a storage bag to keep things more organized and save space.
Towels
Is anything more debated than how to fold towels? I don’t think there is a right or wrong way, but I do firmly believe that rolling towels saves the most space. We keep all additional towels rolled on a shelf when needed, and washcloths and hand towels go in a basket.
Overall Rules to follow
The biggest things to remember when it comes to organizing your linen closet is that the items you are reaching for more often are at arms reach, and the items you rarely use are great options for higher shelves. Keep things like medicine out of reach of your children – so those are also great options for higher shelves.
Keep in mind who uses the linen closet and make it easy for everyone who uses the space to keep an organized space . This may mean using labels and a label maker, and keeping things that kids need to access in easy access so that they aren’t tearing apart the space while searching for what they need.
For things like sheet sets – keep an extra set or two in reach for accidents/ sick kids, but store excess up and out of the way. Table linens should be stored together, and in my case I even found that they were better stored in a hutch in our dining room.
Baskets are always a good idea, because anything roaming free will likely become a mess quickly. If you have high spaces between shelves, a good use of space is getting baskets or storage bins with lids that can stack. You want to use as much space as you can.
How I Organize my Linen Closet
To make things easier I have rounded up my own linen closet organization finds for you all below, as well as a small linen closet video tour to help share how these things can be used best in your space. As a family of 6 we have one linen closet that is by no means large. The tips in this post, combined with the items below have allowed us to keep an organized and gorgeous linen closet.
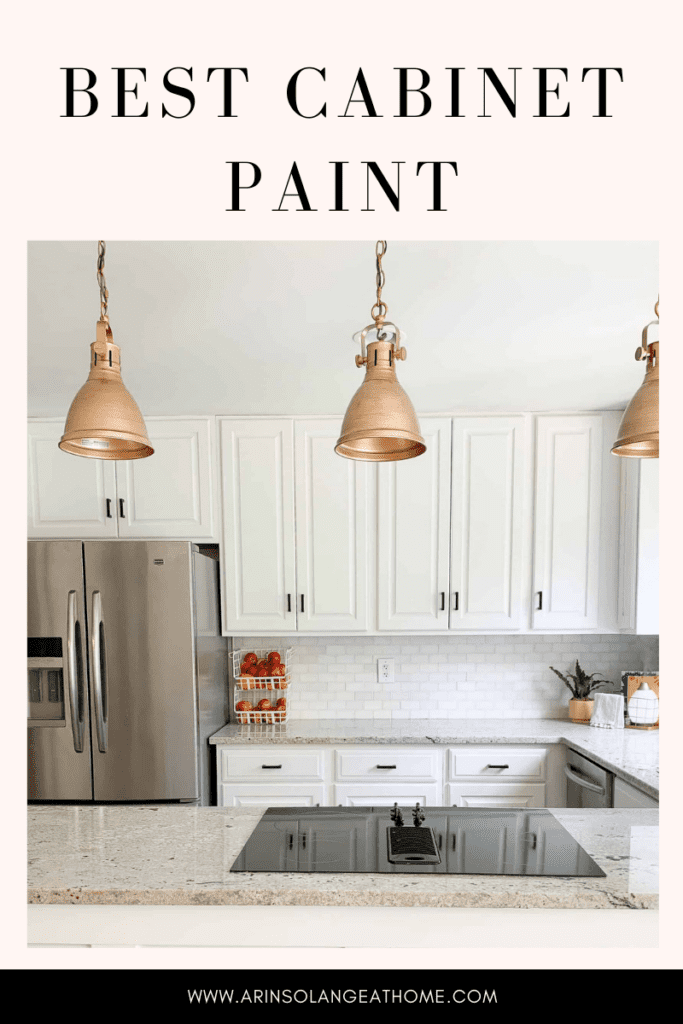
Cabinet Paint Explained: The Best Paint For Cabinets
Have you been wanting to do something drastic in your home? Painting your cabinets in your home can have a huge impact at a reasonable cost. If you want to paint your cabinets, whether that be kitchen, bathroom, or built-ins, then you are in the right place. In this post, I’ll go over the best paint for your cabinets. What a huge undertaking it is but the payoff is so incredibly worth it!
This post may contain affiliate links.
Cabinet Paint Explained: The Best Paint For Cabinets
I’ve spent my fair share of time painting kitchen cabinets. Cabinet painting makes an incredible impact to a room and is a super cost effective way to update an outdated space. You can make a huge impact without buying new cabinet doors. Before you take on this project, you’ll want to make sure you have the best cabinet paint and correct finish for a paint job that will stand the test of time.
Beautiful cabinets painted in Benjamin Moore Pale Oak, designed by Andrea McQueen.
Painting Existing Cabinet Doors
If you have never painted cabinets before, my advice is to begin with a smaller project to gain confidence. You don’t need to jump into a large renovation project right away. Rather, try your hand at a smaller project like a laundry room or bathroom to help you get proficient in the process and hone your technique.
There is never a great time to start a major project. Between kids being in school, work, and daily life, it is easy to put your home projects on the back burner. If you decide to take the leap and update your home for the change, you can check out my kitchen cabinet process here. It isn’t always easy, but with some hard work and determination you can do it.
Whether you are renovating your entire kitchen or simply changing out your decor, you’ll need to determine what is within your budget for the change. One way to help you stay on budget is to use what you have on hand. If you have cabinets that are already in great shape, then painting them to update their look makes sense. Replacing kitchen cabinets is not only expensive, but is a major renovation. I choose to avoid waste as much as possible which is why painting them works for our family.
To avoid ruining our functionally sound cabinets, I made sure to learn all the best steps along the way. I hope these tips and tricks will help you avoid any stumblings and give you confidence to take on this project.
Kitchen Cabinet Painting & Stock Cabinets
Between a pandemic, move, renovation, and a HgTV appearance, a lot can change. One thing that remains constant is my need to DIY
The playroom in our new home doesn’t have a lot of storage space. To help organize all of our toys, a built in system would be the perfect solution. In our last house, stock cabinets were so easy to work with that I knew they were the key for our new playroom. For our DIY with stock cabinets, see our post here.
Presently, Sam and I are in the middle of building built-ins in our living room (more on that later). Of course, I’ll need to find the right interior paint finish and a good quality paint to complete that project.
Between our bathroom, kitchen, playroom, and built-ins, I feel confident in our ability to paint our cabinets. I’m glad I was able to take the leap of faith and begin that first bathroom project. All of this is to say that even though painting cabinets can be overwhelming, don’t let it stop you from making a change.
This is such a great DIY and relatively inexpensive project that you can do with minimal tools. You just need to do the proper prep work: research and supplies.
Check out my post on our DIY repainting cabinets here.
Painting Kitchen Cabinets: Do Your Research On Paint & Prepare Wisely
When you begin gathering information on painting your cabinets, whether that be bathroom cabinets, kitchen cabinet doors and drawers, or bare wood built-ins, you need to make sure you get the right type of paint.
Not all paint is equal and you’ll need to ensure you are picking the best paint for the project. You may know that paint can come in different forms: oil paints, latex paint, alkyd paint, chalk paint, etc.
All are different kinds of paint. So let’s quickly go over some of these foreign paints and talk about which ones you want to look for and which ones you’ll want to straight up run from during your cabinet painting project.
True oil based paints are no longer available in today’s environmentally conscious world. These paints have a strong smell and have volatile organic compounds that can spontaneously combust. Let’s avoid burning our homes down, shall we?
Latex Paint
Latex paint may be a paint that you commonly see in a paint store. Latex paint is a water based paint made from acrylic resin. Like latex, acrylic paint is also made from acrylic resin but instead of being water based, acrylic paint is a chemical based paint that makes the paint a bit more elastic than latex.
Latex can be easily cleaned with soap and water, and is a popular choice for painting walls in homes. However, latex cabinet paint can flake more easily. This in turn makes latex paint a poor choice for painting cabinets. Acrylic paint, on the other hand, is better at expanding and less likely to flake with temperature changes.
Wood swells and contracts with temperature changes. If your cabinets are painted with latex, you’ll notice cracking. Who wants to spend time painting their kitchen
Enamel paint is another durable paint option for cabinets. Enamel paint is a paint that dries as a hard and glossy substance, not much unlike nail polish. This can be very beneficial for projects that require durability (like cabinets). However, this kind of paint is oil based and can be difficult to clean up and gives off pungent fumes.
What is The Best Kitchen Cabinet Paint?
What you really need is a durable paint that has properties that are similar to an oil based paint but is a water based paint with easy clean up, quick dry time, and low VOCs like latex paint. What I just described is a paint known as alkyd paint.
Alkyd Paint
Alkyd paint is a great paint for cabinets in that it mimics the durability of oil based paints but cleans up like latex with warm water and soap. Alkyd cabinet paint dries with a hard surface (similarly to enamel) that typically only requires one coat of paint (not always but typically).
You don’t generally see brush strokes or roller marks (down side of latex paint) and the paint overall is very durable. This is key if you decide to use this type of paint in your kitchen. Consider the amount of dirt and grime that your cabinets will be in contact with. Wiping down latex cabinets in a kitchen will lead to worn out and flaking paint. Alkyd paint is a great option for kitchen cabinets and cabinets in high traffic areas.
Studio McGee uses Benjamin Moore Intrigue in this bathroom.
While we have covered many types of paints, in the end, the choice is yours. You need to consider the type of project you are doing in your home, your budget, and your end goal. Do you have cabinets that are being painted in a high touch area of your home that will be prone to spills and stains like kitchens (and a child’s bathroom perhaps?).
Keep Paint Finishes In Mind
Once you pick the type of paint you’ll want to use, keep in mind that paint can come in several finishes. You’ll want to pick a durable finish for cabinet doors. One that can handle high traffic, being wiped clean, and avoid showing fingerprints and scuffs. A high-gloss finish will give you the best results.
The higher gloss reflects light providing a smooth finish that is not only shiny, but can be wiped clean easily. A semi-gloss finish would also be a good choice as it is still durable, easily cleaned, and less likely to show scuffs. Matte finishes tend to be dull and can easily show those spills and stains.
Benjamin Moore Hale Navy in this bathroom created by the Holst Brothers.
Tips for Painting Kitchen Cabinets
I have a more in depthpost on how to paint kitchen cabinets in this post, but still wanted to get you started here in this post as well.
Before you go to Home Depot or Sherwin Williams to pick out your new paint, let’s talk about prep work first. Now that you know the various types of paints that can be used, you need to have a game plan on how to actually paint your kitchen cabinets.
So don’t go picking out a new color just yet! To get good results, you’ll need to put in some serious prep work first. The end result will be well worth it but these things take time, best not to rush it!
Step 1: Take Apart Your Kitchen
If you aren’t a fan of clutter or messes, you are going to hate this project. Breathe. It will all be put back together again later. You’ll need to take apart your entire kitchen. That means take all your drawer fronts off, hardware off the drawer fronts, and cabinet doors off the hinges. You’ll want to label your cabinet doors (left, right) so you don’t get them confused.
Keep the hardware in bags and label them as well. If you are switching out the hardware, then feel free to disregard. However, keep in mind that not all hardware is applied in the same way. You’ll want to get hardware that matches the drilled holes already existing in your cabinet drawers and doors.
Of course you can get different ones, but it may require some extra elbow grease, wood filler and sanding in the end. Now you may be thinking, “There is no way I’m taking my doors off and disturbing my kitchen,” And if that is the case, then you might as well just turn around and not even start the project. Yes, you must take the doors off the hinges. Yes, you must label the doors. Yes, this does make the biggest difference. If you don’t, you won’t get a professional looking outcome.
Have you ever seen Dexter where he takes all the plastic sheeting and uses it to contain the blood in his “kill room”? If you haven’t seen Dexter, just trust me on this. You are going to make your kitchen space very Dexter-esque.
Take plastic sheeting and tape it across your appliances, backsplash, inside of the cabinets, etc. You want to prevent paint from spraying or getting anywhere it shouldn’t go.
Step 3: De-Funk Your Cabinets
Next, you’ll want to invest in some serious degreaser. All of the cabinets will be cleaned to get all of that built up grime off the surface space that will be painted. You can buy products at your local hardware store that are specific to cabinet cleaning. If you skip this step, your paint won’t stick well and you won’t get a smooth surface.
If you have any imperfections that need to be fixed, now is a great time to do it. Wood filler can be used to fix any dings or holes that require attention. Once cleaned and patched, you’ll want to sand your cabinets.
We used this sander with 220 grit sandpaper in our last project. If you don’t own a sander, you can rent one or use some elbow grease with a sander block.
Once sanded, you’ll need to rinse and wipe down the cabinets again to completely rid them of any debris. This step goes a long way in creating that professional finish at the end. I go much more in depth on this part of the process in my blog post about painting our cabinets.
Grab your paint brushes and foam roller and apply your first coat of primer. You may need a second coat depending on how dark your cabinets are and how light you are going. I’d say if you are going from dark cabinets to white cabinets, a second coat of primer wouldn’t hurt. Keep in mind, you don’t want to lose the labeled doors.
You need to keep track of this! Allow your primer drying time before going on to the next step. Once the primer is nice and dry, you’ll want to sand (yes, again). This is going to be a quick sanding to create that nice smooth finish. It’s a good choice to use a microfiber cloth to dry your cabinets to ensure all debris is free.
Patience is key here, people. You can’t rush perfection. We started with our cabinets and then moved on to the doors. With the cabinets, we applied a base coat of paint first with brushes and foam rollers. We allowed a dry time of 24 hours and then we lightly sanded the cabinets.
After we washed the dust off and dried the cabinets, then we added an additional second coat. Again, we allowed 24 hours of drying and then added a 3rd coat. Yes, there were multiple coats of paint, but we wanted to ensure that we had the best coverage. For the doors of the cabinets, we followed the same process.
Keep in mind, you may have details on doors that require some brush work. Do that first and then smooth it out with a foam roller to finish the process to avoid brush marks. An alternative is to use a paint sprayer rather than rollers and brushes.
Professional painters use a paint sprayer for a seamless finish, but I will say that they can be pretty expensive and you have to be proficient in using it. If it is your first time using a paint sprayer, you may want to get some practice under your belt before busting out cabinet painting.
Step 6: Re-Assemble
Lastly, reassemble your kitchen once your cabinets and doors are fully dried. This is the fun part! You get to admire your work!
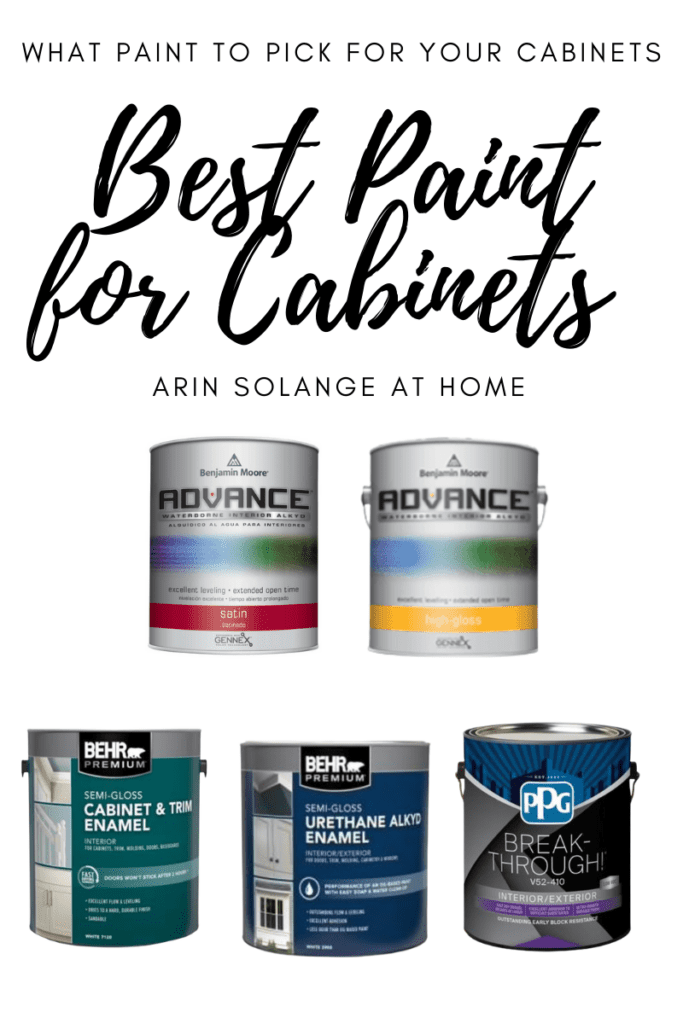
Now that you’ve decided to take on this DIY, you’ll want to pick out new paint to get you the best end result. You don’t need to invest in premium paint to get a professional finish. There are some great cabinet paint brands out there to fit every person’s budget.
We used Behr’s Premium Semi-Gloss Cabinet and Trim paint at our last house. This is a popular choice, available at Home Depot. Since it is an enamel paint, this dries as a hard and durable finish that is excellent for your kitchen. The semi-gloss paint is a great choice in our kitchen as it is washable and does not easily show grime and dirt.
This is another great pick that is available at Home Depot. Honestly, this is extremely similar to the Semi-Gloss Cabinet & Trim Enamel by Behr. The alkyd paint acts like an oil based paint with the ease of clean up like a water based paint. This does give you a bit more ability to use with other materials like stucco, wrought iron, and brick.
Benjamin Moore’s Advance line is an alkyd based paint product that creates a great finish with easy clean up. You get the same benefits of the oil based product without all the hassle. High gloss is a popular choice because of its durability and likelihood to hide smudges and stains. This does cost a bit more in comparison to the Behr line.
I added in the same Benjamin Moore Advance line but in a satin finish. Normally, you don’t expect to see a satin finish in cabinets because of the durability and the fact that it can show smudges. However, this satin finish is a great option if you don’t want that full high gloss shine but still want to hide those smudges. As a bonus, Benjamin Moore carries thousands of different colors!
This is a water based acrylic so clean-up is easy and comparable to an alkyd paint. The finished product is super durable and can apparently be used to paint laminate (according to PPG). This comes in a satin finish, semi-gloss, and high gloss. PPG also has an impressive array of colors so you’ll be sure to find a favorite color.
Now that you know the best paint for cabinets, I hope you the confidence to finally try your hand at painting your cabinets. Just remember, go slow and give yourself plenty of grace and time. You can have a beautiful finished product without spending tons of money on new cabinets. You just need a little time and patience. If you have any questions, feel free to leave them in the comments, and follow me on Instagram @arinsolange for more home, decor, and DIY. Happy painting friends!
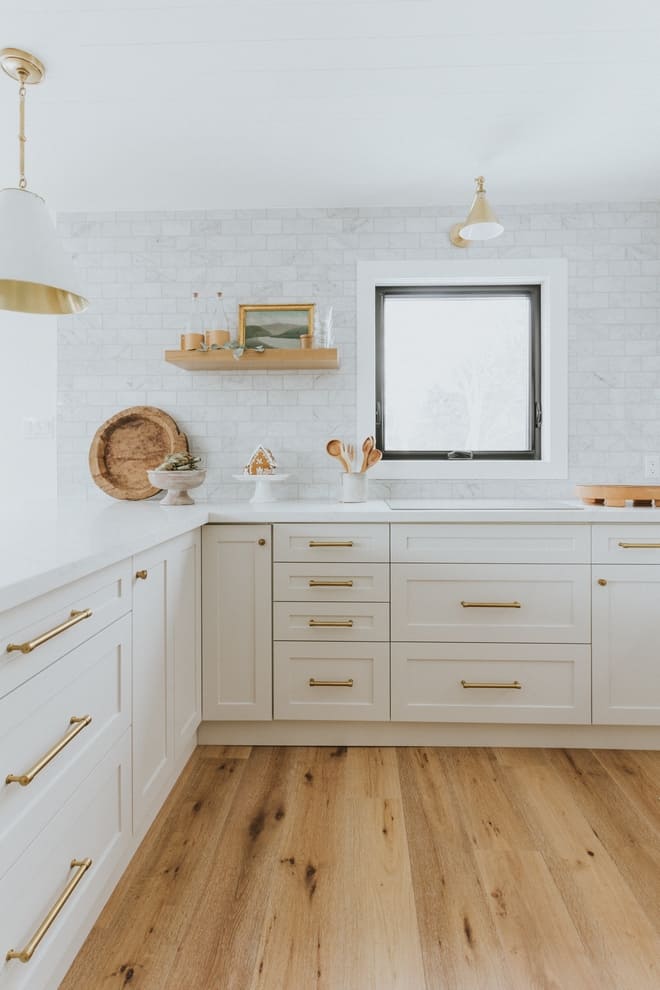
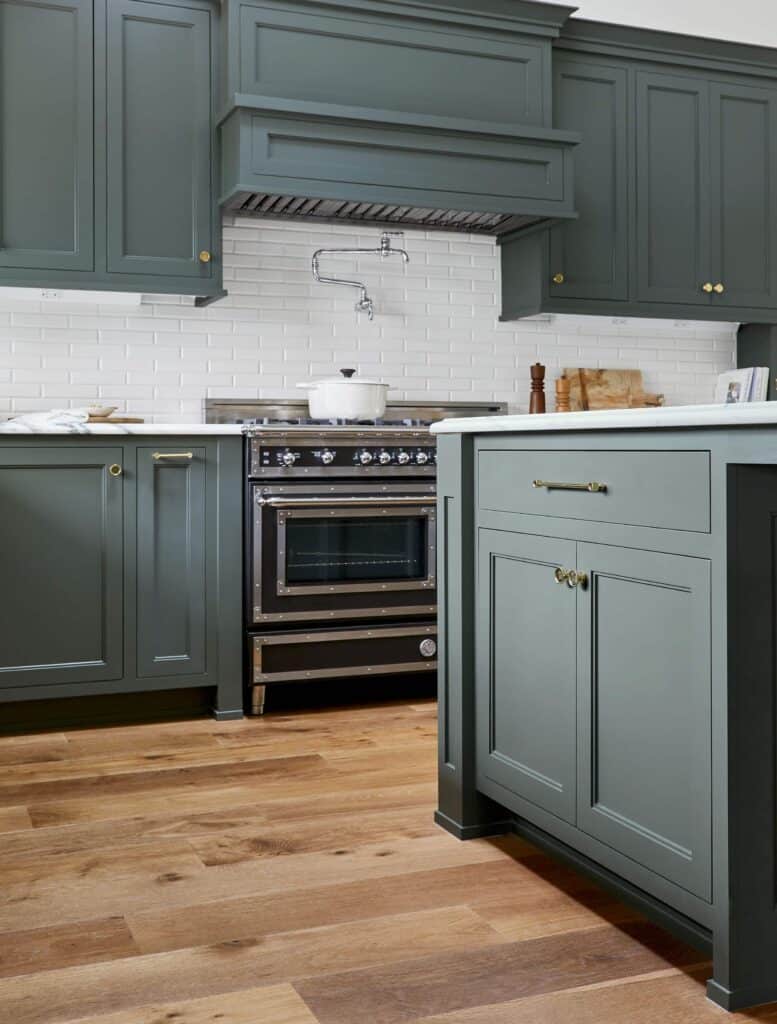
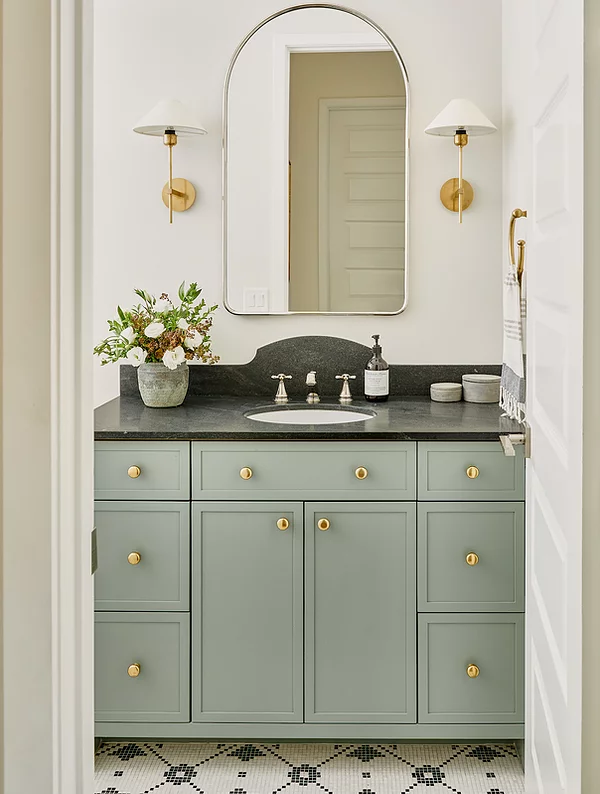
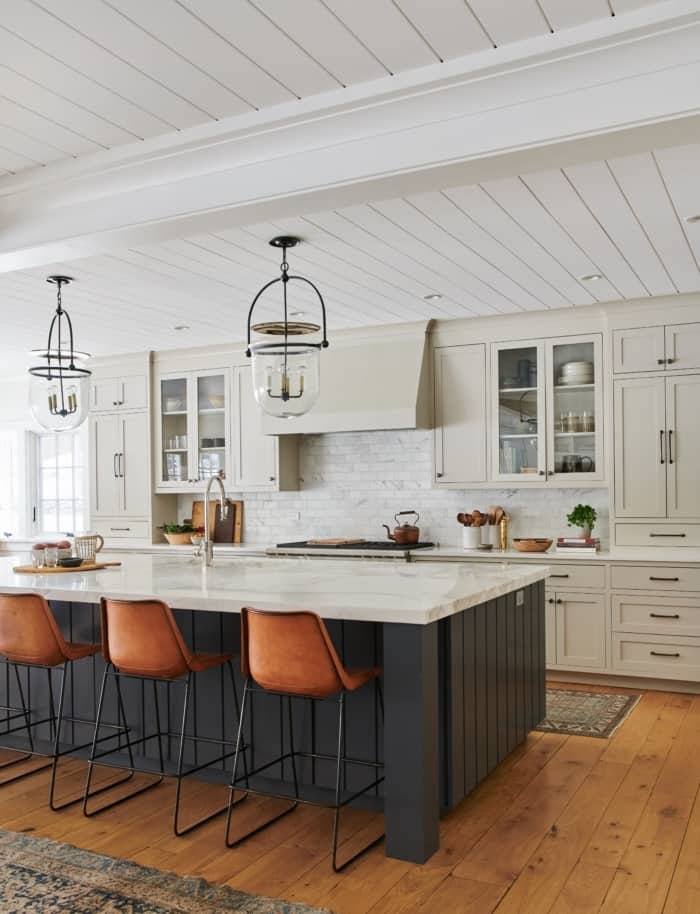
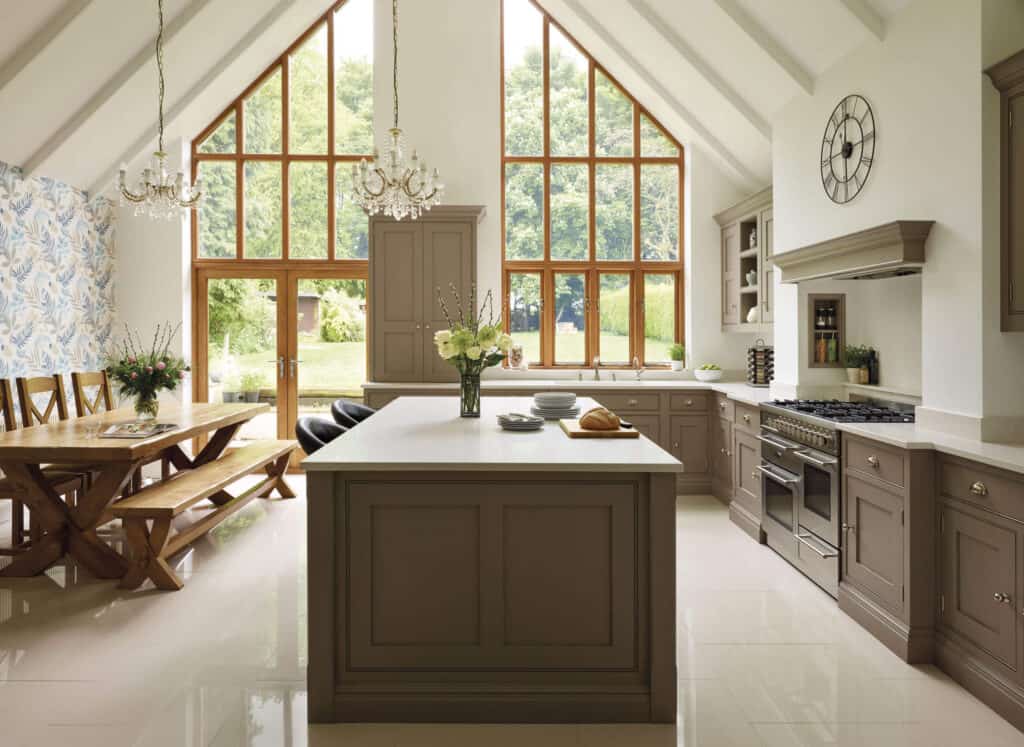
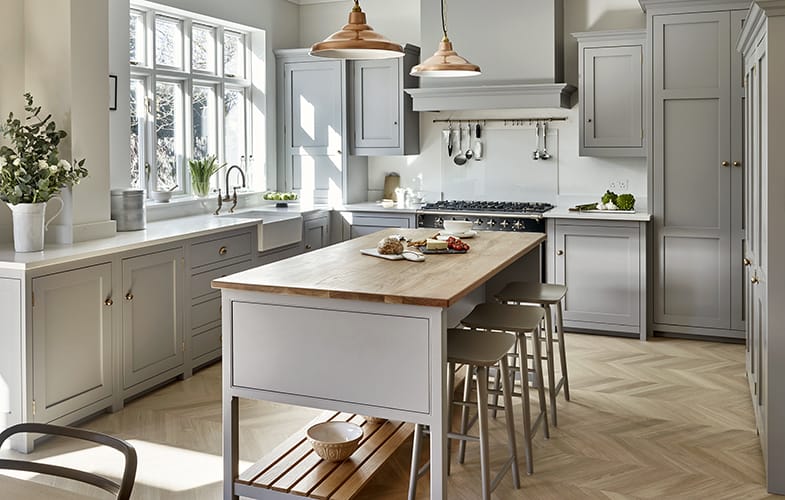
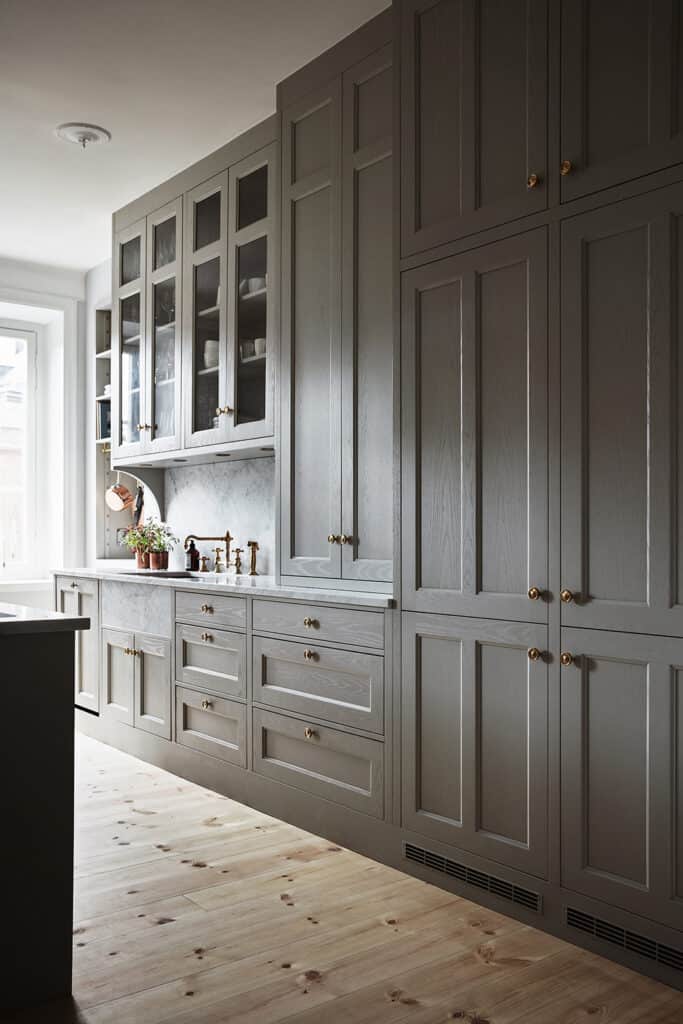
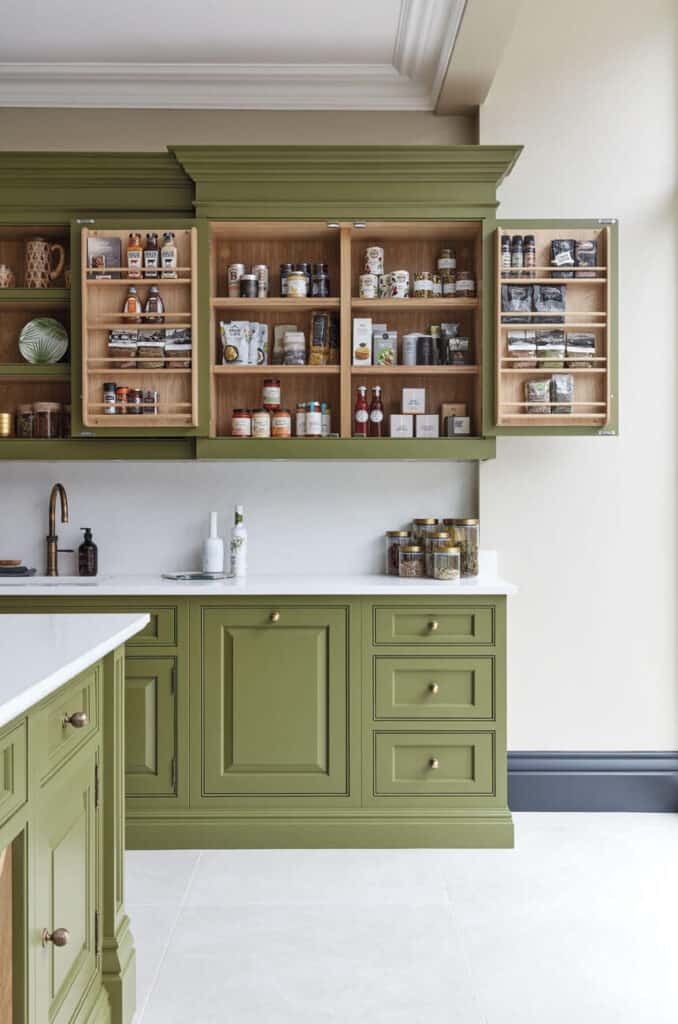
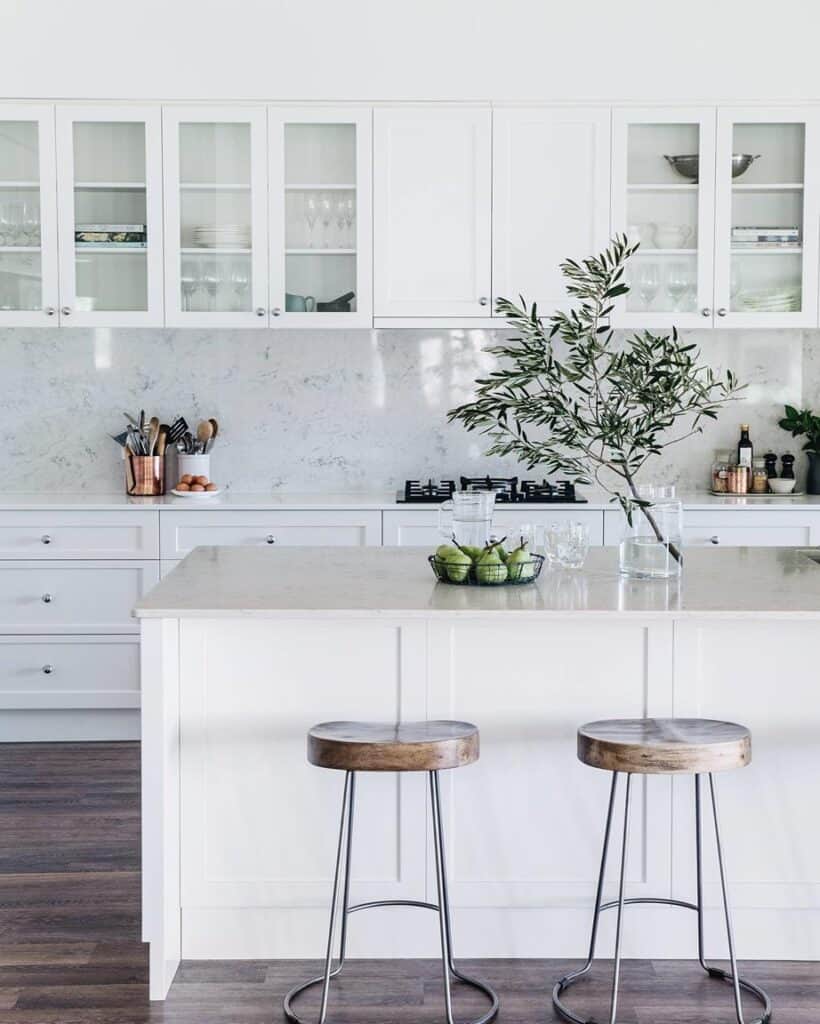
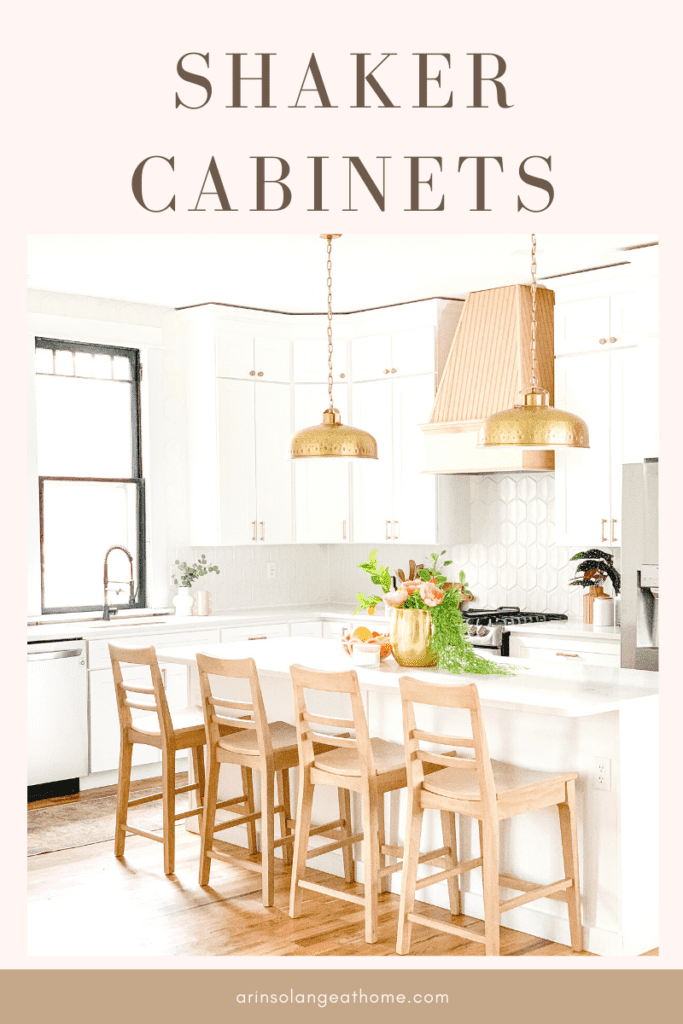
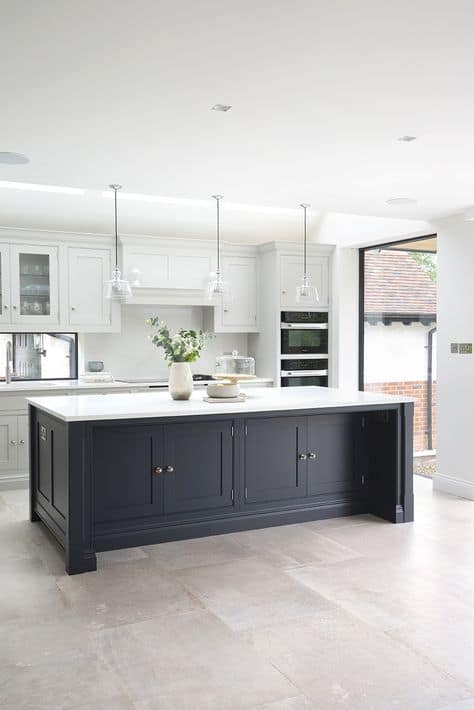
Shaker Style Kitchens – Everything You Need to Know
I have spent more time than I care to admit Researching Shaker style kitchens this past year. Now that the cat is officially out of the bag, I can give you more insights into what decisions were made while renovating our 1860’s historic home.
One of those major renovations was our kitchen and can I just say, wholly transformation Batman! It can be so overwhelming to make decisions during a renovation and one of the kitchen decisions we had to make was the type of cabinetry and kitchen style we wanted for our home.
We opted for a classic Shaker kitchen cabinets and door style. If you are thinking about renovating or are just interested in learning more about Shaker kitchen doors, then this post is for you! I’ll go over what you need to know about this classic style and show you some amazing inspiration along the way.
Our before and after pictures from our renovation can be found here.
This post may contain affiliate links
Shaker Style Kitchens
As I mentioned, Sam and I had to make a ton of decisions while renovating our 1860’s historic home. For those of you who haven’t seen the updated house tour, check it out here. I go into all the details on the house and show you all the before and after pictures. You won’t believe it is the same house!
The kitchen remodel was a huge part of our renovation. In fact, the kitchen was actually just a random room in the house and not an actual kitchen at all! When deciding the type of kitchen I wanted, I knew I wanted a classic all-white kitchen.
I love the timeless and seamless look of an all white kitchen. With that white-kitchen, I also knew I wanted the clean lines that are achieved with Shaker style cabinetry and kitchen doors.
A Review in History of Shaker Style Kitchens
So what exactly is a Shaker style kitchen? Shaker kitchens actually get their inspiration from a religious sect known as the Shakers. Their real name was the United Society of Believers, but due to their ecstatic worship and love for dancing they became known as the Shakers. The Shakers weren’t just known for their dancing.
They were a celibate group with strong beliefs in equality for all members well before emancipation and women’s rights. The principles of the Shaker religion also included striving for perfection in everything they did.
Work was a form of currency in their community and labor was highly regarded. This resulted in beautifully constructed villages, homes, and gardens. Their work became well known worldwide for their craftsmanship using the best materials.
It was regarded as being durable and simple with a minimalist design concept. They preferred to avoid embellishments in their work with the exception of their design circle of their symbol- the tree of life.
This contemporary Shaker inspired kitchen can be found here.
A Shaker style kitchen is characterized by it’s simple and unassuming design. The shaker design avoids any sort of embellishments and real wood is often stained in various shades. The high quality of their work makes them an excellent choice for furniture and kitchen components.
Shaker doors and shaker style kitchen cabinets are characterized by a five-piece door with a flat recessed center panel, four trim pieces, and a solid wood frame. The clean lines of shaker cabinets created a seamless and simple look that makes it a popular choice for kitchens today.
What I love about Shaker cabinetry and Shaker style doors is that you can use the traditional styles of the Shaker religious community and mix it with modern kitchens and contemporary designs. It does not limit itself to a traditional kitchen. Rather, the style of your kitchen can be a mixture of modern designs and a classic look.
Now that we have a better understanding of what Shaker kitchen cabinet doors are all about, let’s take a look at some popular styles of kitchens using these Shaker cabinet designs.
Contemporary Kitchen Designs
Of course Studio McGee hits it out of the park with this great example of mixing traditional Shaker style cabinets with a bold contemporary pop of the green paint color and modern gold hardware. The marble veining ties the lower cabinets in nicely and compliments the white shaker cabinets above.
This is a great example of a basic Shaker style cabinet door. Studio McGee explains on their blog how these cabinets were actually semihandmade cabinets which accelerated the rate of their install for this new kitchen.
The popular cabinet door styles made famous by the Shakers means that this style is available for every person’s budget and widely available at your local hardware store (or in this case, Ikea). The contrasting lower cabinets created a custom look for this incredible kitchen.
These shaker-style cabinets look incredible in contemporary kitchen designs.
This next kitchen is love at first sight. Brayer Design (UK based interior designers) slayed this kitchen. This is a perfect example of a Shaker inspired kitchen. The flat center panel is key for Shaker style cabinet doors. What I most love about this kitchen is that it is such an incredible mix of traditional elements paired with contemporary pieces.
The natural oak floor is elevated with a herringbone pattern for a modern style. The brass pendant lights add a pop of color and tie in nicely with the modern floors and other finishes.
If you take a look at more photos of this kitchen, you’ll also notice that the dining room table is a great example of Shaker furniture. The natural wood finish and simplistic design of the table is something you’d expect to see in a late 19th century home.
This next kitchen contains floor to ceiling Shaker style cabinets. From the lighter wood finish floors to the unassuming cabinet hardware this is a prime example of a traditional Shaker kitchen.
The glass pane on the upper cabinets add a modern look to the basic shaker style cabinet door. The darker colors of the cabinets make the door fronts pop and complement the light wood floors.
Hear me out on this next kitchen. I know you’re going to take one look at the color and think, “Are you out of your mind?” While the different color of the kitchen cabinets make this more contemporary, the cabinets themselves are a great example of a traditional Shaker kitchen.
The flat doors, vertical pieces of the cabinet frames, and recessed panel drawer fronts are as traditional as it gets.
This 1920’s farmhouse has been completely renovated and has the most incredible story. The owners have had their home in their family since the 1920s. Obviously, I have a soft spot for historic homes with a story and I love that this family has kept this property in their family for generations.
The kitchen was originally in another part of the house and was renovated and moved to overlook their gardens. This all white kitchen has beautiful lighting that is amplified by the glass panes on the Shaker style cabinets. The entire kitchen is timeless and captures the spirit of the Shaker design.
Check out the story on this family’s 1920s property here.
Dream Nest Homes pairs the classic Shaker cabinets with contemporary accents in this all white kitchen. The brass lighting, brass hardware, and herringbone backsplash are examples of an easy way to update the traditional cabinets for a contemporary design.
Check out this white kitchen by Dream Nest Homes here.
Modern Shaker Kitchen Designs
Traditional Shaker kitchens don’t limit themselves to one design concept. The great thing about Shaker cabinets and doors is that the simplistic design lends itself nicely to blend into kitchen designs whether that be traditional, transitional, or modern.
This modern kitchen contains lighter wood, heavy metals, and a swoon worthy window. The shaker drawer fronts are simple and allow the modern hardware to shine through. This is just another great example of the versatility of Shaker cabinets.
This modern kitchen is complemented by Shaker drawers.
This next kitchen is another great example of using the simplistic design of the Shaker-style cabinet doors in a modern kitchen design concept. Your eyes aren’t deceiving you, there aren’t any handles on these cabinet doors.
The variety of colours of wood tones and handleless cabinet doors contrast the simple cabinet design for a modern look.
Shaker style kitchens are a great option for any kitchen design. The unassuming design of the cabinetry and doors creates a timeless look for any kitchen. The simple nature of the style allows you to create traditional, transitional, contemporary, and modern kitchens using cabinetry that has stood the test of time.
Other Posts You’ll Love
If you liked this post – check out these other great posts you will love too!
I hope this post gave you some inspiration into the various ways you can utilize the Shaker style kitchens into your own home. From cabinetry to furniture, the Shaker design is a timeless concept. If you have any questions, feel free to leave them in the comments, and follow me on Instagram @arinsolange Open in new tab for more home, decor, and DIY.
With the holidays quickly approaching I’m racking my brain trying to think of some great gift options for Goldie. With 4 kids, Goldie has plenty of toys to choose from so finding the perfect gift for her can be difficult. This has had me searching for the best scooter for 2 year olds. She seems to be more interested in whatever our big kids are doing at the time. Of course with a 7 year age difference between Jack and Goldie, finding things that are developmentally appropriate for both young kids and older kids can be difficult. Enter kids’ scooters.
This post may contain affiliate links
Best Scooter for 2 Year Olds
A kids scooter is a great option for both older children and younger children. It is an activity that not only gets your kids outside and active, but it also is a great family bonding activity.
The older kids can teach the younger kids how to ride and it is a toy that will grow with your child as they grow older. I love watching the confidence on my kids’ faces when they learn a new skill and it is even better when their older sibling or friend teaches them (as opposed to Sam or I).
If you are interested in getting your toddler a scooter this holiday season you might have noticed that prices of scooters range greatly. Not only do the prices range, but the features of scooters can be all across the board.
How do you know what is the best scooter for your young riders? I’ll look at the benefits of scooters and what to consider before you purchase one, as well as some of my favorite scooters on the market.
Benefits of Scooters for 2 year olds
Below are some of the biggest benefits of scooters.
Gets Them Outside
Have you ever noticed that when your toddler is having a hard time how a change of scenery can make a world of difference? Specifically, taking your toddler outside after a few tantrums automatically resets their mood for the day.
It is like a magical ray of sunshine that switches their foul mood into joy again. There is a reason for that sudden mood switch. Research shows that spending time outdoors helps lower anxiety, anger, and depression. It lowers blood pressure and improves our mood, but also can help our focus. Kids who spend time outdoors also reap the incredible benefits of nature.
So encouraging your little one to ride their scooter outside is a great way to enhance their mood and help their focus. As an added bonus, they will sleep better too!
Exercise
Scooters not only get your little ones outside but it is also a fun way to exercise. Physical activity is not only essential for adults, but also for our small children and adolescents.
It is recommended by the CDC that toddlers aged 3 up to 5 years old receive at least an hour of exercise every day as it is essential for their growth and development to further their motor skills. That may seem like a lot, but consider the amount of energy your toddler has each day.
There is nothing Walker loves more than running around outside! That boy definitely gets the recommended amount of exercise. Unfortunately, kids in today’s electronic world are less likely to reach that level of activity due to all of the electronics at our fingertips.
I know I struggle with that balance myself- it can be so easy to sit them in front of a tablet or a tv to get a few minutes of peace and quiet. Before you know it, the minutes turned into an hour and a half and your kids are full on protesting to move away from the tv!
Whenever this happens, I kick everyone outside and make them do some sort of physical activity. Between the benefits of being outside and the benefits of getting exercise, your kids will forget all about how mad they were at you for leaving their favorite show.
Helps with Balance & Motor Skills
Riding a scooter is a great way for your toddler to work on their balance. Balancing is actually a pretty complicated process that involves the marriage of your child’s physical development, sensory skills, hand-eye coordination, and fine and gross motor skills.
Balancing is a process that occurs anywhere from when your baby first learns to sit, to when your toddler takes their first steps. In order to do any of that, they must have balance. As your child grows, so does their sense of balance.
By 2 years old, your child may be able to balance on one foot. Balance is actually indicative for future learning as balance requires both sides of your child’s brain to work together. Their brain must know how to control their body parts both as a whole and as separate entities.
While your child balances, they are also working on their gross and fine motor skills. Pushing their feet, standing on one leg, gripping the handlebars, steering- all are building their motor skills and physical development.
Before you know it, they will be ready to try their hand at riding a bike. The tools they gained from learning how to ride a scooter, such as balancing and steering, will help them with learning their next skill.
Encourages Cognitive Development
While your child builds their motor skills and physical development, their cognitive development is also benefiting as they ride. Kids are faced with lots of decisions while riding. For example, what direction should he go? How fast is too fast? Is this rough terrain and will it lead to a bumpy ride or more of a smooth surface?
If multiple kids are playing together, your little one needs to learn how to steer properly to avoid collisions. All of these split time decisions build their cognitive development.
Builds Confidence
Not only is their cognitive development building, but so is their confidence. There is no greater joy than watching one of my kids learn a new skill. They are so proud of themselves and want to show off their trick to their friends and siblings.
Allowing them the opportunity to master this new skill and feel the immediate joy they feel when they realize they can do it all by themself is priceless.
Teaches lessons in Safety
One of the most important items that go hand in hand with your child’s scooter is ensuring your child has a helmet while riding their scooter. Scooter safety is key (more on that in a bit) and children need to be aware of the safety protocols while riding.
It is a great time to help your toddler learn to stop, look, and listen (okay, that might be from Daniel Tiger’s Neighborhood). The lesson is important though! While riding, your child needs to be encouraged to look at their surroundings, where they are going, and listen for any upcoming traffic to avoid any collisions.
Scooter Safety & Injury Prevention
It is always important when doing anything like this you take into account safety so your kids can enjoy things in a safe manner!
Helmets Are A Must
Scooters can be safely enjoyed by ensuring your kids follow important safety tips. One of the most important safety tips is to ensure your child wears a helmet. In several states, helmets are required to be worn by law. It is so crucial for your little one to wear a helmet to prevent head injuries.
The last thing you want to happen is to have your kid come zipping down the street and take a tumble landing on their head. Emergency room visits are no fun and head injuries are no joke. If you’ve got a toddler who is hesitant on wearing a helmet, try finding one with their favorite character on it, or you can buy a plain colored helmet and get stickers with their favorite character to bedazzle all over it.
Make it a fun game with them and introduce the helmet before going outside for a ride. If you bring it in a few days before you plan on trying out the scooter, the helmet won’t seem so big and scary. Instead, it will be their new fun helmet and they will be excited to show it off to the neighborhood.
Check out this great article by the New York Times on scooter safety.
Elbow & Knee Pads
Elbow and knee pads are also a great idea, but I’ll be honest, my kids don’t wear them. Yes, they can help protect themselves if they fall, but I also like to pick my battles with my kids. The helmet is an absolute must- no helmet, no scooter.
Find The Right Size & Scooter Type
You’ll need to ensure the scooter your child rides is fitted for their height and weight. There are many types of scooters (more on that in a minute) and you will need to ensure that your child has the proper size for their body type.
If your scooter is way too small or too large for your child then your toddler won’t be able to safely enjoy their new toy. A good scooter will have adjustable height handlebars or height settings to accommodate different sized children. Not only is the right size crucial, but you also need to ensure the scooter your child rides is one that aligns with their skill level.
Scooters can range from a three-wheel scooter to a two-wheel scooter. The 3 wheel scooter generally offers more stability and is more appropriate for small children, while the 2 wheel scooter requires more balance and can be used once your child has mastered balancing on their 3 wheeled scooter.
You’ll want to pick a scooter that is appropriate for your child’s skill level. Generally speaking, you’ll want to start with a 3 wheel scooter as a first scooter to help your child learn the basics before graduating to a two wheel scooter.
The last thing you want to do is to make your child frustrated because the scooter they are using is not appropriate for their age and skill level. Set your child up for success, not failure.
Check out Today’s round up of the 7 best kids helmets here
Shoes
You’ll want to ensure your kid has the right shoes on while playing outside. During those summer months, my kids go barefoot quite frequently. Ideally, your kids need to have closed- toe shoes while riding.
In the event they fall or come in contact with something on the ground while riding, they’ll need their feet protected. Sandals and bare feet don’t offer a whole lot of protection.
Stop, Look, Listen
In the words of Daniel Tiger’s Neighborhood, “Stop and listen to stay safe.” Teaching your child to be aware of their surroundings while they ride is important, not only for their safety, but for the safety of those around them. You’ll need to talk to them about watching for people walking, other scooters or bicycles, and cars.
If you are crossing a street, now is a great time to make sure they are looking and listening before crossing. It is also a good idea to teach your younger toddlers the freeze game. You can practice this before riding your scooter too.
If your toddler rides off a little too far ahead of you, yelling “Freeze” can help ensure they don’t get out of eyesight. This also comes in handy when you see a car coming, pedestrian, or other obstacle.
Never Alone
This should go without saying, but never leave your young toddler alone outside while they play on their scooter. They should play in a well-lit area, and you may even consider adding reflectors to your scooter or having your child wear a reflector vest for visibility.
Best Scooter for 2 Year Old – Types of Scooters
Finally, we can talk about different types of scooters for your kids! There are several types available and they range anywhere from a classic scooter with two wheels or three wheels to scooters that can be used for tricks and off-roading.
The biggest difference between scooters are motorized or electric scooters vs. non-motorized scooters. A quick note on electric scooters. The American Academy of Pediatrics warns against using electric scooters for kids who are under the age of 16 years old. These e-scooters are widely available all over major cities.
I know we have them available across the neighborhoods in St. Louis. These scooters can go up to 15 miles per hour, and should not be used unless you have a driver’s license. Emergency room visits have increased with the use of these scooters and fractures and head injuries are among the types of visits seen with falls from electric scooters. If you are under 16 years old, it is best to stick to a non-motorized regular scooter.
The best scooters for your toddler are wheeled scooters, specifically a three-wheeled scooter if they are just starting out. There are two front wheels and one back wheel which help your child learn how to balance.
These are also known as glider scooters. They are a great option as a first scooter as it teaches stability. Once your toddler learns how to balance properly on the scooter and steer, then they can move on to more advanced scooters.
Caster scooters are also three-wheeled scooters, but there is a single front wheel, and two rear wheels that are spread apart. These are definitely for more advanced riders as the scooter is ridden as if the child is skiing, feet widely apart.
Two-wheeled scooters are what you typically see when you think of scooters. These are for children who have mastered balancing and steering and have graduated from their toddler scooter. Two-wheeled scooters have one wheel in front and one wheel in the back. You’ll generally see these scooters with a kickstand as well to keep the scooter upright.
They can come in all different fun colors and you may even have some with flashing wheels that light up as your child rides. Trick scooters are another option for two-wheeled scooters and are generally what you see at a skate park.
The biggest difference with trick scooters is the handlebar is wider which allows for greater stability while performing tricks. These are also going to be a bit more expensive and are generally reserved for the more experienced rider.
Off-roading scooters are also two-wheeled scooters and have larger wheels for those rough surfaces. These are a great choice for people who may do a lot of hiking and want an option for unpaved roads.
Check out Elisabeth McKnight’s scooter review here
Considerations Before You Buy
There are plenty of scooters to pick from all ranging in different functions, styles, and skill levels. So how do you know which scooter is right for you? Before you buy, you’ll want to consider your child’s age and skill level. If you have a two year old toddler or newly turned toddler, you’ll need to have them start with a three-wheeled scooter to learn the basics.
Children that are older and have mastered balancing can move on to the two wheeled scooters. You’ll also want to consider what your child plans to do with her scooter. Is this a scooter that will be played with everyday or only once in a while?
Is this a scooter that your child plans to grow into or are you buying time until you can get a more expensive scooter for tricks or off roading? Consider your budget as well. Scooter prices can range greatly and part of that large variation is due to the scooter’s function and features.
Some scooters have extra features such as those 5:1 scooters that have a removable seat and can change from a pushcart to a tricycle to a scooter, while other cheaper scooters are more basic.
You’ll also want to consider your scooter’s durability. If you plan on getting a nicer scooter and passing the scooter down to younger siblings, it may make more sense to spend more money for a scooter that has multiple features and can accommodate multiple skill levels and ranges of children.
Pay attention to the maximum weight limit on the scooters as this may give you an idea of how long the scooter can be used with your child. Additionally, you’ll want to make sure the scooter itself is not too heavy. It should be lightweight enough for your toddler to handle by themselves.
Lastly, I always like to look for additional features like easy storage. I’m not a big fan of toys that take up a large footprint for storage space. So if the scooter can be folded up, not only is that great for storage space, but it also means it can travel easily too.
Scooter Reviews
For the purpose of this post, I won’t be reviewing any electric scooters as this post is directed toward younger children. I do plan on reviewing electric scooters in a different post, but please keep in mind the AAP’s warning on the use of electric scooters for those under the age of 16 years old.
Three-Wheeled Scooters
Below are my favorite 3 wheeled scooters for 2 year olds
Shop Best Scooter for 2 Year Old – 3 Wheel Options
Micro Kickboard is a company who makes high quality durable scooters for a wide variety of kids ages. (1) The Micro-Maxi Deluxe , (2) and folding version gives you the best bang for your buck. These are definitely on the more expensive side, but they can grow with your child as they learn to balance and steer.
The micro kickboard provides stability for younger children as they learn to balance and the learn-to-steer technology can help them become more confident in steering. The smooth ride allows your toddler to learn the basics with confidence.
There are height-adjustable handlebars that grow with your child and a higher weight capacity of 150 lbs, which means your little one will have plenty of time for play as they grow. This is a great value for a sturdy scooter that can last a long time.
Micro Kickboard also has this same version in a smaller footprint for up to 110 lbs (kids up to 5 years old) in their (3) Micro-Mini Deluxe version. A smooth and stable ride for your two year olds as they learn the basics. This model also has an adjustable t-bar which extends up to 25 inches.
Once they outgrow this model, you can upgrade them to the Micro-Maxi Deluxe. There are different colors to choose from and it is a good choice as a starter scooter.
There is also a (4) Mini 3:1 Deluxe 3 Stage Ride on Micro Scooter for your younger toddlers, aged 12 months up to 5 years. This is a great option from mini mico that allows your child to grow with their scooter. It starts out with your young toddler’s little hands holding on to the O bar while being seated and riding the toy.
Once they learn to balance and feel more comfortable on the toy sitting, the ride- on-seat can be removed, for a scooter with a short O bar. From there, once they outgrow the O bar and learn to balance on their feet, the O bar can be removed for a T bar and converted into a full micro-mini which is suitable up to age 5. This is the best choice for those who plan on having more children. You can use this for younger siblings without having to buy another scooter.
(5) Bird Kids scooter or (6) in pink Is a great option for someone who loves style and function. We have owned YBIke Brand, Micro brand, and now Bird, and although I can’t say anything bad about any of them, the Bird is my favorite!
The ride is smooth and it has well thought through brakes and wheels that allow for it to be an easy ride, while still keeping it stylish and adorable.
(7) The YBike Kids GLX Cruz 3 Wheel Kick scooter is another great option for young toddlers just learning how to balance. This scooter has lean-to-steer technology and large wheels in the back for stability. There is an anti-slip-deck that provides additional stability, and a curved handlebar for easy handling. This scooter also has a rear brake, which sets it apart from the scooters previously mentioned. This scooter is for toddlers up to 5 years old and 44 lbs.
(8) The Razor Jr. Lil’ Kick Scooter is another great budget option. At only $27 this scooter is another great choice for a first scooter. It is noted to have a wide deck for stability and larger wheels to help for a smooth ride. There are some reviews on Amazon that state the back wheel may be troublesome over time. For a starter scooter, you can’t beat the price. * it is worth noting that as a mom – i prefer the 2 wheels in the front. I think they are smoother.
Two-Wheeled Scooters
Now chances are your two year old won’t be ready for a two-wheeled scooter anytime soon. In fact, I’d say they won’t be ready until around 4-5 years old before they can move onto a two-wheeled scooter. However, on the off chance that you have a little scooter prodigy, I’ll list a few great options for two-wheeled scooters.
Shop Best Scooter for 2 year old – 2 wheel options
Razor scooters are pretty well known. You can spot them by their shiny sleek designs zooming across your neighborhood streets. (1) The Razor A Kick Scooter is a budget friendly choice for kids who have advanced to a two-wheeled scooter.
It is lightweight, folds up easily for storage, and has an adjustable handlebar for various heights. You will note that the deck itself is pretty slim, so young riders should be proficient in balancing before graduating to this design.
There is also a rear fender brake as an added safety feature. The weight limit is a generous 143 lbs so it will grow with your child. It is a great budget option to consider
(2) The Beeleev V1 Scooter is another great option for a two-wheeled scooter and is suitable for toddlers aged 3 all the way to 14 years old. This scooter’s adjustable T bar ranges from 30-34 inches and has 3 adjustable height options for older kids. It is lightweight and has some fun light up flashing wheels that get brighter the faster you ride. Who doesn’t want fun flashing lights?
This scooter also folds up for easy storage and travel. It comes with a kick stand so the scooter stays upright and moms everywhere can avoid tripping over it while unloading groceries. I speak from experience.
Speaking of light up wheels, how about an entire scooter that lights up? (3) The Jetson Jupiter Kick Scooter is a LED light up scooter that has lights on the wheels, deck, and handlebar. You won’t be able to miss your kid riding on this scooter.
It has an adjustable handlebar to grow with your kid and a wide deck for stability. A rear foot brake system is an added safety feature. I’d say if you have a kid who loves flashy things then this is the scooter for them.
I hope this helped narrow down some great options for the best scooter for 2 year olds. There are so many options that can grow with your child or be passed down to younger siblings, cousins, or friends. Whichever scooter you chose, I hope your toddler has a blast learning this new skill and feels confident as they zoom down the block. If you have any questions, feel free to leave them in the comments, and follow me on Instagram @arinsolange for more home, decor, and DIY.
If you are home shopping – I bet you have looked at master bedroom size (or main bedroom). This is the one bedroom that is basically 100% of the time going to be used, and pending your wants and needs in terms of furniture and use, the size really can matter. I am going to walk you through everything you need to know about master bedroom size in this blog post.
How many times do you get on Realtor or Zillow and look at homes for sale in your neighborhood or surrounding area? Do you compare your home against these homes? Or perhaps, you are simply gathering research and storing all that information away for the distant future.
I love looking at homes, not because I want to buy, but just because I absolutely love real estate. It is so fascinating to me to see how a builder designed a house and I’m often left asking lots of questions. What are the ceiling heights? How many stories? Is the laundry room on the second floor or in the basement? How much space is built into the home?
Of course if you are looking for a new home, you’ll want to pay attention to important features like square feet of space, new construction vs. older home, number of bedrooms and bathrooms, and floor plan. One important thing I always like to look at with homes is if there is enough space for my current and future needs.
The amount of space you need is a personal preference, but you’ll want to ensure that whatever home you decide to buy is one that you can grow with and provides enough room for your entire family.
You’ll need to decide where in the home you’ll want that square footage concentrated. For example, is it more important for you to have a large living room or dining room? Or, would you prefer to have several bedrooms? Some homes are designed to have a floor area that is large but with smaller bedrooms.
Other homes divide the floor space more into the bedrooms, and for example, provide larger bedrooms with a spacious master bedroom complete with a sitting area and master suite. The preference is entirely your own.
For this post, I’ll focus on common master bedroom sizes as I was so sure that our historic home master bedroom would be a small cramped space. Fortunately, I’ve put my spin on it and it is perfect for our needs.
This incredible window seat and bedroom is found here.
The Average Master Bedroom Size
When Sam and I were looking at our current home I was terrified of giving up my large master bedroom. Historic homes aren’t known for their walk in closets, master bathroom, or seating area. Quite contrary, historic homes are known for quirky angles, smaller spaces, and little to no storage spaces.
So while walking through our historic home the first time, I was pleasantly surprised to see a larger room with a master bathroom attached. Perhaps this could work out in my favor!
While looking at any home, you’ll want to ensure that your master bedroom is the right size and has a good bedroom layout for you and your partner’s needs. Keep in mind what you intend to use your master bedroom for- is it a room where you will go to unwind and rest, or do you intend to use it as an office or reading nook?
The size of your home, budget, and intended use all impact the size of your master bedroom. As a general rule of thumb, large homes have a large master bedroom, and vice versa, small homes tend to have a smaller room. Bedrooms range in sizes with the standard bedroom size being around 132 square feet.
In order to qualify as a bedroom, a room must have a minimum amount of space of 70 square feet, which is one small room! The average master bedroom size is 224 -309 square feet, which leaves plenty of room to fit a king size bed or queen size bed and space to move throughout the room.
On average, homes with 2000-3000 sq ft of living space tend to have master bedrooms approximately 14% larger than the other bedrooms. Larger homes (homes greater than 3000 square feet) have the master bedroom about 43% larger than the other bedrooms.
Of course bedroom dimensions vary, but you’ll want to ensure you have plenty of space for the size of the bed you have and room to walk for easy access. You don’t want to have a king-size bed pushed up against both walls and no way to move around the small bedroom.
Additionally, you need to consider other pieces of furniture such as side tables, dressers, and any extra space for seating. If you intend to use your bedroom as an office or if your bedroom is equipped with a seating area, you’ll also need to consider additional furniture. How you decide to incorporate that furniture is entirely your choice.
As you may be limited on space, you may have to prioritize what is important. For example, is it more important to have an office space in your room with a queen bed or, would you prefer a california king bed and no office space? All of this is to say that your personal preference and needs dictate how you choose to set up your bedroom space.
If you’ve been around my blog long enough, you’ll know that Sam and I built our king size bed directly in our master bedroom, see our post here. Due to our charming angled stairs, the only option we had to get that bed size in our master bedroom was to build our bed in our room. In total, our master bedroom is 228 sq ft. We have plenty of room to move around our king size canopy bed and side tables.
We knew we could accommodate the size of the bed as we made sure to prioritize what we wanted in our room and opted to not go overboard with too much furniture. The one thing our bedroom was missing was a good walk in closet. Fortunately, we were able to take a half bath and renovate it into a great walk-in closet.
While planning our master bedroom, I knew I wanted the space to feel cozy and comfortable as it is my happy place where I finally unwind after a long day of DIY and juggling kids. I also wanted the space to feel open and bright. By sticking to more neutral colors and keeping my decor simple, the room is not overshadowed by busy and bold patterns. Rather, a seamless cohesive look is achieved.
It is also important to ensure you are picking the right size furniture for your space. We’ve already touched on the fact that you don’t want to have a king size bed where a full-size bed would normally fit comfortably. Instead, choose the furniture that is right for your room. A large room can accommodate larger and heavier pieces of furniture. You may even need to add seating and additional decor to ensure the room does not feel sparse. On the flip side, a smaller room will require bedroom furniture that isn’t too heavy.
You’ll also want to consider adding storage pieces where you can to keep your space more organized and less cluttered. Consider side tables that have multiple drawers or cabinets where you can store clothing. These storage ottomans are some of my favorite items for our bedrooms and bonus, they can be used as additional seating. Lastly, don’t overlook your room’s lighting.
Lighting can make a big impact on your bedroom space and can make smaller rooms feel much bigger. Hanging overhead lights or installing sconce lights are a great way to incorporate additional lighting, without adding clutter or taking up space. Plus, pendant lights make a great statement and can frame your bed when they are hung above your nightstands.
Hopefully that helps you understand what to think about in terms of what master bedroom size bedroom will work best for you, and you feel ready to tackle and decorate whatever room you have!
Other Posts you’ll Love
Here are some other posts you will love if you are looking at Homes
I hope this gave you all some insight on master bedroom size and strategies to implement when designing your room to maximize space. If you have any questions, feel free to leave them in the comments and follow me on Instagram @arinsolange for more home, decor, and DIY!
Best Steam Mop For Tile Floors: My Top 6 Picks From a Mom of Four
As cooler temperatures slowly (very slowly) creep into our forecasts, I have the sudden urge to prepare for all things winter. It may be 90 degrees out this week, but I’m already in holiday mode over here in my house. And while I love all things holidays, I really don’t love the winter, and the mess it brings. In the past year I have been trying to find the best steam mop for tile floors to tackle our mud room, and I think I have all the info you will need if you’re in the same boat!
This post may contain affiliate links
Best Steam Mop For Tile Floors: My Top 6 Picks From A Mom Of Four
As fall and winter are rolling in the days seem longer, the sun seems to fade, and the whole city seems to have a permanent grime to it from all of the salted ice trucks. What is even more annoying, is it seems like there is a never ending to-do list of cleaning.
Cleaning up after sick kids (because of course everyone gets sick three times more in winter), cleaning up all of the cold winter gear (the hats, gloves, winter coats, snow boots), and cleaning my floors! I absolutely, positively, despise having snow tracked all over the house, and with four kids and a dog you better believe I constantly have tiny boot and paw prints all over the floors.
Fortunately, this year, we have a mudroom that can help control all of those pesky boot prints. While the majority of my home is all hardwood floors, our bathrooms and mudroom are tiled. One of the benefits of tile floors is that they are much easier to clean than traditional hardwood floors, and with snow-laden boot prints all over our tiled mudroom, I do plenty of cleaning!
If you are like me and preparing for your winter apocalypse, I’ve got all you need to pick out the best steam mops for your tile floors to help get you through this winter. Can you tell I’m just so excited for this season to start?
What is so great about steam mops that I’m dedicating an entire post about them? Not all mops are created equal. Yes, a regular mop will clean your floors, but different types of surfaces require different methods of cleaning.
Your Floors Matter
Depending on your types of floors, you’ll need to decide what is the best option for cleaning. For example, laminate floors and hardwood don’t do well with traditional mopping. Water can damage the hard surfaces and cause staining or bubbling. You’ll also need to pay careful attention to the type of floor cleaner you use as the use of harsh chemicals can damage the hard floors.
Additionally, harsh cleaners are not ideal to use around kids or pets. On the other hand, stone floors can’t tolerate the use of more natural cleaners such as vinegar, lemon juice, and other acids as they can damage the surface. This is why it is a good idea to consider the type of flooring you have before cleaning floors.
Ceramic tile and porcelain tile are very durable and an excellent choice for high traffic foot areas. This is why we chose to install tile in both our mudroom and bathrooms. The tiles are not easily scratched or damaged and don’t lose their shine (unlike laminate flooring and hardwood).
You can easily clean tile with soap, water, and mostly all cleaners. The problem with tile is you will have to take a little bit of elbow grease to clean the tile grout. Depending on your grout’s color, you may need to spend more or less time cleaning it.
Those with white grout will note that they notice dirt far more easily than those with a black grout. Either way, you’ll want to ensure you spend some time with a grout cleaner. The good news for you is that I have just the tool for that!
This super sonic electric scrubber is basically a giant electric toothbrush but it does the best job on cleaning grout and even works on baseboards! I love mixing baking soda, vinegar, and a little bit of Dawn dish soap. It works like magic!
How Do Steam Mops Work
Alas, I’ve digressed some. Steam mops! Let’s get down to the dirty work. Steam mops are great for everyday use. They don’t require any fancy cleaners, just regular old tap water! The best part of a good steam mop is that the high temperatures and continuous steam not only reaches layers of dirt, grime and stubborn stains, but it also sanitizes while it cleans.
Steam As A Sanitizer
So a steam mop for a bathroom is an absolute MUST! I’m not sure about you but whenever we have the stomach bug come through our house, I cringe at the amount of cleaning I’ll have to do and all the bleach I’ll go through. The hot steam sanitizes the floors without the use of those harsh chemicals. In fact, the power of steam can remove built up cleaning products that leave behind their tacky residue.
A light and airy mudroom refresh with light tile and grout by Olive and Tate
So how exactly does this magical steam cleaning work? Essentially, you have a large water tank full of distilled water (you can use tap water but distilled will make your steam mop last longer). The water is warmed up to approximately 250 degrees Fahrenheit.
From there, the steam is emitted out into the mop head covering the mop pad. Between the amount of steam, steam flow, and cleaning head, dirt is then loosened and bacteria is eliminated by 99.9% all without the use of a cleaner. One key distinction between the steam mop and sponge mops or spin mops, is that dirt and bacteria can simply be moved around the floor with these methods.
By using the steam mop, you have a constant flow of hot water and steam that eradicates the bacteria. You don’t have to change out the dirty water you are using to clean the floor since the water itself is in a separate tank. The benefits of the steam mop don’t stop there. I really believe that it takes a lot less time to steam mop my floors than if I used our regular mop.
Mediterranean tile in a primary bath renovation by Magnolia
Ease Of Use
By the time I fill the bucket, get the cleaner out, change out the water in the bucket, rinse out the mop head, and finish my mopping, I would have saved so much more time using a good steam mop. You know I love a good time saver! The ease of use and ability to clean large areas and small areas of course, as well as the ability to sanitize while I clean is why my steam mop is my top pick.
Top Features In A Steam Mop
So what steam mop is right for you? The best steam cleaner will have a few key components to keep in mind while you look for what is right for you. You’ll want to pick a steam mop that has a nice swivel head to allow you to easily navigate corners and tight spaces.
A long cord is also a must have. I hate having to stop and start when I’m in my cleaning groove. So having to stop to plug in my cord to a different part of the bathroom is not great. A longer cord that allows me good reach is an important feature for me. I also don’t want to spend an arm and a leg for my steam mop so looking at both positive reviews and a reasonable price is key.
Now, depending on how fancy you want to go, some steam mops have other features that may make your life easier but may not necessarily be a deal breaker. Having a removable water tank is certainly nice, but not necessary. Different attachments, different steam settings or a variable steam control are also all bonuses.
You’ll also want to look at whether your steam pads are disposable pads or washable pads. I love the idea of being able to throw your pads directly into the washing machine when you are done. The best steam mop checks all of your boxes.
Best Steam Mop For Tile Floors
Let’s take a look at some of the best steam cleaners! Keep in mind the type of flooring in your home and where you’ll be using your steam mop. If you have a home that is primarily tiled, then spending more on a steam mop may be a good idea. If you only have say 2 bathrooms that could benefit from a steam mop, then you may want to look at something a bit less expensive and not top dollar. Here are my top picks for the best steam mop for tile floors.
Bissell PowerFresh Steam Mop 1940
The Bissell PowerFresh Steam Mop 1940 is a top pick among amazon reviewers. With over 35,000 reviews and almost a 5 star rating, you know you’ve got a winner. The Bissell steam mop notes to have variable steam settings from low, medium, and high, with a digital steam control that is easily set based on your cleaning needs to eliminate 99.9% of bacteria and ready to use within 30 seconds.
A swivel head, a long (23 ft!!) power cord, and lightweight (9 lbs) design are all key components that I look for in my mops. This model includes microfiber pads, including an easy scrubber pad to help with tough stains and grout cleaning. It’s sleek design also helps with easy storage.
Bissell Powerfresh Deluxe
The Bissell PowerFresh Deluxe Steam Mop 1806 model is similar to the 1940 counterpart. With over 13,000 amazon reviews, this steam mop has variable steam settings from high to low. Ready to use within 30 seconds, a long 25 ft. power cord, and power scrubbers. The 1806 model does not contain a removable water tank, like the 1940, but still packs plenty of punch. At $99 this is a great option!
Bissell Power Steamer Heavy Duty 3:1
The Bissell Power Steamer Heavy Duty 3-in-1 Steam Mop and Handheld Steamer is a great option if you have multiple surfaces to clean both indoor and outdoor. This is a more expensive option, but gives you the option of the 3-in-1 cleaning from an upright steam cleaner to an extended reach steam mop for hard to reach places and a detachable handheld steam cleaner.
There are adjustable modes and a trigger that helps you control the amount of steam released to help prevent damage to any flooring. It comes with plenty of accessories including a window squeegee for steaming inside and outside glass. The handheld cleaner would be a great option for cleaning cars. I also love that it comes with a wall mount option to help save on space! This is a pro-option for those who love steam mops.
Shark S3501 Steam Pocket Mop
The Shark S3501 Steam Pocket Mop is a great pick that comes with 2 washable microfiber pads to help rid dirt and grime from your floors. The pads are actually dual sided so you don’t need to change your pad in the middle of a cleaning session.
Instead you can just flip your mop head over and start on a new side. There is an 18 ft power cord and 30 second use time from plug in. This does not have a variable steam control but is still a great pick if you’d like a more basic model for those smaller jobs. At only 4 lbs it is easily maneuvered and stored.
Shark Genius Steam Mop System
The Shark S5003D Genius Hard Floor Cleaning System Pocket System Steam Mop boasts touch free technology that allows you to go hands free after cleaning by pressing the release button directly into your washing machine. The dual sided pads have specialized grip designs that help lift dirt and grime. This shark genius model also has a steam blaster that provides blasts of steam for areas that need extra help to loosen stuck on dirt.
Dupray Neat Steam Cleaner
The Dupray Neat Steam Cleaner Multipurpose Heavy Duty Steamer is the Tesla of floor steam mops as an Amazon favorite with over 11, 799 ratings at 4.5 stars. This steam mop not only mops and steam cleans but it also says it degreases and deodorizes surfaces! There is an extremely large water tank at 1600 ml for over 50 minutes of cleaning time.
While the large water tank is useful to avoid having to stop mid clean, it does take up to 7 mins to heat up to the 275 degrees Fahrenheit temperature. The tank itself is lightweight and portable and is easily moved on wheels. In comparison to the other steam cleaners, this does take up a larger footprint spacewise.
The kit comes with 17 pieces and includes extension tubes, microfiber pads and cloths, a window squeegee tool, and multiple adjustable brushes. There is a specialized brush that is extremely useful for grout and kitchen appliances.
The idea of using it to degrease my stove and oven has me very tempted! You can also use it to steam clean furniture and mattresses which would be extremely helpful if you have any lice or bed bug infestations!
There is even a tool to sanitize showers and toilets! I even saw you can use it to sanitize and clean your walls and ceilings. It would also work great to steam your car for a good detailing. Really, there is a tool for everything with this steamer!
There is a longer 2 year warranty on the cleaner and a lifetime warranty on the boiler, which is an added bonus. This may be the best steam mop for tile floors or one with the most bells and whistles. You get what your money pays for in this model.
Taking Care Of Your Mops
Now that you have a good idea of the best steam mop for tile floors, you’ll want to know how to care for them properly. How does this whole system work? Make sure you read your owner’s manual and instructions for key information. You’ll want to prepare your space before you get down to your cleaning job.
Make sure to use a vacuum cleaner on your floors to pick up any dust or pet hair. Otherwise, you’ll be moving dust bunnies around- YUCK! Next, attach a clean pad and fill your water tank per your manual’s instructions. If you have a steam mop with adjustable steam levels, it is never a bad idea to start on low settings to make sure your flooring can tolerate the heat and while you get the hang of it.
You don’t want to spend too long in one place, as the excess heat can cause damage to the floors. Instead, think of long passes across the floor in an organized fashion. If you notice the mop pad has become overly dirty or soiled, make sure to change it out.
This is why I love the idea of washable pads. You can have several back ups and it is much more cost efficient. If you are doing larger areas, you’ll need to keep an eye on your water level to ensure you have enough water to get out those tough stains. Once you complete your cleaning, throw that cleaning pad into your washing machine and admire your beautiful floors! Boot prints are no match for the steam cleaner!
I hope this post was helpful at giving you insight into the best steam mop for tile floors. While I love my spin mop, our steam cleaner will always have my heart! Now you should be fully ready to tackle those pesky boot prints too! And if you live in an area that escapes the snow and ice- then lucky you! If you have questions on this post leave them in the comments below, and be sure to follow me on Instagram (@arinsolange) for more fun! Happy steaming!